#uv mapping
Explore tagged Tumblr posts
Visit Tumblr Blog
Explore Tumblr blogs with no restrictions, modern design and the best experience.
Last Seen Tumblr Blogs


Fun Fact
US Tumblr user growth rate is estimated to slow down to 4.1%.
Text


Returning to hominid facial anatomy once again, I was able to adapt my A. sediba muscle model onto the OH5 skull (P. boisei) too! I'm happy enough with it that I went ahead and rendered some skins for them as well. Selected all the right vertices and generated UV maps and everything. Hopefully the colors look as legible on your screens as they do on mine, these are still very much in progress.
My restoration of this individual was partly based on an earlier attempt at rendering Paranthropus, from back in 2019. There were a lot of elements that got tweaked or entirely changed up in the update, but the mouth got to stay the same between renderings. Having even a little understanding of the face muscles makes a visible difference from one model to another, and I'm sure there's still some parts I could improve on as I keep working in this vein. If anyone has more technical knowledge about this sort of thing than I do, feel entirely free to get at me : )


#hominids#human evolution#Australopithecines#Australopithecus sediba#Paranthropus boisei#hominid facial reconstruction#digital sculpture#Blender#paleoart#South African prehistory#Tanzanian prehistory#anatomical model#UV mapping#comparing old art and new art#Christopher Maida Artwork
27 notes
·
View notes
Text
stares at you autistically

#art#artists on tumblr#my art#ask me and i'll tell you#oc artist#oc art#character art#creature#blender#3d art#3d model#3d modeling#uv mapping#tee hee
6 notes
·
View notes
Text
🧠 "When your first UV map EVER has to be a complex project and end up looking just like a subway map. Baking became a full-body workout that required numerous attempts. Still, I pushed through and will be included in Greenhouse Haven Reloaded pt. 1 with 10+ swatches and BGC! 💪🎨 #blenderpain
Find out my sneek peek on my Patreon
#ts4cc#sims4cc#thesims4cc#sims 4 custom content#sims 4 modding#blender cc#blender sims 4#sims 4 blender#uv mapping#texture baking#blender problems#cc creator life#sims 4 build cc#sims 4 clutter cc#blender workflow#cc in progress#wip cc#behind the cc#simblr#simblr community#simblr creators
2 notes
·
View notes
Text
blender trenches invite link
feel free to join!
#blender3d#3d modeling#3d art#3d sculpting#game dev#indie dev#animation#uv mapping#geometry nodes#grease pencil#signal boosts appreciated#not a whole lot of traffic in there so we'd love some more members
7 notes
·
View notes
Text
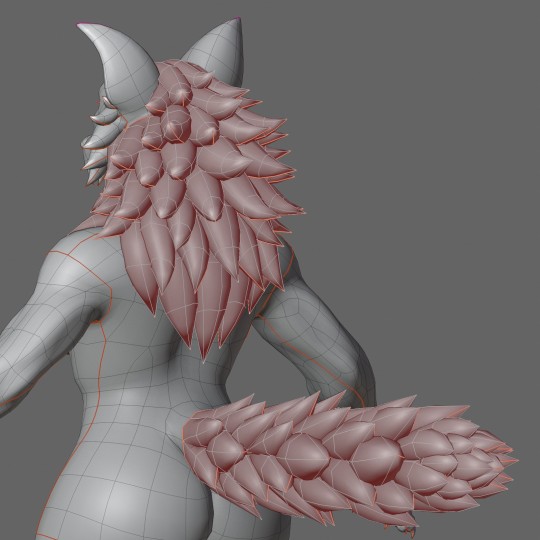
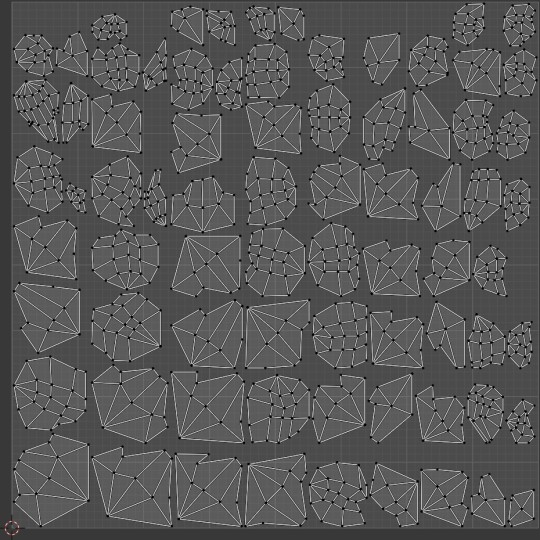
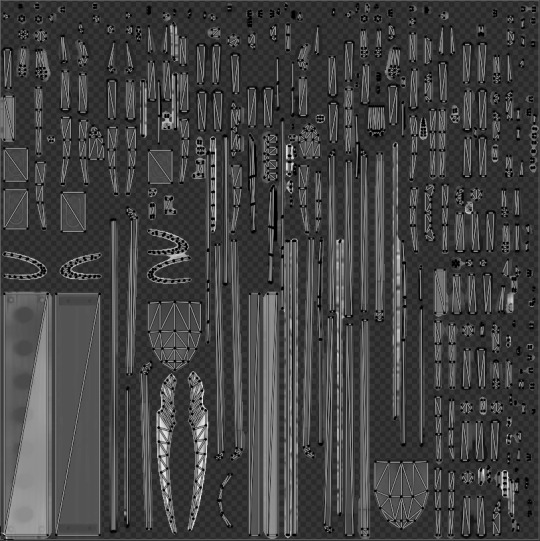
Fur floccule UV mapping, before and after.
Looking at it now, I probably could have made the islands a bit shapelier, but at least it's better than what Blender does automatically. It's like a geometry puzzle. XD
8 notes
·
View notes
Text

Started working on a new character this weekend!
Name TBD, let's call him Kenny for now.
Some small texture details to add later but pretty happy with how he's developing so far.

Took some extra time to figure out how to approach face expressions and animation, I at one point considered modeling the face fully but ultimately I determined that was a huge time sink for rigging and animation. So what I decided on is a texture sheet of many different expressions. some tutorials I looked up would say it's a sprite sheet.
Despite it being a straightforward method and pretty simple to setup in Blender(and certainly an old method, especially in video games if I'm not wrong) I couldn't quite find a good resource on this method, I bet there is one but not easy to google.
Anyway - eventually I will have to figure out how to swap character faces in Unity whenever I get around to importing them. and make a workflow for marking face swaps, because I don't believe the material data I animate in Blender won't import into Unity.
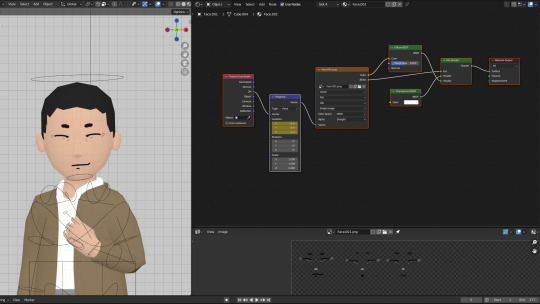
here's the node setup for anyone curious :)
(This of course could be setup a little better for animation in blender but for my needs I just key-framed the X Location.)

Lastly here's a little test animation!
I made this Japanese style classroom a while ago, so it was nice to just have it ready to go!
Tho it definitely needs some more props and things on the walls! Also students!
Unsure if I want him to have glasses or not. What do you think?

Excited to show more later :)
Until then peace out,
MKO~
#blender3d#animation#3d animation#lowpoly#b3d#blender#unity3d#gamedev#UV mapping#sensei#rigging#stylized 3d#3d art#gif#material nodes#indie dev#indie animation
10 notes
·
View notes
Text

i animooted plane
3 notes
·
View notes
Text
Look, my UV mapping skills aren't the best either as a VRC creator, but can we please not have UVs that turn back and wrap around on their own mesh, creating an unholy ouroboros of texturing madness? Not asking for much, I don't care if your UV packing isn't the most 'optimal', I just don't want to have to sacrifice my first born son to be able to navigate a labyrinthian maze of polygons.
2 notes
·
View notes
Text
Blog Post 10 – Naming, Grouping, and Preparing for Baking
Before baking, I took time to properly name and group all the low poly objects in Maya. I made sure every piece had a clean, clear name .This made it easier to keep track of each mesh and match them later during the baking process.
I also merged some objects together where it made sense for example, combining smaller accessories into one mesh to make the texturing process in Substance Painter smoother. Grouping similar items helped reduce the number of texture sets and kept things simple.

For the high poly, I organized everything using ZBrush subtools and layers. Each sculpted piece was clearly labeled to match its low poly version. This was important for baking clean maps in Marmoset, where both the high and low poly objects need matching names or organized folders. This technique was new to me.

0 notes
Text
Mastering Hard Surface Modeling: Tips for Precision and Polish
Introduction Hard surface modeling is a cornerstone of 3D design, used extensively in video game development, animation, and industrial design. It involves creating models with smooth, defined curves and sharp edges, such as vehicles, architecture, and machinery. Whether you’re a budding artist or a professional looking to refine your skills, these tips will elevate your hard-surface modeling…
#3D Design#Animation#art#Blog#creativity#engagement#Game Development#Hard Surface Modeling Tips#just release#Modeling Techniques#Post#Texturing#UV Mapping
0 notes

Text
Understanding UV Mapping - How Map Projections Work.
youtube
Back to Geography with this one; I've seen in some places people say they don't like/understand UV Mapping or unwrapping. Well, I love mapping and had this video saved, It's short and light and explains very clearly how projections work. It helped me catch up on the issue. Unwrapping from what I understand, is basically the first part in the video where the guy is fighting the globe.
1 note
·
View note
Text
It's that time again! Today I'm going to be continuing work on UV Mapping the AC prop that I began last time.
0 notes
Text
youtube
Made a VR game called Bhavishyakaal for my senior capstone project that gives an environmental conservation message
0 notes
Text

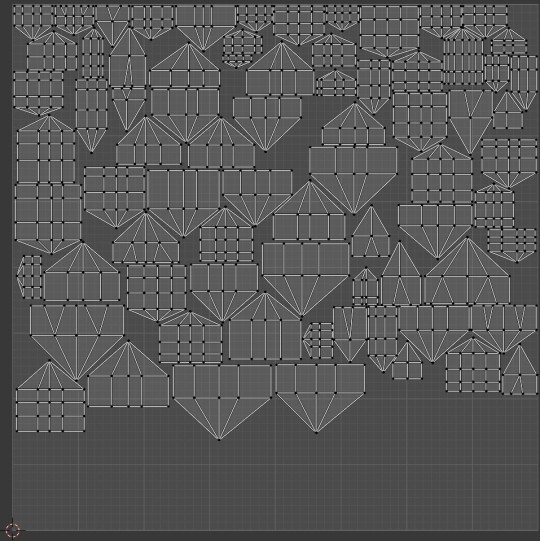
I unfortunately forgot to screenshot the horror show that was my UV map before I textured
To describe it, it started off as a box with an amalgamation of lines everywhere inside it, which is obviously bad. I attempted to cut and unfold the joints and the UV completely freaked out when I tried to do that, so I just used the automatic method that separates the ploy's for me, and no it didn't look like the image you see now but it was less of an eyesore to look at because it had a bunch of shapes aligned next to each other. The UV guide on it wasn't perfect but it was less distorted, enough to start texturing
the UV map you see now is how it looked when substance painter reworked the UV further for me when I textured my model
the next big scare when it came to texturing my model was if maya decided it couldn't read it, the reason I had to do my camera pan-around in the modelling view for my room model last semester
0 notes