#version 3.4.1
Explore tagged Tumblr posts
Visit Tumblr Blog
Explore Tumblr blogs with no restrictions, modern design and the best experience.
Last Seen Tumblr Blogs


Fun Fact
Tumblr has a low social media market share in South America.
Text


Here's the full versions of some of the art for this event!
#persona#p5x#persona 5 the phantom x#wonder#motoha arai#closer#riko tanemura#wind#shun kanou#soy#ruferu#official art#open beta#version 3.4.1
49 notes
·
View notes
Text
Updating... The Tattooer (ver. 3.4)!

Finally! Took me a while, huh. This is the updated version of the Tattooer project. It skips some steps, making the workflow much, much faster! Huge thanks to @applewatersugar for his suggestion on how to bake textures while preserving the transparency. This is kind of a repost of the original Tattooer post, but it actually has some new stuff and a few changes here and there, so please take a look if you want to learn how to use this new version.
This is a series of Blender template files already set up to quickly bake textures from The Sims 4 to The Sims 2. The different Blender files will allow you to: -Bake body textures from TS4 to TS2 (Female) -Bake body textures from TS4 to TS2 (Male) -Bake body textures from TS4 (Female) to TS2 (Male) -Bake body textures from TS2 (Female) to TS2 (Male) [Bonus!] -New! Bake face textures from TS4 to TS2 (Unisex) [Bonus!] -Bake head textures from TS4 to TS2 (Face + Scalp) (Unisex) [Still experimental] Check the file names to see which one is which, and the resolution of the baked texture it will give. Everything you see in the render above was 100% converted using those Blender files.
Download here! SFS / GD
Update: Version 3.4.1 (27/08/2023) Fixed some issues on the shoulders for the AF-body-4t2-1024 and AF-body-4t2-2048 templates. Now the top straps on most converted underwear/swimwear should look right.
Update: Same version (13/12/2023) As requested, added a new spanish version of the included pdf guide!
These templates were made mainly to bake and convert tattoos, but there’s more you can do with them if you get creative. I have to say, these are NOT perfect. Results may vary depending on what you are trying to convert, so! With that in mind, this is all the stuff you will be able to convert almost seamlessly from TS4 to TS2: -Tattoos. -Other body details such as body hair, scars, freckles, supernatural/occult details… -Body painted underwear and swimwear, as well as some other clothing that’s mostly painted on the body. -Socks, stockings and maybe leggings. -Even skintones! In some areas they will look weird, so I recommend editing and blending them with other existing TS2 skins. -Makeup, eyebrows and beards. In the old version this was just a proof of concept, but now I’ve added a new Face file template which gives some pretty decent results! -Hair scalps. Very useful when converting some hairs! Although keep in mind part of that texture might also need to be baked on the face mesh, you know, that hairline makeup stuff.
Got your attention? Nice! Editing some of the textures from TS4 to match the UV mapping in TS2 using a 2D editing program can be incredibly hard. That’s where texture baking in Blender comes to the rescue!
You will need to download Blender, at least version 3.4, but you could always use a newer version. It is only incompatible with versions older than 3.4. -You can download Blender for free here. -You will also need Sims 4 Studio to extract the original Sims 4 CC textures you want. In the first version of these Blender files, there was a necessary step using Photoshop, but that’s no longer needed. However, there’s still a tiny extra step which requires resizing the newly baked texture on some of the high resolution templates, so you might need a 2D editing program like Photoshop. More on that later.
So, before we begin, let’s clear out some questions you might have. What the heck is this texture baking thing and what does it do? Well, let’s imagine you have a video projector and point an image into a blank wall. Then you pick up some brushes and start painting and copying that projected image in that wall. Texture baking is kinda like that when it comes to 3D models. You align two models and match them as closely as you can in shape and form, and once you adjust some parameters and values, Blender does the rest for you: it will give you a new texture for a new model with a different UV map. These files I’m sharing have everything already set up, so it’s a matter of plopping in that Sims 4 texture and you will get that new texture for TS2 in just a few clicks.
This tutorial assumes you know literally nothing about how to use Blender, so if you feel uncomfortable with it, worry no more! This will guide you with pictures showing where you need to click and explaining what is happening. For Sims 4 Studio and Photoshop the process might be a bit less detailed, but still this should be pretty beginner friendly. For this tutorial, I will use some tattoos as an example (properly credited at the end of the post). Alright, enough with the rambling. Let’s get started!
·EXTRACTING TEXTURES IN SIMS 4 STUDIO: First things first, you will need to extract as pngs all the textures you want to convert from TS4 using Sims 4 Studio. It should be pretty straightforward. Just open the packages and export the Diffuse textures. Keep them organized in a folder for easy access.
·BAKING THE TEXTURES IN BLENDER: PRELIMINARY STEP 1: CONFIGURING BLENDER’S GRAPHICS SETTINGS: Open your preferred Blender file depending on what you’re going to bake and the desired resolution (in this example I’m going to use the AF-body-4t2-1024 file). Before we start messing around in Blender, there’s one thing you should set up. It is a onetime step, and once it’s done, you won’t need to do it again. So, does your computer have a dedicated graphics card? If you don’t know or you’re not sure, just skip to the next step. Configuring Blender so it uses your graphics card instead of your CPU will make the baking render much faster, so it is recommended you set it up correctly. If your computer has a dedicated graphics card, click File (1) > Preferences (2) > and on the window that pops up click System (3) > and select CUDA and make sure your graphics card is there and tick it (4). I have an Nvidia Graphics card but your case may vary. Once you’re done, click on the tiny button on the bottom left corner and Save Preferences (5).

PRELIMINARY STEP 2: CHOOSING THE RENDERING DEVICE: Click on the tiny camera button on the right, called Render Properties (1), and on Device (2) select GPU Compute if it’s not already selected. If you’re not sure if you have a graphics card or not, just select CPU. Then select the Material Properties tab (3) and Save your changes, either by pressing Ctrl + S, or clicking File (4) > Save (5). You might need to do this second step with the other Blender files, but once you have it done and saved, you won’t need to do this again. Okay, time to get into the good stuff!

·STEP 1: LOADING YOUR TS4 BASE TEXTURE: In the Material Properties tab, click the folder icon that says Open (1) and on the window that pops up, navigate through your folders and select your first texture. To navigate easily, the 3 buttons on the top right (2) are for the display mode. They will show your files in list mode, vertical and horizontal, and the one on the right will display the file thumbnails, pretty useful if you want to easily preview your textures here. The icons on the left side (3) will let you go one folder back and forward, go to the parent directory, and refresh the folder in case you just dropped something new in there. Double click on the image you need and that will load the texture into the Sims 4 body model, named “ts4 body”.

·STEP 2: SETTING UP YOUR SELECTION AND BAKING THE TEXTURE: On the top right of the screen, you will see the names of the 2 models in the scene. Hold the Ctrl key in your keyboard and left click on the “ts2 body” model (1). If you did it correctly, you should see “ts2 body” in a yellowish orange color, and right down below, “ts4 body” should look more like a red orange. If not, try again by clicking first on ts4 body, and then while holding Ctrl click again on ts2 body. Then switch to the Render Properties tab by clicking the tiny camera icon (2) and click Bake (3). Depending on your screen resolution, you might need to scroll down a bit with your mouse to see the Bake button. Wait a few seconds for it to finish. You will see the progress percentage down on the bottom of your screen. Don’t panic if you notice your computer fans start ramping up, that’s completely normal! As I said in the beginning, using your GPU will bake the textures much faster than the CPU.

·STEP 3: SAVING YOUR NEW TS2 TEXTURE: Once it’s finished, switch to the UV Editing Mode by clicking “UV Editing” on the top of your screen. And there it is: your new texture! You might have to scroll up your mouse wheel a bit to zoom in and see it in all its glory on the left side of the screen. We’re still not done yet though. You need to save it to yet another new folder (always try to keep your stuff organized!).

You can save it by pressing Shift + Alt + S, or clicking on Image* (1) and then Save As… (2). That will pop a window where you’ll need to navigate again and save it somewhere. Give it a proper name (3) and hit Enter to save it… well, Enter doesn’t always work for me for some reason, so if that happens just click Save As Image (4). And that’s it! You’ve successfully converted your baked texture. Congrats!

·STEP 4: GOING BACK TO STEP 1: Alright! If you’re done with your textures, you can close Blender without saving and call it a day. But let’s say you want to keep baking other swatches. In order to go back to step 1 and start the process once again, click Layout (1), go back to the Material Properties tab (2), select “ts4 body” (3) and click on the folder icon (4) to open and load your next swatch.

Then it’s just a matter of repeating the process from step 2. When you’re ready to move on, close Blender without saving. If you see a small check telling you it will save some images, make sure you uncheck it, so you will be able to use it again in the future from the starting point with no issues. I don’t think it really matters if you accidentally save your progress in these files, but I like to keep it clean and fresh so I can do the process where I left it from the beginning next time I open it. And in case you mess up and save somewhere, you can always just delete the .blend file and download the template files again.
In case you’d like a video tutorial on how to use these files, the amazing @platinumaspiration recorded this fantastic video showcasing the process! You can watch it here.
One final note: some of the baking .blend files save the textures with a resolution of 2048x2048 pixels, as clearly stated at the end of their file name. That’s way too overkill, because TS2 only properly supports up to 1024x1024 for most of its textures and you should always resize your final product to that max resolution (or lower if needed). I just made those 2048 versions because there might be some really tiny and slim details on some tattoos that might look a little too blurry when baked into a 1024 resolution texture, so for those cases use that if you want and then resize them using your 2D editing software of choice. In Photoshop, in the Resample mode of the Image Size menu, there are a few options to choose. For the fine details, I like the Nearest Neighbor (hard edges) option, which, even if it looks a bit pixelated, it still preserves most of the texture and quality.

For anything else, I would just directly bake them using the 1024 versions in Blender (512 for the face and scalp).
And for the folks who feel comfortable playing around in Blender, this is just the beginning! Texture baking opens a LOT of possibilities, so feel free to move stuff around and edit the models to your liking! If you notice the baked textures look warped or stretched somewhere, or don’t like where some textures are placed in the S2 body, poke around that area moving stuff and then give it another try. The main objective of the baking process is keeping both overlapping models as close in shape as possible. You may also edit and save new copies of the templates, or make new ones from scratch using mine as a reference (keep a close look on those Baking settings and values, I think they work pretty well) and share them if you want to. Go ham, do whatever you want with them! I still have plans on making templates to convert body textures from Sims 3 to Sims 2, but for now it’s not on my priorities, so we’ll see when that happens.
Whew! Hope none of this was too confusing. Need help or have any issues with these? Please ask/message me here and I’ll be glad to help when I’m able to!
Credits for the CC used in the render demonstration: -Skin by Sims3Melancholic. -Eyes by Northern Siberia Winds. -Eyebrows by PeachyFaerie. -Tattoos by xtc. -Top by SerenityCC. And the Tattoo I used for the tutorial can be found here, by ValhallanSim.
Last but not least, a huge thanks to all the people who somehow contributed to make this project and update possible, either by doing initial testing, finding issues to fix, or teaching me new Blender tricks to make the workflow way faster and easier. So thanks again to @elvisgrace @moyokeansimblr and @applewatersugar on Tumblr! <3
And thank you for reading! Hope you have fun playing with this (not so) new toy hehe.
#tattooer project#tattooer update#ts2 tutorial#ts2 resources#ts2 blender#ts2 overlays#ts2 texture baking#4t2 conversion tutorial#this took me so LONG to update#im really sorry for the delay :(
409 notes
·
View notes
Note
Hi! From your posts and comments, you know a lot abput the different translations of Les Mis. The one that I have is Wilbour, which I like the most of the ones I’ve encountered, in terms of wording and writing style; are there any issues with it I should be aware of? As people following Les Mis Letters comment on the original French, I’ve noticed a couple things missing, or bits where the translation seems less clear than in some others versions. What are your thoughts on this translation?
Wilbour is a great translation! It's the first English translation of Les Mis, but has many errors because it was published very quickly after the publication of the original novel. The most common criticism I've heard of Wilbour is that it's extremely stodgy and old-fashioned, even compared to Hugo's language; Wilbour often adapts the sentence structure of French very literally in ways that can read awkwardly or not completely correctly in English. But! I've heard he also captures the poetry and feeling of the language better than Hapgood, though, when it comes to 19th century translations. I believe Wilbour was the first translation I read, and if Hapgood weren't the most easily accessible on the Gutenberg it might be my translation of choice! He and Hapgood also cut sentences here and there but don't rise to the level of massive deliberate censorship, the way other 19th century translators like Wraxall do. The only serious error i remember Wilbour making is in Combeferre's speech at the barricade, where he discusses how women are left behind by society. Combeferre says "Women, we are not much given to thinking about them." But Wilbour mistranslates this as "women are not much given to thought" which is the EXACT opposite sentiment to the one Combeferre expresses XD. If you want a "more accurate" version of Wilbour that fixes the errors he made while translating at an unhealthy pace in a time before the internet existed-- the Fahnestock McAfee translation is meant as an updated version of Wilbour that corrects his errors! However, they occasionally "correct" things he didn't get wrong. For example, there's a moment where Javert boasts "I have claws like a woman" but FMA mistranslates it as "you have claws like a woman." Like, FMA is wrong and Wilbour is right there- Javert is just a strange little guy. For a translation comparison: here's a comparison of how various Les Mis translators handle Les Amis's introductory chapter, "A Group Which Barely Missed Becoming Historic!" You can contrast Wilbour with other translators here to see the general way he approaches things in comparison to other translators ^_^.
31 notes
·
View notes
Note
hi wcif the reshade/gsehade preset you used here please? post/733170131173310464/7-sins-legacy-generation-3-sloth

Hi, I use the Control preset by Helgatisha for reshade 3.4.1 (it's an older version). I have to admit that I am totally not tech-savvy when it comes to reshade and over time I've been toggling shaders on and off and changing things without really knowing what I was doing, so my screenshots probably look a little different than with the original preset.
9 notes
·
View notes
Note
Hii! Ive downloaded relight and the shaders wont show up in my game! I have reshade 3.4.1 installed and i placed the shaders and textures in the shaders/textures search path that i set up in reshade settings in game. What could i have done wrong? ;(
Hi anon. Are you using other shaders that do show up when placed in the same place?
I'm not sure what version of ReShade ReLight was made for but I'm going to guess your problem might be that you're using a very old version of ReShade now. There were big changes to ReShade between 3 and 4.
So what I'd do is first of all double check you have all the shaders all together in the correct folder (only use subfolders if you've got ReShade set up to know to look in subfolders). Then, if it's still not happening, update ReShade to the latest version and start again.
9 notes
·
View notes
Text
CISA Adds New Exploited jQuery Vulnerability to KEV Catalog
The CISA known exploited vulnerabilities update has just included a critical jQuery vulnerability cross-site scripting (XSS) flaw, tracked as CVE-2020-11023, to its catalog. This latest addition highlights the importance of safeguarding systems against known threats. The vulnerability, which affects jQuery versions 1.0.3 to 3.4.1, could allow attackers to execute malicious code through untrusted…
0 notes
Text
[Announcement]
'Your Favorite Phigros Songs 2024' voting event is coming!
Scan the QR code or check the link below to vote ↓

1 note
·
View note
Text
Raspberry Pi Pico: Programmierung und Entwicklung mit der Arduino IDE auf Linux

In diesem Artikel zeige ich dir, wie du den Raspberry Pi Pico in der Arduino IDE unter Linux programmieren kannst. Gemeinsam werden wir die Schritte zur Einrichtung und Konfiguration der Entwicklungsumgebung durchgehen, um sicherzustellen, dass du problemlos mit der Programmierung starten kannst.

Den Raspberry Pi Pico gibt es derzeit in zwei Versionen, zum einen mit und ohne WiFi und neuerdings sogar mit Bluetooth Support. Der kleine Zwerg auf dem nachfolgenden Bild ist der XIAO RP2040 welcher auch mit dem RP2040 Chip des Pi Pico daher kommt nur Bauartbedingt weniger Pins als der große hat.

Mikrocontroller - XIAO RP2040 & Raspberry PI Pico Die Inspiration für diesen Artikel stammt von einem treuen Leser meines Blogs, der aktuell Schwierigkeiten bei der Einrichtung und Konfiguration seines Raspberry Pi Pico hat. Mein Ziel mit diesem Beitrag ist es, ihm und anderen, die auf ähnliche Herausforderungen stoßen, zu helfen und eine Lösung für dieses Problem anzubieten.
Anschluss & Einrichten des Raspberry Pi Pico unter Linux
Zunächst schließen wir den Raspberry Pi Pico an einen freien USB-Anschluss an, dieser sollte dann auch erkannt werden. oem@anna:~$ lsusb Bus 001 Device 002: ID 8087:8000 Intel Corp. Bus 001 Device 001: ID 1d6b:0002 Linux Foundation 2.0 root hub Bus 003 Device 001: ID 1d6b:0003 Linux Foundation 3.0 root hub Bus 002 Device 002: ID 0bda:57bc Realtek Semiconductor Corp. USB Camera Bus 002 Device 003: ID 2e8a:0005 MicroPython Board in FS mode Bus 002 Device 001: ID 1d6b:0002 Linux Foundation 2.0 root hub oem@anna:~$ Nun müssen wir dieses Board in den Bootloader Modus starten, dazu trennen wir zuerst das USB-Kabel wieder vom PC und drücken den kleinen, weißen RESET-Taster auf dem Board und verbinden dann wieder den Raspberry Pi Pico (mit gedrückter RESET-Taste) mit dem PC. Im Dateimanager sollte dann ein neues Laufwerk "RPI-RP2" sichtbar sein. In meinem Fall hatte ich sogar auf dem Desktop noch ein zusätzliches Symbol für dieses Laufwerk erhalten.

Laufwerk des Raspberry Pi Pico unter Linux
Installieren der Treiber für die Arduino IDE unter Linux
Jetzt wechseln wir zur Arduino IDE, in meinem Fall hatte ich bereits die Version 1.8.18 auf meinem Linux Mint 20.2 installiert, welches ich weiter nutze. oem@anna:~$ lsb_release -a No LSB modules are available. Distributor ID: Linuxmint Description: Linux Mint 20.2 Release: 20.2 Codename: uma oem@anna:~$ Schritt 1 - Erweitern der zusätzlichen Boardverwalter-URLs Als ersten Schritt müssen wir der Arduino IDE eine neue Quelle für Boardtreiber angeben, dieses wird im Dialog "Zusätzliche Boardverwalter URLs" gemacht. Du erreichst diesen über "Datei" > "Voreinstellungen" > "Zusätzliche Boardverwalter URLs"

Dialog "Zusätzliche Boardverwalter-URLs" in der Arduino IDE Hier fügen wir die nachfolgende URL hinzu und betätigen die Schaltfläche "OK" https://github.com/earlephilhower/arduino-pico/releases/download/3.4.1/package_rp2040_index.json Schritt 2 - Installieren des Boardtreibers über den Boardverwalter Nachdem wir die neue Quelle für unseren Boardtreiber angegeben haben, können wir in den Boardverwalter wechseln. Diesen findest du unter "Werkzeuge" > "Board: xyz" > "Boardverwalter...". In diesem Dialog suchst du nun nach "rp2040" und wählst die Schaltfläche "Installieren" am Paket "Raspberry Pi Pico/RP2040" aus.

Boardtreiber "RP2040" im Boardverwalter Es werden jetzt diverse Dateien heruntergeladen, die Verbindung war in meinem Fall nicht sehr stabil und somit musste ich diesen Vorgang insgesamt dreimal starten. Das gute war jedoch, dass der Installer am letzten Schritt weitergemacht hat, somit dauerte dieser Vorgang nur wenige Minuten. Schritt 3 - Auswahl des Boardtreibers Wenn der Boardtreiber für den Raspberry Pi Pico erfolgreich installiert wurde, dann wählen wir diesen aus "Werkzeuge" > "Board: xyz" > "Raspberry Pi RP2040 Boards (3.4.1)" aus. In meinem Fall habe ich einen normalen RP2040 also ohne WiFi Support gewählt.
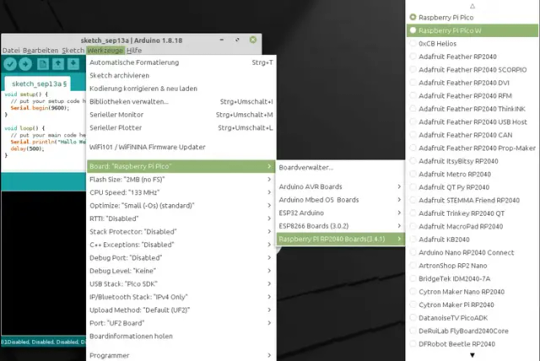
Unterstützte Boards des Treibers Im nächsten Schritt müssen wir noch sicherstellen das, der korrekte Anschluss gewählt ist, hier muss "UF2 Board angewählt sein.

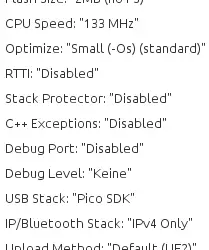
Auswahl des Ports für den RP2040 Die Konfiguration des Boards habe ich nicht verändert und mit dieser hat der Upload eines ersten Sketches auch funktioniert.
Konfiguration des Raspberry Pi Pico in der Arduino IDE
Testen der Installation & Konfiguration mit einem kleinen Sketch
Nachdem jetzt alles eingerichtet ist, testen wir unsere Installation & Konfiguration einmal. Dazu schreiben wir ein kleines Sketch welches uns lediglich die Textzeile "Hallo Welt!" auf der seriellen Schnittstelle ausgibt. void setup() { // put your setup code here, to run once: Serial.begin(9600); } void loop() { // put your main code here, to run repeatedly: Serial.println("Hallo Welt!"); delay(500); } Der Upload-Button führt dann nachfolgende Schritte aus: - prüfen & kompilieren des Codes, - Umwandeln in eine UF2-Datei, - suchen nach Laufwerken / RP2040 Geräten, - kopieren der erzeugten UF2-Datei auf das gefundene Laufwerk
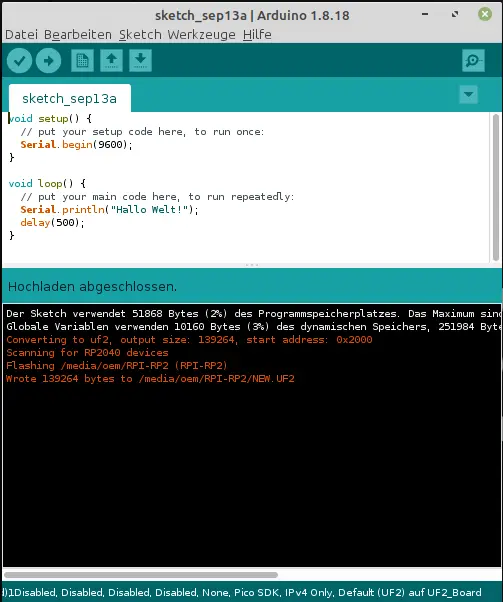
kleines Beispiel Sketch zum Testen der Installation & Konfiguration Wenn wir uns nun die Ausgabe im seriellen Monitor anschauen möchten, erhalten wir eine Fehlermeldung, denn im letzten Schritt wurde der RP2040 neu geflasht und dann mit einem neuen Anschluss eingebunden. Diesen Anschluss müssen wir dann zunächst unter "Werkzeuge" > "Port" auswählen.

Auswahl des neuen Anschlusses nach dem Upload einer ersten UF2-Datei Nun können wir wie gewohnt den seriellen Monitor öffnen und sehen unsere Ausgabe "Hallo Welt!" (hier zusätzlich mit einem Zeitstempel).
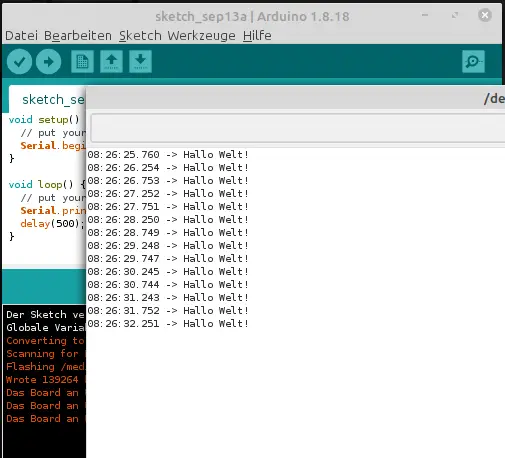
Ausgabe der Textzeile "Hallo Welt!" im seriellen Monitor der Arduino IDE
Abschluss & Ausblick
Ich habe dir jetzt gezeigt, wie du deinen Raspberry Pi Pico unter Linux einrichten und ein erstes Sketch auf diesen speichern kannst. Die Information dazu musste ich jedoch zunächst auch erstmal suchen, dass dieses nicht so einfach ist. Hier habe ich mir als Quelle den Beitrag Raspberry Pico mit der Arduino IDE programmieren vom Heise-Verlag genommen. Im nächsten Beitrag würde ich mir mal den Raspberry Pi Pico mit WiFi und neuerdings auch Bluetooth Support nehmen und testen, wie man dort einen kleinen Webserver programmiert. Read the full article
0 notes
Text


Here's the art for all the different chocolates the characters give to Wonder! In order, they come from: Ayaka, Motoha, Runa, Minami, Merope, Tomoko, Kotone, Yuumi, Miyu, Yaoling, Shun, Riko, and Yui.
#official art#open beta#version 3.4.1#chord#closer#howler#marian#merope#moko#mont#phoebe#puppet#rin#soy#wind#bui
52 notes
·
View notes
Note
What do you use to make your photos so beautiful 😍
Hey!! Tysm omg! I use reshade and PS~
#ask#neluunanswers#un-bear-able-sadness#I linked the last version of reshade#but i think most of us still use 3.0.8 OR 3.4.1#you can still find other version
3 notes
·
View notes
Text
This might have nothing to do with anything and I could just be NOT understanding reshade (which I usually don't, I just hope for the best) but my game kept crashing while trying to load the older reshade version (3.4.1) that I always play with. I tried to manually change it like some people have posted about but it still always crashed. As soon as I updated to the latest reshade (6 something?) it works fine again and doesn't crash. So, again, might be just me but maybe it's useful to someone smarter.
Updated my game because I am a simpleton and now it crashes at the first loading screen without even getting to the main menu (and this is without any mods installed - I always take them out when updating). Seems like a good time to redo my CC and regret all my life choices 🦝
72 notes
·
View notes
Text
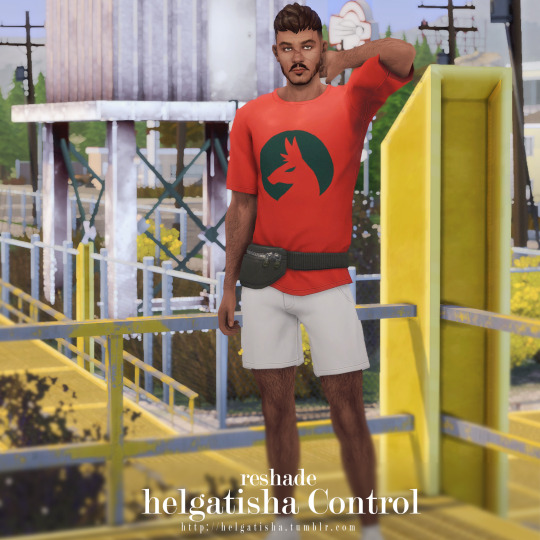
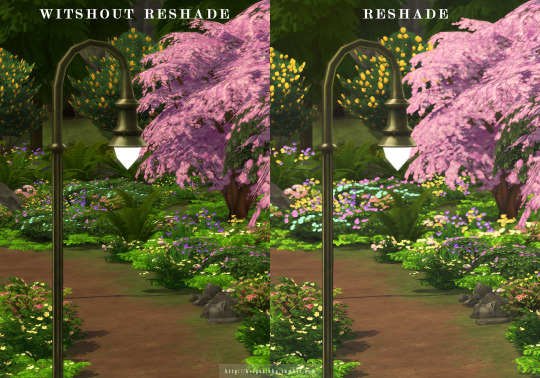
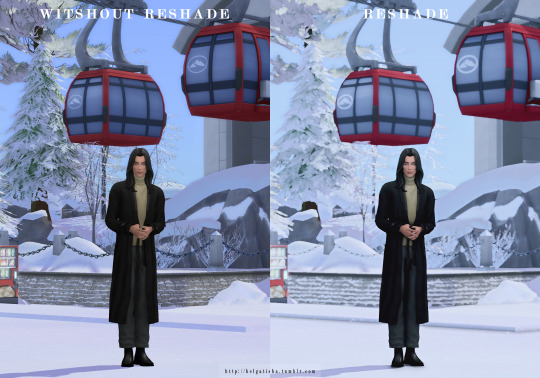
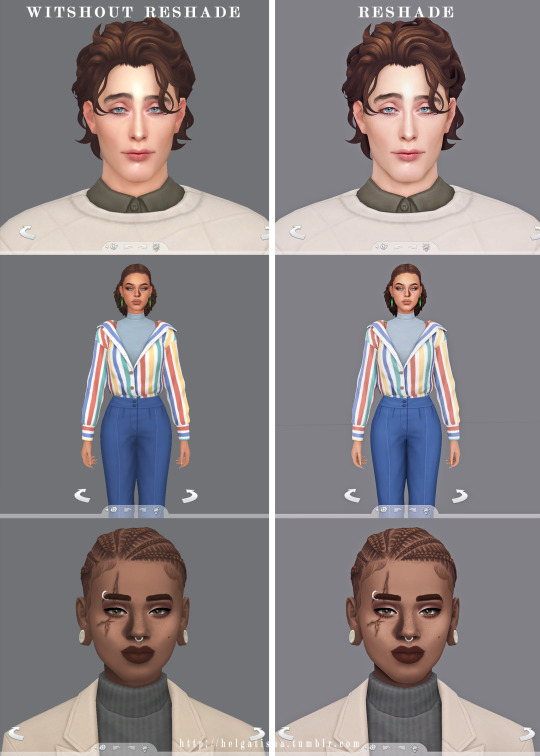
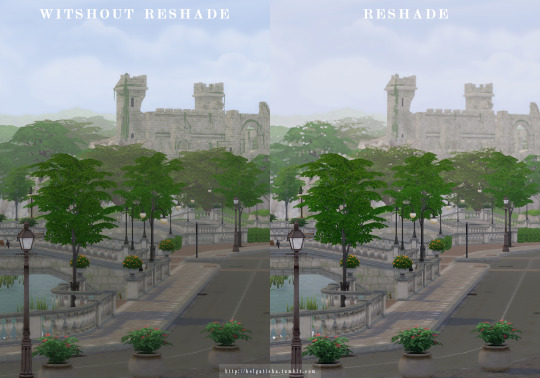
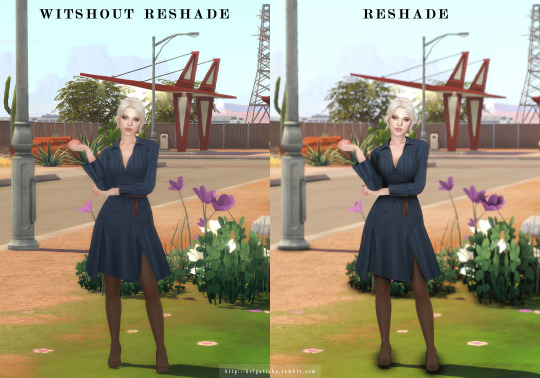
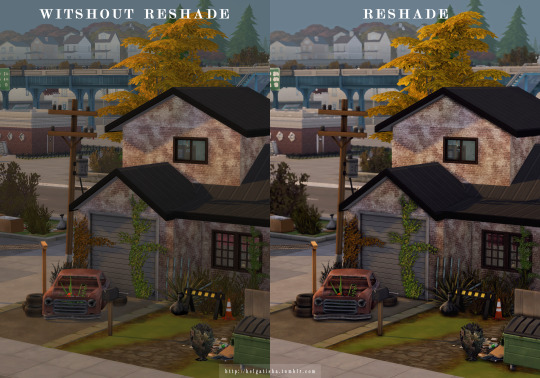

( reshade preset ) helgatisha Control
Download: patreon | simfileshare
For version 3.4.1
how to installed reshade - click
needed reshade - click
place it into: The Sims 4\Game\Bin
Turn off edge smoothing
hotkeys
I advise you not to use all the effects in the game. Last photo as an example of what is possible
please read and respect my tou
489 notes
·
View notes
Note
hi! just a quick question, with relight is there a certain reshade that it works with, for example would it work with older reshades like 3.4.1? or would i need a higher version? thank you in advance, you're out here saving us all! <3
Hi anon, I haven't tried it on older versions so I don't know for certain but I think it probably needs version 4 or above because the way sliders work got an overhaul at that point.
It's always best to use the most up to date version of ReShade so you can avoid any weird bugs, and also get performance improvements and better shaders along the way.
3 notes
·
View notes
Text


! THIS IS PRESET FOR GSHADE 3.4.1, NOT FOR RESHADE ! ! ЭТОТ ПРЕСЕТ ДЛЯ GSHADE 3.4.1, НЕ ДЛЯ RESHADE !
YOU NEED/ВАМ НЕОБХОДИМО: FULL BLOOM MULTILUT 2.0 BY AMOEBAE recommended mods/рекомендуемые моды: ~ OOTD ~ ITL ~ Milk Thistle V2 keys/горячие клавиши: ~ border: F10 ~ ADOF: F11 DOWNLOAD PRESET/СКАЧАТЬ ПРЕСЕТ (boosty\always free\use EN version of site and google translate please.) !!! А для обхода блокировки патреона, если кто ещё не в теме, юзаем вот этот скрипт: ~ Chrome, Яндекс.Браузер ~ Firefox
@mmfinds @maxismatchccworld @sssvitlanz @emilyccfinds @itsjessicaccfinds thank you for reblog <3
#THE SIMS 4#TS4CC#S4CC#S4CUSTOMCONTENT#SIMS4CC#SIMS 4 MAXIS MATCH#SIMS 4#THESIMS4#SIMS CC#SIMS 4 DOWNLAODS#TS4 DOWNLOAD#TS4 MAXIS MATCH#sims cc#gshade#gshade preset#sims 4 gshade#ts4 gshade
198 notes
·
View notes
Text
I have recs!! English Translations:
Wilbour and Hapgood are the oldest! They're good for a more 19C feeling to the language. They've both got their quirks (all the translations have their quirks) , but they are quite good! Hapgood is a little more modern sounding, and probably the default translation for a lot of people.
SIgnet Classics FMA: Fahnestock and Macafee translation! an updated version of Wilbour, with somewhat more modernized language, and things like the bleeped-out-for-19C-censorship place names changed to be just the place names. A popular version (my own fave, for personal reasons!) and especially good if you want a version you can carry around; it's just a little tank of a book!
Rose and Donougher translations: much more modernized language, and, gloriously, LOTS OF FOOTNOTES. Like Wilbour and Hapgood , both solid choices for the approach they're taking, IMO., You can compare different approaches in this spreadsheet which compares the translators in their approach to 3.4.1 (the intro of the Amis ).
I don't personally recommend Denny or Wraxall but they're there!
i wanna read the brick but i don't know what version yall think is best so if anyone has a reccomendation that would be helpful thanks
76 notes
·
View notes
Text
Grantaire and the unbearable cringe of caring about anything ever
For no particular reason, I want to talk about these lines in Grantaire’s intro right now!
He sneered at all devotion in all parties, the father as well as the brother, Robespierre junior as well as Loizerolles. "They are greatly in advance to be dead," he exclaimed. He said of the crucifix: "There is a gibbet which has been a success." (3.4.1, Hapgood translation)
Il raillait tous les dévouements dans tous les partis, aussi bien le frère que le père, aussi bien Robespierre jeune que Loizerolles.—Ils sont bien avancés d'être morts, s'écriait-il. Il disait du crucifix: Voilà une potence qui a réussi. (original French)
Because they are in many ways SO at odds with...everything else about him! And I think puts him in a closer parallel arc with Enjolras!
Breaking the lines apart just a little:
He sneered at all devotion in all parties, the father as well as the brother, Robespierre junior as well as Loizerolles. "They are greatly in advance to be dead,"
Robespierre “ junior” --that is, the younger-- was Robespierre’s brother, who was executed along with him. Loizerolles here is Jean Simon Loizerolles , who volunteered for execution in place of his son. Also both were executions taking place during the Revolution,on opposite political ends, more or less. It’s not surprising that Grantaire would mock the idea of dying for any sort of politics at this point--of course he would, that’s his thing.
But the big point of the text here is that these people didn’t die for politics, but for devotion to a loved one--a brother, a father.
And Grantaire is absolutely ragging on it! He is mocking the very idea of devotion to another person! This is the cynic’s version of “ the bare throat of Evadne would have moved him no more than it would have moved Aristogeiton”. Basically:

(they are both so young and so ridiculous)
There’s a big difference though- nothing about Enjolras in his intro contradicts that disavowal of personal attachments. Every note about him is about how much he is Not Interested in the personal. If this is an error in judgement, it is one he is making with his whole idealistic self.
But the very next paragraph of Grantaire’s intro is about how he has One Fanaticism , and his whole life revolves around Enjolras, and he doesn’t have any joy in the world except being around his friends, and basically: He Could Not Be More Full of It, personal attachments are his LIFE and on at least some level he knows this! He’s just tangling himself up in stubborn, self-defeating denial!
This also sets up more of a gradual character arc for Grantaire ! if in 3.4.1 he’s mocking the very idea of personal devotion, by Enjolras and his Lieutenants (5.1.6) he’s openly swearing his devotion to Enjolras. He still can’t help mocking the cause itself some, and distancing himself from that--which is where he and Enjolras are still zooming right past each other. But he’s losing some of the ironic distance from his own deepest feelings, and I think that’s part of why he’s able to even try to act for the republic here.
I think this parallels Enjolras’ character arc here too-- if he’s all about the abstract ideal in 3.4.1, by 5.1.6 he’s thinking of that ideal in terms of his friends-- the revolution is now made up their spirits for him, the republic something that will be worthy of their efforts.
By the time the barricade is built, Grantaire will be ready to directly state his personal kind of devotion even more clearly, and make a more direct move of acting on them--even if that action is just to Be There and Not Leave at first. And Enjolras, in parallel , will be willing to cede a practical advantage-- a spy’s info-- for the chance to save a friend.
OFPD is something of a leap of faith for both of them, really-- but I think they’ve been moving closer through the story, just enough that in that final moment they can finally reach each other.
The other thing, of course, is THIS line:
He said of the crucifix: "There is a gibbet which has been a success."
Which is just straight up mocking Jesus Christ/Christianity--but, also, crucially, acknowledging that that story of sacrifice has become a big deal.
And this is something I think Grantaire struggles with through all his appearances in the novel. He hates the idea of sacrifice-- but he doesn’t deny that it can work for a movement, even when he’s doing his best to dismiss it. There’s a lot to be said about Christianity , but it can’t really be denied that it caught on and got popular!
And...I think I will have to think about what that all conveys here! But putting a pin in it for sure.
211 notes
·
View notes