
tags: mods, defaults, objects, hair, fhair, mhair, facegunk, skins, clothes, mclothes, cclothes, buildmode, etc. _________________________________ - click tag icon to reveal tags - - search tags for quick finds -
Don't wanna be here? Send us removal request.
Statistics
We looked inside some of the posts by tiptoeccfinds and here's what we found interesting.
Average Info
Notes Per Post
59K
Likes Per Post
39K
Reblog Per Post
19K
Reply Per Post
217
Time Between Posts
4 months
Number of Posts By Type
Text
6
Photo
11
Last Seen Tumblr Blogs


Fun Fact
There were a total of 171.5 billion posts on Tumblr in 2019.
Text

・゚✧☽ Loading Screens | Henford-on-Bagley ☾ ✧ ・゚ 🍀 Pt. 3 ~ Riverside 🌊
a set of loading screens with Henford-on-Bagley landscapes! part 3 of 3.
✨ open the picture in new tab for closer look!
.*✧・゚:* 💚 DOWNLOAD 💚 {Google Drive} *:・゚✧*.
🦆
🔍 cc finds: @wcifs4cc @maxismatchccworld @wcifsareclosed @mmfinds @s4library @love4sims4 @sssvitlanz
317 notes
·
View notes
Text
More Realistic Lifespans in The Sims 4
I saw a video on Youtube and I wanted to share this post with you guys. It came to my attention that people use rather different lifespans in their games, but nobody talks about how they determine them. If you are using MCCC to modify the lifespans in your game like I do, here is my method that I formulated over the years to make them feel more realistic.
If your gameplay style is fast-paced, this method is definitely not for you. But if you enjoy long-lasting legacy gameplay, you may find this useful.
I am a bit too literal about lifespans. I like it being as close to as RL. Unlike the players who equate 1 sim-day to 1 sim-year, I base a sim-year on the duration of the in-game calendar. The calendar provides me the multiplier I need when I’m calculating how long a lifespan should be, in sim-days.
If I am using the shortest season length (1 week for each season), 1 sim-year = 28 sim-days
If I am using medium season length (2 weeks for each season), 1 sim-year = 56 sim-days
If I am using the maximum season length (4 weeks for each season), 1 sim-year = 112 sim-days
Here is how I perceive the life stages in the sims 4, based on human years (a.k.a. real life, duh) :
Elder: 60-70
Adult: 35-60
Young Adult: 20-35
Teen: 12-20
Child: 5-12
Toddler: 0-5
Before I trigger anyone, let’s clarify one thing. In my opinion, how we perceive age is relative. If your definition of an adult or an elder is different than mine, that is totally fine. Feel free to tweak the numbers, replace them with the ones that make more sense to you, considering how you perceive or define a certain age-group in human years.
So, my calculation looks like,
B (Max. RL age) - A (Min. RL age) = C (Lifespan in human years)
C (Lifespan in human years) x S (sim-days in a sim-year, a.k.a. the multiplier) = Y (Lifespan of the life stage in sim-days)
Let’s see the formula again, but clearer,
B - A = C
C x S = Y
Now let’s put this formula in action. With basic mathematics, the duration of lifespans should be calculated like this;
If the season length is set to minimum, 1 week for each season:
Elder => 70 - 60 = 10 (x 28) ==> 280 sim-days
Adult => 60 - 35 = 25 (x 28) ==> 700 sim-days
Young Adult => 35 - 20 = 15 (x 28) ==> 420 sim-days
Teen => 20 - 12 = 8 (x 28) ==> 224 sim-days
Child => 12 - 5 = 7 (x 28) ==> 196 sim-days
Toddler => 5 - 0 = 5 (x 28) ==> 140 sim-days
If the season length is set to moderate, 2 weeks for each season:
Elder => 70 - 60 = 10 (x 56) ==> 560 sim-days
Adult => 60 - 35 = 25 (x 56) ==> 1400 sim-days
Young Adult => 35 - 20 = 15 (x 56) ==> 840 sim-days
Teen => 20 - 12 = 8 (x 56) ==> 448 sim-days
Child => 12 - 5 = 7 (x 56) ==> 392 sim-days
Toddler => 5 - 0 = 5 (x 56) ==> 280 sim-days
If the season length is set to maximum, 4 weeks for each season:
Elder => 70 - 60 = 10 (x 112) ==> 1120 sim-days
Adult => 60 - 35 = 25 (x 112) ==> 2800 sim-days
Young Adult => 35 - 20 = 15 (x 112) ==> 1680 sim-days
Teen => 20 - 12 = 8 (x 112) ==> 896 sim-days
Child => 12 - 5 = 7 (x 112) ==> 784 sim-days
Toddler => 5 - 0 = 5 (x 112) ==> 560 sim-days
Right now I am using the maximum settings for my game :) I know this may seem insanely long for the majority of simmers, but rest assured, the time flies when you are playing on maximum speed, and they grow up faster than you’d even imagine :)
301 notes
·
View notes
Photo


CAS Backgrounds * Henford-on-Bagley * Part 1
Attention! Only put one background file in the mods folder!
DOWNLOAD Free

49 notes
·
View notes
Photo

“One Fish, Two Fish” Painting Set
Don’t love fishing? No problem! These paintings pack in all the cuteness of fishies without the slime or stink! Collect them all and spruce up your space today!
This is a recolor of the painting included with Tiny Living so I’m pretty sure it requires Tiny Living to show up!
8 swatches
$50 simoleons
Pretty sure Tiny Living is required
Found under wall decorations
Find it easily in game by searching for [SalemSims]!
I hope you love these cute little fish as much as I do! Please let me know of any issues.
DOWNLOAD (sfs, no ads, ever!)

152 notes
·
View notes
Photo
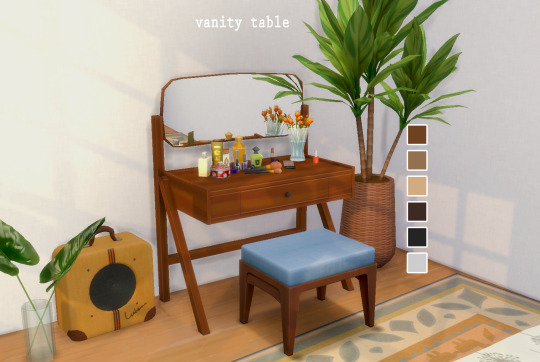
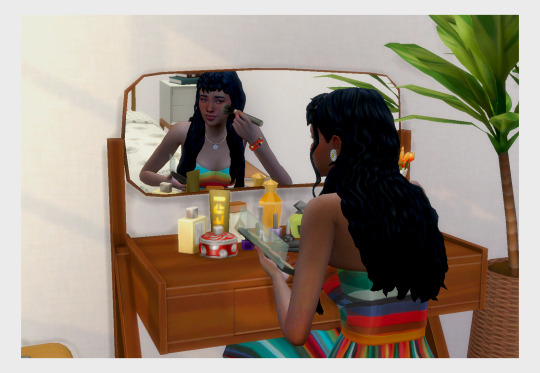
Mid-century modern vanity table
Hmmmm… Thank you for 1000 followers?!!
I rarely use vanity tables because I don’t really like the ones we have sooooooo here you go, a Mid-century modern one.
Requires Vintage glamour
6 swatches
Let me know if there is any issue!
Download - Dropbox | Simfileshare
5K notes
·
View notes
Photo

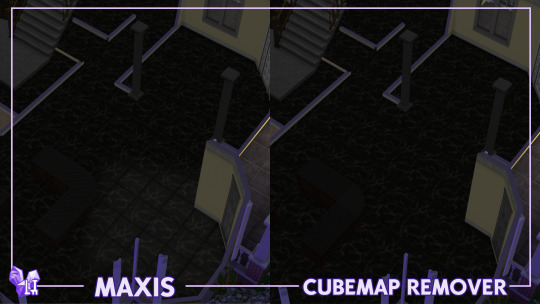


DOWNLOAD:
SFS / GOOGLE DRIVE / PATREON
So, this is another one of my little attempts at making the game more visually enjoyable.
To emulate believable reflections without setting fire to everyone’s computer, what most games do is use cubemaps. Simply put, they’re images layered underneath everything that move depending on the camera position. Parallax and all that stuff.
What developers usually do for sandbox/open-world games is automatically generate cubemaps so that it actually looks like objects are reflecting the world around them. For whatever reason (probably performance), TS4 doesn’t do that. The developers use premade images with white squares that vaguely resemble windows and stuff, cause most of the time when you’re indoors that’s where light comes from.
Now, that doesn’t always work. And with that I mean it almost never works. When it’s completely dark, for example, the cubemaps get completely blown out, and instead of a nice reflection you get a weird alien glow on your kitchen tiles. You also just get random reflections that don’t really come from anywhere, and that can be a little immersion breaking. I personally hate it.
So I replaced all cubemaps in the game with empty, black textures. That way, they become transparent and don’t ever show up at all. To me, that looks way better, the game looks more natural and things look less plastic-y. It’s my personal preference, and I’m posting this here in hopes that maybe someone else likes this look as well :)
All pictures in the post are taken with both my ITTL and OOTD mods! Highly recommend you to use both of those as well.
(This isn’t going on early access on my Patreon, but you can still support me there if you want to help a sister out in this economy lmao)
2K notes
·
View notes
Photo


**Srsly’s Blank Save - All Worlds**
I keep getting asks about the blank world that I use. So I figured I would package it all up and share it with all of you!
I created this save mostly for Challenges and Build projects. So you can just plop this save, and start building.
*NOTE: I have flagged all lots as residential so you can choose the lot type of your choice. If you are having trouble changing a lot type for one of the special lots check out Zerbus Turbo Carrers & Venue Changes.
Worlds Included
Willow Creek
Oasis Springs
Newcrest
Granite Falls
Magnolia Promenade
Windenburg
San Myshuno
Forgotten Hollow
Brindleton Bay
Selvadorada
Del Sol Valley
Strangerville
Sulani
Glimmerbrook + Magic Realm HQ
About The Save
All EA residential & destination worlds bulldozed!
All GTW career lots bulldozed! (Hospital/Science Lab/Police Station)
All EA original lot names are the same!
Optional EA Households/Lots - Pick and choose Tray Files
Be sure to read the .txt files included if you have any questions.
Feel free to send me a message if you have any questions.
Download
Please Reblog <3
3K notes
·
View notes
Text
Changing Lot Sizes S4S
First of all, this statement was made some time ago: “You can’t make a lot bigger. The size is given. To place bigger houses you need to put them on bigger lots.”
Well, you can’t change lot sizes IN the game, but you can change lot sizes in Sims 4 Studio 😇 And yes, you can freely build on its altered size! Just for secret lots (and non-residential lots) such as the Forgotten Grotto, Sixam, and Sylvan Glade you’ll have to enable the bb.enablefreebuild cheat.
Here’s a test example of the lot size altered to 28x in Sylvan Glade:

And another one altered to 40x:

In the same world file you can also alter its position, right now you can see that almost half of the lot is covered by the world props (mountains).
The tutorial will continue below the read more cut~
Weiterlesen
3K notes
·
View notes
Photo

Change the name of any world in any save file.
Have you ever wanted to change the name of the worlds in your save file on a whim? With this handy trick, you can change the name of any world at any time. The names are never permanent.
Requirements:
— Sims4Studio


— Open Sims 4 Studio and click My Projects.


— Locate your saves folder located at (Documents\Electronic Arts\The Sims 4\saves).
— At the bottom right corner, make sure you select Sims 4 Save (*save).
— Here you’ll see all of your save files. Double click your desired save file to open it.


— Search for Save Game Data on the left hand side and select it.


— On the right hand side, scroll down until you find neighborhoods. Click Edit Items… to the right of it.


— Finally, on the left side you’ll see [NeighborhoodData]. These are each world in the game. Click each one until you find your desired world. The world name is displayed on the right hand side.
— On the right side, simply change the name of the world.
— Now click the blue save button then save again in Sims 4 Studio.
You’re done! When you open your game and load into the save you’ll notice the world names have changed! You can always repeat these steps to change the names again. You can also change the names of multiple worlds.
I hope you enjoyed this tutorial! Happy Simming!
405 notes
·
View notes
Text
No EA Eyelashes HOTFIX
So uh, I whipped up a quick fix for @cienzroza ‘s no EA Eyelashes mod, because it stopped working with island living (you know the drill, mermaids lose their faces, floating teeth, kinda sounding like a low-budget horror movie)
not gonna lie, I’m kinda proud of myself for figuring this out
Before you download my fix, please check cien‘s original post to see if it’s updated!
If you run into any trouble with this fix, shoot me a quick message and I’ll try my best to fix it ,, again
Make sure to remove the old files for this mod!!
You’ll be downloading a single file, no separate files for age groups!!
download
I’m tagging everyone who commented on my post about the mod fix under the cut, so just ignore that
Keep reading
5K notes
·
View notes
Photo

How to get rid of lines that appear on sims/objects/walls
This bug came back when I updated my laptop and I’ve been seeing a lot of people recently that have this bug, so I decided to make a little tutorial on how to get rid of it. Everyone that I know that has the bug had a Nvidia graphics card, so if you don’t have a Nvidia graphics card, sorry, this tutorial probably won’t work for you.
Follow these steps at own risk, nothing should normally go wrong if you follow this tutorial step by step, but if stuff does go wrong then please don’t blame me.
Click on “Keep Reading” for the full tutorial.
Keep reading
3K notes
·
View notes
Photo
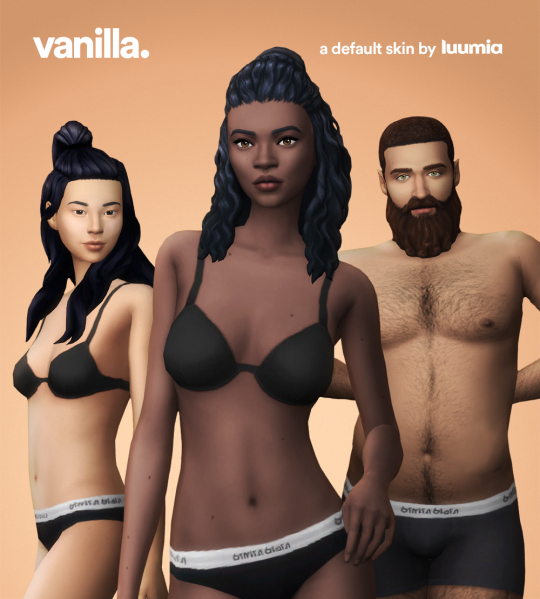
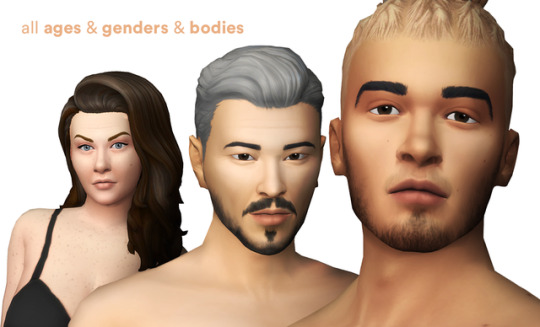
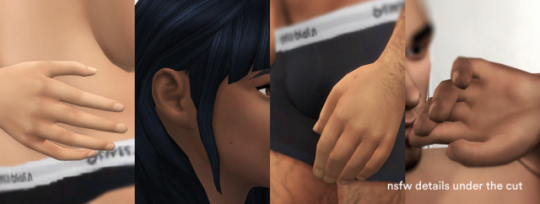
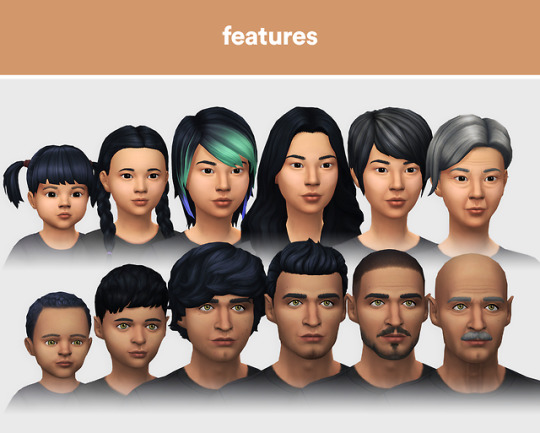
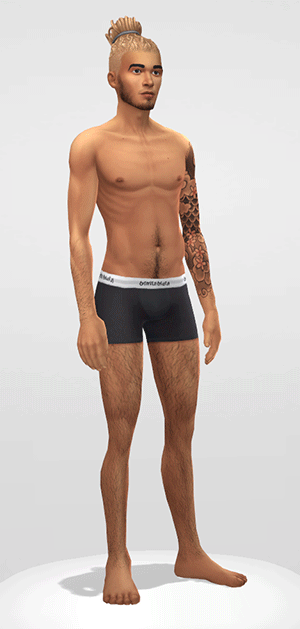
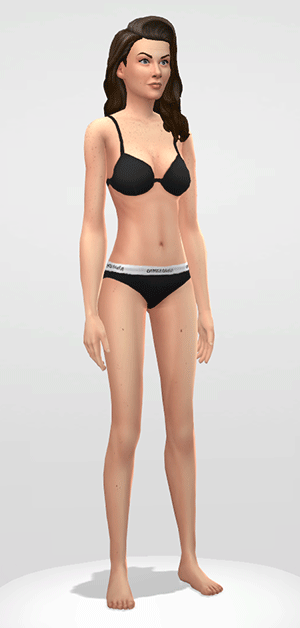
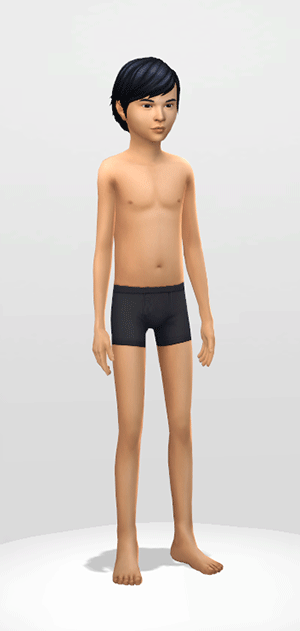
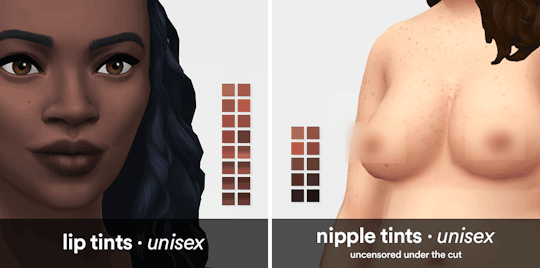
vanilla.
here it finally is. a fresh look on a familiar skin. a brand new default skin for all ages, genders, and body types.
download & more information under the cut:
Keep reading
19K notes
·
View notes
Text
LAG+ENDLESS LOADING SCREEN FIX!
PART 1
Downloading millions of cc will REALLY slow down your game, but there is an easy way to fix this. I for one used to wait so long for my game to start up, and now it takes 3-4 minutes MAX.
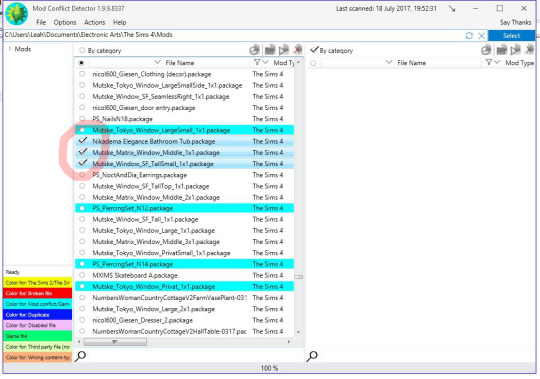
STEP 1) Download MOD CONFLICT DETECTOR
The link is going to take you to a page that look likes this. Note it says ‘UPDATE’ but you DON’T want to download the newest version because it’s complicated and doesn’t work like the original.

Download the very first link.

Once that’s downloaded, it’ll take you to a page that looks like this.

Double click the one that says Application (Highlighted Above). NOTE: If you are not taken to this page, type “MTS” in the search bar and it will come up.
Once that is open, this will show.
Make sure that the options are checked like below. Once everything is checked correctly, click “scan”.

Wait for it to scan everything and something like this will show.

The colors on the bottom left corner will tell you what file is what.
NOTE: BLUE FILES AND GREEN FILES SHOWN ARE 99.9% NOT CONFLICTING WITH THE GAME SO LEAVE THE CC ALONE!
Often times you will get some odd files that are green and/or blue, so you can delete them. Just make sure to READ the file and make sure it’s NOT a package file.

STEP 2) Deleting Corrupt Files
Sometimes, we can download duplicates and Sims 3 items. In order to delete them, just right click on the file and
-Go down to ‘DELETE’>’MOVE TO RECYCLE BIN’>OK
You can also click on several files to delete by checking the little circle next to the file.
It may ask you to update this version but I just click “no”.
Hope this helps!
Any items that don’t show up in game can be deleted very easily. Click HERE for a tutorial~
657 notes
·
View notes
Text
DELETING CORRUPT CC
PART 2
Some CC won’t show up in game but we can delete it by downloading SIMS 4 TRAY IMPORTER
STEP 1) Download and Install
Once you click the link, scroll down and find where it says “Google Drive”.

It’ll take you to this page.
Click and download the one that says “Sims4trayimporter”.

This may or may not pop up, but just click “no thanks” if it does.

STEP 2) CREATING A SIM
Now in order for this to locate what file is corrupt, you need to create a sim wearing the corrupt clothes.
MAKE SURE YOU DO THIS STEP BEFORE OPENING “Tray Importer”

Then you just save the “household” to your library.
Next, EXIT the game and open “Tray Importer”.
STEP 3) DELETING FILES
Your saved sim should be there, so click it and this will show up.
Click “CC” and find the file that is corrupt and RIGHT CLICK. then click “Show Containing Folder”.

It will take you to where the file is and you just have to “cut” and “paste” it OUT of your mods folder and then delete. NOTE: You can only delete files when Sims 4 is not open.
Hope this helped!
Find out how to keep your game from lagging HERE
564 notes
·
View notes
Photo

Nolan Sims here.
Long time no upload! So, I finally got my haircut again, and needed an updated hairstyle for my Simself. I figured i’d share the final result. I hope you’ll all find a use for it!
Info & Download Below!
Keep reading
8K notes
·
View notes
Photo


Howdy! Today i bring you a small mesh edit of my blinds that came with my Shaker Kitchen set. I really liked the blinds, but my good friend jorgha pointed out that since they are quite long, they don’t always work for every situation. Luckily, i had planned to make them in different lengths, but the kitchen got out of hand so it got put on the back-burner………… until now. Both roman blinds are available in 2 additional lengths, medium and high. They use the same textures as the other blinds, just the mesh has been shortened. They are separate items in the catalogue too. So if you want more blind choices, fear no more! If you missed the blinds, be sure to check them out in my latest object set here.
The Build/Buy items feature:
basegame compatibility
non-default
4 meshes in total with 32 fabric options:
find items easily using phrase “Shaker Kitchen” in search bar
style (found under “contemporary”) and colour filter compatible
custom thumbnails
Style tool compatible
Pricing and polycount as follows: - 1 tile Roman Blind - High ($108, 328 polys) - 1 tile Roman Blind - Medium ($109, 360 polys) - 2 tile Roman Blind - High ($118, 328 polys) - 2 tile Roman Blind - Medium ($119, 360 polys)
CC credits:
All custom content, apart from the floor (find here) is all mine, so feel free to browse through my downloads to find it.
Now, there is only one archive with the separate files. There is no merged option because there just aren’t enough files to make that effort Feel free to merge yourself. The archives contains the package files and style image inside a folder. Extract the archive using winRAR or WinZip, place the package file(s) in your mods folder, then look for them in your game. I hope you enjoy.
Download: Mediafire | SimFileShare | Onedrive
1K notes
·
View notes
Photo


Curtains are one type of object i find lacking when it comes to TS4. I generally rely on CC or recolours to meet my needs, but when that failed I decided to make my own. This is the end result and I tend to use these everywhere now.
Due to the length of these posts and for ease of updating, you can find the download and info under the cut.
Keep reading
5K notes
·
View notes