
Statistics
We looked inside some of the posts by 2024idpgroup14 and here's what we found interesting.
Average Info
Notes Per Post
0
Likes Per Post
0
Reblog Per Post
0
Reply Per Post
0
Time Between Posts
8 hours
Number of Posts By Type
Text
17
Last Seen Tumblr Blogs


Fun Fact
Tumblr was created by web developers David Karp and Marco Arment.
Text
Developing the Experience
Blog Post # 6 - Disintegration Effect
Sai Pratyaksh Epari (MA Games Art and Design)
In order to create the dissolve effect I referred to the following video:
youtube
I did create the effect using the following steps however I was unable to apply it over a sequence.
Initially we need to make a material with the following parameters.


Once the material is set we need to make a material instance out of it.

Once the instance is set we need to apply it on meshes where we desire the effect.
To bind it with a mesh or a collision we need to make an actor class blueprint and add a sphere or a cube. Then we need to create a function.


References:
UnrealCG (2023) Unreal Engine 5 Dissolve Mesh tutorial. https://www.youtube.com/watch?v=N_pq2RYTG04.
0 notes
Text
Developing the Experience
Blog Post # 5 - Scene Set-up
Sai Pratyaksh Epari (MA Games Art and Design)
In order to create a scene I used the following assets:
I set up the camera at the center of the theatre and composed a scene around it.

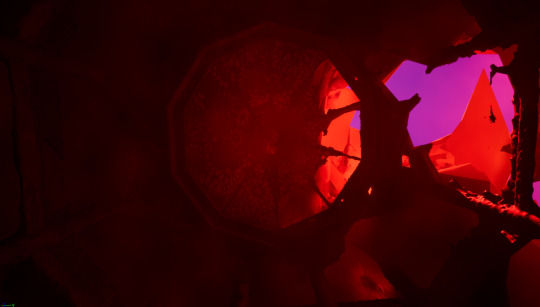
To add depth to the scene I tried creating smoke and dust effect using Niagra Particles. The Following are the settings:
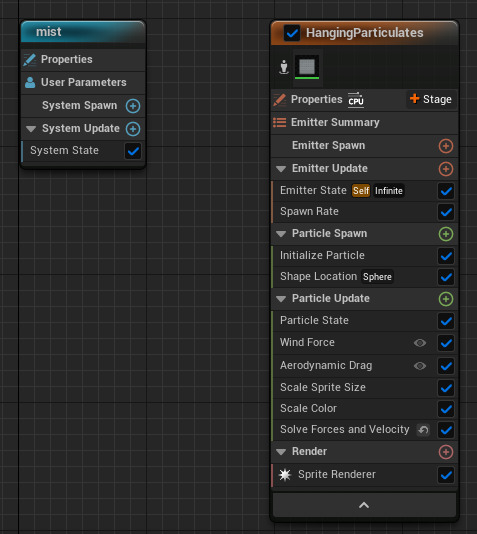


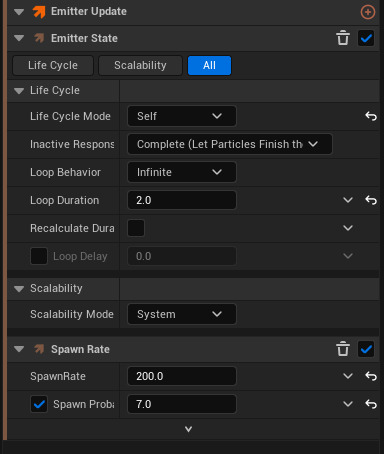
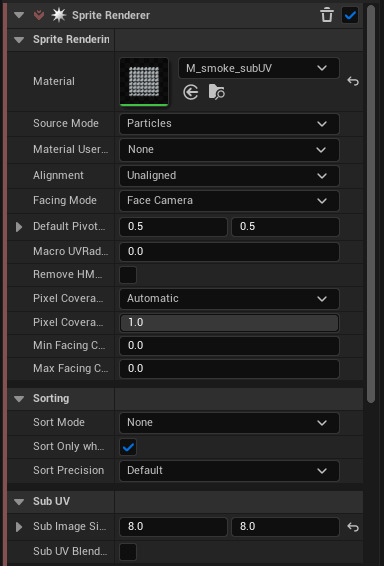
Once the effect is made, drag and adjust the niagra effect accordingly.
0 notes
Text
Developing the Experience
Blog Post # 4 - Developing Plans and Ideas
Sai Pratyaksh Epari (MA Games Art and Design)
I initially pitched three ideas.
Idea 1: Kali Yuga or The Judgement Day
In Hindu cosmology, the fourth and last of the cosmic ages known as the Yugas is referred to as the Kali Yuga. Hindu texts state that every Yuga corresponds to a distinct phase of human spiritual evolution. It is thought that the Kali Yuga was a time of moral decline, conflict, and darkness.
According to Hindu mythology, the Kali Yuga is marked by a generalized lack of integrity, avarice, violence, and corruption. It is regarded as the age of spiritual deterioration, in which righteousness declines and human values erode. This time frame is frequently linked to moral rot, social unrest, and a general loss of human virtues.
Hindu texts state that the 432,000-year Kali Yuga officially began with the departure of Lord Krishna, who was an incarnation of the god Vishnu. The length of the Kali Yuga, however, is interpreted differently in different sources.
Though depicted in a depressing light, Kali Yuga is also viewed as a chance for personal salvation and spiritual development. It is thought that through self-realization, devotion, and moral behavior, people can achieve spiritual liberation even in this dark age.
Diverse interpretations and viewpoints have surfaced over time concerning the characteristics and importance of the Kali Yuga. Some see it as a precise period of time, while others see it symbolically as cycles of human consciousness and civilization. Still, Kali Yuga is an important idea in Hindu cosmology, symbolizing life's cycles and the never-ending conflict between good and evil.

Idea 2: Multiverse and Time Warping
One intriguing concept in the field of creative innovation is the merging of several universes into our own realistic universe. This idea, which draws heavily from the Spider-Man multiverse series, explores the boundaries of 2D and 3D art forms and combines them to produce a completely unique and immersive experience.
Artists have imagined a narrative akin to the Spider-Man multiverse, where different versions of the adored superhero coexist across multiple dimensions. This rich tapestry serves as inspiration for their works of art. Imagine canvases where figures and scenes come to life in a dynamic fusion of styles, where traditional 2D artwork blends seamlessly with three-dimensional sculptures.
This idea offers a special chance to investigate themes of interconnectedness, diversity, and the fluidity of artistic expression. It goes beyond simple visual aesthetics. With a unique flavour and story, each universe represented in this convergence gives viewers a peek into different realities and possibilities.
By using this creative method, artists can challenge the conventions of traditional art forms and encourage viewers to interact with their pieces on several levels. The fusion of various art forms opens up new creative possibilities, from interactive digital experiences to immersive gallery installations.
Just as Spider-Man navigates the multiverse, weaving between different dimensions and encountering diverse versions of himself, so too does this concept of convergence invite us to explore the vast and interconnected landscape of artistic expression. It is a testament to the boundless imagination of creators and the endless possibilities that lie within the realm of art.

Idea 3: Japanese Ink Paintings
Drawing inspiration from the evocative graphics of the video game "Ghost of Tsushima," an intriguing concept has come to life: Japanese ink paintings that surround the dome in a captivating exhibition of artistic storytelling, telling a story with ink blot and spatter effects.
Taking inspiration from the rich history of sumi-e, the Japanese art form of ink painting, this idea presents a contemporary interpretation that goes beyond convention. The dome is transformed into a canvas and covered in an intricate ink tapestry, with each brushstroke narrating a story of bravery, dignity, and the splendor of nature.
The artwork gains a dynamic quality and a sense of movement and spontaneity from the use of ink blot and spatter effects. Gazing upward, viewers are taken to the realm of feudal Japan, where cherry blossoms sway in the breeze and samurai roam mist-covered landscapes.
Every painting inside the dome reveals a new chapter in the narrative, enticing spectators to embark on an exploration and discovery voyage. The story is told in a sequence of vignettes that represent the spirit of Japanese history and culture, from heroic battles to pensive moments.
This immersive experience offers a distinctive fusion of tradition and innovation, paying homage to the spirit of "Ghost of Tsushima". It embraces the potential of contemporary technology and design while honouring the ageless artistic quality of Japanese ink painting.
Gazing up at the dome, visitors become more than just onlookers, they are actively involved in the narrative. They advance through the story with each step, the depth and beauty of the surrounding ink paintings igniting their imagination.
The Japanese ink paintings in the dome thus transcend beyond mere artwork and become doors to a different realm where the past and present collide and narrative power is unbounded.
References:
The Editors of Encyclopaedia Britannica (2023) YUGA | Vedic Age, Dharma & Cosmology. https://www.britannica.com/topic/yuga.
0 notes
Text
Personality Type and Group Work Reflections
Liangying Wang (MA Game art and Design)
According to the test results, I am ENTP-A. It describes me as a curious and flexible thinker who cannot resist intellectual challenges. They tend to be creative and have a high degree of mental agility to deconstruct and reconstruct ideas.
This test shows that I am better at giving ideas and deconstructing other people's ideas when I am in a team. Will complete some challenging problems. I deeply felt that after my team members came up with ideas throughout the group work, I was the one who took their ideas and reformed them to make them simpler and more feasible.

In the test Ian sent us, my metrics are as follows. Which shows that my“ Plant ”and Speciaist" are strong.

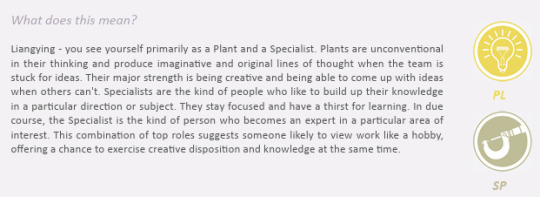
This shows that in the team I like to use my knowledge to solve technical problems in addition to giving ideas. I do provide ideas through the resources I have at hand and often think in order to be able to produce a large volume of work in 3 weeks with 4 people indeed.
One of the MBTI's showed that I have a certain aggressiveness and I feel that the more I do solve other people's problems, the angrier I get when I am in a team. But in the end, I will control my emotions and be patient to solve the problem.
Anyway, going by the MBTI with the summary of team roles that Ian sent me, I am a person in the team who can come up with new ideas and make them feasible and solve technical problems.
Reference
16 personlities (2011-2024). [online]. https://www.16personalities.com/profile. [Accessed 11 Feb 2024]
0 notes
Text
Developing the Experience
Angelique Shelley (MA Concept Art)
Blog Post #7
Sound
As production in After Effects continued, it became clear that it would make more sense for me to add and composite together the audio. The main reason for this is that the After Effects project file, complete with image sequences from Unreal added up to over 60GB so syncing that between team members could be problematic, especially since I am remote. There was also quite a lot of sickness in the group which I was fortunate enough to avoid.
Ana selected and shared some excellent sounds throughout the project for us to use.
We also received feedback from staff on how we should avoid just sticking sounds straight on but should pay attention to blend them together carefully.
I found that Premiere Pro was far more capable in the sound department than After Effects so exported the final composition from After Effects as an mp4 with a manageable file size that could render in real time in Premiere Pro. To avoid double-compression by encoding to mp4 twice though I decided to edit the sounds over the pre-rendered mp4 and then bring in the processor-intensive after effects file directly into Premiere Pro with the dynamic link at the very end and render that instead. This ensures maximum video quality and ease of editing along the way.
While it could be argued that our visuals may seem disconnected throughout the video I hoped that the sound could help tie it together with more cohesion.
After adding the first sounds of rocks banging down and slate grinding and stone chips falling, I noticed that the sound effects seemed laughably ‘small’ compared to the size of the giant heads rotating into position. I found that adding a Bass effect made the sounds sound larger and a Studio Reverb with the equalizer set to custom>great hall with some extra tweaks made it more echoey in between the pillars of the first scene (see fig. 1).
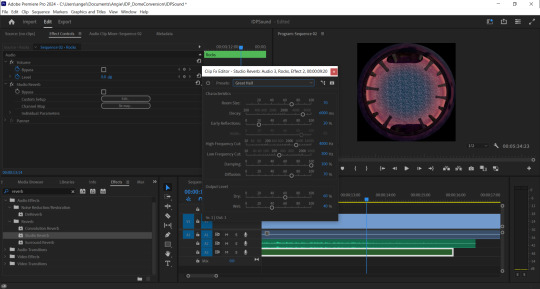
Fig. 1 A screenshot showing the application of Studio Reverb.
The echoes unfortunately did not extend beyond the audio clip length so although echoing through the clip, ended abruptly. If this was After Effects I would assume that a precomposition of the audio layer would allow the software to echo even where there is no actual audio clip. I found that the premiere version of precompose is called ‘nest’. Indeed this worked as I intended. Duplicating a small audio file, adding it beyond the end of the composition and nesting that too allowed the final audio clip to echo as well.
The sounds now matched the scene far better. The sound links below show the originals and how small they sound in comparison.
I added the sound of wind and calm water to connect the viewer to the scene more as well.
The sound of the clock increasing in speed was a challenge as the speed ramp effect only worked on video instead of audio but I found that I could increase the speed of the whole layer linearly so just duplicated the audio layers, speeding each one up with a fade between them all.
I applied similar effects to all of the above for the wormhole and final scenes, but layering the sounds for the wormhole effect was both fun and challenging (see fig.2).
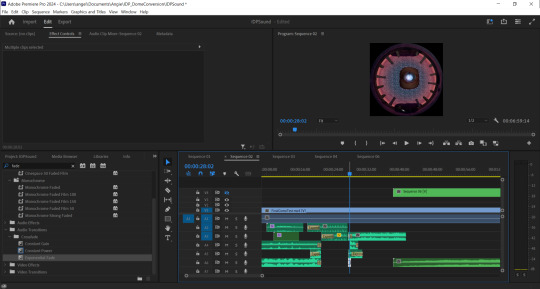
Fig. 2 A screenshot showing some of the final layers of sound for the wormhole effect.
The music we chose had an ethereal, mysterious and slightly unsettling feel and worked well as a more ambient track that did not draw too much attention to itself and did not overpower the direct environmental sounds such as the rocks or wormhole. I feel that the overarching music helps tie everything together and make it a more harmonious experience.
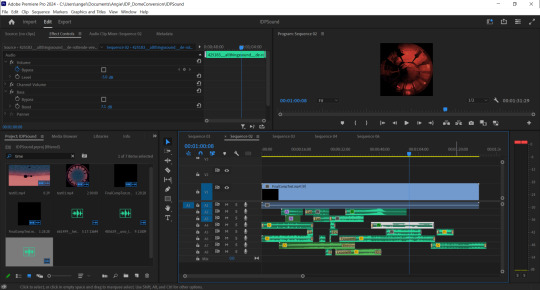
Fig. 3 Screenshot of final sound composition.
The Final Composite
youtube
References:
allthingssound (2018). de rottende veerboot. [Sound]. Freesound.org. [Online]. Available at: https://freesound.org/people/allthingssound/sounds/425183/ [Accessed 12 February 2024]
carmsie (2012). PB It is time.wav. [Sound]. Freesound.org. [Online]. Available at: https://freesound.org/people/carmsie/sounds/168303/ [Accessed 12 February 2024]
carmsie (2012). PB Remember Remember v2.wav. [Sound]. Freesound.org. [Online]. Available at: https://freesound.org/people/carmsie/sounds/168305/ [Accessed 12 February 2024]
DylanTheFish (2018). Warp Speed.wav. [Sound]. Freesound.org. [Online]. Available at: https://freesound.org/people/DylanTheFish/sounds/454683/ [Accessed 12 February 2024]
felix.blume (2023). River bank, waterfall distant loud, lapping water, close recording, bird, subtle cicada in indigenous village Salto Hacha in Amazon rainforest. [Sound]. Freesound.org. [Online]. Available at: https://freesound.org/people/felix.blume/sounds/674104/ [Accessed 12 February 2024]
f-r-a-g-i-l-e (2019). Buttery Breakbeat Synth, octave playthrough. [Sound]. Freesound.org. [Online]. Available at: https://freesound.org/people/f-r-a-g-i-l-e/sounds/500662/ [Accessed 12 February 2024]
het_HCKM_DS_... (2022). Mortality Boring Death Dying clock tick tock klok tik tak incl 20 Hertz sometimes. [Sound]. Freesound.org. [Online]. Available at: https://freesound.org/people/het_HCKM_DS_huis/sounds/661499/ [Accessed 12 February 2024]
Jovica (2008). Pad 006 - Whispering Ears - D4.flac. [Sound]. Freesound.org. [Online]. Available at: https://freesound.org/people/Jovica/sounds/52489/ [Accessed 12 February 2024]
kernschall (2018). SFX_Stone_Calcit_DeadSea_Avalacne_foot #3-178.wav. [Sound]. Freesound.org. [Online]. Available at: https://freesound.org/people/kernschall/sounds/425017/ [Accessed 12 February 2024]
klankbleed (2017). wind gap indoors 001 170305_1100.wav. [Sound]. Freesound.org. [Online]. Available at: https://freesound.org/people/klankbeeld/sounds/383139/ [Accessed 12 February 2024]
Robinhood76 (2021). 10105 big stone crush impact.wav. [Sound]. Freesound.org. [Online]. Available at: https://freesound.org/people/Robinhood76/sounds/567840/ [Accessed 12 February 2024]
X3nus (2020). Ardanbanapolis Interstellar Hub.flac. [Sound]. Freesound.org. [Online]. Available at: https://freesound.org/people/X3nus/sounds/513487/ [Accessed 12 February 2024]
Zimbot (2011). Portal_Continuous_Rumble.wav. [Sound]. Freesound.org. [Online]. Available at: https://freesound.org/people/zimbot/sounds/122972/ [Accessed 12 February 2024]
0 notes
Text
Developing the Experience
Angelique Shelley (MA Concept Art)
Blog Post #6
Special FX, Compositing
The next task was to bring the entire composition together and create the final After Effects file that would be rendered for the group and ensure that everything was suitable to be projected onto the dome.
The pillar falling at the beginning required being paused, a clock tracked to it in After Effects. I modified a video of an animated clock (Kummaru, n/d) first using time remapping and keyframes with easy ease enabled. I then learned how to use the graph editor and adjusted the handles in there for a slower acceleration (see Fig. 1). Note that my experience in After Effects before this project was limited to adding simple parallax animations to my digital paintings.

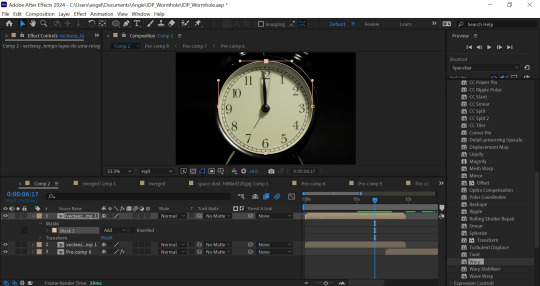
Fig. 1. Screenshots of the animation graph editor and mask.
I made the clock transition into the wormhole with some special effects that I found through experimentation. I used CC flo motion to make the clock face distort radially like a liquid, then on a duplicated layer adding CC lightrays but adjusting the source size so that you can actually see the clock distorting back in. I added a ripple effect to the first few frames of the wormhole itself to complete the transition between clock and wormhole.
Fig. 2 Final clock and wormhole animation.
I then precomposed the clock and attempted to match the speed and position of the pillar falling with further easy ease keyframes with adjustments made in the graph editor to match the acceleration of the falling pillar and eye.
I used a mask on the clock face along with hue and saturation and curves to ensure that it fit onto the eye. I used masking, scale and position tracking to fully integrate it into the scene.


Fig. 2 A selection of screenshots showing compositing the clock render onto the pillar.
I then had to modify a few issues with the renders from the game engine, especially with the pinching texture at the top of the skydomes. This required a gaussian blur with a mask which would not work at all with the After Effects VR camera. I found that precomposing the footage helped. In fact I would advise that precomposing fixes most problems in After Effects and choosing “move all attributes to new composition” was the best option to choose.


Fig. 3 Screenshots showing before and after blurring the pinched pole.
I then blended scenes together with different methods such as fading blending modes, masks and overlays to seamlessly transition into Sai’s red architectural scene. I had to brighten the scene significantly with curves as there were issues with lighting in Unreal causing it to start off as almost black in After Effects. I found that avoiding the curves from touching the edge of the curve graph avoided the image breaking or banding too much.


Fig. 4 Screenshots showing post-render adjustments.
I then created the beginning and end text using an ultra bold font with the VR converter effect applied to it set from 2D to fisheye. I precomposed this and set it to a luma matte mode so that the world could be seen through the letters at the end. I found that this was more visually interesting and original than just putting white text on top of everything.
I also wanted the text with our names on to be more interesting than just popping onto the screen. I learned from a few tutorials how to create the trim paths effect to text after converting it from text to a shape layer. Unfortunately the effect requires action on each letter but I feel that it was worth the time. I like how it looks like alien glyphs as it forms on the screen.

Fig. 5 A Screenshot showing the application of the trim paths effect.
I then used hue and saturation to better colour match the scenes together to attempt to make it more cohesive.
This screenshot (fig. 6) shows the layers and keyframes in one of about 12 precomposition nests that this After Effects file required.

Fig. 6 Screenshot of composition layers
Despite an RTX 3070 GPU, i5 12th gen and 32GB RAM the frames were taking up to 5 seconds each to finish loading. I learned to reduce the quality to quarter while working on it and toggling various effects off temporarily.
I have learned more workflows in Maya and After Effects in the past two weeks than I have in my entire 3 years of university and all the years since. While it is unfortunate that the project direction meant that I was unable to use my primary skills in environment matte painting and character design at all for this project, I look forward to using these newfound skills to further enhance my digital painting work.
References:
Kummaru, T. (n/d). Time lapse of a clock time passing over a day to night. [Video]. Available at: https://www.vecteezy.com/video/23423225-time-lapse-of-a-clock-time-passing-over-a-day-to-night [Accessed 07 February 2024]
0 notes
Text
Personality Type and Group Work Reflections
Sai Pratyaksh Epari (MA Games Art and Design)

Using personality tests to start my path of self-discovery has been a fascinating experience for me. I've spent years delving into the Myers-Briggs Type Indicator (MBTI) in an attempt to understand the intricacies of my own personality. The dynamic quality of personality never ceases to astound me; it's not a static thing but rather a constantly changing fabric of characteristics and inclinations. I was classified as an ENFP-T (Fig. 1), or what they call a Campaigner, in my most recent MBTI adventure.
The analysis indicates that creative, collaborative settings where team-based communication is valued highly are ideal for ENFPs. This realization confirmed the idea that self-discovery is a continuous process with countless surprises and revelations along the way. It also gave me insightful knowledge about my own strengths and shortcomings.
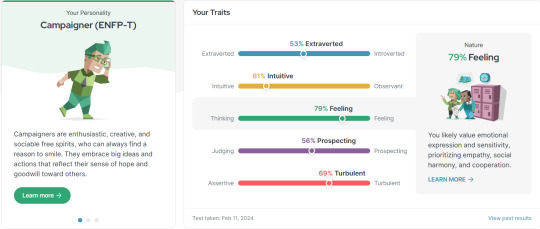
Fig. 1 My MBTI Quiz Dashboard
ENFP (Fig. 2), which stands for Extraverted, Intuitive, Feeling, and Perceiving, is defined by the 16 Personalities quiz. It's common to refer to ENFPs as "Campaigners." They are renowned for being gregarious, impulsive, and imaginative. Generally speaking, ENFPs are gregarious people who love social interaction and have a knack for uplift and motivation. They frequently have a strong sense of empathy, are open-minded and creative, and want to assist others. Additionally, ENFPs are noted for their adaptability, distaste for routine, and preference for trying out novel concepts and experiences. They flourish in settings that foster creativity and teamwork, where they are free to express themselves and collaborate with others to achieve a common objective.

Fig. 2 Information Board on ENFP
Taking the Belbin Personality Test helped me gain more understanding of my natural tendencies and strengths in a group environment (Fig. 3). I identified as the Plant, and that was my primary personality role. As a Plant, I get my energy from coming up with creative solutions and imagining fresh ways to tackle problems. I genuinely enjoy the creative process and am always looking for novel viewpoints and unusual solutions.
The test also brought to light my Resource Investigator secondary dominant role. This position is a wonderful fit for my Plant persona because Resource Investigators are great at networking, obtaining data, and encouraging productive teamwork. I have a talent for finding resources and making connections that advance projects, whether I'm working alone or with others.
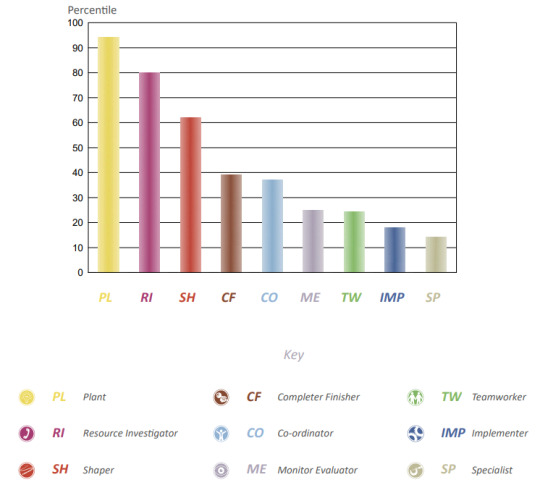
Fig. 3 A Chart of the Personality State Composition
All of these positions highlight my flexibility and ability to adjust to different team environments. Whether it's coming up with concepts or organizing resources, I can make a valuable contribution and move meaningfully closer to common goals. My fit for these positions demonstrates my love of creativity and innovation as well as my dedication to creating collaborative spaces where ideas can bloom and projects can succeed. (Fig. 4)
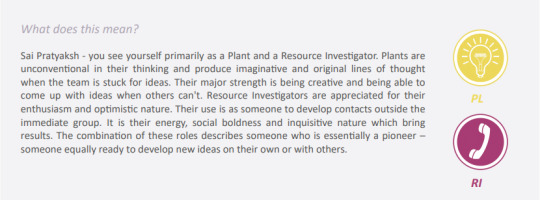
Fig. 4 Belbin Dashboard
A thorough understanding of my personality has been obtained through a number of personality tests, such as the Belbin Personality Test and the Myers-Briggs Type Indicator (MBTI). I am an ENFP-T, or a Campaigner, according to the MBTI, and I am well-known for my gregariousness, inventiveness, and capacity to motivate people. In the Belbin assessment, this is supplemented by my primary role as a Plant, which emphasizes my tendency to come up with creative ideas, and my secondary role as a Resource Investigator, which emphasizes my talent for networking and encouraging teamwork. All things considered, my personality is defined by a dynamic combination of enthusiasm, creativity, adaptability, and a strong preference for both idea generation and teamwork. I do best in settings that value collaboration and creativity, where I can use my skills to spur original thought and significant advancement.
References:
Welcome! | 16Personalities (no date). https://www.16personalities.com/profile?utm_source=welcome-turbulent-campaigner&utm_medium=email&utm_campaign=results&utm_content=view-profile-page-page-0.
0 notes
Text
Developing the Experience
Angelique Shelley (MA Concept Art)
Blog Post # 5
After our feedback with Ian and Neil about surrealism, I thought about changing the planets to eyes. Eyes can be often be found in surrealist work, such as The False Mirror, 1928 by Rene Magritte.
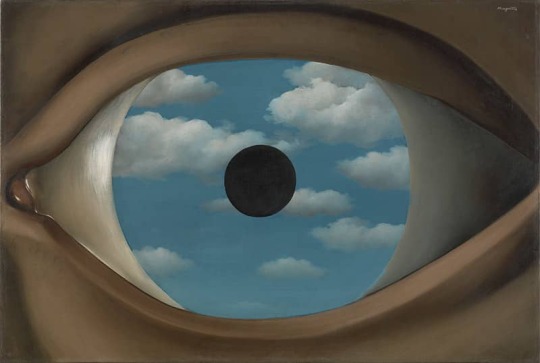
Fig 1. The False Mirror, Magritte, 1928.
On describing the effect of using eye(s) outside of their usual context, renemagritte.org (n/d) describe the effect of her particular work as such:
"The image jolts the viewer by removing the eye from its usual context, presenting it without the face to which it belongs. It further disrupts expectation by placing a circular sky inside the otherwise ordinary oculus. Sometimes called magical realism, such juxtaposition of normally unrelated objects within a seemingly incongruous context is characteristic of much of Magritte's oeuvre. For Magritte and Surrealists working in a similar mode, these surprising, even bizarre combinations were considered the products of their unconscious minds. By visualising them, the artists believed, they might also touch the unconscious minds of their viewers."
Other notable surrealist artists that enjoyed using eyes in unsettling ways were Salvador Dali, and Max Ernst.
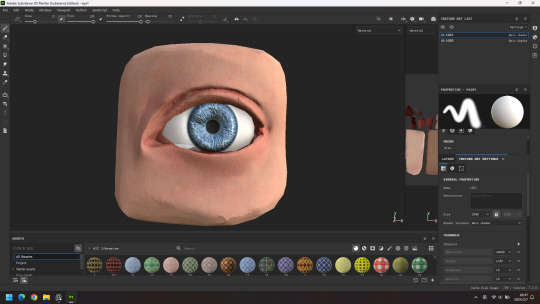
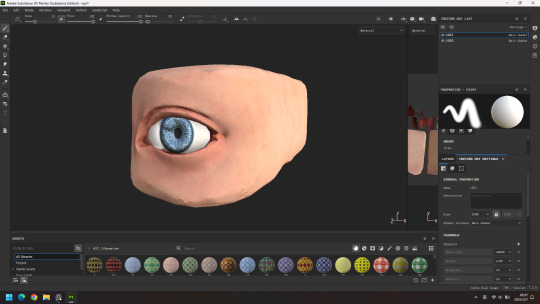
I picked up the Maya project where I had left it off because of technical reasons. I found a free model of an eye on Sketchfab (see fig. 2), because it was modeled in Blender, I had some difficulty assigning the textures in Maya for the Arnold renderer, the main issue was the transparency mask for the cornea. I got the mask working with a Phong material (see fig. 2), but Arnold didn’t read it properly. In the end I retextured it using an Arnold material and assigned the bubble preset material to the cornea faces, the effect wasn’t as nice as the masked Phong though.


Fig. 2 I first textured the 3D model, Eye Blend, Vinny Passmore, 2019, with a Phong material.
After duplicating the eyes along the camera path that I had set up earlier I realised that they looked too static and thought that it would be more engaging for them to aim to look at the camera. Again, before this project my existing skills in Maya was limited to basic modeling so after looking through various forums and tutorials I found how to create aim constraints for the eyes to follow the camera. From an outside view of the camera zooming down past the eyes, it looked great and far more interactive (see fig. 3).

Fig. 3 A Playblast showing the aim constraints programmed onto the eyes.
During this time, I also played with different camera settings. I ran a test render of the spherical camera (see fig. 4), but that would be a lot of wasted render time after cropping into it. In the end, I chose an Arnold Fisheye camera.
From inside the camera, and in my render, I thought the always-tracking-you eyes looked almost 2D and fake like sprites from old 3D games that always faced the camera and the result was less impressive than I had hoped.
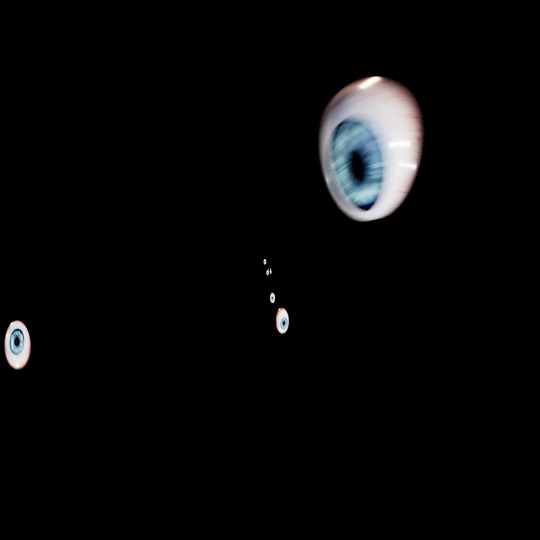
Fig. 4 A still from the spherical render with aim constraints on the eyes, I would need to crop into it too much for it to be efficient.
I then decided to leave some eyes not looking at you which looked more 3D but I still wanted it to look more unsettling. I rendered them off but had trouble getting the alpha channels out of Maya into a png. I troubleshooted to no avail then noticed a few forums telling people to use a white surface shader to act as a layer mask in After Effects. I applied this to an alternate Maya save file and set it so that the eyes were white on a black background, rendered it, googled how to apply alpha masks in After Effects using a luma matte layer mode (something that After Effects must have changed this year as it was no longer a drop down menu item but rather a toggle button that I had to find).
This is the result with added blending:

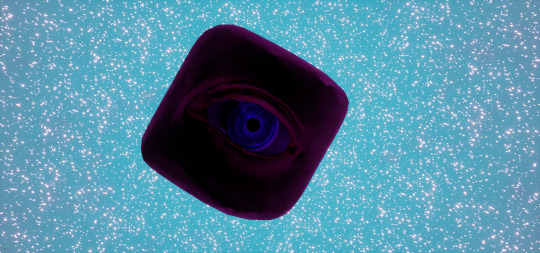
Fig. 5 A GIF showing the eyes composited into the wormhole.
I could not have them at the same speed as the wormhole as they would pass by far too fast. The motion blur that I added to them in Maya did help embed them slightly more though.
I was still not totally happy and thought that it would be more visually engaging to have the eyes blink open at you in space. Having recently learned about the surface shader luma matte workflow I figured that if I duplicated the eyes, split them across the middle, applied a black surface shader, and keyframed both hemispheres to open and close that I could get it to work in After Effects. Unfortunately duplicating the eye broke the black eyelids from aim constraints towards the camera. I again did some more digging and found that duplicate special and duplicate input graph made the eyes face the camera again. Unfortunately this duplicated the camera too so I tested it on duplicate input connections and it worked fine.

Fig. 6 A GIF showing the eyelid animation
Maya would crash reliably after “duplicating special” for each animated eyelid, but as long as I saved it each time I could progress. After adjusting the keyframes so that they would blink open at you just before passing I rendered them off again as an image sequence and applied them over a precomposition of the existing eyes so as to not interfere with the existing luma matte pass.
I was much happier with the result:
Fig. 7 A render of the final wormhole with blinking eyes.
References:
Magritte, R. (1928). The False Mirror. [Painting].
Passmore, V. (2019). Eye Blend. [3D Model]. Available at: https://sketchfab.com/3d-models/eye-blend-a8259f43d41e4204a7e9746dfd112c30 [Accessed 09 February 2024]
renemagritte.org (n/d). The False Mirror, 1928 by Rene Magritte. [Online]. Available at: https://www.renemagritte.org/the-false-mirror.jsp [Accessed 09 February 2024]
0 notes
Text
Research into Immersive Experiences
Blog Post #3 ( Sherlock: The Official Live Game )
Sai Pratyaksh Epari (MA Game Art and Design)
What is Sherlock Holmes?
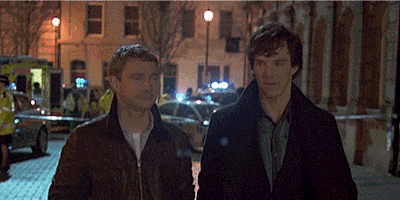
A contemporary retelling of Sir Arthur Conan Doyle's detective novels, "Sherlock Holmes" on the BBC stars Benedict Cumberbatch as Sherlock Holmes and Martin Freeman as Dr. John Watson. The show, which is set in modern-day London, centres on the intrepid but eccentric detective Holmes and his devoted partner Watson as they use cunning and deductive reasoning to solve intricate crimes. BBC's "Sherlock" has captivated audiences worldwide with its clever writing, dynamic characters, and captivating mysteries, garnering critical acclaim and a devoted fan base. The show is a must-watch for lovers of crime dramas and classic literature alike because of its contemporary interpretation of the legendary detective, which gives new life to the timeless stories of Sherlock Holmes.
youtube
Sherlock: The Official Live Game lets you play detective! Discover a series of clues, puzzles, and codes that must be cracked as you play this immersive escape game from the creators of the popular BBC TV series. assemble your most prestigious team of adventurous friends to locate crucial evidence and unravel the mystery. Explore the show's recognizable sets with a lot of assistance from the cast, which includes Martin Freeman, Andrew Scott, and Benedict Cumberbatch. You should not miss this!
References:
Sherlock (no date). https://www.bbc.co.uk/iplayer/episodes/b018ttws/sherlock.
West End Theatre (2023) Sherlock The Official Live Game - trailer. https://www.youtube.com/watch?v=N49N742nYCE.
0 notes
Text
Research into Immersive Experiences
Blog Post #2 ( Dopamine Land: A Multisensory Experience )
Sai Pratyaksh Epari (MA Game Art and Design)

Dopamine Land offers visitors a unique multisensory experience designed to stimulate feelings of happiness through the release of dopamine. The immersive attraction features various activities carefully crafted to trigger this neurotransmitter, known for its role in regulating mood and pleasure. One highlight is the interactive sensory museum, where guests can explore exhibits specifically designed to elicit dopamine release, providing a sense of joy and fulfillment.
In addition to the sensory museum, Dopamine Land offers a range of other engaging attractions. Visitors can participate in activities such as pillow fights, meditation with fire lanterns, and immersive digital landscapes, all aimed at enhancing the overall mood and creating a sense of blissful escape. The attraction caters to visitors of all ages, with late evenings providing an adult-friendly atmosphere for those seeking relaxation and enjoyment.
Photography enthusiasts will appreciate the colorful settings and surroundings at Dopamine Land, providing ample opportunities for unique and memorable photographs. From vibrant backdrops to whimsical displays, every corner of the attraction offers a visually captivating experience.
Guests can also indulge in refreshments at the Bubble Bar, where they can sip on bubble tea while surrounded by a sky filled with bubbles, adding an extra element of whimsy to their visit.
The overall experience at Dopamine Land typically lasts between 25 to 30 minutes and is suitable for all ages, though children must be accompanied by an adult. It offers a chance for visitors to immerse themselves in a world of happiness and wonder, with each activity carefully curated to provide a sense of joy and fulfillment.
youtube
References:
Dopamine Land London Tickets | Fever (no date). https://feverup.com/m/109997?utm_source=affiliate&utm_medium=impact&utm_campaign=&utm_content=1236178_Immediate%20Media%20Company%20Limited&irclickid=0rpSqxQWOxyPT:8xdbzcIRDuUkHw9bWVmxooxs0&irgwc=1.
Specialduo Explores (2022) Dopamine Land | A Multisensory Immersive Experience | London 2022 | 4K Quality. https://www.youtube.com/watch?v=12804cEDC2k.
0 notes
Text
Research into Immersive Experiences
Blog Post #1 ( Squid Games )
Sai Pratyaksh Epari (MA Game Art and Design)

What is Squid Game?
The South Korean television series "Squid Game" shot to global fame after it debuted on Netflix in September 2021. The plot of Hwang Dong-hyuk's show centres on a group of desperate people who enter a deadly competition in the hopes of winning a sizable cash prize. The contestants, who are set in a dystopian society, are made to play kid-friendly games, with fatal results for the losers. The show explores themes of survival, socioeconomic disparity, and the human condition; its compelling storytelling and provocative social commentary captivate viewers. With its rapid rise to fame, "Squid Game" sparked discussions and debates about its underlying themes and effects on viewers all over the world.
youtube
The Immersive Gamebox offers a simulated version of the hit TV series "Squid Game," providing a 60-minute experience where participants can engage in the games featured in the show. Adapted from the series, this immersive experience includes six thrilling games: Red Light, Green Light, the Honeycomb Challenge, Tug of War, Marbles, and Glass Stepping Stones, concluding with Squid, a classic children's game.
References:
D'Addario, D. (2021) 'Variety,' Variety, 13 October. https://variety.com/2021/tv/reviews/squid-game-tv-review-1235084305/.
Squid Game (TV Series 2021– ) ⭐ 8.0 | Action, drama, Mystery (2021). https://www.imdb.com/title/tt10919420/.
Santikos Entertainment (2022) Squid Games Immersive Gamebox Experience at Santikos! https://www.youtube.com/watch?v=3_Glxx5ZC_U.
0 notes
Text
Developing the Experience
Blog Post 6
Liangying Wang (MA Game Art and Design)
After we exported the first scene at the altar, Sai pointed out that it was probably only 50 seconds for all the scenes combined, not enough time. So I was looking at the storyboard that Angelique had drawn up, and she had the idea that we could write a postscript to the story, telling a story about the disappearance of the altar years later. I thought it was a great idea, and I saw that Sai's scene had a desert ruin feel to it, so I was going to do a desert "death" altar, and get out of the desert quickly.
My reference was the design from Blade Runner (Santini, 2019). Here's a screenshot from the film.

There are other artists (Stuart, 2019) and (Stuart, 2020), who also do desert-type theology of intention-type images.


Plus I had my model of a skeleton monster, which felt very much in line with "death".

So I put it into the Unreal Engine as follows. There is only a little bit of water left in the altar, the rest of it is going to be filled with sand, and the giant stone statue seems to be begging for help.

At first, Angelique proposed, to add the animation of the crow staying. But I tried the following with not very good results. Because I can't find the assets of the standing crow.
So I changed to add a smoke effect, the effect is as below.
And I exported it as a 360° panorama, which works pretty well.

Reference
Santini, P (2019). Blade Runner 2049 cinematography. [image]. https://www.santiniphotography.com/blog/blade-runner-2049-cinematography/. [Accessed 7 Feb 2024]
Stuart, L (2019). April Everydays 2019. [image]. https://www.behance.net/gallery/79741017/April-Everydays-2019. [Accessed 7 Feb 2024]
Stuart, L (2020). May Everydays 2020. [image]. https://www.behance.net/gallery/98648449/May-Everydays-2020. [Accessed 7 Feb 2024]
0 notes
Text
Developing the Experience
Blog Post 5
Liangying Wang (MA Game Art and Design)
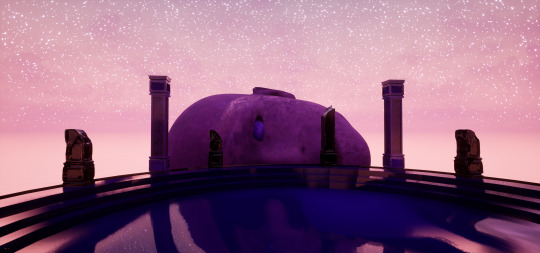
I've got the whole lake and face scene done last time, next, I'm going to start making, the eye pillar through the disc.
Here's my Zbursh scene modelled.


Then start texturing with Substance Painter.
Here are my texture.

In the Unreal Engine scene, my eyes are as follows.


And I started trying to animate it in Maya.

I watched some YouTube instructional videos on Maya animation. I followed the instructions and did my eye animation.
But when I showed it to Neil the next day, I found that the origin was not correct, so Neil taught me how to return the origin to 0.
After adding the animation, the whole scene behaves as follows.
My team members and I tried to export a 360° panorama as follows.

It feels like it works pretty well.
0 notes
Text
Developing the Experience
Blog Post # 4
Angelique Shelley (MA Concept Art)
I was a little concerned with the running time of our group’s production, so I pitched an idea of some 2D animations to buffer out the total time. The idea would expand the concept and add some more shape to the narrative. There would be three different scenes from different times after judgment day, we would be seeing the world years and years in the future and then moving back in time to the judgment day. The statues will also show the progress of time by slowly rising out of the ground after falling, and being overgrown. The degrading statue would be a repeating focal point, his true identity would slowly be revealed as the creature that destroyed the world, which would add a fun twist. While not very clear in this story board, frame 6 would visually allude to this more by having some cracking and flaking of stone revealing patches of its grotesque skin.
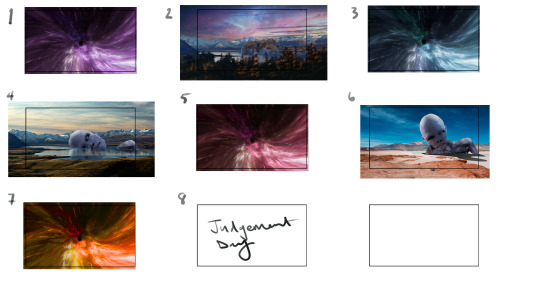
Fig. 1 The storyboard for the 2D additions pitch.
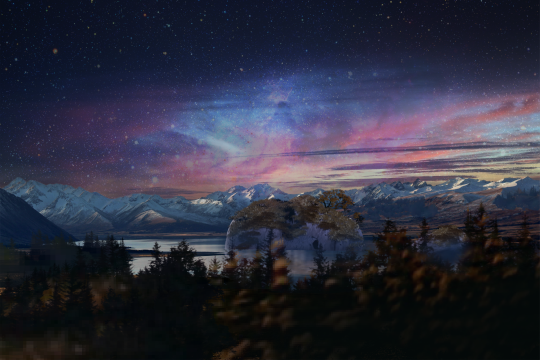
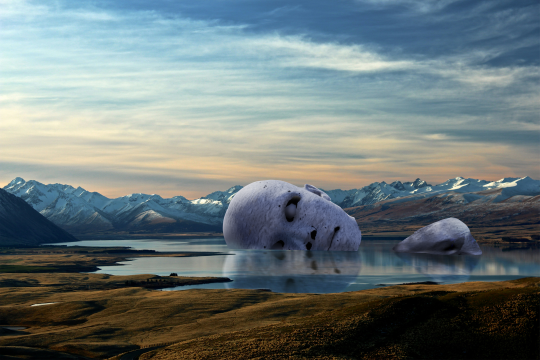
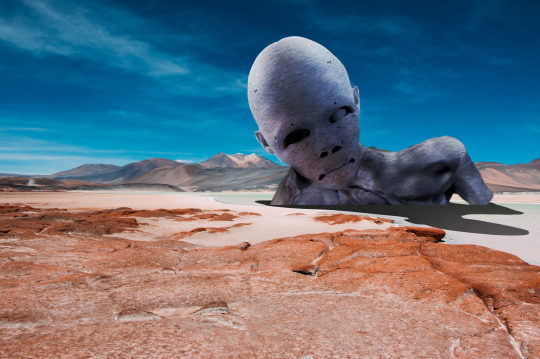
Fig. 2 The keyshot images I created for the storyboard using Liang's statue and creature
To create a 180 degree environment quickly, I decided to look at mirroring the image and creating a spherical image (see fig. 3). For the animation, I created a cylinder in Maya and learnt how to do camera-based projection. I also learned how to render out a playblast to test it. The render would be just a surface shader, meaning that I could use the animation of the image without the lighting information from the scene affecting the geometry.
Fig. 3 The playblast showing the animation idea.
In the end, Liang suggested she and Sai could render out their scenes at 0.5 speed, and I could make my portal animation longer without the above landscapes, Ana expressed concerns about whether it would be cohesive with the aesthetic of the piece. There was discussion around including this at the end if there was time, but it was ultimately decided against.
References:
Ibañez, A. (2018). The Orion Nebula, Castillo de Villamelefa, Barcelona, Spain. [Photograph]. Available at: https://c02.purpledshub.com/uploads/sites/48/2019/12/08-Alberto-Ibanez-Orion-Nebula-d32cbed.jpg?webp=1&w=1200 [Accessed 07 February 2024]
Jimenez, D. (2017). person walking in distance of mountain. [Photograph]. Unsplash. CC BY-SA. Available at: https://unsplash.com/photos/person-walking-in-distance-of-mountain-HNOaMthcq0w [Accessed 07 February 2024]
Jor4gea (2023). Purple and blue galaxy wallpaper. [Online]. Available at: https://wallpapercave.com/w/wp4247401 [Accessed 07 February 2024]
Keller, T. (2016). Landscape photography of lake and mountain. [Photograph]. Unsplash. CC BY-SA. Available at: https://unsplash.com/photos/landscape-photography-of-lake-and-mountain-73F4pKoUkM0 [Accessed 07 February 2024]
Wallpaperwolf (2024). Space-Dust … [Online]. Available at: https://www.chromethemer.com/wallpapers/8k-wallpapers/space-dust-wallpaper-8k.html [Accessed 07 February 2024]
0 notes
Text
Developing the Experience
Blog Post 4
Liangying Wang (MA Game Art and Design)
After I made a draft in MAYA, I used Substance 3D Painter to texture the columns in my scene. It looks like this


Because of the thought of Sai's scene being post-apocalyptic and destroying the city, in discussion with Sai, I changed the columns to broken ones using the complete columns I used to have in Maya. So the columns are broken.
I'm going to use a plaster-type material for the faces.


This is what the material looked like when I first started on it in Unreal Engine, and considering the pillar face and the disc staircase floor, the material didn't have levels all blended, so I considered changing the material.

I deepened the texture of the face on the back and changed the stairs and planes to a running water texture, which worked great. And because of the textures, we had "animation", which solved our group's dilemma of lacking an animator.
Later on, I saw Angelique's work, her main colour scheme was purple and pink, and it had the feeling of travelling through the stars. To better connect the second part, I changed the sky box tonight and changed the main colour scheme to pink and purple as well.
Next, I'm going to be thinking about how to make the eye pillars and additionally animate the pillars.
0 notes
Text
Developing the Experience
Blog Post # 3
Angelique Shelley (MA Concept Art)
Final Render of Base Layer for Portal
0 notes
Text
Developing the Experience
Blog Post # 2
Angelique Shelley (MA Concept Art)
To begin creating the portal, I experimented with setting up a camera animation through some planets/spheres in Maya and choosing Arnold VR in the render settings (see fig. 1).
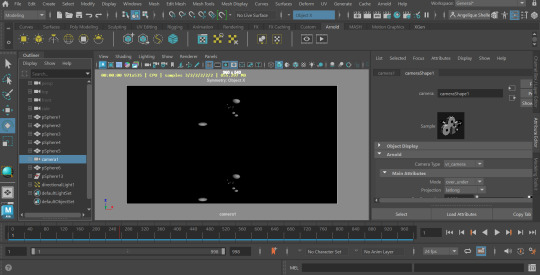
Fig. 1 A screenshot of Maya before rendering out the spheres.
Fig. 2 A brief test to see if the VR render would output to dome format correctly.
I rendered out a couple of seconds as a test and output it into dome format, but there was something amiss with the way it was rendered (see fig. 2). It may be due to traveling vertically rather than horizontally and the eye-spacing setting. This needs some troubleshooting, so I moved onto the bulk of the portal animation which was the portal effect itself and I’ll attempt to correct the 3D aspect later.
youtube
Fig. 3. How To Make a Portal Tunnel In After Effects (EASY), LuCa, 2023.
I had decided to use After Effects to create the portal after some research into tutorials and was fairly confident I could do it. I followed a tutorial (see fig. 3), but it was slow and arduous as I'm fairly new to After Effects and they used unspecified hotkeys I did not know, I also had to reverse engineer a plugin that I did not own with blending modes. I had trouble with After Effects interpreting the camera settings in the tutorial shown. I realised belatedly that it was still set up for dome output. I reset my composition settings and had to restart the tutorial. Despite this steep learning curve, the initial result was really convincing and I was able to apply the technique to new layers, building a richer image, such as the stars in fig. 5&6. Because I chose not to warp the stars it created a 3D parallax effect. I attempted using alternative source images for the portal effect, but none worked as well as the detailed nebula in fig. 7.
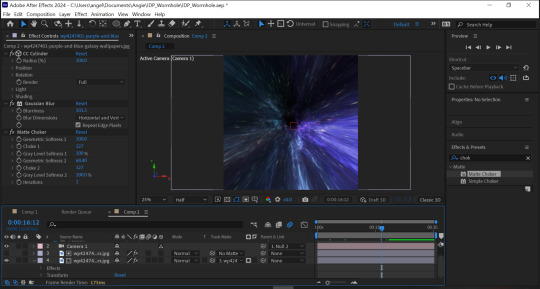
Fig. 4 A work in progress shot of the portal.
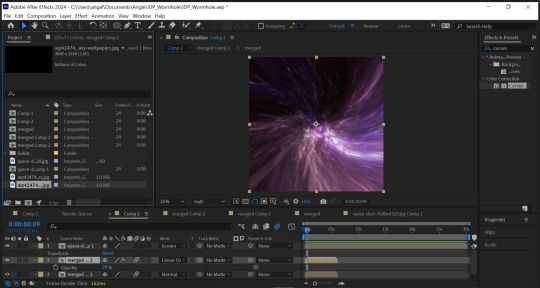
Fig. 5 I applied a starry effect to the portal with a different animation type and speed.
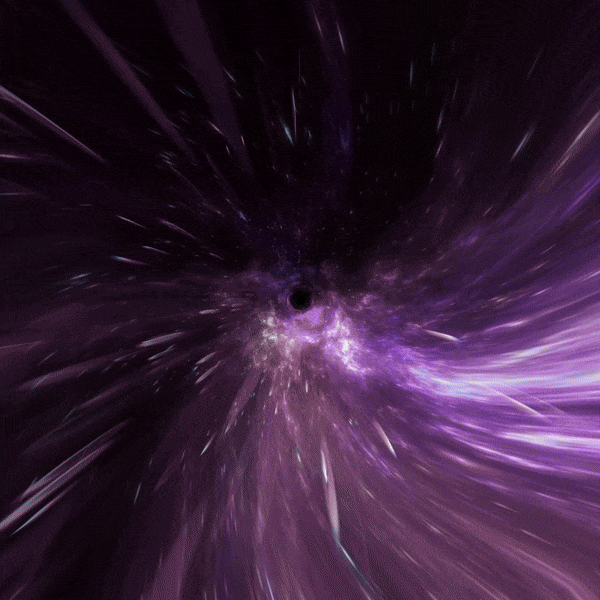
Fig. 6 A GIF showing the 3D parallax effect.
I wanted to further enrich the portal and lengthen the time, so I precomposed my work yet again (this would be the fourth time to achieve the effect) and offset two duplicate layers all on a screen blending mode and faded them into one another using opacity and keyframing. I also needed to conceal the “black hole” that was created from the edge of the source image. I took the source images into Photoshop and painted in a black, feathery edge to help soften the fade, I also offset the image and removed the seam for clean wrapping (see fig. 7&8).
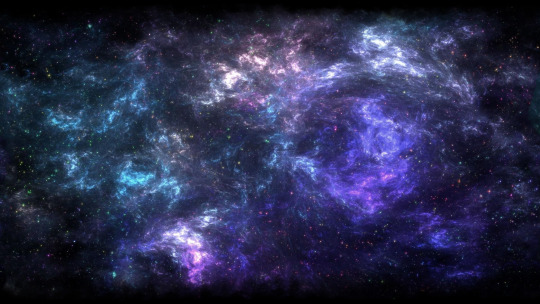
Fig. 7 Purple and blue galaxy wallpaper, jor4gea, 2024, altered for better fading.

Fig. 8 Space-Dust …, Wallpaperwolf, 2024, altered for better fading.
I precomposed again, scaled it down and created a circle mask about the same size as the hole. I then increased the feathering as much as I could. There was still a visible black dot, so I repeated the above technique only pulling from another part of the portal. I added a gaussian blur to this to reduce the amount of animation (see Fig. 9). The final result is quite effective (see Fig. 10). To tie into the original portal concept and to prepare to transition into the final scene, I added a hue/saturation effect to turn the portal red. I rendered the portal using Adobe Media Encoder.
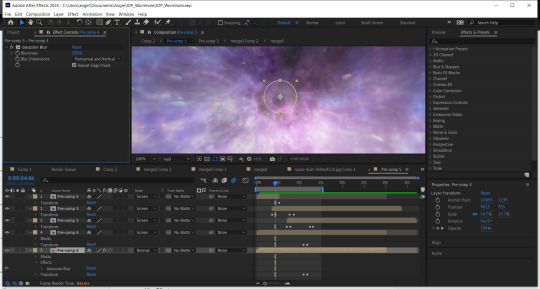
Fig. 9 A screenshot showing my keyframes for the fades and my feathered and blurred mask to conceal the “black hole”.
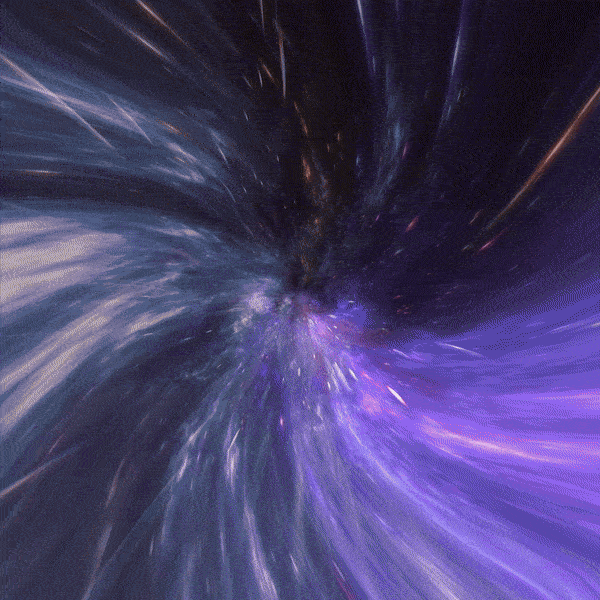
Fig. 10 A GIF showing a part of the final render of the base portal, please see separate blog post for full render.
References:
Jor4gea (2023). Purple and blue galaxy wallpaper. [Online]. Available at: https://wallpapercave.com/w/wp4247401 [Accessed 07 February 2024]
LuCa (2023). How To Make a Portal Tunnel In After Effects (EASY). [Video]. [Online]. Available at: https://www.youtube.com/watch?v=MHipcwcsZ0k [Accessed 07 February 2024]
Wallpaperwolf (2024). Space-Dust … [Online]. Available at: https://www.chromethemer.com/wallpapers/8k-wallpapers/space-dust-wallpaper-8k.html [Accessed 07 February 2024]
0 notes