
Statistics
We looked inside some of the posts by 30daysofbread-blog-blog and here's what we found interesting.
Average Info
Notes Per Post
8
Likes Per Post
7
Reblog Per Post
0
Reply Per Post
1
Time Between Posts
13 days
Number of Posts By Type
Photo
14
Text
3
Last Seen Tumblr Blogs


Fun Fact
Tumblr was attacked by a cross-site scripting worm deployed by the Internet troll group GNAA on Dec 3, 2012.
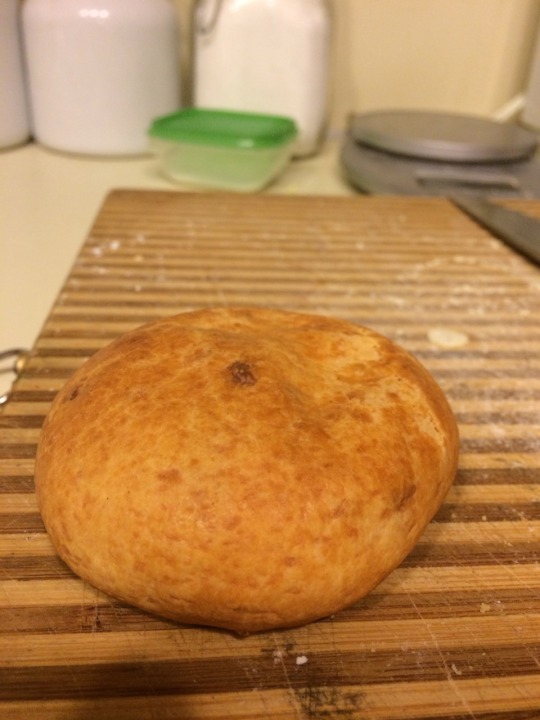
Photo
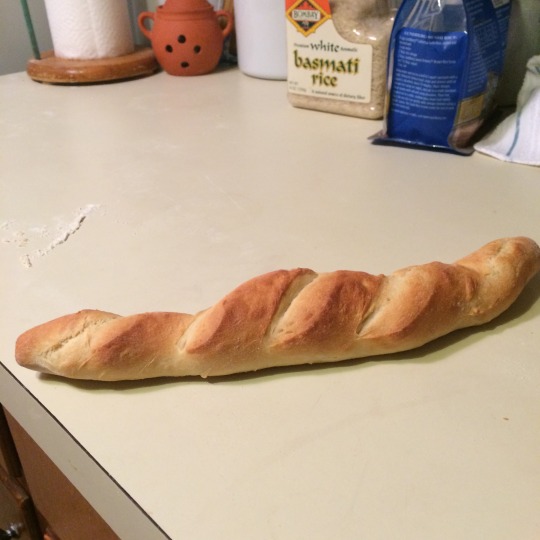
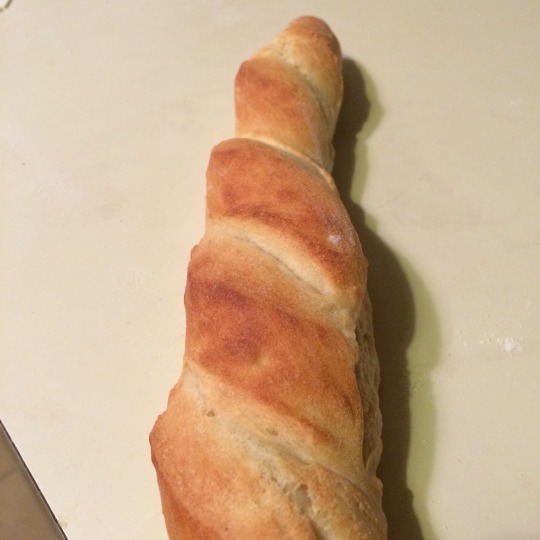
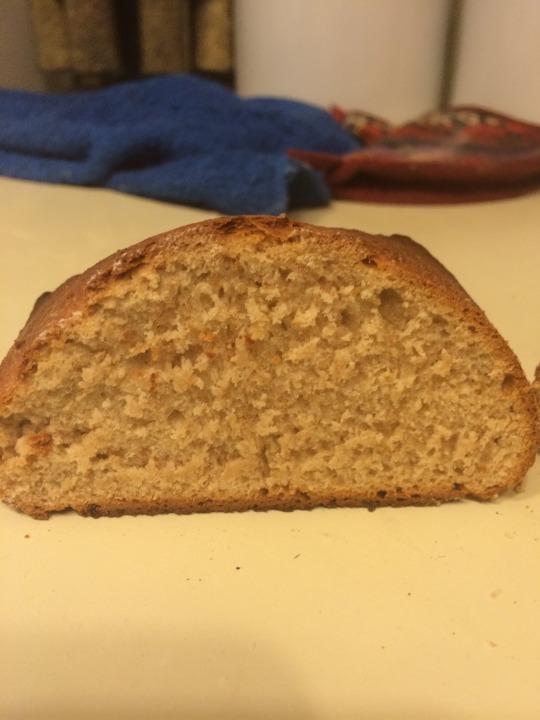
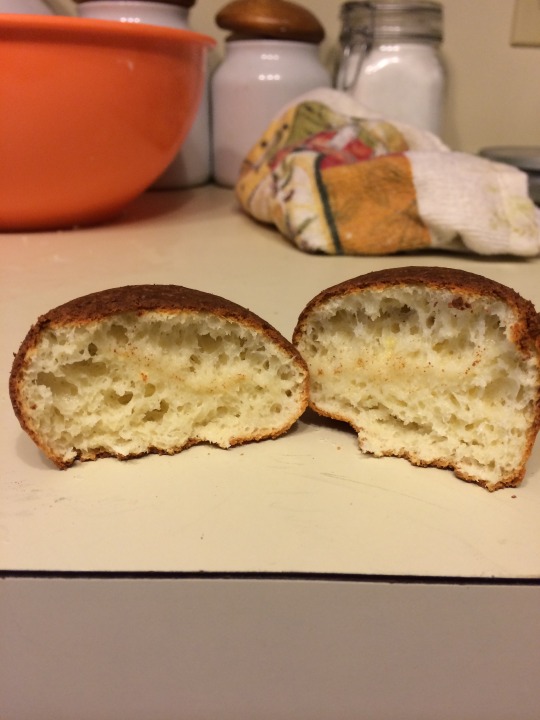
Every Latin American country has its own version of French Bread. All it really means in Colombia is a white bread made with a sponge (in the French style). I shaped mine to look like mini baguettes (although my technique could use some work), but you can shape your French bread however you like.
Pan Frances Colombiano
Sponge
150g Bread Flour
150mL Water
20g Yeast
Dough
Sponge
350g Bread Flour
175mL Water
12g Salt
10g Malt Extract (optional)
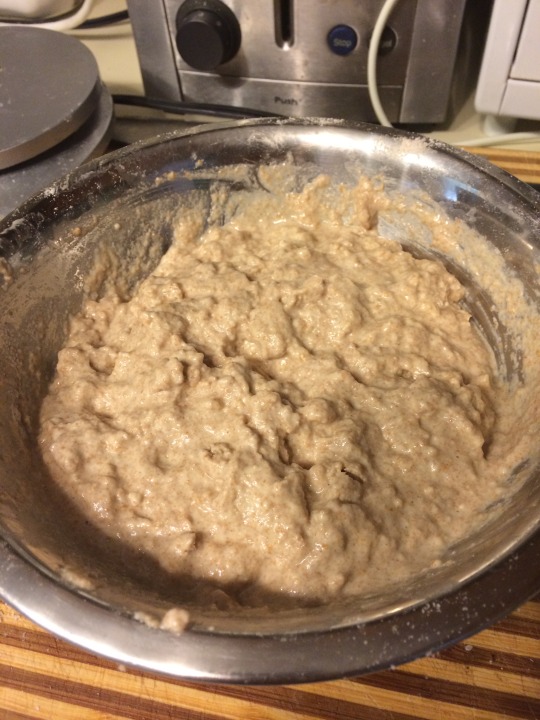
Make the sponge with the ingredients listed above. Let the sponge sit covered for at least 2 hours and as long as overnight. What the sponge is doing is kickstarting the fermentation process for the yeast. In theory, the longer you let your sponge sit the more complex the taste of your bread should be.
Place the remaining ingredients into a mixer along with the sponge and mix until you form a dough. Let the dough mix for at least 10 minutes to develop gluten. Or if you're feeling up to the task you could knead it by hand.
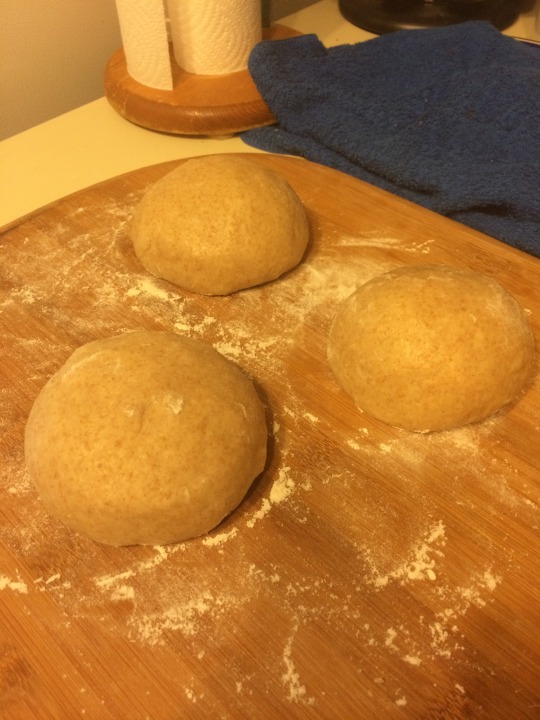
Form the dough into a ball and let it rest for an hour. Preheat your oven to 500F. Cut the dough into smaller balls and shape them however you'd like. If you want a soft exterior you could brush the dough with water before placing it in the oven. Bake the breads for about 12-15 minutes (again it depends on how big your breads are. But you will know when they are done by noting when they have a golden brown color and by tapping on the bottom of the bread. It should sound hollow.
1 note
·
View note
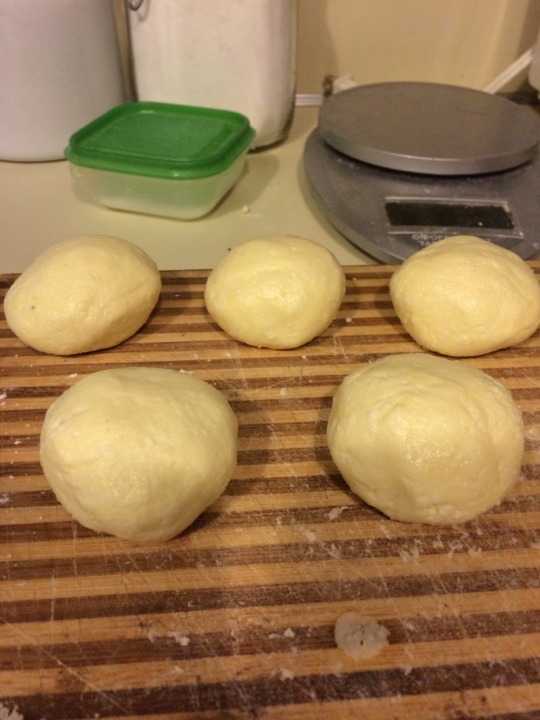
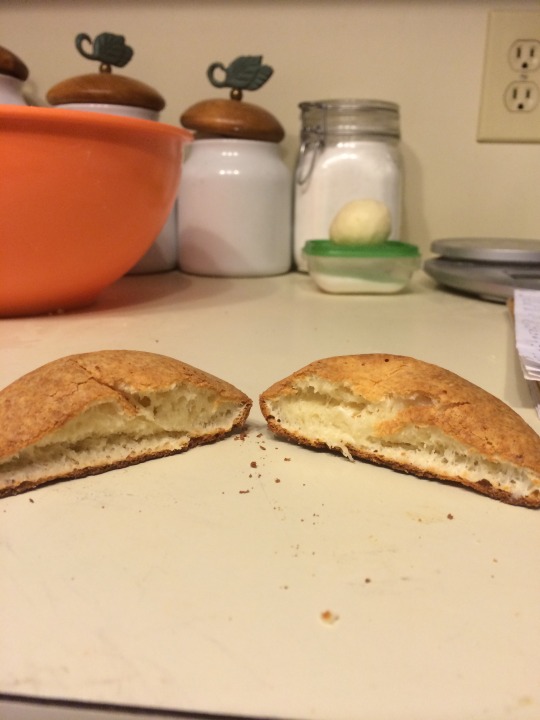
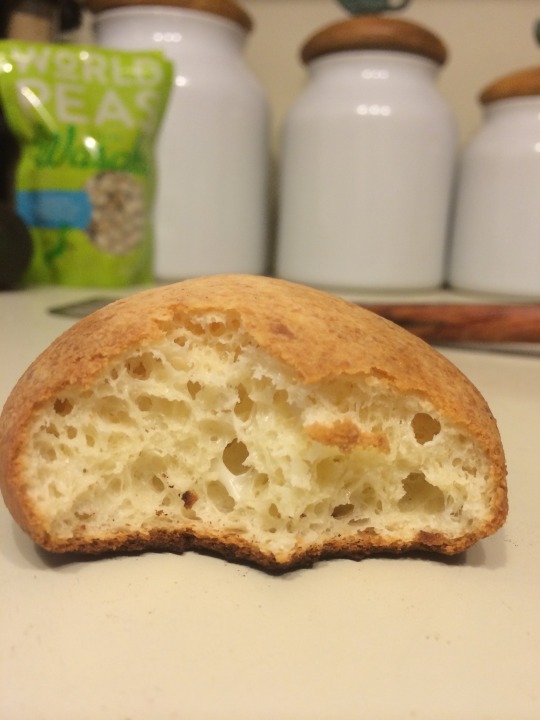
Photo

One of my all time favorite Colombian breads is the almojabana. It originated in the Iberian Peninsula in Spain during the Arab occupation. The word is derived from the arabe mojabana, which is a cake made from wheat flour, cheese, egg, butter, sugar and is fried. The Colombian variety is formed into little rolls and baked at a high temperature until it gets some color.
The recipe below is in baker's percentages. So if the cheese amount is 100g then the remaining ingredients will be a percentage of the 100g (ex. cornstarch will be 25g).
The cheese I used in the recipe was feta cheese, but queso fresco would be interchangeable.
Almojabanas
Feta Cheese 100%
Cornstarch 25%
Yuca starch 12%
Powdered Milk 9%
Sugar 9%
Butter 9%
Egg 2%
Baking powder 1%
Water as needed
Preheat the oven to 450F. Let the butter sit at room temperature until it is malleable. Grate the cheese and mix it with the starches and baking powder. Add the powdered milk, sugar, and salt. Mix in the egg and softened butter. Add some water (drop by drop) and continue to knead the bread until it just comes together. It is important to add the minimum amount of water necessary to bring the dough together. If the dough is too wet the almojabanas won't rise.
Form small balls with the dough and place them on a baking sheet. Place the sheet into the heated oven and bake for about 15 minutes (it depends how big you make your balls) or until they are golden brown.
1 note
·
View note
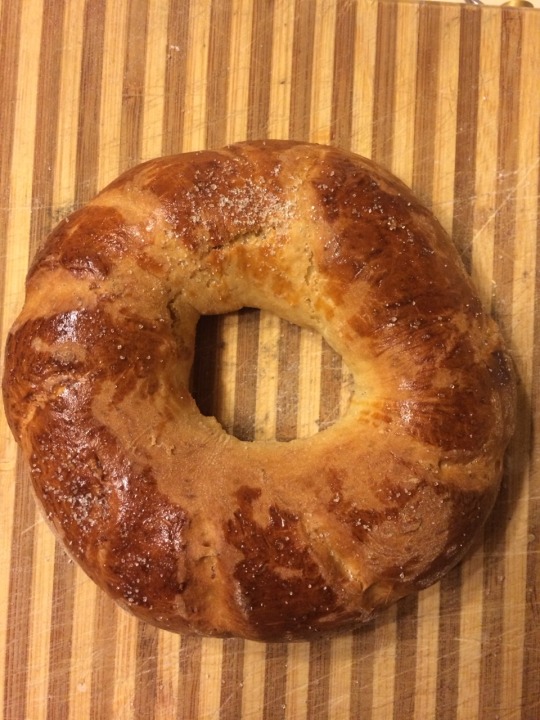
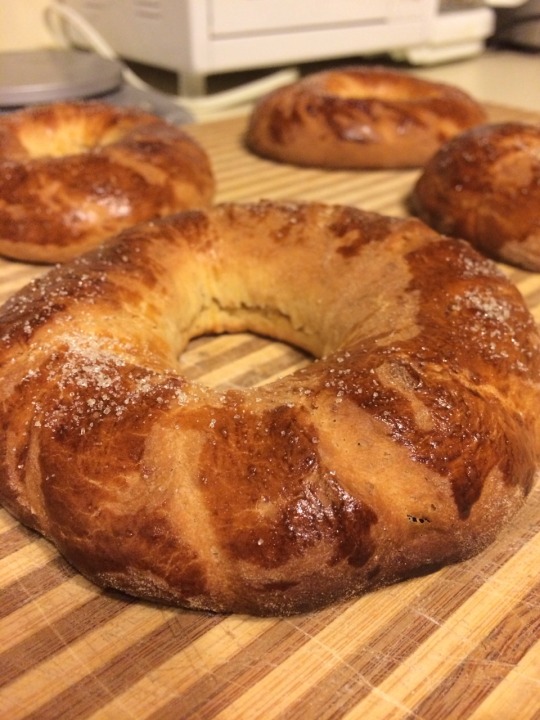
Photo
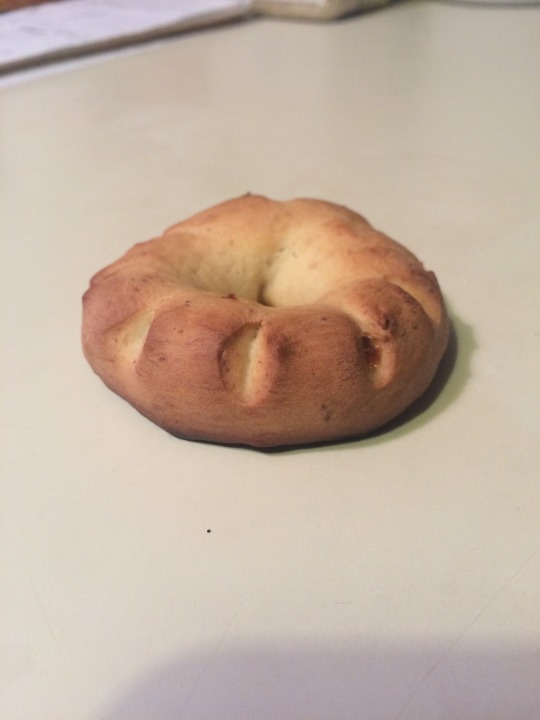
Feliz (day after) dia de los reyes! It was only appropriate that I tested the recipe for roscones. Or, in this case, rosconcitos. I'm happy to say they came out well. The true secret to a great roscon isn't how it's baked though, it's what you fill it with! I filled my rosconcitos with bocadillo which is made from guava. You could also brush a mix of egg and milk onto the roscon and then cover it with granulated sugar to give it that extra holiday edge.
The following recipe is in Baker's Percentage. It's an easy way to scale recipes up or down. All you do is pick the desired weight for your flour (100%) and calculate the amounts for the remaining ingredients. For example, If you use 100g of flour you would use 40g of water, 30g of sugar, and so on.
Rosconcitos
100% All Purpose Flour
40% Water
30% Sugar
10% Egg
8% Yeast
12% Butter
1% Salt
.5% Orange Zest
Desired Filling (I used Bocadillo)
Mix the flour, yeast, and salt in a bowl. Place the butter and sugar into a mixer and mix until it creams. Add the eggs and orange zest to the mixture. Add the flour mixture followed by the water to the mixing bowl.
Let the dough mix on medium high for 10 minutes to build of gluten. Lightly flour the surface of a counter and place the dough onto the counter. Form the dough into a ball and cover with a towel. Let the dough rise for at least 2 hours.
Preheat the oven to 400F. Cut the dough into smaller portions (Mine were about the size of a golf ball) and form them into balls. Let rise, covered, 45 minutes. Flatten the balls and fill with desired filling. Roll them into tubes and use a lame, razor, or knife to make slits. Pinch the two ends of the tube together to form a donut shape. Use an egg/milk wash and sprinkle sugar onto the tops. Let rise 15 minutes.
Bake in the preheated oven for 15-20 minutes (depending on how big your rosconcitos are). They are finished when the tops are golden brown.
0 notes
Text
Recipe Testing- Molletes
It's been a rough couple of months. A lot of things on my plate and not enough time to do them all. I apologize for the inactivity in the blog, but a new year means a resolution to finish this project as soon as possible.
The hardest part of the project is recipe testing and that's what I'm working on now. I have the recipes I collected in Bogota, but now I have to make sure they work. And once I make sure they work as I collected them I have to convert them from volume to weight measurements. I think I collected about 30 recipes (give or take) and it will be no small feat to get through them all.
But I'm happy to say I have a successfully tested recipe to add to the blog today: Molletes de Cauca. Molletes are anis flavored coffee rolls. The anis adds some sweetness to balance out a slightly bitter cup of coffee. Next up, Mostacones de Nariño!
Molletes
-500g flour
-1/2c sugar
-125g butter
-1 cup warm water
-1 T yeast
-1 T salt
-1/2 t ground anis
Dissolve the yeast in a little bit of water. Mix the sugar and butter until it comes together. Add the flour, salt, and anis to the butter mixture. Add the water until the dough comes together. Knead the dough to build of gluten. Let rise, covered in a warm place from at least 2 hours. Form into rolls and let rise 30 minutes. Bake in a preheated oven at 350F for 25 minutes or until golden brown.
0 notes
Text
Whole Wheat Pita
I've spent the last few weeks in front of a computer rather than an oven and I have to say it feels unnatural. I've gotten so used to testing (and tasting) recipes that I've decided I have to split my time between the two to feel at peace again. To be honest pita is not at all a Colombian bread, but my partner just got back from Israel so Pita's been on my mind lately. Once again I like the idea of baking with whole grains so here's a recipe that should make healthy, fluffy, ballooned pita every time! (This isn't my recipe by the way it's borrowed from King Arthur Flour Whole Grain Baking):
1.75 cups(7 ounces) whole wheat flour
1.5 cups (6 3/8 ounces) bread flour
1.5 teaspoons salt
1.5 teaspoons yeast
1.25 cups (10 ounces) warm water
2 Tablespoons (7/8 ounces) olive oil
Mix all of the ingredients until you have a soft dough that feels tacky to the touch. Cover and let rise until doubled.
Place a baking stone in your oven and heat it to 450F. After the dough has risen divide it into two on a floured surface. Divide the two halves into 4 equal portions to form rough balls. Let the dough balls rest 10 minutes (this will allow the gluten to relax and make the balls easier to roll out).
Using a rolling pin roll each ball into a circle about 6 inches in diameter and less than 1/4 inch thick. Load the pitas onto the baking stone 2 at a time and bake for 3-4 minutes until they go into a full balloon. Turn them over once to assure even coloring on each side. Remove them and place on a kitchen towel. Enjoy!
0 notes
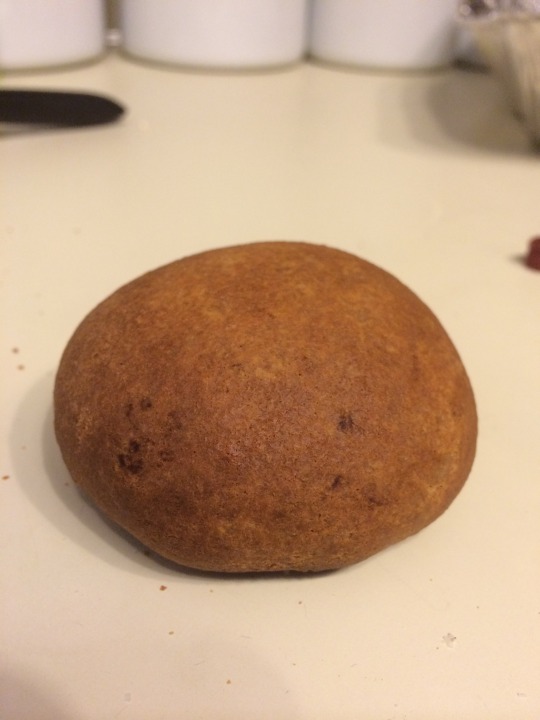
Photo
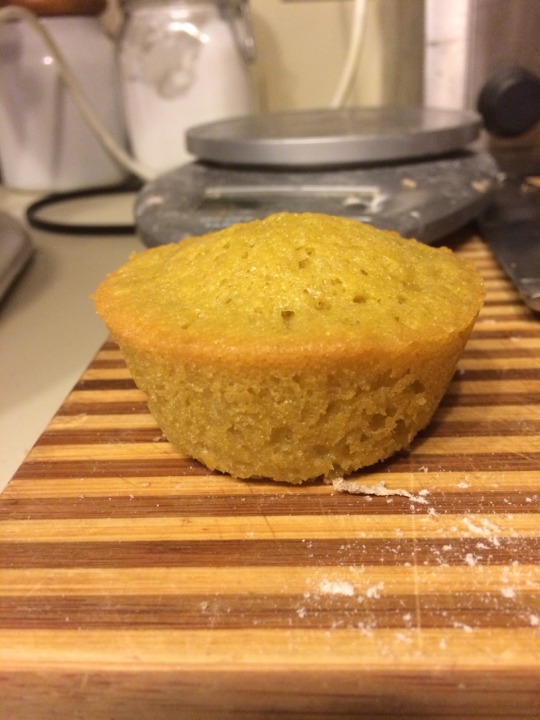
Pan de Cafe
What would a recipe book on Colombian breads be without a coffee bread? These breads are often made in bread molds and sold whole or by the slice. Since I was only testing out the recipe I decided to scale it down and bake them in muffin pans. I tweaked the original recipe a bit by adding more coffee than it called for and I think it could still use more coffee. I'm going to test it out again with a higher coffee % and see where its best balanced.
Bread flour 100%
Baking Powder 1%
Butter 87%
Sugar 87%
Egg 100%
Coffee 30%
Milk 10%
Preheat the oven to 300F. Mix together the ingredients and place the batter into a greased and floured bread pan (you can also use muffin pans like I did). Bake for 30 minutes or until a knife comes out clean.
1 note
·
View note
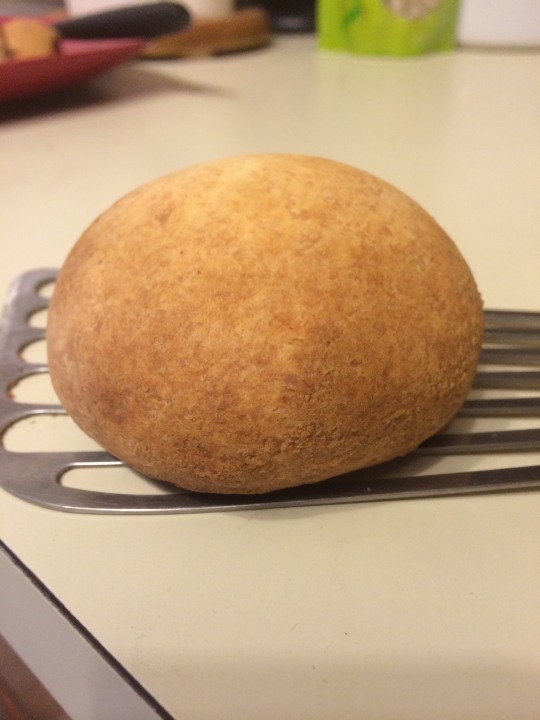
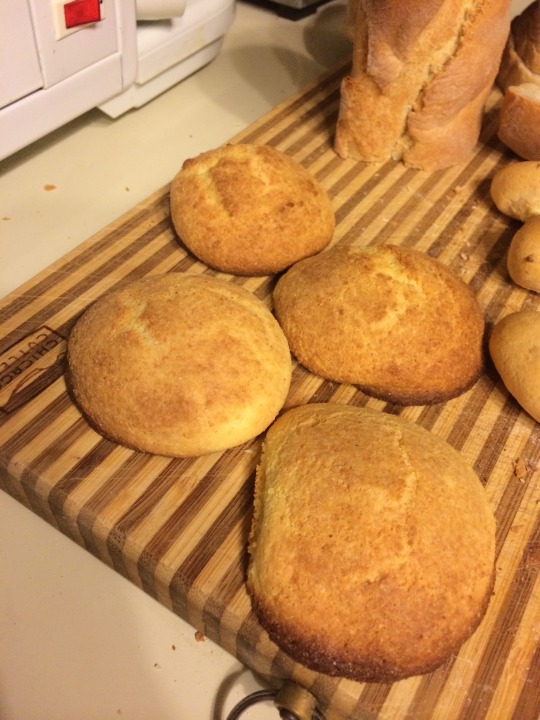
Photo


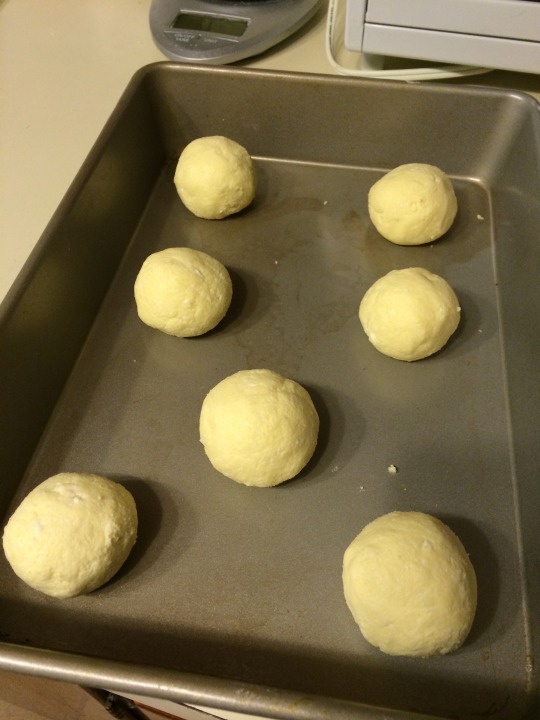
Mogollas Santafereñas
The mogollas were a beautiful success! The little experiment I set up yesterday worked and allowed me to avoid baking dense, tasteless mogollas. Instead they came out fluffy, nutty, and slightly sweet. And the best part is? I was able to take a recipe I obtained in Bogota and make it mine by tweaking the ingredients and techniques.
Soaker
-250g whole wheat flour
-275mL water
-5g salt
Mix together the ingredients in a bowl, cover with plastic wrap, and let sit overnight on the counter. What you're doing here is soaking the whole wheat flour to help break down some of the starches into simpler sugars for the yeast to consume.
Dough
-Soaker
-110g sugar
-75g butter
-20g yeast
-20g milk powder
-250g bread flour (or as needed)
I used a kitchen aid for this dough because it was a wetter dough than normal. If you don't have a kitchen aid you can also mix it by hand, but you have to use the "wet hands" method to keep it from sticking to your hands.
Preheat our oven to 400F. Start by creaming the butter and sugar until it is well mixed. Add the milk powder and yeast and continue to mix until homogenous. Add the soaker and continue to mix. Add the flour bit by bit until the dough starts to come together (for me it took about 200g of flour, but it can vary depending on where you are and the moisture in the air). You don't want a completely dry dough, but you also don't want it to stick to everything. What you're looking for is a slightly tacky consistency. What this means is you want the dough to stick to your finger if you touch it, but not break apart from the rest of the dough when you remove your finger.
If you're not using a kitchen aid there is a nice little trick for kneading wet doughs. What you do is wet your hands in some water and then begin folding the dough over itself. You start on one side and fold the top to the bottom. Then you turn the dough clockwise 90 degrees and repeat. You do this 4 times per side and then flip the dough. Let it rest 10 minutes and repeat the process. Repeat the steps 4 times total (40 minutes) and your dough will have a nice gluten structure without having to knead.
Lightly flour a surface and break off pieces of the dough to form small rolls (I was able to make six from this recipe). Bake them for 15 minutes, rotate them, and bake them for another 15 minutes. At the end of the 30 minutes if they have browned evenly turn off the oven and leave them in there another 5 minutes. Take them out and let them rest until cooled. Enjoy!
1 note
·
View note
Photo
I have an exciting project under way! In the typical bakeries in Bogota you won't find many whole grain breads. They may have the occasional whole wheat loaf that is denser than a day old meatloaf, but other than that you're out of luck. Bogota bakeries often do, however, have what are called mogollas. Mogollas are brown rolls which historically were breads made with a mix of white and whole wheat flour. They were often thought of as bread for the poor because they were tainted by whole wheat brown flour. I've had my fair share of mogollas santaferenas and they vary in terms of how much whole wheat flour is used.
I've been to bakeries that no longer even bother to use whole wheat flour and instead opt to use caramel coloring. Anyway I had the idea of upping the whole wheat flour % used to make mogollas and that's where the bowl of oatmeal above comes in.
However, it's not really a bowl of oatmeal. It's what's called a soaker in baker terms. A soaker is a mix of whole wheat flour, water, and salt. By soaking the whole wheat flour in salt and water we're giving the amylase time to break down the complex starches into simpler sugars in the flour. This allows the yeast to start consuming more sugar and reproducing faster when we make our dough. What this means for our final product is it should be airier (more yeast means more rise) and slightly sweeter (more residual sugar in the final bread).
Now this experiment could be a total flop and I could end up with rolls harder than rocks. But fortune favors the bold and we'll never know until we try!
0 notes
Photo
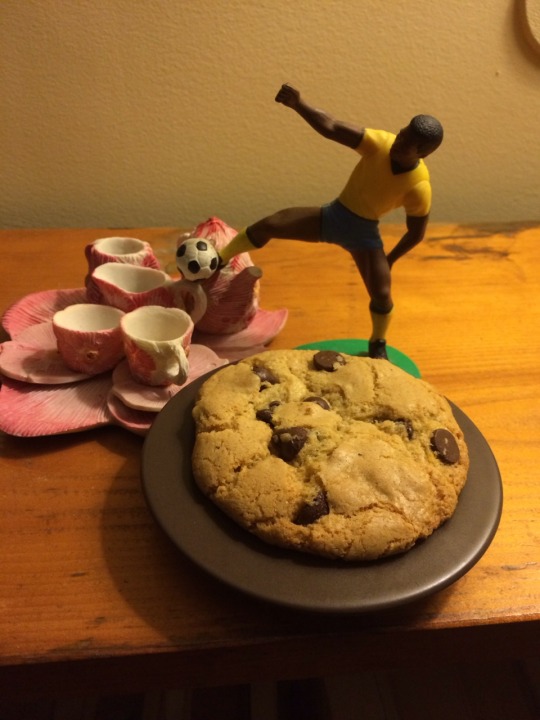
Chocolate Chip Cookies
Soo this isn't exactly related to the bread project, but these cookies turned out so good I had to share them. The secret ingredient for these cookies was bread flour, which came out of necessity because I ran out of all purpose flour. It was a pleasant surprise, however, as it gave the cookies a bit of airiness.
1/2 cup softened butter
1/2 cup white sugar
1/2 cup light brown sugar
1 egg
1 teaspoon vanilla extract
1/2 cup All purpose flour
1 cup bread flour
1/2 teaspoon baking soda
1/4 teaspoon salt
chocolate chips as needed (I used about a 1/4 bag)
Preheat the oven to 350F. Mix together the butter and the sugar until they are homogenous. Add the egg and vanilla extract. Next add the salt, baking soda, and flour. Mix in the chocolate chips and place the batter in the freezer for a few minutes to chill and let the gluten relax. Scoop the dough into balls and place on an ungreased baking sheet. Bake the cookies for 10 minutes, rotate them, and bake for another 8 minutes or until they are golden brown. Enjoy just in time for the world cup! Go Brazil!
0 notes
Text
Notes from Bogota and Pan Rollo
Hi y'all,
Just wanted to let you know that I spent much of today reading through my notes from Bogota. I'm trying to organize them as best I can so I can use them as a template for the book manuscript itself. I've started writing it and am making progress. I'll post the occasional paragraph from time to time so you can see the direction I'm heading in.
I also wanted to say that tonight I'll be making pan rollo, which is a bread similar to a croissant. It is a laminated dough (meaning you roll a piece of butter between some dough and then create layers) and is supposed to be airy and flaky. I feel like most people would fear making croissants, but pan rollos are great alternatives because the dough is a lot more forgiving.
0 notes
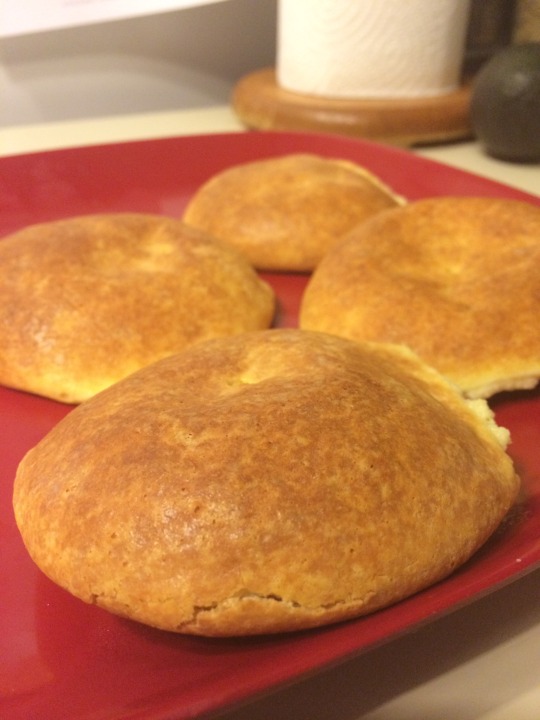
Photo
Pan de Bono del Valle
This was my first attempt at re-creating the pan de bono recipe in the states and I'm happy to say they came out great! Like I said in a previous post, pan de bono is a type of bread that was created in the valle de cauca region of Colombia. It is said that a farm called Del Bono first created and sold the bread as Pan Del Bono, but over time the name was shortened to pan de bono as others began to sell it as well. Pan de Bono is a cheese bread made from corn and yuca starch and traditionally is made with panela (cane sugar). You'll find pan de bono almost everywhere in Bogota. They are extremely popular with tinto (black coffee) in the mornings or at las onces (afternoon coffee and bread).
I posted the recipe using percentages again which allows you to scale the quantity size to however many breads you want to make. Remember that the ingredients are all based on the amount of queso fresco that you decide to use. So if you use 200g (100%) of queso fresco then the rest of the ingredients are scaled accordingly.
Queso Fresco 100%
Yuca Starch 75%
Cornstarch 25%
Egg 20%
Panela (Cane or Brown sugar) 9%
Butter 9%
Baking Powder 2%
Water as needed
Preheat the oven to 450F. Mix together the dry ingredients. Add the egg, cheese, and butter and mix until homogenous. Slowly add water until the dough comes together. Break off small pieces and roll them into balls. Place them on a baking sheet and leave some space between the balls. Bake them for 10 minutes and rotate the pan. Bake another 10 minutes or until they reach a golden brown color. Traditionally you're supposed to take a fork and make a mark on the top of the dough balls to signify that they are pan de bonos (which I forgot to do).
2 notes
·
View notes
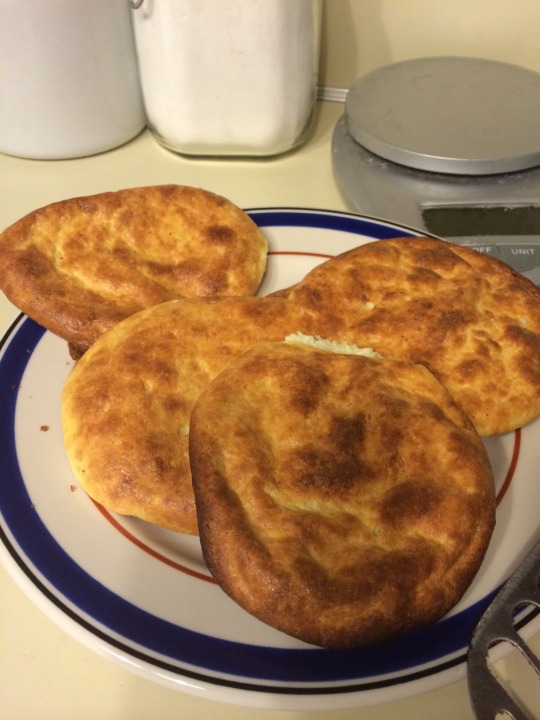
Photo
Roscon
Roscones are sweet breads that can be filled with bocadillo (guava paste), arequipe (dulce de leche), jams, chocolate, etc. They are round and resemble the Cajun Kings Cake to a certain extent. I wasn't too happy with the recipe I tested out. The dough wasn't as rich as I had expected it to be and they browned a bit too fast for my liking. I'm going to try another recipe I have and see how the second batch comes out.
When making roscones you roll out a piece with a rolling pin and then fill it with whatever you have on hand. You close the dough, roll it out into a rope, and bring it together to make a donut shape. You slash the top of the dough with a blade so that the bread doesn't explode while baking. The roscones I made above didn't have much bocadillo in them so they did not explode even though I didn't slash them as deep as I could have. I'll post the recipe and the instructions on how to bake them in a future post once I get them right!
1 note
·
View note
Photo


Almojabanas
Queso Fresco 100%
Cornstarch 25%
Yuca Starch 12%
Powdered Milk 9%
Baking Powder 1%
Sugar 9%
Butter 9%
Egg 20%
Water as needed
This was my third attempt at making almojabanas and through trial and error I finally got it right! What I found out is almojabanas require extreme attention to detail. The slightest change in the recipe will throw them completely off. Also, I used a different recipe than the one i had used before. The previous dough was too wet so the almojabanas were coming out too flat.
This dough incorporates a higher percentage of starch, which allowed the breads to retain their shape when baked right. The key word there is right. I went through 4 test runs before I finally got the oven temp and baking time right. The percentages are all based on the queso fresco's 100%. All of the other ingredients are based on the queso. So if you use 100g of queso then you would use 25g of cornstarch.
The first row of photos show my first attempt. I baked the first almojabana at 450F for 20 minutes and it came out way too dark. I baked the second almojabana at 375 for 25 minutes and it came out a bit too flat. The third almojabana was baked at 400 for 25 minutes and came out too dark as well. It was the last almojabana where I finally got it right. I baked it for 20 minutes at 400F. It held its shape nicely and baked to a golden brown. Almojabanas down; next up Roscones.
0 notes
Photo
Hi folks,
Once again I apologize for being MIA for so long. I've been fighting a nasty cold and although I'm still not 100% I'm definitely feeling much better. Today I took another stab at the almojabanas recipe. The last batch came out too wet so they turned into pancakes rather than hold their shape. This time around I didn't add any milk to the dough and although they held their shape a little better they still came out too flat. I've been using queso fresco as the cheese and maybe it holds too much moisture to being with so I'm going to tweak the recipe by decreasing the amount of cheese in the dough. I'm also in the process of trying out another recipe I have for almojabanas and see how they come out. This second recipe uses a higher proportion of corn yuca starch which will definitely help them retain their shape better. I'll post the results later this afternoon.
1 note
·
View note
Photo
I'm sorry for the hiatus, but I've been feeling a bit under the weather. I'm still not 100%, but I decided to get back into the kitchen and whip up a bread. This post is a great example of how finicky these doughs can be and how even an extra drop of milk can devastate the results.
I attempted to make almojabanas and all was going well until I reached the point of adding milk little by little until the dough ball took consistency. My hand slipped, just a bit, and I added a few too many drops. The result? Almojabana pancakes! The dough was too wet, which caused the almojabanas to spread out too much while baking. I knew the dough was too wet, but I didn't want to ruin the recipe by adding too much cornstarch as well. So instead I threw them in the oven and crossed my fingers. Turns out you don't always get what you wish for.
0 notes
Photo
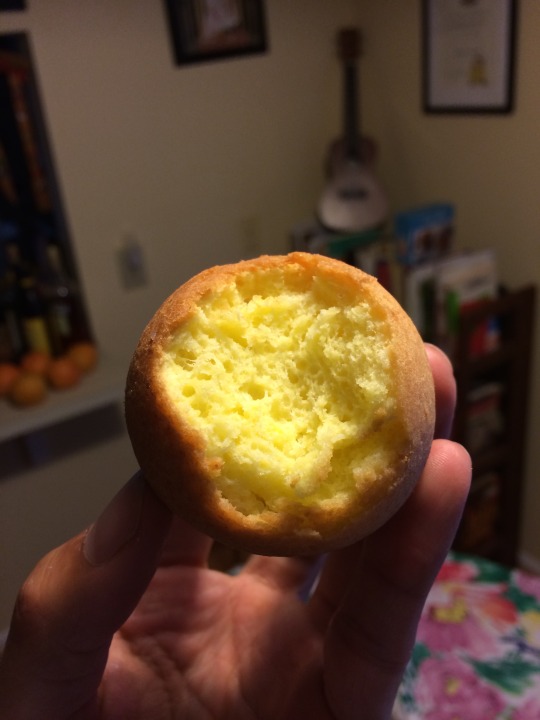
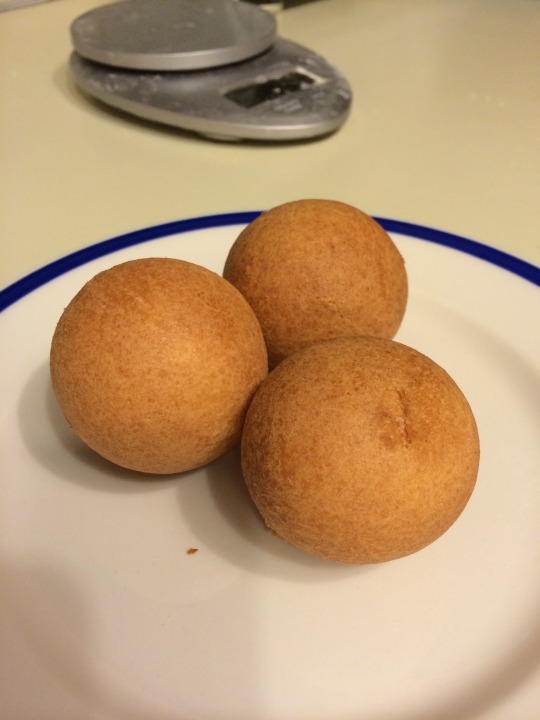
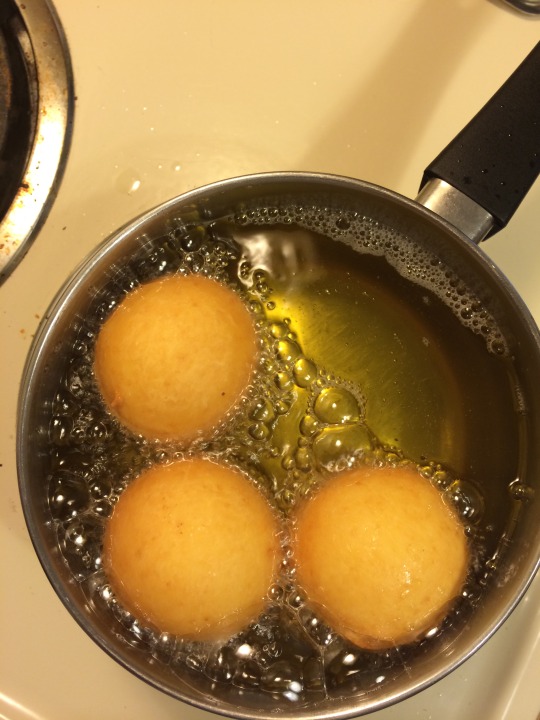
Buñuelos Round 2
I did it! I mastered the art of the buñuelo! They came out light, airy, and golden brown. They have a slight sweet taste, which pairs well with saltiness of the queso fresco. Makes 6 Buñuelos:
100g queso fresco
60g cornstarch
30g yuca starch
25g sugar
1 egg
1/2 teaspoon salt
1/2 Tablespoon butter
1/16 teaspoon baking powder
Neutral oil for frying
Start heating the oil in a pot. The trick to cooking buñuelos right is to get the temperature to a constant 325F. You could use a thermometer to be safe, but I just kept my eye on the oil to make sure it wasn’t getting too hot. You’ll know it’s hot enough to cook the dough when you put a piece of test dough in and bubbles start forming around the ball like in the picture above.
While the oil is heating mix together all of the ingredients (minus the baking powder) and knead until it is a smooth ball. Add the baking powder to the dough ball and continue kneading it until it is incorporated. Tear off 6 equal-sized pieces and roll them into balls. When the oil is hot enough drop the balls in (I did three at a time) and let them cook for 20-25 minutes or until they reach a golden brown color as seen above. The buñuelos basically cook themselves. Once they start to brown they’ll start to rotate themselves and cook evenly. Really, it’s a waiting game at this point.
Once they are golden brown take them out and let them dry on a paper towel. Grab one and enjoy with some natilla (which I will write about in the next post)!
0 notes
Photo
Recipe testing is harder than it sounds. There are so many variables that come into play when baking that each time you control them you remember another. Slowly but steadily, I've been testing different variations of recipes I brought back with me from Bogota. The breads on top are some pan de yucas and the ones below are faux-almojabanas. The pan de yucas came out great in regards to taste and color, but they were a bit harder than I had expected. I think the temperature was too high and it dried them out. My home oven is actually able to maintain a constant temp so I have to play around with different baking temps.
The faux-almojabanas were an experiement. Almojabanas really need cornstarch, which we didn't have, so I increased the yuca starch and added some cornmeal just to see how they would turn out. They came out like corn cakes, which wouldn't have been bad if I had remembered that queso fresco is already a salty cheese. You can learn a lot from failure and sooner or later I'll get these recipes down. Until then I'll keep you all posted on the progress!
0 notes