
Don't wanna be here? Send us removal request.
Statistics
We looked inside some of the posts by 3d-moddeling-blog and here's what we found interesting.
Average Info
Notes Per Post
0
Likes Per Post
0
Reblog Per Post
0
Reply Per Post
0
Time Between Posts
1 month
Number of Posts By Type
Link
1
Text
5
Photo
11
Last Seen Tumblr Blogs


Fun Fact
The most popular pages on Tumblr are about Minecraft, GIFs, and David J. Peterson.
Link
0 notes
Text
3D & TV Ident Idea
This is a write up explaining and showing the Idea I have for my 3D animation which can then be used in my TV Idents assignment as well.
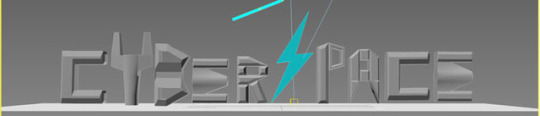
My 3D animation will be an animated logo Ident for a fake company idea I have created called Cyberspace. It is a SCFI based company showing shows and films of that genre. Here are some of the inspiration for the design of the logo.
I like the combined CS of this logo and how it blends. I also like the metallic design so when making this in 3Ds max I will try to make the letters look metallic and industrial as possible to fit with the SCFI theme. I also like the way a lightning bolt is incorporated into the Screw Attack logo. This made me think of having lightning in my logo, it would be the S of the Cyberspace logo and would be actual lightning.


Animation
The animation of my animation would be in split into many different parts. It would start off with the stage being dark and then it would light up and the text would drop down. It would then settle on the ground and then a lightning strike will hit to create the S of the Space in the Cyberspace logo. Everything else would then light up revealing the logo completely. Camera panning around to get a good look of the logo and also to make the metal look of the text shine.
Step 1: Black screen then a flash of light to reveal the area. While the flash is happening the letters will drop from the top and land on the ground.
Step 2: Once it has settled the area gets brighter so you can see the words that are the logo for the TV ident.
Step 3: A lightning strike will then appear in the middle and form the S of the Logo.
Step 4: It will spark a few seconds before settling with the rest of the text.
Step 5: The camera will then pan to show the whole ident together and everything will then be done.
This animation would be 5-10 seconds long not to short and not too long to get the feel of a real TV ident and 3D animation.
Help
Lightning to be something like this: https://youtu.be/ITNsXC-rvl8
Tut https://youtu.be/PSNvlU_GE2c
Sky https://youtu.be/RzebSGOGl5Q
Lighting https://youtu.be/vuHdnxkXpYo
Lighting 2 https://youtu.be/4Tioy5Sgk-4
Storyboards
These are the storyboards and concepts I came up with to help me follow a design and to have a visual path to remind me of what I am trying to create.

https://youtu.be/p2X8vlU3k8I

0 notes
Photo
3D Animation Assignment Task 3
This is an evaluation of my 3D animation and the process I used to create it for this project.
I started this project by writing down and finding examples of what I would like to do and I came up with an animation that I could use for this assignment as well as my TV ident assignment as well since the animation idea I had was an animated logo for a fake TV channel. The name I came up with was Cyberspace which would be a SCFI channel based on the design I came up with.
Once all that was decided I began by drawing up storyboards to give myself a visual look at what I wanted the animation to look like. I then created a few sketches of what I would want the name of the fake TV Company to look like once I decided on the one I liked I created a mock-up in Photoshop. After that I opened up 3Ds max and began to create the models that I will animate.
I began by making a box with a set amount of sections that I need to make the shape I wanted. I then used edit poly so I can extruded the edges to make the shape I wanted. The first letter was C so I used the extrude tool to get it to the height I wanted to be. I then selected the two edges to extrude to finish the shape of the edge. This is how I made the first letter I then duplicated it and made it an instance to that if I made any changes the other wouldn’t be affected. The other reason I duplicated it was to save time instead of making another C that’s in the Cyberspace logo.

I then started making the Y in a similar process but instead of a box I used a cylinder instead since its body would go straight up and is easy to make a Y shape with. I then set the amount of sides I wanted so when extruding the two parts at the top later it would be made easier and wouldn’t look wrong or clipping weird. I used the edit poly to use the extrude feature to make the sides come up and out to make a Y shape.

I then started making the B the beginning was the same as the others using the edit poly and extrude tool. I pulled it out until I got the size I was looking for but I didn’t pull out the centre to give it the curve indent like you see in the letter B. I then used the polygon tool to take out the sides to give it the two holes that are in a capital B. but that left the centre broken so I used the edge tool to grab the lines on each side and used the bridge feature to reconnect the centre.

The E was the next letter I created with a box object. I set the number of sections I needed to make the shape I wanted and then added the edit poly modifier. I then used the extrude tool to create the first two parts like the C in the beginning. I then used the bevel tool for the centre section to drag it out to the same length but make it concave a little to make like look different and give it more style so it looks like a space invader spaceship. The then duplicated this and put it at the end for the last E in Cyberspace.

The R was the next letter I began to make. I used an edit poly to extrude it to the height and thickness I wanted the letter to be. I then used the edge tool at the edge of the bottom of the R to make a separate polygon where I can use the extrude tool to make the outer leg which you would see on an R.

The S of Cyberspace was made using the line tool. I did this by making a plane and putting an image of the bolt so onto it which I would then trace with the line tool. Once it was all connected I got rid of that plane and converted the line object with edit poly and used the extrude tool to give it the shape it has and fill it out. I then chose a blue colour to make it look like a lightning bolt like I said in the planning write up.

The P was a simple letter to make I edit poly the box and extruded it up and then used the bevel tool to make the top of the P. Like the B I selected the middle polygons and got rid of them and used the edge tool and used the bridge to fix the gaps it had made on the inside of the shape.

The A letter was a tricky part to make because of the shape I was trying to get. I set up a specific number of sections to get the shape I wanted. Using the edit poly I selected the polygons I wanted to select and dragged them up. I then only selected the centre and pulled it together to give it a gap at the bottom like the letter A. Also just like the B and R letter that I made I selected the polygons on both sides and deleted them to get the hole in the centre, then using the edge tool and bridge button I fixed any holes inside that were made to give it a solid inside.


After I had made all the letters made I used the bevel feature and edge tool to add more unique shapes to add more detail and help with reflection when adding the metal texture later. I did this by going to a website where I could download free 3D areas that would be used to show the reflection in the metal when creating and adding the material later.
After that I began by creating the material that would be applied to all the letters except the lightning bolt which would be metal looking like a spaceship to help show that the fake tv company is a sc-fi channel. I started with a new standard material and played around the reflection setting until I got the look I wanted. I then brought in a metal texture that liked to get it to be that colour and grit, I then added in the old industrial hall file I got from the website so that the reflected metal would be reflecting something so the metal didn’t look blank and dull.
I then played with the reflection setting and other settings again to match the type of metal I was looking for. Once I was happy with it I applied to the letters to give it the metallic spaceship look I wanted.


The part I created was a glow texture for the S to help the lightning bolt design stand out even more and created a line object which would be used as the lighting effect that hits the plane and then the S shows up right after that to make it look like it came right out of the sky. I change and mess around with the numbers and settings in the material editor and in the rendering panel so when rendering I got the right amount of glow I wanted. I then applied it to the S shape and the line that I would then use with noise and other tools to animate the lightning effect.


While I was doing this I had also already set up the camera and light in the scene for animation later. I set up a target camera and put it at the front so it would be able to see all the letters in one shot. I got it to be the right height and distance I wanted to be for the final shot of the animation. I then set up a target spot light which would be used to show where the action is happening on screen and give the animation better lighting that what would be given to it if I used no lights at all. I then positioned it at an angle and height I liked to cast shadows of the shapes to give the scene more depth. I then


Before I began the animation I set everything in place by pulling all the letters and lightning effects out of the camera view to begin the animation with the text dropping down by dragging them all down at once. At the same time I would be moving the camera a bit to make it look shaky like something big was coming or you were in a storm to empathise the lightning in the scene.
I started by having the camera close to the plane then pan back and tilt to make it look like it was being blown by wind as the text came down. Then as the text got to its point where it would be still the camera stopped being tilted and became straight like it was at the beginning. The next part I did was some panning to show you that the next action is about to happen. I then panned in close to the gap with the dolly button and then when the S and lightning come down it would pan out fast to show that it is there and to see the full TV ident at its full size.
I used the curve editor and assigned controllers to the scale to get that shooting down lightning effect with a use of a waveform and changed the numbers over and over until I got the effect I was looking for. This was a use of procedural animation which was needed for this assignment since using the wave form does all the movement for me all I had to do was change the settings and numbers to increase or decrease the size and intensity of the lightning in the scene.
I also added a controller to the curve editor to give it a bit of a shaky effect when the lightning hits. The reason I added this was to give the lightning more of an impact when it showed up to put the S in place it would make the whole animation more exciting. The assign controller I used was the noise position. Where this would make the camera shake violently to add the intensity I wanted. I played around with the numbers until I got a shake I was looking for I then assigned this shake to the part of the animation where the lightning bolt hits so that it wasn’t shaking for the entire animation because that would make it disorienting.


These were all the tools and techniques I used to create my 3D animation for a TV Ident. If I were to improve anything it would by making the scene a little brighter to focus on the centre and darken everything else to look like it was in a thunderstorm, and work more with the camera to get it to act the way I wanted it to.
0 notes
Text
3D animation write Up
3D Animation Essay
This is an essay I am writing to show that I understand the theory history and ways that 3D animation is used and can be used.
Theory
When going to work on 3D animation it’s important that you know the theory behind it. The theory of 3D is that it is so flexible that it can be used in many different media structures and businesses.
3D animation is the process that uses fully 3D objects. It doesn’t matter if it’s a real object or digital. It is used to animate the object to move. Most of today’s animations are created with CGI. CGI stands for Computer generated imagery. When something that’s as simple as a small cartoon to something as large as a full film 3D animation is used to create masterpieces. But like all art it takes time and patience to create.
Some of the main business that 3d animation is used in is Entertainment i.e. Movies; TV and cartoons. Ways this would be used could be special effects for a certain scene a background or environment for a green screen or a fully animated cartoon show. Great examples of this in entertainment would be companies like Pixar and DreamWorks that made fully animated films like the Toy Story and Shrek franchise.


3D animation is also in gaming. Nearly every single game now has 3D in it now. Some games are looking so good it’s like looking right outside your window. Many things are created and animated in 3D like character animations; barrel explosions and cut scenes in games. Some of the biggest company names that made great games like Halo; Skyrim; Mass Effect and Half-Life; now the companies that created these great games are rich and are looked at as inspirations for their work in 3D modelling and animation. These companies’ names are Bungie, Bethesda, and BioWare Valve.


3D animation is also used in Architecture. How it would be used would be to create a rotating model of the building that is going to be made so they have a real look of what the building will be like. This helps them decide changes easier or to help by always having a reference of the 3d model of the building as it’s being constructed.
3D Animation is also used in the advertising business. It is used in many ways like being used in a presentation to pitch the idea to catch the eye of the client. It could also be used to create 3D Idents, idents are used to keep the viewers’ attention to that channel examples of this would be the fuzzy two from BBC 2 or the E4 Eastings. This is how 3D animation would be used in the advertising industry.


3D animation has also started to effect Publishing. Some magazine covers and articles are created in 3D to give the look of images popping out of a page. It is really effective for people who read on a tablet or other electronic device. Using this can help look at simple images at different angles. This is how Publishing is used in 3D animation.
This is the theory of how 3D animation is used in the different industries around the world and how it affects them.
History
The next part of understanding 3D animation would be to know its history. Even though we get a lot of 3D animated movies today it wasn’t the first type of 3D animation, no it was stop-motion/Claymation that was the first type of 3D animation. This started around the 1960’s and was created by using objects that would use in life like clay or playdough.
What they did was pose the object into the shape they wanted and then move it slightly to the next shape and took another picture, this process was rinsed and repeated to get the look of movement. It was used to create great animations like Shawn the Sheep, and Wallace and Gromit. But the problem with this is it can take up to several hours to do even one scene so it is too time consuming.

After a while as computers got better a new type of way to animate was created called CGI. It has been used by many companies over the years but one of the most famous 3D animators is Pixar. They founded themselves in 1985 and made the very first full length animated feature film called Toy Story. Since then they’ve created lots of other animated films and now their entire business is just creating art with 3D animation.
Applications
There are different applications for 3D animation and modelling although some are more for modelling than animation there are many type of programmes that can be used.
3Ds Max
3Ds Max is a 3D computer graphics program. It is used to create 3D models inside a computer. It allows to create many things from environments to character models and objects.
This program can then use these models to create animations for games; advertising and marketing or architecture. The animation and modelling tools that it has are the latest for this type of software allowing you to do more dynamic things like hair and the sea. This is what 3Ds max is and what it can do and why it is one of the best software’s to pick if you are going to do 3D animation or modelling.
Maya
Another 3D software that is used for 3D animation and modelling is Maya. This software does the same stuff as 3Ds Max and more. It has similar features to 3Ds max but some are different or new all together so in some ways it is just a professional more polished version of 3Ds Max.
Some examples of work that has been created in Maya is Disney’s Dinosaur and the TV show Star Wars: The Clone Wars and most recently Rebels. These have all been very successful 3D animations and have made their company millions even though it takes a lot of time and millions to create such great products.


Houdini
Houdini is another 3D animation software that was create by a company called Side Effects. This company adapted Houdini to be able to use the PRISMS suite. The PRISMS suite is a procedural generating software tool that is used in 3D animation to make animating materials such as clothes and hair easier.
But it is incredibly difficult to use you will need to have been good with maths to be able to use this part of Houdini correctly because it involves numbers and precise setting to get the effect and animation style that you want when using the PRISMS tool in Houdini. This is what makes Houdini different from other 3D software applications.
This software has be in many different animated films. Examples of movies it has been used in would be Disney’s Frozen and Zootopia or the company Blue Sky Movie Rio. You can see from these movies that this software can generate quality animation into your movie was you learn how to use it.
The company Side Effects now has a published and limited version of this software called Houdini Apprentice. It is limited so it doesn’t have all the features that the paid product would have but it is good to get this one first to learn and practice from it. Also it is free of charge as long as it’s used for non-commercial use.

If I am going to create 3D animations I will need to understand the techniques and tools used in 3ds Max. Here is my understanding of each tool below:
An example of a 3D animation would be reloading your weapon in Halo. I am going to explain how I think they constructed the animation. I believe there was a lot of use with rigging and different models. It would begin with your character taking out the empty magazine out of the gun and then reaching to his body. This would have been done by using the auto-key and using the rig to move the arm to reach for the spot on the gun where the magazine would be, a model when then be put in of the magazine so when the character gets to that spot there is actually something to grab. He would then move the arm away using the rig again and dropping the magazine model and go to the body. And this is where a new magazine model would appear for the hand to grab.
The rig again would be used to move the arm from the body to the gun where it would be reloaded. The action of reloading the type of gun would then be changed depending on the gun being used but they would all require the right moving the arm and the gun model when loading in the magazine to look like there is recoil to look like you are really slamming in the magazine to reload getting ready to fire again. It would then go back to the first frame where everything started.
If I am going to create 3D animations I will need to understand the techniques and tools used in 3ds Max. Here is my understanding of each tool below:
Keyframes
Keyframes in 3D are the same in most other software’s that have a timeline and keyframes to use like After Effects or Flash. Keyframes in here are the timeline and each keyframe on it is called a key. And when animating by pressing the auto key then preforming an action then turning it of you have created a keyframe. It does this by recording what you have done by making a start keyframe from when you first pressed the auto key button and then makes another where you have moved on the timeline and when you do something new on the scene.
Procedural animation
Procedural animation in 3D is when the computer automatically creates animation in real-time based off the action you have set up to get the look you want. This is mostly used in particle systems to create effects like Fire, water, electric, clothes or hair and fur dynamics along with character animation. The reason this would be used for a particle effect is that it saves time if you were doing it manually you would have to go through every single object in the scene to animate it and there could be millions so it is better to use procedural animation where you can choose an action and mess around with numbers to animate all of them and keep doing it until you get the effect you want.
Cameras
Cameras in 3Ds max can be used in animation to change the view of your animation or add more of an impact to it. Cameras are used as direct viewpoints in your animation so when it comes to seeing it finished you will only see what the camera sees so it’s important to set it up and use its features right. You can use these to tilt the angle or zoom in and out to add more animation to a simple animation to make it look like there is more going on. They can also be used to follow the object in your scene this is good if using a helicopter flying over an island with a sweeping shot or a chase scene.
Curve editor & Dope sheet
A curve editor is a tool in 3Ds max that helps you track the motion of your animation through these lines. It is a visual display of the motion in your animation of the object in the scene. The closer the curves are the faster the animation and the farther the slower it is unless it is a straight line then the animation is at a normal of the action it is doing that you animated. Another way to have control of the speeds of your animation would be the Dope Sheet that works with the keys themselves rather than the curves.
The Dope sheet is a tool in 3Ds max that is used to manage your animations speed by controlling the distance the keyframes are from each other. The display helps simplify the process of making changes to the animations timing so you can get the best result you want where it is slow at the parts you want and speeds up where you want it. In short these are both useful tools that help make adjusting your animation’s timing better.


IK & FK
The letters IK stands for inverse kinematic and it is used in 3Ds max to rig a 3d model. It is used to link all the parts together like a bone structure to create fluid movement and makes everything connect like a real model depending on what you are using like a human or a dog for example. The bones of it are what you can move and when you move it the model will move this makes animating so much easier so when you move the bone it moves the whole object unlike if you didn’t have I you would have to select all the polygons to do so. Another part of animating in 3Ds Max is Forward kinematics. It is also used to help make 3D animation easier with a model. It is similar to IK but instead it effects the child nodes more as the parent joint is positioned and rotated.
Controllers
Controllers are what handle everything you do when animating in 3ds max. It’s a plug-in that deals with the storage and workings of every animated value. The basic uses are controlling the position, rotation and scale of your model in the animation with the XYZ axis. Other controllers that help with animation are Bezier controllers that put itself in the middle of keyframes of curves to adjust the keys in the tract to help with more control with the controller in track views like that with more detailed looks of animation.
Massfx
Massfx is a tool in 3ds max in animation that adds physics to an object in the scene. This helps add more realism to the animation and makes animation a bit easier depending on what you are trying to do. An example of this would be dropping a ball onto a table. The physics it would create would be the two objects collision and the ball bouncing after wards to settle. What this does is make automatic animations with the use of physics which can be used physically or elemental like by using wind on a flag.
Particle flow
Particle flow is another tool in 3Ds max that is used to change how a solid object in your scene like a sphere or a model acts. It can do this in many ways by adding effects like liquids, metals, lightning or fire to create the illusion that it’s doing something that it’s not. This is useful in animation because it helps create and test real world effects to make the object act similar to the effect in rea life like rain falling and splashing or dust being blown when something heavy is dropped or explodes.
Auto key & Set key
The auto key in 3ds max is a button that when you press it everything you do in the scene will be recorded and a keyframe will be made and then press it again to stop animating. A way to know that you are animating is when you press it a red box will appear around the border to show that you are animating. In short this is the button you press when you are ready to animate your model in 3ds max.
This is used with the set key button and the use of key filters helps organise between main other keyframes to make the animation easier to manage. But it is different from auto key because you have control over when you key the animation, this helps when using an model where you can have a set pose at the beginning with your character and move to the next frame knowing that the first position will always being in place if you get lost in the action you were trying to create in the animation.
Baking
Baking is when you are rendering to texture. This makes you able to make texture maps based off the models appearance in a fully rendered scene, this is then baked into the model and becomes a part of it because of the mapping. This is useful because this method helps show the textured model fast on 3D software.
Motion blur
Motion Blur is tool you can use in your 3D animation to add more realism to an object in your rendered animation. Motion blur is used to simulate real world cameras and how they work this helps with making effects like a car going by super-fast and because of it being so fast there is blur making the whole car looking distorted especially the wheels since they are spinning. This effect would be used to make an object look faster than it is.
Frame rate
Frame rate is the amount of frames that is shown and rendered every second in real time. 3ds max contains all your animated keys in real time as well with precision of 1/4800 of a second. You can then alter the frame rate as you see fit to fit what you want the animation to do by being faster or slower in timing.
Lighting
Lighting is a tool in 3ds max that is used to give the look of real light in your scene whether it be sunlight or lights in a house or car lights. Depending where you position is can change how it is cast and the shadows it creates so pick an angle with height to get the lighting that you want to match the feel of what you are trying to convey in the scene. Whether it is happy and sunny or dull and sombre. You can also use the light to hide a character in the shadows to make the character a big reveal.
Render passes
Render Passes are simply the render elements in their basic form made from the rendering engine, it then puts it all together for the final output render. Most effects like lighting, shadow, and more are also add to give the render the fullest and best look. They are all parts you can remove and change yourself so you get the amount of light and shadows you want to see in your render.
Image sequences
Image sequences is a method of rendering animation into a video file. This is done by rendering out the animation as images in a frame then putting them in a software like after effects where it plays like a stop motion frame after frame you can then save it out as an AVI or other video file types. This is what image sequences is and how it used to render a video of your 3d animation.
0 notes
Text
3D Island
This is the 3D island i created. I used a height map and put it onto a plane. once it was one a plain I added the modifer

I created the water by going into the material editor and changing the settings until it was seethrough like water and added it to the second plane that was below the island.
This is what the finished model looks like.

0 notes
Text
How I made Dodge
This is a Blog telling you how I made my 3D model named Dodge.
I started it off with making a box. I then used the vertex tool to select one side and delete it. The reason for this that I am going to use the symmetry tool to save time so I don’t have to build the other side so all I have to do is work on one side and the rest will be made automatically as I make it.

I then used editable poly with Turbosmooth to give it a round shape which will help me shape it how I want it. I then connected the ends and sides for extra polygons where I will later make the legs and head. I used the edit poly to help change the length and width of the main body object so that it was less round and more of what dog’s body would look like.

The next step after I got the body to the shape I wanted to go to was to make the legs. I used the extrude tool for this. On both ends at the same time and extruded them until I got the length I wanted. I also used the bevel tool and transform tool thin some of the polygons to make it bend more in certain parts like where a knee or paw would be.

The next step was to make the feet. I used the extrude tool to get the length of the foot. I then used the vertex at the front to make extra polygons for the toes. I then used the bevel to drag them out and thin them at the front to make them look like the feet of a dog.

After I created the feet I started to work on the neck section which would be become the head section later. I used the transform tool to drag it out to the length I need it to be and the used the extrude tool and bevel tool to start shaping the neck and start the fleshing out the head.

Sometime later I got it to the shape I wanted it to. I even went to the side and created ears and small ridges and details so I would know where the mouth nose and eyes would go when I started creating them.

After this I decide to make the eyes nose and mouth for dodge. The Eyes Are just spheres that I cut in half by lowering the number of the hemosphere and changing the colour of each part of the eyes by selecting and changing the colour in material editor. I then moved them into position of where they will go on the head. This is how I created the eyes of dodge.

I made the mouths by using the line tool and drawing the shape I wanted the mouth to be. Once I got the shape I wanted I used the smooth tool that made it round and look more natural I then extruded it to give it a shape since it was just a flat object before. I then slide it into position on the head used the cut tool to chop out that shape into the head. I then got rid of it once it was done.

I made the nose by making a new sphere object and and using the squash tool to get it more wider surface to it I then made it an editable poly and used the transform tools to make it into the shape I wanted it to be and changed the colour to object black.

This is how I made the tail of dodge I went to the end of the body and selected a few polygons at the back where it starts to bend and used the extrude tool. This is what I used to create the length to bend it more down and make it thinner near the end I used the resize tool. This is how I made dodge’s tail.

I made the tong by creating a box with 3 segments and bending them with transform tool I then added the smooth modifier to give it more of a round shape and changed its colour and changed it to pink. I then positioned into the mouth where it would stick out. The reason I decided to add a tongue was to make have more of a feature and more like a real dog instead of just an empty whole of the mouth.
After this I changed his colour to the brown and added the hair and fur modifier onto the model. This is what it looked like. I then changed with the parameters around to get the look of what the hair would look like.

I hit the render and this was the result of what my changes were. This was ok but not what I was looking for so I went back into the hair and fur and played around with it some more until I could get the hair to look like what I wanted it to.

This was the hair I liked and decided to stick with it. It took a lots of attempts of changing settings different ways increasing and decreasing until I finally got the look I wanted which was this.

This is how I created my 3D model of Dodge the dog which was a character I drew and created in my Concept art class and decided to bring it into 3D.
0 notes
Text
3Ds Max A1 T1
This is a blog I have made telling you about techniques and methods that can be used in 3D scenes to animate. I will be using examples of some of the models I have created as examples for some of these techniques and methods.
There are many techniques and methods to use in creating a model in 3D modelling here are a few of them.
Keyframes Keyframes in 3D are records of points that have been made when animating a 3D model. The keyframes are mostly at the start and end of any 3D animation and also highlight important points that the user has chosen like bookmarks.
The keys are just the rest of the frames of animation. This is an image I got off the Autodesk website I got as an example. The red boxes are the keyframes in the scene and the dotted line shows the path the object is moving on. This is helpful because it can let you follow the motion of an animation and helps you know when important sequences are about to happen as well.
One way this is useful when starting a 3D animation is when you start with no keys. Turn the auto key on and go to the last frame which is usually frame 20 and move the object to a different position like a bouncing ball from the top where it started to the ground of frame 20. When you do this 3ds max automatically makes a position key at the first frame and last.
This is a fast way of making a simple animation because. With using key frames by starting at the end instead of the start it automatically fills in the rest of the frames creating the motion for the object. So when you play the animation it will start at the top of the scene and go down to the ground at whatever speed you set the animation to.
This is why Keyframes are a useful technique to know it helps with making quick animations and knowing which sections of the animation are important in case you need to check it.

Procedural animation Animation is a method that can be time consuming which can slow down the creation of your animation. But with the use of a host of procedural animation tools can be used to speed up the process allowing you to get on with other 3D work you might be working on.
Using procedural animation can help with making an animation in 3D modelling software. Using it can make use of making the timeline more flexible and editable. This can help with sequences by isolating certain parts of the animation to tweek the movements made with the model and timeline. This can be used to make the animation smoother of fix any mistakes that were made and make sure that everything runs smoothly so it looks fine and not jumpy.
Rigging is also used in this to help with the animation of the 3d model you are using. It helps with connecting parts of the model to each other to get it to all move together instead of moving separate pieces. It also creates guidelines that can be used to follow so you will always know what you want your model to do and what direction to move when animating.
Examples of this would be how a leg would be on a character when walking or running. This could be used to go to a certain point in the animation and help fix any mistakes made or tweek it to make it even better. This would be used in animated films like Toy story when Woody would be running.

Cameras The cameras are your eyes in 3D modelling they can make the slightest difference when modelling a character an example would be modelling at the front of a 3d model. But forgetting to use the rest of the cameras to look around the rest of the model can lead to problems like parts sticking out or bent where you don’t want it to.
The camera are all for perspective it is important to use them all the time to get a good look at whatever you are creating from all angles to make sure it looks right.
There are two types of cameras in 3ds Max menu and those are Standard and enhanced. The standard is the one that is used when starting up the program. That moves wherever you want it to move and gives you a wide range of anywhere to go in the area of 3ds max.
The enhanced camera can be set to specific points like making it stay at a certain angle or distance. It can also be used to make sure it follows the model when moved in an animating stage while the standard will only follow if you move the camera.
Target camera and Free Camera are two objects that are used in 3ds max. The target camera focuses on the environment around the object that is the target in this case the model you are using. It uses two icons one for the camera and the other for the model.
This is used to help view the animation independently. This means it is easier to use if the camera doesn’t move on a path set. The free camera is used in the area direction it is aimed at. But this only makes a single icon showing the camera and where its view is. But this does not create an icon for animating like the Target camera. This makes this camera better to use when animating along a path.
This is what a camera is and what it is used for in 3ds Max.
The curve editor The curve editor in 3D modelling is used for the object you are using. Using this feature can help make the exact number of curves you want on the object and how much it will be curved by. This helps with making objects that have a curve in them like a plate or handle of a cup.
The editor is a view mode that helps track the curve being made in the model and move with the motion of it to get it to the right amount so it isn’t too curved so it looks wide or not curved enough and it doesn’t look like it is supposed to. This helps with object transformations within keyframes. It helps with making it easier to see and control the movement of the animation when parts of the model are being curved.
This is what the curve editor is used for in 3ds max.
The dope sheet The Dope sheet is also another part of the Track view that is used in animation. It is also used in the curve editor. What this is used for in 3ds max is to show the animation keys over time on a graph. This shows simplafires of the process of adjustments that are made in animation timing. The reason for this is then you can see all the keys at once like using a spreadsheet to see results like a table.
So what this is used for is to keep information on the track view of any and all keyframes of the animation. This can help with locating specific moments in a 3d animation just in case any changes need to be made this helps find a key moment quickly.

IK and FK IK stands for inverse kinematic. This is used in the 3d model as part of the rigging. This is a link or chain that connects parts of the bone structure to one another. The bone structure is a part before the rigging where you make the objects that will be made and applied to the model. When you move the bone structure the model will move as well making it all move so you can get to animating.
An example would be when moving connecting the top part of a leg to the bottom. So when you move one part they both move. This helps with speeding up the motion process of animating and saves you having to move each piece separately.
FK stands for Forward kinematics. This is used in animating a 3d model.
This is the most used method for moving the model it has 3 basic principles: • Hierarchical linking from parent to child • Placement of pivot points • Inheritance of position, rotation and scale
The hierarchy is the structure that is used for the animation. The bone and IK the bone is the parts that will be moved and the IK will link specific parts together. The way they are named and order it is linked will help with the parent and child aspect. This is used so when the parent main object moves the child’s will follow like lower leg to upper leg.
The placement of pivot points is important as well. The pivot points are where each of the IKs are connected. Like a child object it will keep its position’ rotation and scale the same as its parents but if the parent’s is changed so will the child’s change too.
The Inheritance of position, 'rotation and scale is all to do with the parent. If where it moves changes the child will change too unless it is on its own independent pivot point then it will stay on its own. This is the same for the rotation and scale of the movement as well. If connected to the same pivot they will both rotate the same but if on different pivots they won’t this also applies to change in scale as well.

Controllers The controllers in 3ds Max is like constraints that are used to help handle the tasks in scenes when animating them. It is used to store animation key values and settings of procedural animation, it also mixes them with animation key values. But some parts don’t get a controller until it is animated. But if you make changes my using Auto Key or adding a key it will be automatically given a controller by 3ds max. But it will only give it a default type which you can then be modified to how you want it to handle the scene animated.
The controller can manage many points to help with managing tasks in scenes. It can manage the position of the objects being animated; the rotation of the object and the scale of the object. The controller can help with the direction of the object moves and the width and length it will change when being animated. Also the transform controller controllers all three at once but this can be confusing so there is separate controls in each one.

Massfx This is also another technique that is used in 3ds Max it has four panels that can be used. The Massfx in general are the main four panels that are used to change the options of how you use 3ds max tools objects and the settings of how everything that looks and works. It is the simulation engine that helps with the operation of partial flow and similar effects.
The panels are: World Parameters: This lets you control common parts of the entirely project like the scene being used settings and advanced setting adjusting it to your wants and needs when using 3ds max.
Simulation Tools: This panel helps with using actions during the making of a simulation. Some of these actions would be Play, Reset, and Bake.
Multi-Object Editor: This panel allows you to change the settings for many bodies or constraints at the same time.
Display Options: This panel controls the projects display properties. The rigid bodies rollout gives visual options for all the bodies in the scene. It also gives you tools for debugging the simulations made.
Particle flow The particle flow is a toolset in 3Ds Max that allows you to change how the solid objects act. This can be from a number of effects like smoke; liquid; metal; snow and many other effects to make it look like something it is not. This is used to test and simulate real world effects.
This could be from something exploding to dropping something in a liquid or gravity to help with when something goes up to make sure it comes back down. You can edit how many particals you want this can range from 100 to 1000. This matters to give it more of a large range of the effect spreading across the screen or in a controlled burst.
An example of partial effects would be in the Pixar Movie WALL-E when he is in space and flying using the fire extinguisher. It would use like a snow like effect and shoot using a path but it wouldn’t need gravity since it is being used in a space environment.

Auto key and Set key Auto key is a technique that is used for the animating stage of 3D modelling. This is the button that can be seen on the bottom right corner of the window. When it is pressed and a red boarder shows anything you do on the stage will be animated. So make sure it is gone when editing the model or creating one or else it will animate that and not what you want.
When going to animate make sure to press the Auto key button when the red boarder shows this means anything done on the stage will be animated. You will use the time slider to go from the start to the end frame or any keyframe of importance. So when animating use the object or model load and rotate or move the position of whatever you want it to do then move the time slider a bit then move it again and repeat until it has done what you want it to do.
To view the animation just click the play button and it will show you what you have done. You can then go to the time slider and look at each frame and fix any movement that is wrong it that one frame to make it run smoother..
The Set key is an animation mode that lets you create the keys for selecting objects and individual tracks using a mix of the set key and key filters. Unlike Auto key this mode allows more control over what you key and when it keys. This allows you to pose the model and then if you like it you can then use that to make keys and move to the next point without it being removed it will stay until you move the model again. This helps with still moments when the character will do pause before doing something else.
Baking Baking is a technique that is used to texture your model. By adding a texture to it this will change its appearance in a rendered scene. While adding a texture just changes its look baking it makes the texture become a part of the model with the use of mapping.
There are two types of texture for baking linear or automatic. Each one will have a different lighting effect generating different patterns depending on what texture you use on the object. This also helps with the rendering making it smoother however with automatic it can be rushed and looks horrible. Also there is Logarithmic Exposure Control. This is used to help remaking the same image right so you get a good texture. But this can also be good or bad depending on the method used to apply it to the model created.
Motion blur Motion blur is a feature that can be added to the animation to give a better feeling of realism. This is mostly applied to something if you are making it look really fast so it blurs examples of this would be cars planes and any object you apply it to.
This is added when an animation is being rendered as you make the object speed up. It uses a mental ray renderer using a Shutter parameter to control how much blur you put into the motion. What this effect does is blur it the way a real camera would blur something that zooms past it. It is important to equal the amount because if there is too much blur it may be hard to tell that goes by the scene or not enough so it looks slow and less real. But if you get it right it will look like the object is moving at a fast speed.

Frame rate The frame rate is also another important feature in 3Ds max. It is mostly used in the animating stage of the program. It is shown in animation as FPS frames per second. It is the amount of frames it shows and renders for every second in real time 3ds Max keeps your animation keys with internal precision of 1/4800 of a second. You can change the frame rate of the animation any time without changing the animation timing.
An example would be when creating a three second animation with a video frame rate of 30FPS it will have a 90-frame animation. But if you need to change it to a different video type the timing will not be changed only the number of frames that will show and the render will also change. This is what a frame rate is in 3Ds Max
Lighting Lighting is also another important technique in 3D modelling. It can help with making a model look bright or dark. Using lighting can give the model more of a feeling of realism if something doesn’t have a shadow or if parts of it are too bright or dark it can ruin the look of the model.
This is more important in the animation step where if it is too dark the model will be hard to see on the stage it is on or too brightly coloured and will hurt people’s eyes.
There are two types of lighting used Photometric and Radiosity. Photometric lights use values that give you more accurately define lights like in the real world. This also allows you to make different colour choices as well. Radiosity lights simulate the way lights interact in the environments they are placed. It is the global illumination technique being the sun when used for lighting These are the types of lighting there are in 3ds max and why lighting is so important

Render passes Render passes also known as render elements are the basic elements made by the rendering engine and is all put together for you to the final output render. Most of the elements are lighting, shadow, reflections global illumination and more.
These are all parts you can take out and edit and put everything together yourself so you can get the right amount light you want move the shadows where you need them and make the environment bright or dark enough. Each part works in layers and gives you finer controls over each part to get the final result you want. This is what render passes are.
Image sequences Image sequences is a technique in rendering an animation into a movie file. You can do it by default with formats like AVI or you can render the sequence from still image files to the file format like TGA. This is like a stop motion animation putting each image one after another to show movement like a video this is what an image sequence is in 3ds max and how it is used.
This also helps if any frames have errors in them they can be fixed or taken out. This can take more time for the animation to render but it is worth it since it will be a good and you know there are no mistakes since using this method you are able to check and fix the video with ease which is harder with a compressed AVI file.
These are all the methods and techniques that are used in 3Ds Max these can help with the creation of the model and the animation of it.
0 notes
Photo

This is a simple dog model I made in 3Ds Max. some parts were difficult to model like trying to get the ears right and tail to curve like a swril.
0 notes
Photo

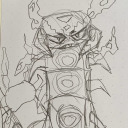
This is the finished model of the minion i’ve been working on.
0 notes
Photo

At this stage of creating the minion I made the eyes and goggles for him.
0 notes
Photo

This is the next stage when I was making the minions hands. This was challening because of what I did when creating the arms. I forgot about how the shape of the bottom of the limbs woud be like. so I used the resizing tool and the Bevel tool to make the hands and to make it look like a glove.
The bevel option was used give the lip look at the wrist to make it look like a glove. I used the extrude option at three different points of the hand to make the thumb and two fingers. I then used the mirror modifer to fix any errors to make everything look even.
0 notes
Photo

This is the second step of making the minion. I had to make the arms legs and feet. How I did this was by selecting one polygon on each side and using the extrude option to drag out from each side to length I wanted them to be.
the reason to select two from each side is it saves time than extruding one arm at a time. the legs were done in the same way. The feet were spheres I used the squash and slice effect to make them the shape I wanted them to be.
0 notes
Photo

This is the Minion character I created in 3Ds Max. This is how I started it with a box shape then used Turbosmooth to make it smoother and then with Editible Poly to change the size and width of it to get this shape which is what a minion is shaped like.
0 notes
Photo

This is my first time using particals in 3Ds max. It was weird to work with at first but once you found the right settings for how much you wanted it to spread and when to hit the ground it became easier. there were many partical effects to choose from but since I am learning to use it I picked the PArry effect.
this made it blow up into chunks in this style. other effects would have made turn into dust or smoke like but I liked the explosion look.
This is was used with a name model I made earlier.
0 notes
Photo

This is an alien I made in 3dsmax. the head was the easiest part to do because it was just shaping a sphere object to the right shape. to make the eyelids for the eyelids I just used spheres and used the slice action that cut out the amount I wanted. the eyes were just spheres I added with a standard texture to get the different colours for pupils and shine of an eye from the rest of the model.
The mouth was using the line object to cut out the shape then making it 3D to give it shape. It was then moved to the head with the modifier ProBoolean. this cut out the shape of the mouth in the head to make it look like a part of it.
I used a box object with edit poly and turbosmooth to give it the round shape shown. I changed the size with the scale tool by bending it at the middle. The hands were made from a box too and the same methods were used to make the hands.
The feet were just spheres with slice on cutting half off the shape. the with the shaped changed and moved to make them.
this is how I made this cool little alien.
0 notes
Photo

This is a tattoo design I made in 3ds max. to make this I used the plane object with modifiers to give it this look. the modifiers I used were Edit poly MeshSmooth. the edit poly was used to help edit the shape to make it go into the shapes I wanted it to go into.
I also used Meshsmooth. this is used to smooth out the edges and give it the look of a real tribal tattoo instead of a box look it would have had without this modifier.
0 notes
Photo

This is my name I made in 3Ds Max. This was a simple one to do. I used the text tool to type my name and then used a modifier to make 3D. There are also two other ways to make text 3D
0 notes