
Don't wanna be here? Send us removal request.
Statistics
We looked inside some of the posts by 3rdyearstudio-2018 and here's what we found interesting.
Average Info
Notes Per Post
3
Likes Per Post
3
Reblog Per Post
0
Reply Per Post
0
Time Between Posts
8 days
Number of Posts By Type
Text
16
Photo
1
Last Seen Tumblr Blogs


Fun Fact
Tumblr has 411 employees.
Text
Spring Week 13

On Monday we had an all day field trip to Columbus, MS. The first home, Riverview, is a Greek revival home built in 1847 with an impressive cupola that has stained glass to match where the light comes in during the different seasons, such as red, blue, green, and purple. The floor plan, typical to Greek Revivals, is symmetrical.
Some of the homes in Columbus were open for pilgrimage and were reenacting the original owners and how they lived. We walked through the home and got a double dose of history and architectural information. Temple Heights (the 2nd house we toured) was built in 1837, and combined Federal and Greek Revival features. It has a wonderful garden and porch area, contrary to most Greek Revivals the home is slightly asymmetrical.
Waverly (the 3rd home) was completed in 1852 as a Greek Revival structure. It is most unique for its enormous octagonal cupola, which everything in the home is oriented. The plantation was originally a self-sustaining community with gardens, livestock, and orchards. It even had its own mill.


We finished putting panels up on the back wall and then moved onto the north facade.
Our final chairs were due on Friday so as soon as we got off site and ate, we hit the shop. Everyone was hard at work, cutting, sanding, steam-bending,and etc.

The MEP team went on a hunt to find the existing plumbing line. They then got down and dirty in the mud and dug trench to attach the newly installed plumbing.
The sheet rock finally finished, was sanded and wiped down. We began to prime and paint the walls.


We finalized our porch design by going through a few more mockups. We decided to add stairs to the south facade and a ramp that cuts into the porch. We also discussed some landscape options and ways to integrate the spaces between Ree’s home and her sister’s neighboring home.
0 notes
Text
Spring Week 11
This week we visited Marion, Al to see Kenworthy Hall also known as Carlisle Hall. It was built around 1860 and is one of the most well preserved asymmetrical Italian Villa style homes by Robert Upjohn. It is the only surviving Italian Villa by Robert Upjohn that was designed for the southern climate and culture. The house has a massive brick structure and a tower that is four stories high. We first walked around the exterior of the home in order to get a sense of the plan and then proceeded to walk through the interior. Our professor had us sketch the floor plan of this large home’s asymmetrical plan.
The dry wall got dropped off and set up for installation.

The MEP team finished all the wiring and plumbing lines so the rest of the insulation could go in the walls and the sheetrocking could ensue.


The siding team began putting flashing around the edges of the home. Flashing is a barrier that keeps water from going places it does not belong. It is put on the bottom edge near the foundation, on the corners, around doors, and along the underside of the roof where the truss meets the top of the wall. They also worked on putting up the rigid insulation, the barrier that goes on the house after the housewrap and before the metal siding. It typically sits on the drip edge or the flashing at the bottom of the wall. To test how all the layers of the wall would go on together we mocked up a corner of a wall.
0 notes
Text
Spring Week 10
We started our week off with the usual Monday afternoon field trip. This week we went ten minutes up the road to Greensboro, Al. A local historian invited us to his home which he had decorated to fit the time period in which it was built, the 1850’s. He had many landscaping projects going on and was attempting to create gardens like the ones in Victorian mansions.

Several students got a crash course in site surveying on Wednesday, which they used to survey Ree’s property so that we could identify high and low points for drainage.

After gathering the site information, Jake’s mom, a civil engineer, came to Newbern to teach us about water management. Using her expertise and the information from the survey, we began developing a water management plan for Ree’s site


On Thursday, some of Emily our professor’s past Architecture colleagues from Mississippi State University came to give us feedback and advice regarding our site. We discussed different tactics and ways to plant or place objects or plants around the site. We discussed the impact of each move and how it would effect the view from the porch, the relationship between Ree’s house and her sister’s home, and how it could facilitate gathering. We then proceeded to site and began mocking up ideas of ramps with scrap pieces of OSB leading onto the porch, trees on the side of the house by putting PVC pipes in buckets with some bricks, and other landscape ideas.
Thanks to some wrestling and reconfiguring of walls, we managed to get the shower stall into the bathroom and into place so that we could begin plumbing for it.
The two exterior doors also went in this week, so the house is now dry and secure! In order to place each door in its hole, we had to caulk the entire back of the frame and slide it into place. Then someone came and nailed it to the wall and filled in the gaps between the frame and the wall with spray foam insulation. We then installed the door handles and were officially dried in.

Once the MEP team gave us the ok, a team began to install insulation into the walls. They cut it to size and fit it between studs, where it will supplement the rigid insulation on the exterior.
This week the MEP team worked to finish plumbing and electrical by installing the washing machine drain line. They chose to run the washing machine drain separately from the rest of the drain system so that the greywater would not overwhelm the septic system.

This week we prepared the house for an HVAC contractor to install a mini split HVAC system. Rowe and Owen made formwork for a concrete pad for the split to sit on. We chose to have the system installed professionally so that Ree could have a warranty.
0 notes
Text
Spring Week 12

This week we traveled to Marion, Alabama to visit Folsom Farms. This property is the remnants of a cotton plantation, and although the plantation house has not survived, all of the outbuildings that serviced it have. We saw buildings like the original cotton gin, seed house, hay barn, blacksmith shop, and many other small structures. It was interesting to see a more functional part of historical structures, since many structures like this do not survive once they are no longer useful. It was an interesting contrast to the beautiful homes we typically see.

This week we divided into four teams and worked together to continue to develop a landscape design for the courtyard space between Ree and Geraldine’s Homes. Our designs focused around providing an enjoyable space between the two houses, as well as providing a ramp and handrail for Ree’s Home. After formulating our ideas and drawing them out, we pinned up and presented to our classmates as well as Alex and Emily. Following our presentations, we had useful discussions on how we should proceed.


Siding work began this week, and metal panels have been installed across most of the back wall. We chose to start the process on the back wall to learn the system in a less visible location. To put the panels on the wall, holes and notches must be cut precisely to fit around windows, doors, and penetrations through the wall. After this, the panels must be placed on the wall and fit into the flashing while overlapping the panel previous to it.
0 notes
Text
Spring Week 9: a special
So right now we are on our spring break. Instead of featuring Ree’s Home, we would like to feature all of our favorite furry friends here at Newbern.


Sir Charles aka Charlie. The resident cat at Morissette who helps keep our pods snake and mouse free.

Red who comes and visits the Faunsdale community center site.

Clyde came to visit us while we toured Buster’s home.

A puppy at the local bakery

more puppies!


We pass many farms on the way to our site. The area around Newbern is a big Agricultural hot spot.

after heavy rains our site is a swamp.

Traffic problems here are a bit unconventional.


Johnny had a photoshoot with the resident studio bats.
1 note
·
View note
Text
Spring Week 8


MEP is continuing to work on plumbing and electrical, and they have completed running the wires for the house. The vent stacks are also nearing completion, which will allow the pipes to “breathe”, which equalizes pressure and allows waste to flow through them. Fresh water plumbing has also been run, and we’re getting close to being ready to pressure test. On friday we brought the trencher out to the site and dug to bury the electrical service cable as well as the main water line.


The exterior of the house is one step closer to completion as we have begun to install house wrap or Tyvek. It is as if we are wrapping a giant Christmas present. There is a person unrolling the Tyvek as we work our way around the house, another person is holding it tight while someone nails it to the studs. We have wrapped the lower part of the house and one of the gables, and now only the south facing gable remains unwrapped. This step is helping us reach our quickly approaching goal of having the house “dried in” so we can install drywall.


Another important step on our path to being “dried in” was the installation of windows. After the Tyvek was installed, it was cut for window openings and wrapped through the rough openings to provide a seal. Sealant tape was also used to ensure that no moisture or air would be able to move through the openings. After this was done, the windows were installed. This process involved lots of leveling and using shims to ensure that the windows were perfectly straight in their places. Now that the windows are in, it’s really starting to look like a real house!


This week the interior team has been hard at work building and installing interior walls. They have completed all of the walls that divide rooms, so it's now possible to walk through the house and really see what the house will eventually be. They also installed two small hip height dividing walls between the kitchen and the living room, which help to divide the two spaces. They have also been working to install the blocking and rough openings for doors on the interior.

This week Ree came to site to visit and see our progress. Several students met with her to present our options for the exterior color. We showed her several options, and she she selected the color “ash grey”, which is a light grey that will look great next to the blue of Geraldine’s house.
0 notes
Text
Spring Week 7

This week in woodshop we all have been working hard on our chair mockups. This is as Steve says, “To get all of the ugly out of the way”. Everyone was practicing their cuts, drilling holes, joint connections, and so on. Then on Friday we all met with Steve and review our work and what we need to improve on for the next week.

Our weekly Monday Afternoon field trip this week was to the Gaineswood Mansion in Demopolis, Al. Gaineswood was a plantation home designed and built by General Nathan Bryan Whitfield, beginning in 1843 as an open-hall log dwelling. Whitfield was a cotton planter who had moved from North Carolina. Today was a great day for a trip to this elegant home. The sunset was beautiful enabling people to take good pictures. At the end of the trip to get the blood pumping, we had to do a three minute sketch of the plan of this massive home and then a three minute sketch of the section.

We started off our Tuesday in studio catching up on our “office work” as Emily calls it. It was a good way to make sure our entire group is on the same page with what needs to get done behind the scenes.


One of the design decisions still facing our team is the exterior space between Ree’s home and Geraldine's home. Our team will be tasked with designing and building a landscape that will connect the two spaces so the sisters can enjoy it. Our crash course in landscape began with a studio trip to Lions Park, where we spent the day creating sketches that we used to study various elements of the park. We studied themes such as seating, the arrangement of trees to create spaces, and the feelings that were created by the design of the park. At the end of the day, we gathered together in the skate park to study our sketches. This gathering provided another unexpected lesson in the way people interact with the built environment. Even though the skate park had not been an agreed upon meeting location, it provided a comfortable seating arrangement that we all gravitated to. This helped us understand the importance of proportion in the design of our exterior space.

The house has been sheathed! Dana, Cam, and Sarah finished sheathing the other gable end.
They stood on several levels of scaffolding to successfully reach the top of the gable. They spent all day measuring, cutting, and nailing. We were all glad to have the sheathing finally completed.

The Water team, Interior walls team, worked on the construction of the bedroom and bathroom walls. This required extra blocking in the ceiling plain to nail the walls into to stabilize. Some on site corrections and modifications were needed for the bathroom wall from the placement of the plumbing in the slab. The wall, or no wall for the “Bonus Room” is still being discussed and designed so that stud wall was not built yet. The interior walls were completed, which was our goal to be finished before Spring Break. In order for the sheetrock installers to give an estimate, all of the walls that need sheetrock are needed to be up. During our Spring Break, the installers will complete the sheetrock while we are not there and when we return the interiors team can move on with our tasks. There are a few other tasks that need to be complete before the sheetrock can go up like getting fully dried with windows and doors, water lines and electrical running through the walls, and boxes for outlets and switches.

This week the MEP team began to rough out plumbing and electrical. This process began with drilling holes through our beautiful stud walls to allow the pex piping to run through the walls. With the help of Johnny Parker, we ran the piping and connected fittings with sharkbite and crimp rings. Electrical work has begun with installing the breaker box, as well as placing boxes for switches and outlets. Holes have also been drilled for romex wiring to be run through the house.

Although birds are lovely animals and people frequently make a hobby of observing them, they are not usually welcome guests in a home. To prohibit unexpected feathered creatures in Ree’s attic, we installed bird blocking to fit in between the trusses and above the top plate. This blocking uses a combination of wood and metal screen to allow the attic to ventilate but keeps the worm eaters out. The process took a surprising amount of time given we had to use the drill press to drill 78 holes. Ingrid and Sarah drilled took turns drilling the holes and Emily blew the air compressor on the drill bit as it was going to keep it cool and to blow saw dust out of the hole. Preston then took all of the cut and drilled pieces and cut and stapled the metal screen to the back. It took us about a day to complete.
1 note
·
View note
Text
Spring Week 6


After the purlins went on, week six was spend installing the roof metal. This process again required teams to harness up and climb the roof. A team on the ground carefully cut and measured the panels, then handed the panels up to the roof where they could be installed.

To follow an old Northeastern tradition, we stuck an evergreen branch in the roof to give our home good luck.
Sheathing also moved forward significantly this week, and we have enough installed to cut windows into rough openings. This was an exciting moment, as it allowed our design decisions to be seen in real life.

In history class this week, we road tripped up to Tuscaloosa to tour the historic Jemison Mansion. Built 1859-1862 this Italianate house was an interesting departure from the Greek revival houses that were typically built.

This week we also took a studio trip out to Busters home to study the flashing details, as well as the siding and interior. This trip showed the value of having built projects to reference and improve upon in current and future interactions of the 20k product line.


The MEP team is ready for us to be dried in! They started drilling holes for plumbing and caulked around the floor.

The interior team has started framing interior walls and mocking up potential bonus room ideas.

Last week we had the second lecturer of the semester. Our very energetic and enthusiastic guest was Dan Wheeler from Chicago. After his lecture, he gave us a short impromptu sketching lesson.
1 note
·
View note
Text
Week 5
The first day the trusses were delivered to the site we were finishing up framing the house and the details on the porch such as the columns and beam. Then a truck came and unloaded the trusses. The next workday Rural Studio’s handyman, Johnny Parker, came out to drive the Bobcat with the crane. Scaffolding had been placed on the front porch, in the kitchen area and living room area to begin. Everyone was divided into stations on each scaffold and waited for Johnny to bring the trusses over. After about four or five Johnny pointed at one of our classmates, Nicole, who had been in studio and came out to watch. He told her to get into the Bobcat. Johnny talked her through how to use it and Nicole quickly got the hang of it. As each truss was lifted up, everyone grabbed them and pulled/pushed them into their positions. Then a person at the two stations at the exterior walls nailed them into place. Another person on each station would double check to see if the truss was plumb. As soon as it was, another person from each station braced the truss. It took roughly two days to complete putting up the trusses.

Week 5 started out with a morning in woodshop and a tour of the beautiful Thornhill Mansion. We also completed a Rural Studio tradition: taking polaroid pictures.

We spent the entire week juggling site work and studio work. In studio, we worked on designing window heights and exterior cladding schemes for Ree’s Home. We did numerous iterations of options and presented them to Xavier and Steve.
Another one of our design problems this semester has been figuring out what to do with a small bonus room by Ree’s front door. This room was originally intended to be a laundry room but we were able to move the washer and dryer into the bathroom to free up that little space. Every person in studio came up with an idea for that room, we presented those ideas, and then grouped people up based on common design ideas which we presented to Xavier and Steve.


The first day the trusses were delivered to the site we were finishing up framing the house and the details on the porch such as the columns and beam. Then a truck came and unloaded the trusses. The next workday Rural Studio’s handyman, Johnny Parker, came out to drive the Bobcat with the crane. Scaffolding had been placed on the front porch, in the kitchen area and living room area to begin. Everyone was divided into stations on each scaffold and waited for Johnny to bring the trusses over. After about four or five Johnny pointed at one of our classmates, Nicole, who had been in studio and came out to watch. He told her to get into the Bobcat. Johnny talked her through how to use it and Nicole quickly got the hang of it. As each truss was lifted up, everyone grabbed them and pulled/pushed them into their positions. Then a person at the two stations at the exterior walls nailed them into place. Another person on each station would double check to see if the truss was plumb. As soon as it was, another person from each station braced the truss. It took roughly two days to complete putting up the trusses.


After trusses went on we were free to start installing the purlins. Five of us got harnessed and climbed up the roof to install the purlins. We had an excellent team on the ground that measured out where the purlins lined up with the trusses. Then we pushed and pulled the trusses so that they were plumb and lined up correctly with the purlins.
0 notes
Text
Spring Week 4
Now that we had a schedule, we were able to divide and conquer. Team Air (framing) took charge and organized the rest of the class on site. Within the week we finished framing, blocking, ladders on the exterior walls and anchor bolted the walls to the foundation. We also installed the double top plate on the exterior walls and put up all the sheathing.

0 notes
Text
Spring Week 3
Although we were eager to get started on finishing Ree’s home, we had to accomplish a few more things. First, we organize ourselves and created a schedule for the entire semester. We did scheduling through a pull planning session and divided ourselves into teams with fun aliases. We have framing (team air), exterior (team fire), interior (team water), and MEP (team energy). Here at Rural Studio safety comes first so we all got OSHA certified. Week 3 was our first full week of normal classes. We spent Monday in woodshop class and on our first field trip of the semester for our art history class. We left the trip feeling excited about all the wisdom we will gain this semester from the experienced Dick Hudgens.

Last semester’s third year students spent a lot of their semester experiencing the wonders of the Alabama clay. They wanted to make sure that we also got the chance to become familiar with the nature of our site. Our dear professors, Emily and Alex, made sure that we did experience the dirt and we spent our first day on site trampling through the clay, digging. Despite the sticky, heavy clay that masquerades as dirt, we were able to alter the landscape of the site so that water would slope away from the house and not pool around the foundation.

Although we were eager to get started on finishing Ree’s home, we had to accomplish a few more things. First, we organize ourselves and created a schedule for the entire semester. We did scheduling through a pull planning session and divided ourselves into teams with fun aliases. We have framing (team air), exterior (team fire), interior (team water), and MEP (team energy). Here at Rural Studio safety comes first so we all got OSHA certified.
0 notes
Text
Spring Week 2

The first week in Newbern we spent moving in to our pods and studio. Our professors took us on a tour of Rural Studio’s projects. We were all very excited to see the structures we had heard so much about.

Normally during the first week of classes all the students and faculty work together on different construction projects around the town and studio. We call this week ‘neck down’ week because its all physical labor. However, our neck down week was a bit more relaxed than usual. Many of us were surprised that even Alabama can experience several days of snow/cold delay. We spent the extra down time playing games in Morisette and enjoying the days that we did get to work.
0 notes
Text
Newbern Newbies
Hi! Welcome back to Rural Studio’s 3rd-year Blog. This Spring semester we are going to be picking up where the 3rd-years from last semester left off and finishing Ree’s Home. We are all incredibly excited for the semester out in Newbern and would love to introduce ourselves to you.


0 notes
Photo

SOUP ROAST
Because of the snow, the events at Faunsdale Bar & Grill on Friday night were canceled, and Soup Roast got pushed back to 12:00PM on Saturday. A few of us spent the morning in the nearby city of Faunsdale to see the progress of the Faunsdale Community Center and watch the Faunsdale Christmas Parade.

Soup Roast began at Morrisette House with a delicious lunch of tacos! We also displayed our 3rd-year watercolors under the Great Hall.


Our Architecture History professor, Dick Hudgens, announced that the winner of the best watercolor this year was Lauren Wertz!

After that, we caravanned to Ree’s Home to present our project. It was fun to show our friends and family what we had been working on this whole semester!


The next stop was the woodshop to show everyone the chairs that we had been working on all semester. Jersey Devil legends Steve Badanes and Jim Adamson judged the chair competition this year. The winning team was Henry Savoie and Kyra Stark, who did the Frei Egidio Folding Chair by Lina Bo Bardi!

After woodshop, we crossed the street to Red Barn and watched the 5th-years give their presentations. The 20Kv22 Home, Horseshoe Farm Hub, and Horseshoe Farm Homes did a great job presenting and got helpful feedback from our consultants and visiting alumni.

For dinner, we had soup of course! Chef Cat made a delicious meal of vegetable soup, chicken noodle soup, and cornbread rolls. Since the visiting alumni were unable to give their Pecha Kucha speeches on Friday, they did them during dinner. It was inspiring to see how Rural Studio alumni had all gone in very different career paths, but were still making an impact.

We finished up the night back at Morrisette House chatting around fire barrels and saying our final goodbyes. Next semester, 2 of us will be returning to Auburn, 7 of us will be studying abroad in Scandinavia, and 7 of us will be studying abroad in Rome. The spring semester of 3rd-years will be arriving in January to finish Ree’s Home. They will be doing tasks such as installing the roof trusses, exterior sheathing, plumbing, electrical, dry wall, choosing siding materials and colors, and landscaping.
We’ve had the time of our lives this semester, and are so thankful for all the people who have helped us along the way. Thank you to our friends and family who came out to Soup Roast. Thank you to the 5th-years and leftovers who made living in West Alabama fun. We were so lucky to have such hardworking and great leaders during our time at Rural Studio. Thank you Chef Cat for feeding us throughout the semester and thank you Tim for your wonderful smiles and positive attitude. Thank you Ms. Gayle and Ms. Brenda for everything you do behind the scenes. Thank you Natalie for always having great advice on interning and how to write. Thank you Eric for growing the best food in West Alabama and your wonderful sarcastic humor. Thanks Mason for all your help on site and building snowmen with us. Thank you Johnny Parker for everything you do; from digging trenches on site to pulling our cars out of the mud. Thank you Dick Hudgens for teaching us that the best way to watercolor and learn new things in life is by jumping right in and doing it yourself. Thanks Xavi for giving us great feedback during reviews and teaching us about the history of 20k Homes. Thank you Steve Long for remaining calm throughout all of our calls of distress and always having a solution to our many woodworking problems. Thank you to Alex and Emily for always keeping us on task and motivated on site. We have learned so much about what it takes to get from the design phase to on-site construction, and its all thanks to you two! And last but not least, thank you Ree for letting us build you a home. Although our semester at Rural Studio may be over, our time here most certainly is not. We can’t wait to come back for project openings, Soup Roasts, and Pig Roasts for many years to come!
0 notes
Text
Week 11
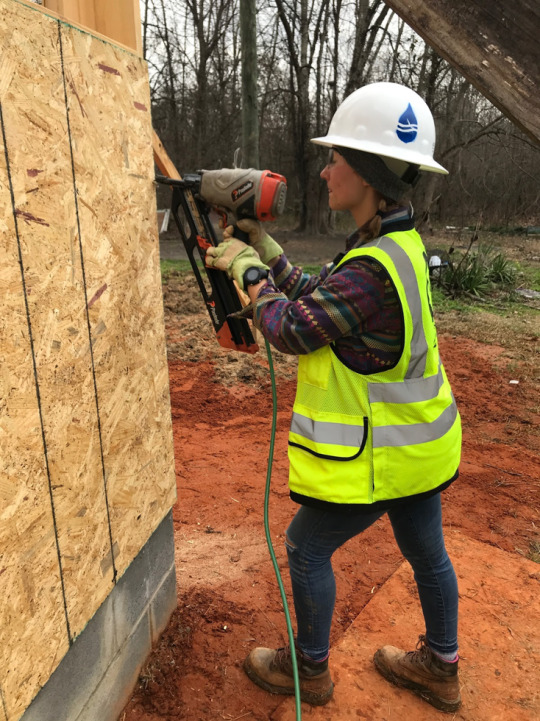
The last week was entirely dedicated to porch framing and wall framing. We finally got to put our construction documents to use and got to learn how to use a nail gun. By the end of the week, we had all of our exterior walls put up and our porch was finished!


On the last day of class, we were blessed with a beautiful snow fall. We built a snowman, took tons of pictures, drank hot coco, and watched Christmas movies in the common room.


Friday was our last day of class out at Rural Studio, but thankfully we have one last day to come together and celebrate tomorrow at Soup Roast!
0 notes
Text
Week 10
This week we finished slab preparation and set up for porch framing. We put up another round of batter boards that marked the placement for our porch column foundations.

We then dug the holes so that they were two feet wide and two feet deep.

The first step for slab prep this week was to attach the vapor barrier to the outer perimeter of the rigid insulation. The next step was to place L-shaped rebar that connected our CMU blocks to our slab. We also placed sheets of wire mesh that will reinforce the concrete slab.

We had planned to pour our slab on Thursday, but rain pushed the process a day back. We spent the day updating construction documents, gathering materials, and working on our Soup Roast presentation.
On Friday, we finally got to pour our concrete slab! The concrete truck rolled up around 12:30, so we had plenty of time to make sure everything was ready in the morning. We had two concrete experts, Clyde and Adam, who came out to finish the slab. We helped out by spreading the concrete around the foundation with shovels and rakes.

Clyde and Adam finished the slab using a Concrete Vibrator and Power Trowel.


Next week we will begin wall framing, which is our last step before the end of the semester!
One of the great traditions of Rural Studio is the Christmas Dinner, which happened on Saturday night. The 5th-years hosted the dinner at the “Cat Drop” Loft in Greensboro, and everyone signed up to bring a dish. After the feast, we had a humorous white elephant gift exchange and danced away the night!

0 notes
Text
Week 9
This week was all about slab preparation. The first step was to fill our foundation with engineered dirt to the height of our third course of blocks. We spent a lot of time filling up wheelbarrows with dirt, but made a fun game out of dumping it into the foundation! We would fill the foundation up to one course of CMU blocks, rake the dirt so that it would be level, and then use a tamper to compact the corners and a jumping jack to compact the fill.


Last week, Andrew worked on the plumbing plan that marked the exact placement of the plumbing lines and the slope the pipes would have to be underground. The plumbing goes out of the house on the south side and the kitchen plumbing connects to the bathroom. In order to mark where our plumbing will go on site, we set up batter boards to drop down lines that would serve as our guide when digging the trench.

Johnny Parker came out to site to help us do the plumbing. We cut and placed the PVC pipes and their connectors into the ground.

The process of filling the foundation with gravel was very similar to the process of filling dirt. We scooped the gravel into wheelbarrows and buckets and dumped them into the site.The height of the gravel fill was 4″, so we had to use rakes and hoes to even it out.

Once our foundation was filled with gravel, we used the tamper and jumping jack to compact the fill. We also laid 2″ thick and 2′ wide rigid insulation around the perimeter to insulate the slab.


All that’s left to do for slab prep is lay the wire mesh, place our rebar, and dig our porch foundation, which we will finish when we get back from Thanksgiving Break! For now, we’re all just thinking about the Iron Bowl, War Eagle!
0 notes