
Hi there, you can call me M. Welcome to my blog.This blog is dedicated to my experiences as a first time homeowner, and all the ups and downs associated with it. You can read the pinned comment to see answers to specifically asked questions, as well as a little bit more about me.
Don't wanna be here? Send us removal request.
Statistics
We looked inside some of the posts by 820619 and here's what we found interesting.
Average Info
Notes Per Post
885
Likes Per Post
654
Reblog Per Post
229
Reply Per Post
2
Time Between Posts
22 days
Number of Posts By Type
Text
17
Last Seen Tumblr Blogs


Fun Fact
Tumblr is used by 21% of adults online aged 18-29 years.
Text


Studio House, Nelson, New Zealand - William Samuels Architects
238 notes
·
View notes


Text
Update 10 - December 2024
With a month off work, i decided to tackle the loft boarding project I'd been sat on.
I'd tidied the loft a few months back, so it should have just been a matter of measuring, installing, and then filling it with stuff.

I started by installing the tri-struts of the kit, working from left to right in the loft space. I bought a kit that was slightly oversized for the space I had, since the size that was just under didnt have enough length or width. The kit was 3.6m² but I roughly measured a 3x2.8m space, excluding the areas either side of the loft hatch. This meant that in theory I should've had enough materials left over to build either side of the hatch too.

The kit explained that each tri strut should be placed every other joist, and in between should be a uni strut. Before placing the uni strut however, the beam was to be placed across the tri struts and secured. Then the uni strut was to be slot into the beam from underneath and secured to the joist and beam.
This was fine until I realised i did not have enough uni struts to intersperse between every tri strut. I think, based on the instructions, I should have just used the tri struts because the distance between the joists was less than 400mm. Anything above 600mm should have had a uni strut in between. So the centre and right half of the boarding floor are "reinforced" with a uni strut, and the left half is not. No big deal really, just annoying for me that I misread the instructions.

I worked from right to left, as the right required the least modification to the boards and joists.

Once i had all the struts and beams in place, I started re-laying some of the insulation and tidying up a little before everything was enclosed under the boarding.

The boarding is meant to be staggered to spread the load across multiple joists and struts, with each board being secured at either end and the tongue and groove being connected down the sides. I'd bought a jigsaw to cut the boards and the blades I'd bought, whilst being expensive, started to burn out rather quickly. So i worked on the premise of cutting as few boards as possible, which was fine when working from the right hand side but not for the left hand side of the loft space, as there were vertical joists that were in between the struts and beams.

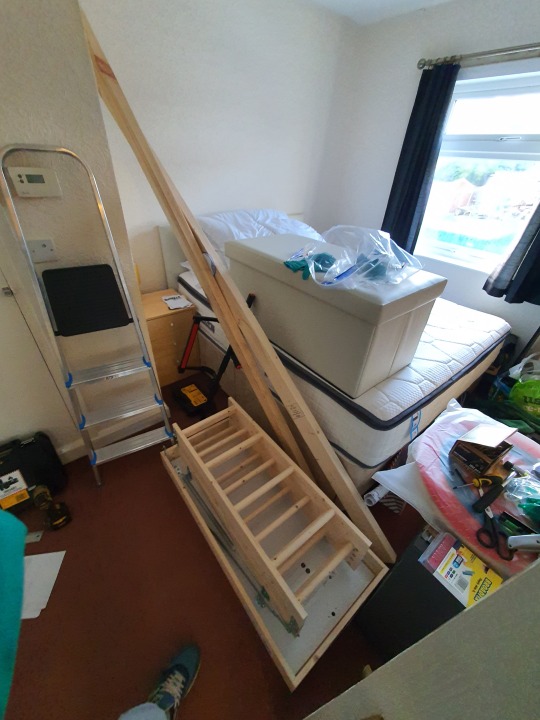
With that in mind however, I plugged away and it took the best part of 10 hours to get to the point below:

The end to end cuts are not perfect (straight lines are the bane of my existence as I can never achieve them, even with some sort of guide) but the majority of it was installed and stable by the time I picked up the doggo from daycare.

The following day, I finished up by working all the way back to the end of the beams I'd installed, which takes you a comfortable distance away from the battery and inverter. I borrowed some hazard tape from work, and taped out a walkway for potential engineers that may go up there to work on the system. I also taped right at the end as the board is not fully supported and I'd hate for them to walk right there and put a foot through the ceiling! I may print some little warning signs to put at the edge of the board and serve as a physical reminder is people overstep...

As mentioned at the beginning, I bought excess materials so most of those are in the loft ready for when I have the time and energy to build to the left and right of the loft hatch. For now however, I have enough space for what I need to store up there so there is no big rush. I need to remember to leave space for ventilation when i do however:


0 notes
Text


House in the Mountains, West Coast DC, South Africa - Wolff Architects
205 notes
·
View notes
Text


Bundanon Art Museum & Bridge, Illaroo, Australia - Kerstin Thompson Architects
299 notes
·
View notes
Text


Sinfonia Verde Home, Carate, Costa Rica - Studio Saxe
91 notes
·
View notes
Text
Update 9 - October 2024
Now the panels are installed, I want to tidy up the loft space and have a kit ready to install to add storage space.


The insulation (left to right in the images above) was a mess from a) when i installed the big loft hatch, and b) from the installers of the battery and inverter. So in preparation for installing the boarding kit, I tidied what i could and removed a bunch of crap that was up there:


Now I just need to find the motivation to install the kit - that can wait until December i think as I've got the month off work.
0 notes
Text
Update 8 - September 2024

Following recent world events affecting the cost of utilities, I decided it was time for my first major project on the house. It doesnt need anything currently, and the leaky roof hasnt been an issue since i emergency sealed it, so i can keep doing that for now once a year considering its cheap.
I checked with my electricity supplier, and they had a deal whereby if you installed a solar energy system through their approved installer, you got a 25% reduction on your electricity bills for a year, and a better rate on exported energy generated by the system. I contacted their supplier, went through the details with them, and got approved for a bank loan.

In short, the system would consist of 7 panels, an inverter and a battery (5.3 kWh), and would cost £10k all in. Paying that back to the bank worked out at just over £200 a year over 5 years. Cheaper than a new car, and once I've paid the loan off, it'll pay for itself within another 8 years. The systems expected life time is 30 years, with 5 year warranty on parts and labour, and an additional 5 years on the parts from the supplier themselves, SunSynk. Over the year, the system will cover about 70% of my electricity usage; this doesnt directly correlate to how much money I'd reduce my yearly bill by though, and the estimate was around £400, but this is a conservative estimate based on current weather patterns. It might be more or less depending on my habits. The installer of the system was super helpful and informative, and provided me with a decently detailed document that explained everything.


The system took less than a day to install, the scaffold was up for about 5 days, and after 3 months of use I'm pretty happy with the work they did and the system itself. The battery and inverter are installed in the loft, and i made sure to check with my house insurance whether it was all covered. They stated that the first installation for renewables is always covered providing its classed as a residential system, which mine is.
The supplier of the hardware has their own app that lets you see what the system is doing, and it also directly connects with the Hive app and gives information there too, but the Hive app is much less detailed than the official SunSynk one. Its pretty addicting to see the numbers go up and down! I've only had two issues with the system so far:
The first was the app's server going down, so i couldnt see what the system was doing without using the Hive app or looking at the inverter itself.
I noticed the charge of the battery jumped from 26% to 100% in the space of 5 minutes the other weekend. I've read that this is a problem with the battery monitoring its level and getting stuck. A reset of the battery usually clears it but the problem rectified itself as the charge went down like normal and has been fine since. I put it down to the winter months and the fact the battery has been sat at its hold level of 25% for a prolonged period of time.
So yeah, very happy with the system, and the reduction in my bills - once i have a full years worth of data to share I'll do so.
0 notes
Text
Update 7 - August 2024

Nothing major, just replaced some fence panels in the back garden as the storms a little before then had broken one of them and split some of the others.

New fence panels were left to dry on the drive for a few days, and then kept dry by storing under a tarp. Once i was ready to paint - i used some Owotrol paint to see if it was worth the price: it was - i laid the tarp down and set two panels on it.

Two were painted, then stood up to dry, with two un-painted panels laid down after. I painted only one side with a semi thin coat (neighbours were not bothered about me painting both sides, which is good because i ran out of paint before finishing all 7 panels 🙃) and then left it to dry. The paint is a good enough quality that it took to the wood well and even now 3 months on after some pretty heavy downpours, it looks good and even. I will get some more paint over the christmas period and do the last panel and then give the others another thin coat.

Once they were all painted and dried, I ripped out the old panels from the posts and slowly slot them in. This was tiring but good fun. The last panel to remove is out of shot to the left behind the raspberry bush, and is not broken and kinda hidden so theres no real rush to replace it.
0 notes
Text
Repair 3b - April 2024

I managed to get on the roof and chuck some emergency sealant on where I think the water got in. I did run the hose along the back of the house prior to that, and had my brother stand in the living room where the leak appeared on Saturday night. This didnt reveal the leak though, so I thought fuck it and sealed all the most likely areas for the water to get in. Touch wood, no issues so far and we had more torrential rain on Sunday night.
I've got in touch with another roofing specialist who's going to get back to me on his next available date he's free to come and do an inspection and give me a quote. Here's hoping this guy is less than the price of a moderately used car.
0 notes
Text
Update 7 - April 2024
I had a lamp in the living room that didnt have a lamp shade. So i printed one.
I bought some translucent blue PETG material for the printer, printed a 1/10th sized one before hand to make sure the material settings were correct, and then set off the full sized one the following day.


The model isn't my own (see here) but the material choice was, and I did tweak some of the settings on my printer based on some of the comments on the file. Overall I'm pretty happy with it and have had some nice complements on it!
Oh and i found the loft hatch pole that i couldn't find yesterday:

4 notes
·
View notes
Text
Update 6 and Repair 3- Big holes and little holes: April 2024
Pretty busy month so far, and at the time of writing we're only 6 days in.

Firstly, I want to be able to utilise the loft space more for storage. However, the loft hatch was only just big enough to climb through, let alone carry items up into it too.
So i bought a loft hatch kit, with an extended hatch size and a ladder attached to it.
My manager, MD, offered to help me with the process of cutting out the ceiling, cutting out the joists, re-bracing it all and then securing the hatch into the ceiling.
We started by removing the existing wood/joists that framed the old hatch, and then we cut out the sections of joist that would need to be removed for the new hatch.
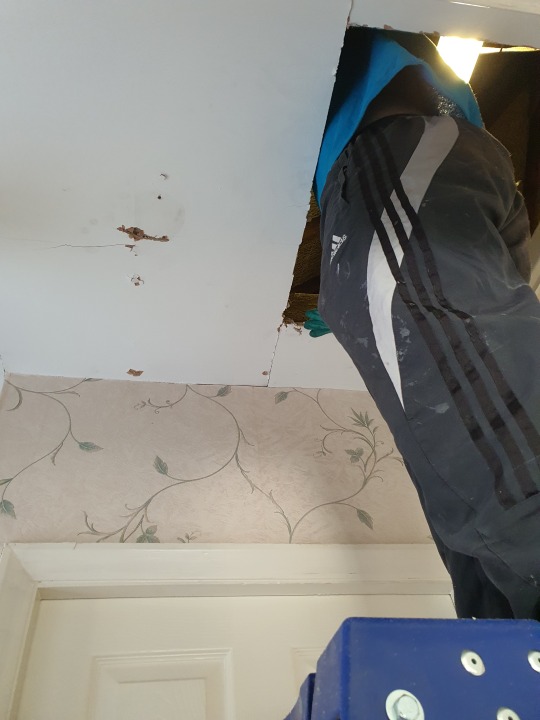
The act of cutting through the joists started to collapse the plasterboard, so we pushed it through and left it to one side.

From there, we measured, made a note, and then measured again to make sure we have enough new joist CLF to make the frame of the hatch. I bought about 50% more than we actually needed, which turned out to be essential as one of the pieces of CLF was twisted, and when we cut it to size and put it in place against the original joists, it did not sit where we needed it to. So we had to trim the twisted piece, cut from the other piece I bought, and then but the two sections up against each other and secure them to an original joist (see the right hand side CLF joist in the below image - it is in two halves).
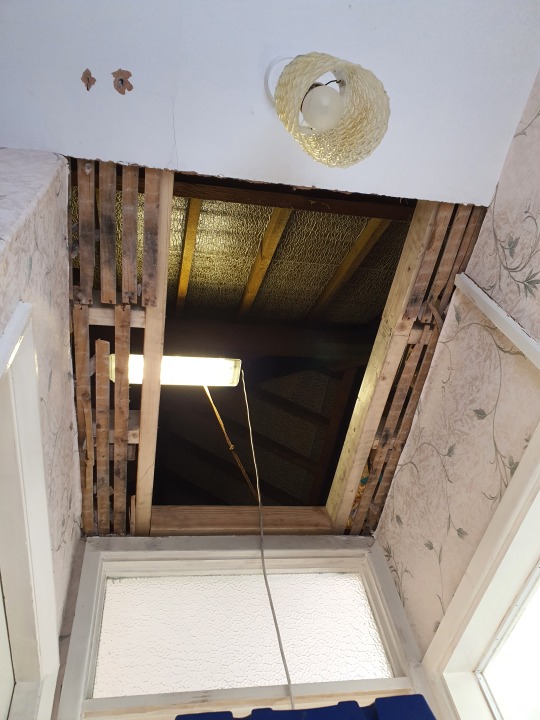
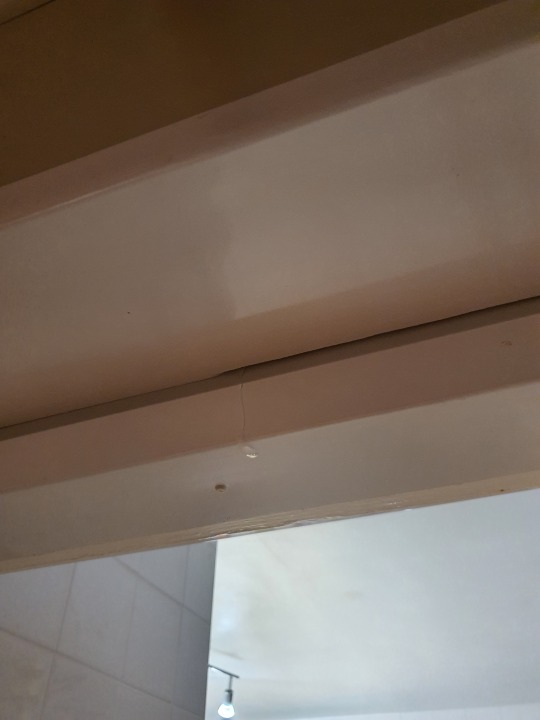
Initially, I wanted the ladder to pull down and into the spare room, however when we initially fit the hatch into position, spaced it away from the new joists, and opened the hatch, the ladders wouldn't swing past the top of the door (see the glass panel in the image above). This resulted in us removing the spacers and screws into the new frame, lifting it up into the loft, spinning it around, and then dropping it back into position in the other direction.
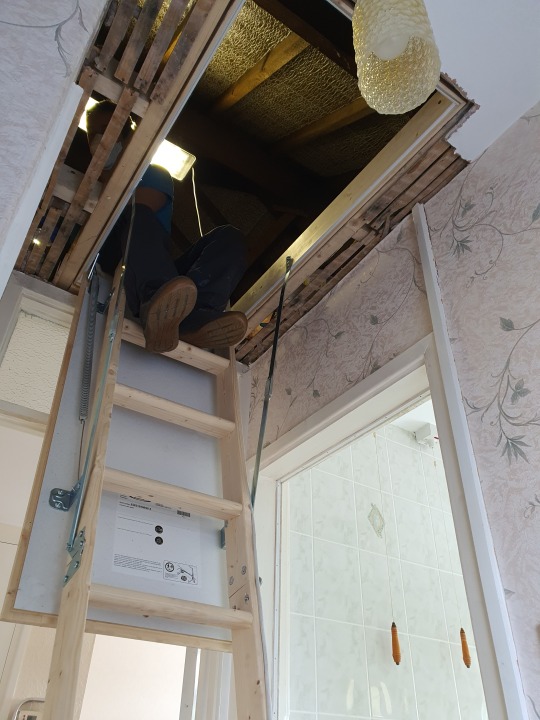
This worked, but with two caveats: a) the ladder swings out onto the stairs, which is a bit dangerous when you are carrying heavy items. b) the ladder swings into the light fitting, so I'll have to fit some sort of spot light or shortened light fitting in future to avoid smashing the current one in frustration.
After 6ish hours of getting hot and sweaty wrestling wood in a confined space into tight positions - i know how that sounds but it was definitely not as fun as you're thinking - the hatch was in place and secure.

All that was left was to tidy up. I lost the pole that came with the kit to open the hatch, so temporarily I planned to use my crowbar. Long term I will print something on my printer.
The plasterboard that was around the hatch was no good, so my brother (who's a plasterer by trade) has said he can sort it.
The next day...


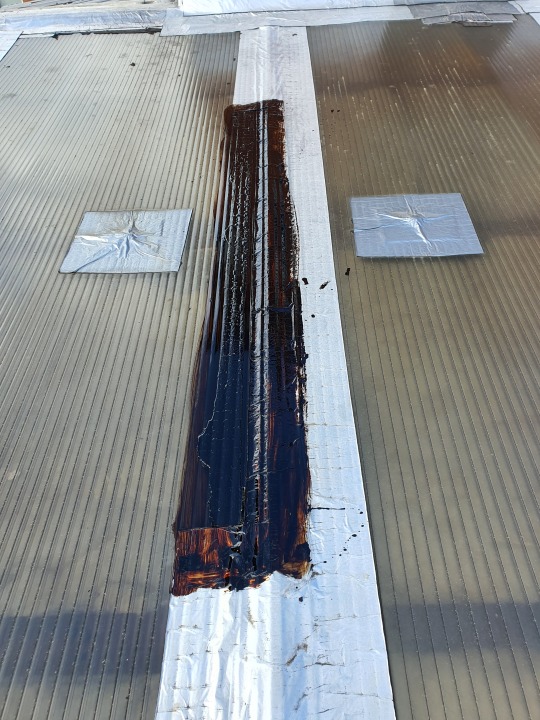
I was in the garden and noticed the flash band on the living room roof had peeled up in another location. Fearing the impending storm, I got back up onto the roof and hastily cut away the old, peeling flash band, cleaned it up as best i could, applied some flash band glue, and then put a fresh piece in its place.

The tape is not completely straight, and it does sit on a small area that i didn't apply the glue to (i underestimated the thickness but did clean the area), however it sealed tightly after being pressed down and had about 2 hours of direct sunlight to set in before the wind and the rain came bounding down.
Whilst this patch seems to have held, somewhere else appears to have given up, as later in the evening a leak made its way into my living room and started pooling in the doorway between the kitchen and the living room.
Ironically, I had a guy out in the week to price up a new roof - in short, building regulation in the UK prohibits building an extension without prior permission, and one of the ways to circumvent that is by making the roof of a non-fixed construction. In this case, the roof resembles a series of polycarbonate sheets taped together, not a fixed, solid roof. Upgrades include replacing with glass panels (which is fine until the sun comes out and you make a room sized furnace) and aluminium panels like the image below (which offer the best in terms of noise cancellation from the rain, insulation from fluctuating temperatures, and longevity)

To have an aluminium roof, I'd be looking at spending around £16k, which I just don't have at the minute. Even taking a loan would be unreasonable, as over a 5 year term I'm looking at paying back almost as much as my mortgage. My mortgage is already a quarter of my salary, so its not even an option.
Tomorrow I'll get back up there and seal the entire top section with emergency sealant: its going to look awful for a while but Id rather that than have a small swimming pool ruin my living space...
0 notes
Text
Update 5 - March 2024
I decided to replace the cutlery that was given to me at moving in, and I also bought a drawer organiser.

Prior to purchasing, this is what the drawer looked like. It irritated me every time i opened it....

This is after - i moved plastic and metal utensils to a spot next to the oven and left wooden utensils and cutlery in the drawer. Logistically, it makes more sense to have them over there next to where they're used mostly.
0 notes
Text
Repair 2 - March 2024
We had some bad storms in March of this year, one of which borrowed the felt off my dry stores shed to give to a neighbour and didn't give it back once they were done with it.

I toyed with the idea of just replacing the felt, however the roof on the inside was kinda damp and I was thinking it might be best just to put some emergency sealant on there and let it dry for a couple of months, then check the roof again. If its still damp, the felt nails will most likely just not hold the felt properly, so I'd have to replace the roof anyway. If its dry, then I can replace the felt and save some money.

Not the prettiest of jobs, but after a month it appears to be holding firm still. The roof inside has started to try out a little bit too, so I might be able to get away with just re-felting it when the warmer weather comes.
The storm also separated a gutter pipe so I've bonded that back together with some sealant to a) avoid a build up of leaves in the pipe (a nail holding the pipes together would've provided a snagging point for foliage) and b) ensure I can dismantle it in future if needed.

In preparation for a future event, I needed to make the washer level and quiet, so i bought some anti-vibration pads to put under the feet. I bought two thicknesses, so that I can fill in the void below the foot that doesnt have any tiling underneath it.

After some back and forth with moving the washer and then the dishwasher and squeezing between the two at awkward angles, I managed to get the washer somewhat level.

Unfortunately, adding the feet raises the washers overall height, and it now touches the underside of the worktop.

Over time it'll wear, but for now I've left it as is as the washer is much quieter. I've also used some of the spare vibration pads as padding between the top of the washer and the worktop, so this should reduce some of the wear further.
0 notes
Text
Update 4 - Dec 2023
Not much change here: bought some Google Home's with my christmas bonus so that I can control some of the things currently smart enabled. Just a hive thermostat and some smart lighting at the minute.

I've set them up in the Games Room, Kitchen and Living Room. I've also bought some brackets so I can recess them into the walls at some point in the Games and Living Room, but havent got the balls yet to cut up the brickwork to the extent thats needed!

So far, Im impressed with their functionality. I can use them to check whether the front door is locked, bring up the feed from the front door bell on the display (useful when im cooking and could do with knowing whos at the door before burning my dinner by getting stuck in conversation), play music in each of the rooms, start a timer (useful for naps) etc.
0 notes
Text
Update 3 - November 2023

I didn't realise how irritating a ticking clock can be when you are the only person in a room, so i bought a new clock. It's the only clock i could find that was digital and looked general enough that it would fit in a living room setting.
During the day/with the lights on, the power wire is clearly visible and does annoy me, but at night it looks ok.
I relocated it to the wall above the downstairs toilet because i think that's where it makes the most sense to put it, which i'll show in later pictures of the living-room.
0 notes
Text
Update 2 - Oct 2023
I like tech, and i like tinkering with automation and programming, so part of my ambition for Sanctuary is to automation where it makes sense and make things easier when a) I have guests over to entertain, and b) should I need help with something in an emergency.
I've always been interested in the idea of a smart lock, and having remote access to a home without a key, however most devices look really obvious and I wanted something discrete from a manufacturer I vaguely knew. I started reading into it and the lock company Yale actually released a new smart lock whilst i was doing my research, the Conexis L2. The L1 was met with lukearm reviews, as the app was janky to use, it didnt always work, and some of the most obvious features were left out of the device. Luckily though, reviews of the L2 seemed to suggest that this was all addressed with the new device, so I decided to give it a shot.
One of the best things about this lock is the ability to check if the doors locked from wherever. I constantly leave for work, lock the door, walk 3 steps and then think "did i lock the door?", go back and then check it. Now I can just check from my phone (even though I always lock the door). Its also very useful for house sitting, as i can get spare keyfobs, assign them a name and then hand them out to immediate family. Similar for contractors too - if im at work, I can either unlock the door from my phone should they ring me, or give them access through the app via a guest email address and account. I can then restrict access as and when they do work for me. This is basically the same as giving them a key, but i dont have to chase them up to get the key from them should they forget to give it to me.
It does have a Geofencing feature too so that it primes the unlock when youre in a specific range, and then when your phone is near the door it will unlock for 30ish seconds before locking again, but this is only really useful if you have your hands full with shopping and you cant really get to your keys - otherwise its a bit of a gimmick.
Overall, pretty happy with it - its not overly "look at me - im a smart lock" and its been faultless since i installed it.
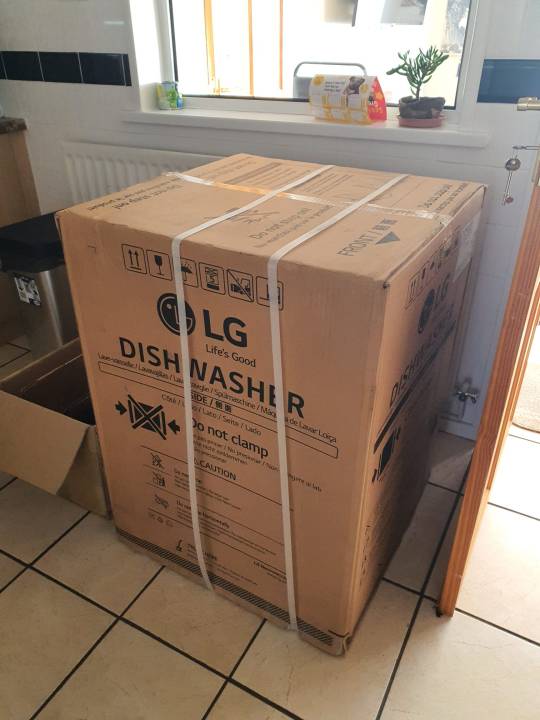

The dishwasher also arrived, so I spoke with R - a work colleague who suggested i get a dishwasher and he could help install all the pipework and get it all set up - and we penned in a date to get it all plumbed in. I got all the bits and pieces he specced out for me beforehand.
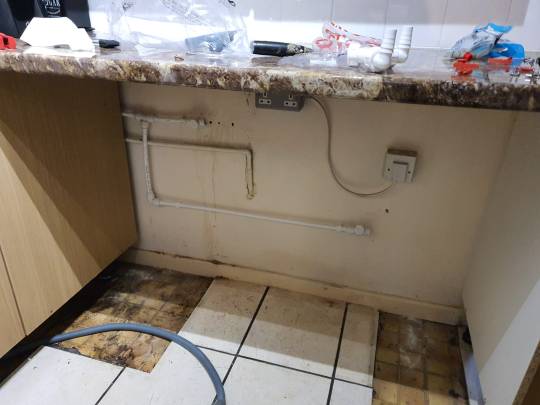
On the day, we took the washer out of its slot, removed the cabinets either side of it, and then looked at the plumbing. We just needed to put a T piece in and another line for the washer water supply - we did this with JG Speedfit components, that are simply push fit fittings and snap together like Lego.
We noticed that either side of where the washer was, there were tiles missing. This wasnt an issue, as we put some wood board in the slots, but made levelling the washer a PITA.
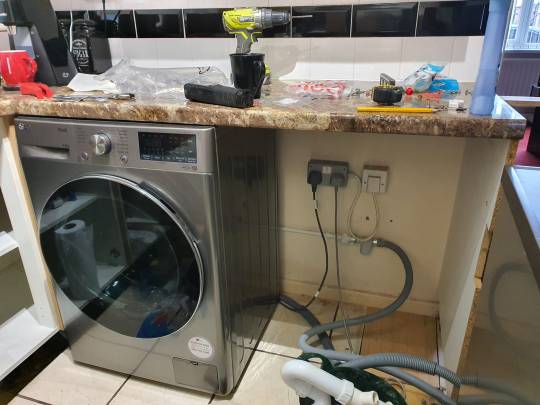
We also had to relocate the plug socket on that wall so that it didnt foul on the back of either of the appliances.

At that point, I realised the cupboard next to the washers new position wouldn't open because it didn't have enough clearance, so we moved a door from the other end of the kitchen cupboards with hinges on the opposite side, and put it next to the washer. This meant i could now open the washer door and the cupboard door.
The last thing to do in terms of pipework was replace the pipework under the sink with a U piece that had two waste points instead of a single waste point. This involved some cutting of the cupboard sides to accommodate the pipework, but that wasn't an issue either as I have more than enough cupboard space and could relocate things if needed.
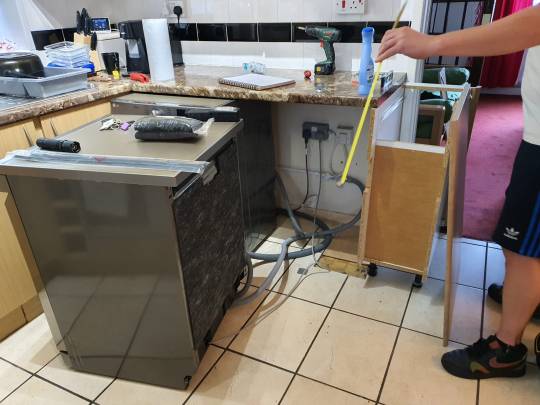
Once it was all connected, we ran both appliances at the same time to make sure the connections for the waste water were all tight and could handle both lines being pressurised at the same time, and then started measuring out the new end-board, as previously this was the side of the small cupboard we had removed.
The end-board was due to be delivered that day, so we waited for it to get here. When it did, we measured it to size, cut the board, and then fit it into place - we cut snuggly and reinforced its location with some L brackets that went into the sideboard and the wall. Pleased with the fit and it was a pretty close match in terms of colour and surface to the rest of the kitchen, so I was happy with that too.

Once all that was completed, checked the connections for the waste water and noticed the washer was leaking a little - i hadn't tightened it up enough it seems! We retightened, and then ran the washer again to check if it leaked and when we were confident it hadn't, we then spent half an hour levelling the bastard thing. Super annoying and some of it was guesswork as the far corner had to be levelled, pushed back into position, then we had to rock it gently to see where it moved, pull it back out and adjust and rinse and repeat. Even now, in March 2024, its not perfect and I am going to have to replace the wood board with something else as it seems to be getting noisier with each cycle, but its running for now and that's the main thing.

Overall though, I'm pretty happy with how it turned out, and the appliances themselves have been faultless so far. Both are LG, with "smart" functions, which are somewhat useful and somewhat gimmicky.
Useful features including telling me when it is time to run a cleaning cycle with some sort of cleaner , as well as the washer auto stopping if it senses too much vibration from an unbalanced load. It will then send a message to the LG ThinQ app asking me to remove some items or to rearrange them in the drum - this will stop it damaging itself or from running across my kitchen. The dishwasher has a steam mode to really clean glass or ceramic items, like stained glasses or casserole dishes with years of baked on crap - whilst not tied to a smart function as such, its been pretty handy to use. The dryer function on the washer/dryer is also pretty energy efficient, i think in part because its got a heat-pump to generate the heat which it then just cycles round for a few hours, and on the other hand its about 10 years newer than the previous dryer left behind by the previous owner.
Gimmicks include being able to download "niche" cycles onto the machines, which so far has been pointless since none of the cycles that you can download offer anything you cant already achieve with the standard, in machine ones.
Having a dishwasher is much better for me as an individual, as its a good way to make the most of my time outside of work - it can do the washing whilst i sleep :)! Still, at this point Sanctuary didn't feel like my home. It felt like i was house sitting and being a super generous house sitter by maintaining it and buying new appliances whilst it is under my watch... I think as I put more of my own mark on it, it'll feel much more homely - even now, 8 months into ownership, im 50/50 feeling like a house sitter and like this is my own space.
0 notes