
Don't wanna be here? Send us removal request.
Statistics
We looked inside some of the posts by abigailwilkinsonproject3 and here's what we found interesting.
Average Info
Notes Per Post
4
Likes Per Post
4
Reblog Per Post
0
Reply Per Post
0
Time Between Posts
1 day
Number of Posts By Type
Text
17
Last Seen Tumblr Blogs


Fun Fact
The KCSC sent more than 20K requests to delete posts related to prostitution and porn to Tumblr from January to June 2017.
Text
Evaluation
In my evaluation I am going to be talking about my final piece and how I came up with it and the process of it. Firstly, when I was starting to think about my final piece I had a different idea to what I ended up with and a completely didn’t meaning behind the sculpture. My first idea that I through of and created was to have a main image as a canvas of one person and then use different facial features from other people and put them around the image in different places and put multiple of the same features in the same place and that first idea was inspired by Bruno Del Zou, Bruno Del Zou has a sculpture the same to this and that’s what I was first inspired by because I liked the idea of having facial features in different places and I liked the composition in the image but after thinking about the sculpture and my creation, I wanted to put my own twist on it, by getting the model I was using to have no makeup on and look bare and fresh and then put the main image in black and white but then keep the facial features in colour and then putting the like and comment bar from Instagram onto it, I got this idea because I started thinking more about it and I started thinking about natural beauty and the expectations of what society wants you to look like and so I put my own meaning behind the picture. When doing this sculpture the materials I used were card, I used card to put on all of my images so that they were sturdier and not fragile because I didn’t want anything to crease and I also used a glue stick, I used a glue stick to stick the paper onto the card, I also used a guillotine, I used a guillotine to straighten up the edges on my main image and the individual facial features so that they were straight and more pleasing to the eye and I also used double sided tape, I used the double sided tape to stick the facial features onto the main image and I also used a white foam board and cut out little squares and I use that little squares to stick on the facial features so that it gives that 3D effect. The photoshoots I did when planning my final piece, I didn’t end up using the pictures I took because I didn’t like them as much as I thought I did when I first took them and so I took other pictures for it and I felt happier with them. If I was to do this again, I would think more about it and think about my ideas in the beginning so that if I wanted to change I’d have plenty of time to do so because I think I did my thinking and planning and ideas in a short amount of time and so when I decide to change the idea and put my own twist on it I feel like I rushed it because I had a short amount of time to complete it. The location I chose to photograph my sculpture was in a studio because I thought the studio would be the best place because it has a white backdrop which is very useful and it also has studio lights I used to capture good lighting, I also decide to do it in a studio because I thought it would help focus more on the sculpture because of the white plane background and I didn’t want anything else to take the focus off the main piece. In this assignment I feel I did very well although there were times when I struggle such as when I was thinking about my final piece and how I was going to make it and what I was going to use to making it, I also had a lot of problems with printing out my images because I needed A3 paper but the printer didn’t always have A3 paper so I had problems with that but I managed to sort it out apart from I think my overall finished 3D sculpture was a success and I was very happy with the outcome of it. When I was going through the process of my making my final piece, I had some struggles such as the photoshoots because I wasn’t completely happy with the photos I took, and so I didn’t want to use them in my final piece and so I took more photos and I was really happy with them so I used those images for my final piece. I had fun making my final piece such as sticking the final features onto the main image and figuring out where to place them. My overall finished sculpture is a big A3 image and it is a portrait of a girl wearing no makeup at all and having a naked, bare face which is representing the natural beauty and then I stuck on different facial features from different people and put them around the face and the facial features are in colour and they also have makeup on them and that is representing the expectations of today’s society and on the portrait there is a box from Instagram which has the likes and comments and the likes say 2 million+ which gives the social media effect. The meaning behind my sculpture is everyone is beautiful in their own way but when you are looking through Instagram and you see all of these women and girls with beautiful bikini bodies and with pretty faces, it makes you feel ugly and insecure because you don’t look like those Instagram models, and these days society paints beauty as being small and skinny and having clear face with no spots or imperfections and so everyone is expected to look like that but everyone is beautiful in their own way and that is my overall final piece.
0 notes
Text
My Final Piece

My final piece is a portrait of a girl wearing no makeup at all and having a naked, bare face which is representing the natural beauty and then I stuck on different facial features from different people and put them around the face and the facial features are in colour and they also have makeup on them and that is representing the expectations of today’s society and on the portrait there is a box from Instagram which has the likes and comments and the likes say 2 million+ which gives the social media effect. The meaning behind my sculpture is everyone is beautiful in their own way but when you are looking through Instagram and you see all of these women and girls with beautiful bikini bodies and with pretty faces, it makes you feel ugly and insecure because you don’t look like those Instagram models, and these days society paints beauty as being small and skinny and having clear face with no spots or imperfections and so everyone is expected to look like that but everyone is beautiful in their own way and that is my overall final piece.
When creating this I used card, I used card to put on all of my images so that they were sturdier and not fragile because I didn’t want anything to crease and I also used a glue stick, I used a glue stick to stick the paper onto the card, I also used a guillotine, I used a guillotine to straighten up the edges on my main image and the individual facial features so that they were straight and more pleasing to the eye and I also used double sided tape, I used the double sided tape to stick the facial features onto the main image and I also used a white foam board and cut out little squares and I use that little squares to stick on the facial features so that it gives that 3D effect.
1 note
·
View note
Text
Paper Vision

This is the image we were handed and then had to create our own 3D replica of it using the provided materials, this image is by Pierre chatel.


In order to make this replica of Pierre chatel ‘s image firstly, we cut out multiple different sized circles using pink card in order to create the balloon. We also decided to cut out a small white circle from paper in order to create a highlight effect onto the balloon once everything was stuck together. In order to stick each balloon layer together we used matches to put in between the layers and stick them down using a glue stick. This created a 3D effect and made the card look more like a balloon.
Then we needed to make the chair, to do this we used white paper and matches. Firstly we used four matches which acted as the chair legs and stuck them onto a square piece of paper in each corner, Then we used two more matches and stuck them ontop of the white square on one side. These were then attached to a small rectangle piece of paper which acts as the back to the chair. After our chair was put together, we painted all of the matches white so that it looks as much like the image as possible. Finally we got a small piece of string and attached it to the back of the balloon and the other end to the back of the chair.
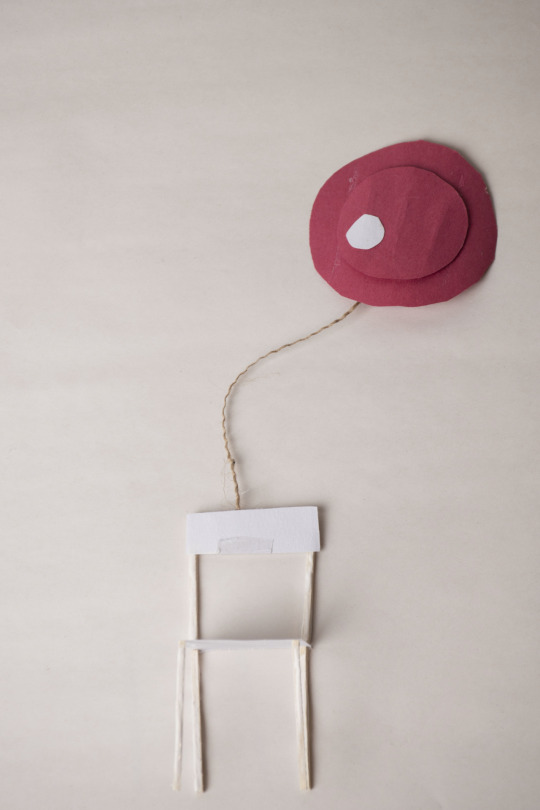
To photograph our creation, we went into the studio and rested it down onto a white board so that we could re create the original version as accurate as possible. In my opinion this was very successful, however if i was to recreate this photograph again i would use different rope, or paint it white so its a true representation of the photograph. However over all i think our attempt at recreating Chatel’s photograph was very successfully and resembles the original.
0 notes
Text
Photo Sculpture - Planning
Imagine you have to design and build a children’s nursery.
What rooms do you need included? Where should they be? What should they be near? What should they be made of? How should they be laid-out?
What else do you need to think about? Think externally and internally, what materials should be used? Why?
The rooms I am going to include in the nursery is an outdoor play area, indoor play area, toilets, Kitchen, a coat room, an area where they can have quite time. these should be maid out of soft materials so then there is a less risk for the to hurt them selves. The places should be near each other is the indoor and outdoor play area so it is easy to get to because if a little kid hurts themselves the teachers can get to them right away and they can keep an eye on them.
Imagine you have to design and build a memorial to WW1
Where would be an appropriate place to place it? Why?
Where would be inappropriate and why?
What materials should be used? Why? Think about the environmental factors of the location.
What should it look like?
The most appropriate place I think for a WW1 memorial to be build is in very quite park because I think people will respect the memorial because this is the place where people go for a quite walk. it would be inappropriate to put it in a filed where people can’t respect the WW1 memorial. Because none will go to a filed to look at a memorial WW1. To build the memorial I would use concrete to it last over many years and doesn’t brake. I think this makes it look more respected and none can brake the memorial. It will also last through all the weathers over the years. Also it should of the name and when the person passed away, it also should have setting areas so people can sit around and show there love and respect.
1 note
·
View note
Text
Final Proposal
What are your photographs going to be of? And why?... Explain your current ideas for a final piece?
- My photograph is focused on true beauty and insecurities, it’s a black and white portrait with different coloured features of other peoples faces such as eyes, nose, mouth, ear and hair and it also has an Instagram bar with 2 million+ likes on it... The meaning behind my final piece is someone looking through Instagram and seeing other women and girls with a nice bikini body and a pretty face and making them feel ugly and insecure because they are looking at all of these pretty, summer body girls. For the location of my final piece, when I’m finished with my final piece i’ll take it into the studio and take a picture of my finished product. The problem I had with my 3D sculpture was the layout of the portrait and the feature because i didn’t know if i’d have enough or not enough.
Who or what have you been inspired by?

This is a portrait from the artist i was inspired by. The artist i was inspired by when doing and thinking about my final piece was Bruno Del Zou, when thinking about my final piece i had this portraits in mind because I like the different features In different places and that is what I was inspired by when thinking about my final piece but then i thought more about it and put my own twist on it by putting the main image in black and white and putting the different facial features in colour and i also put a bit of Instagram on it too, to add the social media effect and my own meaning behind the picture, The meaning behind my final piece is someone looking through Instagram and seeing other women and girls with a nice bikini body and a pretty face and making them feel ugly and insecure because they are looking at all of these pretty, summer body girls.
0 notes
Text
Ideas for final piece

This was my first idea for my final piece, when creating this I was inspired by an artist called Bruno Del Zou, he has a very similar piece of portrait this and I was very interested init and felt very inspired and that’s why I had the idea to recreate it. When recreating this portrait I went into a studio with a model and took a picture of her doing a straight face to use as a main image such as a canvas and I also got other models in the studio and took multiple images of them, getting different poses and different angles so that I had a variety of facial features to chose from. When taking these picture I set my camera settings to aperture f/5.6 and ISO 100. The setup I had when using the studio was a white backdrop, a soft box light and a snoot light, I used these two studio lights to create a good lighting and the right amount of lighting on all my models faces and I also used a tripod so that I didn’t get camera shake when taking the photographs. After using the studio I put my photos onto photoshop and adjusted the brightness and contrast on each image I then printed them all out and sorted out what facial feature I wanted to use and where I wanted to put them and then cut them out and stuck them in place. Even though I was happy with this idea I wasn't completely satisfied with it and so I made some changes and out my own twist onto the idea and made more of a meaning behind the idea.
0 notes
Text
Photo Shoot 4


For my forth photoshoot, I also took multiple images but I think these two images turned out the best out of all the images I took, I did this photoshoot and took these photographs so that I have a variety of images and options for final piece ideas. In this photoshoot I was focused on portraits and different angles. When I took these photographs I went into the studio and in the studio I was using a white backdrop, a tripod, a soft box and a snoot light to add good lighting and I also had gel colour sheets and held them in front of the snoot light so that the colour goes on to the models face.
The first image, in the first image i got my model to do a smile and tile her body a little because I wanted to get different angle and because I wanted to get a variety of options, I like the composition of the photograph. When taking this image I used a green gel colour to hold in front of the snoot light so that it reflects red onto her face. and I also set my camera settings to aperture f/5.6 to get the correct amount exposure and I set the ISO to 100 and before posting the image I went into photoshop and I cropped the image little bit and I also changed the brightness and contrast. I chose to post this picture because I like how the green gel colour looks on her face because it looks different and I like how to body is more on a side angle.
The second image, in the second image i got my model to do a smile and put her body on a more of a side angle because I wanted to get different angle in the portraits, because I wanted to get more variety of options, I like the composition of the photograph. When taking this image I used a yellow gel colour to hold in front of the snoot light so that it reflects red onto her face. and I also set my camera settings to aperture f/5.6 to get the correct amount exposure and I set the ISO to 100 and before posting the image I went into photoshop and I cropped the image little bit and I also changed the brightness and contrast. I chose to post this picture because I like how the yellow gel colour reflects on her face and I like the angle I got.
0 notes
Text
Photo Shoot 3


For my third photoshoot I also took multiple images but I think these two images turned out the best out of all the images I took, I did this photoshoot so that I have a variety of images and options for final piece ideas. In this photoshoot I was focused on portraits and different angles. When I took these photographs I went into the studio and in the studio I was using a white backdrop, a tripod, a soft box and a snoot light to add good lighting and I also had gel colour sheets and held them in front of the snoot light so that the colour goes on to the models face.
The first image, in the first image i got my model to do a smile and tile her head a little bit because I wanted to capture different perspective and features because I wanted to get a variety of options, I like the composition of the photograph. When taking this image I used a red gel colour to hold in front of the snoot light so that it reflects red onto her face. and I also set my camera settings to aperture f/5.6 to get the correct amount exposure and I set the ISO to 100 and before posting the image I went into photoshop and I cropped the image little bit and I also changed the brightness and contrast. I chose to post this picture because I like how the red gel colour looks on her face and I like how her hair framed her face.
The second image, in the second image I got my model to do more of a straight face and out her head straight because I think it shows a different perspective and I also wanted to get more options and ideas for my final piece, I like the composition of the photograph. When taking this image I used a red gel colour to hold in front of the snoot light so that it reflects yellow onto her face. and I also set my camera settings to aperture f/5.6 to get the correct amount exposure and I set the ISO to 100 and before posting the image I went into photoshop and I cropped the image little bit and I also changed the brightness and contrast. I chose to use the picture because I think the yellow gel colour compliments her skin.
0 notes
Text
Photo Shoot 2


For my second photoshoot I also took multiple images but I think these two images turned out the best out of all the images I took, I also did this photoshoot so that I have a variety of images and options for final piece ideas. In this photoshoot I was focused on portraits and different angles. When I took these photographs I went into the studio and in the studio I was using a white backdrop, a tripod, a soft box and a snoot light to add good lighting on the models face.
The first image, in the first image i got my model to smile because I wanted to capture different facial expressions and features because I wanted to get a variety of options, I like the composition of the photographs. When taking this image I set my camera settings to aperture f/5.6 to get the correct amount exposure and I set the ISO to 100 and before posting the image I went into photoshop and I cropped the image little bit and I also changed the brightness and contrast. I chose to post this picture because I think how her body is on more of an angle but she's still looking at the camera.
The second image, in the second image I got my model to turn her body to the left and look up because again I want more variety of ideas for my final piece and I really like the way she looks up, I like the composition. When taking this image I set my camera settings to aperture f/5.6 to get the correct amount exposure and I set the ISO to 100 and before posting the image I went into photoshop and I cropped the image little bit and I also changed the brightness and contrast. I chose to post this image because its different the other pictures I took because she's standing to the left and smiling.
0 notes
Text
Photo Shoot 1


Main Images
For my first photoshoot I took multiple image but these two images are my favourite out of them all. I did this photoshoot and took these photographs so that I have a variety of images so that I have idea of options for my final piece. In this photoshoot I was focused on portraits. When I took these photographs I went into the studio and in the studio I was using a white backdrop, a tripod, a soft box and a snoot light to add good lighting on the models face.
The first image, in the first image i got my model to smile because I wanted to capture her happy side because I wanted to get a variety facial expressions. I like the composition of the photographs. When taking this image I set my camera settings to aperture f/5.6 to get the correct amount exposure and I set the ISO to 100 and before posting the image I went into photoshop and I cropped the image little bit and I also changed the brightness and contrast. I chose to post this picture because I think I got the image at good timing and I like that some of her hair is behind her ear and and I like how her head is tilted a little bit. I really like the lighting.
The second image, in the second image I got my model to do more of a serious face because I thought it would be good to have a variety of facial expressions so that I have more options. I like the composition of the photograph. When taking this image I set my camera settings to aperture f/5.6 to get a good exposure and I set my ISO to 100 and before posting the image I went into photoshop and I cropped the image and also adjusted the brightness and contrast to get it just right. I chose to post this image because I like the lighting in the image and I like how her head is tiled a little bit and I like how the image turn out
0 notes
Text
portraits of portraits of portraits

This is my first attempt of doing a 3D portrait, firstly me and two other people went into the studio and we took photos of each others face, when taking these photographs we got the person who was modelling to do different facial expressions and different poses using their mouth and eyes and we also took pictures of them face forward and there head to the left and right so that we that a different variety of angles and we took a few photos of each person so that we had different choices and options for when we was putting our portrait together. We made 3 different style copies of our portraits, this portraits is the digital copy, to do this we sorted out what parts of who faces we wanted to use and where we wanted to put it and then crop each feature and put it where we wanted it to go. When taking these photos I set my camera settings to aperture f/8.0, shutter speed 1/125 and then ISO 100.

This is my second attempt of doing a 3D portrait, to do this I printed all the images out that I wanted to use and I printed them out on card so that it is more stable, I then cut out all the features I wanted and placed them where I wanted them to go and when sticking each feature down I used a bit of spare paper and made little cubes to stick between the features and the paper to give that 3D effort and make it more 3D. This is the second style portrait copy and this portrait is made out of paper.


This is my third attempt of doing a 3D portrait, to do this we used the canvas model and we stuck each facial feature onto her face using double sided tape and we then went into the studio and took a few photos of her faces when taking these photos we got her to move her head to the left and to the right so that we got a good angle of the facial features on her faces, when we was in the studio the set up we had was a white backdrop and a soft box light and a snoot light and we also used a tripod so we wouldn't get camera shake, when taking these photographs I set my camera settings to aperture f/8.0, shutter speed 1/125 and then ISO 100, after taking these photos I went into photoshop and I changed one of the pictures to black and white so it looks more like the image it was inspired by. This is the third style portrait copy this copy is the real life style.

This is the artist I was inspired by when doing the third style portrait copy and he is called Bruno Del Zou, I wanted to recreate this piece of work because I think it looks very interesting and fun, when looking at this artist and doing research this portrait stood out to me the most because I like how he has placed each Facal feature and put it together. Bruno Del Zou is 53 years old and he was very talented in many different things such as photography, art, filmmaking and software developer. In his photo sculptures, Brno Del Zou uses photo manipulation and photographic structure to create a cubism effect. The body and the faces are revisited and their volumes are highlighted in order to create installations of multiple scales.
0 notes
Text
360 Joiner

This is my first attempt of doing a 360 joiner, to get the 360 effort I stood in a place and I went around in a circle and took pictures of the area I was looking at until I reach the first angle and I took a picture of every angle after that I then put the pictures onto my computer and printer them out and stuck them together to make one long photograph, for my first attempt of making a 360 joiner I think I did a good job when I stuck all the pictures together I thought it looked very satisfying to look at... To take these photos I went to a church in Nottingham because I thought it would look good because you can see the buildings and the church and the ground around and I think it looks really good.
0 notes
Text
3D shapes
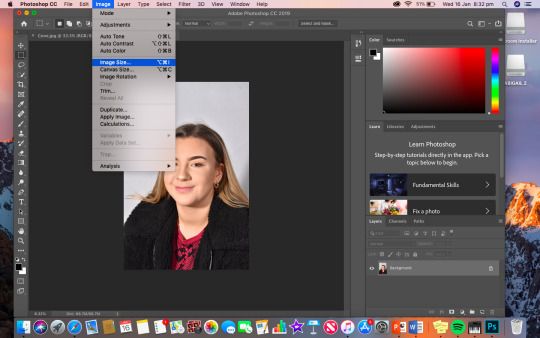
Step 1 - In step one I brought the picture into photoshop and went to image then image size.
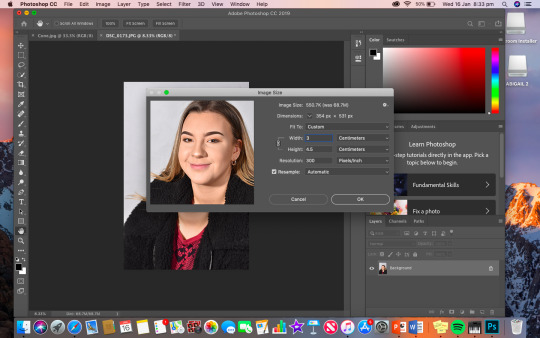
Step 2 - In step two I changed the image size to 3 to make it fit the template.

Step 3 - In step three I select and all on the image.

Step 4 - in step four after selecting the image I copied the image.
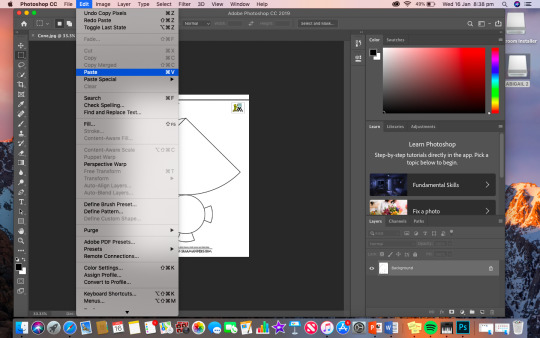
Step 5 - In step five after copying the image I paste the image on to the template.

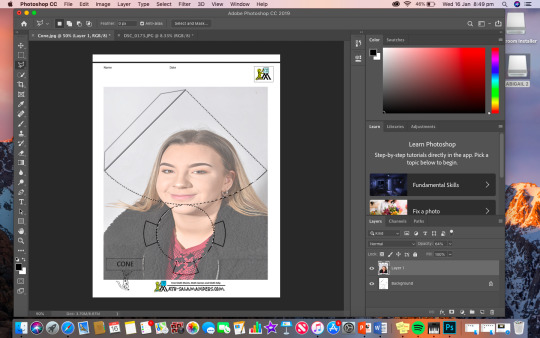
Step 6 - In step six I moved the image to cover the template.

Step 7 - In step seven I changed the opacity of the image and I moved it down so I can see the template through the image.

Step 8 - In step eight after I changed the opacity I selected the polygonal lasso tool.
Step 9 - In step nine I used the polygonal lasso tool and went around the shape of the template so when I deleted the layer and paste the image onto the template it will cover just the inside of the template.
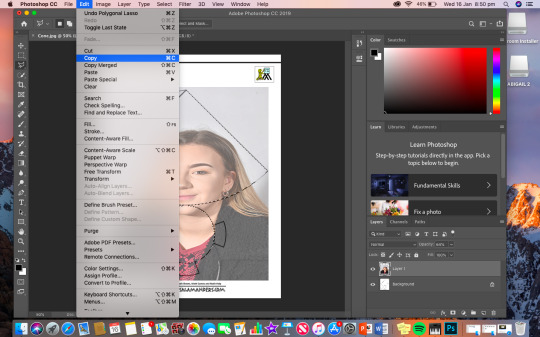
Step 10 - In step ten after I went around the shape of the template and copied the image.

Step 11 - In step eleven after copying the image I deleted the layer.

Step 12 - In step twelve after deleting the layer and paste the image.

Sep 13 - In step thirteen I pasted the image on the template.

Final piece - This is the finishing piece, for the finishing piece I printed out the template and cut it out and then stuck it all together and to take the picture I stuck a red background to the wall and used a soft box for the lighting.
1 note
·
View note
Text
Carl Kleiner

What artists do you look at? Th artists I am looking at is called Carl Kleiner and he does 3D sculptures out of different materials from photographs.
What are the artists known for? known for his often-times colorful still lifes in which Kleiner finds interesting and humorous positions for the photographed; in this series the Swede selected tulips as his subject.
Carl Kleiner was born in 1983. He is a photographer and image-maker based in Stockholm, Sweden. The photographer keeps a very low profile. Kleiner seems to have the ambition to define himself only by his work, in which he is most known for his still-life photography and his insightful photographic diary.
what disciplines the artists practice? To define himself in his work, he wants show what he is like in his final sculptures, so he focuses more on still life photography.
0 notes
Text
Thomas Demand

What artists did you look at? The artists I am looking is Thomas Demond, he does 3D Sculpture of different types of rooms.
What are the artists known for? He is known for taking images of different rooms with plastic materials and the what is happening in the rooms is based on real life. So in the image Room (1994) By recreating the 1944 assassination attempt on Adolf Hitler, Demand addresses questions of public and private memory. (Thomas Demand / VG Bild-Kunst, courtesy Sprüth Magers)
what disciplines do the artists practice? To capture different moments that happens in different rooms and document the moment by making 3D sculptures.
0 notes
Text
Nick Meeuws - Savanna Paper Project

- What artists did you look at? The artist I was looking at is Nick Meeuws. He has done a 3D sculpture of the savanna with paper.
- What are the artists known for? The artists is known for making this 3D Savanna from paper. He has overlaid different colour paper and cut out different shapes to make this sculpture. This shows that he is interested in nature.
- What discipline do the artists practice? The artists practice doing all the different shapes and did each part at a time to get the detail and sharp look to the whole sculpture.
0 notes
Text
Richard Artschwager

The third artist I will be looking at is Richard Artschwager. this sculpture is called live in your head and it was made in 2002. I like this sculpture because of the way the boxes look and I like how the the bottom box is shaped because it is shaped how the boy is sitting and I like the colour the boxes because they a old vintage look to them. Richard Ernst Artschwager was an American painter, illustrator and sculptor. While known for stylistic independence, his work has associations with Pop Art, Conceptual art and Minimalism.
1 note
·
View note