
Sharing the things I've been working on, art, websites and blog posts!
Don't wanna be here? Send us removal request.
Statistics
We looked inside some of the posts by activebodi-blog and here's what we found interesting.
Average Info
Notes Per Post
5
Likes Per Post
5
Reblog Per Post
0
Reply Per Post
0
Time Between Posts
18 days
Number of Posts By Type
Text
17
Last Seen Tumblr Blogs


Fun Fact
Tumblr Inc. is funded by 13 investors.
Text
How to setup MailChimp for your blog (Free!)
Looking for some tips to start your Website’s email newsletter with Mailchimp? Well this is the post for you.
Mailchimp is a great option as you can have up to 2000 subscribers with access to their basic features – all for free.
So below I created this post as a resource to help you get started with MailChimp and perform a few fundamental tasks.
Please Note: some of the links below are affiliate links I earn a commission from. I still highly recommend these products with or without the link and it is at no extra cost to you, with the occasional discount being placed on these links also.
How to Start a Free Email Newsletter with MailChimp
This video walks through the sign up and set up process on your site, including adding forms and sending your first email!
Please Note: By playing any videos on this page, you hereby consent to the use of YouTube’s Cookies.
Subscribe to my YouTube Channel Here
Sign up to MailChimp here if you haven’t already.
As you can see there is a little bit involved in the process but it is quite simple overall. The main thing is taking the time to sit down and nut it all out.
How to set up a Landing Page
If you need a form hosted externally by MailChimp that will collect subscribers, than this tutorial will be useful to you!
Subscribe to my YouTube Channel Here
As you can see there a re a number of templates to choose from and you can easily use this as a trigger when setting up automated campaigns aswell.
This is also perfect if you don’t have a website or can’t get a landing page looking as good as what MailChimp offers.
How to send our Blog Updates Automatically using RSS
Maybe you want a more automated solution to send out blog updates? Well with MailChimp you can find your website’s RSS feed, hook it up and send out updates on auto pilot! Here’s how.
Subscribe to my YouTube Channel Here
Now when you update your blog, your readers will be notified via email without you having to log in and send them an update. This is terrific for becoming more efficient and focusing on quality content instead of smaller tasks.
More to come!
As we create more tutorials for MailChimp we will pop them here! Otherwise I hope you found that useful. If you haven’t got an account just yet Sign up to MailChimp here to get started.
Also, if you didn’t like the look of MailChimp, check out my videos on ConvertKit, which is a superior choice for most serious bloggers in my opinion.
Otherwise thanks for reading and have an awesome day!
The post How to setup MailChimp for your blog (Free!) first appeared on Creator Impact. source https://creatorimpact.com/mailchimp-setup/
1 note
·
View note
Text
How to know when your Social Media Audience is online!
Are you just pumping out social media posts that simply sail on out into the abyss of updates and never seem to reach your audience?
One major reason this could be happening is that you could be posting at the worst time – when hardly anyone is online.
So the question becomes “when is my social media audience online?“
Well, below I’ll show you exactly how to find out when for the following platforms:
YouTube
Facebook
Instagram
Twitter
Once you know when you’re audience is actually online it can help you determine how frequently to post to optimize your workload and at what times to have the post land right when the most people are online to see it.
So let’s get into it! Starting with…
YouTube
YouTube is a terrific platform for reaching people as the content you create is easy to consume as people just sit back and watch!
But it can be more work, so optimize your posting time by seeing when you audience is online in the video below (steps afterward).
Please Note: By playing any videos on this page, you hereby consent to the use of YouTube’s Cookies.
Subscribe to my YouTube Channel Here
Yeah, it’s as simple as logging into YouTube Studio, heading to ‘Analytics’ on the left and then click the ‘Audience tab’. Down the page you will see when your audience is online!
It will look something like this:
You can see the time zone, day, and time above, with the darkest areas being when most people in your audience are online.
Facebook
Facebook has a pretty easy to use analytics section which gives you the exact information you need.
It’s simple, head to your Facebook page, and at the top click ‘Insights’, then down the left side menu go to ‘Posts’. There is then a tab at the top titled ‘When your face is online’.
It does show an average overall (above) but if you hover over each day it gives you a day-specific graph (below).
There’s also a lot of other useful analytics in there too, so don’t overlook them!
Instagram
You will need 100+ followers and a professional account to do this, here’s how to convert your account if needed.
Subscribe to my YouTube Channel Here
Otherwise, whip open the ol’ Instagram, head to your Profile and click on ‘Insights’, once it opens head to the ‘Audience’ tab. Scroll down to ‘followers’ and you’ll see day at the top and the times people are online.
You can choose ‘Hours’ (top right).
Or Days (top right) to see which day is busiest.
That easy!
Twitter
Twitter is a little different, there aren’t any insights to play with that give you this information!
Instead, I use FollowerWonk. Simply head over there, log in with your account and head to the “Analyze” tab. Then enter your name, and choose to analyze your followers in the drop down. Click “Do it”.
Once you’ve done that, you can scroll down and you’ll find a whole range of useful information about your followers. But most importantly, you’ll see ‘Most active hours of (your handle)’s followers.
But keep scrolling, there’s more handy info below also!
That’s it!
Hopefully, that should help you understand your followers more and schedule your social media more effectively in the future.
Let me know your thoughts or questions below in the comments. Otherwise, have a great day!
The post How to know when your Social Media Audience is online! first appeared on Creator Impact.
source https://creatorimpact.com/social-media-audience-is-online/
2 notes
·
View notes
Text
An Introduction to Adobe Photoshop (and how it works)
So, you’re thinking of learning your way around Photoshop?
It’s a very powerful tool, perfect for:
Photo editing & manipulation
Digital Art
Design for print, web or social media
Well, I’ve spent a bit of time putting this together so you can get a basic idea of how Photoshop works and the most common approaches to using it.
Please Note: some of the links below are affiliate links I earn a commission from. I still highly recommend these products with or without the link and it is at no extra cost to you, with the occasional discount being placed on these links also.
Here’s the video – an Introduction to Photoshop
I have compiled a video which will walk through and cover a big chunk of what Photoshop is and how it works.
Get comfy, this video goes for over an hour!
I also have some notes below on what I cover in the video, along with a timestamp, so you can skip to particular areas within the video itself.
Please Note: By playing any videos on this page, you hereby consent to the use of YouTube’s Cookies.
Subscribe to my YouTube Channel Here
If you don’t have a copy of Adobe Photoshop, you can sign up for it here.
Don’t forget to check out our Photoshop resource page for more tutorials and information around using Photoshop.
What’s in the video
This video covers a lot and goes for some time – 1 hour and 17 minutes!
So I decided to break things up a little so you could choose to sit and watch the whole thing or skip into certain areas if you wanted to.
So, please see below some information on the various chapters of the video, and I will be adding resources here over time also.
Creating a New Document (1:48)
It’s not as simple as many may think.
Yes, you can go to ‘File’ -> ‘New’, but what is it you need? First of all the size of the image will depend on what you’re looking for.
Social Media images should be in ‘pixels’ and RGB Color. I have a full list of image sizes for social media platforms in this post here. It can give you the sizes you need to get started there.
If you’re working in Print, best to go with mm or inches. Some common sizes (depending on your country) are listed below:
A0 841mm X 1189mm
A1 594mm X 841mm
A2 420mm X 594mm
A3 297mm X 420mm
A4 210mm X 297mm
A5 148mm X 210mm
A6 105mm X 148mm
Half Letter 5.5 x 8.5 in
Letter 8.5 x 11.0 in
Legal 8.5 x 14.0 in
Junior Legal 5.0 x 8.0 in
Ledger / Tabloid 11.0 x 17.0 in
Color for print is a bit more complicated.
If you decide to work on a photo (even if for print), I would still use RGB and convert to CMYK later. But if you are doing some graphic design or printed stationery/flyers I would use CMYK color.
You may also need to be educated on bleed and margins to effectively create print designs in Photoshop or any other design program.
Exploring the Interface & Tools (9:55)
This the part of the video which talks about how the interface of Photoshop is laid out, with the left “point and shoot” toolbar, various dockers and the top tool options being explained and explored.
Some areas covered are:
How the tools & layers work (16:30) – more info below
How the tools work (26:52)
Scale & Rotate (31:42)
Importing images & files into an image (33:23)
Selection Tools (34:20)
Adding & editing text (38:54)
Exploring more brushes & tools (49:25)
Adjusting color & light (1:00:53)
Filters & Effects (1:05:59)
Layers are a very fundamental part of how Photoshop works. With layers, you can essentially lay images over the top of one another and choose different ways to blend them together if necessary. Once you wrap your head around layers, you learn to structure and protect a lot of areas within your photoshop image so they can be more easily edited in the future.
It’s important to get a grasp of layers if you want to use Photoshop effectively.
The rest of the tools will help you to paint and create onto the image/canvas itself. There are few main areas covered (in the dot point list above) that will be the major instruments to opening up the possibilities of what you can achieve with Photoshop.
Cropping & Resizing Images (51:10)
The size of your image is dependent on the canvas (work area) you’re working on within Photoshop. Here you can learn not only how to resize an image but how to crop with various features to make life easier.
This will allow you to take more control over the final file you export from Photoshop to ensure it is set up correctly for whatever purpose you need it for.
‘View’ & ‘Window’ menu options (1:08:56)
In this chapter you can take more control over what toolbars and views are available to you within the Photoshop interface.
‘View’ in top menu is perfect for adjusting what you see of your image/canvas as you work. From zooming in and out, changing properties of the color your monitor displays or even adding guidelines and showing other areas such as rulers or basic toolbars.
‘Window’ is a lot less general and more specific. Here you can turn on or off various toolbars and dockers directly and specifically, one by one. You can also organise the layout of your workspace here as well.
Using ‘History’ (1:11:11)
Photoshop moves beyond the simple ‘Undo’ and ‘Redo’ functionality but adding the history panel to it.
You can go through your history to specific steps in your work and skip hitting ‘undo’ 20 times to get there. You can also take history snapshots and keep them aside for later so you can create a more flexible timeline to explore what you’ve done.
History is a great and convenient feature to help you cover mistakes and issues, especially if you’re proactive with it while you work.
Saving & exporting (1:13:11)
There are two files you need when working in Photoshop:
The editable Photoshop file (.PSD)
The final file you export and use.
Why? Editable Photoshop files are quite large and not so flexible for use on a website, social media or in print. But it does keep all of your layers and editing capabilities in tact.
So you should always save a Photoshop PSD for later use or editing. Simply go to file and ‘Save’ or ‘Save As’ to save a Photoshop PSD you can edit later.
You will then need to Export your file for practical use. This could be a simple JPG or PNG for use on the web or a PDF for printing. There are a massive number of other formats and options you have for exporting your files for use. These files won’t be as easily editable and in most cases flatten your image (removing your layers) making it impossible to open back up and reorganise (that’s why it’s good to keep a PSD as well).
Here are some of the main options for exporting your image:
‘Save’ or ‘Save As’ – pick a format form the drop down and save a copy that way.
‘Export’ -> ‘Quick Export as PNG’ – Quickly save a PNG file, possibly with a transparent background
‘Export’ -> ‘Export As’ – Save as a JPG, PNG, GIF or SVG file with some basic options.
‘Export’ -> ‘Save for Web (legacy)’ – Recommended for compressing files for the web as JPG, PNG, WBMP or Gif (video coming soon).
Here’s what I recommend for:
Web/Social Media – Use a JPG for photos without a transparent background, PNG for a transparent image (or if it ends up smaller than a JPG).
Print – a PDF with high quality settings and 300+ dpi or ppi.
The above is what most people will need to work with but as always there are exceptions. ‘Save’/’Save As’ or ‘Export’ have more specific formats available if you need them also.
Now you have the beginner basics.
I recommend spending some time playing around with photoshop.
Come up with some projects and take your time working on them. Also don’t forget to check out our Photoshop resource page for more tutorials and info you can use to further expand your knowledge in using Photoshop.
If you don’t have a copy of Adobe Photoshop, you can sign up for it here.
Otherwise, I hope you found this useful. If you have any questions about Photoshop, leave a comment below and I’ll do my best to help.
Have a great day and thanks for dropping by!
The post An Introduction to Adobe Photoshop (and how it works) first appeared on Creator Impact.
source https://creatorimpact.com/adobe-photoshop/
1 note
·
View note
Text
10 Top Smart Passive Income Ideas (You Can Start Online)
So, you’re sick of trading time for your money and want to earn some smart passive income online?
Do you even know what passive income is?
Either way, you’re sick of your job, sick of surrendering your time and just plain sick of feeling enslaved to giving up all of your most active hours to earn a living. I hear ya!
This is definitely the post for you.
Below I explain briefly what passive income is and how to start making some for yourself on the internet.
I list a series of methods to make this happen not only from research I’ve done but from my personal experience making a regular (and growing) passive income online to supplement my business.
So let’s get into it!
Why Passive income?
You or may not have heard this term before.
Many business experts talk about passive income these days, but it’s always been a term thrown around for popular investing options like real estate and dividends from shares.
Basically, Passive Income is generated through an asset that makes money without you being present. Hence the popular phrase “make money while you sleep”.
With software online we now have the option build websites or set up automated funnels that people encounter and purchase through, with money landing directly in our bank account.
Imagine owning a downloadable E-book that sits on your website and 10 people show up every day, buy the book and download it automatically whilst money get deposited into your bank account. Sounds pretty sweet, right?
The other benefit of passive income is that there’s no limit to how much you can make. When you trade time for money there are only so many hours in the week and your income is basically capped. With a passive income idea or method, all you need to do is reach more people and you can grow to any level!
Passive income is a truly enjoyable and realistic way to make money for content creators and is extremely scalable. But you gotta work hard!
One thing to remember is that nothing is truly 100% passive. All products and assets that generate passive income need some degree of maintenance and updates to remain relevant and keep making money. Even rental properties need repairs from time to time.
So how do you start?
Smart Passive Income Ideas you can Start Online.
So below is my comprehensive list of ways you can start making money in your sleep. The video covers 10 main ways you can make passive income, but I go into further details beneath it, offering some resources youc an use.
Please Note: By playing any videos on this page, you hereby consent to the use of YouTube’s Cookies.
Subscribe to my YouTube Channel Here
Nothing in this list is easy to pull off, there is no such thing as a way to easily succeed in these passive income methods or any money making method. But as you grow and improve your skillsets in these areas it will become easier.
So see which would be the most fun or compliment your skill set the most, as this will make the process more enjoyable and increase your chances as making a decent amount of money.
Let’s get into it!
Online Courses
Courses are extremely popular right now and seem to be the thing that takes people from a pretty standard income through to the roof to hundreds of thousands if not millions of dollars.
Courses are a tonne of work so you want to make sure your audience is truly interested in what you offer. But the earning potential is massive as you could charge anywhere from $19 up to $1000+ for enrolment, depending heavily on the value being delivered.
If you have an existing audience who are looking to learn something, this could be a massive and incredibly smart source of passive income.
By setting up a sales funnel and letting the sales drip in, this option can work well. But most courses tend to make a tonne of sales when they are initially launched so there’s typically a big start to popular courses getting sales.
Here are a few of the most popular platforms you can use to create Online Courses:
Udemy (for smaller, cheaper courses)
Teachable (perfect for more expensive, targeted courses)
Kajabi
If you’re using WordPress, there are also a number of plugins you can use:
LearnDash
Sensei (works with WooCommerce)
LearnPress (Free)
While it is a tonne of work, this really is a very popular and high earning form of passive income. But don’t invest weeks or months of time without building your audience and seeing what they want first!
Membership site
Membership sites are the holy grail of online passive income.
You offer almost anything you want here and just have people sign up with a regular fee. You then get paid month after month (or whatever frequency you choose) for them access to your premium content or products.
Imagine that income repeating consistently while you simply maintain your site, if add anything at all!
You can keep this pretty passive too, as a lot of membership sites and software will allow you to slowly release content as people stay enrolled for longer, so the ability to access products and content can grow automatically if you plan things right.
There are a few of the best options for creating a membership website:
MemberPress (plugin for WordPress)
Memberful
You can offer a ‘pay per page’ option with the use of WooCommerce and the ‘Pay Per Post‘ Plugin also. This way you can offer small chunks of premium content for people buy, one at a time. Not bad, right?
Software service
This one is a bit advanced, but can also be a huge payer.
If you can create software either yourself or with a team, then coming up with some online software you can charge monthly or annually for could be a massive source of relatively passive income.
There will always be upkeep but once the main piece of software is built it can operate by itself and tick over making you money. But the more complex the software, the more customer support you’ll need to offer and the more you’ll need to keep onto updates and technical support.
But if you can build a team to cover a lot of this, you can operate in a relatively hands-off fashion and make important decisions to focus on growth.
Affiliate marketing
This is a fun one which is easy to start! With affiliate marketing you basically sell other people’s stuff and receive a commission for it.
You find a program, sign up and start promoting their product, it’s that simple. It’s also a good way to start when you are building your audience as you don’t need to spend the time creating products yourself.
Once you get some regular traffic coming to your website or links, you can promote on autopilot and make sales of just about anything and generate a passive income online.
Some programs give you very little commission (like Amazon, but the range and ease of sales makes up for it) while some give you very large commissions of more than half the product (mostly software and downloadable products).
A decent percentage of my income has come from affiliate marketing over the years. I love how hands off it can be once you get going.
Getting started isn’t difficult, you simply need to take the time to learn the skills of marketing / generating traffic and selling. Learn more about Affiliate Marketing (including how to get started) here or see my top tips for making money with affiliate marketing here.
Ads on website
This one is really passive but not as high earning as some of the options above.
Basically, more traffic usually means you earn more money. As long as you are getting visitors to your site you will earn something. I’ve seen sites with thousands of visitors per day make anywhere from a few hundred dollars per month up to thousands.
There are several different ad types you can choose from
CPC – Cost per Click Simply display an ad on your website and earn money when someone clicks on that advertisement. There are a number of options but Google AdSense is by far the most popular and best choice for many.
CPM – Cost per Mille For every thousand impressions (views) an ad gets on your website you earn a small amount of money. For example, a $2 CPM ($2 per thousand impressions) means you can earn $20 per ten thousand impressions. Add 2 more ads to your page and that becomes $60 per ten thousand visits.
Here are some CPM Networks you can check out:
Propeller ads
HillTopAds
ClickADu
Exponential (Formerly Tribal Fusion)
CPL – Cost per Lead This means for every lead you generate you get paid. This could be a phone call, a free sign up or subscribe to an email newsletter.
This means you don’t even have to sell anything, but it also means you could have ads all over your website potentially making you nothing if they don’t perform well.
Either way, some places to start are:
ShareASale
Awin
Tradedoubler
Rakuten affiliated network
Rent space by the month or week / predetermined price. You can also set a price for adspace yourself and sell independently or use an agency that sells your ad space.
You can set what you earn, although the higher a price you ask for, the less likely you will be to fill the space, and you may need to offer information such as how many impressions the ad gets or is expected to get per month.
Some top agencies offering ad space management are:
BuySellAds
AdSella
Advertiise
Smarty ads
This is an old but effective method as many prefer not to deal with agencies but would rather talk direct with the website owner.
Print on demand
This is another method I use to sell small items and create a nice, easy smart passive income source online.
If you have an idea for shirts, stickers, posters, or anything that is offered by a Print on Demands site, then you can whip up a design (or pay someone to) and list it on an existing marketplace!
You can take it a step further and promote these yourself to improve your sales. Below I have some of the best options for selling via Print on Demand:
Zazzle – massive variety of products to customize
Spreadshirt – large variety, not as big as Zazzle but less competition
Teepublic – mostly apparel, stickers and cases for phones & laptops
RedBubble – easy to sell on, a decent variety of products
Amazon Merch – it’s Amazon, you reach the largest marketplace in the world here!
If you have some basic art skills or can create images to upload, then you can easily start making your own products on these websites and start generating some passive income sales.
Start a YouTube channel
If you start a YouTube channel and grow it to over 1000 subscribers and 4000 watch hours (hours in the past 12 months) then you can receive a percentage of the money YouTube makes from advertising on your videos.
It’s a lot of work building an audience, creating videos and learning what works for you and YouTube, but it is another incredibly passive way to earn some money.
I do this myself and have also written a post to show you how to get your first 1000 subscribers here.
You can either be in front of the camera, voice only, or simply use music and text to create your videos. It’s a lot of fun and you truly have the potential to go anywhere with it.
Sell on stock photo sites
Are you a good designer or pretty good with a camera? Submit your images to Stock photos sites to earn a buck!
You probably won’t make a tonne of money with this but it is possible if you get an image that a lot of people use. You can (in some cases) upload the same image to multiple websites also! These can be photos, art, vector graphics or even video.
According to Improve Photography, most people make 25 – 45c per image sold.
Below are some places you can sell with:
Shutterstock
Deposit Photos
Can Stock Photo
Stock Photo Secrets
iStock
Rent out a website
Imagine creating a website that receives a lot of traffic and you had no use for it yourself. Well, find a business which can use it and rent it to them!
This means if you build a website up in a certain niche with highly trafficked content and decent Search Engine Optimization, renting this out to a business is a great win-win and they pay a consistent fee for use of it for their sales.
This means as long as the website performs and keeps your customer happy, you will continue to receive payments. It’s like the internet version of commercial rental property on a busy street.
Digital downloads
This is absolutely huge and almost limitless!
Selling digital products is such a good passive income model as you can easily create a store, upload your file and set it up so that when payment is made into your account (be it Paypal, Stripe, etc) the user downloads the file automatically. All you do is receive the money!
Now, you do need a file to sell though. You can create it yourself or get someone else to, either way, here’s some ideas to get you going:
E-books and PDF Guides
Design Templates (like Photoshop, Illustrator etc)
Premium Videos
Music or albums
Software or video games
Custom designed fonts
Stock media
3D models for animation or 3D printing
Sewing and knitting patterns
Plugins and themes for WordPress and other website software
Use your imagination!
The sky is the limit, any kind of downloadable file worth buying can be sold as long as it’s not illegal and not too huge.
Some options to sell online are:
WooCommerce (a plugin for WordPress that is free)
Selz
Payhip
You will need to learn how to get traffic to your store but once you can build that traffic, you can easily optimize your site to sell from there.
I have one idea that is scalable…
…but technically it’s not passive income.
You might not be looking specifically for passive income but instead a business model that simply doesn’t rely on your time.
Well, there are a few ideas you can try which are somewhat active, but incredibly scalable as your efforts can be duplicated and sold to many…
You can sell premium subscription to an ongoing service or kind of media.
This could be a premium version of:
Regular videos
Email Newsletter
Podcast
Downloadable products released regularly
Blog
Music
etc
You can setup a membership site, but for this case in particular, you can use something like Patreon.
Tips to get started
So you’ve seen the above tips, but there are some external factors you need to learn in order to help you put it all into action.
It’s one thing to set these up but how do you get people to visit your passive income assets and convince them to buy?
Build an online presence
I highly recommend starting a website and growing you social media so you can build an audience to work with.
This also means that if one avenue fails, you can switch things up and promote to the same audience and you won’t have to start again.
I offer a free email course showing you how to build a website in WordPress and get started on Social Media here.
Start An Email List
People who are subscribed to an email list are far more likely to become buyers than someone landing on your website for the first time or who follows you on social media.
So offer something valuable in return for signing them up and then keep them up to date via email and send out the occasional promotion to get them on board.
You can keep this passive and automated with an auto-responder series like the ones you can build using ConvertKit.
Learn how to sell
The art of selling is a skill in itself and require research, practice and patience to develop.
A few quick tips are:
Push benefits instead of features. Most people want an end result and don’t care about the features.
Post Testimonials – as people will trust you more when they see other people vouching for you.
Be Transparent – don’t try to be vague or hide anything, put yourself out there so people know you’re a real person. This is another trust factor.
There’s a lot more to it than the above tips but they can help you get started.
Now get out there and build your passive income.
You can pick one of these smart passive income ideas or choose many and combine them together.
If you focus on building a solid online presence and email list then you will have that nice safe space to sell to and even switch up strategies if things don’t work out, so don’t overlook those tips.
One question – do you already make passive income online?
Leave a comment below telling what you do – or which of these options appeals to you the most.
Otherwise thank you for reading and I hope to talk to you again soon!
The post 10 Top Smart Passive Income Ideas (You Can Start Online) first appeared on Creator Impact.
source https://creatorimpact.com/smart-passive-income-ideas/
1 note
·
View note
Text
Full List of Social Media Image Sizes & Templates (2020)
If there’s one thing truly makes a social media profile stand out and look unique it’s custom designed imagery.
Putting your own unique spin on your images whilst setting them up in a way that functions perfectly within the constraints of the page is important, and to pull this off you need to make your images the right size or proportion.
So in this post, I go over a complete list of image sizes for the following social media platforms:
Facebook
Instagram
Twitter
LinkedIn
Pinterest
YouTube
I will also include downloadable templates you can use for some of the more complicated images here which may crop or lose information across devices.
What kind of file should you use?
If you’re not sure I highly recommend optimizing your image to find the balance between quality and filesize. JPG & PNG are best with JPG being much smaller for most types of images (simpler images can be smaller with PNG). I generally lean more toward JPG.
Please note that all dimensions are ordered width x height.
So let’s get into it!
Facebook
Facebook is the big one. It has the most users and so many different areas with varying image sizes throughout their platform.
But it’s a little complex.
Basically, some images are a certain size on Desktop but completely different on phone or tablet. So I go over how to prepare for this when creating your image.
Profile ID photo
Recommend Size: 500 x 500 or higher (square)
The ID photo on Facebook is different on various devices. At the time of writing this post it displays on Desktop at 132 x 132px, however some devices display images at a higher resolution (especially one Apple devices with Retina displays).
So I recommend a higher resolution file so it retains quality. Also keep in mind that the image is in a circle, so keep any elements you want visible away from the corners of the image.
Facebook cover photo size
Recommended size: 1920 x 1080 (with a 184px margin top and bottom)
Basically, the Facebook cover image is 820 x 312px for desktop and 640 x 360px for mobile. So depending on the image, it will get cropped one way or another to accommodate alternate devices.
So by making an image larger 1920 x 1080px that has all important information within a ‘safe zone’ of 711px high in the center you can keep all the important information out of the cropping areas. You also future proof by creating a higher resolution image but also make it so you don’t lose important information when it’s cropped.
Templates & Resources for you:
Tutorial: How to create a Facebook Cover Image in Photoshop
3 x Free Cover Image Predesigned Photoshop Templates
Facebook Cover Image PSD Template
Facebook Cover Image JPG Template (design over the top of)
Shared link image
Recommended Size: 1000 x 522px
These link images usually display at 500 x 261px, so as usual I recommend creating a larger image to future proof your work and also cater for devices with higher density resolutions.
The main way you use this image is on your website or blog using Open Graph Data, which you can set up using an SEO plugin like All in One SEO or Yoast if you using WordPress (search for these in your plugin repository).
Basic feed image
Recommended Size: 1080px x 1620px (or shorter) OR 1080 x 1350px to use the same image on both Instagram & Facebook.
These images typically appear in your feed at 500px wide and up to 750px tall. So as usual, making your images larger is better for image quality. Any taller and the image is cropped.
I do recommend being efficient and designing at 1080 x 1350px if you’re on Instagram, as you can use that image size effectively for both platforms when auto sharing.
Event image
Recommended Size: 1920 x 1005px (keep important elements away from the edge to avoid cropping)
The event image used to crop quite heavily but now it seems a little more standard, however you can lose a bit of information near the edges if not careful, so I recommend leaving a small space form the edge of the image just to be safe.
Facebook group cover image
Recommended Size: 1640 x 859 Keep important elements 102px away from the top and bottom to avoid cropping
For Facebook Groups, the cover is image for desktop displays at 1640 x 662px and the mobile version displays at 1640 x 859px. So create at the larger size with the margin top and bottom for Facebook to crop off one Desktop.
Templates:
Facebook Group Cover Image PSD Template
Facebook Group Cover Image JPG Template (design over the top of)
Instagram
Instagram is a much simpler platform to work with and has a less of an issue with cropping images across device types. So below I have some recommended image sizes for you.
This could change in the future though, so we’ll keep an eye on it :)
Profile ID photo
Recommend Size: 500 x 500 or higher (square)
Instagram displays your ID photo at 160 x 160px. I still go a little higher just to future proof the image. Also keep in mind that the image is in a circle, so keep any elements you want visible away from the corners of the image.
Image Feed
Recommended Sizes:
Portrait: 1080 x 1350px (largest image & most impact)
Square:1080 x 1080px
Landscape: 1080 x 608px
Any of the above sizes can be used and Instagram will display these proportionally without cropping in the feed. However, all images on your profile will display in a perfect square (110 x 110px), so you may want to consider that when creating your image.
Video & IG TV
Instagram supports various types of video on their platform. You can have a dedicated IGTV Video or a short video on your feed.
Here’s what I recommend:
Landscape Feed Video: 1080 x 607px (or 16:9 ratio)
Square Feed Video: 1080 x 1080px
IG TV Vertical: 1080 x 1920px (1080p rotated)
IG TV Landscape: 1920 x 1080 (1080p)
Instagram Stories images
If you want create images for your stories, it’s a basic 16:9 ratio again, nice and simple.
Recommended Size: 1080 x 1920px
Twitter
Twitter is another platform which has some funny image resizing going on in some areas. It’s not overly complicated though, so I’ll get into it below!
Profile ID photo
Recommend Size: 400 x 400 or higher (square)
Twitter displays your ID photo at a number of sizes, but 400 square still seems to be the safest size. You can go a little higher if you to though. Again, keep in mind that the image is in a circle, so keep any elements you want visible away from the corners of the image.
Feed Image
Recommended Size: 1080 x 650
A feed image in Twitter generally shows at a ratio of roughly 5:3 (not exact). On desktop the image in the feed is 507 x 305px (cropping anything outside of that) but when you view the tweet the image is reveals the extra image that was cropped.
So I recommend designing at a larger size as usual for future proofing or better quality on higher resolution devices and at this size so you don’t lose anything in the feed.
You could choose any size larger than 500px width realistically if you’re not concerned about cropping in the feed.
Cover photo
Recommended Size: 1500 x 500px (keep important elements 60px away from top and bottom)
Resources & Templates:
Tutorial: Coming Soon
Twitter Cover Image PSD Template
Twitter Cover Image JPG Template (design over the top of)
Linked In
It’s important that you look sharp on LinkedIn, being the professional’s Social Media platform, you want to keep your images looking clean and not blurry / low resolution. So here’s some sizes you can use for your LinkedIn Profile.
Personal profile
Recommended Sizes:
Profile photo: 400 x 400 pixels
Cover image: 1584 x 396 pixels
Company Page
Recommended Sizes:
Logo size: 400 x 400 pixels
Cover image: 1584 x 768 pixels
Pinterest
Pinterest is a powerful platform to grab people’s attention visually and link off to a website URL. The demographic of Pinterest is also far more likely to spend money online. So getting your images right can be very useful!
Profile ID photo
Recommend Size: 165 x 165px or higher (square)
Your ID Photo only needs to be 165px square, but a larger image, as I usually recommend always gives you some margin for error.
Pin Size
Recommend Size: 683 x 1024px or higher
Pins currently display at 236 pixels wide by whatever height they are. This makes the height of your pins adjustable. A 2:3 ratio for vertical pins is recommended, so the larger size of 682 x 1024px is perfect for creating a decent sized image that when expanded can look quite stunning.
Board image size
Recommend Size: 222 x 150px
Optimizing the cover of your boards is great to optimize your Pinterest Profile, so control the design adn get the right size & proportion with the above image size.
YouTube
YouTube is a bit trickier to design for. Whilst the ID Photo is straight forward the channel art get heavily (up a good 75%) cropped in some places/
Channel icon / ID photo
Recommended Size: 800 x 800 pixels
A simple square image will do the trick here, nothing fancy. But it will be quite small in some areas so keep things simple to perceive when at small sizes.
Channel art / cover photo
Recommended Size: 2560 x 1440 pixels
Take note of the heavy cropping with YouTube Channel Art. See below:
This means you need to keep the design large but all important information within a small central area that is 1546 x 423px. I recommend checking out the resources below to get this one right.
Templates & Resources for you:
Tutorial: coming soon
YouTube Channel Art Template PSD
YouTube Channel Art Template JPG (design over the top of)
YouTube Video Thumbnail
Recommended Size: 1280 x 720px or 1920 x 1080px
The thumbnail will automatically be downsized to 1280 x 720px, however, working a slightly higher resolution is always good practice so I recommend people work in 1920 x 1080px as it can be sized down but is also future-proofed in case YouTube decides to increase the size of thumbnails at a later date.
That’s all of them!
Did I miss anything? Let me know by leaving a comment below! If there’s a templat eyou’d like to see that isn;t listed here, also mentioned that below.
Otherwise, I hope you found this post useful and I hope to see you again soon!
The post Full List of Social Media Image Sizes & Templates (2020) first appeared on Creator Impact.
source https://creatorimpact.com/social-media-image-sizes/
0 notes
Text
How I got over 2.1 Million visitors to my website
It’s been 5 years.
5 Years, over 2 million visitors and a hell of a lot of fun (and traffic!).
No, I’m not talking about this website, but another one I own which talks about Martial Arts movies. It’s had it’s up and downs and experienced a lot of publicity in it’s time.
Over the years this website has range from 1000-2000 visits per day, mostly from SEO, and despite me putting far less effort into it these days it seems to keep following that trend.
It’s reached a fairly passive level of work and is a cool asset to have up my sleeve.
But how did I grow this website to 1000-2000 visits per day?
It was a lot of work, but more importantly a lot of learning.
There is a pretty basic formula I was able to discover through trial and error, playing around with content ideas, keeping active and always pushing forward.
So I thought I’d share with you here exactly what I did so you can grow your traffic and hopefully get even better results than I did. Some tips may apply to you and some may not.
So here we go!
Below I have a video discussing this, but also the written tips underneath.
Please Note: By playing any videos on this page, you hereby consent to the use of YouTube’s Cookies.
Subscribe to my YouTube Channel Here
Now, onto the written post!
I aimed for low competition
As I mentioned much earlier, this website is about Martial Arts movies.
When I first got interested in watching martial art movies I went online and did a search. Whilst there were plenty of movie reviews around, there were hardly websites specifically any dedicated Martial Arts films.
So I considered throwing my hat into the ring to start watching movies and writing reviews – but I wanted to make sure I could compete so I did some solid research and still it seemed to be a low competition topic.
Beyond that, I also searched for certain things to see if anyone had written about them, both in the beginning and whilst growing the website.
So I started the website about a topic in a space that had hardly any other websites and I also wrote posts that had little or low competition in Google Search Results.
These days more of these sites are up, but getting in early definitely helped secure my spot :)
I started a blog
It may seem obvious but yeah, I started a blog.
Blogging is an easy platform for really pumping out articles and reviews without having to find a home somewhere on your website for them, since they all end up in your blog feed.
But there’s more to it than that.
The blog has a theme and a mission. The first post I wrote introduced the website and a concept behind the whole blog. I found a list of the top Martial Arts Movies (250 movies) and my mission was to review them all.
So now people weren’t just reading movie reviews, they followed me on a personal challenge and then connected with me as I went.
People don’t just want an anonymous voice, they want a person to connect to and get information from. But that leads me to my next point.
The focus was on offering value
I know, I watched a tonne of TV – but I built my reviews based around informing people of the style of action they would find and if I would recommend the film.
The website was about suggesting good movies to watch.
So people had a resource of finding recommendations for martial arts movies as I slowly ranked all of these films on my own list they could refer back to. I offered a central and easy spot to see which movies I recommended, linking off to each review.
I further expanded on this by writing about the actors themselves and useful blog posts full of recommendations based on a theme. I offered valuable information for anyone who was looking to see some quality martial arts films.
I sought out people willing to promote me – and many did
Now getting onto the fun stuff!
Sure, I created a Facebook page and Twitter Profile and posted there, but being new I had no fans whatsoever. So I needed to leverage someone else’s audience. I looked up a number of people in the space, such as actors and fan pages,leaving comments and sending messages.
I didn’t straight up ask for a share, I instead focused on talking to them first and creating a connection. With one person in particular (an actor named Scott Adkins) sharing my page. More on that here.
This lead to about 500 page likes that day and kick starting the blog at about 200 visits per day. Which gave me a solid start instead of trying to reach a single person at a time and building that way.
I then listened to my audience and tailored a lot of the social media content to their liking, which gave my page a very high engagement rate and lead to a lot of traffic. But the real growth came from search engines afterward as Google’s algorithm recognized the social signals and gave me a good boost.
I hit a wall, analyzed and made adjustments
The initial boost took me so far, but things began to plateau.
As the initial novelty of my reviews started to wear off, a small group of people kept reading but a lot of people dropped off. I still had decent traffic but growth had stopped since I wasn’t getting the social signals.
This was a sign that the content I producing wasn’t something people really wanted that badly.
So I experimented with a bunch of different ideas and also checked my analytics to see what was performing best. I then moved my focus to a couple of areas, including top lists (more on that down the page).
I started a small YouTube channel
I noticed that videos I posted on social media, made by other people, were getting the most interaction and engagement – especially short music videos with a mixture of fight clips.
So I made my own!
These videos did relatively well with one of the videos getting millions of views (currently just under 5 million views).
The medium worked well since video was the same medium as the martial arts movies themselves. I linked off to the website and it still drives traffic to this day. The key for me here was to share and reshare videos and prompt other people to share also.
However, I did stop at one stage because the next tip really took me to the next level.
I limited writing reviews and focused on lists
I phased out the movie reviews almost entirely.
I accomplished my goal of reviewing the films on the list as my analytics clearly said one thing – film reviews get hardly any traffic while a few ‘Top List ‘ posts I wrote brought in most of the traffic.
So I wrote a series of list posts and took the traffic of the size well over 2000 visitors per day.
This works because people on search engines quite often want quick answers – like which “Donnie Yen movie to watch next?” and lists give people a number of quick and easy answers whilst being SEO friendly.
These same list posts went completely viral on social media despite, at this stage, having a bit of competition to work against (this was no longer low hanging fruit). I learned a few things about blog posts and SEO, leading to the next tip…
I made a point to write 3000 – 5000 word posts more frequently
I noticed my longer posts often performed better, but they were also top list posts.
So I investigated and found a number of articles talking about how blog posts with over 2000 words often performed the best. Backlinko touches on this here, although the word count has dropped a little in recent years.
So I aimed to make my blog posts comprehensive.
A good tip for this is to turn each item in a top list into a short 300 word article, or make each subheading a short 300 – 500 word article. So instead of writing a 3000 word article, you write 10 short 300 word articles.
I started an email list
“The money is in the list”
Creating an email list is one of the best things you can do for you existing traffic. Once people sign up you drastically increase their chances or returning (assuming you actually email them).
Email gives you the option to touch base with your audience far more effectively than using Social Media as it doesn’t come down to algorithms and likes as much.
People who have signed up to an email list that offers value will continue to read those emails, so you can strengthen your connection with them.
I created an autoresponder series
I created an automated funnel that sends out a series of emails over six months, starting frequently (every 2 or 3 days initially, and slowly dialing it back to once every 10 – 14 days, in order avoid being too aggressive and prompting people to unsubscribe.
Email can easily turn 1 visit into 10 or 20 repeat visits. That’s a powerful factor in increasing traffic.
This auto-responder series has a number of emails within it designed to sell affiliate products and means that for every visitor that signs up, they are likely to return a number of times over 6 months (the current length of the series of emails).
I send out occasional updates between this to keep things fresh, but it’s only about once per month at this stage.
While this still isn’t the highest source of traffic for me, it is definitely making me the most money as my audience is used to me, trusts me and follows through with purchases via my affiliate links.
I constantly promoted old posts
You may note that I mentioned the sharing of older content on my email list once people signed up.
This is a great way to get people onto those old posts but I also promoted old posts on Social Media using tool like Buffer and Revive Old Post.
You can also make a point of linking back to older posts within your new posts so that when people land, they continue to explore your website and consume your old content. This will decrease your bounce rate and improve the quality of your traffic.
This is something a lot of people don’t do but it has really helped me rank a lot of the articles on my site.
I have more information here about promoting old posts if you’re interested.
I worked on my website speed
A slow website sucks and people don’t hang around waiting just to read from it.
I took a lot of steps to drop the load time of my site right down so that less people would bounce and I’d get more traffic from search engines.
I wrote a post on this exact process right here called How I Managed to Speed up WordPress – from 20 to 2 Seconds Load Time.
Basically, I removed all of the useless BS from my design.
I redesigned, moved all content above the fold.
I started off with a really tall header/navigation and elements above each blog post.
After getting my hands on the Divi Theme, I simplified the blog layout and put more effort into the other pages. I brought the post content up as high as possible, and simplified it.
When I discovered over half of my users were using phones, I made the design dead simple and put effort into the logo to sharpen up the appearance without having too many crazy design elements distracting on the page.
This meant people could land and see what they wanted straight away. This helped to keep people on the website.
I decreased posting frequency, but continued to update old posts
Since the website has hundreds of decent posts already, there was no need to update so frequently.
As most people finding the site now are new visitors, it’s more efficient to funnel them through the email list and show them existing content as the value remains the same as I keep the posts relatively up to date.
I started with 3 or 4 posts per week and was pouring everything into this website. I now batch a number of posts with the aim of posting one per month since I covered so much ground with the site and have reached a point of diminishing returns when it comes trying to think up with new topics.
There’s always more that can be done, but not making this my whole life was important as it wasn’t intended to be a business that replaces my fulltime income (despite the fact I do make a nice little chunk of passive income from it).
To grow and move onto other things to make online business more manageable, I have been slowly converting this site into more of a niche site that is less hands on but updated enough to keep delivering value to my audience.
I built an asset, both for myself and martial arts movie fans and now I do my best to maintain that asset.
Now it ticks over seamlessly…
The only reason it worked was value and, for a while, consistency.
I found the most searched for topics and personalities in my niche and wrote resourceful articles about them, giving people an easy place to stop and learn more.
I do my best to keep up engagement, but overall it’s a very passive website now and I believe sometimes it’s best to move onto other things. Every so often there might be a little surge of interest and work to breathe a little more life into it, but otherwise keeping a consistent monthly update seems to be working for now.
You can do that same!
The above property wasn’t only a good project, but it was a fantastic learning curve that allowed me grow as an online blogger and content creator.
Experience speaks volumes so all I can say to you is give it a go!
If you already have a website, hopefully this has helped you to learn how to grow it. If you haven’t got a website yet, check out my free email course to get started.
Otherwise I’d love to hear any questions or thought you may have below! Thanks for reading and let’s keep the conversation going :)
The post How I got over 2.1 Million visitors to my website first appeared on Creator Impact.
source https://creatorimpact.com/2million-visitors-to-my-website/
0 notes
Text
Why fake or non-active followers are killing your social media
We all want to get our numbers up on social media!
Who doesn’t want to login into Facebook or Instagram and see 100,000 followers? It’s gratifying :)
But what if those followers aren’t active? would you rather have 100,000 inactive followers or 100 true fans?
Here’s why it’s not only useless to have a higher number of inactive followers, but why it’s actually damaging!
First of all, let’s get some perspective.
There are a few ways people go about this:
Buying Fake Followers
Lazy Follow/Follow Back Methods (this can be done right though)
Buying real likes via marketing
Organic Follows from people who genuinely enjoy your posts
You guessed it, the top 3 will lead to a higher ratio of people simply not engaging with your content. But focusing on engagement, having conversations in comments, DM’s, etc will build a network of true, active fans who engage with your content.
You know that means more actual people are noticing you, but is it really so wrong to have vanity numbers that look like social proof?
First of all it’s misleading and dishonest, especially if you’re buying fake likes or follows, but it will also decrease your reach through the algorithms on most social media platforms such as Facebook, Instagram and YouTube.
How are inactive followers harmful?
Let’s tell the imaginary tales of ‘The little profile that could’.
(Is anyone else thinking of Major Payne right now?)
This profile is on Instagram, yet behaves the same as many other platforms, and has 100 true followers that found and followed the profile organically.
‘The little profile that could’ posts something, and 10 of these true fans get to see it straight away, as Instagram tests it before pushing it out into the pool or other followers connected to the profile.
The Instagram algorithm wants to see if anyone likes or comments on it, to make sure it’s something people want to see.
After 5 people interact directly with this new post, Instagram realises that it’s quite popular and pushes it the other fans. But it doesn’t stop there, as more people see it, like it and comment it starts to trend in some of the hashtags it mentioned.
Before you know it this new post reaches hundreds of people and gains some new followers in the process. The profile now has even more true fans.
OK, let’s follow the adventure of a profile called ‘fake followers’.
‘Fake Followers’ has 10,000 inactive fans and posts something new. Instagram shows this new post to hundreds of the followers.. if they are even online.
No one likes, no one comments, people don’t even pause to look.
Instagram stops showing the post because it doesn’t show any signs of being engaged with and you reach even less people overall.
Does that make sense to you?
Follower numbers are a vanity metric.
Engagement and interaction are the true signs of influence on social media. So you need focus on:
Getting authentic, engaging followers (organic is best but can be slow)
Producing solid, valuable content
Maintaining a real connection with people who engage
This is literally like making friends and networking in real life, only it’s the internet.
If you’re boring, selfish and not engaging to talk to in real life you will never be popular – like your social media presence. If you just go around trying to claim random people are friends when they indeed aren’t, let’s see how many approach you when you next see them.
It’s that simple, fake followers are the same.
How do you make it happen?
You need authentic, engaging followers.
Don’t buy followers, make sure you engage with people on social media. This means responding to DM’s and comments form your posts and the posts of others. Add value to the conversation and head out into the world of social media and interact with people.
You can do a little “follow, follow back” for a while but the idea is to be less aggressive and converse with those people, like their posts and leave some comments whilst doing it. Don’t just follow them and leave the connection cold.
Engage, support them, be friends and socialize.
Produce Good Content.
Find a problem and solve it. It could be a tutorial on making something or fixing something or a list of the top tools for something or even jsut solve the problem of boredom by being entertaining (this is why meme pages are often huge).
Try to think what people would need from you instead of what you want to deliver. If you have people following you, ask them what they’d like from you.
Maintain that quality and engagement.
Set up a schedule and a system to keep things rolling to cover everything above. it can be a posting schedule along with a daily schedule to fit those tasks in. Some people spend 30 mins in the morning and 30 mins at night engaging, and batch create their content ahead of time.
What you need to do is figure out what is going to work best for you.
To wrap things up…
…you can’t be lazy or cheat the system.
Put the ‘social’ into social media as this is what they’re designed to work best with. So understanding what social media platforms want and what your potential audiences wants is the key.
I hope that has given you some insight on moving forward on social media. Any thoughts please consider dropping a comment on the page below. Otherwise, have an awesome day!
The post Why fake or non-active followers are killing your social media first appeared on Creator Impact.
source https://creatorimpact.com/fake-followers-killing-social-media/
0 notes
Text
Why do people say “Content is King?”
Yeah I know, you here it everywhere:
“Content is King!”
Why do people say it? It’s cliche, it’s repetitive, it gets annoying and it’s also true.
It’s not one of the coolest looking kids in the blog/content marketing strategy playground, but it has the most impact.
But you may have a few questions about this.
So here are a few answers to help give you an understanding so you can finally put down the cliche and start thinking about the actual concept more.
Please Note: By playing any videos on this page, you hereby consent to the use of YouTube’s Cookies.
Subscribe to my YouTube Channel Here
Can good marketing overcome medicore content?
I’ll refer to another quote: “Content is King, Distribution is Queen, and she wears the pants”
Basically, if you can’t get anyone to find your mind-blowing blog post, video, or podcast then it has no chance to shine at all.
But let’s flip it around…
If thousands of people see your crappy content no one will finish reading, viewing, or listening to it. People will arrive at an empty vessel offering no value and they won’t stick around. To put it simply, they came for the content, in particular, so you need to offer them value.
Another angle, ten people see an absolutely mind-blowing piece of content. One person shares this content and another 20 see it. They all think it’s mind-blowing too, 2 more people share it, and so on until it goes viral.
Good content is something people share an talk about and it can grow legs all by itself!
Content is Currency
You want eyeballs and the eyeballs want value. Without value, you have nothing to offer and those people will go elsewhere.
What’s even worse? Crappy content will give you the reputation of someone who doesn’t offer any value at all, meaning people may actively avoid you and your content after a bad experience!
However, create some crazy good stuff, and people will definitely come back for more. This is why content is King.
But my content is GREAT, why aren’t people responding?
The reality check is – you don’t know if your content is great unless you are validated by those who consume it.
It’s all about results. Always be looking to improve regardless of the outcome.
Ask yourself questions all the time like:
Is there anyway I can offer more?
Is there any fluff or noise I can remove from this and be more focused on substance?
Can I make it easier to understand or act on?
Is my competition doing this better than me?
You get the idea.
Is your space crowded?
The other thing is that if you are in a high competition space, your value drops as there are many people with the same message.
Sure, you’re unique – but so is everyone else.
Research and analyze your competition and figure out what they’re missing, how can you offer more, be better, and stand out in a way that separates you from the pool of others.
You can do this with a rare perspective, a unique and entertaining personality, original and innovative delivery of your content, or by narrowing down further and finding topics that have far less competition, so you can fight an easier battle and work your way through.
There are so many variables that you just need to keep analyzing and adjusting, working to improve, and remaining consistent.
Then multiply the effect with good strategy.
When you reach a point where people are really responding to your content, you can step up your promotional game!
If you had a scale, you could say bad content is 0, good content is 5 and mind-blowing content is 10.
Multiply your promotion efforts by 0 (Bad Content) and you still get 0. But for every number up from there, your efforts go further, reach further, and the viral potential of what you’ve written truly starts to spring to life.
What are your thoughts?
Did this post give you any insight? Was my content good?
I’d love to hear your thoughts in the comments below or even continue the discussion and flesh this out further. Let’s all help each other to grow and improve our content to reach more people and achieve our goals.
Thanks for reading and have an awesome day!
source https://creatorimpact.com/content-is-king/
0 notes
Text
I quit my job & messed up completely.

Seriously, I really messed this up!
This isn’t my usual style of post, but it’s something personal I think a lot of us can learn from and relate to.
So here goes!
I currently run a webdesign / graphic design business (active, freelance income) as well as this website and others (for passive income.)
I work from home, I have for a number of years now and it is the best move I’ve ever made for my career. It’s made me happier, wealthier, and has given me a lot of flexibility.
But it took two tries to make it happen!
What happened with the first try? Everything about it was wrong and a massive mistake, so here’s a little insight.
Please Note: By playing any videos on this page, you hereby consent to the use of YouTube’s Cookies.
Subscribe to my YouTube Channel Here
Not in the mood for video?
Keep reading, the story is written below :)
My job was actually quite good.
Here’s the thing, when I just worked my job life was simple, income was consistent and my bosses were actually very relaxed and cruisey. If I needed time off, I got it. If I had a suggestion they listened. I was always told how good my work was and I got paid a standard full-time wage.
There was nothing wrong, hence I worked there for 12 years before I left.
As the say goes “It’s not you, it’s me”.
A fulltime income wasn’t enough for me, not being able to be in absolute command of my time wasn’t good enough. I’m super creative and much of the job, despite being focused around Graphic & Web Design, actually wasn’t creative at all.
I worked at a print shop called Zip Print (great place!), but there’s so much technical work involved in designing and preparing for print that you don’t get a good chance to be creative as often as you’d like.
I couldn’t take control of the situation so the joy slowly disappeared from the work and I was always struggling to keep up financially. So about 4 years before I finally quit, I did something stupid.
I got angry.
I got super stressed because I got married earlier that year and money was tough (after the expense of it all). The work was no longer enjoyable (nobody’s fault) so I miserable at work and miserable at home.
I started creating websites and earning some online income through passive income. But that stuff takes time, so it was literally just pocket money back then. I felt trapped in a perfectly fantastic job and I always put in the extra effort to show up early, do exceptional work and have a good attitude and I was even complimented on it from my bosses.
Then why they hell am I struggling? It was a mindset of entitlement.
Then one day I came to work about 10 minutes late and it was one of those days, everyone was just not in the best of moods. Normally, I’d pop my head in and apologize if I was ever late, but instead, I just got to it. My boss had a word with me about it.
I was furious.
All of a sudden my mind was screaming at me that “I’ve put in 8+ years of work and I’m being treated this! what the hell!”
I politely said OK, no smile, just got back to work and stewed ALL DAY.
Later that day I snapped, so I asked nicely if I could talk to them and I told them I was going to change career and wanted to leave in a few months (trying to be helpful with the extra notice as I was a core part of the business in my opinion).
They received notice, started looking for a new staff member while I started planning with my wife.
So, what went wrong?
I started saving, planning my business and began to realize what I was in for.
I had a mortgage and credit card debt and I was potentially throwing away half of our household income. I started taking on some work on the side but it wasn’t enough.
The end of the year was approaching and I had enough capital behind me to last a month, hardly any clients and the trajectory wasn’t good. I broke down, cried, got angry did all of the things before finally talking it over at home, and realizing that I needed to go in and undo everything.
The problem is that I made a decision while I was angry.
Some people make worse decisions but this one would have made life hell for me. I realized that I didn’t set things up so I knew that when I quit, I’d be in the position to make it work. I did no research, planning, or movement toward making this happen when I so hastily gave my resignation.
You need to be smart, don’t do that same stupid thing I did.
I crawled on back…
…I told my boss I’d rather not quit.
All the detail aside, they gladly kept me on board and I forgot about quitting for 18 months or so and just enjoyed the stability.
I stuffed people around at every angle, I felt like a failure and was even angrier than before – but I wasn’t scared anymore because I knew I could pay my bills.
The best part? I knew what was next…
This time I created a plan.
I built a portfolio website to put my work up, I created a social media page and I started building a presence.
I went to a handful of people I knew outside of my area who had businesses and networks, I offered to build them free websites in return for them handing my name out to their network.
I started saving.
I started on the free stuff. The free stuff lead to cheap stuff. The cheap stuff lead to profitable stuff.
My name started to circulate, all the while my passive income efforts were growing and getting me more money.
I worked from my waking moments until I went to sleep at night, slotting in martial arts training and tiny amounts of downtime on weekends and built a part-time business.
Despite money coming in regularly now, I waited until I had enough money up my sleeve to cover 3 months of pay, I gave 6 months notice (again, trying to be generous to my bosses who were generous to me for 12 years).
Then I left, and here I am. I wouldn’t change a single thing about the whole process.
The harder the fight, the sweeter the victory.

My last day on December 2016
When you have a goal that seems so impossible to achieve, going through frustration and struggle helps you to appreciate it and become proud of what you’ve done.
I know many other people, maybe you, want to make this happen. Many others have made it happen. Either way, it’s something anyone can do if they want to be smart, create a plan, and execute without the cloud of emotion or anger fueling your bad decisions.
But mistakes can suck but they are such good teachers, as we all know!
What about you?
Do you intend on quitting your job?
Have you already quit your job?
Leave your story or your thoughts in the comments below and get the conversations started.
Thank you for reading, have a great day!
source https://creatorimpact.com/quit/
0 notes
Text
How to Make Money as a Woman During the Pandemic

The following is a guest post by Sarah Bull.
If you’re a woman who has been economically impacted by the coronavirus pandemic, you’re not alone. A large percentage of female employees in the hospitality and leisure, restaurant, and health and education sectors have suffered job loss, furloughing, or reduced hours.
The question now is, what can you do about it? No one knows how long the pandemic will last or when certain business sectors will be operating in full swing again. So, it’s critical to be proactive if you are looking for ways to generate income. Fortunately, the internet has a lot to offer when it comes to work-from-home opportunities. To help you get started in your quest for part-time or full-time work, consider these practical tips:
Start Freelancing
Freelancing basically means that you work for yourself and provide services to various clients and businesses. As you build your reputation, you can choose how much work you do each week or month. Freelancing can be a great opportunity for working part-time, full-time, or alternating between the two. You won’t find a career path that offers more flexibility.
Another advantage of becoming a freelancer is that you can work in almost any field. The freelance market is vast, and there’s a demand for design and creative jobs, data science, engineering, IT, customer service, and much more. As long as you’re a self-starter and are OK with forfeiting employee benefits and structure that come with a traditional job, freelancing could be ideal for you. To start getting your feet wet, sign up for an online job platform.
Build a Business
At first, this may sound counterintuitive. After all, you’re reading this article because you are out of work and need to make money. However, many of the world’s most successful businesses started in difficult economic times. A lack of financial cushion can provide extra motivation to take the risks necessary to run a successful business.
Think of any hobbies you have, scour the web for business ideas that may interest you, or consider developing a business idea around your previous industry. If you take the time to craft a business plan around something you’re passionate about, figure out how to satisfy a need for consumers, learn to market yourself, and devote yourself to tirelessly studying business and leadership, you can put yourself in a position to flourish long-term.
Create Online Tutorials
If you like to teach others, consider making online video tutorials. Whether you bake, do home repair, design websites, play a musical instrument, or do any other teachable skill, making how-to videos could be a fulfilling venture. Not only would it allow you to share your expertise and build a solid reputation in your industry, but you could also make money by posting on sites like YouTube, which would allow you to collect ad revenue, paid sponsorships, and so on.
Outfit Your Home
Lastly, make sure you have a space to do your work. When you have kids at home, it can be hard to get anything done, and if you are relying on your job or business to provide for your household, it’s critical that you are able to focus and be productive. Dedicate a spot in your home, and invest in a good desk, chair, computer, and any other equipment you need to complete your daily tasks. And make sure those in your household understand and respect your work routine.
If you’ve fallen on hard times financially, the only way to turn things around is to be proactive. Consider becoming a freelancer in your area of expertise, or start a business out of your home. Also, look into making online tutorials to build your brand and bring in some extra income. Finally, make sure your home accommodates your work needs by dedicating a workspace.
source https://creatorimpact.com/how-to-make-money-as-a-woman-during-the-pandemic/
0 notes
Text
Exploring the ‘Ultimate Blocks’ Plugin for Gutenberg
The Gutenberg Block Editor for WordPress is here to stay.
To many (but not all), it is a great improvement on what we had before, adding functionality and more options into the content creation side of WordPress.
But there was still a few things missing, imagine you could add more blocks to Gutenberg? Well you can!
Enter ‘Ultimate Blocks’
One such plugin that adds some really handy blocks to your editor is Ultimate Blocks, a free plugin you can search for within your WordPress site!
Simply by installing the Ultimate Blocks plugin, a number of blocks appear in the editor, it’s that simple.
Here’s a look at some of the blocks:

But what do they do?
I’m glad you asked! :P
I created this not so short video which goes through and test out every single block. Get comfy though, this one goes for a while!
Please Note: By playing any videos on this page, you hereby consent to the use of YouTube’s Cookies.
Subscribe to my YouTube Channel Here
It’s a pretty awesome addition to Gutenberg and one I’ve started using. If you want to install Ultimate Blocks on your WordPress website, search for it under you ‘Add Plugin’ page or download it here.
I hope you found this video useful. Leave a below if there’s anything else you’d like me to check out in the near future :)
source https://creatorimpact.com/ultimate-blocks/
0 notes
Text
How to Remove Background in Photoshop CC (Video Tutorial)

This is a skill that comes in handy and can help you elevate the presentation of anything you make online – cutting out people and objects in Photoshop.
There’s a million different ways to do it, but in this video below I’ll show you the basic approach using the Pen tool, with some small additional tips to clean it all up with.
If you don’t have a copy of Photoshop yet, you can grab it here (this is an affiliate link, so I do earn a commission if you purchase).
It’s pretty straight forward, you can find the video below explaining the process!
Let’s get started…
Please Note: By playing any videos on this page, you hereby consent to the use of YouTube’s Cookies.
Subscribe to my YouTube Channel Here
That’s basically it, although I will be covering other methods in the future that you may find helpful. I would recommend subscribing to my YouTube channel if you want more as I put the most content up there at the moment.
Otherwise, I hope you enjoyed the video, leave a comment below if there’s anything else you’d like to learn in Photoshop. Have a great day!
source https://creatorimpact.com/how-to-remove-background-in-photoshop-cc-video-tutorial/
0 notes
Text
Enter the Fat Dragon Movie Review
Donnie Yen is back and he’s bigger than ever!! Fatter… I should say. Yeah, Donnie Yen plays an overweight hero in this film in a reimagining of the 1978 Sammo Hung Film called ‘Enter the Fat Dragon’! But don’t worry, it’s all in the name of art as Yen proves he can move as good […] from Martial Arts Action Movies! Martial Arts, Movies, DVD's, Blu-rays and Book reviews https://ift.tt/3dlFGD2
0 notes
Text
How to Create a Facebook Cover Image in Photoshop

Want to design a Facebook Cover Image?
It’s simple, in this blog post/video, I’ll show how to create a Facebook Page Cover Image / Header Image in Photoshop, step by step.
You probably don’t realise, but there’s more to this process than you may think, as when you add an image to your Facebook page it displays differently, cropping information that you’ve carefully placed into the image and ruining the look of your page.
But I’ll show you below how to avoid that by sizing things a bit more strategically.
Let’s get into it!
The video below covers the whole process, from start to finish. But I have some notes and resources underneath that should help greatly.
Please Note: By playing any videos on this page, you hereby consent to the use of YouTube’s Cookies.
Subscribe to my YouTube Channel Here
The first thing we need to do is address the image size, so check out the image below:

Notice the left image (PC Screen) has the top and buttom cut off? You can’t even see the border lines that are on the right side (phone screen) – but they’re the same image!
Dimensions / Downloadable PSD Template
So below is the quick sizing guide & template you can use. I do make the image larger than it needs to be as a way of future proofing the image as updates roll out and resolution can change.
So I start by:
Creating an image that is: 1920 x 711 pixels
Adding Guidelines to the very top and bottom of the page (turn on ‘Rulers’ under ‘View’ in your top menu, then click and drag from the ruler into position)
Expand to 1920 x 1080 pixels ( head to ‘Image’ -> ‘Canvas Size’)
or, you can Download this template
Now you can start designing!
Just keep anything you don’t want to be chopped off between the guidelines! If you’re looking for how to create the design itself, I recommend watching the video above.
When you’re done you can save your image. Head to ‘File’ -> ‘Export’ -> ‘Save for Web (Legacy)’. Save as a JPG or PNG (whichever ends up smaller – it will be the jpg 99% of the time). Also zoom in on the preview window to check quality.
Now Upload to Facebook! Open your Facebook page and then hover over the cover image, press ‘Change Cover’, then ‘Upload Photo’ Upload your image and then press save. Done :)
Other Resources
In the video I mentioned a few resources, you can access them below:
Social Media Icons for Download
Find Images for Download (Top Royalty Free sites)
3 Free Facebook Image Design Templates

Download the 3 above designs by clicking the image above and subscribing to our newsletter!
Otherwise, I hope you found the video and information useful. If you want information like this please consider subscribing. I’ll talk to you again next time!
source https://creatorimpact.com/facebook-cover-image-photoshop/
0 notes
Text
The Useless Elements of Your Blog You Should Remove
“Look at how awesome my website is!!”
“There’s a slider, a Facebook box, 2 popups, 4 ads, all of these cool flashing buttons, a picture of my dog ‘Rex’ (my inspiration) and it’s probably the best site that ever existed. Seriously.”
Sounds crazy, right? Well, that’s the reality of many bloggers trying to succeed.
There’s nothing to be ashamed of here.
When learning to build a website or a blog these are fun items to play with, learn about and implement as you work toward becoming more knowledgeable and taking your online presence to the next level.
You have to get right into the thick of things, get your hands messy and then dial back as you discover what works for you.
But what do the experts say? How about...
“Looks nice, I can see my content, now does it convert?”
Check out the video below or scroll past to read the details!
Please Note: By playing any videos on this page, you hereby consent to the use of YouTube’s Cookies.
Subscribe to my YouTube Channel Here
What’s the difference?
Purpose and function are the main keys the successful bloggers and website owners want. They design a website with a goal in mind; a purpose it has to serve.
A lot of people out there are too lost in the “bit and pieces” of their design and find themselves forgetting about the real reason they started their website in the first place (whatever that may be) – until they check their stats and get frustrated because nothing is happening.
There’s the problem, it’s your first obstacle and it’s time to overcome it – you’re focusing on the wrong areas.
The next step is to shed the “bells and whistles” mentality, find out what you want your website to do for you and work towards ‘design’, instead of art or craft.
After all, design is about function.
Your website needs to fulfill a few goals, here’s a few suggestions:
Convert to sale – make money
Convert to a subscriber – so you can get repeat traffic from them
Get your reader to Share your website/page – to reach more people.
The above may not be your goals exactly, but they represent what most people’s websites are trying to achieve. You need people to be on your site in order to make a sale or fulfill your ultimate goal. Also, the more people you get to your website the easier it will be to fulfill that goal.
This is what your website ‘design’ can do for you. So you’ve got to start getting rid of things that make that difficult to happen.
So naturally, I created a list here of things you should consider removing. It’s essentially about behavior that certain elements encourage, but tailor it to your individual needs, these aren’t gospel.
Remove anything unnecessary that takes your visitors off-site
It’s a simple concept, you’ve got people on your website, so don’t encourage them to leave.
You think you don’t but really, most of you do without realizing it!
Take a look at your theme or layout, really think about each element and ask “where does it take my visitors?”. Do they stay on your site or exit from somewhere else?
Here’s a few examples:
Social Media Widgets – A lot of these widgets just take people off-site and slow down your loading time, creating a big barrier between your visitor and conversion.
I’ve always held the opinion that Social Media should be used to drive people to your website – as it’s not as powerful a ‘repeat traffic’ tool as an email list.
Get people subscribing to your email list instead. It will lead to repeat visits to your site if implemented correctly.
Add a few small links to you social media profiles somewhere else on the page where they don’t distract.
Under-performing Advertisements – Making $30 a month with your Adsense ads? Got some affiliate banners in your sidebar? If you track them and they make hardly anything you should consider removing them.
Sell with your words instead, through quality education and value. Ads that don’t perform just add to the load, clutter up your page and distract people from your main call to action.
Link Exchanges – Having a list of 15 websites you exchanged links with in your sidebar or footer isn’t exactly a powerful SEO or traffic technique and they just send people to other websites.
Instead, allow people to contribute posts to your website with a bit of info and a link, so people will get a sample of their work and want to check out their website. Make sure the links open in a new window! But by having them write something on your website they will share it with their audience and drive more people to your blog!
Don’t encourage people to leave, keep them on-site.
YouTube does this effectively. They reward videos that keep people on the platform. Facebook, Twitter, all of these places make more money when you’re using their platform. So they do what they can to keep you there. You should do the same!
Remove less relevant pages from your navigation

Listing 14 pages on your design is an excellent strategy to get people look elsewhere.
If you give people too many options they will be intimidated.
Simplify by grouping under pages that cover several pages, linking out from there or even just add some of the less relevant pages to the footer of your website.
You can slim down your navigation by switching to custom menu. Just go to Appearance -> Menus.
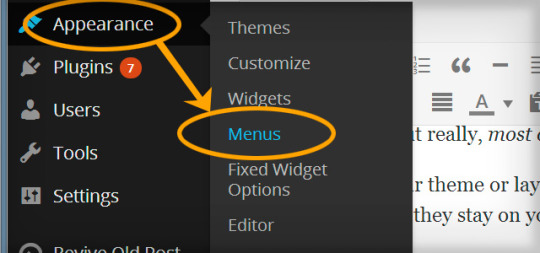
Either alter the existing menu or add a new one by going to ‘create a new menu’.
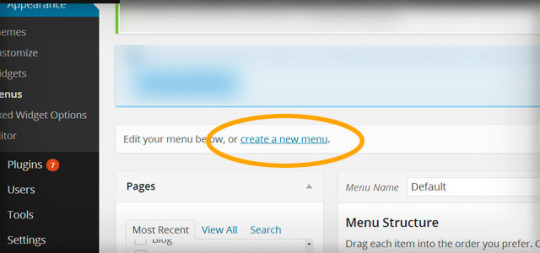
Then add the pages you want to menu!
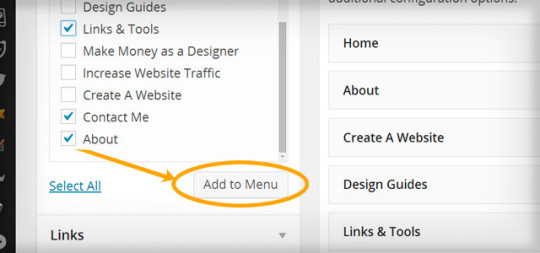
Then simply change your main nav to that menu, this will depend on your Theme’s settings, but you may find it changes by default anyway. Another alternative is to use the plugin ‘Hide pages’
Remove elements that keep your content from being “above the fold”
First of all, what is “Above the fold”? It’s anything that shows up above the bottom section of the browser window, see below:
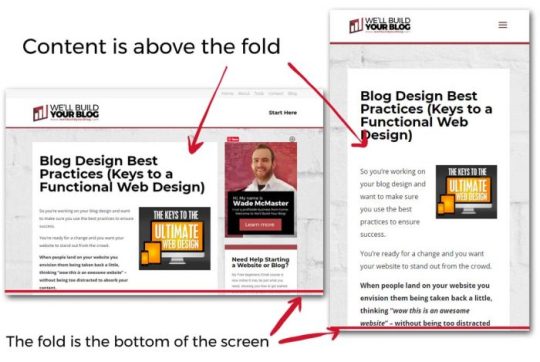
But quite often people see this “opportunity” as a chance cram a bunch of other things up there because they want their ‘extras’ to convert more than they care about their visitors seeing the content they’re looking for.
Give first, receive second.
You need to give people what they’re searching for and then offer the call to action. The best way to serve up the content on a silver platter is to have it above the fold, taking up the majority of the space. There are a few things you should consider keeping like your logo, navigation and maybe a subscription feature box on your home page (as most people go to this page after reading your content).
But you need to remove the useless stuff – slideshows, too many ads, headers that are too tall and push the content back below the fold and put the content on the front line.
But what about pop ups?
They show up above the fold and in front of your content! Make sure they don’t pop up until someone has been on your page for a certain period of time or get a popup that is designed to show up when someone is about to leave. But before you even think about that, is it for an email subscription? That’s OK, anything else I’d seriously question and weigh up.
If you want to use popups, run some test firsts and see if they actually improve conversion or harm it.
Remove anything that distracts from your Call to Action…
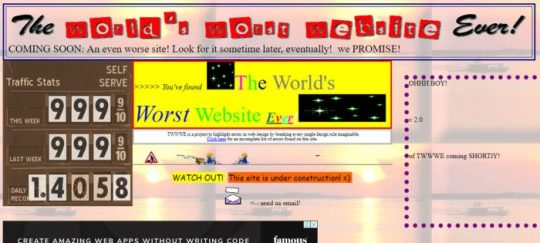
…minus your content of course.
So you’ve set up your website with your logo, navigation, content and you’ve sprinkled a few calls to action around including your email subscription box, some share buttons and a link to your product.
You think “why stop there?”
You start adding links to your other content, cool widgets you’ve found, a tag cloud, links, categories, recent comments and blah blah blah.
Now what? You’ve got an overcluttered design and people don’t know where to go next!
If you’ve got an overcluttered design and people don’t know what to do! Chances are, if they read your content, they’ll bounce afterward or leave because there’s no clear direction and it’s just plain confusing.
Or maybe they’ll leave without reading your words at all!
Also beware of being too aggressive with your call to action, 1 or two in a sidebar, below your content, one or two other places are about as many spots as you want to fill. Being overly aggressive will put people on the back foot.
Choose your design elements wisely. Make your main call to actions the second most outstanding element after your content.
Ultimately, focus on 3 things

I’ve covered them before in the secret of an awesome website design, they are:
1. Give the people what they want – the content.
2. The purpose of your site – the call to action.
3. Making people familiar with who you are – make it share-able and have unique branding.
This doesn’t mean you have to follow what everyone else is doing. Allow yourself to break away from the mold.
Simplify. Make things clear and concise.
James Clear removed his whole sidebar and noticed improved engagement and better results. Because people landed and all they saw was the content they were looking for.
It’s going to that way no mobile anyway, and that will most likely be more than half of your visitors!
You can think just like this and create a website that gives people what they want and they’ll dig for more – this leads to conversions.
Your website is just the middle man between you and your visitors – you’re giving them content, possibly some products or some kind of value in exchange for an email address or money.
There doesn’t need to be all the bells and whistles.
Follow this thought pattern with your website layout and you can forget about the ‘stuff’ and focus on the more important elements- what you offer.
Try it out and leave a comment here to tell me how you went!
If you found this article useful, please subscribe to my newsletter for more.
Thanks for reading!
source https://creatorimpact.com/useless-elements-blog-remove/
0 notes
Text
How to Plan, Schedule and Brainstorm Ideas for Social media

Ever had that nightmare of trying to figure out what to share on your social media account (or accounts)?
Every day or every few days you sit down and think “what the hell will I share today?”
After 20 minutes or an hour, you land on an idea you like and then share it.
Then you try to shut off the idea-generating machine that is your mind as more ideas keep popping up. You wonder why you couldn’t think of these earlier and by the time you post again, those ideas are gone.
It’s frustrating and inefficient!
Fear not, I have a process I use which is really efficient and makes the job SO much easier and you don’t have to think of something new every day.
So let’s get into it.
Below I have a video covering the process, but you can read instead, below as I have also typed it up here for you also.
Please Note: By playing any videos on this page, you hereby consent to the use of YouTube’s Cookies.
Subscribe to my YouTube Channel Here
You need a basic system
You want everything to be structured, planned and easy to produce idea after idea without spending 15 minutes starting your brain.
Here’s my basic process summarised:
Work out a weekly/monthly posting frequency
Create a Post type structure
Create a calendar/spreadsheet for above
List topics relevant to your niche
Pick one post type or topic brainstorm enough ideas for 3, 6 or 12 months. Do this for topic or post type
Schedule each post idea to be posted according to the initial structure.
Does that make sense?
Well, I thought I’d explain in further detail and even touching on how to make this more efficient for multiple networks.
Work out a Weekly or Monthly Posting Frequency
When it comes to social media, you have to be consistent to expect any kind of results.
So depending on the type of social media you intend on using, the frequency is going to vary due to the varying nature of the platform and its audience.
Here’s a basic guide to how often you should post:
Facebook: 2 times a week minimum, 1 or 2 per day is good.
Instagram: 2 or 3 times a week minimum, 1 or 2 per day is good.
Twitter: 1 or 1 per day minimum, 10 times per day is good, no more than 30 per day.
Pinterest: 1 pin per day is minimum – aim for 10 per day
LinkedIn: 1 or 2 per week minimum, aim for 1 per day.
YouTube: posting every few weeks is OK, 1 video per week is good for consistency, you can do 1 a day if you can manage but don’t sacrifice quality.
So, if you only need to post a few times a week, make your structure monthly. If you post daily, make the structure weekly.
So you have a frequency to work on within a cycle of one month or one week. Moving on!

Create a Post type and topic structure
OK, what works?
What kind of content do I post? Here’s some basic ideas to start (just as an example):
Post a motivational quote
Post a link to your blog, podcast or YouTube content
Post a portfolio Piece of your work (art, design, house you just built, whatever)
Share a small lesson or some advice within your niche
Post a joke or meme relevant to your audience
mention a product or service you offer
Give your opinion on something in your industry
Ask your audience for their opinion on something
Post a personal update
You get the idea. The idea is to give you a list of things to rotate (even repeat) throughout this social media cycle). It will make more sense in the next step.
Create Your Calendar/Spreadsheet
You know your post frequency and cycle. If it’s daily posting on a weekly calendar, then create a weekly calendar with those post types.
So you may end up with calendar like this:
Sunday: Post a personal Update
Monday: Post a product or Service Post
Tuesday: Share a Small Lesson or some Advice
Wednesday: Share an old Blog Post or Video
Thursday: Post a Portfolio Piece
Friday: New Post or Video, then a second post a question for your audience
Saturday: Share a Joke
So if you want 12 months of content, you need 52 personal updates, 52 service posts, 52 small lessons and so on. If anything is repeated (twice per week), then you need 104 of those posts. This is where a spreadsheet can be useful as each row is numbered.
The main thing to remember is that you need to make your content primarily something your audience will enjoy and make the blog posts, videos, and services minimal so people are engaged first and sold to second.
This will create a blank template for you to fill in with your ideas. You can do this with Excel quite easily.

Create a List of Post Topics
Come up with a list of topics in your niche. If you are a personal trainer it might be muscle growth, rehab, injury prevention, fat loss, nutrition, etc, etc.
Once you have this topic list, keep it aside as it will be the perfect reference for coming up with content ideas for your calendar or spreadsheet.
Now it’s time to really get moving.
Brainstorm.
Go through each topic, listing ideas that match each post type (if applicable). Put these all onto paper, into a word document or note-taking system. You can even use Trello as I’ve shown in the past.
Do this for each topic and you will have a tonne of ideas to pop into your schedule. You are essentially creating your own vast resource of social media post ideas.
Pile them up, take a few days if you need to. Work out how many posts you need for each post type in your weekly or monthly cycle. AIm for 3, 6 or 12 months of content!

Schedule those social media posts!
It’s easy, fill out your spreadsheet or calendar, rotating topics throughout your post types to keep it fresh (or grouping if relevant).
You can then refer to this spreadsheet whenever you post or you can automatically create a schedule using Buffer or even try out RecurPost.
The next step is to create the actual content. You can do this as you post it, or more efficiently, do it nice and early in buffer or by popping images and text into a folder. This will take the burden of daily creative thinking off your shoulders and allow you to get on with what’s important.
But it doesn’t end there.
You will forget about this and the ideas will dry up – schedule up the next big brainstorm session to keep your ideas banked up for the future.
If you do forget on a daily basis and everything is automated, you need to remind yourself to log in, check and interact with those commenting on your posts to create a good, natural interaction.
That about wraps it up!
You’ve got a system for planning your social media and relieving the stress of creating something on the spot.
If you’re looking for a good piece of software to schedule your posts on social media, check out my guide on Buffer, it offers a free plan to get started.
Tell me, do you already use social media scheduling software? Let me and everyone else knbow in the comments below, and help others find the platform that’s best for them :)
Have a great day and talk soon!
source https://creatorimpact.com/schedule-social-media/
0 notes
Text
Guide to Scheduling WordPress Blog Posts (with Calendar!)

So, you’ve got a number blog posts written and ready to publish.
Imagine if you could type up a number of blog posts and simply schedule them to be posted automatically. It would save logging just to publish your post.
Combined with tools that can auto post to social media from an RSS feed (such as IFTTT.com), it’s a big step in automating your blog if it’s an approach you want to take to become more efficient.
The good news is that scheduling is a basic feature and a part of WordPress. But the addition of a editorial calendar you can drop and drag your scheduled posts in isn’t, so here’s how to set it all up!
Please Note: By playing any videos on this page, you hereby consent to the use of YouTube’s Cookies.
Subscribe to my YouTube Channel Here
Here’s a quick summary of these steps
To cut to the chase, when you publish with WordPress 5.0 or higher, you are asked when you’d like to publish, so simple choose the date there.
To get the calendar with the drag and drop functionality, search for Editorial Calender (WordPress plugin page here) and install that. You then get a section under posts called ‘Calendar’. You can then move items around as you please!
I hope that was useful to you, keep an eye out for future posts on automating your blog and social media. Otherwise, enjoy your day and see you again soon :)
source https://creatorimpact.com/schedule-wordpress-posts/
0 notes