
Don't wanna be here? Send us removal request.
Statistics
We looked inside some of the posts by adsqpractri2 and here's what we found interesting.
Average Info
Notes Per Post
0
Likes Per Post
0
Reblog Per Post
0
Reply Per Post
0
Time Between Posts
6 hours
Number of Posts By Type
Text
11
Last Seen Tumblr Blogs


Fun Fact
In Q3 of 2020, 31% of US users access the Tumblr app daily.
Text
Zine Project! Final Print.
After merging my digital art with the prints collected from last week's print press process, I have created a harmony in unison with the methods and produced some illustrations I can consider not onlyeye catching but harmonious in it's colours and brightness.

As visible here, my art is overlayed onto the marbled paper background while I used the other half textures on parts of the clothing on each character to keep them married to the backdrop without taking anything from what is depicted in the illustration. I considered the artwork a drop dead success all around, and now all that was left was to actually print it out!
This, however, proved to be quite arduous for me.


In this initial print from my own home printer it is obvious I hadnt taken into account converting my colours into CYMK for the printer to handle very well, and so the toner on my printer ruined the colour and saturation to hell and back when printing the images I had illustrated. I then turned to convert into CYMK and lower the darkness of the toner applied to the image, but around this time is when I began to run out of appliable inks and the printer began having issues printing out so many double sided fully coloured images.

And with this I had thought I would be forced to settle for the darker first print as my final submission, until I looked around my local area to find a print shop. With this in mind I compiled a PDF with the correct adjusted CYMK colour graph and layout in order to print out each page in the correct order and template and the result truly speaks for itself!


My colours are super vibrant and the texture of the backgrounds and integrated print techniques really pop out with the silky print paper used in the booklet! I really loved this project and enjoyed it a lot. It motivates me to create more in the future to tell stories or compile fan artwork to sell commerically... I just have to make sure to properly consider my colours and layouts for next time!
0 notes
Text
Zine Project! Concept and Technique.

This project was started before I began filming my puppet animation, but it was a lot easier for me in my experience I believe. It was very fun to think about what I could illustrate pages of a zine about, when I thought about some of my own original characters and decided I could use this project as a reason to plot out an animation I wished to do during the summer! The comic is to plot out and consist of my character (Zerge)'s life and key moments in the history of his life leading up to his adulthood, in which he is imprisoned and subsequently set free by sacrifice. My first idea for this came with a song, but this expanded when I sketched out a cover for it in which Zerge stands looking upward, the kanji on his back says "Punishment", while the back cover design I made has him as a younger self with the kanji for "Love" on his back. I planned for it to be a sort of life cycle, with the opening being the beginning then his end to then loop when turning the booklet over...
We were tasked with utilising print-making methods, which I decided to use the print making room available to us! I used mono print techniques to create textured ink materials for me to use in my digital artwork process in order to have this nice paper like feel to the images, while also allowing th echaracters to feel invited within the background paper colours by using these textures to merge them together.


As seen here I not only used flat print paper to make smoother yet messier gradiants for backgrounds or floors, I used lighter tissue like paper that I used to wipe excess ink or product when cleaning to create a marbled look with the ink, very great for a spacey appearance or a colder, chaotic atmosphere which would help add to the supernatural abilities and locations my characters reside in.


0 notes
Text
Animation Process!

The set is prepped and ready to go, however I found difficulty matching the lighting exactly every time. It meant I had to cover the blackout curtains from behind to ensure absolutely no light leaked through when filming during daylight and so I taped a blanket on all four corners just to ensure darkness. Here is a photo of my light rig too, as I forgot just how loose and unsecure the lamp itself was when hung over the railing of the curtain... It stood pretty well while taped up there though, as I was able to use my tripod to keep my camera at such a distance where the darkness of the set would still be blended out to the corners of the screen while the light itself stayed out of the camera's sensors by using a piece of paper taped over the camera like a little sun roof to stop the image from faltering. Despite the difficult setup process however, I was able to record something and compile the frames using a different mobile program called Stopmotion Studio and export it in 24fps successfully. The sounds I chose to include in the editing process helped cement the motions very well in reality and create very comedic manneurisms.

I had to use some string in places to prop up not only Menad herself but some of the puff balls that I used as juggling balls, which proved to be a pain to move around in a believable manner with only two hands on my human self. It was also an insurmountable task to paint out the wires in each shot I had used one to keep the animation looking seamless and smooth. I believe it was a success to the highest degree! My only downside here is the camera movement is quite jagged in the nature of it being stop motion while the movement of the character itself is quite fluid which leaves it to be quite distracting when seen like this. But other than that, I believe this little experiment to be a great success.
0 notes
Text
Lighting Trials!
A complication came up while painting! I had moved the arms up to paint the hands without staining the work surface I had, yet when moving them back down I had managed to snap the arm off by the shoulder joint, breaking the thick twisted wire and disabling movement in the right arm. This is obviously a problem as by this point I had decided to animate within a dark set with focus on the athletic movement of the clown, which would require the movement of both arms... This is when I realised I could twist another thinner wire, wrap it around the torso, neck and bicep of the broken off arm to create another makeshift joint to reconnect the body to the arm within the same region of the original connection without having to reconstruct the arm joint from scratch! Now I would have to hope the other joints dont break when creating the clothing...


I managed to make some sleeves for Menad just on my own using some scraps of fabric I found around in my room - my original plan was to use an old white t-shirt to dunk and dye in my inks to give a light purple hue when dried however I found it more worth my time in the long run to order a few fabric scraps online for my sisters to help me sew an outfit later. For now, I ran with some sleeves while doing the lighting trials. This is where I allowed myself to play with lighting sources when I realised for the full real set I can try using a spotlight to illuminate the set from above similar to an actual circus tent! This was also my first time animating in stop motion ever too, using the dragonframe program to organise my frames and rendering at 12fps when animating but exporting as 24fps in 2s for the final product. I believe that this will be a fun task, as the motion I can express with little actual movement and clever use of the camera can help me accomplish something with intricate and character filled movement!


Clothing is complete! Now with the set at home with my shutout curtain and darker enviroment I am able to start filming... The set is a simple layered cardboard painted in a dark hue to mesh into the blackness of the dark room while the spotlight that will hang from above can illuminate not only the floor but hopefully catch on the brighter hues of the faces I painted onto the audience! I had considered originally creating a full scale tent to better hide this darkness, but i felt as though itd highly limit the range of movement and space to work with as the puppet moved around. The brighter colours of the puppet definitely helped with making this work well, as the dark enviroment would be contrasted by the joyous yellow and fancy purple.
0 notes
Text
Puppet Creation! Product.


It's made! I believe this little guy will be perfect... The creation process was quite arduous but I believe it was well worth it, as the roundness of the head and stature of the body allow it to stand up on its own quite well all things considered! The armature is completely made up of twisted wire, both thicker and thinner to keep flexibility and structural soundness to a maximum. I believe the next steps are creating the foam body mass to keep it in check with the mass I drew in for the character and not relying solely on the bagginess of the clothes to hold up the shape language I originally designed!

One thing I forgot to mention in this was the creation of the hands and feet! I had originally intended for them to be made of bits of clay and loop seperately onto the arms and legs but I had not accounted for the extra length created by making these wrist joints and noticed how they would ultimately ruin the proportions and make the character look quite uncanny compared to how I envisioned them, which would possibly ruin my enjoyment of the project in general due to it. But, to oppose this, I instead relied on the wire of the legs and arms on their own and molded the feet and hands with the miliputt used to create the bones of the armature under the foam to create joints for the limbs to move in proportion. I will sand these down and paint them to create the final base of the puppet, as for clothes I'm not quite sure what I will end up doing, but I am considering using my sisters' help on this project to create a cute outfit for them...
0 notes
Text
Puppet Creation! Final Designs.

Here I settled finally for the clown design! I believe it is the most charming and endearing, as well as the possibility to have a set designed around a circus or the prep room for a theatre. I havent had many ideas for what the actual story will revolve around, however I do think the setting will breed the creativity required to bring them to life.
Anyways, the clown (I'll call them Menad) will have posable wires attatched to the main head mold of clay to pose and move around the hat I plan to make for the head, which will lay over down to the nose which will be a loose bit of clay to perhaps make a gag about the nose falling off... I think the design allows for most of the inner body to be hidden from sight in animation, especially if ruffles will be added over the wrists but I don't think it needs that many, especially if I still wanna convey the athletic nature of the character when moving around the set...

0 notes
Text
Puppet Creation! Initial Designs.

This week we are tasked with adapting our Winter research into a character design! This design is to be taken into account for modelling and animating a puppet with a skeleton made of twisted wire due to limited resources that would not possibly allow us to use any pre built animation rigs. I thought long and hard about a design that could work for my niece as a representation of her energy and activeness while also being a charming and endearing character easily identifiable and full of character to animate and bring to life. My initial thoughts revolved around her big round eyes, but then I remembered her wide smile that I could easily characterise. This basically solidified the notion of her big toothy grin being the main character identifying trait of the design.

I first began with clown doodles as I have a tendency to lean into their design motifs, but I also considered a cat with feline attributes like wiskers and a posable tail made of the same wire as the torso, with other smaller kitties to represent her cousin or sister. However, this animal almost mascot-like design felt just a tad uninspired to myself, and as such I began sketching out more athletically built clowns, with the nose being big and goofy much like her head, and the eyes being covered as to emphasise the big smile. I originally intended for mouth movement by having swappable heads, but with the size I ended up going with it ended up being far too big to even consider something like this.
0 notes
Text
Christmas Project - Locals!
During the Winter we were tasked with finding someone from whichever location we visited during the holiday break and conducting either an interview or a research log on them, finding and collecting relevant items and observational drawings of things they were associated with or loved doing to depict them in 10 pages.
As I was staying back home in Essex where my family kept themselves after multiple moves around London, I decided it would be appropriate to draw my niece, who I had spent a lot of time with during specifically christmas as it was a time of family togetherness and we loved to religiously come together each christmas to take a breather and just have fun together. She is my oldest niece, as I am an uncle to 4 different silly girls. But I chose her because she means a lot to me as a person as when I was growing up alongside her she helped me be happier and hopeful for the future. When drawing her she always had this smile on her face from whatever she was doing, being so animated it was like she was from a cartoon!

One of her favourite activities is making this slime substance and giving it out to friends at school! It's honestly quite impressive and she seems to make a lot more for her cousin to play around with alongside her.
She tends to ask me a lot to spectate her gymnastics and as such I go with her to watch her participate at the gymnastics club on thursdays I'm able to. She has a lot of fun with it, and tends to just move around with a fluidity and excitement that could only really be seen in someone as full of life and youthful as her.

Something else I noticed and believe would be interesting to incorporate into a character is her affect on others, in which she is almost bound to the hip with her cousin and little sister, always aiming to bring a smile to everyones faces. She is a kind hearted individual and brightens up the area tenfold by just being herself.
0 notes
Text
Experimental Animation! Pixillation.
This project was extremely fun, with a lot of the ideas coming from whatever objects and materials were at our disposal at that moment in time. We were collectively more inspired by the realistic and fantastical looking uncanniness of Jan Svankmajer. We decided to write the script around the concept of a cigarette, where actions would be jagged and strange. Everything would have this sort of strange yet real feeling, while still being presently animated. We did run into some issues with timing and motion however, as you can see in our final product that it appears moreso as a live action creation with minimal actual animation as opposed to it leaning towards more fantastical movement. The most we could manage is how we interacted with objects while still working alongside our limited ability to prop up some objects when animating.
0 notes
Text
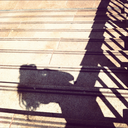
Experimental Animation! Animation to Real Life.
In this exercise I was tasked to animate a character into the real life world! My challenge here was to exaggerate the motion of this character using squash and stretch to create a type of fluidity that allows for the character to have this grounded nature in the reality of the world outside. I decided to record the outside at a height of the roofs to have my character move across the rooftops like the sort of visualisation you might have as a kid when looking outside of a window! To execute that amount of squash and stretch I made the character a sort of trapezium that could easily squish down, so each time they jumped they would squish down like a little spring and launch forward by extending their torso before reaching the apex of the jump and shortening again to hold the momentum in the landing, allowing for a higher jump off the surface. The only struggle I feel I had here was actually the end bit, where I wanted to fully elongate the last bounce off the closest roof then have them squish down before launching off in the electricty again but for whatever reason I just couldnt get this down without the momentum of the last jump feeling like it was cut off by a huge margin.
0 notes
Text
Experimental Animation! Collage.
In this module we will experiment and study different forms of animation in order to hone the basics and how they would apply in other forms of motion. Here is an attempt at a collage trim animation making use of assets and colours. It was a fun little challenge, with sounds being compiled by Antonio. We originally had the challenging idea of having a moving background, but as we went along with it we decided it was not only far too time consuming but also far too much use of resources than we could handle. We eventually settled for abstraction, but as we didnt crop the field of view of the camera properly it ruins the effect of the paper being moved around and transitioned. What didn't help was my catching of covid-19 during this task, and as such I had to head home early and left my classmates sadly. But despite this, I believe we had a successful experiment!
0 notes