
aisling5396418
IDES1262
Aisling McCreery z5396418
11 posts
Don't wanna be here? Send us removal request.
Last Seen Blogs

notanybiblemale
Untitled

oups46
Sans titre

fragxle-bxtch
I'll be a skinny bitch

masterpromotional
AR Allen

genshin-impact-headcanons
Requests are Open!!
Text
Week 10

This week I got my moisturiser bottle ready to be 3D printed. It was an easy process of changing the file type, uploading it to cura, changing the printing parameters and slicing it. Going through the entire process of designing, creating a physical model, scanning, adjusting in 3D Max and sending it to the 3D printer was very helpful in understanding the design process as a whole. I believe I will be able to replicate this process, which brings me one step closer to my goal of being able to professionally design. I found that I have strengths and weaknesses over the course of this process, but to be a good designer I have to work on my weaknesses to not be put in a box of what I am good at when out in the field.
This term I found I struggled with learning the rules of design more than the actual design process. For example, sketching an accurate 2 perspective view of an object was difficult as there were rules to it that had to be learnt and followed. After I did these activities a few times over I began to get the hang of it, which is quite motivating. Through this process in particular I learnt that no matter what it is, if you attempt something enough times (with the help of pointers from people who have done it before and research) you can get better at anything. I also found that I have a talent for picking up practical processes, like physical model making and design sketching. I will also be expanding on these skills going forward as the scope for growth is unending.
If I were to redo this course I would pay even closer attention to the professionals aiding in my work as their tips have really helped me develop as a designer and acquire these new skills in a much shorter time than I would have on my own. I would also do each activity until I have a real grasp on how to execute it to a high level, so as to not lose any of these new skills due to forgetting the basics. Overall, this course has been probably the most beneficial course I have taken so far, as I can physically see the new skills I have obtained and the confidence in my designing that comes with that.
0 notes
Text
Week 9
This week we edited the scan of a moisturiser bottle using what we've learnt in 3DS Max. I found it very useful going through the process of taking the raw scan and going through a compatible software (Rhino 7) to convert it into a file type that can be read in 3DS Max. Learning how to orientate the gizmos correctly was a real life saver as when using the FFDs without orientation first, it's impossible to have a symmetrical end product.

After adjusting the scan to be editable, I was able to play with some of the parametric deformers and free form deformers to create an elegant bottle shape. To achieve this I used the FFD tool in 4x4, taper, and stretch.

I feel like I am finally getting somewhere with understanding how to 3D model for small products like this. This activity was very useful and will aid in the future when I am converting more complex physical models into virtual ones. To improve, I would like to learn the other ways of modifying a solid other than the deforming tools, like combining 3D objects and cutting into them like you would when physically making a model.
2 notes
·
View notes
Text
Week 8
Part 1
This week we began learning the software 3ds Max. Initially, this was not too difficult as we were just playing with the tools and familiarising ourselves with the interface. This part of the task was enjoyable and interesting as I could figure out how different tools work through experimentation. I believe I could have expanded my experimentation further, but without a grasp on the basics, this would most likely confuse the issue.


Part 2
I found that once there was a goal to work towards in this program it began getting quite confusing. It might be because I do not have much experience with 3D modelling and the tools were not self-explanatory. With the parametric deformers, the angle, axis and effected axis are all typed in and changed in a sidebar. I found the uses of these tools did not do what was expected.

I first experimented with creating a cartoon television set, but wanted to try different ways of manipulating primitive shapes so I created another object.

I settled on constructing a basic object, a beer mug as I would need much more practice to be able to do anything more complex than this. I intend to continue learning 3D modelling but on a different platform, as I believe this one does not suit my needs as a designer like other ones out there.
2 notes
·
View notes
Text
Week 7
This week we used our designs of moisturiser bottles from last week to create a 3D model out of foam. I found this process to be helpful in the visualisation of my design in the 3D form, and how it would lend itself to being used as a product. I decided to attempt this perfume bottle design as learning the proper techniques for foam modelling this design would help in another course of mine too. I also chose it for the negative space, and irregular shape to give myself a challenge.

The pointers of using profile templates did not work as well for my design, as there are no flat surfaces. I attempted the technique anyway and found the hot wire had to be taut with no slack in order to get a perfect perpendicular cut on the foam block. What I found most useful was the toothed grater which let me take away a lot of the negative space left on the foam. To achieve the negative space I experimented with cutting it out with a box cutter, but the foam was too thick and broke while trying to dig it out. I found that the dremel with a flat head was perfect for this task, but required a steady hand. Overall I was happy with my foam model once sanded down, it did not completely match my sketch, but correctly represented the idea and functionality I was attempting to portray in this model.

4 notes
·
View notes
Text
Week 6
This week I experimented with turning a physical sketch into a digital rendering. At first, I attempted using photoshop, but then realised I could use procreate which I am reasonably more familiar with. I am happy with how the shading came out, but I believe my lines could be crisper. There is still so much I need to learn in order to create professional renders. I will research tutorials to learn more tricks in order to enhance my future renders in Photoshop and Procreate. I was unable to create a shadow that looked realistic, it just ended up making the render look more sketchy as the outline of the bottle was not completely straight.

4 notes
·
View notes
Text
Week 5
This week there was a big focus on learning how to sketch properly. We did quite a few warm-up sketches to get the feeling of being fluid and confident with a pencil. I found that I usually spend a lot of time on each line which probably slows down my sketching process quite a bit.

figure 1.
I redesigned the Olay bottle 12 different ways, keeping the capacity held as consistent as possible. Some of the designs are a bit out there in terms of functionality, but I believe a few of them could be genuine redesigns for this bottle.
4 notes
·
View notes
Text
Week 4
Part 1.
This week we focused on 2-point perspective drawings of the chamfered box we made and brought to class. I struggled a lot with this task at first, every time I thought I had done it correctly I realised what I had drawn did not look how the physical model did.

(Sorry for the lightness of the photo, I'll draw with heavier lines to show progress in future)
The above image shows my first attempt, in which I did not place the horizon line in the right place. I corrected this in the following image. For the final product to be accurate, each measurement relies on the last being correct. This became very frustrating when I realised I made a mistake earlier on in the process like the horizon line.

Part 2.
I then redrew my box using a perspective line that was further away. I can note the slight difference in the dimension of the upper left edge the most. I found that the further away the object is the less distorted it appears. After getting the hang of this process, it became much faster with this second sketch. I can already see that the repetition of this task is benefiting my skills with accurate drawing.

Part 3.
Drawing spheres in perspective is something I usually just eyeball, but learning how to draw them in proportion was interesting. My circles came out a little wobbly as when using a felt tip pen you must use one fluid movement to create a line, whereas I am used to doing a feathering technique with a pencil. I aim to work on my ability to be confident in the lines I draw without having to go back over them

0 notes
Text
Week 3
This lesson was quite beneficial in understanding orthogonal projection and how to set out an engineering drawing to look professional. Having a model with all the measurements shown on a 3 quarter view made the model easier to read. I found that this method of drawing plans creates the ability to communicate hidden components of the object that would not be able to be seen from a single projection of a face of the object. The lecture and research material covered other ways to demonstrate the form of the object to a high degree, like employing a section line to show the object's internal structures.

figure 1.
At the beginning of this task I read the measurements incorrectly on the model. I was instructed to start my drawing at a place I know the measurements for sure, and I'm not guessing what form it takes ( which is what happened here with the slanted line). I then stopped doing this drawing and decided that planning my projections beforehand would benefit my final product and avoid mistakes like these.

figure 2.
My final product ended up looking professional in my eyes. I am not sure if my auxiliary view is correct as I saw some of my peers do it differently, but this is what made sense for me. I found this style of drawing (orthographic projection) to be easy to read as all the measurements line up for each side of the object. If I were to do this again I would add labels to my views and space out the concentric lines for the cut section more as that is what I have seen in other drawings. Overall I am proud of my final product and think this task will help me understand plans of objects in the future in the Industrial Design space.
12 notes
·
View notes
Text
Week 2
This week we were introduced to orthogonal projection. The task of cutting out a box that fits over our chosen object was a useful activity for visualising how orthogonal projection works.

figure 1.
I found this portion of the exercise quite simple, as it only involved 3 measurements from our object which were then manipulated to produce this box. At this point in the activity, I realised my object would have the same projection for the front, left and right sides.

figure 2.
My orthogonal projection ended up being both simple and challenging at the same time. My projections were consolidated into 2 drawings rather than 4, but on the other hand, there were many minute measurements that I found had to be precise, or else the entire silhouette of the object would not look correct. Another challenge was the many concentric circles on the top view. I became proficient in using my compass and using the attachment to use a felt tip pen. I should have left more room above my front/left/right drawing to fit all the measurements in. I believe this would make the plan look less crowded. The measurements for the top of the object were very densely packed when I started writing them in. I began wondering if there is a more professional way of writing in many measurements in a small area, if you have any ideas for me please let me know!
7 notes
·
View notes
Text
Week 1
This week we were set 3 tasks in which we were tested on our ability to use our design tools correctly and accurately. I enjoyed learning how to use these tools as I can see how this knowledge will make my practical design sketching easier and faster in the future. I learnt how to use a tee square, specifically how to line up my paper with the desk or workspace and do quick and accurate horizontal and vertical lines. I also found out that when using the circle template I should use a one mm larger diameter circle when using an art liner ink pen due to the thickness of the line.
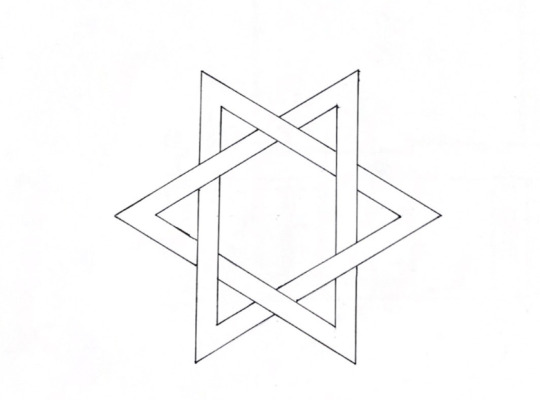
figure 1.
My strength was measurements with straight lines and angles when drawing this star. My area of improvement would be pen control to not create a pooling of ink as seen on the leftmost point's inner line. I also had messy sketch lines so I decided to rub them out. I will aim to sketch more precisely to keep these guidelines in my drawing to portray the accuracy of my sketch.
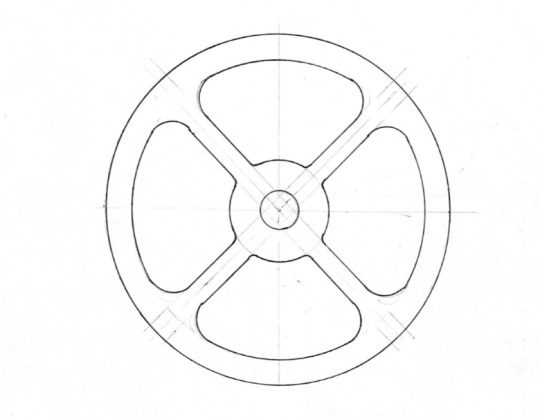
figure 2.
For this exercise, I had a few issues, mostly with the circle template. The instructions were in radii, whereas the template was measured by diameter. This tripped me up as I did not double the radius length to get the diameter and had to restart the curves inside the circles as they were too small.

figure 3.
I measured this shape on tracing paper and then cut this shape out and used it as a template for all the coloured shapes. I realised I should have done my template one mm smaller to make my coloured shapes accurate. You can see the error in this measurement on the top left where the shape corners of orange and yellow do not meet.
11 notes
·
View notes
Text
About me
Hi everyone I'm Ash, I love everything art with lots of colour. I use to do horseriding and have a few ribbons to show for it. Riding on the beach was always my favourite, especially when the horses would decide to roll in the water with me stuck in the saddle. Horses are as heavy as they look, trust me.
1 note
·
View note