
Sometimes I play around with making books
Last active 4 hours ago
Don't wanna be here? Send us removal request.
Statistics
We looked inside some of the posts by all-bound-up and here's what we found interesting.
Average Info
Notes Per Post
26K
Likes Per Post
14K
Reblog Per Post
12K
Reply Per Post
266
Time Between Posts
7 days
Number of Posts By Type
Text
16
Note
1
Last Seen Tumblr Blogs


Fun Fact
Tumblr has 411 employees.
Text

I finally put titles on all the books I’ve bound!
I also printed all the signatures for Lady Chatterley’s Lover today, and started typesetting the first fanfic I ever read back in 2011, to bind just for nostalgia’s sake. It’s currently 1244 pages in word though, and getting bigger with every chapter break so… that’s fun. It also has a sequel which I am debating whether to bind.
#bookbinding with becki#bookbinding#fanbinding#I haven’t done any binding in what feels like forever because I’ve had so much on
21 notes
·
View notes
Text
Things I Wanna Tell You


Want to share an old work of mine with you guys today :) It’s a lil book called Things I Wanna Tell You
It's long so I'm gonna put a read more here before the whole book!


There was a depressed period in my life, where I felt tired of things, and I even found painting and watching others’ works were terrifying. Though now those feelings seem so far away from me, I didn’t know when it could end when I was in it. I think it’s same for a lot people, and I know that encouragement and positive words can’t just bring you out of there.
So I made this book when I started to feel that I’ve got out of that situation. You can say it’s a collection of small things in life that I found comforting in my hard time, I simply want to share them with you. They may be tiny and ordinary and we always forget about them when we focus on “bigger” things, but I think they are actually the big part of life.
This is from May 2020 and I’m glad to say it has been almost a year!! It was my first book and I’m looking forward to make more in the next two years^ ^
8 notes
·
View notes
Text


It’s done!!!!!! Edith Wharton’s House of Mirth and Age of Innocence bound into a dos-á-dos book!
I’ve been planning this for months and been putting it off until this week because there were so many new techniques I wanted to learn to put into it (kettle stitching, making and using book cloth and the whole general concept of a dos-á-dos book)
It’s nowhere near perfect, but I’m proud of it.
Oh, I used @omfgreylo’s video on dos-á-dos binding to guide me.
#oh my god I’ve just realised I formatted the titles for them differently#I’m such an idiot#hom#the house of mirth#the age of innocence#bookbinding#bookbinding with Becki#handbound books#dos-á-dos#dos-a-dos#Edith Wharton#classics#I made this!
29 notes
·
View notes
Text


I was going to bind The House of Mirth and The Age of Innocence together as a dos-a-dos volume but I think together they’re too thick and heafty to make it practical for actual reading though. I mean it’s over 800 pages and whilst I really want to, I also want it to be practical for actually reading.
I’m going to think on it a bit.
#the house of mirth#hom#the age of innocence#bookbinding with becki#edith wharton#handbound books#bookbinding#because I’m incompetent at posting to the correct blog
10 notes
·
View notes
Text


Amish Country by Lolabeegood (on gossamer) all completed.
I know I was posting my progress with this in a thread to help others, but I was finding making that post was anxiety inducing and so I was putting it off. I would recommend using Sea Lemon’s youtube if you need support though.
11 notes
·
View notes
Text
Folding and trimming - your book is starting to take shape!
Okay, so you’ve printed your signatures. Next, you want to take those signatures and fold them.
First, make sure that you’ve got two consecutive pages on top, so page 199 and page 200 for example.
You want to knock them on the side and top to make the pages of your signature all line up and even, then you want to fold down the middle. Make that line nice and crisp. Simple.

Now, you’ve got to remember that because you’re folding around 7 or 8 sheets of paper together, it’s not going to look neat at the edge


This is okay - we’ll trim those edges. Fun fact though, pages left like this are called deckled edges.
Just keep repeating this until you’ve got all your signatures folded! This doesn’t take long at all.

And now it’s time to grab that pencil, sharp knife and straight edge (I really recommend a steal ruler because you’re less likely to damage it with your knife and it gives a better edge).
You’re going to want to start by marking out where you’re wanting to trim it. The measurements I use for a standard size paperback (according to bookbinder3) on A4 paper is 2cm from both the top and the bottom, like so


and then 11.2cm from the fold, like so
And trim, pressing down on your ruler and running your Stanley knife down it.
Be responsible. Practice all the knife safety shit that I don’t.

To produce margins like this:

And then, like before, repeat with the rest of the signatures.
Honestly, this is the part I hate most about the whole process, because my brain has so much trouble reading rulers. Like, my dyslexia looks at all the lines and breaks. So I normally put a YouTube video on of artists/creatives (a lot of Evan and Kaitlyn and Nerdforge lately) in the background because people chaotically creating things whilst I chaotically create calms me.
I’m going to leave it here and do stitching when I feel more like it.
So I’m going to, as I work on the next book I’m binding, give a step by step of the way i do it. Now, this is by no means the best most perfect way to bind a book, and I take a lot of shortcuts. But it works.
So, we start with the digital side of things. For this example I’m using the xf fanfic Amish Country by Lolabeegood on Gossamer. I start by copy and pasting the entire fic into a word document. If I’m using a fic from AO3, you just click the little download button at the top and it gives you options - I use html and copy it from there.
In the word document, you then want to edit the text so it looks like how you want it. I find that size 18 times new Roman font works the best for the look I want to achieve - when the pages are scaled down into signatures and printed the font size drops quite dramatically.
You also want to create a cover page - I just use a word preset because I’m lazy.
Add page numbers and check they’re in the font you want - it’s a little detail but having them in a different font can be quite jarring sometimes.
Once it’s done to your liking, save it as both a word document (so if you notice a problem whilst printing you can go back and edit it) and a pdf.
I then use a Java program by Quantum Elephant called bookbinder to turn the pdf into signatures.
It can be intimidating at first, but you just import the pdf you’ve just saved and check the settings are correct. I usually leave the units as points, paper size as A4, single sided, with alternate page rotation on because I don’t have an automatic duplex printer. For book size I use standard paperback, keeping proportion, and I add a fly leaf. I use the standard signature format.
And then all you do is hit generate document and it will create a folder of pdfs containing your signatures.
I tend to find that the first page of the second side of the first signature is upside down so you just need to rotate that one in your pdf viewer, and you’re good to go.
I’m going to leave it here for now, because I have to do stuff for my dissertation to be submitted tonight, so when I print it out either tomorrow or Friday probably I’ll do another step by step of that.
52 notes
·
View notes
Text
Printing! This is the first physical step of your book becoming a book! Yay!

Printing is...it’s pretty self explanatory. You just have to figure out what way your printer orientates. DO THIS ON PLAIN CHEAP PRINTER PAPER FIRST.
Every printer is different, so what I do once I’ve printed the first side of my signature will possibly be different to what you need to do. I essentially reorder them so the top sheet is on the bottom and the bottom sheet is on the top, and then rotate them 180°. In the old printer I would turn the pages upside down and then rotate 180°.
Once the second side is printed, I then reorder them again so that the bottom page is on top again - this should be the middle page in your signature, with consecutive page numbers visible:

You also should have quite a big boarder. Don’t worry, this will all be trimmed off.
Also, this is an example of what times new Roman font size 18 looks like when printed. It may seem big in the document, but it’s about right when printed.
The fic I’m printing has 12 signatures and I’m timing how long it takes to print it. The print spooler on the laptop I use gets stuck so between each signature side i have to reset it, but that takes less than twenty seconds on average now. I’m also going to have to change the ink at some point but it will give a rough guide. (51 minutes - including an ink change and having to reprint one because I messed up)
My biggest top tip for printing is alternating which way you stack each signature so you can keep them separate whilst still in the correct order, like so:

And that’s pretty much all for printing. It’s probably the most boring bit.
I’ll probably do folding, trimming and stitching tomorrow because I just don’t have the brainpower to focus on it tonight.
So I’m going to, as I work on the next book I’m binding, give a step by step of the way i do it. Now, this is by no means the best most perfect way to bind a book, and I take a lot of shortcuts. But it works.
So, we start with the digital side of things. For this example I’m using the xf fanfic Amish Country by Lolabeegood on Gossamer. I start by copy and pasting the entire fic into a word document. If I’m using a fic from AO3, you just click the little download button at the top and it gives you options - I use html and copy it from there.
In the word document, you then want to edit the text so it looks like how you want it. I find that size 18 times new Roman font works the best for the look I want to achieve - when the pages are scaled down into signatures and printed the font size drops quite dramatically.
You also want to create a cover page - I just use a word preset because I’m lazy.
Add page numbers and check they’re in the font you want - it’s a little detail but having them in a different font can be quite jarring sometimes.
Once it’s done to your liking, save it as both a word document (so if you notice a problem whilst printing you can go back and edit it) and a pdf.
I then use a Java program by Quantum Elephant called bookbinder to turn the pdf into signatures.
It can be intimidating at first, but you just import the pdf you’ve just saved and check the settings are correct. I usually leave the units as points, paper size as A4, single sided, with alternate page rotation on because I don’t have an automatic duplex printer. For book size I use standard paperback, keeping proportion, and I add a fly leaf. I use the standard signature format.
And then all you do is hit generate document and it will create a folder of pdfs containing your signatures.
I tend to find that the first page of the second side of the first signature is upside down so you just need to rotate that one in your pdf viewer, and you’re good to go.
I’m going to leave it here for now, because I have to do stuff for my dissertation to be submitted tonight, so when I print it out either tomorrow or Friday probably I’ll do another step by step of that.
#bookbinding with becki#bookbinding#fanbinding#bookbinding instructions#long post#printing signatures
52 notes
·
View notes
Text
Let’s talk book presses.
Now...I would argue that a book press is not 100% necessary. BUT, I would say that it helps and makes life somewhat easier and gives a better finish.
Firstly, what does a book press do? Well, as the name suggests, it presses the book. The main benefit of this is that you can when gluing the spine together hold the signatures tighter so no glue slips through and you get a tighter spine.
For example:
This book was made without a press, using a vast quantity of binder clips. You can see a very clear gap between the two signatures. The other problem with binder clips is that the spine bows out in the middle because it’s held tight at the edges rather than an even pressure.

This book was made with a press. There’s still a gap but it’s less prominent (I had a lot of trouble with this one - if the birthday present for my friend was already wrapped up I’d show that one as an example because that one worked well.

The other benefit of using a book press (which was my main motivator for building one) is that you can do painted edges, for which the only example i have is a photo of my friends birthday present before I wrapped it.


It’s nowhere near the easiest of practices, and it depends on whether you like the look, but it’s quite useful to have the ability.


This is my book press. It’s very rudimentary. But, it works for what I need.
I’m going to go through how I made it, and then what I would do different if I made another.
So, it’s total cost was £24.26, but depending on what materials you already have you could probably do it for cheaper.
First off, we have our wood. I used a 18x405x810mm MDF board cut into three. I then on the bottom pieces drilled 4 14mm holes, 2 inches in from the sides. On the top board I drilled 12mm holes in the same place. If you’re using MDF, do not use wood bits, use normal bits. Wood bits really don’t cut MDF well because of what MDF is.
I then used 4 12x120mm hex bolts, with 4 12mm washers and 12mm wing nuts. It’s heavy duty but it really holds the book tight and that’s what you want.
Put the hex nuts through the two boards with 14mm holes, put your book on, and then the top 12mm hole board, your washers and your wing nuts. Tighten that baby up and voila, a book press.
I put little felt feet on the bottom of my hex bolts so they don’t damage the floor, but that’s just because my landlord scares me. It does make it easier to slide it around thought.
On that note, I recommend using a sturdy table or desk. The only table we have in our house is glass and really not ideal for the force needed for cutting down through blocks of paper or greyboard or supporting a book press whilst you’re tinkering, so I work on the floor. That works too, but a table or desk is probably better. You want a hard flat surface to work against ideally.
On to what I would do differently.
Firstly, if I could I would use hardwood, just because the MDF is flexible, which isn’t really what I want. It works, but I would have preferred hardwood. We couldn’t get any in a reasonable size or price because, y’know, the whole pandemic situation meant that where I’d normally buy wood is closed at the moment so we had to do our best.
I actually want to try getting a couple of butchers blocks and try using those instead, but the butchers blocks in our local supermarket are like £30 each, which is a far cry from the £9 I spent on a sheet of MDF.
If I had a real plan and wasn’t just making it up as I went along, I probably would have devised a system of guides to keep the text block lined up whilst I glue the spine together just because I don’t stitch the signatures together before I glue (I know, another shortcut, but I haven’t gotten around to teaching myself. When I do a dos-a-dos binding soon I might learn.
The only other thing I would change would be having some sort of Chuck to stop the MDF from warping when there’s pressure on the book, so it doesn’t bow either side of it. That’s not as easy a fix as it sounds because each book is a different width.
So, do you need a book press? No, I wouldn’t say so. Does it make life easier? Yes. Would I recommend at least making a rudimentary one if you’re planning on making more than just a couple books? Yes.
So I’m going to, as I work on the next book I’m binding, give a step by step of the way i do it. Now, this is by no means the best most perfect way to bind a book, and I take a lot of shortcuts. But it works.
So, we start with the digital side of things. For this example I’m using the xf fanfic Amish Country by Lolabeegood on Gossamer. I start by copy and pasting the entire fic into a word document. If I’m using a fic from AO3, you just click the little download button at the top and it gives you options - I use html and copy it from there.
In the word document, you then want to edit the text so it looks like how you want it. I find that size 18 times new Roman font works the best for the look I want to achieve - when the pages are scaled down into signatures and printed the font size drops quite dramatically.
You also want to create a cover page - I just use a word preset because I’m lazy.
Add page numbers and check they’re in the font you want - it’s a little detail but having them in a different font can be quite jarring sometimes.
Once it’s done to your liking, save it as both a word document (so if you notice a problem whilst printing you can go back and edit it) and a pdf.
I then use a Java program by Quantum Elephant called bookbinder to turn the pdf into signatures.
It can be intimidating at first, but you just import the pdf you’ve just saved and check the settings are correct. I usually leave the units as points, paper size as A4, single sided, with alternate page rotation on because I don’t have an automatic duplex printer. For book size I use standard paperback, keeping proportion, and I add a fly leaf. I use the standard signature format.
And then all you do is hit generate document and it will create a folder of pdfs containing your signatures.
I tend to find that the first page of the second side of the first signature is upside down so you just need to rotate that one in your pdf viewer, and you’re good to go.
I’m going to leave it here for now, because I have to do stuff for my dissertation to be submitted tonight, so when I print it out either tomorrow or Friday probably I’ll do another step by step of that.
#bookbinding with becki#bookbinding#fanbinding#bookbinding instructions#long post#supplies for bookbinding#book press
52 notes
·
View notes
Text
COME ON, PEOPLE! WE'RE BANNING THE CONFEDERATE FLAG!
Video by the guy that started it below.
-fae
26K notes
·
View notes
Text
I posted this to the wrong blog and then reblogged the wrong post saying I posted it to the wrong blog. Gagh!!!!!
So I’m going to, as I work on the next book I’m binding, give a step by step of the way i do it. Now, this is by no means the best most perfect way to bind a book, and I take a lot of shortcuts. But it works.
So, we start with the digital side of things. For this example I’m using the xf fanfic Amish Country by Lolabeegood on Gossamer. I start by copy and pasting the entire fic into a word document. If I’m using a fic from AO3, you just click the little download button at the top and it gives you options - I use html and copy it from there.
In the word document, you then want to edit the text so it looks like how you want it. I find that size 18 times new Roman font works the best for the look I want to achieve - when the pages are scaled down into signatures and printed the font size drops quite dramatically.
You also want to create a cover page - I just use a word preset because I’m lazy.
Add page numbers and check they’re in the font you want - it’s a little detail but having them in a different font can be quite jarring sometimes.
Once it’s done to your liking, save it as both a word document (so if you notice a problem whilst printing you can go back and edit it) and a pdf.
I then use a Java program by Quantum Elephant called bookbinder to turn the pdf into signatures.
It can be intimidating at first, but you just import the pdf you’ve just saved and check the settings are correct. I usually leave the units as points, paper size as A4, single sided, with alternate page rotation on because I don’t have an automatic duplex printer. For book size I use standard paperback, keeping proportion, and I add a fly leaf. I use the standard signature format.
And then all you do is hit generate document and it will create a folder of pdfs containing your signatures.
I tend to find that the first page of the second side of the first signature is upside down so you just need to rotate that one in your pdf viewer, and you’re good to go.
I’m going to leave it here for now, because I have to do stuff for my dissertation to be submitted tonight, so when I print it out either tomorrow or Friday probably I’ll do another step by step of that.
#bookbinding with becki#bookbinding#fanbinding#bookbinding instructions#long post#supplies for bookbinding
52 notes
·
View notes
Text
So I’m going to, as I work on the next book I’m binding, give a step by step of the way i do it. Now, this is by no means the best most perfect way to bind a book, and I take a lot of shortcuts. But it works.
So, we start with the digital side of things. For this example I’m using the xf fanfic Amish Country by Lolabeegood on Gossamer. I start by copy and pasting the entire fic into a word document. If I’m using a fic from AO3, you just click the little download button at the top and it gives you options - I use html and copy it from there.
In the word document, you then want to edit the text so it looks like how you want it. I find that size 18 times new Roman font works the best for the look I want to achieve - when the pages are scaled down into signatures and printed the font size drops quite dramatically.
You also want to create a cover page - I just use a word preset because I’m lazy.
Add page numbers and check they’re in the font you want - it’s a little detail but having them in a different font can be quite jarring sometimes.
Once it’s done to your liking, save it as both a word document (so if you notice a problem whilst printing you can go back and edit it) and a pdf.
I then use a Java program by Quantum Elephant called bookbinder to turn the pdf into signatures.
It can be intimidating at first, but you just import the pdf you’ve just saved and check the settings are correct. I usually leave the units as points, paper size as A4, single sided, with alternate page rotation on because I don’t have an automatic duplex printer. For book size I use standard paperback, keeping proportion, and I add a fly leaf. I use the standard signature format.
And then all you do is hit generate document and it will create a folder of pdfs containing your signatures.
I tend to find that the first page of the second side of the first signature is upside down so you just need to rotate that one in your pdf viewer, and you’re good to go.
I’m going to leave it here for now, because I have to do stuff for my dissertation to be submitted tonight, so when I print it out either tomorrow or Friday probably I’ll do another step by step of that.
52 notes
·
View notes
Text


Always make sure you have a cat supervising when editing text
#I’ve been formatting this text for three hours now and I’m only a fifth of the way through#gahhggggh
0 notes
Text
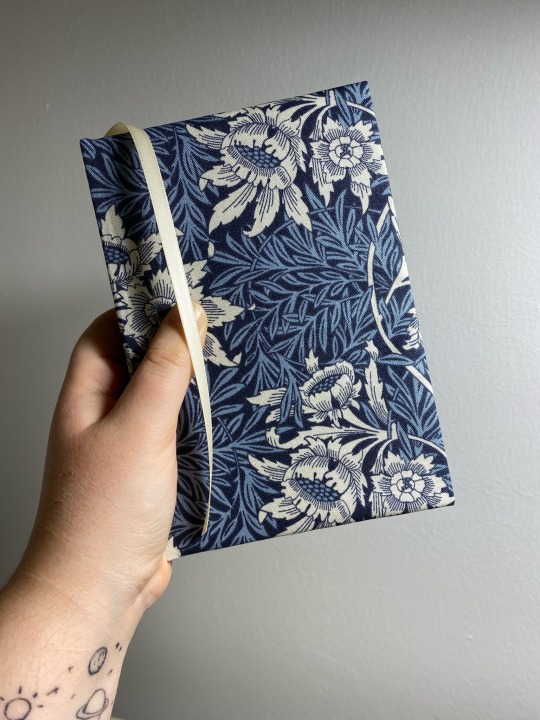
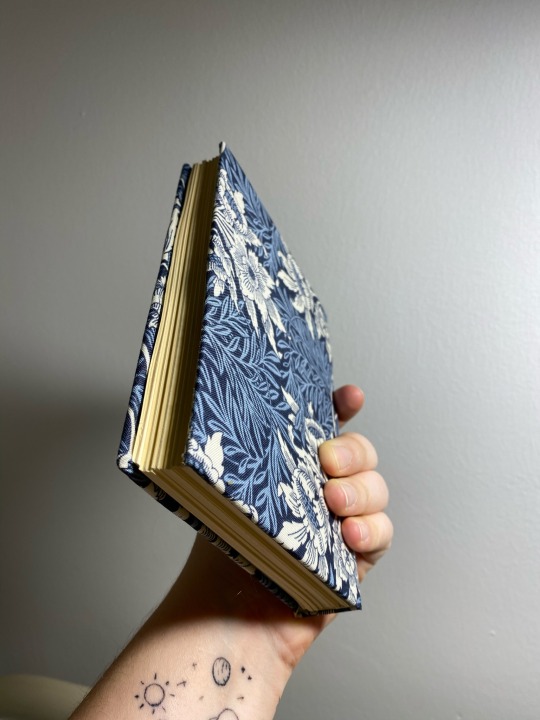
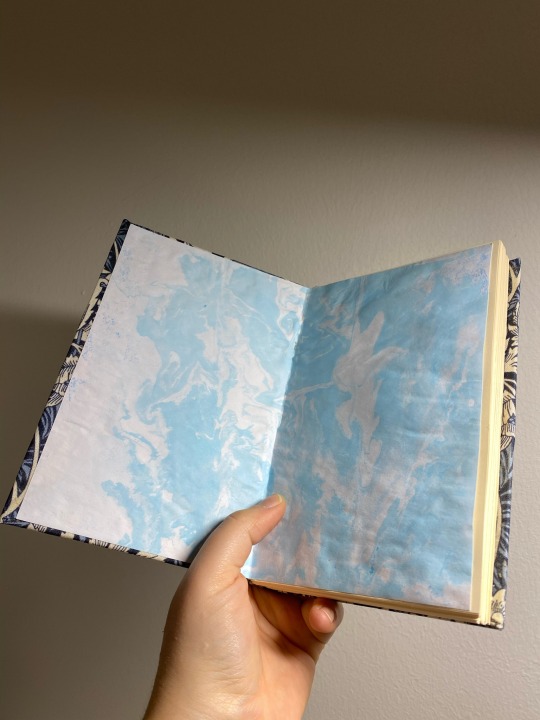
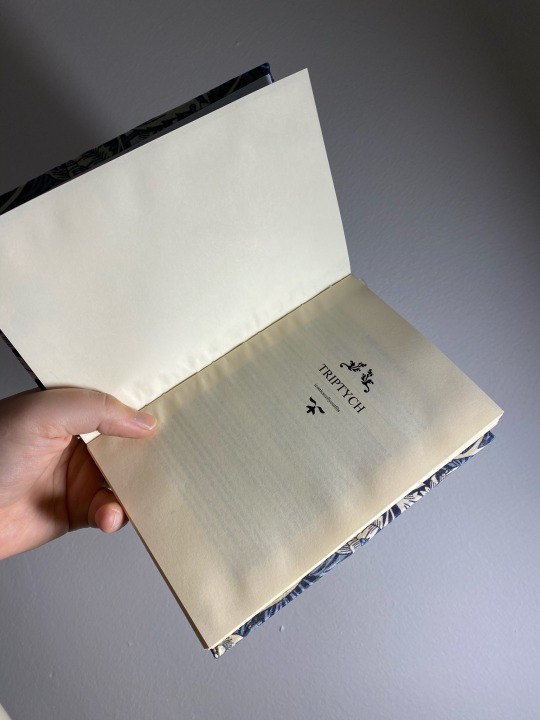

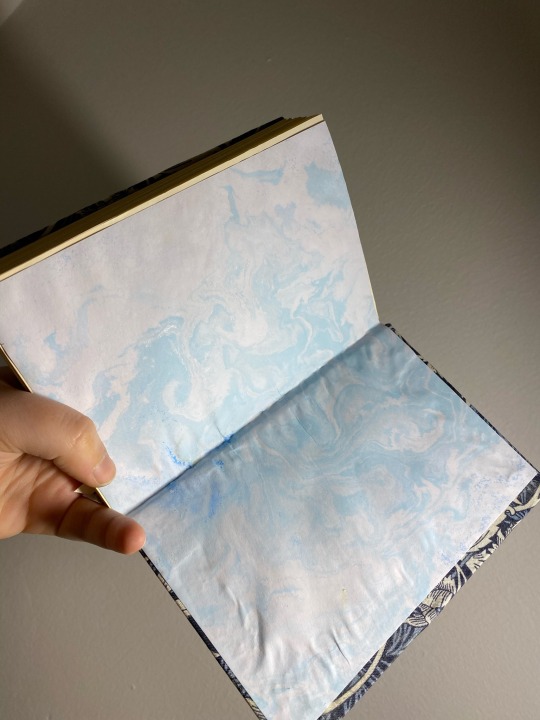
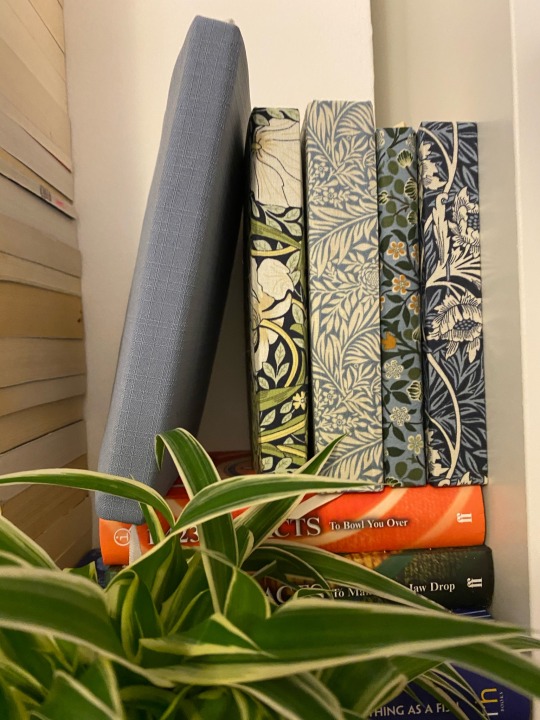
@iconicscullyoutfits‘ Triptych
282 pages
I somehow managed to mismeasure everything with this one, but it still looks cool. And it looks so pretty with the other books, though I don’t have any more William Morris fabrics which sucks because they look so good together.
51 notes
·
View notes
Text
Am I considering binding Edith Wharton’s House of Mirth and The Age of Innnocence into a dos-a-dos binding?
#this might go tragically 😬#I have run out of paper though so I have to wait until that’s delivered.
0 notes
Note
Listen i have no printer or book binding equipment but you're seriously making me want to print out and illustrate fic and turn it into a book
Ahah, my plan is working
#I’m going to inspire a whole generation of philes to bind xf fic into books#and then in 100 years when x files is all but forgotten#some kid will find a bunch of books in the back of a bookshop#all hand bound#faded well thumbed pages#about Mulder and Scully#and each book will have a different author#and this kid will go and search on its eyepad and rediscover this old grainy tv show#and fall in love like we did
3 notes
·
View notes
Text
Some still stitching and gluing shots from the first book I made. I can't share the finished product on here yet as it is for my friend and she doesn't get to see until she gets it.


76 notes
·
View notes
Text


And it’s finished!
@mldrgrl’s Broken Things
I really like this little volume - Printy McPrintface the new printer meant that I could finally sort out the problem of pages being misaligned, and so it’s a centimetre shorter than the past few.
I messed up one of the end pages, which annoys me, but I had a spare so it’s not really a problem. It just means there’s a less nice end page at the back.
43 notes
·
View notes