
Don't wanna be here? Send us removal request.
Statistics
We looked inside some of the posts by altercontrollerproject and here's what we found interesting.
Average Info
Notes Per Post
4
Likes Per Post
3
Reblog Per Post
1
Reply Per Post
0
Time Between Posts
2 days
Number of Posts By Type
Text
17
Last Seen Tumblr Blogs


Fun Fact
Tumblr has 4 main sources of revenue.
Text
EGX/UOS trip
EGX:
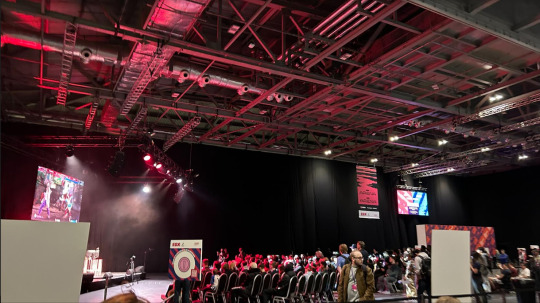
EGX, or the Eurogamer Expo, is one of the largest gaming events in the United Kingdom that provides for gamers, developers, and industry professionals to come together. Known for showcasing the latest and upcoming video games, hardware, and technology, EGX offers attendees the opportunity to experience early gameplay, attend panel discussions, and interact with developers. The event typically features a diverse range of gaming genres and platforms, from PC and consoles to virtual reality. It serves as a hub for the gaming community to celebrate their passion, discover new titles, and connect with like-minded individuals.
With West Suffolk, I have attended both the 2022 and 2023 events. At both of these, I was presented with the opportunity to play newly released or games that are still in beta. This year the biggest names were Super Mario World and Modern Warfare 3 which was really cool being able to play them.
There was also a stand for the (at the time) unreleased five nights at Freddy's film where they had a photo opportunity and were giving out a free slice of pizza.

EGX also ran tournaments where you could win prizes.
After our time came to an end, I left London with a huge spike in inspiration for the alternative controller project which then led to me having a finished game I was very proud of. I would definitely recommend this expo for young games designers as it helps give you an insight into the industry and processes used to make these games.
UOS:
The University of Suffolk is a public university located in Ipswich, Suffolk, England. Established in 2007 as University Campus Suffolk, it gained full university status in 2016. The university offers a diverse range of undergraduate and postgraduate programs across various disciplines, including arts, business, health, science, and technology. The campus is known for its modern facilities, and the university places a strong emphasis on engaging with the local community through partnerships and collaborative initiatives. With a focus on student success and employability, the University of Suffolk continues to contribute to the academic and cultural landscape of the region.
On our trip to UOS, we were provided with workshops where we demonstrated our skills in the games design industry whilst also learning on what to do during your interviews with a university. We were also challenged with making changes to a game using a different game engine (unity) than we're used to (Unreal Engine.)
I'm glad we had this surprise trip as it helped me furthermore understand my future education despite the University of Suffolk not being one of my choices as it was a very big decision to make with time slowly passing.
0 notes
Text
--Final Gameplay video of Decibel Dash--
youtube
0 notes
Text
Targets for 6.12.23
Edit blog appearance.
Complete research blogs
finish endless runner blog
0 notes
Text
Targets for 4.12.23
Finish unfinished blogs.
Get the glow to function again. -done
Find out why there is playback on the microphone. -done
0 notes
Text
Making the project look nice.
So far my project has been coded to get the game mechanics working but now it was time to polish. With the game being called decibel dash I had made the them of the game audio level bars. I modelled a voxel bar that would be used as the tile that the character runs on. However, as usual I added more than what I had originally planned to do.

This was the finished result in Magica Voxel, the only issue being that if I wanted the material to glow I would have to do it myself as the only drawback of using voxels is that the materials are not very tangible.

The mastertile was originally going to stay like this until I decided the game would look much better with some glowing materials. Though due to the limitations of the voxel material it wasn't as straight forward as it would be for a regular object. I had to create a sub assembly where I separated one of the bars as this would help with giving each bar a different material. These individual bars were then stacked up on each other to mimic the original model.

But after this I then decided I wanted to make the tile glow in response to volume input. Many things in this project react to my How loud? variable but this unfortunately became difficult very quickly.
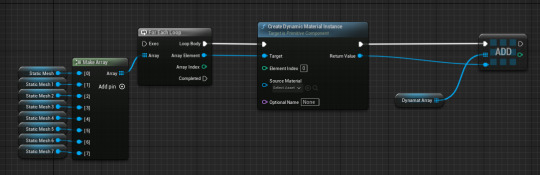
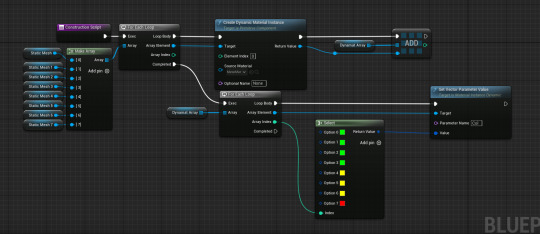
This was the first thing I had tried was to actually create they dynamic material for each of the bars (which you can see from the 8 static meshes on the left.) This ended up not functioning at all despite it being set up with no errors, meaning that I had to try something else.

I made sure to cast the thirdperson character so that I was able to access the How loud? variable as it was the key to making things work when I wanted something to react to sound. And after a lot of trial and error the code finally works. The values could be tweaked as I found out when I ran the game on my home pc that if your microphone has a pop filter on, it is much more difficult to make the bars glow.
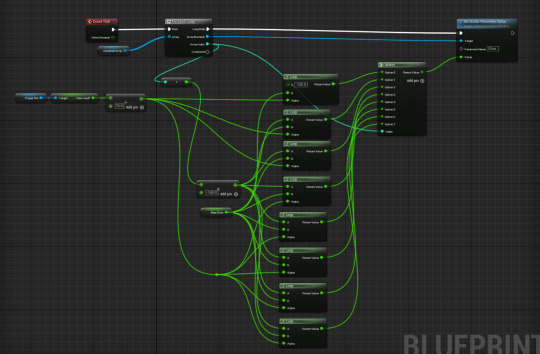
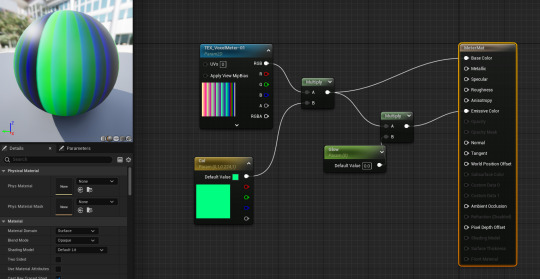
This could mot likely be done in a cleaner way but the way I did it was by connecting a lerp for each individual static mesh that was being divided by 75 as this is what the max volume was due to a clamp and then multiplied by -100. These two nodes were plugged into both A, and B of the lerps with a max glow variable (which is set to 15 so that the glow doesn't completely fill the screen) which goes into the Alpha. The return value was plugged into a select node where I had to create enough options for the amount of bars I would want to be glowing. Finally the return value was plugged into the value of a set scalar parameter value. This is what the scalar parameter was referencing:
This is how it was left after last Wednesday. I came back to work on the project in the final days to discover that the audio meter was no longer working as it should be.
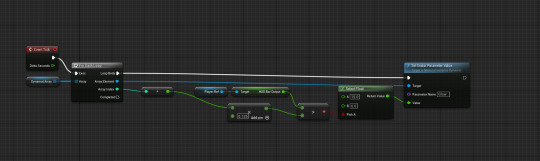
Whilst the debugging was in progress, the functionality of the bar had also changed so that it reacted to the progress bar that resided in the HUD as this had the most accurate audio input reading whereas before it only reacted to loud noise. This quality of life change was much needed and I'm happy with how it changed as a result of the code breaking. In this screenshot the event tick fires this code every tick meaning that it is constantly active. It multiplies the HUD bar output by 0.125 (1 divided by 8 for each of the individual bars) and then it is plugged into a float with a range between 15 and 0, 15 being the glow limit of the tiles. The select float was then plugged into a get dynamic material which is where I was able to set the material. The loop at the beginning ensured that this code would be repeated over and over.
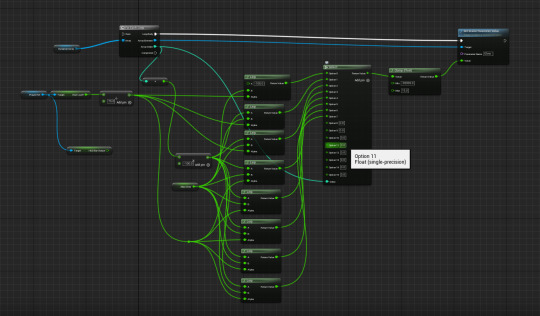
This mess that was used above is now completely obsolete, despite it working before.
This screenshot was the primary reason why fixing this took so long. The create dynamic material instance somehow got set to none which messed up the referencing with other bits of code. It had always been a part of the code to make the glowing work but I had completely forgot about it over the week. Once this was set to the correct meter material, the rest of the code was then fixed, and revamped.
youtube
0 notes
Text
Beta testing
After implementing the new audio bar a bunch of my friends had come over and wanted to play the game. After many of them struggled to get over 100 points it was apparent to me what the issue was.

My jumpheight value was changed massively a couple weeks ago to ensure you didn't hit the height barrier every time you made a loud noise, except the value of the jumpheight was nerfed significantly. It originally had a value of 50, which was too much; this was shortly changed to 10. The issue with the value being 10 is that the height the character jumped was not a satisfying result as you could max out the clamp (75) and barely make it over the tallest obstacle.
To fix this I immediately went into my thirdperson character and edited the value to be 35 since 10 was too low and 50 was too high. I then ran this and the game functions perfectly now however, I may consider lowering this value to 30 or 25 after the results of the official playtesting.
Another issue that was discovered was that the height barrier was able to be clipped through if you jumped high enough and you would hit an invisible wall. I quickly came to the realisation that it was because I was using a duplicated mastertile as the roof, this also meant the obstacles were spawning in as well. This explained both issues that I had. I quickly replaced the duplicate tile with a collision box which is what I should've done in the first place and now both of these issues are no longer a threat.

I also fixed the position of the obstacles as the gap inbetween them was very small, thus making the game very difficult to play. For some reason I had put them all in the middle of the tile which is the primary issue as it forced the player to repeatably jump which wouldn't make a good game.
0 notes
Text
Targets for 28.11.23
Fix jumpheight multiplier (character not jumping correctly)
Model tiles
0 notes
Text
Endless runner code
Open up Unreal Engine 5.2 and create a Third Person Template - name it EndlessRunnerGame
Open the Content Browser by pressing CTRL and Space together
Go to the ThirdPerson folder, then open the BluePrints folder, double click on the character blueprint - BP_ThirdPersonCharacter
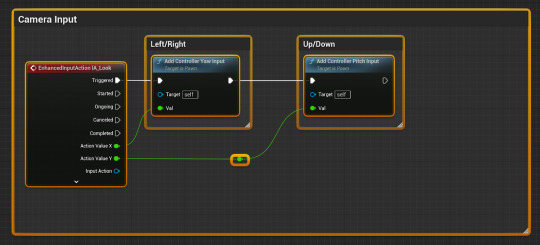
Go to the Event Graph, highlight and select the Camera Input code, then delete this. This is because we will be using a fixed camera view behind the player character
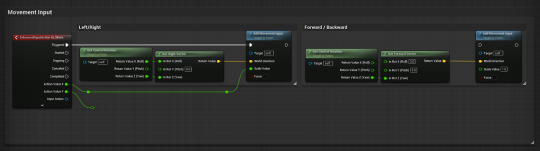
Then below this in the Movement Input code, disconnect the Forward/Backward code by holding ALT and left clicking on the joining pins
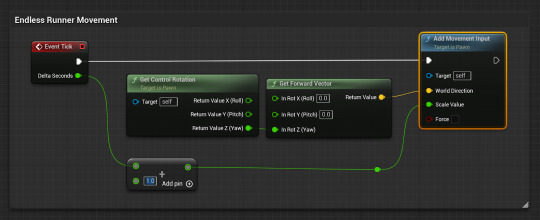
Drag the Forward/Backward comment box (and its contents) into the space where we deleted the Camera code. Rename this Endless Runner Movement. Then right click in the event graph and search for an EventTick node. Connect this to the Add Movement Input node in the Forward/Back comment box

From the Delta Seconds pin on the Event Tick node, drag off and search for an Add node (you find this easily using the “+” symbol) and put a value of 1 in the box. Then connect the Add node to the Add Movement Input node. The continuous forward movement is now complete (we will add lane switching later). Now test it by running the game!
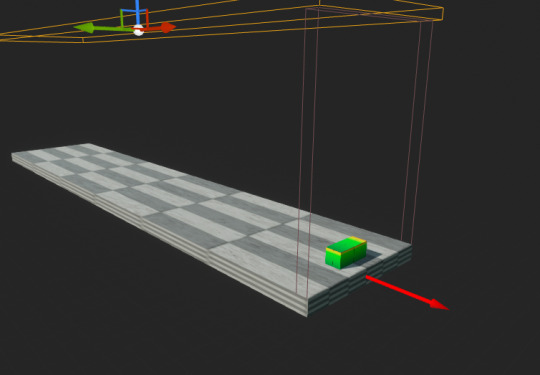
Finally, go the Viewport tab on the BP_ThirdPersonCharacter blueprint. Select the camera and set the location values (in the Details panel) to X = -95.0, Y = 0.0, Z = 165.0 and the rotation values to X = 0.0, Y = -10.0, Z = 0.0. This will set the camera further back to give the game more of an endless runner feel
Step 2 - Creating the Master Tile
Go to the Content Browser - In the Content folder, create a new folder called GameFiles
Create a new actor blueprint, name it MasterTile, double click the actor to open it and go to the viewport tab in the blueprint
Add a Cube component and set the scale to X = 15.0, Y = 10.0, Z = 1.0. Then set the location values to X = 750.0, Y = 0.0, Z = 0.0
This will ensure the Default Scene Root is at the start of the tile so that when we start spawning the tiles in they will perfectly aligned and not overlapping
Set the material to M_Ceramic_Tile_Checker, this will give us a guide for setting up the lanes
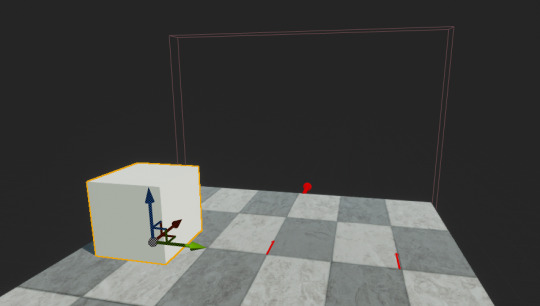
With the Cube selected, create an Arrow component, rename it SpawnPoint and set the scale to X = 0.25, Y = 0.375, z = 0.375 (You can constrain proportions by clicking the little padlock symbol and then set the X scale) and then set the location values to X = 50.0, Y = 0.0, z = 0.0
Check that the Arrow is facing the same way as the X direction on the compass, see image below (pink arrows 1 and 2), if it is not then rotate the Cube itself so it faces the correct direction. If you have input the location and rotation values in correctly up to this point it should be fine
Create a Box Collision and scale it to cover the end of the tile. Make sure it is wide enough for the whole tile and high enough that the player character will still go through it even if they are jumping
Select the box collision in the Components panel and then scroll down in the Details panel to the Events drop down and click the + symbol for On Component Begin Overlap
From the execution pin drag of and Cast To BP_ThirdPersonCharacter and connect other actor to object
Then from the pin of Cast To BP_ThirdPersonCharacter drag off and Cast To BP_ThirdPersonGameMode and from the object pin, drag off and Get Game Mode
Open the content browser, go to the ThirdPerson folder and open the Blueprints folder and open BP_ThirdPersonGameMode. Click on Open Full Blueprint Editor to open the the Event Graph for the Game Mode
Within the Game Mode create a new function (left sidebar) and drag off the Exec Pin and search for SpawnActor from Class
Right click on the Spawn Transform pin and promote to a variable and rename it NextSpawnPoint, set the default value for this to X = -500.0, Y = 0.0, Z = 0.0
From the return value drag off and search for SpawnPoint, from this drag off and search for GetWorldLocation
Drag the NextSpawnPoint variable on the left sidebar onto the grid and select Set NextSpawnPoint, right click on the left structure pin and select split structure pin, then plug Get World Location in the Next Spawn Point Location pin
In the ThirdPersonGameMode click on the Event Graph tab, Right Click and search for Event BeginPlay. From this drag off and search for a ForLoop node and set the last index to 5 then find the SpawnTile function that we created (on the left sidebar under functions) drag it onto the grid and connect it to the Loop Body pin on the ForLoop node. This will automatically spawn 6 tiles when you run the game
Return to the event graph on the MasterTile actor and on the Cast to BP_ThirdPersonGameMode node, drag off the As BP_ThirdPersonGameMode pin search for the SpawnTile function we just created and connect this to the Exec Pin from Cast to BP_ThirdPersonGameMode
Now go back to the ThirdPersonMap and go to the Outliner on the right sidebar (if this is not visible go to the Window Tab at the top of the screen and select it)
We then need to remove everything we don't need in the level. You can manually delete everything by clicking on it in the Viewport but this will take ages, so it is easier to select everything that we don't need in the Outliner and delete it from there.
You can left click on an object to select it, then hold Shift and scroll down to another object and left click on it (with Shift still held down) to select multiple objects. Or hold down CTRL and select each item you want to delete.
Then in the Outliner (top right sidebar) select the PlayerStart and set the location of this to X = 400.0, Y = 0.0, Z = 0.0
Now test it! It should run fine but if you are dropping below the first tile, try adjusting the X location of the PlayerStart in the Outliner
Finally for this step, for optimisation purposes, we need to remove the tiles that we have already crossed. To do this, on the Event Graph for the MasterTile actor, following on from the previous code, drag off from the SpawnTile node, and add a Delay node. Set this to 2 seconds and from the Delay node drag off and search for a DestroyActor node
Test this a final time to check it works and Step 2 is complete! To eject from the player when the game is running, press F8 or the semi colon and you can then see the tiles being spawned and destroyed behind the player character.
Setting up the score system:
First open the BP_ThirdPersonGameMode and create three new Integer variables for Score, Score Multiplier and Collectables.

Then go to the MasterTile blueprint and open the event graph, and create a new function called AddScore.

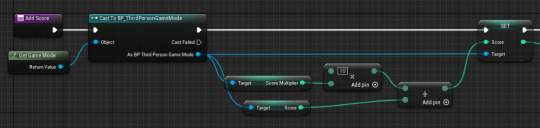
In the function, Cast to BP_ThirdPersonGameMode (adding Get Game Mode) and then from this get ScoreMultiplier and get Score. Search for a Multiply node and plug ScoreMultiplier into the bottom pin and add a value of 10 to the top pin. From this search for an Add node and connect the Multiply node to the top pin and Score to the bottom. Then from the Cast to BP_ThirdPersonGameMode set Score and connect the output of the Add node to this.
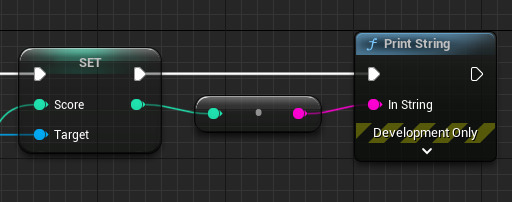
Then add a Print String so we can see the score increase.
Back on the event graph for the MasterTile add the new function in after the Spawn Tile node.

Increasing Speed.
Back on the Event Graph for the MasterTile create another new Function and call it IncreaseSpeed. Cast to BP_ThirdPersonCharacter and As BP Third Person Character find Character Movement, and from this find Max Walk Speed.

Connect Max Walk Speed to a Multiply node and set the amount to 1.05. Then add a Clamp node with Min set to 600 and Max set to 1500. Then from Character Movement search for Set Max Walk Speed and connect the Clamp to this as below.

Back on the Event Graph, add the new function in after the Add Score function we previously created and you character will now speed up the longer you play.

Spawning obstacles--
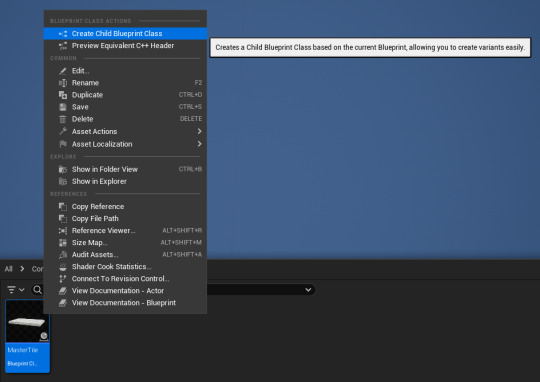
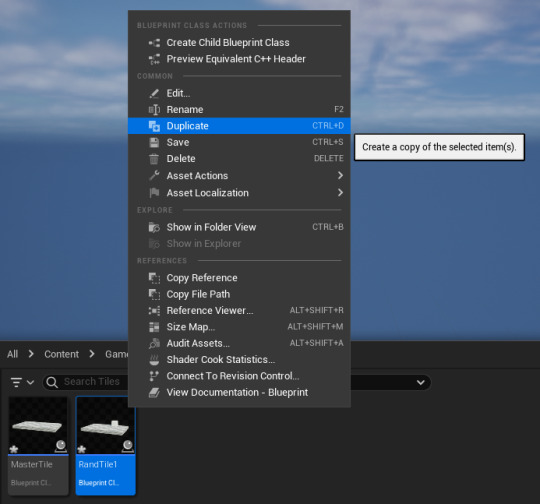
The first and most important part of this step is to create a Child actor from MasterTile and call it RandTile1. Right click on the MasterTile to create a Child Blueprint Class (see below). If you just duplicate it, the rest of will be an exact copy of the master tile.
Open the new Blueprint (RandTile1) and go to the Viewport. Add a Cube Component. In the details panel set this as a Cube and set the collision to OverLapAllDynamic.
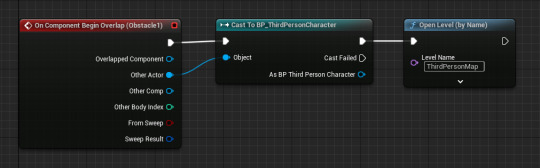
With the Cube selected, scroll down the details panel and add an On Component Begin Overlap event. Connect this to Cast to BP_ThirdPersonCharacter and then an Open Level (by Name) node. Set the Value to whatever your level is called, if you used the Third Person Template it will likely be ThirdPersonMap.
This is all the code need on the random tiles themselves but we need to create some variants of this. This time we do want to duplicate the RandTile1 Blueprint as this has the collision code read to re-use on the other tiles. Make two duplicates.
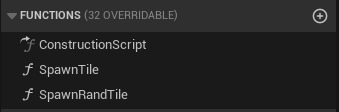
Now open the BP_ThirdPersonGameMode blueprint and duplicate the SpawnTile function that you previously created and call the new function SpawnRandTile.
Create a new Variable called RandTiles and set it as Object Types - Actor - Class Reference and change the container type to be an Array.

Hit compile and add three Array elements. Populate these with the the three RandTile’s that you just created.

Then in the new function that you made (SpawnRandTile) before the SpawnActor node, get the RandTiles variable, and from this drag off and search for Get a Copy. Then for the integer, attach a Random Integer node and set the Max to 3.

(The reason we need this set to 3 is because it will select a number between 0 and -1 from the Max number. If you set the Max to 2 it will only select 0 or 1 and wont spawn the third tile that you made.)
Then from the SpawnActor node, Cast to MasterTile and connect As Master Tile to Target - Spawn Point.

On the Event Graph for BP_ThirdPersonGameMode set the For Loop Last Index to 3 and then from the Completed Exec pin add another For Loop with the same values and connect this to the SpawnRandTile function (see below).

Now on the MasterTile blueprint swap the SpawnTile function for SpawnRandTile.

UI
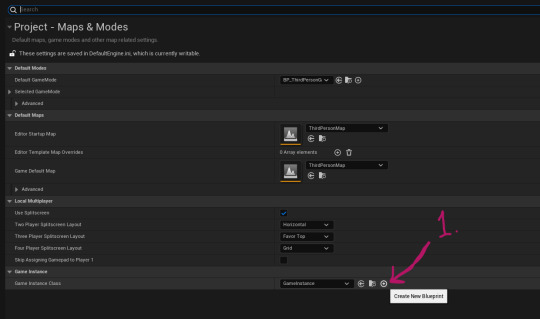
First open the Project Settings, go to Maps & Modes and create a new Game Instance - call it MyGameInstance.
In MyGameInstance create a new Integer Variable and call it HighScore. Then close MyGameInstance.

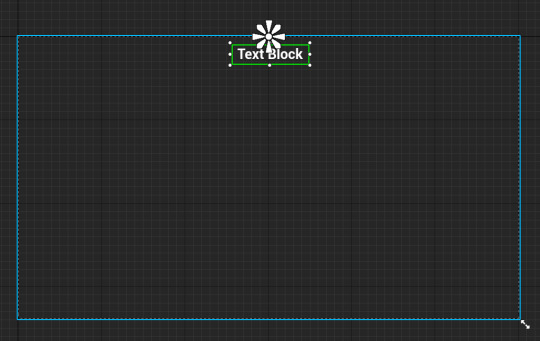
Open the Content Drawer and in your Game Files folder, make a new folder for UI. Then in this folder create a new Widget Blueprint and call this HUD. Open the Designer and add a Canvas Panel and then Text. Align the Text to the top centre of the screen and also set the Anchor point to to the top centre of the screen. Then change the Font Size to 40.
Then with the Text selected, go the Content section of the Details panel and click Bind.

From Get Text → Cast to BP_ThirdPersonGameMode and get Score. Then search for an Append (String) node. In the top box type “Current Score: “ being sure to add a space are the colon. Then connect Score to the bottom value. Then connect the Append node to the Return Node.

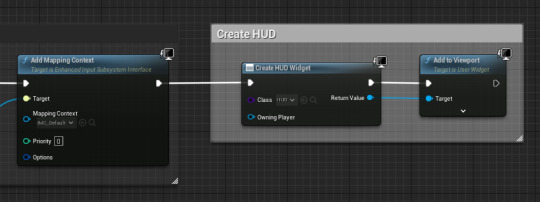
Then go open the BP_ThirdPersonCharacter blueprint and on Event BeginPlay, after Add Mapping Context, search for and add Create Widget, set the class as the HUD Widget we just made and Add to Viewport. Then test it.
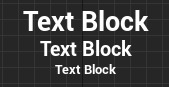
If this works correctly, go back to the Designer for the HUD Widget and duplicate the Text Blocks and make them decrease in size as they go down.
Copy the code from the Binding on the first Text Block and Create Binding for the second one down, then paste in the code. Then Change Get Score for Get ScoreMultiplier and edit the text in the Append node.
Repeat this for the next one, but instead of casting to the Game Mode, cast to MyGameInstance and Get High Score. Then adjust the Append node again to say “High Score: ”.
Run the game and check it is all working. The High Score will be 0 for now as we haven’t written any code to set this.
Then in your UI folder create a New User Widget and call it DeathScreen. Inside add a Canvas Panel and a Text Block, align the Text Block to the Centre of the Screen and set the Anchor point to match. Create Binding for this Text Block and copy the code from the last Text Block on the HUD Widget (Step 9 - High Score).
Then add two Buttons, with Text Blocks inside them and align them to the centre fo the screen. The first should say “Try again” or “Play Again” and the second should say “Quit Game”.
On the Try Again button, scroll down to On Clicked and create a binding for this and connect it to an Open Level (by Name) node.
Repeat for the second button but instead connect a Quit Game node.
Now we need to make two new Functions in the MasterTile Blueprint. First, create a new Function and call it SetHighScore. Cast to BP_ThirdPersonGameMode and get Score. Then Cast to MyGameInstance and get HighScore. Search for a Greater Than node and connect Score to the top pin and connect HighScore to the bottom pin.
Then connect the Greater Than node to a Branch. Then from Cast to MyGameInstance add Set HighScore and connect this to the True Exec pin on the Branch.
Now make another new Function and call this one DeathScreen. Add Remove All Widgets, then Set Game Paused then check the Paused box to true. Search for Get Player Controller, then from this add Set Show Mouse Cursor and check this to true as well.
Then add a Create Widget node, select the DeathScreen widget and Add toViewport.
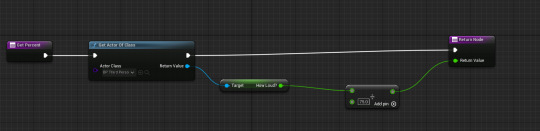
Now open the RandTile1 blueprint. Remove the Open Level (by Name) node. Then add a Get Actor Of Class, select the MasterTile blueprint. From this add the Set High Score function and the Death Screen function.
(Image limit reached.)
youtube
0 notes
Text
Progress bar in HUD
The progress bar is a component in the HUD that I'm quite familiar with. For this project the progress bars purpose wasn't as straight forward however.
I thought this until I realised all I needed to do was reference the how loud variable in the thirdperson character as that variable contained the information of how loud the input from the microphone was. This then divided the progress bar by 75 so it matched the clamp in the thirdperson code.

The progress bar's background fill had to be a certain format so I had to copy the material and alter the duplicates format to user interface .
The print string showing the audio level is still active however it will be removed when the game is complete.
0 notes
Text
Audio bar material
As my game Included you making noise to make the character jump, it only made sense to include an audio level bar. I started off by finding an image online before screenshotting it and saving it onto the pc. This was then put into the content drawer and had 2d texture applied to it before I finally created the material. At first this material was used for the texture of the obstacles, but it was then copied and used as a progress bar that reacted to any audio input from the pc.
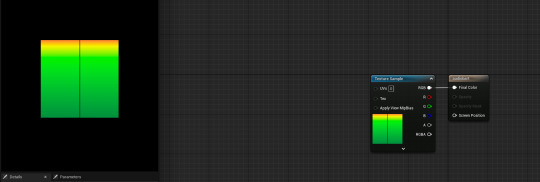
I changed the material domain to 'user interface' so that the material was now eligible to be used in the background fill of the progress bar in the widget; as it didn't allow the use of anything that wasn't a specific format.
0 notes
Text
Targets for 27.11.23
Fix skysphere
Get audio level bar on screen
0 notes
Text
Custom skysphere
After I had finished the final bit of code for the endless runner I decided to change the skysphere to a desert sky; I used this video below from the previous project as it had worked very well.
youtube
For a 6 minute video the skysphere is very pleasing with the only issue being the line in the sky where the edges of the picture meet.
An issue I ran into this time, which did not happen at all during the last project was that my project was completely missing a skysphere. This meant that I was unable to change the default material of the skysphere to my custom one easily. I dragged in a skysphere from the engine's content drawer but this only create a small sphere rather than the one that covered the entire sky.

This issue could not be fixed, and with the time left I just made the skysphere very big so it looked like it covered the entire sky. vIn the end I decided not to have a skysphere at all and just have the sky black as the lights would glow better without.
1 note
·
View note
Text
5 endless runner games
Subway surfers:
Subway surfers is an endless runner game where you are doing graffiti in the subway and the security/police officer starts chasing you and you have to avoid obstacles such as trains, stop signs, barriers, platforms etc. You are able to collect coins in the level which you can then use to upgrade powerups that can be found on a run.

Minion rush:
Minion rush is an endless runner game where you play as a minion as you just run through the customisable locations to collect as many bananas as you can and get a highscore without hitting into any obstacles.

Pac-Man 256:
Pacman 256 is an endless version of the classic pacman arcade game. The layout is randomised and there's ghosts roaming the level but you can also eat pellets and power pellets to assist getting rid of them. Eliminating a ghost will also give you some bonus points. Whilst the game is going on the bottom of the level is decaying, you have to run away from both the 'glitch' and the ghosts whilst aiming for a highscore.
Temple run:
Temple run is an endless runner where you steal an artifact within the jungle and are then chased by the beast protecting it. You traverse the jungle through ruins and zipwires whilst collecting coins that can be spent on upgrades. You have to avoid tree roots and pits in the ruins so you don't slow down and get caught by the beast.
Jetpack Joyride:
Jetpack Joyride is an endless runner where the player controls Barry as he traverses a lab after stealing a machine gun jetpack. You have to fly over lasers and dodge missiles whilst collecting coins and getting a highscore. There's power ups throughout the level that have different abilities, they also allow you to take a hit without dying but you will lose the power up. You can also collect the letters S.A.M to create the SAM machine which is a big mech that allows you to deflect the missiles.

3 notes
·
View notes
Text
Making the character jump with a microphone
I am very proud of the progress I have made so far. I've had no help getting this to work and I'm surprised at myself as I have never done this kind of input/code before. I used a small bit of code from a previous blog that allowed me to get the audio input working, but I only used the log, clamp. event, and how loud variable and the rest was purely me attempting to get this to work.

The code starts with an audio envelope value which I was able to access by creating an event from the audio capture. This was then linked to the log and clamp where the values for the audio are set and easily accessible. The rest of the code contains a variety of floats and increments. The floats allow me to set the numbers of the input and the increments allow me to multiply and change the sensitivity. The how loud? variable is able to detect the amount of noise before going to the is jumping boolean which decided if the character is jumping or not. The increment before is set to 0.1 so any input higher than 0.1 will then activate the jump node at the end of the code.
0 notes
Text
Targets for 20.11.23
Try and get the audio input to work with the jumping.
0 notes
Text
Audio input test
Since my research is near enough finished, I decided it would be smart to test if Unreal engine was capable of receiving audio as an input. I haven't worked with audio besides voicelines before so I followed a tutorial which will be linked below:
youtube

Here I created a blueprint that would include an audio capture in the viewport. I then used this audio capture to create an event which then gave me an event called On audio envelope value. I then
0 notes
Text
Rubber duck debugging
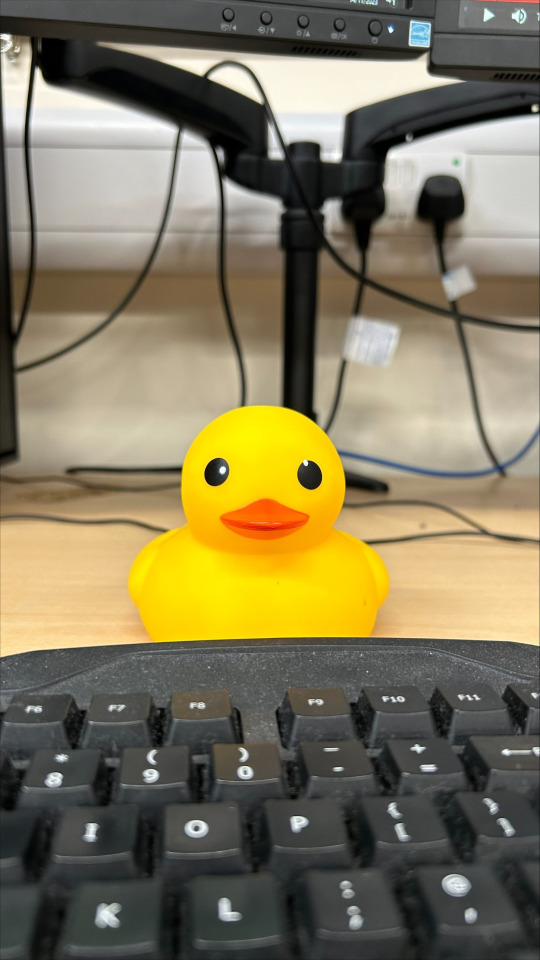
In software engineering, rubber duck debugging (or rubberducking) is a method of debugging code by articulating a problem in spoken or written natural language. The name is a reference to a story in the book The Pragmatic Programmer in which a programmer would carry around a rubber duck and debug their code by forcing themselves to explain it, line by line, to the duck.
Rubber duck debugging so far has helped me set up the test that I ran for the audio input that would be used in this project. The test was successful and the duck helped me realise I hadn't referenced correctly between blueprints.
0 notes