
Statistics
We looked inside some of the posts by andrewadamides and here's what we found interesting.
Average Info
Notes Per Post
0
Likes Per Post
0
Reblog Per Post
0
Reply Per Post
0
Time Between Posts
3 months
Number of Posts By Type
Text
10
Last Seen Tumblr Blogs


Fun Fact
Tumblr has 4 main sources of revenue.
Text
Web Inspector
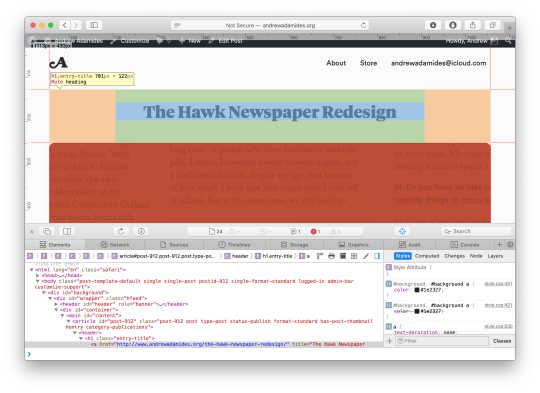
Building a website requires a lot of trial and error. Even the most seasoned web developer will often need to try multiple things before ending up at the results they are looking for. For newer developers, this task can seem like grasping at straws. That is where the web inspector comes in.
Nearly all web browsers have an inspector feature, usually called something like ‘Inspect Element’ and they basically all work the same. A panel shows you the current webpage’s source code, but unlike the ‘view source’ command, this panel is interactive. Meaning, you can hover over an element to be brought directly to the line(s) of code that produced that element. This is very useful when you are trying to locate the source of an image or video, or to understand the complex layering of nested items in HTML.
The Inspector also helpfully color codes selections, making it easy to distinguish between an element’s boundaries and its margin and padding. This makes the box model much easier to understand.
To enable element selection, both Safari and Chrome require you to click an icon. In Chrome it is a square with a mouse cursor, in Safari it is a crosshair.
Demystifying CSS
Another invaluable feature in the inspector is the ability to see linked CSS code in the sidebar. Highlighting an element will show you its CSS attributes. This can be very useful when the style you’ve chosen is not working. Attributes that are overwritten will be shown in strikethrough. The attributes in the sidebar are displayed in cascading order, with the most specific selectors on top and less specific below. Attribute can be temporarily turned on and off with a simple check box, making complex CSS a breeze to understand and edit.
Try it out!
The inspector and its sidebar can also be used to temporarily edit HTML and CSS code. This makes troubleshooting and website tweaks easy and non-destructive. You can copy edit, rearrange, and re-style elements without fear of messing up your actual code. If you like the changes you’ve made simply copy and paste them into your project files. If not, simply refresh the page it's back to normal!
This post barely scratches the surface of the web inspector or each browsers individual developer tools. I highly recommend clicking around your browser to see how these tools can make web development much easier and more efficient.
To use the inspector in Safari you must enable the “Develop” menu. To do so, go to Safari > Preferences and then at the bottom of the Advanced tab enable “show Develop menu in menu bar.” Now, when you right click on any web element you will see the “Inspect Element” command.
0 notes
Text
HTML Skeleton
I use this code as the foundation of any static HTML site I build. It sets up the main shell and gives me a space for a title, external stylesheet, favicon and sets up the appropriate margins for edge to edge mobile displays.
<!DOCTYPE html>
<html> <head> <meta charset="UTF-8"> <title>Title Goes Here</title> <link rel="stylesheet" href="style.css" type="text/css"> <meta name='viewport' content='initial-scale=1, viewport-fit=cover'> <link rel="icon" type="image/png" href="images/favicon.png"> <link rel="apple-touch-icon" href="images/apple.png"> </head> <body> <h1>Title</h1>
<p>Body Text</p> </body> </html>
I currently use Espresso as my code editor.
0 notes
Text
Centering an Absolute Positioned Div
Absolute position divs can be a dream to work with. They can also be a nightmare. Absolute position divs are great when you need a piece of content to move relative to another.
I often find myself trying to keep an absolute position div centered, but the code to do so isn’t immediately obvious. Especially, if the div has a variable height or width.
If you find yourself facing the same conditions, this CSS code should help.
.parent { position: relative; }
.child { position: absolute; top: 50%; left: 50%; transform: translate(-50%, -50%); }
Absolute position divs are not a solution for everything, or even really most things, but when you are faced with a difficult situation they can be the solution you need.
This code can be particularly challenging in mobile responsive layouts so be sure to combine it with a good media query to ensure that nothing breaks on your site.
This site has more information on centering in CSS.
https://css-tricks.com/centering-css-complete-guide/
0 notes
Text
Practice What You Preach
For years I have preached the virtues of security and privacy. You’ve heard these things a hundred times. Looking back, I realize that I have been lax when it comes to my own digital wellbeing. Recently, I’ve made some changes to my computer hygiene and I’m going to share what I’ve learned.
Close Unused Accounts
Go through your accounts and delete any that you don’t use. This might seem tedious but consider that every orphaned account is a possible security vulnerability. With so many sites and services being compromised everyday its risky to trust your personal information on an abandoned account.

Change Passwords
Most people create one or two passwords and reuse them on every website they come across. This sort of password recycling leaves you open to compromise. If someone was able to get your gym password, could they guess your Facebook? Or maybe your bank? If they got access to your email would they be able to change the passwords to your other accounts? It’s a chilling thought, but one that is easy to remedy.
Both iOS and macOS let you see which passwords you have reused.
On iOS go to Settings > Passwords & Accounts > Website & App Passwords.
On Safari for macOS go to Safari > Preferences > Passwords.
Stop Using Bad Passwords
Adding numbers and symbols to your passwords isn’t enough to make them secure. It is as easy to guess Kitty as it is to guess Kitty123 or Kitty123! What looks like a good password fails instantly. Often, it isn’t a “person" trying to guess your account, it is a bot or a software program designed to quickly guess letter/number combinations and dictionary words.
Use Good Passwords
So what can we do? The answer is to use a password generator. A reliable password generator will create a pseudorandom combination of letters, numbers and symbols. These combinations are anonymous and unique and are often significantly longer than the passwords that you might think to use on your own. That is because it is much harder to guess a twelve digit random password than a six letter dictionary word.
I went through every single account I had (over 40 by the time I was done deleting unused accounts) and reset every single password using the password generator built into my web browser.

Get a Password Manager
We all have too many passwords. We need a password storage solution that doesn’t involve memorization, sticky notes or paper journals. You need a password manager. Password managers are applications designed to store your passwords in a secure encrypted manner.
A good password manager is characterized by the following:
Your password manager should be so secure that you’re the only one who has access to it. Not bad guys, not the company that makes the software, just you.
Makes it easy to enter and manage passwords.
Has a password generator built in.
Be super portable, it should run on every platform that you use natively. Including your phones, tablets, computers and hopefully even be available online.
Has a 2FA code generator built it. (More on that in a moment).
There are a number of good password managers now. I currently use 1Password. It recently switched to a monthly subscription fee, if that’s not your thing then there are some great free options including LastPass. Whatever you choose make sure that it has been vetted by a trusted security expert.
Multi-Factor Authentication
Multi-factor authentication is a technology that requires you to have two or more things in order to access an account. These two things usually are comprised of something you know and something you have. The “something you know” is probably your password. The “something you have” might be a fingerprint, a USB thumb drive or a your phone. In the case of your phone, you might receive a text message or a secret code when you try to sign in. That means that even if someone besides you who doesn’t have your phone figured out your password they wouldn’t be able to sign in. Every time you add another ‘factor’ you make yourself significantly more secure.
A lot of sites are starting to offer multi-factor authentication now including iCloud, Google, Facebook, Twitter, Dropbox, Snapchat and more. I turned it on for every account I could and will be keeping an eye out for more in the future.
Conclusion
It is important to remember that you are only as secure as your least-secure attack vector. I am not someone who cares to look over my shoulder and I am not paranoid about “hackers”. But I do like my technology to work the way I expect it to. Computer security is not just another brick in the building that is our digital life. It is in many ways the cornerstone that holds the whole thing together.
0 notes
Text
Why Wordpress?
There was a time where if you wanted to change a website you had to hire a developer or learn to code yourself. It really limited what kinds of content you could put on a site.
That is where a content management system comes in.
A content management system is software that runs on a server that makes it easy for any non-technical user to add and change content on a website. It’s like using Microsoft Word, what you see is what you get. I use the highly advanced WordPress content management system. It is build on a strong foundation and has been tested by some of the internet’s biggest sites.

So, say for example you want to create a new page in WordPress. As a user, you simply type up your text, drag in a photo and then click “save”. Those changes are instantly reflected on your site. You never had to write any code and everything happens seamlessly. You also get neat features like automatic Search Engine Optimization and social networking built in.
This is all possible because the design and technical code of your site is separate from your content. The developer builds it and then you can add and edit content without effecting the structure of your website.
Learn More about WordPress
0 notes
Text
Batch Resize Images
Occasionally I need to quickly resize large groups of images.
Instead of resizing the images one by one or creating a complicated Photoshop script, I’ve set up an “Automator” application that with one step automatically resizes any number of images and saves them to my desktop.
Automator is a vastly underrated computer automation utility that comes preloaded on all Macs. It is easy to use and very powerful once you know what you are doing. Automator “workflows” are like a recipe. The directions are “Actions” that you can mix and match and the ingredients are your files.

How To: Create an Automator “application” for Batch Resizing Images.
Open Automator from the /Applications folder on your Mac.
Choose the “Application” document type.
In the “Actions” library search for “scale images”. Drag the “scale images” action from the sidebar into the main window. Automator will automatically create a “Copy Finder Items” action, here you can choose where you would like the images to be saved after they are resized.
Enter the size (in pixels) you would like the images to scale to. Images are automatically resized on the longest edge.
Go to “File>Export” and save your application.
Now you can easily drag image files from the Finder onto your application and they will be instantly resized and saved!

More Automator Resources
https://macosxautomation.com/automator/
(This is the main hub for anything Automator, check it out for free workflows, actions and tips).
http://www.macworld.co.uk/how-to/mac-software/what-automator-can-do- for-you-3605538/
https://en.wikipedia.org/wiki/Sal_Soghoian
0 notes
Text
How To: Force Empty Trash
“The operation cannot be completed because the item ‘file.jpg’ is in use”.
We have all seen this error message before. It pops up when the user attempts to empty the trash. There are a number of reasons why this happens. Usually it is related to misconfigured permissions or hidden/locked files.

When this happens, there’s a surefire way to force the trash to empty. Navigate to /Applications/Utilities/ and open Terminal.app. As soon as the Terminal window opens up, type in the following command:
sudo rm -rf ~/.Trash /Volumes/*/.Trashes
And voila! Those pesky files vanish.
0 notes
Text
WordPress and sRGB Images
While uploading images to WordPress one day I noticed something strange. The color of certain images seemed off. Actually worse then off, everything was kind of desaturated and muddy. After a bunch of searching, editing and re-uploading I figured out the problem.

It has to do with embedded color profiles in images and how WordPress handles them. The WordPress servers handle images with the sRGB profile best. In fact they recommend that you convert all your files to sRGB before uploading to avoid quality loss and color shifts.
Thankfully embedding the sRGB color profile is pretty easy using Adobe Photoshop CC 2015.3.
When you’re ready to save your image go to File > Export As...

In the right sidebar towards the bottom you’ll see a checkbox labelled “Convert to sRGB” make sure that is checked and then click Export All...

That’s all there is to it! Now WordPress should be able to upload your images with minimal color shifting.
0 notes
Text
Repair Permissions in MacOS
rior to OS X 10.11, Disk Utility (the system utility for managing hard drives) allowed users to scan for and automatically correct errors with file permissions. In OS X 10.11 El Capitan, Apple redesigned Disk Utility. It now automatically scans and repairs permissions on it’s own.
Occasionally however, you may find that you need to force your computer to repair permissions. This comes up a lot when working on system images for Macs in a multi-user environment such as a classroom or lab.

To repair permissions in El Capitan navigate to /Applications/Utilities and open Terminal.app.
Repair Permissions in MacOS – Andrew Adamides
To verify your disk, type in the following command:
sudo /usr/libexec/repair_packages --verify --standard-pkgs /
To repair permissions, type in the following command:
sudo /usr/libexec/repair_packages --repair --standard-pkgs --volume /
0 notes
Text
How To: Show Hidden Files
By default macOS hides many system files. This feature is designed to protect certain files that may cause damage to your computer if they’re altered or deleted. Occasionally however, developers or system administrators may need access to these hidden files.
To enable these files open the Terminal application and enter the following command:
defaults write com.apple.finder AppleShowAllFiles YES
Press return, then enter the following command:
killall Finder
Press return.
Your desktop should flash as hidden files pop up all over your system. To hide protected system files enter the following command:
defaults write com.apple.finder AppleShowAllFiles NO;
Press return, then enter the following command:
killall Finder
Press return.
0 notes