
Don't wanna be here? Send us removal request.
Statistics
We looked inside some of the posts by angryphilosophermagazine and here's what we found interesting.
Average Info
Notes Per Post
1
Likes Per Post
1
Reblog Per Post
0
Reply Per Post
0
Time Between Posts
6 days
Number of Posts By Type
Text
12
Last Seen Tumblr Blogs


Fun Fact
Tumblr was acquired by Yahoo for $1.1B in 2013.
Text
Error 1 Occurred Building Shared Library Mac

Hey, everyone. I am trying to learn the Rcpp by the example “Rcpp attributes: A simple example 'making pi' ” (now.
Sep 02, 2017 Dismiss Join GitHub today. GitHub is home to over 40 million developers working together to host and review code, manage projects, and build software together.
Error 1 Occurred Building Shared Library Machine
Error 1 Occurred Building Shared Library Mac Download
Error 1 Occurred Building Shared Library Mac Download
This most likely means you don't have Rtools installed. If that's not the problem try passing showOutput=TRUE to get more diagnostics.
Join GitHub today
GitHub is home to over 40 million developers working together to host and review code, manage projects, and build software together.
Sign up New issue
Have a question about this project? Sign up for a free GitHub account to open an issue and contact its maintainers and the community.
By clicking “Sign up for GitHub”, you agree to our terms of service and privacy statement. We’ll occasionally send you account related emails.
Already on GitHub? Sign in to your account
Error 1 Occurred Building Shared Library Machine
Comments
commented Sep 2, 2017
I am getting the following error when I try to knit 07-Performance.Rmd.
I noted another thread here with a similar issue in index.Rmd, and followed your advice in that thread to knit each chapter individually. All were sucessful except 07-Performance.Rmd
Whether in index.Rmd or 07-Performance.Rmd, the 'Quitting from lines' are the following -
I have the latest Rtools version 3.4.0.1964 Latest R version 3.4.1 (2017-06-30) Latest RStudio for Windows 1.0.153
On installing Rtools, I did select the option to edit the path and my path contains -
commented Sep 5, 2017
Would you trying running the problem code in an R terminal (no knitr)
commented Oct 4, 2017
Can't reproduce
Error 1 Occurred Building Shared Library Mac Download

closed this Oct 4, 2017
Sign up for freeto join this conversation on GitHub. Already have an account? Sign in to comment
I've been looking all over the net for about two weeks now trying to find a solution to this problem. Application Launch Failure The application 'PowerPoint' could not be launched because of a shared library error: '4<Microsoft PowerPoint><OpenGLLibrary><CFMPriv_AGL>' All of my Microsoft Office X apps work except for PowerPoint. I've found about 50 (I was going to say 1000) suggestions on how to fix the problem. Lots of guesses. No one knows what is going on and no one has an answer. The above text in quotes varies from problem to problem, BUT, it's always a shared library error. I've tried every suggestion I've found. Nothing makes any difference. To the best of my knowledge, this problem occured not long after I 'updated' some system protection from Apple/Mac and/or 'updated' Office from Microsoft. Will all of the pundits please chime in? Let's think this out and stop guessing. Gary
Mac 733, Mac OS X (10.3.9), no games, no fluff, I use my Mac for business.
Error 1 Occurred Building Shared Library Mac Download
Posted on
0 notes
Text
Add Movies To Itunes Library Mac

Add Movies To Itunes Library Mac Torrent
Adding Mp3 To Itunes Library
'I have been trying to transfer movies from Mac to iPad with iTunes for long. Every time my iPad video library will be refreshed. Is there any other method to help me move movies from Mac to iPad without deleting any existing movie on my iPad? Or do I need some special tool to transfer movies from Macbook to iPad?' – From Apple Support Communities.
To add a video file such as an MOV or MPEG document from your hard drive, either drag the document to the iTunes window or choose File→Add to Library (shortcut: Command+O) and choose the file in the Open File dialog. In either case, the file is added to your iTunes Movie library. Oct 15, 2017 The more iTunes movies metadata is attached to your video files, the better iTunes will be able to organize, sort, and group your videos. The easy way to automatically add movies to iTunes. In the “Preferences” tab you’ll find options for automating the conversion process. You can add folders to the “Watch Folder” tab with the. Jan 04, 2020 How to Move Your iTunes Library. You can move your iTunes library to a different folder, computer, or drive. Here's how to do it, even in macOS Catalina, which ditches iTunes for the Music app. Preview, buy, or rent movies in up to 1080p HD on iTunes. Browse more than 65,000 comedies, romances, classics, indies, and thrillers and your downloads will be instantly accessible. Oct 25, 2019 Adding Home Videos. Historically, once a movie or TV show was added to iTunes, you would also upload it to your connected iOS device through iTunes. That is not the case anymore, as Apple has done a complete 180 and made it possible to sync movies/TV shows through Finder. Oct 24, 2017 Open iTunes on Mac computer and then click the 'File Add to Library' to add movies you want to transfer to iPad into iTunes library on Mac. The added movies would appear in the Movies library of your iTunes. (Make sure the movies are recognizable by iTunes and iPad.) Connect your iPad tablet with Mac computer via the USB cable provided by Apple.
Watching movies on iPad would be a wonderful way to kill boring and lonely weekend. However, how much do you know on how to transfer movies from Mac to iPad? Do you still use iTunes to copy movies from Mac to iPad everytime? If so, it’s time for you to refresh your thought on iOS data transferring. You could get easier and friendlier solutions on how to transfer movies from Mac to iPad. In this guide, we would like to introduce you 5 ways on how to transfer movies from Mac to iPad.
Part 1: How to Transfer Movies from Mac to iPad via iTunes
Let’s firstly talk about using iTunes to transfer movies from Mac to iPad. It’s the most popular method that has been used among iPad users to move movies from Macbook to iPad tablets. Most people would have learned how to use iTunes to transfer movies from Mac to iPad. Here we would like to briefly introduce the steps:
Open iTunes on Mac computer and then click the 'File > Add to Library' to add movies you want to transfer to iPad into iTunes library on Mac. The added movies would appear in the Movies library of your iTunes. (Make sure the movies are recognizable by iTunes and iPad.)
Connect your iPad tablet with Mac computer via the USB cable provided by Apple.
When you see the iPad icon on iTunes, click the iPad icon.
Then go to 'Summary > Movies' tab.
There you could see all movies in your iTunes library on the right panel.
Check 'Sync Movies' option and then select the movies you want to transfer from Mac to iPad.
After selecting the movies to transfer, click the 'Sync' button at the bottm right corner.
Then iTunes would immediately start to transfer movies from Mac to iPad.
You then only need to wait for the sync to complete. It would take some time to finish, depending on the size of movies you’re transferring. It should be noted that if you use iTunes to transfer movies from Mac to iPad, all existing movies on iPad would be erased.
Part 2: How to Transfer Movies from Mac to iPad via Email
You could also transfer movies from Mac to iPad via email by making the movie as email attachment. Most mail servers enable you to do this. The only difference lies in the size of attachment file. For example, gmail limits the attachment file to be less than 25MB. Attachment file over 25MB would be shared as Google Drive link, which means the attachment file would be automatically uploaded to Google Drive for sharing and downloading, and the email will send movie from Mac to iPad in a link type. The below steps would show you how to transfer movie from Mac to iPad via email (by taking gmail for example):
On your Mac computer, open the browser and then log in the gmail account.
Click 'COMPOSE' button to create a new mail.
Enter the receiver address (your own email account that could receive email on iPad) and the topic.
Click the 'Attach files' icon to choose movie as attachment. You could upload movie from Mac computer as attachment or choose movie from Google Drive as attachment.
Send the email.
Log in your email account on iPad to receive the mail from your gmail account.
Tap the attached movie file and download it to your iPad.
Apparently, if you choose to transfer movie from Mac to iPad via email, you need to make sure that your network is fast enough so as to make the uploading process as shorter as possible. Meanwhile, you have to pay attention to the attachment file size limitation of the mail server you’ve using.
Part 3: How to Transfer Movies from Mac to iPad via iMesssage
If you are using OS X Mountain Lion, you can let iMessage transfer movie from Mac to iPad tablet. You just drag and drop the video clip into iMessage input box and then receive the file from your iPad mini. When the file has been delivered, you will be able to play it, save it to Camera Roll and even open it in other apps.
Part 4: How to Transfer Movies from Mac to iPad via AirDrop
AirDrop is a feature that lets Macs and iOS devices share files wirelessly with a minimum of fuss. AirDrop is an excellent way to share content between two Macs or a Mac and iPhone, or Mac and iPad, in the same vicinity, because it works even if the Macs and iOS devices aren’t connected to the same network. With AirDrop, you could you can wirelessly send photos, videos, websites, locations, and more to a nearby iPhone, iPad, iPod touch, or Mac. The below steps would show you how to transfer movies from Mac to iPad via AirDrop.
Open the AirDrop feature on your iPad first (if you don’t know how to open AirDrop feature on iPad, see https://support.apple.com/en-hk/HT204144).
On Mac computers, choose 'Go' from the menu bar in the Finder. If the 'Go' menu includes AirDrop, that Mac can use AirDrop. Choose to be seen by Everyone, or only those in your Contacts. To raise your chances of your Mac seeing your devices and vice versa we suggest that you choose to be seen by everyone.
You should see the iPad in the AirDrop window on your Mac and the Mac should show up AirDrop on your iPad.
You can now drop and drag videos onto the icon representing the iPad.Tap 'Accept' on your iPad to open the file.
To transfer movies from Mac to iPad via AirDrop feature, you firstly need to make sure that your Mac computer supports AirDrop feature. Otherwise you have to turn to other solutions.
Part 5: How to Transfer Movies from Mac to iPad via iTransfer
3rd-party data transfer app could also be of great tool to help you transfer movies from Mac to iPad, just like Leawo iTransfer for Mac, a professional iOS data and file transfer app that is designed for Mac users to transfer up to 14 types of data and files between iOS devices (iPhone, iPad and iPod), iTunes and Mac computer. With this Mac iPad data transfer software, you could easily transfer movies from Macbook to iPad, as well as iMac to iPad.
Leawo iTransfer for Mac
☉ Transfer files among iOS devices, iTunes and PCs with ease. ☉ Transfer up to 14 kinds of data and files without iTunes. ☉ Support the latest iOS devices like iPhone 7, iPhone 7 Plus, etc. ☉ Play back, view, and delete data and files on iOS devices.
Download and install this iTransfer on your Mac computer. The below steps would show you how to transfer movies from Mac to iPad in detail with the help of Leawo iTransfer for Mac (here we take iPhone 6 to replace iPad. Both iOS devices have the same operation on how to add movies from Mac to iPad and iPhone).
Step 1. Connect iPad to computer
Open the software and connect your iPad to your Mac computer via USB cable. Your iPad will be detected soon and displayed on the left sidebar.
Step 2. Open Movies tab
Successively open 'iPad > LIBRARY > Movies' tab. You could then view all movies on your iPad.
Step 3. Add movies to iPad
On the right panel, click the Add button to choose to browse and add movies from your Mac computer to iPad within this iTransfer. You could add multiple movie files or a movie folder as you like.
Step 4. Transfer movies from Mac to iPad
Upon the loading, Leawo iTransfer for Mac would start the process of transferring movies from Mac to iPad immediately. You then only need to wait for the transferring to finish. Once it’s done, disconnect your iPad to Mac computer. You now could freely watch movies on iPad anytime anyplace.
Leawo iTransfer for Mac supports up to 14 types of data and files for you to manage from computer, including: photos, videos, music, contact, note, books, etc. You could transfer and manage all these data and files between iOS devices and computer. If you’re using a Windows computer, you could make use of Leawo iTransfer for iOS data transferring and managing on Windows that runs after Windows Vista.
Everyone knows that iTunes is a great platform that provides a lot of stuff regarding entertainment and fun. However, most users don’t know where to find iTunes library on their computer when transfer them to a new computer. Don’t worry, we will teach you where to find it without any hassle.
Part 1: Where to Find iTunes Library Location on Your Computer?
Part 2: How to Change iTunes Library Location to a New One?
Where to Find iTunes Library Location on Your Computer?
If you don’t know where your iTunes library is on your computer, don’t worry about it. Here are the detailed procedures of finding it on your computer systems.
1 How to Find iTunes Library Location on PC
Add Movies To Itunes Library Mac Torrent
If you are using a PC, you can find your media files in the iTunes library folder. The media files contain imported songs, downloaded stuff and purchased items from iTunes. You can also find individual folders containing songs and movies etc. Here is the complete address of iTunes library on windows: C:UsersusernameMy MusiciTunes.
2 Where Is iTunes Library on Mac
Oppositely, if you are on a Mac, follow the process below. You can do the same steps including finding the media files including songs and other stuff.
Step 1: While you are in the Finder, click on Go button on the menu bar. The menu bar is located on the top of your screen.
Step 2: Now click on Home>Music>iTunes.
Adding Mp3 To Itunes Library
3 How to Locate a Specific Item You See in iTunes?
Everything you see on iTunes including your songs and other media files can be located on your computer. All you need is to find the media folder locations which you can do easily from iTunes. Here is how to locate a specific file or media folder of iTunes.
Step 1: Choose the item and click on Edit>Get Info from the top menu.
Step 2: Choose the File tab.
Step 3: Here you will see the location of this item with its complete address. This item may stored in your computer or a cloud server.
How to Change iTunes Library Location to a New One?
By default, your songs and movies will be downloaded in the media folder location. It doesn’t matter if you have manually set it or not, iTunes will save your files in the media file folder by default. However, if you want to change that location and want to set up a new location for all of your media files and songs, here is how you can do it.
Step 1: Go to the Preferences menu under iTunes in Mac and Edit in Windows.
Step 2: Now click on the ‘Advanced’ tab.
Step 3: Now you will see the location of your folder with option Change in front of it. Click on it and choose a new location for your folder.
How to Export iTunes Library to iPhone within Seconds?
iMyFone TunesMate is a professional iOS media transfer software. Whether you are unable to transfer your files or you are having problems with your iTunes library, iMyFone TunesMate can do a lot of stuff for you. It can do all the tasks you perform with iTunes. In other words, if you are having any type of problems with your iTunes, get iMyFone TunesMate for your computer system.
Here are some great features from iMyFone TunesMate.
You can easily transfer iTunes library to your mobile phone without affecting or erasing any of your files and folders.
You can directly export your iTunes library without actually opening it, even when your iTunes gets crashed.
You can share all of your purchased stuff to any device. It means you will get rid of the restrictions and limitations you face on iTunes.
You can use two-way transfer, from mobile to computer/iTunes and from computer/iTunes to mobile using iMyFone TunesMate.
You can use iMyFone TunesMate to transfer iTunes library to your iPhone within seconds, here is the process to complete this job.
Step 1: Open iMyFone TunesMate on your computer and connect your phone to your computer using a USB cable.
Step 2: On the Home screen, click on Transfer iTunes Media to iDevice tab. It will scan the entire iTunes library and show them in a list.
Step 3: Now select the entire library or the media files you want to transfer and click on Transfer button. (It will only transfer the items which exist in iTunes but not in your iPhone)
You may also like:
0 notes
Text
How To Get Library In Finder On Mac Permanently

Your Mac has a secret. Thousands of them in fact, in the form of hidden files and folders lurking on its hard drive or SSD. Don’t worry, though. These files and folders are all supposed to be there. In fact, many of them are essential.
How To Get Library In Finder On Mac Permanently Windows 10
How To Get Library In Finder On Mac Permanently Computer
How To Get Library In Finder On Mac Permanently Iphone
How To Get Library In Finder On Mac Permanently Mac
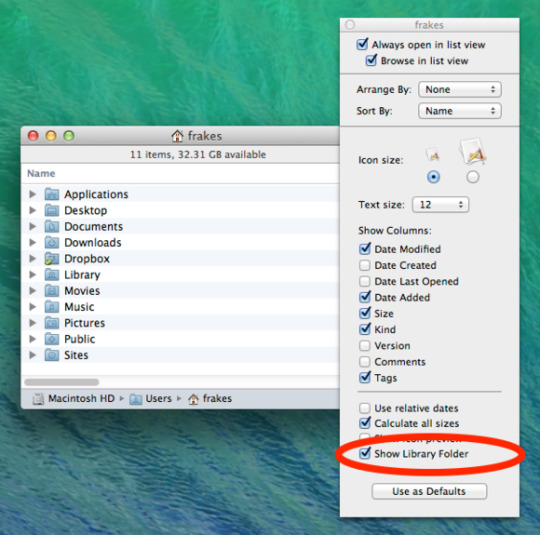
Dec 12, 2016 This is a simple settings change that will cause MacOS Finder to always show the Library folder in the user home: From the Mac OS Finder, go to the Users home folder; Pull down the “View” menu and choose “View Options” Choose “Show Library Folder” in the settings options for the User home folder. Dec 04, 2017 How To Find The Hidden Library Folder On MacOS There are two ways to get to the hidden Library folder if you are confident enough of not triggering a nuclear apocalypse. But the second way is only really feasible when you know where to look. Oct 28, 2013 Show the Users Library Folder Permanently in OS X Mavericks. From the OS X Finder, open a new window and go to the users Home folder (hit Command+Shift+H to jump to Home instantly) Pull down the “View” menu and select “Show View Options” (or hit Command+J if you like keyboard shortcuts). Nov 20, 2012 To permanently display the home folder Library (or at least until the next point update), open Terminal in Utilities and copy/paste. Chflags nohidden /Library. Then hit return.
Many of these files are in your Mac’s main Library folder or in the ~/Library folder, which is in your User folder. Both these Library folders are hidden, but inside them are folders and files that hold things like preferences for apps.
In this article, we’ll tell you how you can view hidden files on your Mac and make your Library folder visible.

What are the hidden files on Mac?
The hidden files are a throwback to macOS’ Unix roots. In fact, the convention of naming them starting with a “.” comes from Unix. For that reason, you can’t use a “.” at the start of a regular file name, otherwise OS X will hide it.
The files themselves contain data like access rights and privileges for files and folders, application support files, and preferences.
There are a number of reasons files and folders are hidden. Mostly, though, it’s because they contain data critical to the smooth running of your Mac and that you shouldn’t interfere with. In addition, there’s no real reason for most users to see or access them. Also, if they were all visible, your Mac would look horribly cluttered.
How to view hidden files on Mac
Before you make your Mac show hidden files, it’s important to remember they’ve been hidden for a reason. The data they contain could cause havoc if you delete or alter it and don’t know what you’re doing.
If your goal in viewing, for example ~/Library is so you can manually delete application support files for a program you’ve uninstalled, consider using a dedicated uninstaller like CleanMyMac X. That will make it easy to remove all the files associated with an application with one click. You can download CleanMyMac X for free here.
CleanMyMac X will also allow you to get rid of all the hidden files you no longer need. Many of these files are created and used then not needed anymore. They just sit there clogging up your hard drive. CleanMyMac X scans your Mac, identifies this system junk and allows you to quickly and easily get rid of it, potentially several gigabytes of disk space.
If you still want to view hidden files on your Mac, you need to go to the Finder and do the following:
Open a new Finder window and click on the name of your Mac under ‘Devices’ in the sidebar.
Click on Macintosh HD, or whatever you’ve called your startup drive if you’ve renamed it.
Press Command-Shift-. (period). You should now see lots of files and folders who’s name starts with “.” become visible.
To re-hide the files and folders, hold down Command-Shift-. again.
How to view your Mac’s ~/Library folder
There are a couple of methods for making your ~/Library folder visible. Here’s the simplest:
Click on the Finder in the Dock.
Open a new Finder window and navigate to your user folder (Tip: if it’s not in the sidebar, go to the Finder menu, choose Preferences, click Sidebar and check the box next to your Home folder)
Click on the Go menu.
Hold down the Option (Alt) key.
You should see that in the dropdown menu, Library appears below Home. Click on it.
Alternatively, do this to view your Library folder:
Click on the Finder in the Dock.
Click on the Go menu and choose Go to Folder.
In the window that opens, type “~/Library”
With both these methods, your Library folder will disappear again when you close the Finder window. It’s easy enough to run through the steps above again to make it visible again when you need to, but if you want it permanently accessible, there are a couple of ways to do it.
The quickest is to drag the Library folder to the Finder’s sidebar. That will create a shortcut to it that will persist. If you want to keep ~/Library visible but don’t want it clogging up the sidebar in Finder windows, do this:
Click on the Finder in the Dock.
Click on the View menu and choose Show View Options.
Check the box labelled Show Library Folder at the bottom of the window.
How to make macOS show hidden files using Terminal

If you’re feeling particularly adventurous, you can use the Terminal command line interface to view hidden files and folders. Here’s how to do it:
Open Terminal from the Utilities folder in Applications, or by searching for it using Spotlight. You can also use the Go menu in the Finder to go directly to the Utilities folder.
Type, or copy and paste, this command: defaults write com.apple.Finder AppleShowAllFiles true
Press Return
Type: killall Finder
To hide the files again, repeat the above steps, but replace ‘true’ with ‘false’ at the end of step 2.
How To Get Library In Finder On Mac Permanently Windows 10
How to hide any file or folder using Terminal
Now that you know how to view hidden files and folders on your Mac, you may be wondering how you can hide other files or folders, to keep them away from prying eyes. There are a number of third-party applications and utilities that offer to do this for you, but you can do it yourself in Terminal, like this:
Launch Terminal.
Type: chflags hidden
Press the spacebar.
Drag the file or folder you want to hide from the Finder onto the Terminal window.
You’ll see the path to the file or folder displayed in Terminal after the command you typed.
Hit Return to execute the command.
The file or folder you dragged onto the Terminal window will now be hidden. To see it again, use one of the methods described above to see hidden files.
To make the file visible permanently again, use the steps above, but in step 2 type: chflags nohidden
As you can see, viewing hidden files and folders on your Mac is very straightforward. There are a number of ways to do it, and you can make them visible temporarily or permanently.
How To Get Library In Finder On Mac Permanently Computer
However, just because you can view hidden files, doesn’t mean you should — the files are usually hidden because accidentally deleting them or altering them could cause chaos on your Mac. So, while it’s fine to have a peek, don’t do anything with the hidden files unless you know what you’re doing.
How To Get Library In Finder On Mac Permanently Iphone
If you want to declutter your Mac or uninstall applications, use a dedicated application like CleanMyMac X. It will safely remove all useless files, add-ons, broken login items, caches, large and old files you didn't know about. Most likely, you won't even need to look for hidden files — CleanMyMac will do all the job for you.
How To Get Library In Finder On Mac Permanently Mac
We also showed that many of those files are stored in Library folders, including the one in your User folder, ~/Library. That folder is hidden by default, but you can view it or make it permanently visible using the techniques described above.
These might also interest you:
0 notes
Text
Mac Os X Sqlite Library

SQLITECORRUPT problem in Mac OS X. Hi, In my Mac OS X, I am linking sqlite(3.2.8) library statically to my C program. I have defined macros -DNOTCL -DHAVEUSLEEP. SQLite is a in-process library that implements a self-contained, serverless, zero-configuration, transactional SQL database engine. The code for SQLite is in. Please make sure MobileAtlasCreator.jar and sqlite-jdbc-3.7.15-M1.jar are located within the same directory. If you would like to refer to this comment somewhere else in. Jan 28, 2020 SQLite is an in-process library that implements a self-contained, serverless, zero-configuration, transactional SQL database engine. The code for SQLite is in the public domain and is thus free for use for any purpose, commercial or private. R-tree query regression, in SQLite library on latest Mac OS X beta. I've run into an R-tree query regression in the latest beta of Mac OS X 10.10. Looks like Apple upgraded the built-in SQLite library.
Mac Sqlite Viewer
Sqlite Mac App
Mac Os X Sqlite Library For Free
Bugfix 2012-08-16: Removed a dependency to a custom library.
This is a very simple thread safe SQLite wrapper for Mac OS X and iOS development.
It is a singleton, so it allows for a single database connection. That being said, the library is threadsafe and if multiple threads attempt to do SQL operations, they will be queued up until the currentthread is done (i.e. the database transaction is committed).
It has support for transactions and uses blocks.
Data skeleton and data locations
Before using the library you have to set the name of your preferred database file and it's location.
After setting the file name, the code below will copy the file data_skeleton.sqlite3 to the file you specified above.Note that this will NOT override the file, UNLESS you specify YES as the ForceReset parameter.
setDatabaseFileInCache
The cache location will store the database in a cache folder and this folder can be deleted at any timewhen the application is not running. It is also not backed up.

Use this for databases that store temporary data that you will not need to store between application launches.
Mac Sqlite Viewer
setDatabaseFileInDocuments
The documents location will store the database in the user's Documents folder. This folder is persistentand will not be deleted unless the user uninstalls the iOS application or manually deletes the file on Mac.
Use this for databases that store persistent data such as user profiles or game highscores.
Logging
Log messages are output based on your setting of DEBUG_LOG preprocessor macro.
DEBUG_LOG=1 - outputs basic messages and errors
DEBUG_LOG=2 - outputs every query and lots of other data
Typical usage scenario
The performQuery: method returns different integer values depending on the query:
Sqlite Mac App
INSERT returns the id of the last inserted row
UPDATE returns the number of affected rows
SELECT returns number of found rows
Using transactions
By default every query is performed in it's own transaction, however if you are performing lotsof insert queries using transactions increases performance quite a bit.
Threads
Mac Os X Sqlite Library For Free
Calling begin initiates a thread lock, and the lock is only released only when commit is called.
So once an SQL transaction is started, all other database access will be put on hold until the threadthat begun the transaction calls commit.
Note: A single query outside a transaction calls begin and commit, and thus follows the above principle.
Rollback
There is currently no rollback support.
sqlite3_column_nsstring
For NSString support I wrote a custom function sqlite3_column_nsstring, it behaves like other sqlite3 functions but returns an NSString instead of a C string.
0 notes
Text
Watchtower Library 2016 Mac


Watchtower Library 2016 Dvd
Watchtower Library 2016 Mac Free
Comment Installer Watchtower Library 2016 Sur Mac
Watchtower Library 2016 Dvd
Watchtower Library for Mac 2 2.1 is available as a free download on our software library. The actual developer of this free Mac application is Roy Ratcliffe. The actual developer of this free Mac application is Roy Ratcliffe. Watchtower library 2016 on mac free download. Clipper The Clipper library performs clipping and offsetting for both lines and polygons. All four boolean c.
Run script for Watchtower Library on Mac using Wine.
CrossOver Mac enables you to run Watchtower Library without buying a Windows license, rebooting or using a virtual machine. https://angryphilosophermagazine.tumblr.com/post/640569482851516416/mac-find-files-in-library. CrossOver Mac makes it easy to launch Watchtower Library natively from the dock, and integrates macOS functionality like cross-platform copy & paste. CrossOver Mac enables you to run Watchtower Library without buying a Windows license, rebooting or using a virtual machine. CrossOver Mac makes it easy to launch Watchtower Library natively from the dock, and integrates macOS functionality like cross-platform copy & paste.
By default, iPhoto is a photo management program which comes standard on every Mac computer. But if you want change your Mac computer to Windows PC, then you need to transfer you all data from Mac to Windows PC. The most important thing is your photos and videos. You can transfer all your photos from iPhoto to Windows with simple steps. May 31, 2018 The real answer is that you can get to your photos easily on a Windows computer and copy them easily to any folder (directory) you want. People who say you cannot do it are wrong. On a Windows computer the iPhoto library will appear in Windows Explorer as a Folder with the same name as the iPhoto library. When you open that Folder you will find. Iphoto library upgrader. Mar 18, 2020 Your Photos library holds all your photos, albums, slideshows, and print projects. If your library is large, and you want to free up storage space on your Mac, turn on iCloud Photo Library and use Optimize Mac Storage, or move your library to an external drive. Before you start, be sure to.
Icloud photo library on mac. Jan 05, 2020 ☁️ 💕 iCloud Photo Library How to set up iCloud Photo Library on your Mac If you're interested in using the iCloud Photo Library on your Mac, here's how.
WatchtowerLibrary-run.sh
Watchtower Library 2016 Mac Free
#!/bin/bash# Get the path to this script and its containing directory.app_script_path=$0app_script_dir_path=$(dirname '$app_script_path')# Get the correct username under which the wine files were added.username_path='$app_script_dir_path/username'if [ !-f'$username_path' ];then username=$(whoami)echo'$username'>'$username_path'else username=$(cat '$username_path')fi# Make sure that wtl_paths will be correctly split on newlines instead of spaces.IFS=$'n'# Get the local path to the 'Wine Files' directory and the Windows path to 'WTLibrary.exe'.wine_files_path='/Users/$username/.wine'if [ -a'$wine_files_path' ];then drive_c_path='$wine_files_path/drive_c' wtl_paths=($(find '$drive_c_path/Program Files/Watchtower' -iname WTLibrary.exe 2>/dev/null))fiif [ !-f'$wtl_paths' ];then wine_files_path='/Users/$username/Wine Files'if [ -a'$wine_files_path' ];then drive_c_path='$wine_files_path/drive_c' wtl_paths=($(find '$drive_c_path/Program Files/Watchtower' -iname WTLibrary.exe 2>/dev/null))fifi# Done working with the internal field separator.unset IFSif [ '${#wtl_paths[@]}'-gt'1' ];thenforwtl_pathin'${wtl_paths[@]}';do msg='Would you like to open '$wtl_path'?' resp=$(osascript -e 'tell app 'System Events' to display dialog '$msg' buttons {'Yes','No'}')if [[ $resp*:Yes* ]];thenbreakfiunset wtl_pathdoneelif [ '${#wtl_paths[@]}'-eq'1' ];then wtl_path=${wtl_paths[0]}fiif [ -f'$wtl_path' ];then back_slash='' forward_slash='/' c_wtl_path=${wtl_path/$drive_c_path/'C:'} c_wtl_path=${c_wtl_path//$forward_slash/$back_slash}# # Run WTLibrary.exe using Wine.export WINEPREFIX='$wine_files_path/' /Applications/Wine.app/Contents/Resources/bin/wine '$wtl_path'else msg='Unfortunately WTLibrary couldn't be found. Please make sure it is installed using Wine before trying again.' osascript -e 'tell app 'System Events' to display dialog '$msg' buttons {'OK'}'fi
Comment Installer Watchtower Library 2016 Sur Mac
Sign up for freeto join this conversation on GitHub. Already have an account? Sign in to comment
0 notes
Text
Library Could Not Be Opened Mac

The Library Could Not Be Opened Mac
Endnote Library Could Not Be Opened Mac
The Library Could Not Be Opened Mac Photos
Back up your library
Before following any of these steps, it's a good idea to create a backup of your photo library, even if you use iCloud Photos. You can use Time Machine, use a third-party backup solution, or copy the library to an external drive. By default, your photo library is stored in the Pictures folder within your home folder.
Make sure that your software is up to date

Sep 21, 2014 Adobe Reader cannot be opened because of a problem - Mac, not PC Iconoclastmac. Sep 21, 2014. Go to Internet plug-ins present in System Library - /Library/Internet Plug-Ins/ and move the following to Trash. “The Update could not be applied because the Adobe Reader application contents were modified since the original installation.
Mar 13, 2020 The file can be opened and edited on another macbook we have with an older version of office for mac (Retail License 2016) with the same Catalina OS installed. Emailing the file from that macbook to the one with the newer office installation, we CAN open the attachment if we open it directly from within the Mail app by selecting the attachment.
Nov 17, 2016 The Library Could Not Be Opened Photos version: 2.0 (451.20.9) Library location: in the Mac mini's HD. Processor: 2.3 GHZ Intel Core i7. Sadly, I don't know the difference between 'managed' or 'referenced'. I appreciate the help. Warning: If you use i Cloud Photo Library with Photos. With this method, the message “The file iTunes Library.itl cannot be read because it was created by a newer version of iTunes” would not come out any more. Besides, not just about iTunes 12.6.3, if you encounter this problems in other situations, you can apply this method to fix it, too. Solution 1: Use Mac Built-in Photos Library Repair Tool. If Mac photos the library could not be opened or it is showing unexpected errors, then Photos Library Repair Tool is one of the best ways to fix it. This is a built-in repair tool, comes with macOS and it is pretty easy to use. Step 1: Press and hold the “Option” and “Command” keys while photos are opened on your Mac.
Photos is part of the Mac operating system. You can avoid or fix many issues by running the most up-to-date version of macOS. Learn more about updating the software on your Mac.
If you use RAW images in Photos, learn more about the digital camera RAW formats supported by iOS, iPadOS, and macOS.
If you have trouble migrating an existing iPhoto or Aperture library to Photos
You might see an alert message when you first open Photos or migrate an existing iPhoto or Aperture library. Learn what to do if Photos can’t copy or create a library.
If the Media Browser isn't showing your photos and videos
Use the Media Browser to make images from your photo library available in other apps, like Pages and iMovie. The Media Browser shows only the contents of the Photos library designated as the System Photo Library. If you have more than one Photos library—and the one you're using isn't set as the System Photo Library—the Media Browser won't show its contents. Can you transfer iphoto library to different mac.
Follow these steps to designate the current library as the System Photo Library:
Choose Photos > Preferences.
Click the General button at the top of the Preferences window.
Click Use as System Photo Library.
If you're having other issues with Photos
If you're experiencing other issues—like missing or blank photo thumbnails, unexpected behavior, or if Photos won’t open—try to see if it's an issue with your library by following these steps.
Create a new Photos library and see if your issues persist:
Quit Photos.
Press and hold the Option key while you open Photos.
In the dialog that appears, click Create New.
Give your new library a name, then click OK. Note whether Photos opens successfully with this new library.
To return to your main Photos library, quit Photos. Then open it again while holding the Option key, select your main library, and click Choose Library.
Alternatively, you can open Photos in another user account on your Mac and note whether Photos opens successfully.
If Photos opens with the new library, or in a different user account, it might mean that there's an issue with your library. Follow the steps to use the Photos library repair tool on your main Photos library.
Learn more
Learn how to create and order print products like books or calendars in Photos with Project Extensions.
Get help with iCloud Photos.
The safest place to get apps for your Mac is the App Store. Apple reviews each app in the App Store before it’s accepted and signs it to ensure that it hasn’t been tampered with or altered. If there’s ever a problem with an app, Apple can quickly remove it from the store.
If you download and install apps from the internet or directly from a developer, macOS continues to protect your Mac. When you install Mac apps, plug-ins, and installer packages from outside the App Store, macOS checks the Developer ID signature to verify that the software is from an identified developer and that it has not been altered. By default, macOS Catalina also requires software to be notarized, so you can be confident that the software you run on your Mac doesn't contain known malware. Before opening downloaded software for the first time, macOS requests your approval to make sure you aren’t misled into running software you didn’t expect.
Running software that hasn’t been signed and notarized may expose your computer and personal information to malware that can harm your Mac or compromise your privacy.
View the app security settings on your Mac
By default, the security and privacy preferences of your Mac are set to allow apps from the App Store and identified developers. For additional security, you can chose to allow only apps from the App Store.
In System Preferences, click Security & Privacy, then click General. Click the lock and enter your password to make changes. Select App Store under the header “Allow apps downloaded from.”
Open a developer-signed or notarized app
If your Mac is set to allow apps from the App Store and identified developers, the first time that you launch a new app, your Mac asks if you’re sure you want to open it.
An app that has been notarized by Apple indicates that Apple checked it for malicious software and none was detected:
Prior to macOS Catalina, opening an app that hasn't been notarized shows a yellow warning icon and asks if you're sure you want to open it:
If you see a warning message and can’t install an app
The Library Could Not Be Opened Mac
If you have set your Mac to allow apps only from the App Store and you try to install an app from elsewhere, your Mac will say that the app can't be opened because it was not downloaded from the App Store.*
If your Mac is set to allow apps from the App Store and identified developers, and you try to install an app that isn’t signed by an identified developer or—in macOS Catalina—notarized by Apple, you also see a warning that the app cannot be opened.
https://angryphilosophermagazine.tumblr.com/post/639977771128569856/where-is-my-amazon-music-library-stored-on-my-mac. If you move songs out of the iTunes folder, you might have to add the songs to iTunes again before you can play them.If you throw away the, your songs will no longer appear in your library even though the song files are still in the iTunes folder.If files have mysteriously disappeared, run a full scan of your computer with up-to-date antivirus software.To make your songs appear in the library again:.First, drag your iTunes folder (by default, located inside your PC’s Music folder) to the iTunes window. If the iTunes Library file was included, you’ll also see your original.If the above suggestion doesn’t work, your songs may be elsewhere on your hard disk. The songs appear in your library again.
Endnote Library Could Not Be Opened Mac
If you see this warning, it means that the app was not notarized, and Apple could not scan the app for known malicious software.
You may want to look for an updated version of the app in the App Store or look for an alternative app.
If macOS detects a malicious app
If macOS detects that an app has malicious content, it will notify you when you try to open it and ask you to move it to the Trash.
How to open an app that hasn’t been notarized or is from an unidentified developer
Running software that hasn’t been signed and notarized may expose your computer and personal information to malware that can harm your Mac or compromise your privacy. If you’re certain that an app you want to install is from a trustworthy source and hasn’t been tampered with, you can temporarily override your Mac security settings to open it.
In macOS Catalina and macOS Mojave, when an app fails to install because it hasn’t been notarized or is from an unidentified developer, it will appear in System Preferences > Security & Privacy, under the General tab. Click Open Anyway to confirm your intent to open or install the app.
The warning prompt reappears, and you can click Open.*
The app is now saved as an exception to your security settings, and you can open it in the future by double-clicking it, just as you can any authorized app.
The Library Could Not Be Opened Mac Photos
*If you're prompted to open Finder: control-click the app in Finder, choose Open from the menu, and then click Open in the dialog that appears. Enter your admin name and password to open the app.
0 notes
Text
See Library On Mac

Here's what you need
Mac Show Library
How To See Library On Mac
View User Library On Mac
Where Is Library On Mac
How To See Library On Mac
Can't See Library On Mac
Mac Show Library
Update your iPhone or iPod touch to the latest version of iOS, iPad to the latest version of iPadOS, or Mac to the latest version of macOS. On a PC, make sure that you have the latest version of iTunes for Windows.
Subscribe to Apple Music or iTunes Match.
Sign in to all of your devices with the same Apple ID that you use with Apple Music or iTunes Match.
Connect your devices to the Internet over a Wi-Fi or cellular network. On a Mac or PC, you can also connect to the Internet using Ethernet.
How To See Library On Mac
Apple Music and iTunes Match availability varies by country or region. Learn what's available in your country or region.
I think we can all agree that, at the moment, things are wild. Life in the time of COVID-19 is uncertain and we all have our own ways of making sense of or distracting ourselves from the stress and overwhelming emotions that this pandemic has caused. Some troubleshooting procedures require you to navigate to and view a hidden folder on Mac. You can access the Library folder with the Go To Folder command or from the Terminal app. Access the Library folder in Finder: In Finder, choose Go Go To Folder In the Go To The Folder field, enter /library/ Click Go. Please see the Autodesk.
Turn on Sync Library
With the latest version of iOS, iPadOS, and macOS, Sync Library is turned on by default. If you turned off Sync Library, you can turn it back on. Just follow the steps below for your device.
On your iPhone, iPad, or iPod touch
Go to Settings > Music.
Turn on Sync Library. If you don't subscribe to Apple Music or iTunes Match, you won’t see an option to turn on Sync Library.
If Sync Library is updating or turned off, you'll see a message at the top of the Library tab in the Apple Music app.
On your Mac
Open the Apple Music app.
From the menu bar at the top of your screen, choose Music > Preferences.
Go to the General tab and select Sync Library to turn it on. If you don't subscribe to Apple Music or iTunes Match, you won’t see an option to turn on Sync Library.
Click OK.
If you have a large music library, it might take some time to upload and sync your music library across all of your devices.
On your PC with iTunes for Windows
In iTunes for Windows, iCloud Music Library isn't turned on by default. To turn on iCloud Music Library:

Open iTunes.
From the menu bar at the top of your screen, choose Edit > Preferences.
Go to the General tab and select iCloud Music Library to turn it on. If you don't subscribe to Apple Music or iTunes Match, you won’t see an option to turn on iCloud Music Library.
Click OK.
If you have a large music library, it might take some time to upload and sync your music library across all of your devices.
On other devices
If you subscribe to Apple Music, you can also access your music library — without having to turn on Sync Library — on other devices that support the Apple Music app.
View User Library On Mac
If you don't subscribe to Apple Music
If you only want to sync your existing music library across all of your devices, and not any music from the Apple Music catalog, you can subscribe to iTunes Match on your computer. iTunes Match lets you access your music library on any Apple device or a PC with iTunes for Windows.
If you buy music from the iTunes Store, you can redownload your past music purchases on your Apple device or a PC with iTunes for Windows.
You can also manually sync music from your computer to your iPhone, iPad, or iPod touch.
Need help?
If you sign out of your Apple ID or cancel your Apple Music or iTunes Match subscription, you won’t be able to access and sync your music library on all of your devices. The original song files will remain on the device that they were uploaded from.
Apple Music isn't a back up service. Make sure to back up your iPhone, iPad, iPod touch, Mac, or PC, so that you have a copy of your music and other information in case your device is ever replaced, lost, or damaged.
You can have up to 100,000 songs in your music library. Songs that you buy from the iTunes Store don't count against this limit.
If a song is grayed out, incorrect music plays, or you can’t access your music library, learn what to do.
Learn more
Learn how to join Apple Music.
Learn about the icons that you might see next to songs when you turn on Sync Library.
If Sync Library is turned on, a song that you delete from one device is deleted everywhere.
Learn what to do if songs in your music library are grayed out.
Problem to be Solved
You’ve got a great backup of your OSX computer, and you need to get something back from the Library folder, say something in the Application Support subfolder. These instructions will show you how to do unhide the User Library folder on the external drive or even on a second Mac.
Where Is Library On Mac
Credit goes to Steve Davidson for teaching me how to do this.
Can you transfer iphoto library to different mac. Moving iPhoto Library complete.Note: If deleting the old library from the computer's hard drive makes you nervous, you can backup iPhoto to CD/DVD by clicking Share - Burn before you erase anything.More about Moving iPhoto Library:1. The iPhoto library thumbnail is different between pre-iPhoto '08 and post-iPhoto '08.
Let’s Start with a Remote Mac Because the Syntax is Simpler
On the remote Mac, enable Remote Login (https://www.podfeet.com/blog/how-to-set-up-a-mac-for-remote-login/) and use the ssh command to Secure Shell into the remote Mac. In this example, our local machien name is Podfeet-rMBP, and our remote Mac’s name is Core-i7-4.local.
I have the same user account on both but I used the allison@ the beginning to show you how to enter your user name if it’s different on the other Mac.
Note that the Library Folder is Not Visible
How To See Library On Mac
Here’s a screenshot of the remote Mac Core i7, and the Library folder is invisible.
Enter the chflags nohidden Command
User Library Folder is Now Visible on the Remote Mac
Next Let’s Repeat This On An External Volume
My backup drive has a nice long annoying name “Core i7 backup 2011 03 03”. As you can see I have a backup of my home (allison) directory but I can’t see the Library folder.
Quit Photos. In another Finder window, find your library. In the Finder, go to the external drive where you want to store your library. Where is the icloud photo library on mac.
Repeat the chflags Command
In this case we have the same command but we have to navigate first to Volumes, then to the specific backup drive name (with those annoying spaces replaced with and space) and then to the user directory and then Library.
To be honest it might be easier to change the name of the volume not to have spaces than it is to type it this way!
Or you could use quotes like this:
Now Your Library is Visible on Your Backup Volume
Can't See Library On Mac
Important note – you only have to do this one time, every time you connect your external drive the Library will be visible.
0 notes
Text
Where Is The Icloud Photo Library On Mac

Icloud Photo Library Windows 10
Icloud Photo Library On Android
How To Download All Photos From Icloud
Download Icloud Photo Library To Pc
Where Is The Icloud Photo Library On Mac Video
How it works
iCloud Photos automatically keeps every photo and video you take in iCloud, so you can access your library from any device, anytime you want. Any changes you make to your collection on one device change on your other devices too. Your photos and videos are organized into Years, Months, Days, and All Photos.And all of your Memories and People are updated everywhere. That way you can quickly find the moment, family member, or friend you're looking for.
How to Use iCloud Photos on Mac. Once iCloud Photos option is enabled, you can trust the Photos App to automatically upload Photos from Mac to iCloud Photos. Photos uploaded to iCloud Photos from other devices will also be downloaded to your Mac, either in Full. With iCloud Photo Library, your entire Photos Library is actually stored online, and everything in your Library is also accessible from other Macs and iOS devices like your iPad and iPhone. (Think “central storage house for everything visual that you can reach from anywhere with an Internet connection.”).
Your collection uploads to iCloud each time your device connects to Wi-Fi and your battery is charged. When you have iOS 11 or later, your library can update over cellular too. Depending on your Internet speed, the time it takes for you to see your photos and videos on all of your devices and iCloud.com might vary.
Nov 14, 2018 - Repaired the Library using Option and Command Key - Runned Disk Aid. Finally Turned off icloud photo's, created a new library, set as system library, and enabeld again iCloud photo's sync. After this last step it should restart download everything, but it keep on the preparing library screen (which only should be there the first minute or so). Mar 30, 2020 Photo Library uploads all photos to iCloud and keeps them up to date across devices and you also can get access to them through iCloud.com. To transfer photos from the iCloud Photo Library to Mac, please refer to the two methods below. Transfer Photos from iCloud Photo Library to Mac Through iCloud Preference Panel. ICloud Photo Library is Apple`s online file storage service, which uploads photos and videos to Apple`s cloud storage. With fewer files needing to be stored on your device, your device’s memory is optimized and more free space is available.
Before you begin
Update your iPhone, iPad, or iPod touch to the latest iOS or iPadOS, your Mac to the latest macOS, and your Apple TV to the latest tvOS.
Set up iCloud on all of your devices.
Make sure that you’re signed in to iCloud with the same Apple ID on all of your devices that you want to use with iCloud Photos.
If you have a Windows PC, update to Windows 7 or later and download iCloud for Windows.
Turn on iCloud Photos
On your iPhone, iPad, or iPod touch, go to Settings > [your name] > iCloud > Photos, then turn on iCloud Photos.
On your Mac, go to System Preferences > Apple ID. Click iCloud in the sidebar, then select Photos. If you have an earlier version of macOS, go to System Preferences > iCloud. Click Options next to Photos, then select iCloud Photos.
On Apple TV 4K and Apple TV HD, go to Settings > Users and Accounts > iCloud. Then turn on iCloud Photos.
On your Windows PC, follow these steps.
In earlier versions of iOS, macOS, tvOS, and iCloud for Windows, iCloud Photos was called iCloud Photo Library.
This feature will scan your local iTunes library and “match” the songs to songs Apple knows about, giving you access to them on Apple’s servers. ITunes Match costs $25 per year with no free option.This is a bit more tempting if you also use, as iCloud Music Library is included with Apple Music’s $10 monthly fee. If you have more than 50,000 songs, Amazon does let you store up to 250,000 songs for $25 per year — something you just can’t do with Google Play Music or even Apple’s solution.Price: Up to 250 songs for free, up to 250,000 for $25 per yeariTunes Match and Apple MusicRELATED:Apple offers this feature with built into iTunes. Where is my amazon music library stored on my mac. Technically, ITunes Match and Apple Music are separate, but both give you access to iCloud Music Library.This service is only really ideal if you’re invested in the Apple ecosystem, as it works in iTunes on Mac, iTunes on Windows, and the Music app on iPhone and iPad.
See your edits on all of your devices
When you make edits in the Photos app on your iOS or iPadOS device or on your Mac, the photo automatically updates across all your devices. So when you crop or enhance a photo from your iPhone, you see the changes when you access your library from your Mac. Your original photos and videos are stored in iCloud and you can go back to them at any time, and revert any changes you made.
The photos and videos that you delete on one device are deleted everywhere that you use iCloud Photos. Photos and videos stay in the Recently Deleted folder for 30 days before they're deleted permanently.
You can make edits on your iPhone, iPad, iPod touch, or Mac, and you’ll see them on your Apple TV automatically. Your entire collection is available on Apple TV, including your Memories and shared albums.
File types that you can use with iCloud Photos
Your photos and videos are stored in iCloud exactly as you took them. All of your images are held in their original formats at full resolution — HEIF, JPEG, RAW, PNG, GIF, TIFF, HEVC, and MP4 — as well as special formats you capture with your iPhone, like slo-mo, time-lapse, 4K videos, and Live Photos.
Back up your photos and videos
When you turn on iCloud Photos, your photos and videos automatically upload to iCloud. They're not duplicated in your iCloud backup, so you should keep backup copies of your library. You can download your photos and videos from iCloud.com to your computer and store them as a separate library, transfer them to another computer with Image Capture or Photos, or store them on a separate drive.
If you're on a device with iOS 11 or later or macOS High Sierra or later, the photos and videos you take are in HEIF and HEVC format. These formats use less storage, with the same quality.
Download your photos and videos
You can download a copy of your original photos or videos on iCloud.com, iOS, iPadOS, or Mac.
On iCloud.com, click Photos, then select the photos and videos that you want to download. Click and hold the download button in the upper-right corner of the window. If you want to download your content as it was originally captured or imported, choose Unmodified Original. For JPEG or H.264 format — including edits, and even if it was orginally in HEIF or HEVC format — choose Most Compatible. Click download.
On iOS and iPadOS, you can use AirDrop: in the Photos app, select some photos or videos. Tap the share button , then select the device that you want to share with. Learn more about using AirDrop.
On Mac, select one or more photos. Drag the content to your desktop, or right-click and select Share > AirDrop.
Make sure that you have enough storage
The photos and videos that you keep in iCloud Photos use your iCloud storage and your device storage. And as long as you have enough space in iCloud and on your device, you can store as many photos and videos as you like.
When you sign up for iCloud, you automatically get 5GB of free storage. If you need more space, you can buy more iCloud storage. Plans start at 50GB for $0.99 (USD) a month. If you choose 200GB or 2TB plans, you can share your storage with family.
Icloud Photo Library Windows 10
Learn more about plans and prices in your region.
Save space on your device
iCloud Photos keeps all your photos and videos in their original, high-resolution version. You can save space on your device when you turn on Optimize Storage.
On your iPhone, iPad, or iPod touch:
Go to Settings > [your name] > iCloud.
Tap Photos.
Choose Optimize [device] Storage.
On your Mac:
This is a folder that Apple feels you shouldn’t need access to most of the the time, but occasionally, you may need it for specific things. I also use it to access the Application Support folder, which as its name alludes to, features supporting files for apps.If you use a Mac for a long enough time, you’ll eventually run into a situation where you’ll need to access the /Library folder. This video tutorial will show you several ways to do just that. Use Finder’s Go MenuStep 1: Open FinderStep 2: Click Go → Go To FolderStep 3: Type /Library and click Go Use a quick shortcut from Finder’s Go menuStep 1: Open FinderStep 2: Hold Option (⌥) and Click GoStep 3: Click Library A permanent Finder solutionStep 1: Open FinderStep 2: Click Go → HomeStep 3: Click View → Show View OptionsStep 4: Check Show Library FolderThe Library folder should now permanently show inside of the Home folderThere are, of course, many other ways for showing the Library folder, but these are three of my go-to methods. I use it often to view the preferences for the apps I have installed on my Mac. Show hidden library folder mac el capitan 10 13.
Open the Photos app and click Photos in the menu bar.
Click Preferences.
Go to the iCloud tab and choose a storage setting.
If you turn on Optimize Storage, iCloud Photos automatically manages the size of your library on your device. Your original photos and videos are stored in iCloud and space-saving versions are kept on your device. Your library is optimized only when you need space, starting with the photos and videos you access least. You can download the original photos and videos over Wi-Fi or cellular when you need them. You can use Optimize Storage on your iPhone, iPad, iPod touch, and Mac.
If you turn on Download Originals, iCloud Photos keeps your original, full-resolution photos and videos in iCloud and on your device.
Pause library uploads to iCloud
When you turn on iCloud Photos, the time it takes for your photos and videos to upload to iCloud depends on the size of your collection and your Internet speed. If you have a large collection of photos and videos, your upload might take more time than usual. You can see the status and pause the upload for one day.
On your iPhone, iPad, or iPod touch, go to Settings > [your name] > iCloud > Photos. You can also open the Photos app, go to the Photos tab, and scroll to the bottom of your screen.
On your Mac, open the Photos app. Select Photos in the sidebar, then click All Photos in the list of tabs in the toolbar. Scroll to the bottom of your photos and click Pause.
Learn more
Rediscover favorite and forgotten occasions from your photo library with Memories.
Find your missing photos or delete the ones that you don't want anymore.
iCloudPhotos, formerly known as iCloud Photo Library, is an Apple service that moves the user's entire photo and video library into the cloud. It's part of Apple's push to make it as easy as possible for users to switch among Mac and iOS devices throughout the day, making sure the user's photos are available on all of their devices and ensuring any changes get quickly synced across devices.
Turning on iCloud Photo Library
- iOS: Open the Settings app and head to account section and tap on your iCloud account. In the 'Apps Using iCloud' section, tap on Photos and you'll find a toggle for iCloud Photos. This option can also be accessed through the Photos app section of Settings.

- macOS: Open System Preferences and head to the iCloud pane. If you're logged in, you'll see a list of the various iCloud services. Hit the 'Options..' button next to Photos, and you'll see a window where you can turn on iCloud Photos. You can also manage settings within the Preferences section of the new Photos app directly.
- Apple TV: On a fourth-generation Apple TV or Apple TV 4K, head to the Accounts section of Settings, then choose iCloud and turn on the iCloud Photos option.
- iCloud.com: Photos stored in iCloud Photo Library are also accessible through Apple's web-based iCloud.com service. Through the web interface, users can upload or download photos, browse via Moments and Albums view, print or email photos, and mark individual photos as favorites.
iCloud Photos Settings
The Photos apps for Mac and iOS are built to work with iCloud Photos, although users can opt to use local photo libraries on their devices if they prefer. Users opting for iCloud Photos have the choice of storing the original photos on their Mac or iOS device, which is ideal for offline access, or a more flexible optimized arrangement that stores originals locally if you have enough storage space but uses lower-resolution versions if local storage is tight and only downloads the full-resolution versions from iCloud as needed.
iCloud Photos settings on Mac (left) and iOS (right)
Similar settings are available on iOS, where users can choose between storing full-resolution photos right on their devices or saving some space by storing lower-resolution versions onboard and keeping the full-resolution versions in iCloud.
On iOS and macOS, users may also continue to see an option for My Photo Stream, which is Apple's separate service that allows users to automatically sync their last 30 days' worth of photos (up to 1,000 photos) between devices. Users who recently created their Apple IDs may not see the My Photo Stream option, as Apple is phasing out the feature.
On devices where iCloud Photos is active, there will no longer be a separate My Photo Stream album as there was prior to the rollout of iCloud Photos, as all photos are now included in the main library stored in iCloud. My Photo Stream doesn't count against your iCloud storage limits, but edits made to photos in My Photo Stream don't update across your devices.
The My Photo Stream setting does, however, offer some level of integration between devices where iCloud Photo Library is enabled and those where it is disabled. Turning on My Photo Stream on a device with iCloud Photo Library is enabled allows the device to import Photo Stream photos from other non-iCloud devices and also send new photos out to My Photo Stream for display on those devices.
Using iCloud Photos
Once you understand that iCloud Photos stores and syncs photos across devices, usage is very straightforward and it behaves very much like a local photo library stored on the user's machine. Users can freely manage, edit, and save their photos as they have always done, with the added bonus of that work automatically appearing wherever they have iCloud Photos enabled. The original photos always remain stored in iCloud, making it easy to revert any edits made on a device.
As with a local photo library, users can include photos from any source, making iCloud Photos more than the alternative Photo Streams of images taken on their devices. Photos and videos of a wide range of types from any source can be added to the user's library on one device, and they will sync to all other devices.
One important consideration when deciding whether or not to use iCloud Photos is that it is an all-or-none proposition on a given device unless the user chooses to use multiple photo libraries on macOS. With a single photo library, there is no option to sync only some photos while the remainder is stored only locally. For example, users can not opt to have only their iOS device photos synced to their Mac via iCloud Photos but not have their full library of photos in the Photos app for Mac synced to iCloud and the user's other devices unless they want to manage multiple libraries.
Photos are stored in iCloud Photos at their full resolutions and in their original formats. Common formats like HEIF, JPEG, RAW, PNG, GIF, TIFF, HEVC, and MP4 are all supported, as are special formats captured on iOS devices like slo-mo, time-lapse, and Live Photos.
Pricing
Icloud Photo Library On Android
iCloud Photos taps into a user's iCloud account storage, which is also used for iCloud Drive document storage, device backups, and more. iCloud users receive 5 GB of storage for free, but users who wish to back up their devices to iCloud frequently find they need more than that, and iCloud Photo Library will only increase the need for additional storage.
Apple offers several paid storage tiers for iCloud, priced on a monthly basis and ranging from 50 GB to 2 TB. The lowest paid plan at 50 GB costs $0.99/month in the U.S., with Apple also offering a 200 GB plan for $2.99/month and a 2 TB plan for $9.99/month. Even the high-end 2 TB plan may not be enough for some users who have a lot of photos, requiring them to either archive some photos outside of the service or simply opt to not use iCloud Photos at all.
If you fill up your iCloud storage allotment, new photos and videos will no longer be uploaded to iCloud, and libraries will no longer be synced across devices. In order to restore iCloud Photos functionality, users will need to either upgrade to a larger storage plan or reduce storage usage by manually deleting certain photos or other files from iCloud.
Turning Off iCloud Photos
So what if you've turned on iCloud Photos and later decide you don't want to use it anymore, either for a specific device or across all devices? On a specific device, iCloud Photos can be disabled the same way it was turned on, through the iCloud portion of the Settings app on iOS device or System Preferences or Photos preferences on a Mac. If you are currently storing optimized versions of your photos, your system will give you the opportunity to download the full-resolution photos from iCloud, at which point you will have a complete local photo library on your device.
How To Download All Photos From Icloud
Disabling iCloud Photos entirely in iCloud settings on Mac
If you prefer to turn off iCloud Photos entirely, you can head to the Manage Storage section of iCloud settings either in the Settings app on an iOS device or System Preferences on a Mac. In that section, you can choose to Disable and Delete iCloud Photo Library, after which point you will have 30 days to download your library to at least one device before it is removed entirely.
Download Icloud Photo Library To Pc
Wrap-up
Where Is The Icloud Photo Library On Mac Video
iCloud Photos represents one of Apple's key efforts to streamline the experience of using multiple devices, many of which have been bundled under the 'Continuity' umbrella. Many of these Continuity features tap into iCloud as a method for linking various devices, and iCloud Photos takes that one step further to ensure the users' photos are available regardless of which device they are currently on.
0 notes
Text
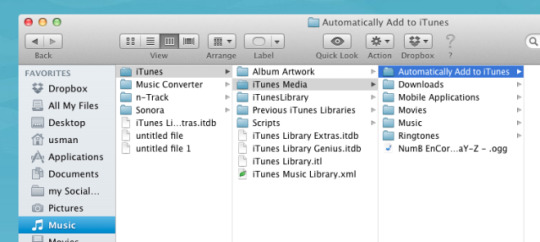
Mac Find Files In Library

How To Find Files On Computer
Find Files On Rapidshare
Access Library Folder Mac
Mar 21, 2018 Many of these files are in your Mac’s main Library folder or in the /Library folder, which is in your User folder. Both these Library folders are hidden, but inside them are folders and files that hold things like preferences for apps.
Make sure the search is set to This Mac, then click the plus button underneath the search box to add System Files and are included. You’ll get a mix of small files and directories as a result (ideally). The folders are what you want to focus on. Clicking on a folder should show.
The Finder is the first thing that you see when your Mac finishes starting up. It opens automatically and stays open as you use other apps. It includes the Finder menu bar at the top of the screen and the desktop below that. It uses windows and icons to show you the contents of your Mac, iCloud Drive, and other storage devices. It's called the Finder because it helps you to find and organize your files.
So, you can pick Apple Music for thelibrary and iHeartRadio for the station, for example.5) When youfinish, you can tap the arrow at thetop to go back or just close the Alexa app. Tap DefaultServices to change it.4) You can chooseboth a Default Music Library and Default Station on the next screen.These are independent of each other. 1) Open theleft-hand menu and select Settings.2) Under Alexa Preferences, choose Music.3) Scroll down to Account Settings and you can see thecurrent default service. Where is my amazon music library stored on my mac download.
Open windows and files
To open a window and see the files on your Mac, switch to the Finder by clicking the Finder icon (pictured above) in the Dock. Switching to the Finder also reveals any Finder windows that might be hidden behind the windows of other apps. You can drag to resize windows and use the buttons to close , minimize , or maximize windows. Learn more about managing windows.
When you see a document, app, or other file that you want to open, just double-click it.
May 24, 2018 Unlike your iTunes music library, the iBooks library location is not immediately obvious to the user. Follow iDownloadBlog's set-by-step tutorial to learn where exactly your electronic books, ePubs, iBooks Author books and PDF files that you organize in the iBooks app are stored on your Mac.
Change how your files are displayed
To change how files are displayed in Finder windows, use the View menu in the menu bar, or the row of buttons at the top of the Finder window. You can view files as icons , in a list , in columns , or in a gallery . And for each view, the View menu provides options to change how items are sorted and arranged, such as by kind, date, or size. Learn more about customizing views.
When you view files in a gallery, you can browse your files visually using large previews, so it's easy to identify images, videos, and all kinds of documents. Gallery View in macOS Mojave even lets you play videos and scroll through multipage documents. Earlier versions of macOS have a similar but less powerful gallery view called Cover Flow .
Gallery View in macOS Mojave, showing the sidebar on the left and the Preview pane on the right.
Use the Preview pane
The Preview pane is available in all views by choosing View > Show Preview from the menu bar. Or press Shift-Command (⌘)-P to quickly show or hide the Preview pane.
macOS Mojave enhances the Preview pane in several ways:
More information, including detailed metadata, can be shown for each file. This is particularly useful when working with photos and media, because key EXIF data, like camera model and aperture value, are easy to locate. Choose View > Preview Options to control what information the Preview pane can show for the kind of file selected.
Quick Actions let you easily manage or edit the selected file.
Use Quick Actions in the Preview pane
With Quick Actions in macOS Mojave, you can take actions on a file without opening an app. Quick Actions appear at the bottom of the Preview pane and vary depending on the kind of file selected.
Rotate an image
Mark up an image or PDF
Combine images and PDFs into a single PDF file
Trim audio and video files
To manage Quick Actions, click More , then choose Customize. macOS Mojave includes a standard set of Quick Actions, but Quick Actions installed by third-party apps also appear here. You can even create your own Quick Actions using Automator.
Use Stacks on your desktop
macOS Mojave introduces Stacks, which lets you automatically organize your desktop into neat stacks of files, so it's easy to keep your desktop tidy and find exactly what you're looking for. Learn more about Stacks.
The sidebar in Finder windows contains shortcuts to AirDrop, commonly used folders, iCloud Drive, devices such your hard drives, and more. Like items in the Dock, items in the sidebar open with just one click.
To change the items in your sidebar, choose Finder > Preferences from the Finder menu bar, then click Sidebar at the top of the preferences window. You can also drag files into or out of the sidebar. Learn more about customizing the sidebar.
Search for files
To search with Spotlight, click the magnifying glass in the menu bar, or press Command–Space bar. Spotlight is similar to Quick Search on iPhone or iPad. Learn more about Spotlight.
To search from a Finder window, use the search field in the corner of the window:
When you select a search result, its location appears at the bottom of the window. To get to this view from Spotlight, choose “Show all in Finder” from the bottom of the Spotlight search results.
In both Spotlight and Finder, you can use advanced searches to narrow your search results.
Delete files
To move a file to the Trash, drag the file to the Trash in the Dock. Or select one or more files and choose File > Move To Trash (Command-Delete).
To remove a file from the Trash, click the Trash to open it, then drag the file out of the Trash. Or select the file and choose File > Put Back.
To delete the files in the Trash, choose File > Empty Trash. The storage space used by those files then becomes available for other files. In macOS Sierra, you can set up your Mac to empty the trash automatically.
Optimized Storage in macOS Sierra and later* can save space by storing your content in iCloud and making it available on demand. When storage space is needed, files, photos, movies, email attachments, and other files that you seldom use are stored in iCloud automatically. Show hidden library folder mac el capitan crack. Each file stays right where you last saved it, and downloads when you open it. Files that you’ve used recently remain on your Mac, along with optimized versions of your photos.
* If you haven't yet upgraded to macOS Sierra or later, learn about other ways to free up storage space.
Find out how much storage is available on your Mac
Choose Apple menu > About This Mac, then click Storage. This is an overview of available storage space on your Mac, as well as the space used by different categories of files:
Click the Manage button to open the Storage Management window, pictured below. (The Manage button is available only in macOS Sierra or later.)
Manage storage on your Mac
The Storage Management window offers recommendations for optimizing your storage. If some recommendations are already turned on, you will see fewer recommendations.
Store in iCloud
Click the Store in iCloud button, then choose from these options:
Desktop and Documents. Store all files from these two locations in iCloud Drive. When storage space is needed, only the files you recently opened are kept on your Mac, so that you can easily work offline. Files stored only in iCloud show a download icon , which you can double-click to download the original file. Learn more about this feature.
Photos. Store all original, full-resolution photos and videos in iCloud Photos. When storage space is needed, only space-saving (optimized) versions of photos are kept on your Mac. To download the original photo or video, just open it.
Messages. Store all messages and attachments in iCloud. When storage space is needed, only the messages and attachments you recently opened are kept on your Mac. Learn more about Messages in iCloud.
Storing files in iCloud uses the storage space in your iCloud storage plan. If you reach or exceed your iCloud storage limit, you can either buy more iCloud storage or make more iCloud storage available. iCloud storage starts at 50GB for $0.99 (USD) a month, and you can purchase additional storage directly from your Apple device. Learn more about prices in your region.
Optimize Storage
Click the Optimize button, then choose from these options.
Automatically remove watched movies and TV shows. When storage space is needed, movies or TV shows that you purchased from the iTunes Store and already watched are removed from your Mac. Click the download icon next to a movie or TV show to download it again.
Download only recent attachments. Mail automatically downloads only the attachments that you recently received. You can manually download any attachments at any time by opening the email or attachment, or saving the attachment to your Mac.
Don't automatically download attachments. Mail downloads an attachment only when you open the email or attachment, or save the attachment to your Mac.
Optimizing storage for movies, TV shows, and email attachments doesn't require iCloud storage space.
Empty Trash Automatically
Empty Trash Automatically permanently deletes files that have been in the Trash for more than 30 days.
How To Find Files On Computer
Reduce Clutter
Reduce Clutter helps you to identify large files and files you might no longer need. Click the Review Files button, then choose any of the file categories in the sidebar, such as Applications, Documents, Music Creation, or Trash.
You can delete the files in some categories directly from this window. Other categories show the total storage space used by the files in each app. You can then open the app and decide whether to delete files from within it.
Learn how to redownload apps, music, movies, TV shows, and books.
Where to find the settings for each feature
The button for each recommendation in the Storage Management window affects one or more settings in other apps. You can also control those settings directly within each app.
Find Files On Rapidshare
If you're using macOS Catalina, choose Apple menu > System Preferences, click Apple ID, then select iCloud in the sidebar: Store in iCloud turns on the Optimize Mac Storage setting on the right. Then click Options next to iCloud Drive: Store in iCloud turns on the Desktop & Documents Folders setting. To turn off iCloud Drive entirely, deselect iCloud Drive.
In macOS Mojave or earlier, choose Apple menu > System Preferences, click iCloud, then click Options next to iCloud Drive. Store in iCloud turns on the Desktop & Documents Folders and Optimize Mac Storage settings.
In Photos, choose Photos > Preferences, then click iCloud. Store in iCloud selects iCloud Photos and Optimize Mac Storage.
In Messages, choose Messages > Preferences, then click iMessage. Store in iCloud selects Enable Messages in iCloud.
If you're using macOS Catalina, open the Apple TV app, choose TV > Preferences from the menu bar, then click Files. Optimize Storage selects “Automatically delete watched movies and TV shows.”
In macOS Mojave or earlier, open iTunes, choose iTunes > Preferences from the menu bar, then click Advanced. Optimize Storage selects “Automatically delete watched movies and TV shows.”
In Mail, choose Mail > Preferences from the menu bar, then click Accounts. In the Account Information section on the right, Optimize Storage sets the Download Attachments menu to either Recent or None.
Empty Trash Automatically: From the Finder, choose Finder > Preferences, then click Advanced. Empty Trash Automatically selects “Remove items from the Trash after 30 days.”
Other ways that macOS helps automatically save space
With macOS Sierra or later, your Mac automatically takes these additional steps to save storage space:
Detects duplicate downloads in Safari, keeping only the most recent version of the download
Reminds you to delete used app installers
Removes old fonts, languages, and dictionaries that aren't being used
Clears caches, logs, and other unnecessary data when storage space is needed
How to free up storage space manually
Even without using the Optimized Storage features of Sierra or later, you can take other steps to make more storage space available:
Music, movies, and other media can use a lot of storage space. Learn how to delete music, movies, and TV shows from your device.
Delete other files that you no longer need by moving them to the Trash, then emptying the Trash. The Downloads folder is good place to look for files that you might no longer need.
Move files to an external storage device.
Compress files.
Delete unneeded email: In the Mail app, choose Mailbox > Erase Junk Mail. If you no longer need the email in your Trash mailbox, choose Mailbox > Erase Deleted Items.

Learn more
Access Library Folder Mac
When you duplicate a file on an APFS-formatted volume, that file doesn't use additional storage space on the volume. Deleting a duplicate file frees up only the space required by any data you might have added to the duplicate. If you no longer need any copies of the file, you can recover all of the storage space by deleting both the duplicate and the original file.
If you're using a pro app and Optimize Mac Storage, learn how to make sure that your projects are always on your Mac and able to access their files.
0 notes
Text
Can You Transfer Iphoto Library To Different Mac

Can You Transfer Iphoto Library To Different Mac Os
Can You Transfer Iphoto Library To Different Mac And Cheese
Can You Transfer Iphoto Library To Different Mac Address
Jan 04, 2020 How to Move Your iTunes Library. You can move your iTunes library to a different folder, computer, or drive. Here's how to do it, even in macOS Catalina, which ditches iTunes for the Music app. Jul 12, 2017 You can also just never convert your new photos library into a system library and just store all your photos locally (or on Dropbox or OneDrive or any other cloud drive). If you’re a Mac owner who’s used iPhoto or another third-party application, Apple’s new app and its iCloud integration will likely appeal to you because it is now OS X. How to safely move your Mac's iPhoto library onto an external drive. By Stephen Robles Saturday, January 24, 2015, 11:00 pm PT (02:00 am ET). You can also upload the iPhoto Library to these.
iPhoto isa photography tool for the home user that can help you organize, edit, and even publish your photographs. After you shoot your photos with a digital camera (or even scan images from original film prints or negatives), you can import them into iPhoto, edit them, and publish them.
Can You Transfer Iphoto Library To Different Mac Os


Here, you can see most of the major controls offered in iPhoto ’11. (Other controls automatically appear when you enter different modes.)
Can You Transfer Iphoto Library To Different Mac And Cheese
Here’s a quick rundown of what you’re looking at when you first launch iPhoto:
Can You Transfer Iphoto Library To Different Mac Address
Source list: This list of image locations determines which photos iPhoto displays.
You can choose to display either your entire image library or just the last set of digital images that you downloaded from your camera.
You can create new albums of your own that appear in the source list; albums make it much easier to organize your photos.
Photos can be grouped by Event (when they were taken), Faces (who appears in the photos), and Places (where photos were taken).
You can view the photos you’ve shared online using Facebook and Flickr (and MobileMe, if you’re already a subscriber).
You can create books, calendars, cards, and slideshows.
Viewer: This pane displays the images from the currently selected photo source.
You can drag or click to select photos in the Viewer for further tricks, such as assigning keywords and image editing.
Full Screen button: Click this button in the upper-right corner of the window to switch to a full-screen display of your photos. In full-screen mode, the Source list disappears, and both images and events appear as thumbnails.
You can double-click a thumbnail to view the image (or the contents, if it’s an event) using your Mac’s entire screen real estate.
Search button: Click the button next to the Search text box to locate photos by specific criteria, or just click in the box and start typing to search by description and title.
Zoom slider: Drag this slider to the left to reduce the size of the thumbnails in the Viewer. This allows you to see more thumbnails at one time, which is a great boon for quick, visual searches. Drag the slider to the right to expand the size of the thumbnails, thereby making it easier to differentiate details between similar photos in the Viewer.
Mac os show hidden library folder. Play Slideshow: Select an event, album, book, or slideshow in the Source list (or multiple images you’ve selected in the Viewer) and click this button to start a full-screen slideshow using those images.
Info button: Click this button to display information on the currently selected photos (or the item selected in the Source list).
Edit button: Click this button to edit the currently selected photos.
Create button: Click this button to add a new blank album, book, calendar, card, or slideshow to your Source list.
If you have more than 50,000 songs, Amazon does let you store up to 250,000 songs for $25 per year — something you just can’t do with Google Play Music or even Apple’s solution.Price: Up to 250 songs for free, up to 250,000 for $25 per yeariTunes Match and Apple MusicRELATED:Apple offers this feature with built into iTunes. This feature will scan your local iTunes library and “match” the songs to songs Apple knows about, giving you access to them on Apple’s servers. Where is my amazon music library stored on my mac download.
Add To button: Click this button to add the currently selected photos to an existing album, slideshow, book, card, or calendar.
Share button: Click this button to share the currently selected photos on Flickr, Facebook, iCloud, and MobileMe. You can also order prints or e-mail the photos.
The toolbar buttons you see depend on which operation you’re performing; for example, you see different toolbar buttons when you’re editing a photo.
0 notes
Text
Where Is My Amazon Music Library Stored On My Mac

Amazon Music Library
Launch My Amazon Music Library
How To DELETE books from my kindle Library: A Complete Easy To Follow Step By Step Guide On How To Delete Books Off Your Kindle in 30 Seconds With Actual 2020.
Amazon.com: my music library. Skip to main content. Try Prime EN Hello, Sign in. Amazon.com Store Card; Amazon Business Card; Amazon.com Corporate Credit Line; Shop with Points; Credit Card Marketplace; Reload Your Balance; Amazon Currency Converter; Let Us Help You. Your Account; Your.
Aug 13, 2017 i can't access my music library. I keep the message that theres no items in this library yet-the player is searching for media files in the backround. I don't understand because I can access all of my music in other user account on my computer, what should I do?
Music that you bought from Amazon is MP3 file which is not encrypted with digital rights management protection. You are allowed to enjoy to Amazon Music on any computer and even transfer them to iTunes without limitation. So, there are two optional methods to transfer Amazon Music to iTunes, one method is to add downloaded Amazon songs to iTunes directly and another is to export Amazon Music to iTunes with Amazon Music App. Please read on to get further instruction.
Don't Miss:Easy and Quick Guide: How to Convert Apple Music to MP3
Don't Miss:How to Rip Music from Spotify as MP3 (320 Kbps)
Part 1. 2 Methods to Transfer Amazon Music to iTunes
Method 1: Add Downloaded Amazon Music to iTunes Directly

Since Amazon Music offers you with offline playback, you can download Amazon Music from web browser and app. Once downloaded the songs that you want, you can import them to iTunes according to the next steps.
Step 1. Open the iTunes app;
Step 2. Select 'Music' from the main interface;
Step 3. Go to 'File' and select 'Add File to Library' from the drop-down menu;
Step 4. Then go the the file or location where you save the downloaded Amazon Music. And select the tracks you want to add confirm. Then all files will be synced to your iTunes library.
Tips: If you can't find your recently added music, try restarting iTunes; if your music is still missing, you may need to update to the latest version of iTunes.
Method 2: Export Amazon Music to iTunes with Amazon Music App
Amazon Music for PC and Mac is an desktop application which lets you enjoy, download and share Amazon Music easily. By taking use of the Amazon Music app, you are able to export Amazon Digital Music downloads to iTunes with simple steps.
Step 1. Download Amazon Music app, then open it and sign in;
Amazon Music Library
Step 2. Open the dropdown menu in the upper right corner of the application window;
Step 3. Select Preferences and scroll to the 'Export Downloads to' section;
Step 4. Choose iTunes so that your downloaded songs will automatically export to iTunes.
Tips: If you don't see the option of exporting to iTunes from the Amazon Music app when you do this on Mac and PC, then exit the app and open iTunes. From iTunes, go to Edit > Preferences > Advanced and select the option to Share iTunes library XML with other applications.
From the two methods, we can know it's not difficult to transfer Amazon Music to iTunes. If you are interested in listening to Amazon Music on iTunes, you can have a try and get more fun!
Part 2. Bonus - Upload iTunes Songs to Amazon Music
Actually, you can upload your music to Amazon Music directly but iTunes songs is not included. Amazon Music supports importing, playing and downloading non-DRM files in MP3 and M4A formats. In addition, Amazon Music supports the import of eligible WMA, OGG, WAV, Apple Lossless, AIFF, and FLAC files where they have rights to provide you access to high-quality 256 kbps MP3 files using variable bitrate encoding from Amazon's Digital Music catalog. However, iTunes songs are M4P format protected by DRM. If we want to upload iTunes songs to Amazon Music, we need a DRM removal tool to strip DRM and convert iTunes songs to MP3 or M4A firstly. Fortunately, TuneFab Apple Music Converter can make this come true.
By taking advantage of the useful converter, we can easily convert M4P to MP3 of high output quality for supporting to upload to Amazon Music. Then follow the next steps to upload.
Note: You are only allowed to upload up to 250 songs to Amazon Music from desktop app for free. Amazon Digital Music purchases do not count towards library limits.
Step 1. From your computer, drag and drop files into the 'Upload' selection in the right sidebar under 'Actions'.
Step 2. At the top of the screen, go to 'My Music' > 'Songs' > 'Offline'.
Step 3. Click the upload icon next to the music you want to upload.
Tips: Click the arrow next to your Amazon ID in the top right of the application window, click 'Preferences', under the 'Automatically import music from' option, choose your preferred folder or location so that you can add music to the Amazon Music app automatically.
The above is all about the method to transfer Amazon Music to iTunes. Try TuneFab Apple Music Converter to convert iTunes songs and then upload songs to Amazon Music if you need.
Launch My Amazon Music Library
0 notes
Text
Show Hidden Library Folder Mac El Capitan

All Mac systems contain hidden files and folders. These are often preceded by a full stop or a slash, and are kept out of sight of the user either to prevent them from being deleted because they perform some essential function, or because they're irrelevant to everyday tasks.
Show Hidden Library Folder Mac El Capitan 7
Show Hidden Library Folder Mac El Capitan 10 11
Mac Os Show Hidden Library Folder
Show Hidden Library Folder Mac El Capitan Crack
Occasionally however, you might need to reveal these files and folders to fix a problem you're having with your Mac. The easiest way to reveal hidden files and folders in an active Finder window is to press the Shift, Command (⌘), and period symbol (.) keys in combination.
Step 1: Open Finder. Step 2: Hold Option (⌥) and Click Go. Step 3: Click Library.
Mar 12, 2015 By default, the /Library folder is hidden on Mac. This is a folder that Apple feels you shouldn’t need access to most of the the time, but occasionally, you may need it for specific things. I use it often to view the preferences for the apps I have installed on my Mac.
Sep 27, 2016 Unhide the Library Folder Permanently If you don’t want to open “Go To Folder” every time you want to access the Library, you can unhide the folder for good. To do this, open Finder, and head to your Home folder.
Jan 12, 2020 Open a Finder window and navigate to your Home folder. From the Finder menu, click View Show View Options. The keyboard shortcut is Command+J. Place a checkmark in the box labeled Show Library Folder.
This action works everywhere except for the Desktop, and you can hide the affected files and folders again simply by repeating the key combo.
If you're comfortable using Terminal, entering the following command will also reveal all the hidden files on your Mac:
defaults write com.apple.finder AppleShowAllFiles YES
Once you've typed the command and pressed Enter, hold down the Option key, then right-click on the Finder icon in the Dock and click Relaunch for the changes to take effect. To switch the files back to hidden, simply change 'YES' to 'NO' in the Terminal command.
That's all there is to it. You can also check out our separate how-to guide on revealing the hidden library folder in macOS.

Just like the Windows operating system, the MacOS operating system has a hidden Library folder full of settings you shouldn’t really touch. Deleting some or all of these settings will at best force you to reinstall certain apps, and at worst, cause the whole system to collapse and require a complete reinstall.
May 01, 2019 The easiest way to reveal hidden files and folders in an active Finder window is to press the Shift, Command (⌘), and period symbol (.) keys in combination. This action works everywhere except for. Dec 20, 2018 In the past with macOS Sierra and El Capitan, I used the Terminal command “chflags nohidden /Library” to make my user library permanently visible. And select View Show View Options then check the box for Show Library Folder. For that reason, Apple decided to hide your user’s Library folder by default in Mac.
But there may be times when accessing the Library folder is necessary. For example, many apps put backups in the Library folder and you may want to back up the backup. Or you might be customising your Mac, which will need access to certain library folders.
Here is how to get there and not cause your Mac to collapse in a cloud of dust in the process.
What Is The Library Folder On MacOS?
The library folder is the area of your MacOS computer where app settings are stored. When you install a program, a folder is created in the Library for all of the essential settings. This can be anything from plugins, preference files and log files.
It’s hidden because basically some people are just plain clumsy and quite often don’t know what they are deleting. It’s only when it’s too late when they realise that something they just deleted should have been kept.
So you could say that Apple is protecting you against your own worst impulses!
How To Find The Hidden Library Folder On MacOS
There are two ways to get to the hidden Library folder if you are confident enough of not triggering a nuclear apocalypse. But the second way is only really feasible when you know where to look.
First Method (The Easiest)
Show Hidden Library Folder Mac El Capitan 7
Go to Finder and drop down the “Go” menu. You’ll see that the Library folder is not listed.
To make the Library folder appear, press the “Alt” key (also known as the Option key) at the bottom left of your keyboard. The Library folder will now appear.
Click on the Library folder option to be taken straight to the folder.
The problem though with this method is that this is very temporary. As soon as you take your finger off the alt key, the Library folder will disappear again.
Second Method (Not Difficult)
Once you know the path to the folder (by following the previous method), you can then use the path to go directly to the Library folder.

At the top of the Library folder, you will see the exact path (location) of the folder on your computer.
I have covered over my username in the screenshot, but the path is :
With that in mind, go back to Finder’s Go menu and at the bottom, you’ll see this option :
Show Hidden Library Folder Mac El Capitan 10 11
Choosing “Go to Folder” will bring up a box where you can type the path to the Library folder. Hitting the “enter” key will then take you straight there.
Even better, until you input the path to a different folder, the path to the Library will remain in the “Go to Folder” box.
Mac Os Show Hidden Library Folder
When it is gone, dropping down the menu arrow on the right hand side will show you a list of previous folders you went to, and the Library one will be there too.
Conclusion
Show Hidden Library Folder Mac El Capitan Crack
There used to be a way to keep the Library folder showing permanently. But as of High Sierra, the Terminal command no longer seems to work.
However, keeping the folder permanently visible isn’t a good idea since you might delete a system-critical file. Besides, as you have just seen, it is not difficult at all to go to the folder when you need it.
1 note
·
View note