
animalcrossingshowdown
Animal Crossing Showdown
An assortment of Animal Crossing related tournaments. "last call" reblogs get deleted the next day after I record the results. Just scroll past the 8 last call reblogs to get to newer polls.
2101 posts
Don't wanna be here? Send us removal request.
Last Seen Blogs

pirateplayground
Pirate! Playground
zakaryasatz
Zakaryas
hs-ts
@msogyny now
mamadoe
Mama Doe's Space
nocturnalbunny3
Nocturnal Wanderer
Text
I don't want to break my at-least-one-drawing-a-month streak, but I'm feeling pretty uninspired so if you guys want to send me villager + outfit combos, I might draw them within the next few days and I'll post them on both @angiestown and @angiestownart
I might do a few quicker doodle-y drawings or I might just pick out one I really like and do a more rendered piece, we'll see how I'm feeling
#I used to draw ac fanart A LOT in the NL era but not so much with NH#also no the outfits don't need to be from the games in fact I'd rather you find something not from the games
17 notes
·
View notes
Text
youtube
someone did the thing I kept saying I wanted to do if I knew how to code
74 notes
·
View notes
Text

I finished that dressup game I said I was working on !! would very appreciate people giving it a go because I spent literally a week on this. like 7 days off work doing nothing but drawing clothes lmao
in order to make the different body types work without ballooning up the file size way more than it already is, I had to make it so you choose your skin tone twice. in meiker you can't arrange the order elements appear in, but I recommend starting with these two options to pick out your body type and skin tone first, since some options look better on certain bodies imo

also !! meiker !! I don't hear people talk about it much, but it's really cool I like it a lot! it's like picrew, but instead of uploading a bunch of pngs, you arrange and label your layers in folders and upload a single psd file. personally I liked the process a lot more than picrew because I'd rather work with one big file than a million tiny image files, but that's just me. plus you can make the images bigger than you can on picrew too
also posting this again since I can attach it to a post with the game, but I made a tutorial on how to create a bunch of colour options super fast if you want to make your own dressup game. there's no way I'd have nearly as many options if I didn't know how to do this. once you understand the actions feature you can do so much stuff so much more efficiently it's insane it's like my favourite photoshop feature
youtube
#okay I PROMISE not to turn this blog into just a place to self promo but this took me a week to make so allow me just this once lmao#plus I feel like there must be a decent overlap between AC fans and dressup enjoyers
205 notes
·
View notes
Text
someone sent in this ask and I spent literal hours putting together this tutorial but then it wouldn't let me post it and when I went back into my inbox the ask was gone?? good thing I copy and pasted it, so here it is in its own post
I'm not sure if this will work with programs other than photoshop, but this is how I do it. I know @shinobi-bacon has a tutorial here on how they do it which is pretty different from the way I do it, so if my tutorial is confusing maybe theirs will click with you better lmao. I stole the greenscreen idea from them anyway
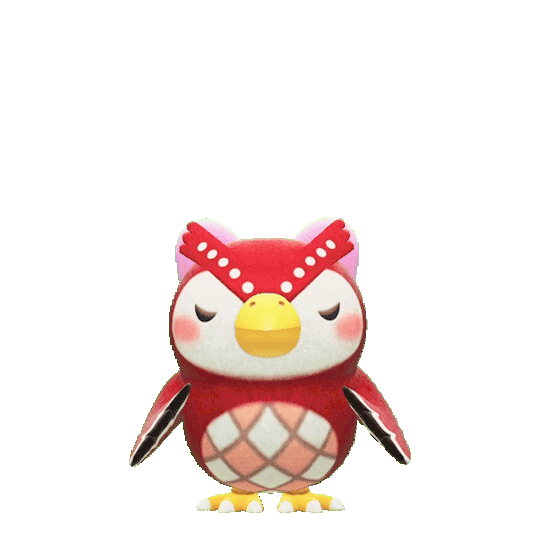
SO FIRST, you want your villager on a green screen background. to do this, go to harv's island and use a custom pattern to make the walls and floors bright green. If the villager you're using has green in their design, you'll have to pick a different colour that isn't in their design, but for most villagers green is fine.
if your villager has every colour on them like pietro or stiches then rip you're gonna have to do some manual editing frame by frame. try to choose a colour that doesn't touch the edges of their silhouette too much in that case because it'll make life easier for you
so once you have them in green purgatory, record them doing their emote or whatever. I just use the built-in screen record function that the switch has. press and hold this button to record the last 30 seconds that your switch displayed:

next send that video to your computer and trim off the start of the video so it starts right before a recognizable part of the animation. for this emote I cut it off right before the blink. if you have a slow computer, you'll probably want to trim the end off too so the video is only a little bit longer than one full animation loop
(you can use the video editing software of your preference, I just use quick time player Edit -> Trim)
okay time for photoshop. go File -> Import -> Video Frames to Layers
for "range to import" select "from beginning to end" (or you could skip the last step about trimming the video and select a range here, but I find it kind of finicky), and make sure "make frame animation" is checked
once imported, if it doesn't pop up on it's own, go Window -> Timeline to get your animation at the bottom

click through those frames at the bottom until you find an easily recognizable frame (I chose the first frame where her eyes are closed) and delete all the frames before it. in the layers panel, the layer from the frame you've selected should be the only one turned on. delete all the layers below it
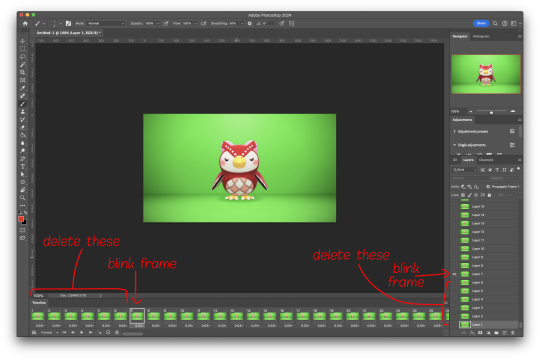
now go through the frames to find the next identical frame. this is where the animation loops. delete that frame and all the frames after it, as well as all of their corresponding layers (note in the picture, frame 121 is selected, and it's exactly the same as the frame from the start of the animation)

hit the play button on the bottom left to double check that it loops properly
next, make sure both THE FIRST FRAME AND BOTTOM LAYER are selected, and crop and reduce the image to your desired size. you can do this step later if you want, it's just that doing it now will reduce the load on your computer and make it run a bit faster. just as long as the first frame and bottom layer are selected, you can do this at any time
SAVE HERE because if you mess up this next part it's a pain to fix, but it's easy to quit and start over if need be
now it's time for my best friend the actions panel !! say hi actions panel !! (Window -> Actions). what the actions panel does is record your steps so you can quickly automate repetitive tasks.
in the actions panel, click the folder and name it whatever you want
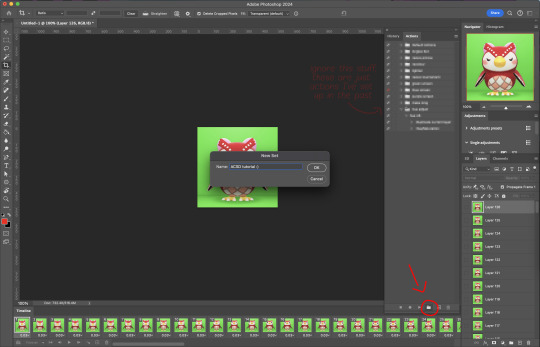
then click the little plus and name that whatever you want and hit record. You'll see the dot turn red to indicate that your actions are now being recorded
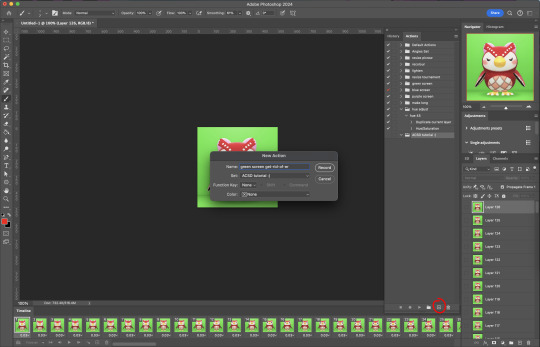
now with the BOTTOM LAYER AND FIRST FRAME selected (ignore that I have the wrong layer selected in the pictures, I fixed it after), go to Select -> Colour Range

click on a part of the canvas that would be green

shift+click on the rest of the green background and adjust the fuzziness until just the character's silhouette remains
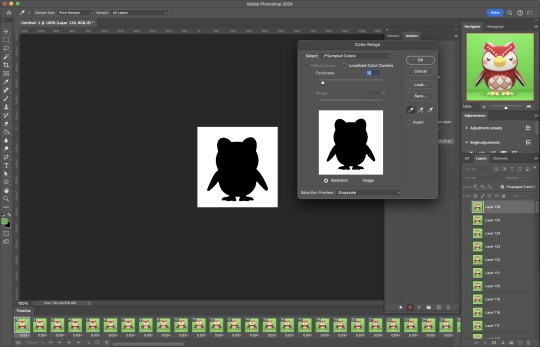
hit OK, now the background should be selected. go Select -> Inverse so that the character is selected, and click on layer mask.
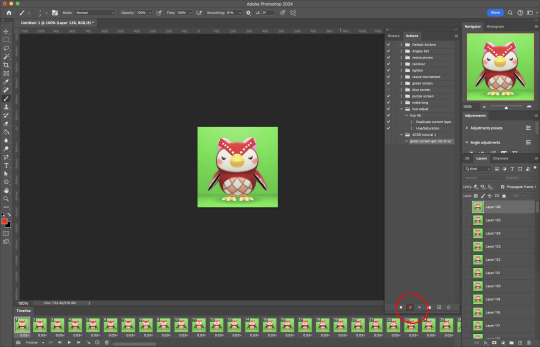
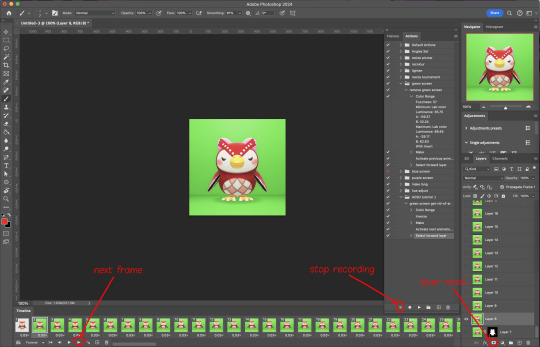
click the next frame button (you MUST click the button, not the actual frame. you need the recording to recognize "go to next frame" and not "select frame 2"),
then keyboard shortcut option + ] to select the next layer up (again, you MUST use the shortcut so it knows to move up one layer and not just "select layer 2"),
and then stop recording.
now just repeatedly click the play button and it will do all those steps we just did for each frame :)

this part is usually where it gets messed up for me. if it did something weird like duplicate the same frame or layer your animation over a static frame, just quit and reopen that save I told you to make earlier. the action recording you just made will still be there when you reopen photoshop, so just select the first frame and bottom layer and repeatedly hit play again. if it STILL doesn't work, you probably did something wrong
the recording is now saved in photoshop forever until you delete it, so you can reuse the recording for other gifs! but if they use a different colour background, you'll need to make a new recording (you can see I have separate ones for blue and purple screens). also if you were working with one of those colourful villagers and parts got masked out that shouldn't have been, you'll have to go frame by frame and manually fix them. that's why we masked out the background instead of deleting it.
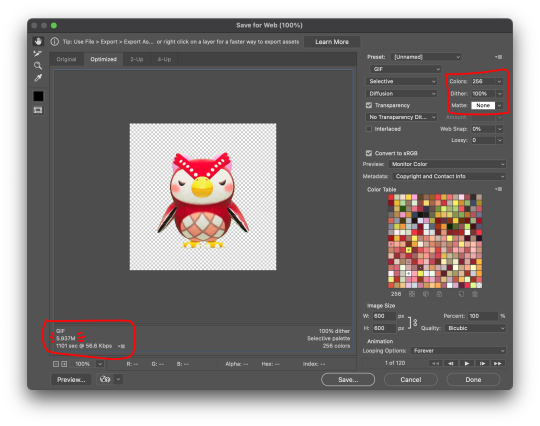
now it's time to make it into a gif! go File -> Export -> Save for Web. make sure Matte is set to "none" so you don't get those weird white flecks. colours and dither you want as high as they can go, but you can lower them if you need to make the file smaller (though I'd recommend resizing the image smaller first). the bottom left shows your file size. currently as of January 2024, tumblr allows gifs of up to 10MB
and there ya go! gif! :)
61 notes
·
View notes
Text
50 notes
·
View notes