
Statistics
We looked inside some of the posts by arieldipo and here's what we found interesting.
Average Info
Notes Per Post
0
Likes Per Post
0
Reblog Per Post
0
Reply Per Post
0
Time Between Posts
9 minutes
Number of Posts By Type
Text
17
Last Seen Tumblr Blogs


Fun Fact
Tumblr is available in 18 languages.
Text


3D design initial ideas:
At first, this project was a mini-class project however due to limited time, the majority of the 3D work was done by myself at home.
I came up with two ideas on what I wanted my product to look like and immediately decided my target clients would be children.
My aim with the planet idea was to educate children on the solar system whilst still making it look fun, in order to influence a liking towards science.
My other idea was a version of a piggy bank that would come across as cute and endearing.
Overall, I decided to go with my planets in solar system idea due to its simplicity but still being a cool idea which I believed would still be popular amongst children.
0 notes
Text


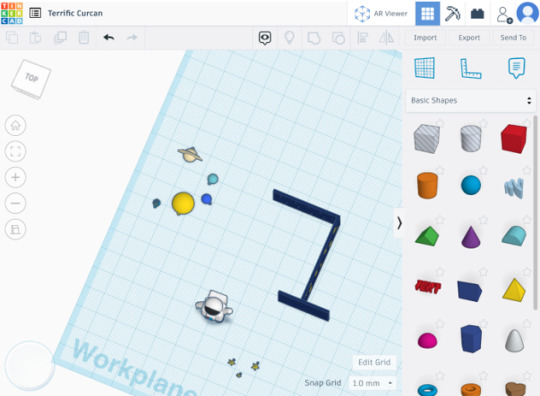
3D design work on TinkerCad:
Due to it being my first time using TinkerCad, I resorted to a tutorial in order to create the astronaut but created everything else myself. I decided to cover the base in stars and put 6 stars that would be hanging from the ‘ceiling’. Here can be shown me slicing all my planets in half in order for it to easily 3D print and then finally laying them down ready for printing. I was quite happy with how it turned out and believed it to be identical to what my sketches portrayed.
0 notes
Text
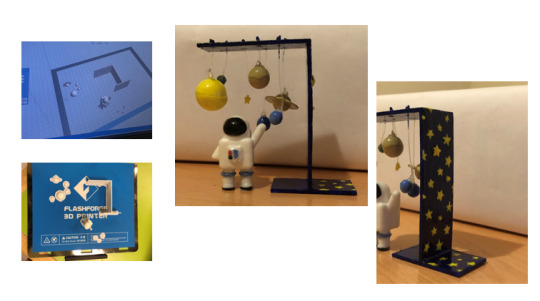
Final 3D model:
Here I shrank the toys to my desired size on FlashPrint. Unfortunately, my school couldn't provide me with any coloured 3D printing filament, therefore the toys remained white. However, I was confident that I could make it work by painting it instead. I painted the toy in acrylic paint, hung my planets using crystal wire, and applied a clear gloss on top. I am personally really happy with the result and have gained an understanding of what to do next to improve, I came across a few obstacles when creating this but believe it to be exactly what I envisioned.
0 notes
Text

The initial ideas for arthritic aid product:
I wanted to make a product for my current A-level project that was inclusive especially towards a medical condition. I looked at a variety of problems a person with arthritis may face with the average item. I chose to create a watering can aid that can be effortlessly used by those with arthritis or with low dexterity. I have chose this because there are not many products on the market that are relatively cheap and assist people with fulfilling their hobbies. Currently, most of the products that are for people with arthritis are simply for reducing the pain rather then assisting with normal activities. Gardening is a fun activity for many and when its harder to participate in a much loved activity due to a disease, it can be heart breaking. I wanted my target customers to continue to feel joy when gardening and be able to look after their plants to the best of their ability regardless of their disease.
0 notes
Text

Cardboard modeling of product:
I am constantly developing my design and looking at different ways to accommodate my client. In the picture above, I can be seen changing how the design looks in order to fit my client's most used watering can, the fixture will hold up the sprout of the watering can and be specific to the watering cans my client uses. The client will simply have to slide it up and down to accommodate each sprout, whilst designing I realised the fixture could look like a tulip - which was perfect for the theme of my design. Fortunately, my design drawings aided with my cardboard models.
0 notes
Text

Product analysis:
For my design I was inspired by the design of stair-climbing sack barrows due to my client having stairs between her kitchen and plants, I wanted my product to tackle the problem of struggling to carry water down the stairs as well as struggling to carry the weight and gripping on to the handle. Therefore, I decided to do some in real-life analysis of my school's site manager's regular 2-wheeled sack barrow.
I noticed that the sack barrow was quite tall (obviously to accommodate the height of the usual user which is a man). Since I am 5’5", I concluded that it would definitely be too tall for my client who is 5’2”. Therefore I knew to make my own product adjustable to accommodate my clients.
I realised that the wheels were too heavy, and the overall sack barrow was too. As a person without arthritis, I believed that it could be very exhausting to drag it around and would take a lot of focus to make sure it is going in the right direction. Therefore, my target audience would definitely struggle to do the same. From this, I gathered my product should be light enough so that it can be tilted with ease but not so much that if the user was not focused they could potentially trip over and fall.
0 notes
Text

Client interview:
This is a page out of my NEA (Non-Exam Assessment) PowerPoint. My client interview was shown to be extremely helpful and informative as this was the research that had actually influenced most of my initial ideas and my final idea for creating a product for arthritis sufferers. I was able to gather information on what problems she faced and what her requirements were. Later interviews after this also helped me with the measurements of the product.
0 notes
Text

Expert Interview:
I was fortunate enough to get some advice and an interview with an expert working in Arthr by emailing them and finally going on a zoom call. They specialise in making products solely for people suffering from arthritis, by focusing on ergonomics but still creating cool and interesting products. All of their products are constantly communicated with the arthritis demographic throughout the design process and even tested and assured by healthcare professionals. My zoom call with Ellen the expert gave me more confidence in my design and encouraged me to continue with my design idea. She also provided me with more products similar to my idea that could help develop my design.
0 notes
Text

House location and inspiration:
As part of my year 12 architectural project, I was told to pick an existing housing location as the house plan. I picked my location due to nearby schooling, hospitals, shops, etc... for the benefit of the 'family' who would be living there.
I used Pinterest for inspiration of how the building should look and after looking through I had liked the idea of a castle-looking house. As can be seen, by my elevations I definitely wanted to keep the turret to make it slightly different from the average house. I also liked the illusions of a house looking like a bunch of houses even though it is one singular building.
0 notes
Text

Architectural floor plans and final model:
I made floor plans for the 3 floors of the family house. Since the Sun is east facing, I wanted to put the living room there as I believed the clients would enjoy some natural sunlight seeping through the living room. I placed the toilet in the north-west direction for all floors of the house. This supported the elimination of waste and toxin’s from one’s body. I made sure to place the kitchen there as I wanted for it to both be close to the dining room but still be next to the garden so that during for example, in the summer the clients could easily access the kitchen after spending extended time in the garden.
When I finally made the the architectural model, I felt extremely unsatisfied and felt as though it looked very messy and did not reflect my vision of the house design.
0 notes
Text


Redesign of the house:
I decided I wanted to redesign the house’s exterior whilst keeping the internal layout as I felt extremely unsatisfied with the previous house. I believed that it lacked coherence and looked aesthetically displeasing. Therefore made I made it my personal mission to recreate it and change the design of the exterior by myself at home. My new model was made by myself at home. I used a 1:200 ratio instead to speed up the process and added features like a pond (made from transparent polypropylene and paper), trees, grass to make it look more seamless.

Since making my new model, I became more confident in this area of design and felt as though I improved. Personally, I am happy with my new model and feel as though it reflects the style I wanted. Regardless of that, I am aware that it lacks tidiness on the little details (e.g. the windows) and am willing to learn and improve from this experience.
0 notes
Text

2D design planning:
I was assigned to make a wooden jewellery box with a design on the top of it for one of my sixth-form projects. I came up with a bunch of designs but eventually decided on my box's design to be based on a scene from a music video and a scene from a childhood show 'Care Bears'.
0 notes
Text


Design on 2D design V2:
For my design, I engraved most of it and cut out the star in the eye and the clouds to give it more dimension. In order to do this, I made sure to make layers.
I have good knowledge and experience of how 2D design works. Therefore, I am very comfortable using a range of tools and can create designs for different contexts.
0 notes
Text


2D design work on wooden jewellery box:
My design work was then laser-cut on birch wood and then stuck onto my wooden box using wood glue. The wooden box I made included a dovetail and mitre joint.
0 notes
Text


Sketching and using watercolours:
I felt inspired to create a photo collage of some nostalgic areas in my hometown in Italy, some being my own photos and other from the internet (due to covid). I first sketched the boxes and the landscapes/buildings. Then on top, I painted using watercolours. I used watercolour techniques such as wet in wet washes to replicate the images the best could.
0 notes
Text

'Save the Turtle' educational board game with brainstorm/client interview/product analysis:
For my GCSE Non-Exam Assessment, I decided to create an educational turtle game to promote sustainability in the context of plastics to young children. I believe that it is important to incorporate a learning factor whilst playing games and thought educating about world issues like the increase in plastic in our oceans would be a good pick.
I also conducted a client interview in order to create the game the best I could and to better understand my demographic's preference for board games.
0 notes
Text


The game design of the 'Save the Turtle' game including the playing cards:
I wanted the shape of the board game to be of a turtle and the shell of the turtle to be hollow in order for the rest of the gaming pieces to be stored underneath. Most of the tiles would be an image of a plastic item (e.g. plastic bag, straw, bottle, etc...) that would lead the user to a playing card that gives them an instruction and 'fun facts' or dare relating to plastic.
0 notes