
Don't wanna be here? Send us removal request.
Statistics
We looked inside some of the posts by as-you-stitch and here's what we found interesting.
Average Info
Notes Per Post
197K
Likes Per Post
111K
Reblog Per Post
86K
Reply Per Post
163
Time Between Posts
9 days
Number of Posts By Type
Text
11
Note
2
Photo
4
Last Seen Tumblr Blogs


Fun Fact
Kazakhstan’s Minister of Communications and Informatics has blocked the Tumblr site because it contained 60 sites of terrorism, extremism, and pornography in 2015.
Text
“Temporary stitches” all stitches are temporary if you have a pair of scissors and aren’t a coward
101K notes
·
View notes
Note
Hello, to start I wanna say I really love your blog!
So I wear a lot of jeans and I also cycle a lot (everyday) which causes my jeans to rip around the crotch area. Do you know a way to mend them as invisible as possible? Thank you!
I'll add some pictures of the last one I ripped.


[ID: three pictures showing a hole surrounded by worn-out fabric at the crotch area of a gray pair of jeans.]
Mending jeans (compilation)
That's absolutely mendable. :) I've done a few posts in the past that may be helpful to you:
Invisible jeans mending:
How to mend holes in the thigh area of jeans
Fixing up thigh holes in jeans
Mending thigh holes in pants
Mending and upcycling jeans
Other jeans mending topics:
Visible mending on a pants' crotch
Mending knee holes in pants
Reinforcing jeans
Broken zipper keyring trick
Mending a belt loop
DIY custom patches
Mending the corner of a pocket
1K notes
·
View notes
Text
Project: taking in trousers
Introduction:
I have a pair of trousers that fit me OK everywhere but the waist. To achieve a perfect fit, the waist needed to lose about 5 centimetres (2 inches).
If you're on Pinterest or TikTok, there's a fair chance you've come across video's like this one:
youtube
This video demonstrates how to use a ladder stitch to take in a pair of pants. While I'm usually wary about quick hack video's like these, this one's actually legit: it's the same technique I used on my own trousers.
The project:
The pants are a basic high-waisted fit made of a cotton/linen blend with a zipper and a button at the top. I decided to take them in at the side seams.

[ID: a pair of black high-waisted trousers lying on a wooden floor.]
I decided to resize these pants in a way that allows me to undo my alteration in the future in case I gain weight.
Lucky for me, these pants have an elastic waist in the back. This gives me some wiggle room in case I mess up or in case my weight fluctuates.
I first put on my pants and measured how much space I needed to lose: 5cm (2 inch). I then drew a dot where the gaping starts at my waist.
I took them off again, and measured 2,5cm (1 inch, half of what I needed) at the side seam. I drew two straight lines to indicate this measurement, then connected them to the mark I made earlier.
I did the same to the other side of my pants.

[ID: two lines drawn in white chalk at the side seam of a black pair of trousers, lining up with both the seam and the pocket.]
I then used a ladder stitch to connect the line I drew to the side seam of the pants. I messed up the alignment of the waistband a bit, but it's fine. I'll hide this later.
The other side looks better, but I chose to show you this side because I want you to know it's okay if you make small mistakes like these. While I might be acutely aware of this misalignment, others won't notice unless I point it out when I wear these pants.

[ID: the side seam of a black pair of trousers, taken in with a ladder stitch. The waistband is slightly misaligned.]
I turned my pants inside-out and went over my new seam with a backstitch to secure it in place.

[ID: a taken in side seam of a black pair of pants as seen from the inside. A threaded needle pokes out of the fabric.]
I then used a thicker thread and embroidered crosses across my new seam. This made my fix look more like a design detail, and helped secure the new seam in place. For some reason the stitching looks wonky in the picture below, but it turned out fine in real life. Especially after I ironed the seam.
I'm afraid I did this alteration at night, so my pictures aren't the best quality.
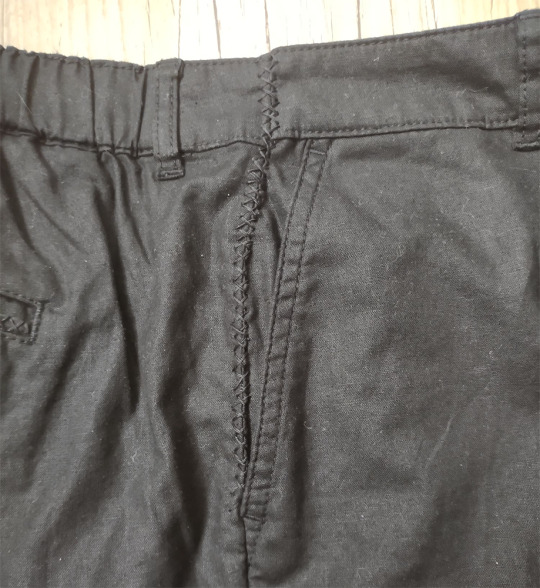
[ID: a taken in side seam with crosses embroidered across the seam.]
I also opened up the back pockets of my pants. While a lot of brands use decorative pockets, some actually have real pockets but baste them shut so the garment looks better when displayed in the shop.
If you weren't aware of this yet, go through your wardrobe and see if you can find any pockets that are sewn shut. Feel free to remove these basting stitches to gain a functional pocket.
And now my trousers are done!

[ID: an altered pair of black high-waisted trousers lying on a wooden floor.]
I plan to add some more cross embroidery in other places to make my alteration blend in better.
If I gain weight in the future, I'll just undo all of my stitches. As I didn't cut any of the fabric, my pants will regain their original fit.
Conclusion:
If you only need to get rid of a little space, this is an easy way to make your trousers fit better. The side seams might get a bit bulky if you do this to pants with thick fabric (denim for example, like in the video above), but as this pair's a thin cotton/linen blend, I barely notice the extra bulk when I wear them.
This is not the only way to take in pants, nor is it the neatest one, but it's fast and easy and it'll hold well if you properly secure your stitching in place.
Remember: your alteration doesn't have to be perfect. It just has to be good enough for you. Alterations like these used to be common place in the past. By comparing our work to the professional machine stitching we find on store-bought clothes, we're just needlessly putting ourselves down. It's great to strive towards improving your skills of course, but don't let it deter you from picking up a needle.
360 notes
·
View notes
Text
Elastic waistband pants
Are you ready to sew your first pair of pants? These elastic waistband pants are a very forgiving project. As the waistband stretches, it's okay if your measurements are a bit off.
The tutorial states these are meant to be pyjama pants, but if you make them out of nice fabric there's no reason why you couldn't wear them outside, too.
You'll have to do a bit of math to draft the pattern, but it's easier than it looks.

(Image source) [ID: drafting instructions for a pair of pants with an elastic waist, as demonstrated on a piece of blue fabric with white dots.]
540 notes
·
View notes
Text
Project: easy wrap pants
Introduction:
I was in need of a new pair of warm weather pants. My requirements were for them to be 1) handmade, 2) cotton or linen, and 3) preferably made from upcycled materials.
While looking for inspiration, I found the following images of a simple but ingenious wrap pants design. I love this type of sewing pattern, so I decided to try it out.

(Image source) [ID: four pictures of a person demonstrating how to put on a pair of wrap pants. First, the front of the pants is tied to the front of the person. Then, the centre of the pants is pulled up through the legs. Finally, the back of the pants is also tied around the person's waist, creating a pair of pants.]

(Image source) [ID: three images of a pair of white wrap pants with a floral print. Image one shows the pants untied and hanging on a wall. Image two shows the fabric for the pants right after cutting. Image three shows the pants while worn.]

(Image source) [ID: two images: the first one is a drawing of the front and back of a pair of wrap pants. The second one is a technical drawing showing how to construct a pair of wrap pants by cutting a U-shape out of two rectangles of fabric and then sewing the U-shaped holes together to form the crotch of the pants.]
The project:
I rarely buy new fabric. I'm at my most creative when I'm limited by what materials I have available, so I usually limit myself to things like thrifted scarves or discarded clothes. This type of pants requires a lot of fabric, so that wasn't an option this time. I still managed to reuse old fabric: a local charity was selling donated fabrics a while ago, and I was lucky enough to find a few metres of green cotton.
It's always advisable to wash your fabric before starting a new project. This went double for this specific fabric as I have no idea of its origins, plus it had a fair amount of stains.

[ID: green folded cotton fabric with pleats lying on top of white bed sheets with a floral print.]
The pattern for this project is really simple: just two rectangles with a U-shape cut out for the crotch, and straps at the sides.
I used these tutorials by Miss_Kreant, Laupre, Instructables, and Mirginie DIY to get a general idea of what measurements to use.
I wanted my pants to be high-waisted, so I ended up going with a height of 40cm for my U-shape. You can go as high or as low as you want. Heck, you could probably go even higher and turn these pants into a jumpsuit. My U was 15 cm wide.
I used my waist circumference + 15cm for the width of both panels as I wanted a large overlap between the sides of the pants when worn. You don't have to use that much if you don't want to. The measurements I've seen in tutorials varied between what I used to 3/4th of your waist. It depends on how much fabric you have on hand and how much skin you want to show.
As for the length, I measured down from my waist to my ankles. You could easily make a pair of wrap shorts by using a shorter length.
If your fabric isn't wide enough to accommodate your measurements, you can always put an extra seam at the centre of your rectangles (the side with the U-shape). It won't be noticeable as this seam will sit between your legs. You could also sew strips of fabric to the sides of your rectangles for additional width, or cut a vertical line down your rectangles and insert your extra fabric there.

[ID: green fabric lying on top of a black and white chequered floor. The fabric has been folded in two at the side. Half a U-shape has been cut at the side.]
If you cut your fabric like this, you end up with two rectangles with a U-shape cut out at the top. That U-shape is the crotch of your pants, so sew both rectangles together along the edges of the U. Leave the other sides alone for now.
I used a French seam because my fabric is prone to fraying. You can use whatever works best for yours.

[ID: two green fabric rectangles lying on top of each other on a black and white chequered floor. A U-shape has been cut out at the top.]
The main construction of the pants is done! Easy, right?
The U-shape is the only seam in these pants. All of the other raw edges are left open and need to be hemmed. I used a double fold hem for mine.

[ID: a green pair of green pants lying on top of a wooden floor. The sides of the pants have been left open and are partly hemmed.]
Once you're done hemming, you need to make straps to tie the pants around your waist with. Pick a length that feels comfortable to you. I made mine long enough to be able to tie a bow.
You could probably forgo the strap tying and use short straps with buttons or snaps instead, if you wanted to.

[ID: a green fabric strap lying on top of a worn-out black surface.]
All that was left to do was to sew the straps onto the sides of the pants. If you plan ahead, you could incorporate them into your top hem for a cleaner finish. I did not plan ahead.

[ID: a pair of green wrap pants with ties at the sides lying unfolded on a wooden floor.]

[ID: a pair of green wrap pants with ties at the sides lying on a wooden floor, folded as if worn.]
All done! They fit well, and are very airy thanks to the open sides. Perfect for summer.
I made my pants wider than necessary: this gives me some wiggle room in case I gain weight, ensuring I'll be able to wear them for a long time to come regardless of how my body changes in the future.
Conclusion:
These are the easiest pants I've ever sewn. No zippers, no buttons, not even elastic, and only one seam! It makes for a great beginner's project and is very versatile.
Play around with different lengths, widths, fabrics, trims, and closures to create different designs.
2K notes
·
View notes
Text


This is my lovely creation, his name is Bean. His main purpose was to refamiliarize myself with a sewing machine but I got overzealous with the planning so: Print-friendly version and bonus pic are under the 'keep reading'


177 notes
·
View notes
Text
I realise that as a gay woman I tend to look for queerness where there maybe isn't queerness HOWEVER...
I was looking for vintage sewing patterns and came across possibly the most QUEER pattern packaging I think I've ever seen from the WW2 era...

Like... just TRY telling me these women aren't hella into each other I DARE YOU!
138 notes
·
View notes
Photo

Baby Possum Plushie Sewing Pattern // 6TinyPumpkins
279 notes
·
View notes
Text
Meet Burger, the prototype for the joltik sewing pattern im making.
If I were to make the pattern a free digital download, would anyone be interested in making one? All I ask is you don't use the pattern or any joltik made from it to sell!
Please LMK in the tags and replies if theres interest, I'm fixing the pattern a little bit before I make it available


Edit: I uploaded a pattern into the reblogs! Check down there for a PDF pattern and an instruction sheet! Its printable onto US legal paper and can be used for felt, fleece, minky, or cotton! I hand sewed mine and I assumed some sewing skills when making the pattern, but anyone is welcome to use it!
1K notes
·
View notes
Text

Hey buddy, you wanna sew your own beasts?
Patterns are perpetually available in the shop! There's a link in my pinned post ✷
4K notes
·
View notes
Photo


Digital Leather Acorn Bag PATTERN // BeardfootCrafting
258 notes
·
View notes
Text


I saw pill bugs on here a few weeks ago and really wanted to make my own! The pattern is a bit rough but I hope it works (I tried to get it perfect for like a week before calling it good enough).
Just print out (or copy from a screen) the first page and cut out the pattern pieces. Hopefully the pictures on page two will help but if not I will do my best to answer any questions!
Hope you enjoy and make your own lil isopod friend!
If anyone makes this, I would love to see pictures 💕
13K notes
·
View notes
Text
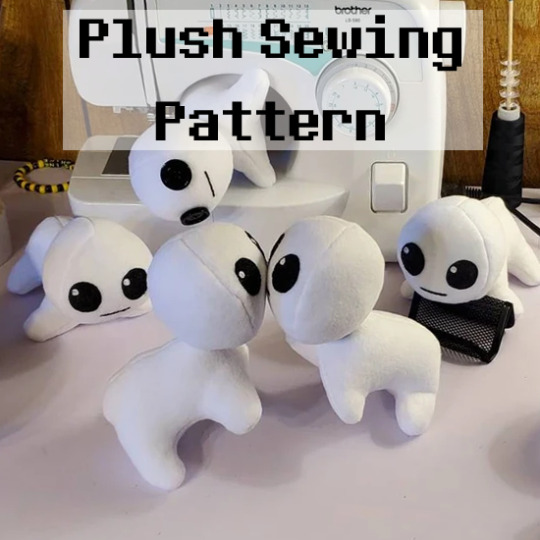

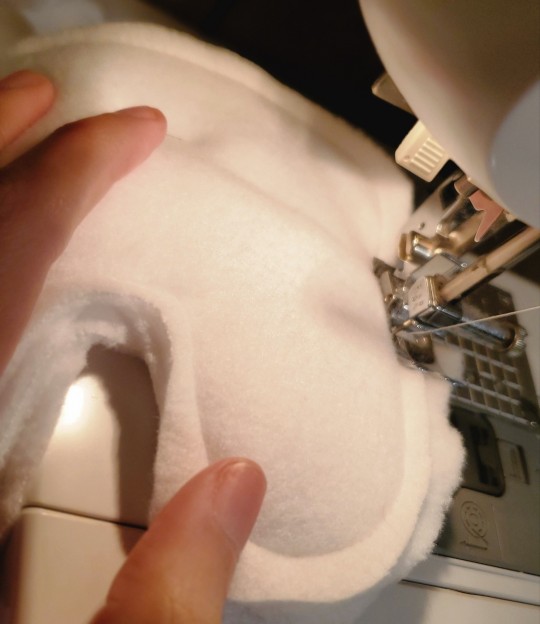
I just released a full tutorial and sewing pattern for my TBH creature plush toy designs! Its got step-by-step instructions, 19 pictures, and my heart in it~!
If you're interested in snagging the PDF for yourself, check it out on my Etsy, or get it for a liiiittle cheaper through my Ko-fi! Yippee!
2K notes
·
View notes
Note
any advice on making capes?
Ooh, I love capes!
Making capes
Types of capes:
There are different types of capes. Let's take a look at a few options.
Rectangle cape: the type of cape American superheroes wear. They consist out of a simple rectangle that can be tied or clasped at the neck. Use gathered fabric for extra fullness. This type of cape won't give you a lot of warmth as it will only cover your back.
Quarter circle cape: slightly more flared than a rectangle cape, but will still only cover your back.
Half circle cape: will cover both your back and shoulders and some of your body, which will give you extra warmth. Great for drama!
Fitted half circle cape: similar to a half circle cape, but made out of three separate pieces to fit around your body better. It won't cover you completely, but it will cover your back, shoulders, and more of your body than a normal half circle cape would.
Full circle cape: this cloak will cover your full body and keep you nice and warm.
Savvy sewists will notice these cape types are similar to circle skirts. The idea's basically the same. Instead of making a skirt, you leave your circle open in the front, and cut a hole that fits your neck rather than your waist.
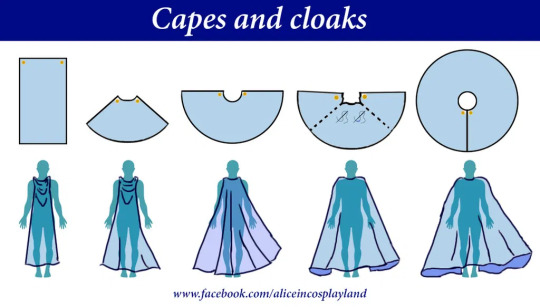
(Image source) [ID: drawing showing five types of coats: rectangle, quarter circle, half circle, half fitted circle, full circle. Text: "Capes and cloaks. www.facebook.com/aliceincosplayland".]
Aside of volume, you can also play around with length. A floor-length cape has a very different effect and function than a cape that reaches your hips, or even a capelet.
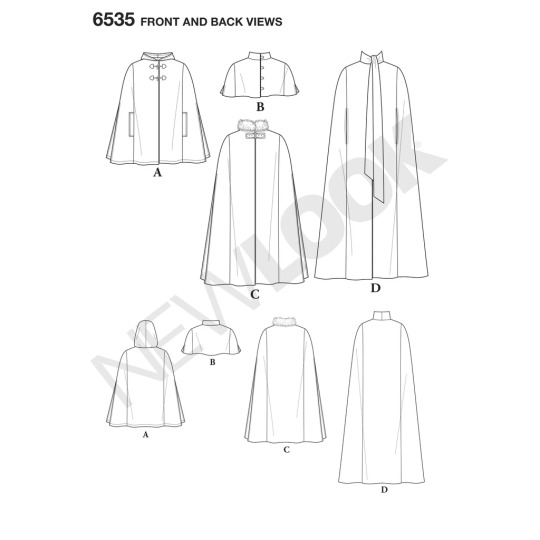
(Image source) [ID: a pattern diagram showing four different cape lengths: floor length, hip length, waist length, and a capelet. Text: "6535 Front and back views. Newlook."]
Details like a hood or armholes can make your cape extra comfortable, and you've got a wide range of options when it comes to fasteners, too.
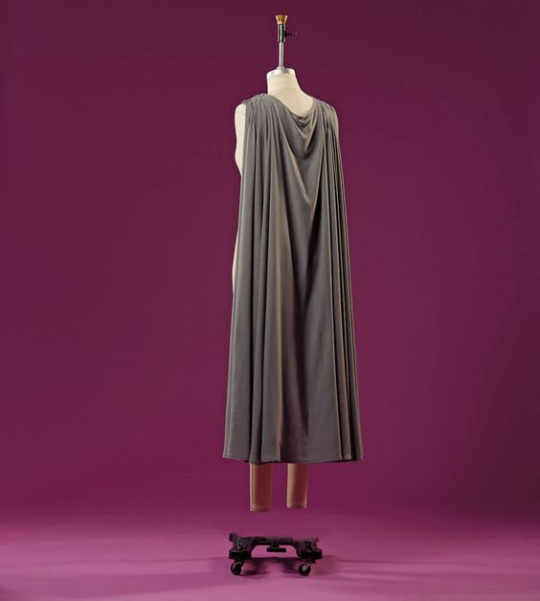
(Image source) [ID: back view of a long gray half circle cape that's been pleated at the shoulders.]
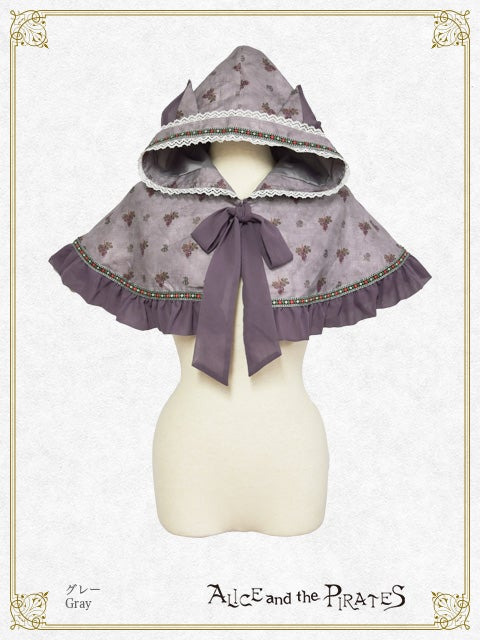
(Image source) [ID: a purple capelet with a hood, frills, cat ears, and lace, tied with a bow at the front. Text: "Gray. Alice and the Pirates."]
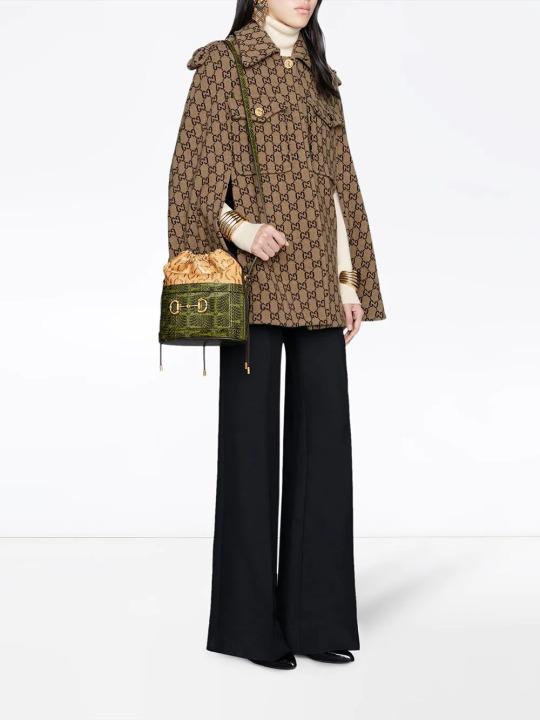
(Image source) [ID: a person wearing a brown monogrammed hip-length cape with front pockets and arm slits at the sides.]
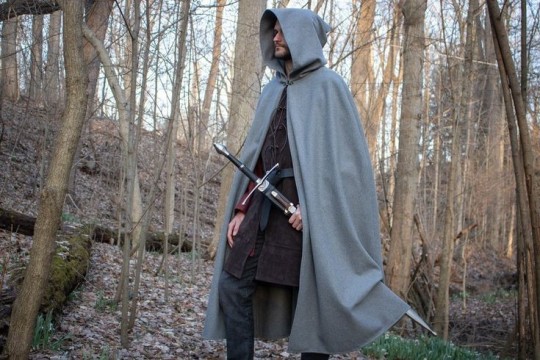
(Image source) [ID: a person wearing a long gray hooded cape, standing in a forest and holding a sword.]
Materials:
Before deciding what fabrics to make your cloak or cape out of, ask yourself what you're trying to achieve first.
Warmth, drape, fabric price, comfort, aesthetic, wearing context,... are some examples of things that can influence your decision.
Some examples:
A cosplay cloak has to look good but doesn't necessarily have to be warm. Choose a fabric that's suitable for your character's outfit, but also keep the circumstances in which you plan to wear your outfit in mind. For example, a warm cloak might pose issues if you do a lot of indoor photo shoots, but convention halls can be pretty chilly.
A fashion cloak intended for winter really does need to be warm! Wool, tweed, and velvet are good options.
A cloak intended for historical re-enactment preferably uses period-accurate materials and therefore won't be lined with fabrics like polyester and such. Which fabric to use depends on the period and region you're working in.
Tutorials and patterns:
Here's a few tutorials/patterns to get you started:
Fitted cloak: winterberry cape (Mood)
How to draft your own hooded cape (The Spruce Crafts)
Pleated half circle cape (Gilian Conahan)
Half circle capelet (Buzzfeed)
Long hooded cloak (Fleece Fun)
Full circle capelet (Project Run and Play)
Four ways to make a cape (WikiHow)
Eight types of capes (Sew Guide)
Half circle fashion cape (Indoor Shannon)
21 free cape sewing patterns (Love Sewing)
Hooded cloak with lining (Online Fabric Store)
Conclusion:
Capes and cloaks make for fun sewing projects. They're pretty easy to make: if you know how to draw circles, you know how to draft a cape pattern.
Capes are a versatile garment, and can range from a great last-minute Halloween costume to an every-day winter cloak. Play around with materials, lengths, shapes, design elements, decoration,... to achieve different effects.
And most of all: have fun with it!
28K notes
·
View notes

Photo

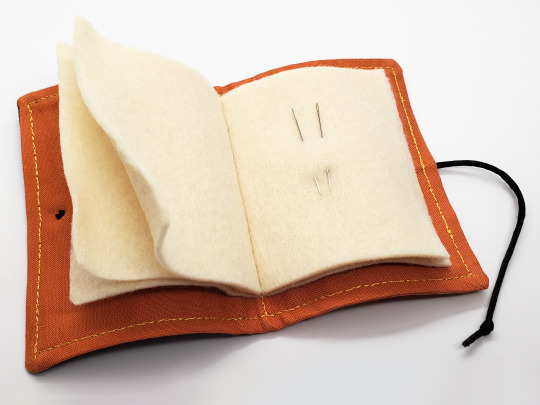
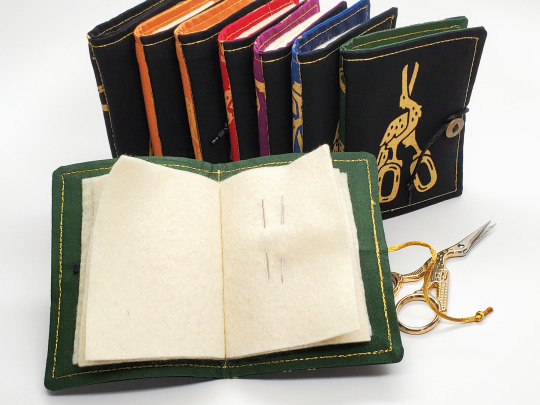

Tiny fabric books to store your stitching needles. There’s a few of these left in the Fireside shop. Each book’s front cover features a hand printed gold stork scissor set on black fabric with a matching repeat pattern version of the motif design on several different solid colors for the back. There’s a small metal button and cord to close and secure the book.
[ID: Four photos showing off small fabric books with felt pages that store needles. First photo shows the cover of a closed book and the second has a book open to show the pages and needles pierced through the felt. The third photo shows a row of several books together - like how you would see on a bookcase - with another open book in the foreground. The last image shows the backs of all those, showing the various colors including red, orange-yellow, black, purple, blue, and green. End]
204 notes
·
View notes
Text
42K notes
·
View notes