
Don't wanna be here? Send us removal request.
Statistics
We looked inside some of the posts by ashwin15blog and here's what we found interesting.
Average Info
Notes Per Post
2
Likes Per Post
2
Reblog Per Post
0
Reply Per Post
0
Time Between Posts
3 days
Number of Posts By Type
Text
2
Last Seen Tumblr Blogs


Fun Fact
US Tumblr user growth rate is estimated to slow down to 4.1%.
Text
React: The Basics
React JS is today's most popular JavaScript library for building User Interfaces, which has created by Facebook. We can build modern, fast Single Page Applications or websites with React. React is so popular in the market and beneficial to know for a Web/Frontend Developer.
Is React JS a Library or a Framework?
This is one of the most unclear subjects of React. Let’s make this clear from the beginning. React is a Library, not a Framework.
What is a Library?
A library in programming can be explained as a collection of codes. We use a library to write code in a much simpler way or to import a feature from it into our project. JQuery is a library for example. We can write JavaScript much simpler by using JQuery, or we can import written JQuery features to our project. The project itself is not dependent on a library.
What is a Framework?
A Framework, on the other hand, is a complete package of code with its own functionalities & libraries. A Framework has its own rules, you don’t have much flexibility and the project is dependent on the Framework you use. Angular is an example of a framework. So React is for building User Interfaces, and how you program the rest of the project is up to you. Like JQuery, you can include React in your project partially, or completely. So React JS a library.
React Virtual DOM
To understand the importance of React Virtual DOM, first, you need to know what DOM (Document Object Model) is. DOM is basically a representation of the HTML code on a webpage. The document is the web page itself, the objects are the HTML tags. And finally, the model of DOM is a tree structure:
The Document Object Model (DOM) is a programming interface for HTML and XML documents. It represents the page so that programs can change the document structure, style, and content. The DOM represents the document as nodes and objects. That way, programming languages can connect to the page.
A Web page is a document. This document can be either displayed in the browser window or as the HTML source. But it is the same document in both cases. The Document Object Model (DOM) represents that same document so it can be manipulated. The DOM is an object-oriented representation of the web page, which can be modified with a scripting language such as JavaScript.
What is the benefit of Virtual DOM?
Each time you make a change in the code, DOM will be completely updated and rewritten. This is an expensive operation and consumes lots of time. In this point, React provides a solution: The Virtual DOM.
So when something changes:
React first creates an exact copy of the DOM
Then React figures out which part is new and only updates that specific part in the Virtual DOM
Finally, React copies only the new parts of the Virtual DOM to the actual DOM, rather than completely rewriting it.
This approach makes a webpage much faster than a standard webpage. That’s also one of the reasons why React is so popular.
So what is this JSX?
JSX (JavaScript XML) is a syntax extension to JavaScript used by React. JSX is basically used to write HTML tags inside JavaScript. Later, the JSX code will be translated into normal JavaScript, by Babel.
In summary, React doesn’t have HTML files, HTML tags are rendered directly inside JavaScript. This approach makes React faster.
What is a React Component?
A component is an independent, reusable code block, which divides the UI into smaller pieces. In other words, we can think of components as LEGO blocks. Likewise, we create a LEGO structure from many little LEGO blocks, we create a webpage or UI from many little code blocks (components).
We don’t really want to have thousands of lines of code together in one single file. Maintenance of the code gets more and more complex as the project gets bigger. In this point, dividing the source code into components helps us a lot. Each component has its own JS and CSS code, they are reusable, easier to read, write and test. In web development, as the reasons I explained above, it’s beneficial to use component-based technologies, and React JS is one of them.
React has 2 types of components: Functional (Stateless) and Class (Stateful).
Functional (Stateless) Components
A functional component is basically a JavaScript (or ES6) function which returns a React element. According to React official docs, the function below is a valid React component:
function Welcome(props) {
return <h1>Hello, {props.name}</h1>;
}
IMPORTANT: Functional components are also known as stateless components
So a React Functional Component:
Is a JavaScript / ES6 function
Must return a React element
Take props as a parameter if necessary
Class (Stateful) Components
Class components are ES6 classes. They are more complex than functional components including constructors, life-cycle methods, render( ) function and state (data) management. In the example below, we can see how a simple class component looks like:
import React, { Component } from 'react';
class ParentComponent extends Component {
render() {
return <h1>I'm the parent component.</h1>;
}
}
export default ParentComponent;
So, a React class component:
It is an ES6 class, will be a component once it ‘extends’ React component.
Can accept props (in the constructor) if needed
Can maintain its own data with state
Must have a render( ) method which returns a React element (JSX) or null
Props
Let’s start by defining Component’s props (obviously short for properties) in React. Props are used to customize Component when it’s being created and give it different parameters.
import React, {Component} from 'react'
class Topic extends Component {
render{
return(
<div>
{this.props.name}
</div>
)
}
}
One of the most important features of props is that they can be passed by a parent component to its child components. This allows us to create a component that can be customized with a new set of props every time we use it.
import React, {Component} from 'react'
class Welcome extends Component {
render{
return(
<div>
<p> Welcome to React, today you will learn: </p>
<Topic name="Props"/>
<Topic name="State"/>
</div>
)
}}
Props are passed to the component and are fixed throughout its lifecycle. But there are cases when we want to use data that we know is going to change over time. In this case, we use something called state.
State
Unlike props, the state is a private feature and it strictly belongs to a single Component. The state allows React components to dynamically change output over time in response to certain events.
Component’s state is initialized inside a constructor:
class Counter extends Component{
constructor(props){
super(props);
this.state = {counter: 0}
}
render(){
return(
<p>{this.state.counter}</p>
)
}
And can be changed later using inbuilt setState() function
class Counter extends Component{
constructor(props){
super(props);
this.state = {counter: 0}
this.increment = this.increment.bind(this);
}
increment(){
this.setState({counter: this.state.counter + 1})
}
render(){
return(
<button onClick={this.increment}>Like</button>
<p>{this.state.counter}</p>
)
}
Lifecycle of Components
Each component in React has a lifecycle that you can monitor and manipulate during its three main phases.
The three phases are Mounting, Updating, and Unmounting.
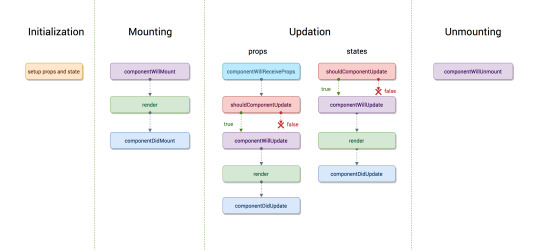
Common React Lifecycle Methods
render()
componentDidMount()
componentDidUpdate()
componentWillUnmount()
render()
The render() method is the most used lifecycle method. You will see it in all React classes. This is because render() is the only required method within a class component in React. As the name suggests it handles the rendering of your component to the UI. It happens during the mounting and updating of your component.
componentDidMount()
Now your component has been mounted and ready, that’s when the next React lifecycle method componentDidMount() comes in play. componentDidMount() is called as soon as the component is mounted and ready. This is a good place to initiate API calls if you need to load data from a remote endpoint.
componentDidUpdate()
This lifecycle method is invoked as soon as the updating happens. The most common use case for the componentDidUpdate() method is updating the DOM in response to prop or state changes. You can call setState() in this lifecycle, but keep in mind that you will need to wrap it in a condition to check for state or prop changes from the previous state. Incorrect usage of setState() can lead to an infinite loop.
componentWillUnmount()
As the name suggests this lifecycle method is called just before the component is unmounted and destroyed. If there are any cleanup actions that you would need to do, this would be the right spot.
Routing
Routing is a key aspect of web applications (and even other platforms) that could not be left out in React. We can make full-fleshed single-page applications with React if we harness the powers of routing. This does not have to be a manual process, we can make use of React-Router.
Switch
Switch component helps us to render the components only when path matches otherwise it fallbacks to the not found component.
<Switch>
<Route exact path="/" component={App} />
<Route path="/users" component={Users} />
<Route path="/contact" component={Contact} />
<Route component={Notfound} />
</Switch>
Browser Router
A <Router> that uses the HTML5 history API (pushState, replaceState, and the popstate event) to keep your UI in sync with the URL.
<BrowserRouter
basename={optionalString}
forceRefresh={optionalBool}
getUserConfirmation={optionalFunc}
keyLength={optionalNumber}>
<App />
</BrowserRouter>
Go through this link for better understanding of Routes: Getting started with React Router
Handling Events
Handling events with React elements is very similar to handling events on DOM elements. There are some syntactic differences:
React events are named using camelCase, rather than lowercase.
With JSX you pass a function as the event handler, rather than a string
<button onClick={activateLasers}></button>
Named Export vs Default Export in ES6
Named Export: (export)
With named exports, one can have multiple named exports per file. Then import the specific exports they want to be surrounded in braces. The name of the imported module has to be the same as the name of the exported module.
// imports
// ex. importing a single named export
import { MyComponent } from "./MyComponent";
// ex. importing multiple named exports
import { MyComponent, MyComponent2 } from "./MyComponent";
// ex. giving a named import a different name by using "as":
import { MyComponent2 as MyNewComponent } from "./MyComponent";
// exports from ./MyComponent.js file
export const MyComponent = () => {}
export const MyComponent2 = () => {}
Default Export: (export default)
One can have only one default export per file. When we import we have to specify a name and import like:
// import
import MyDefaultComponent from "./MyDefaultExport";
// export
const MyComponent = () => {}
export default MyComponent;
Getting Started:
You can just run the create-react-app on the command line, followed by the name of the app you want to create. This creates the react app, with all the necessary functionality you need, already built into the app. Then you can just cd into the react app and start it with npm start.
Command: create-react-app my-app
Basic Structure
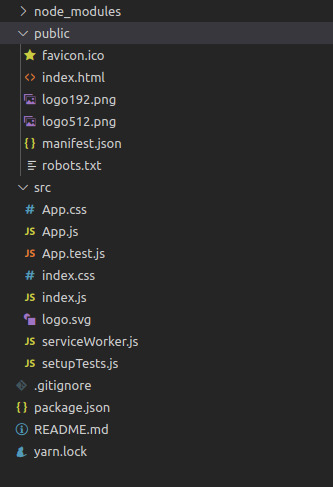
node_modules is where packages installed by NPM or Yarn will reside.
src is where your dynamic files reside. If the file is imported by your JavaScript application or changes contents, put it here.
public is where your static files reside.
0 notes
Text
Ruby on Rails - The Basics
In this article, we will see the major concepts and basic structure of the rails framework.
Rails is a web application development framework written in the Ruby programming language. It is designed to make programming web applications easier by making assumptions about what every developer needs to get started. It allows you to write less code while accomplishing more than many other languages and frameworks.
The Rails philosophy includes two major guiding principles:
Don't Repeat Yourself: DRY is a principle of software development which states that "Every piece of knowledge must have a single, unambiguous, authoritative representation within a system." By not writing the same information over and over again, our code is more maintainable, more extensible, and less buggy.
Here is a basic design pattern which demonstrates how we can achieve this:-
For the purpose of reusability and keeping the controllers sleek we create services. Mostly services handles the particular task and provide the end response to the controllers
For the purpose of keeping the models sleek and reusable we create concerns
It’s best if we do not write ruby code in the view files but in case we need to then we will take the help of helpers and we tend to write such functions those can be used on multiple places
Create a common controller which is inherited by other controllers with the name application controller and which inherits its properties from action controller
Convention Over Configuration: Rails has opinions about the best way to do many things in a web application. If you follow the conventions defined by the rails framework then the development would be very fast instead of updating the configuration of the framework according to you.
Here are some examples how rails achieve this :-
If we have a table with name users then we will create a model file with name user.rb in models folder
If the request goes to users controller and index function then the view file will be present in views > users with the index.html.erb or index.html.haml
Let’s first see the structure of rails application
When you create new rails application with the command
rails new <app-name>
You will get a predefined folder structure of the rails framework. Let's discuss the most used folders of the framework and their purpose
app − It organizes your application components. It's got subdirectories that hold the view (views and helpers), controller (controllers), and the backend business logic (models).
app/controllers − The controllers subdirectory is where Rails looks to find the controller classes. A controller handles a web request from the user.
Note - Ideally your controller should not be used for writing any major code, it is just used for the handling of the requests
app/helpers − The helpers subdirectory holds any helper classes used to assist the model, view, and controller classes. This helps to keep the model, view, and controller code small, focused, and uncluttered.
app/models − The models subdirectory holds the classes that model and wrap the data stored in our application's database. In most frameworks, this part of the application can grow pretty messy, tedious, verbose, and error-prone. Rails makes it dead simple!
app/view − The views subdirectory holds the display templates to fill in with data from our application, convert to HTML, and return to the user's browser.
app/view/layouts − Holds the template files for layouts to be used with views. This models the common header/footer method of wrapping views. In your views, define a layout using the <tt>layout:default</tt> and create a file named default.html.erb. Inside default.html.erb, call <% yield %> to render the view using this layout.
components − This directory holds components, tiny self-contained applications that bundle model, view, and controller.
config − This directory contains the small amount of configuration code that your application will need, including your database configuration (in database.yml), your Rails environment structure (environment.rb), and routing of incoming web requests (routes.rb). You can also tailor the behavior of the three Rails environments for test, development, and deployment with files found in the environments directory.
db − Usually, your Rails application will have model objects that access relational database tables. You can manage the relational database with scripts you create and place in this directory.
db/migration - Contains the migration files
db/schema.rb - Schema of whole application
db/seed.rb - Seed data for the application
doc − Ruby has a framework, called RubyDoc, that can automatically generate documentation for code you create. You can assist RubyDoc with comments in your code. This directory holds all the RubyDoc-generated Rails and application documentation.
lib − You'll put libraries here, unless they explicitly belong elsewhere (such as vendor libraries).
log − Error logs go here. Rails creates scripts that help you manage various error logs. You'll find separate logs for the server (server.log) and each Rails environment (development.log, test.log, and production.log).
public − Like the public directory for a web server, this directory has web files that don't change, such as JavaScript files (public/javascripts), graphics (public/images), stylesheets (public/stylesheets), and HTML files (public).
script − This directory holds scripts to launch and manage the various tools that you'll use with Rails. For example, there are scripts to generate code (generate) and launch the web server (server).
test − The tests you write and those that Rails creates for you, all goes here. You'll see a subdirectory for mocks (mocks), unit tests (unit), fixtures (fixtures), and functional tests (functional)
tmp − Rails uses this directory to hold temporary files for intermediate processing.
vendor − Libraries provided by third-party vendors (such as security libraries or database utilities beyond the basic Rails distribution) go here
Apart from this there are some important files
Gemfile - Here we will define the third party dependencies needed by the system
Gemfile.lock - Lock file of dependencies
Request Lifecycle
For each request we will create a route in route.rb or in routes > web.rb in new rails applications which is placed in the config folder. From here we route our request to particular controller and it’s method. There we will handle that request.
If database interaction is needed then it will call model methods and get the data and render the view, otherwise directly render the view file.

Now let’s discuss main features of rails framework
Active Record - Active Record is the M in MVC - the model - which is the layer of the system responsible for representing business data and logic. Active Record facilitates the creation and use of business objects whose data requires persistent storage to a database. It is an implementation of the Active Record pattern which itself is a description of an Object Relational Mapping system.
Object Relational Mapping - Commonly referred to as its abbreviation ORM, is a technique that connects the rich objects of an application to tables in a relational database management system. Using ORM, the properties and relationships of the objects in an application can be easily stored and retrieved from a database without writing SQL statements directly and with less overall database access code.
Migration - Rails provides a domain-specific language for managing a database schema called migrations. Migrations are stored in files which are executed against any database that Active Record supports using rake.
Basically we create and update database structure in rails with the help of migrations. There are some other benefits like we do not have to share any structure change to the team members, it automatically handles that.
Associations - In Rails, an association is a connection between two Active Record models. Why do we need associations between models? Because they make common operations simpler and easier in your code.
Rails supports six types of associations:
belongs_to - A belongs_to association sets up a one-to-one connection with another model, such that each instance of the declaring model "belongs to" one instance of the other model. For example, if your application includes authors and books, and each book can be assigned to exactly one author
has_one - A has_one association also sets up a one-to-one connection with another model, but with somewhat different semantics (and consequences). This association indicates that each instance of a model contains or possesses one instance of another model. For example, if each supplier in your application has only one account
has_many - A has_many association indicates a one-to-many connection with another model. You'll often find this association on the "other side" of a belongs_to association. This association indicates that each instance of the model has zero or more instances of another model. For example, in an application containing authors and books
has_many :through - A has_many :through association is often used to set up a many-to-many connections with another model. This association indicates that the declaring model can be matched with zero or more instances of another model by proceeding through a third model. For example, consider a medical practice where patients make appointments to see physicians.
has_one :through - A has_one :through association sets up a one-to-one connection with another model. This association indicates that the declaring model can be matched with one instance of another model by proceeding through a third model. For example, if each supplier has one account, and each account is associated with one account history
has_and_belongs_to_many - A has_and_belongs_to_many association creates a direct many-to-many connections with another model, with no intervening model. For example, if your application includes assemblies and parts, with each assembly having many parts and each part appearing in many assemblies
2 notes
·
View notes