
Statistics
We looked inside some of the posts by asmediablog-advikarora and here's what we found interesting.
Average Info
Notes Per Post
2
Likes Per Post
2
Reblog Per Post
0
Reply Per Post
0
Time Between Posts
18 days
Number of Posts By Type
Text
17
Last Seen Tumblr Blogs


Fun Fact
The KCSC sent more than 20K requests to delete posts related to prostitution and porn to Tumblr from January to June 2017.
Text
Final links
Opening foundation portfolio link:-
https://drive.google.com/file/d/19iG9SMgRnlrhS1OKRXEZIKSjagT35Pq_/view?usp=sharing
CCR question 1 and 2:-
https://drive.google.com/file/d/16O28kyEuURuGFUwe0hAH6yLqETtLAa6S/view?usp=sharing
CCR question 3 and 4:-
https://docs.google.com/presentation/d/1PW2aOvLNcA-1mRWqa8rwc418KiiHqFPIJNMhT8_hmFs/edit?usp=sharing
0 notes
Text
Source files
Media Studies Blog source files(Clickable)
Media Studies foundation portfolio sound source files(Clickable)
0 notes
Text
Week 19- Editing of our foundation portfolio
Day 1
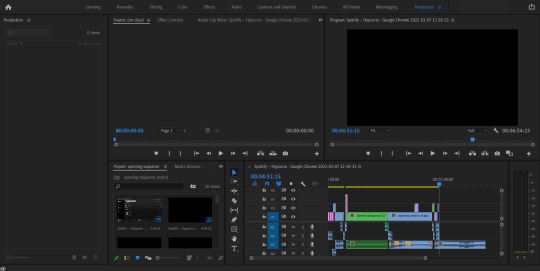
On Day 1, we started our foundation portfolio’s editing. Our entire foundation portfolio was edited on Premiere Pro. During production, I had noted the final take’s source number saved on the camera, so that during post-production I would be able to save time in importing the source files. At the first and final cut stage of editing, I changed a certain amount of shots that signify more meaning.

Before the opening credits
There was this mid-close up shot of our main character struggling to open the rope and the moment he shakes his shoulder, I cut it to a long shot of him sitting on a chair and still struggling even though we had never shot a mid-close up shot, in post, I just increased the scale of the long shot and made it a mid-close up shot. I simply did this because the entire long shot had the rule of third used with the character being with more negative spacing and less positive spacing, so by shifting from the mid-close up to the long shot more positive spacing (the space in front of him) was created suggesting that the character has almost managed to untie the rope. After these shots, a short opening credits came, I have given a detailed breakdown ahead.
Opening credits breakdown(Clickable)

Firstly, the software that I used for the opening credits was Adobe After Effects. The font that I used for the title was Action Now from Fontspace(clickable). The reason why I particularly chose this font was because of it’s in built grudge effect which in a way suggests that the film has a lot of action because a grudge means roughness. Ideally, when a human eye looks at a plain, for instance, arial font text doesn’t have any sort of roughness to it, it’s just smooth in nature.

I downloaded the text as a portable network graphics file with a white font color for the the upper title of the time seeker and a red font color, as red signifies danger, action and rage suiting the genre of our film, for the lower title. White signifies peace, tranquility and happiness, but because our film has violence, I kept white but used a rough textured image, positioned it on top of the text files and the background color, and then later changed the blending mode of the image to screen from normal creating that extra grudge effect on the overall frame.

For the text animation, I just played with the position of the the text file and added a motion blur to it. For the camera animations, I am again just playing with the position and scale of the compositions along with a motion blur. Motion blur adds that natural blur that occurs when an object moves in a fast speed, it helps the animation look more realistic. I mainly keyframed the motion of the text and the camera for less than a minute, meaning that the text will move in less than a second, moreover I also played with the graphs of the keyframe by slowing the speed of the motions of the text and the camera animations initially, then increasing it again. The purpose of this type of this fast paced credit scene is too show the contrast between the speeds of the scenes before it and the text animation. The scenes before the text animation are very slow paced, but the text animation is very fast paced helping us to grab the viewer’s attention again and in a way exciting them.

After the opening credits
Moreover, after the text animation, there is an extreme close up shot and point of view (with a 15 percent camera blur) shot which I kept on cutting again and again with a black fade in and out transition to help the audience understand the character’s vision. The significance of that camera blur is that when someone wakes up in the morning, that person’s vision remains blurry for a couple of seconds after coming back to normal, so because the character had a cloth wrapped around his eyes and because his vision was blocked for a long time, I put a camera blur on all the point of view shots only.

During pre-production and production, we had written 6 scenes and even shot 6 scenes, however, our opening could only include till the 4th scene. We wanted the time seeker (our foundation portfolio) to be a slow paced film with less cuts because it gives that freighting feeling to the audience and also makes them curious of what is about to come next, so I used more cut on actions, insert cuts and standard cuts instead of jump cuts because going ahead in time and cutting the character’s action forward in time would ruin that suspense. There was this long shot of Armaan running in the kidnapping room shot one from outside the kidnapping room and the other long shot inside the kidnapping room. So in editing, by matching Armaan’s action of him opening the door in the both the clips at the same time allowed me to cut between them creating a cut on action. There was one more long shot of Armaan hiding outside the kidnapping room and waiting for the kidnapper, and we had also shot of point of view of the kidnapper walking towards the room, so in post what I did is at the very last moment of Armaan hitting the kidnapper with an iron rod in both the shots, I cut to the point of view shot only showing Armaan hitting the kidnapper nothing else making it a small insert cut.
Day 2(Clickable)
On Day 2, we initially started with the sound designing and mixing. Sound mixing is basically arranging all the foley sounds, pilot sounds, and the background music in a way that makes it go in sync with each other, for instance, if Armaan is speaking his dialogue then the background music or other foley sounds such as traffic noises should be lowered. Through out our opening we only used two foley sounds; one where Armaan’s kidnapper is walking so we needed the footsteps sounds and second where Armaan’s kidnapper is talking on the phone.

Essentially, for the opening credits’ soundtrack I used two different tracks and put them on top of each other so that they can blend well. So for the first track, I used a clock ticking sound effect, and for the second track I used a suspenseful fast tracked music. The reason why I did this is because the title has the word “TIME” in it, hence the clocking ticking and the suspenseful fast tracked music because of the word “SEEKER” which means a person searching for something so that music track technically suggests a panicky effect.
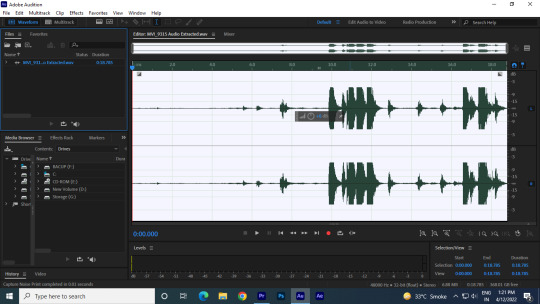
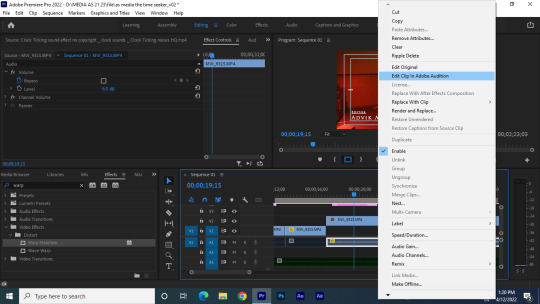
Additionally, I used Adobe Audition for denoising the entire pilot sounds because we majorly used pilot sounds so it was very important for them to be clear. I selected all the pilot audio tracks in premiere pro, right clicked on them, and then selected the option edit with Adobe Audition. In Adobe Audition, I basically imported an audio track, captured a point under the noise reduction tab located in the effects tab where the noise can be heard the most, then selected the entire audio track by Ctrl+A, then went to noise reduction(process) again under the noise reduction tab located in the effects tab, and then finally let Adobe Audition do the work. Through Adobe’s dynamic link, whatever I save in Adobe Audition gets saved in Adobe Premiere Pro.

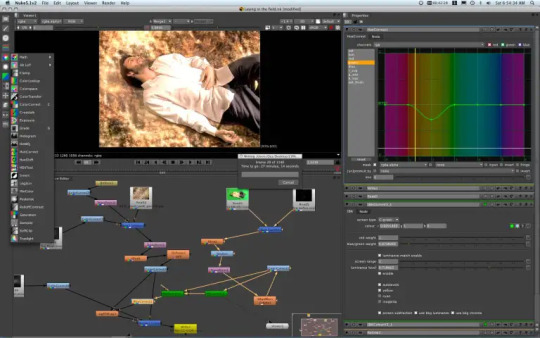
Before starting the color grading of our foundation portfolio, I did some research about Joker, because we were hugely inspired by Joker’s color grading and editing and we thought that would be a perfect example for the way we want our film to look expect that Joker’s color palette had more greens where as our film’s color palette has more reds and blues.

It was very important for me to discuss the color palette once again with the cinematographer and the director, so they sat with me during the color grading session and express their opinions throughout. Inside the kidnapping room, I maintained a more warmth and reddish feeling as warm colors usually create heat helping the audience understand the overall temperature, whereas outside the kidnapping room, I used more blues and cooler colors instead of the same colors helping the audience understand that there is a contrast of temperature or feel between the two rooms. Moreover, in order to maintain the spotlight on Armaan, we designed Armaan’s costume in such a way that the colors of the costume don't blend in with the lighting of our sets. For the costume we decided to use white and black simply because they are such colors that always stand out in the color palette because they are unpleasant to the eye yet the most attractive ones that helped us to maintain the spotlight on Armaan in that kidnapping scene.

So in post, it became very easy for me and I just had to maintain that white color on Armaan’s costume and just play around with the other colors. It was quite a challenge maintaining the white color because there was red lighting right next that was reflecting on Armaan, so initially in the basic color correction, I tried increasing the whites, the contrast, the exposure and I reduced the blacks and the highlights only for the scenes inside the kidnapping rooms. In the other sections of color grading, I tried reducing the reds overall helping Armaan’s costume to stand out inside the kidnapping room scenes. Outside the kidnapping, the lighting in the corridors for when we shot those scenes were white, so in post, under the basic correction, I reduced the whites, the exposure, and the highlights and I increased the blacks, the temperature to blue and the contrast. In the other sections, I overall tried reducing the greens, the reds, and increased the blues creating that cooling effect.

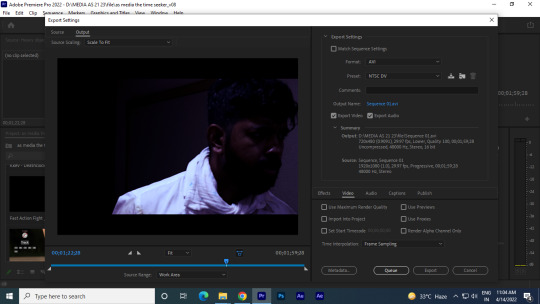
At the final stage of editing that is exporting our opening, I exported the file in a 1980 by 1080 ratio with a high bitrate video source.

It was a tiring, but a productive week. Finally, our opening was ready, and we could achieve the look that we all desired for by applying all the skills and techniques we learnt through out this academic year.
-Advik Arora
0 notes
Text
Week 18-Shoot week of our foundation portfolio
We had divided our entire shoot into two days with day 1 having scene 1,3,4, and 6, and day 2 having scene 2 and 5. Fortunately, we went according to our schedule that we made in pre-production and finish the shooting on time.
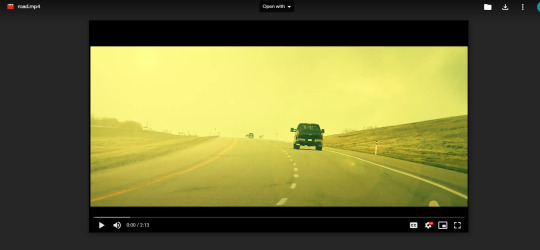
youtube
As we were a crew of 3 people, we had to multitask so our director did the make-up and the blood stains for our actors. We got the ingredients from our respective houses and made it through this YouTube tutorial.(Clickable)
youtube
Behind the scenes of our Day 1 shoot
Editors often don’t have a major in role at the production stage of the film than the cinematographer or the director. Although before the shoot, I had given the editor notes to cinematographer to help him give a clearer idea of when I’ll be cutting and which cuts I’ll be using. Moreover, I made sure that all shoots matched the particular cuts I had in mind. So, for instance, there was this long shot of Armaan running, before the cinematographer shot it, I told him before hand that I’ll be using a jump cut over here so kindly shoot the entire sequence from one angle instead of shooting a point of view along with a long shot.

Me with the cinematographer discussing
Along with being the editor, I was also the clapper which was a good decision as the use of a clapperboard later in post helps the editor only as I would then know where to cut.
youtube
Behind the scenes of our Day 2 shoot
Overall, it was a good shoot as we got a chance to experience how films are shot, how the crew members communicate on set and how the decorum on set is maintained.
-Advik Arora
1 note
·
View note
Text
Week 17-Location scouting
In the 17th week, we started with designing the props and the basic set design required on the shoot day because the three of us are the production designers.

What is location scouting?
Location scouting is basically looking for suitable locations that match your storyline’s locations.


Location 1
The kidnapping room
Before

After

Location 2
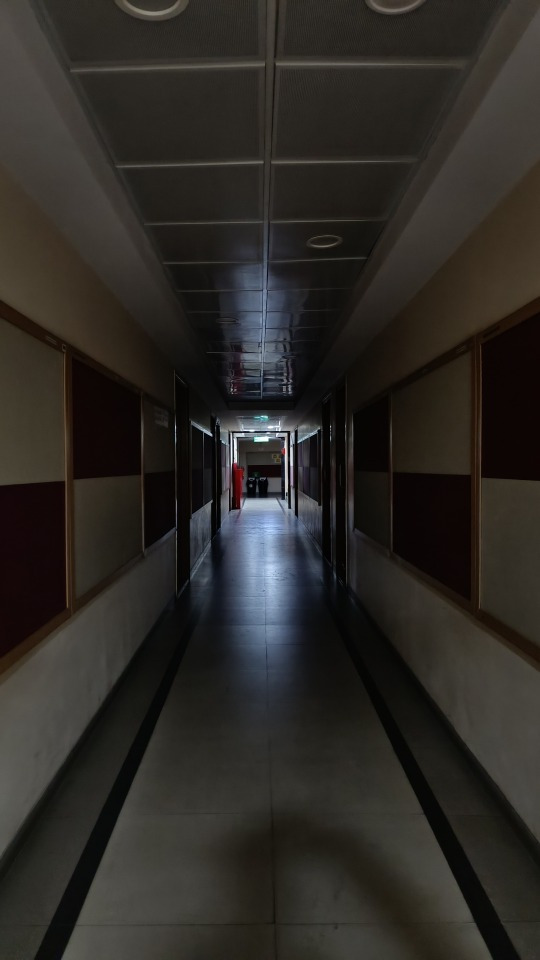
The main corridor which is right outside the kidnapping room
Location 3
This is basically set where the lift that connects the kidnapping room’s corridor and the staircase

Location 4
The building where the kidnapping happens

Lighting up the kidnapping room

Before

After

It was again quite a productive week, and now we have entirely finished our film’s pre-production preparations. Set for the production stage that commences next week.
-Advik Arora
1 note
·
View note
Text
Week 16:- Clapperboard, Schedule, and the Storyboard
In the 16th week, we covered all the last minute preparation that will help us for the shooting of our film including how to use a clapperboard, storyboarding, and callsheet. Each of these elements play an important role during production.
What’s a Clapperboard?
Often during the stage of production on the shooting day, a different device used to record only the audio and a different device to record the video is used. This is done to help improve the quality of audio, and bring the audio recording device closer to the actors. Clapperboards makes it easy for the editors in post-production to make sure the audio and video are in sync with each other.

Test shot 1
We conducted a test shot to see how it would be on the day of shoot
youtube
Test shot 2
youtube
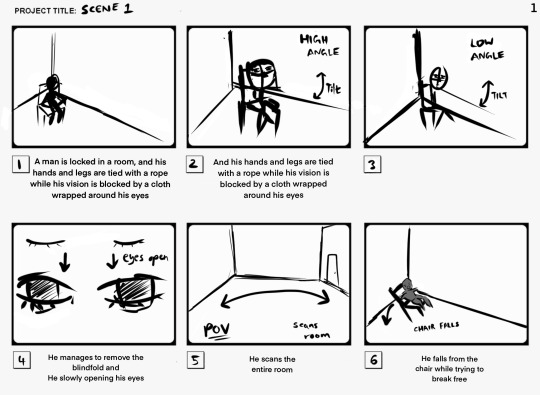
What’s Storyboarding?
Storyboarding is basically a rough sketch of how the entire film should look including all of the shots that mainly cover how the camera should be positioned, angled, and where should the subject. It helps the cinematographer to understand better about how the director wants the film to look. The storyboard was entirely made by our cinematographer(Aryan Vinayaraj).
Here is our film’s storyboard


What’s a schedule?
A callsheet is a detailed record of what scenes will be happening at what time and it also covers the actors’ and crews’ reporting time. A callsheet helps the Directors as it reduces any communication gap between the crew and the director and between the actors and the director.
Note:- I accidentally named the schedule as a call sheet, which I realized later.

In general, it was a productive week and we could complete a lot of work that was required before the shoot.
-Advik Arora
0 notes
Text
Week 15:-Caption and Graphics
In week 15, we learnt about captions and graphics in detail along with that we also learnt the different ways and methods to color grade a clip.

Caption and graphics are basically the embedded title animations present in the essential graphics tab which also enable the user to change the text and use it. It also contains the caption tab which allows you to add captions to your work. The process basically with either the embedded artificial intelligence to analyze your add, make a text file, and then adding the captions or you manually providing premiere pro a script along with the cuts and then adding the captions.
The color tab is basically where all of the color grading happens. All of the options of color grading are under the Lumetri color tab such as the basic corrections that includes the temperature (cool or warm), the tint (more pink or more yellow), then we have exposure which determines the darkness of the clip, and then contrast which brings out the darker colors, highlights which bring out the lighter colors, shadow which brings out the shadows, blacks which bring out the blacks present in the clip out, whites which brings out the white present in the clip and lastly saturation which brings out the overall color.
Note:-Unfortunately, our camera workshop sessions was stopped because of the rising cases of Covid-19. After this week, our media studies teacher had given us the following assignments.
Assignment 1
My work (Clickable)

Assignment 2

My work(Clickable)

Assignment 3
My work(Clickable)

Assignment 4

Assignment 5

My work(Clickable)
My work(Clickable)

Assignment 6

My work(Clickable)

Overall it was a good week, we got a chance to learn about how to insert caption and graphics along with that we also could practice editing through our assignments.
-Advik Arora
0 notes
Text
Week 14:- The tabs present
In week 14, we started learning about the additional tools present in a standard editing workspace of premiere pro that are usually used before or after editing.
Note:- This all had been covered in online school which was on Tuesday, and Friday. (Monday and Thursday, we didn’t have a media studies lecture.)
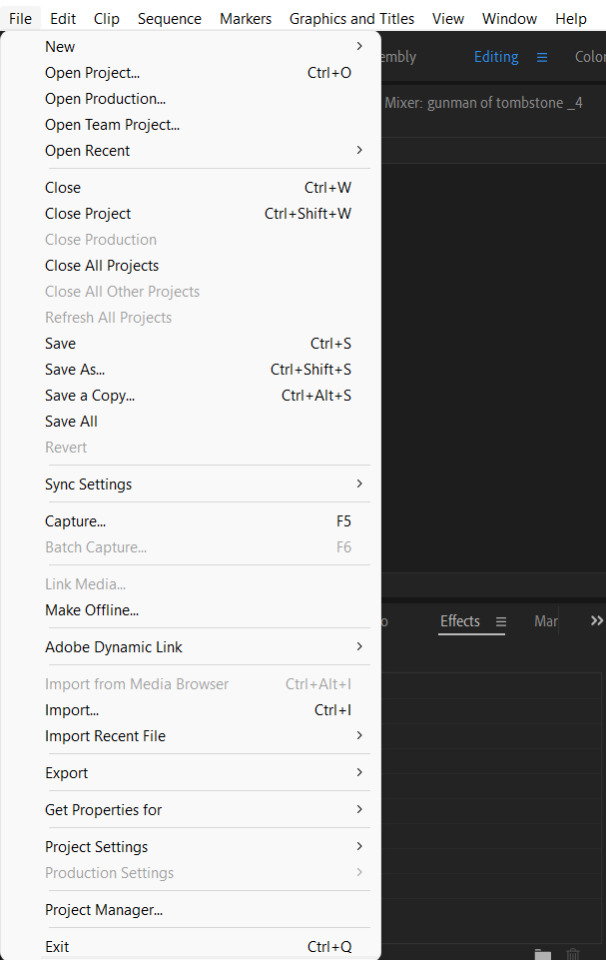
The file tab includes a new subtab which is useful for creating a new project, a new sequence, a team project, a black video or a color matte etc. The open subtab section includes opening an existing or a new project, opening production, opening a team project or opening a recent file. The close subtab section includes closing an existing or a new project, closing production, closing a team project or closing a recent file. The save subtab includes saving the file in premiere pro, or saving your work as another type of file type, saving a copy of your work along with the original file type and lastly saving it all. Sync settings is saving your existing work from one account and transferring it to a different account. Capture is saving an existing frame as an image file. The next section is making the entire project offline which doesn’t require internet. Importing a file means importing a file saved on your system on premiere pro. Importing a recent file that is saved on your system. The exporting file involves exporting your work on your system. The getting properties for includes getting the properties for your work. The project settings shows the existing properties of your work. The production settings shows the existing properties of your production work. The project manager shows the settings of your work. The exit subtab involves closing premiere pro.

The edit tab includes an undo and redo subtab which is used to undo a particular action you did in your workspace. The cut, copy and paste tab is used to move files within your workspace and paste them in your workspace. The delete tab is used to delete anything in your workspace. The duplicate tab is used to duplicate anything in your workspace. The select all tab is used to select anything in the workspace. The deselect tab is used to deselect anything in the workspace. The find subtab is used to file source files in your workspace. The spelling subtab is used to search the entire tab in your workspace for wrong spellings maybe added in the caption and graphics tab. The remove unused subtab involves removing unwanted source files available in your workspace. The team project subtab is used to convert a project to team project. The edit subtab includes moving your work from premiere pro to another editing software. The keyboard shortcuts include all the shortcuts that can be used to change your work. The preference subtab involves modifying the settings of premiere pro.

The clip tab includes renaming a particular source file, making a sub clip, editing a sub clip, editing offline which mainly includes editing without a source file. Additionally, it also includes modifying the current sequence, adding more video options or more audio options, adjusting the speed of the clip present in the sequence, scene edit duration that is basically premiere pro’s artificial intelligence arranging the clips and editing them, remix, capture settings, inserting a black video, sequence etc. overwriting over a sequence, replacing a footage, replacing with a clip, rendering and replacing, restoring unrendered, restoring captions from the original source clip, updating metadata, generating audio waveform, automating to sequence, enabling, linking, grouping, ungrouping, synchronizing, merging, nesting the existing clips present in a sequence.

The sequence tab firstly includes the main sequence settings such as the aspect ratio, quality etc. then we have the render effects in and out meaning that if we used certain visual effects then premiere pro renders only those effects avoiding the sequence to lag, then rendering in and out is rendering the entire sequence. Rendering selection means selecting a particular part of the sequence and then rendering it. Rendering audio means only rendering the audio of the sequence. Deleting render involves deleting the rendered files. Then we have match frame which is used in color grading, it is used for matching the color grading of a picture with the frame. Reverse match frame is the reverse of match frame. Add edit is adding an edit to the sequence.

The markers tab basically contains all the settings shown if markers are selected in the sequence. It includes the marking in (in point), marking out (out point), marking the clip, the selection, and the split. The next sub-tab includes going to the in point, out point or the split followed by clearing the in point, out point or both. Then adding a new marker, going to the next marker or the previous marker, clearing the selected marker, or clearing the markers. The last sub-tab includes adding a chapter marker, a flash cue marker, checking or unchecking the ripple sequence marker, and copy pasting the sequence markers to other clips
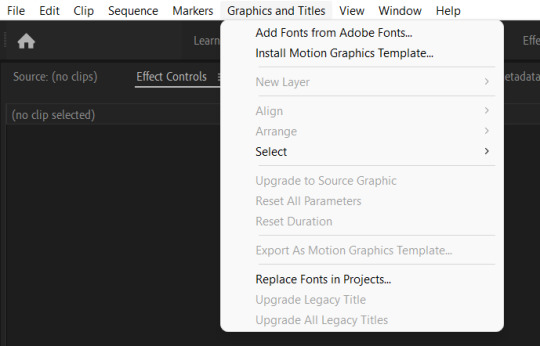
The graphics and titles tab are used when a text is added to the video, it mainly includes adding fonts from the adobe creative library, aligning (center, left, and right), arranging the text, selecting the text, resetting all the parameters, upgrading to a more advanced graphic software, resetting the duration of the text to the default settings, exporting the text as a motion graphics template, replacing the fonts, upgrading some legacy titles or upgrading all the legacy titles.
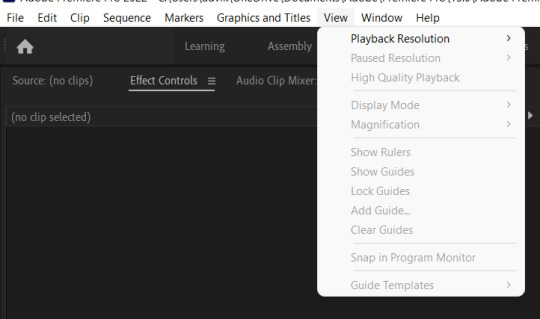
The view tab is used to play the video in the sequence in the maximum resolution or a lower resolution. It also includes adjusting the resolution of the current paused frame, adjusting the display of the sequence, magnification of the sequence, showing, locking, adding, or clearing the rulers and the guides. Lastly, this tab also includes snapping the video in program monitor, or using guiding templated that helps selects template your workspace.

The window tab includes adjusting the workspace such as increasing the program monitor, adjusting the source monitor, and maximizing the frame to full screen. The next sub-tab includes selecting and de-selecting which tools should be visible in the workspace.

The help tab includes all the embedded adobe tutorials which help beginners function premiere pro and the other adobe apps in a better way.
Camera workshop
Note:-The camera workshop had been covered in offline school on Wednesdays for 2 hours.
In this camera workshop, we learnt about focal length and how it affects the photo.
What is Focal length?
Focal length, usually represented in millimeters (mm), is not a measurement of the actual length of a lens, but is basically a calculation of the optical distance of the light rays coverage that helps adjusts the viewer’s angle of view.

Shot with a 20mm

Shot with a 24mm

Shot with a 28mm

Shot with a 35mm

Shot with a 50mm

Shot with a 70mm

Shot with a 85mm
As seen in these photos, the one taken with a 20 mm has the subject’s nose popped out then the one taken with a 85mm which is more flattened.
In general, it was an informative week as we got a chance to understand how camera lens affect a particular frame along with that we also got a chance to understand the additional tools available in premiere pro.
-Advik Arora
0 notes
Text
Week 13:- The tools present in the project panel
In week 13, we started learning about more tools in a standard editing workspace of premiere pro in detail.
Note:-This all had been covered in online school which was on Tuesday, and Friday. (Monday and Thursday, we didn’t have a media studies lecture).
The tools present in a project panel
The project tab in the project panel shows the raw source files which are imported into the project panel.

The media browser tab in the project panel helps search and locate the raw source files present on the editing device.

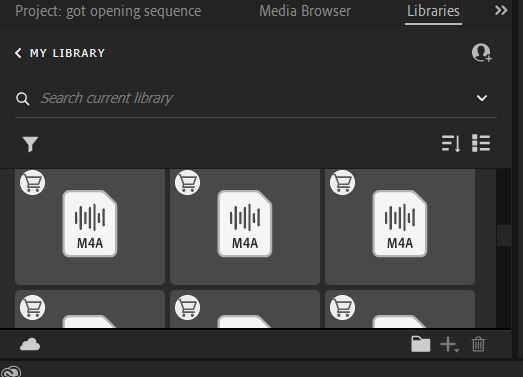
The libraries tab in the project panel that is linked to the adobe creative cloud database which enables the user to search for assets such as stock videos, music, and photos on it.
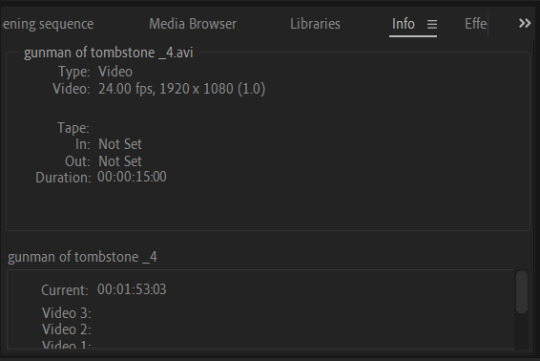
The info tab in the project panel shows the important details of the raw source files such as the file type, duration, fps etc.
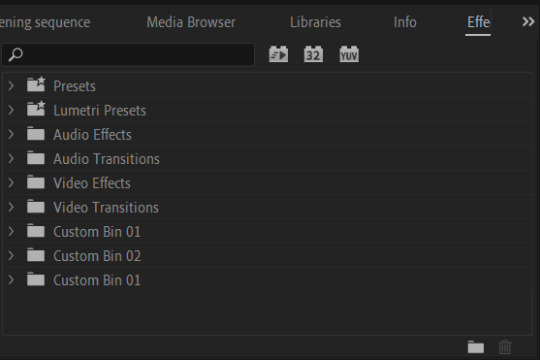
The effects tab in the project panel shows all the plugins, presets and transitions that help the user present their work in a better way.
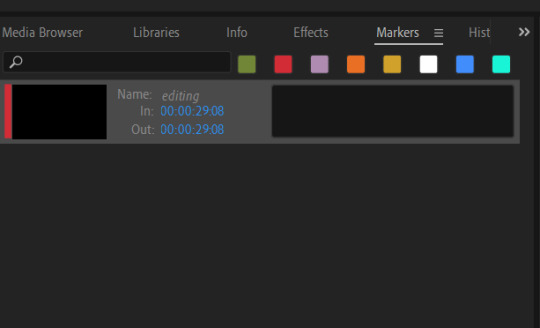
So usually when there is more than one editor working on a project, markers usually help to add notes for a certain amount of duration of frames helping the communication between the editors. They can also be used for one editor also as a certain form of remainder.
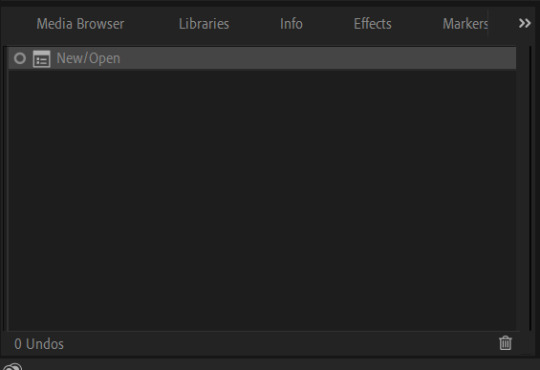
The history tab basically shows all the activities conducted by the user to their work, it’s basically a record of all the user activities.

Camera workshop
Note:-The camera workshop had been covered in offline school on Wednesdays for 2 hours.
In this camera workshop, we learnt about shadow depth of field and different cinematic compositions.
Shallow depth of field

We were then introduced to shallow depth of field that is when the entire frame is divided into layers which is then useful to help the camera focus on particular layers as shown in the photo above, the lens kept in the foreground is currently in focus. As shown below, the camera has divided the entire frame into layers so as we manually approach the lens without zooming in, the focus on that layer doesn’t change. There are three aspects to shallow depth of field:-
Focal length
Focal length, usually represented in millimeters (mm), is not a measurement of the actual length of a lens, but is basically a calculation of the optical distance of the light rays coverage that helps adjusts the viewer’s angle of view.
Physical distance
Physical distance represents the distance between the character and the subject.
Aperture
A high aperture values is basically a big hole in the lens's diaphragm through which a lot of light travels causing the picture to have an excessive amount of lighting as shown in the picture below. The aperture is measured in f/stops. A low aperture is basically a small hole lens's diaphragm through which a small amount of light travels in causing the photo’s frame to have very minimal lighting as shown below. The aperture is measured in f/stops.


So as seen in the above pictures, in the first picture, the focus is on the poach, but as we step away(increasing the physical distance) and adjust the focal length(from 36mm to 80mm), and reduce the aperture the focus changes on the camera lens.
Camera compositions
After learning the different compositions, we were supposed to take some pictures in school which included these camera compositions. We have already covered camera compositions before, hence I will not get into the details and will explain these compositions through examples.

Frame within Frame
As seen in this photo, a balance camera composition is used as there is an object kept in the foreground and a subject kept in the background. Frame within frame is also used as the subject is visible from a frame(tissue paper roll).

Rule of third
Rule of third is used in this frame as the subject is framed with less positive spacing kept in front of him and more negative spacing kept behind him. Moreover, frame within frame is also used as the subject is shown from the Art board.

Leading line
In this photo, a leading line camera composition is used as the dots on the dustbin is directing the viewer to the main object (trash).
Balance
Balance camera composition is also used as the ruler is kept in the foreground and the main is kept in the background avoiding a void. Frame within frame is also used as the main object(trash) is shown from the circular borders of the dustbin.
Pattern
A pattern camera composition is also used in this photo as the dots in the dustbin are the same and are in a pattern.
Overall, we had good informative sessions and we learnt more about editing.
-Advik Arora
0 notes
Text
Week 12:- The default tools
In week 12, we started understanding the default tools present in a standard workspace.
Note:-This all had been covered in online school which was on Tuesday, and Friday. (Monday and Thursday, we didn’t have a media studies lecture).
Understanding the tools
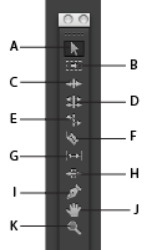
A)Selection Tool: This tool basically enables the user to select and move clips/items around the timeline. B)Track Selection Tool: This tool enables the user to select all clips to the right of the cursor in a timeline. C)Ripple Edit Tool: This tool basically uses the Selection tool to trim the start or end of a video track or an audio track on the Timeline; however, an empty space between the clips on your Timeline might get created. D)Rolling Edit Tool: This tool is basically used to change the In and Out points of a clip present in the timeline. E)Rate Stretch Tool: This tool is basically used to increase or a decrease the length of a clip in the Timeline. F)Razor Tool: This tool is used to split the clip into two parts. G)Slip Tool: Use the Slip tool to simultaneously change the In and Out points of a clip in a Timeline. H)Slide Tool: This tool is basically used to shift the clip in the timeline towards the right or the left. I)Pen Tool: This tool is basically used to add the keyframes on the clip in the sequence. J)Hand Tool: This tool is basically used as an alternate to the scroll bar present, it is used to manually shift the clip towards any direction. K)Zoom Tool: This tool zooms in and out the video clip present in the timeline.
Camera workshop
Note:-The camera workshop had been covered in offline school on Wednesdays for 2 hours.
In this camera workshop, we learnt about shallow depth of field.
What is shallow depth of field?
A shallow depth of field is when only a part of a frame is in focus and rest all parts are in defocus. It’s influenced by the focal length of the lens, the aperture settings and the physical distance of the camera from the subject.

Our media studies teacher showing us how shallow depth of field is created with me being the subject.

The next important thing about camera is what supports the stability of a camera that is a tripod.
What is a tripod?
A tripod can be any portable device that can be transported from one area to another which ensures the stability of the camera.

1)The first component of a tripod is the quick release plate through which the camera is inserted to the tripod, if it unlocked then the camera will fall. That is shown below.

2)The second component of a tripod is the ball head which tightens or loosens the ball, the ball that is linked to the mount over which the camera is kept on.

3)The third component is the pan handle or the tilt handle that is used for creating tilt and pan camera movements.

4)The fourth component is the column twist lock that restricts or tightens the tilt or the pan handle at a particular angle.

5)The fifth component is the leg bracing which is linked to all the leg sections to give in an equilibrium in the weight.

6)The sixth component is the leg lock which is used to lock the length of the leg section.
7)The seventh component is the tripod feet which is the final component over which the entire tripod is held.

It was an informative week as we got a chance to learn a lot about camera and editing in detail.
By Advik Arora
0 notes
Text
Week 11:- Introduction to the editing workspace
In week 11, we were introduced to the different elements present in the editing workspace.
Note:-This all had been covered in online school which was on Tuesday, and Friday. (Monday and Thursday, we didn’t have a media studies lecture)
Understanding the default Editing workspace
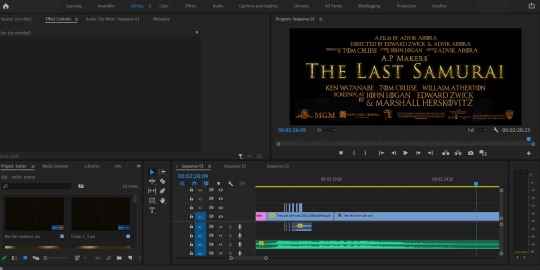
Source Monitor: The Source Monitor can be used to playback and preview individual source clips before actually adding them to a sequence.

Effect Controls panel: This panel basically contains all the special effects and the different transitions that can be attached to a clip present on the timeline such as the dip in black or the dip in white transition.
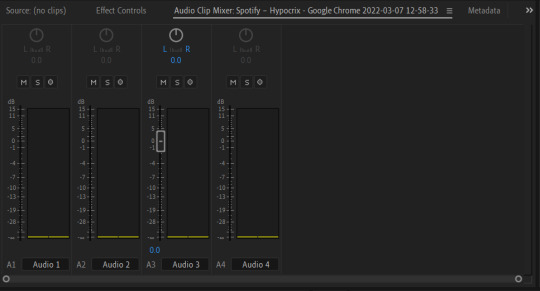
Audio Mixer: The Audio Mixer’s settings can be adjusted while listening to audio tracks and viewing video tracks that are active on the timeline.
Metadata panel: This panel basically shows a set of information that describes the content or properties of a video file such as their file size, format, creation date, and duration.
Program Monitor: The Program Monitor is the live monitor that shows the final output of the combined clips that have been attached on the timeline.
Project panel: The project panel helps save all the source files and all the raw files.
Media Browser panel: The Media Browser helps one search files and preview them that are available on a hard drive.
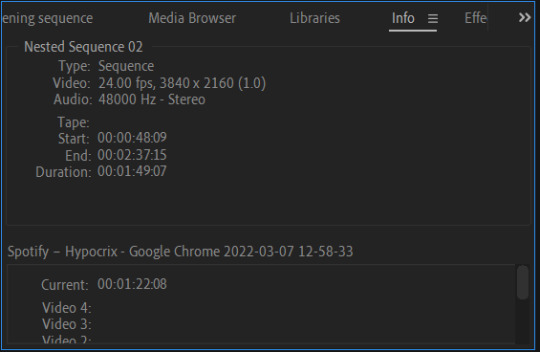
Info panel: The Info panel displays information regarding the currently selected item in the Project panel or Timeline.
Marker panel: The marker panel that is mainly displayed right next to the program monitor, can be used to mark in and the out the durations of a clip that has been attached on the timeline.
History panel: The History panel stores a list of the commands that have been changed in the current project. In order to undo something one can use Edit > Undo, or the keyboard commands Ctrl+Z (Windows) or Cmd+Z (Mac OS).

Tools panel: This panel contains the different editing tools that one can access in the application.

Timeline panel: This is basically where the majority of the work happens such as cut, copying, pasting, changing the additional properties of a clip.
Camera workshop
Note:-The camera workshop had been covered in offline school on Wednesdays for 2 hours.
On the first of the camera workshop, we learnt about the various settings available in a camera such as aperture, the shutter speed and ISO.
Normal picture will all values constant

High aperture
A high aperture values is basically a big hole in the lens's diaphragm through which a lot of light travels causing the picture to have an excessive amount of lighting as shown in the picture below. The aperture is measured in f/stops.

Low aperture
A low aperture is basically a small hole lens's diaphragm through which a small amount of light travels in causing the photo’s frame to have very minimal lighting as shown below. The aperture is measured in f/stops.

High value shutter speed
A high value shutter speed is when light is allowed the most in terms of length to enter the lens’ diaphragm. The shutter speed is measured in seconds with 1/2 seconds, for instance, being the longest as shown below.

Low value shutter speed
A low value shutter speed is when light is allowed the least in terms of length to enter the lens’ diaphragm. The shutter speed is measured in seconds with 1/250 seconds, for instance, being the shortest as shown below.

High ISO
A photo with a high ISO often contains a lot of noise, as it displays how much brightness should be there in a photo. A higher ISO is basically that the camera is more sensitive towards light.

Low ISO
A photo with a low ISO often contains a lot of sharpness, as it displays how much darkness should be there in a photo. A lower ISO is basically that the camera is less sensitive towards light.

It was a good week as we were able to learn about the various settings that should be taken into control before taking a photograph, moreover, in editing we were able to learn a bit more about premier pro.
By Advik Arora
0 notes
Text
Week 10:- Editing
What is Editing?
Editing is the process of selecting and preparing written, photographic, visual, audible, or cinematic material used by a person or an entity to convey a message or information. The editing process can involve correction, condensation, organization, and many other modifications performed with an intention of producing a correct, consistent, accurate and complete piece of work.
We worked with adobe Premiere Pro which is basically a timeline-based video editing software application developed by Adobe Inc. and published as part of the Adobe Creative Cloud licensing program. It is considered to be a layer based software.
Difference between layer and node based software
Node based software
Node based software is handling the often complex compositing tasks by linking together several simple image operations.
Layer based software
Layer-based compositing represents each media object in a composite as a separate layer within a timeline, each with its own time bounds, effects, and keyframes.
What is a pixel image?
A pixel image is made up of tiny squares that create one larger image. On pixel images, if you zoom in far enough, you can begin to see the square forms within the image.

What is a vector image?
Vector file graphics are more mathematical than pixel images. As you zoom into a vector image or make it bigger, you won’t see pixel squares because the lines and shapes in the image are mapped out mathematically so they will always readjust to keep their original shape.
We then started learning the basics of premiere pro which is basically a layer based software that is developed by Adobe Inc. and published as part of the Adobe Creative Cloud licensing program.
The home tab of premiere pro which basically shows all your previous projects and also gives the option of opening a new project or an existing project.
Once a project has been opened, the main panels of premiere pro can be visible which is basically the digital workspaces that facilitate your video project, such as the Timeline, the Media Browser, and the Program Monitor. Each of these areas can be rearranged and retooled to your personal taste.
Afterwards, we have the main workspaces available in premiere pro...

Learning:- This is a workspace layout that mainly contains tutorials on how to operate and work with this software or how to achieve a particular effect in premiere pro.

Assembly:- This is a workspace layout that has a large Project area with the Program & Source Monitors sharing space.

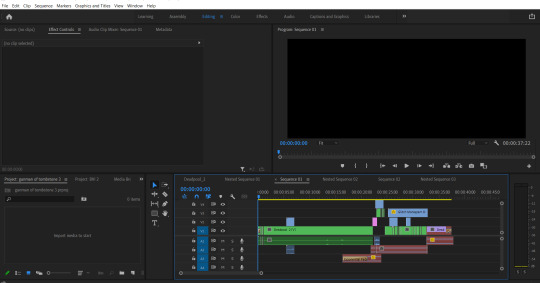
Editing:- This is a workspace layout that equally distributes all of its main panels in a systematic and organized way.
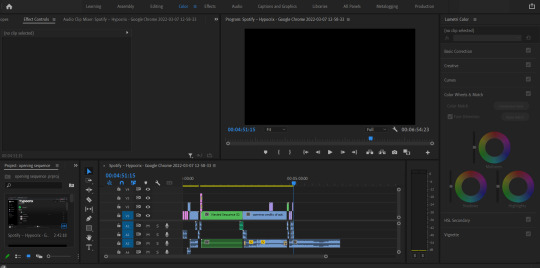
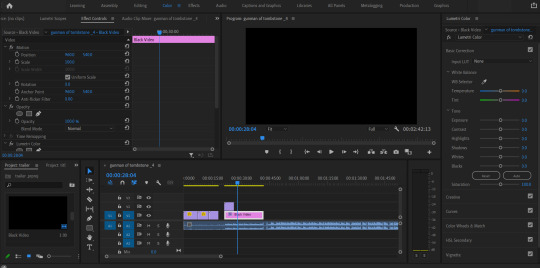
Color:- This is a workspace layout that has a large program and source monitor along with an additional work panel that pops up at the right called the lumetri color. With the length of the timeline being the same, but the source files’ panel being reduced.

Effects:- This is a workspace layout that has a large program and source monitor along with an additional work panel that pops up at the right called the essential graphics and effects. With the length of the timeline being the same, but the source files’ panel being reduced.
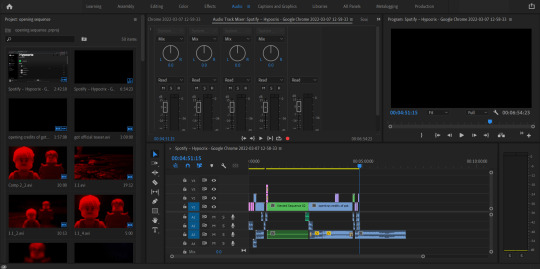
Audio:- This is a workspace layout that has a large source file panel along with the length of the project and source monitors being reduced, but the timeline being the same.

Captions and Graphics:- This is a workspace layout that has a large source monitor along with an additional work panel that pops up at the right called the essential graphics. With the length of the timeline being the same, but the source files’ panel and the program monitor being reduced.

Libraries:- This is a workspace layout that has a large program monitor along with an additional work panel that pops up at the right called the libraries. With the length of the timeline being reduced while the source files being increased, and the source monitor being removed.
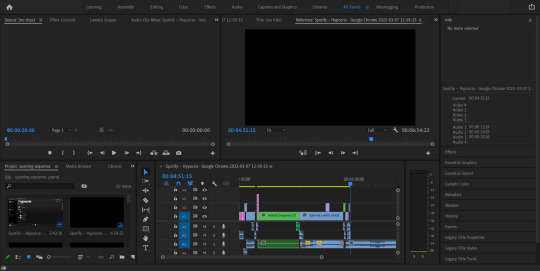
All Panels:- This is a workspace layout that has a large program and source monitor along with an additional work panel that pops up at the right called the essential graphics. With the length of the timeline being the same, but the source files’ panel being reduced.
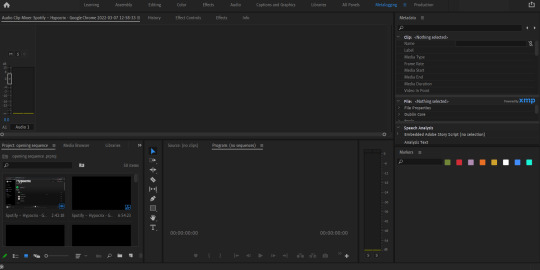
Metalogging:- This is a workspace layout that has a large source file panel along with an additional work panel that pops up at the right called the Metadata. With the source and the program monitors replacing the space of the timeline, and the timeline being completely removed.
Production:- This is a workspace layout that has a large program and source monitor along with an additional work panel that pops up at the left called production. With the length of the timeline being the same, but the source files’ panel being reduced.
Overall it was good week, as we were introduced to a professional editing software that is being used in the film industry by a lot of well-established editors.
By Advik Arora
0 notes
Text
Week 9:-Producers’ PPT and Actors’ PPT
In the 9th week of media studies, where we have almost finished our foundation portfolio’s pre production. We had to make an actor’s ppt and a producer’s ppt. The purpose of an actor’s ppt and a producer’s ppt is to deliver/summarize the entire purpose, story and the requirements of our film that is the Time Seeker. The master breakdown, screenplay, script, actor’s ppt and producer’s ppt was a collaborative effort.
Producer’s PowerPoint presentation

A producer’s PowerPoint presentation is important to help the producer understand in the most simple way and in a way persuade the producer to invest in our film.

The second slide of the producer’s ppt shows the people that are involved in the project which gives a clearer idea to the producer of how many people are involved.

The third slide of the producer’s ppt shows the overall summary of the first 6 scenes.
The fourth slide of the producer’s ppt shows the overall synopsis of the film.

The fifth slide of the producer’s ppt shows the story in a one liner, in case the producer, the director, any crew or cast has to explain the story in a one liner.

The sixth slide shows the unique selling point meaning that one feature that makes our film different than sci-fi films and making the producer understand that our film stands out than other film.
The seventh slide shows how we want the overall film to look and how each set design’s lighting should be.
The eight slide shows how many characters are involved in the story, giving a better idea of the casting budget to the producer.
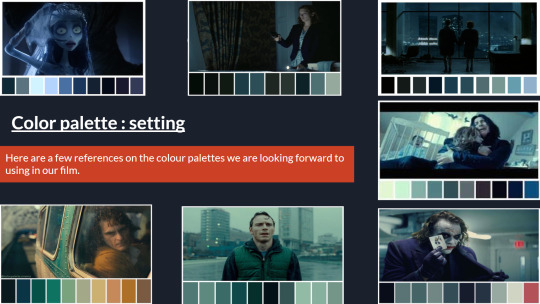
The ninth slide shows how expect the color theme palette to look after the color grading stage of our film helping the producer to understand the overall look of our final product.

The tenth slide shows the budget required for the set designing, costumes, location permission, casting budget and the salaries of the writing departments, again giving the producer a better accounting track of their money.

The eleventh slide shows how much money will be required at the production stage of our product such as the camera equipment and lighting equipment.
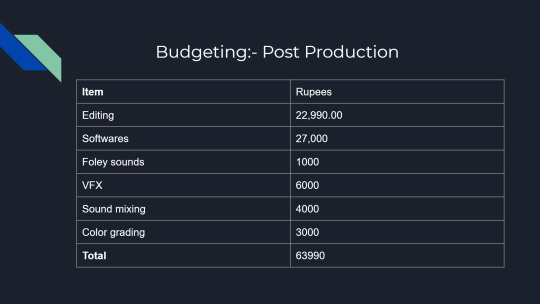
The twelfth slide shows the budget required at the post-production stage of our film, such as the fees required for editing, installing the required softwares, the recording of the foley sounds, VFX, sound mixing, and the color grading equipment if required.

The thirteen slide shows the Head of the department’s budget meaning the main role’s salaries along with that we have also showed our final budget.

The fourteen slide shows our partners who will be helping us promote, finance and run our product giving the producer also an ideal image of how many companies are involved.
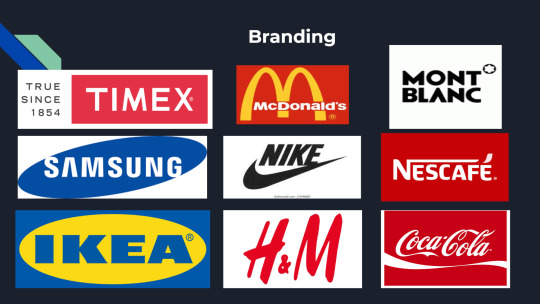
The fifteen slide shows the branding partners whose company’s products will be marketing in our film.
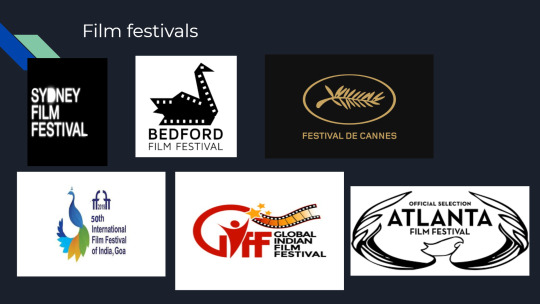
The sixteen slide shows the film festivals where we will be sending our product to.

The seventeenth slide shows the possible platforms on TV which will be marketing our product.

The producer ppt ends over here, after this we went ahead with making the actor’s ppt.
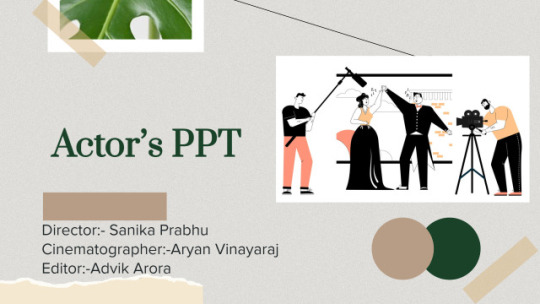
An actor’s PowerPoint presentation is important to help the actor understand in the most simple way and in a way persuade the actor to invest in our film.

The second slide of the actor’s ppt shows the people that are involved in the project which gives a clearer idea to the actors of how many people are involved.

The third slide of the actor’s ppt shows the story in a one liner, in case the producer, the director, any crew or cast has to explain the story in a one liner.
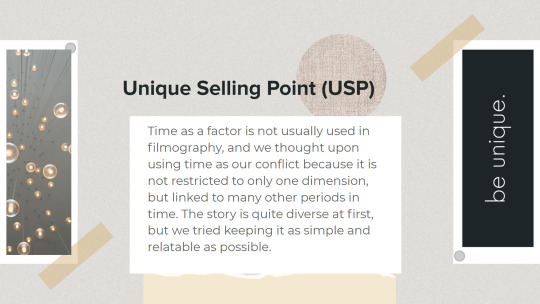
The fourth slide shows the unique selling point meaning that one feature that makes our film different than sci-fi films and making the actors understand that our film stands out than other film.

The fifth slide of the actor’s ppt shows the overall synopsis of the story.
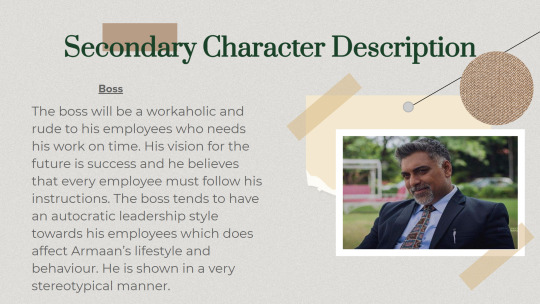
The sixth slide of the actor’s ppt shows the secondary character’s description helping the actors who will playing those characters easier to understand their character.

The seventh slide of the actor’s ppt shows the primary character description(Armaan), basically includes the personality, character description and backstory helping the actor who will playing Armaan easier to understand his character.

The eight slide of the actor’s ppt shows the character sketch(Armaan), basically includes the age, height, hair, nature, and outdoor wear helping the actor who will playing Armaan easier to understand his character.

The ninth slide shows Armaan’s character arc helping the actor understand the ups and downs of the character.

The tenth slide shows the costume of Armaan on the day of the entire of incident giving the actor a clearer idea of what he will be wearing.

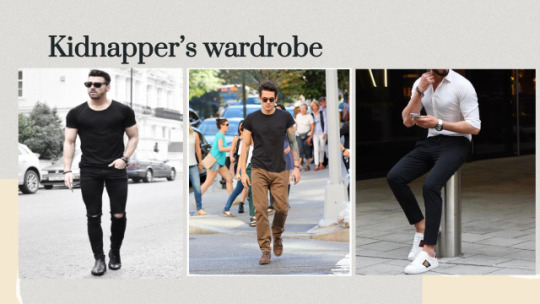
The eleventh slide shows the wardrobe of Armaan helping the actor understand the character’s dressing sense.

The twelfth slide shows the proposed cast of Armaan who we think might fit for the role, basically the actors.
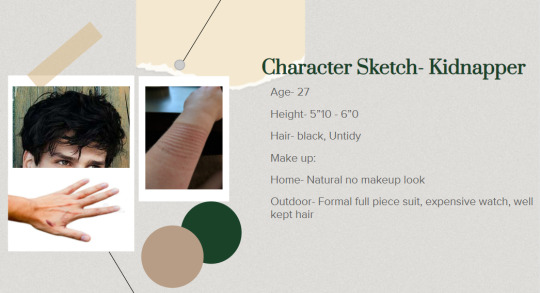
The thirteen slide of the actor’s ppt shows the character sketch(Armaan’s kidnapper), basically includes the age, height, hair, nature, and outdoor wear helping the actor who will playing Armaan’s kidnapper easier to understand his character.

The fourteen slide shows the costume of Armaan’s kidnapper on the day of the entire of incident giving the actor a clearer idea of what he will be wearing.
The fifteen slide shows the wardrobe of Armaan’s kidnapper helping the actor understand the character’s dressing sense.
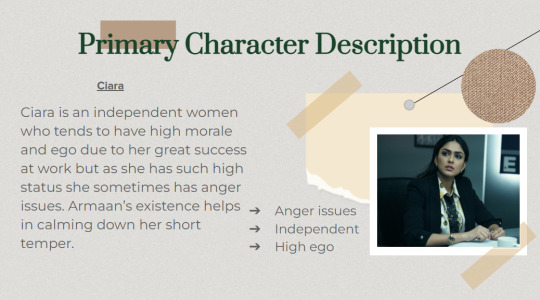
The sixteen slide of the actor’s ppt shows the primary character description(Ciara), basically includes the personality, character description and nature.
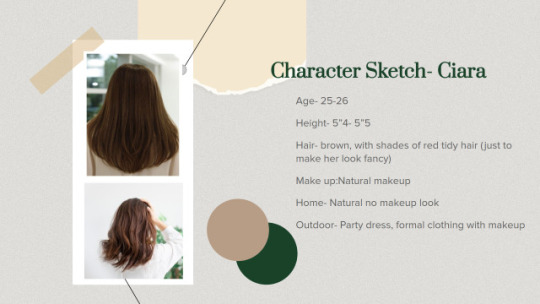
The seventeenth slide of the actor’s ppt shows the character sketch(Ciara), basically includes the age, height, hair, nature, and outdoor wear helping the actress who will playing Ciara easier to understand her character.
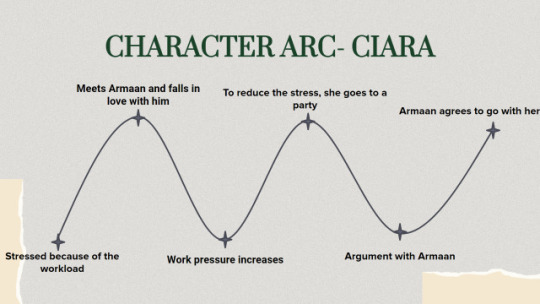
The eighteen slide shows Ciara’s character arc helping the actress understand the ups and downs of the character.

The nineteenth slide shows the costume of Ciara on the day of the entire of incident giving the actress a clearer idea of what she will be wearing.

The twentieth slide shows the wardrobe of Ciara helping the actress understand the character’s dressing sense.

The twenty-first slide shows the proposed cast of Ciara who we think might fit for the role, basically the actors.
In conclusion, it was a productive week as we got a better understanding of what we expect from the actors, and also how to deal with and approach producers and actors.
By Advik Arora
0 notes
Text
Week 8:-Master breakdown
After the making of the screenplay, the next stage of pre-production of our portfolio was the master breakdown, that basically consists of all of the detail that will be present during the scene and also of all of the things that will be present during the scene such as the property, set requirement, animals, vehicles etc.

The making of the Master breakdown
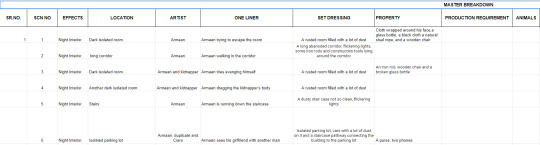
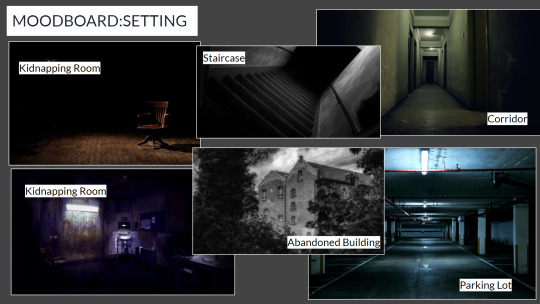
The first row of the master breakdown after the serial number is the scene number. My team and I divided the entire opening shot in 6 scenes, and based on that we accordingly wrote the other detail present in the following columns.
The entire film is based in night with the story majorly being in indoors, hence the following row that is effects consists night with interior.
The first scene’s location is set in a dark isolated room. The reason why we thought upon keeping the room with low key lighting is simply because it shows that our character is in danger and also helps create that horror atmosphere. The building in which majorly the story takes place is supposed to be under construction, hence it is a rusted room and is filled with a lot of dust. Subsequently, I accordingly wrote the following in the set dressing and location for scenes that are taking place in a room where the guy was kidnapped.

The second scene’s location is a long abandoned corridor with flickering lights, some iron rods and construction tools lying around the corridor to give gratify a certain kind of horror atmosphere, hence I accordingly wrote it in the location and set dressing.
The fifth scene’s location is dusty stair case not so clean with flickering lights. The sixth scene’s location is an isolated parking lot that has cars with a lot of dust on it and a staircase pathway connecting the building to the parking lot.
In conclusion, it was a productive week and we got a clearer picture of what we need on the day of shoot.
By Advik Arora
0 notes
Text
Week 7:- The start of our foundation portfolio
In this week, we started working on our foundation portfolio, which basically involves us creating a two-minutes opening sequence. We divided our work as per the standard film division processes that is:
Pre-production

Pre-production is the planning process and execution of every task that must take place before production begins.
Production
Production refers to the tasks that must be completed or executed during the filming or shooting.
Post-production
Post-Production is the stage after production when the filming is wrapped and the editing of the visual and audio materials begins.

(We working on our foundation portfolio’s script)
Our foundation portfolio's story summary
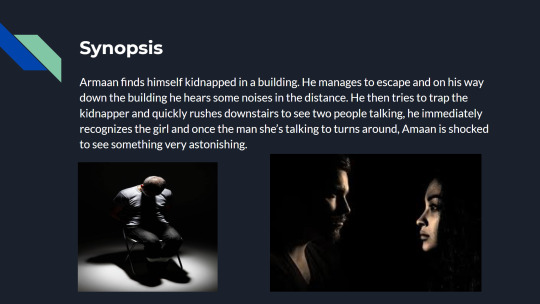
In an isolated building, somewhere in the city, a man is locked in a room, which is plunged in darkness, and his hands and legs are tied with a rope while his vision is blocked by a cloth wrapped around his eyes.
He scans the entire room until he spots a glass bottle lying right next to him, he tries moving his chair towards the same direction, until the chair falls and his head hits the bottle, after which he takes one glass piece and unties the rope. As soon as he steps out of the room, he sees a long corridor after which there are stairs and he scampers towards the corridor’s end.
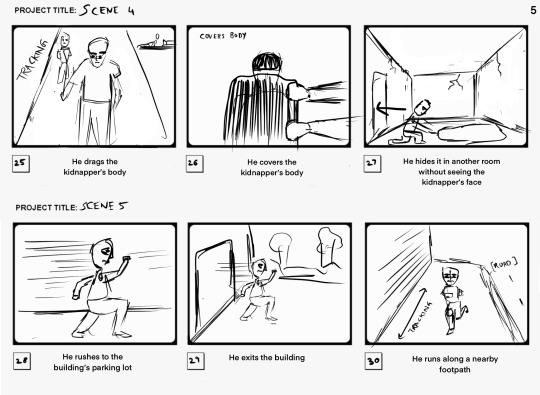
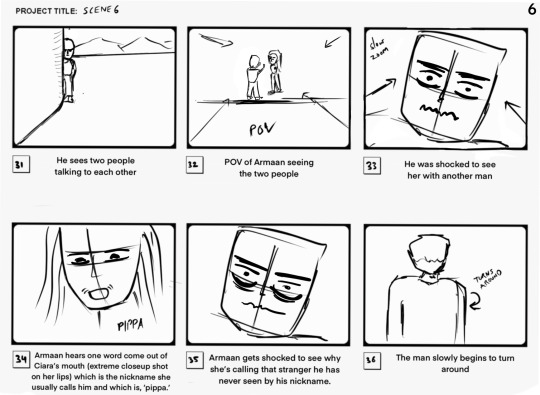
On his way, he hears some distant sounds of someone talking on the phone; he assumes it’s the kidnapper. He rushes back to the same room where he was previously locked, and tries to lay a trap for the kidnapper. The kidnapper steps into the room and the victim stabs the kidnapper with an iron rod which he found lying in the room. He panics; hence he covers the kidnapper’s body and hides it in another room without seeing the kidnapper’s face. He rushes to the building’s parking lot where he sees two people talking to each other.
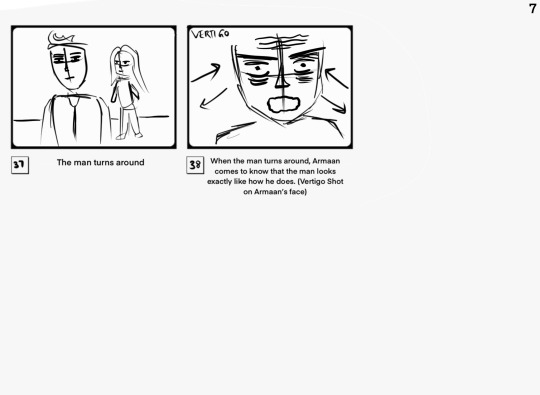
One is a man and one is a girl and that girl is the victim's girlfriend, hence he was shocked to see her with another man and then overheard their conversation. Armaan hears one word come out of Ciara’s mouth, which is the nickname she usually calls him and which is, ‘pippa.’ Armaan gets shocked to see why she’s calling that stranger he has never seen by his nickname, but when the man turns around, the victim comes to know that the man looks exactly like the victim does.
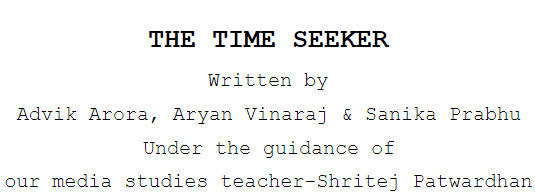
The time seeker official script
Character sketch
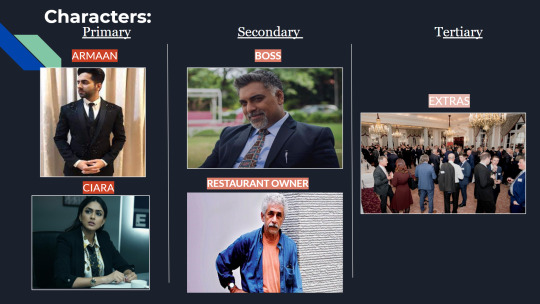
Victim( Armaan) - Meaning of name- Hope, Desire
Calm, vulnerable, smart, workaholic, alcoholic, sophisticated, religious
Three piece suit, watch (needle spinning- time loop) to signify it was a time loop
Goes to a party at work, job promotion
nickname -pippa (only used by Ciara)
Character Clothing Reference- https://www.hockerty.com/en/men/suits/82359-grey-houndstooth-tweed-3-piece-suit-with-pocket-square
Woman(Ciara) - Meaning of name- Dark, Black
Anger issues, independent, high ego, and sophisticated
Jumpsuit/ formal party clothing
Character Clothing Reference-
https://www.myntra.com/jumpsuit/kassually/kassually-women-black--pink-printed-basic-jumpsuit/12742100/buy
After developing a script, we materialized our script into a screenplay.
What is a screenplay?
A screenplay is basically used to exactly describe what will happening in a scene.
Overall, it was a very productive week as we were able to finalize our script and screenplay.
By Advik Arora
0 notes
Text
WEEK-6:- 180 Degree rule
What is the 180-degree rule?
It basically means that if two subjects are standing in front of each other, then an imaginary line can be used to divide the entire the set into two hemispheres that is the X hemisphere and the Y hemisphere. The rule states that the camera should stay on one side of an imaginary line between two characters so that each character always appears to be facing the same direction, regardless of where the camera is positioned.
What is the importance of the 180-degree rule?
It helps the characters maintain the same left/right relationship to each other, keeping the space of the scene orderly and easy to follow.
When is the 180-degree rule often used in which type of scene?
The 180-degree rule helps set a very tense atmosphere, hence is often used in an interrogation between two characters.

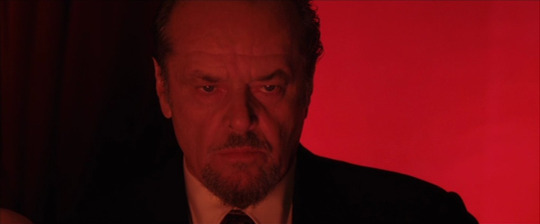
This scene from the bard of blood, clearly shows that the camera is kept in the X-atmosphere as Shah Rukh Khan is dominating over Emran Hashmi.

Once Emran Hashmi starts to dominate over Shah Rukh Khan, the camera is positioned in the Y-hemisphere, meaning that the Breaking 180-degree rule is used.
What does the 180 degree rule do?
Following the rule will establish orientation.
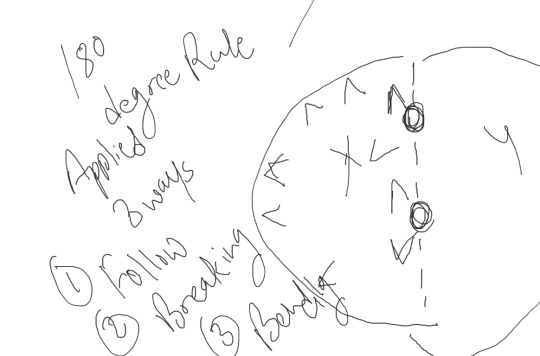
Breaking the rule will disorient and signal unease.
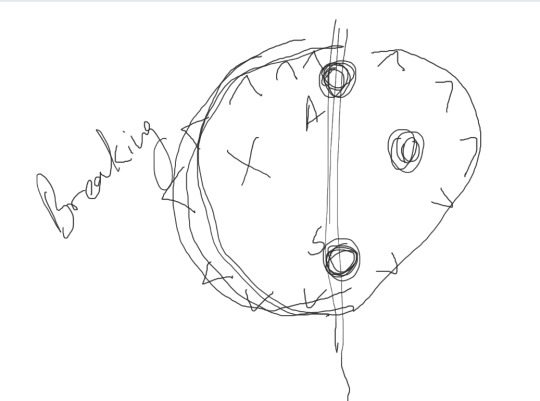
Bending the rule signals a gradual change in your scene.

In conclusion, 180 degree rule is very important in terms of depicting which character is dominating, so it helps portray the character’s position in the story in a better way.
By Advik Arora
0 notes
Text
Week 5:- Mise-en scene
What is Mise-en scene?
Mise-en scene is a term used to describe the setting of a scene in a play or a film. It refers to everything placed in the frame including the set design, make up, hair of the character, the lighting, and the costume design.
What is set design?
Set design is the creation of the physical space in which the action of a performed event takes place. Primarily used to describe theater productions, it constitutes all the scenery, furniture, props, appearance, and overall look of the stage.
What is costume design?
Costume design is the fabrication of colors and clothes to show the overall appearance of the character.
The importance of colors in film
Film is a visual medium, hence colors play an important role to showcase what the director wants and intentions behind what was in the scene. It basically enables filmmakers to manipulate the viewers’ emotions.
Red
The use of red signifies anger, passion, rage, desire, excitement, energy, speed, strength, power, heat, love, aggression, danger, fire, blood, war, violence.
Pink
The use of pink signifies love, innocence, healthy, happy, content, romantic, charming, playfulness, soft, delicate, feminine.
Yellow
The use of yellow signifies wisdom, knowledge, relaxation, joy, happiness, optimism, idealism, imagination, hope, sunshine, summer, dishonesty, cowardice, betrayal, jealousy, covetousness, deceit, illness, hazard.

Orange
The use of orange signifies humor, energy, balance, warmth, enthusiasm, vibrant, expansive, flamboyant.
Green
The use of green signifies healing, soothing, perseverance, tenacity, self-awareness, proud, unchanging nature, environment, healthy, good luck, renewal, youth, vigor, spring, generosity, fertility, jealousy, inexperience, envy.

Blue
The use of blue signifies faith, spirituality, contentment, loyalty, fulfillment peace, tranquility, calm, stability, harmony, unity, trust, truth, confidence, conservatism, security, cleanliness, order, sky, water, cold, technology, depression.
Purple/Violet
The use of purple/violet signifies erotic, royalty, nobility, spirituality, ceremony, mysterious, transformation, wisdom, enlightenment, cruelty, arrogance, mourning, power, sensitive, intimacy.

Brown
The use of brown signifies materialistic, sensation, earth, home, outdoors, reliability, comfort, endurance, stability, simplicity.

Black
The use of black signifies no, power, sophistication, formality, elegance, wealth, mystery, fear, anonymity, unhappiness, depth, style, evil, sadness, remorse, anger.

White
The use of white signifies yes, protection, love, reverence, purity, simplicity, cleanliness, peace, humility, precision, innocence, youth, birth, winter, snow, good, sterility, marriage (Western cultures), death (Eastern cultures), cold, clinical, sterile
Silver
The use of silver signifies riches, glamorous, distinguished, earthy, natural, sleek, elegant, high-tech.

Gold
The use of gold signifies precious, riches, extravagance. warm, wealth, prosperity, grandeur.

Importance of the way the hair is styled

Hair styling plays an important in depicting the story, as seen in our foundation portfolio, our main character’s hair before kidnapping is set, where as after the kidnapping it is messy. Hair styling comes under mis-en-scene.
Overall it was a good week, we got a chance to understand and learn the ideology behind colors in films
By Advik Arora
0 notes