
Don't wanna be here? Send us removal request.
Statistics
We looked inside some of the posts by astcostumedesign and here's what we found interesting.
Average Info
Notes Per Post
1
Likes Per Post
1
Reblog Per Post
0
Reply Per Post
0
Time Between Posts
15 days
Number of Posts By Type
Text
17
Last Seen Tumblr Blogs


Fun Fact
Tumblr.com rank in the US is 25.
Text
COSTUME DESIGN FOR THEATRE – DESIGNING FOR STAGE
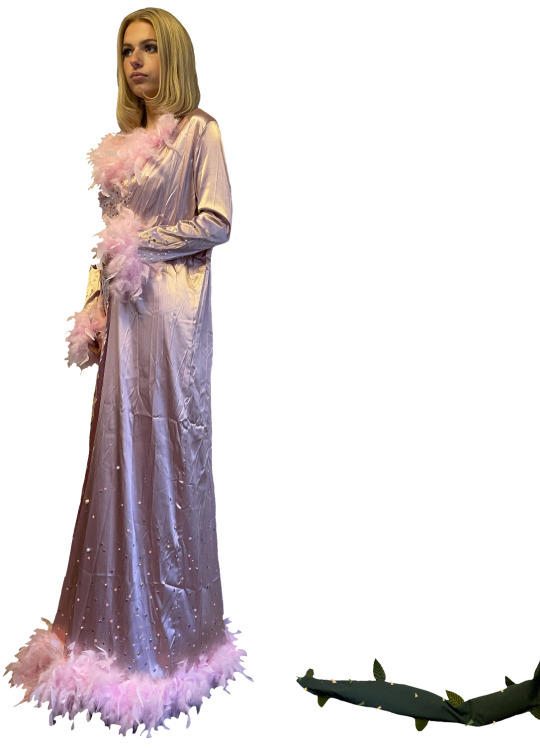
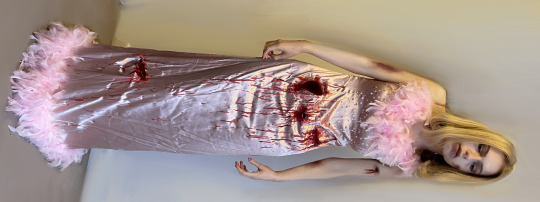
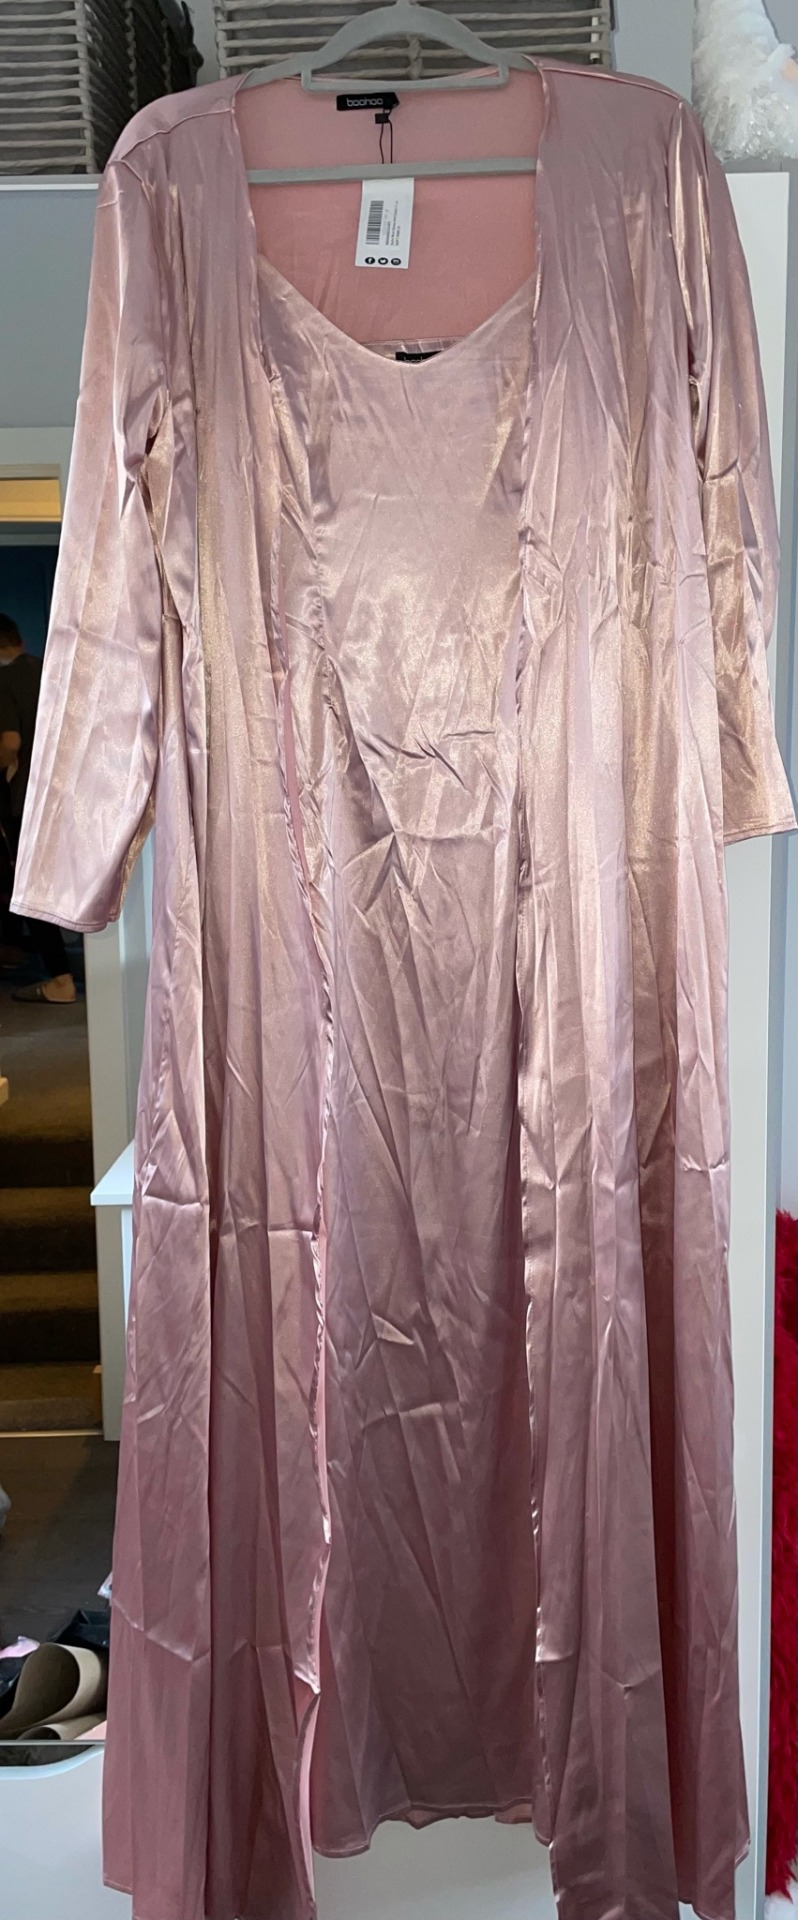
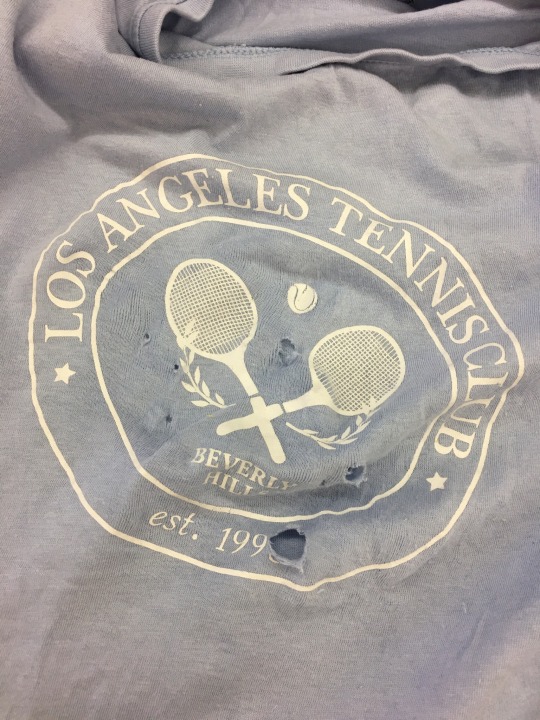
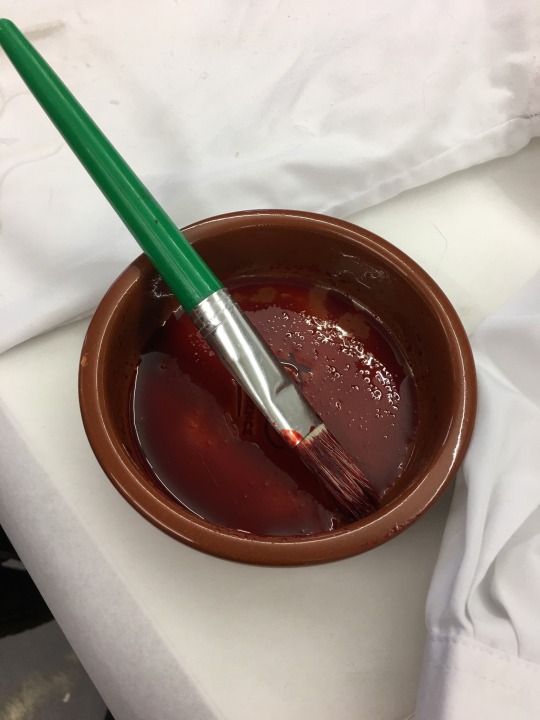
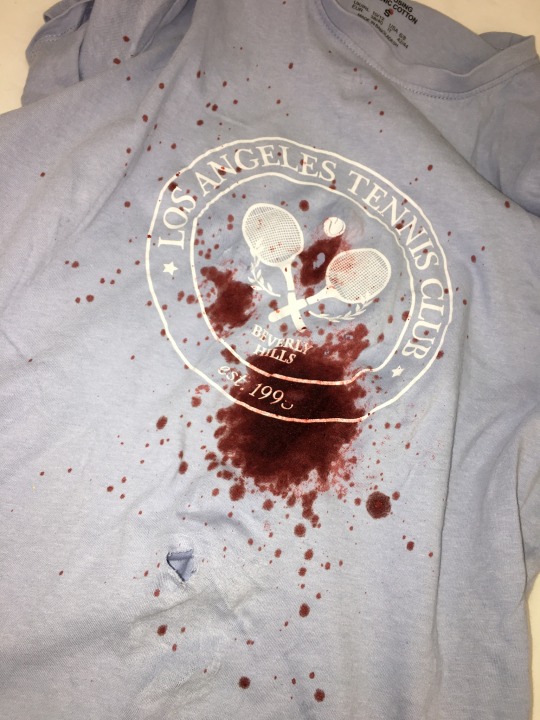
Over the Christmas break I had finished all my research and sketchbook work for this module. To complete everything I had to distress my costume as my chosen scene Audrey is attacked by the plant. I did a photoshoot of my costume before it is ruined. To distress my costume, I cut sections around the waistline and ripped them. As a base colour I mixed red and brown paint and used that close to the holes. I used fake blood to get the more gory look and I watered down the blood to add drips and splats. I completed my photo shoot with the final garment. I made sure the model matched the aesthetic of the costume so in the first photo shoot they looked healthy with a full face of glam makeup, then in the second I used white face paint very dark eye makeup and fake wounds. Here are some pictures of my final garment. I love the way it turned out and the photoshoot was defiently very successful. Also working within budget was another good experience as it makes you reflect a lot more on how you’re spending your money within making the costume and it also proves you don’t need to spend a lot to make and effective looking costume.

DEVELOPING PROFESSIONAL PRACTICE: COSTUME DESIGN
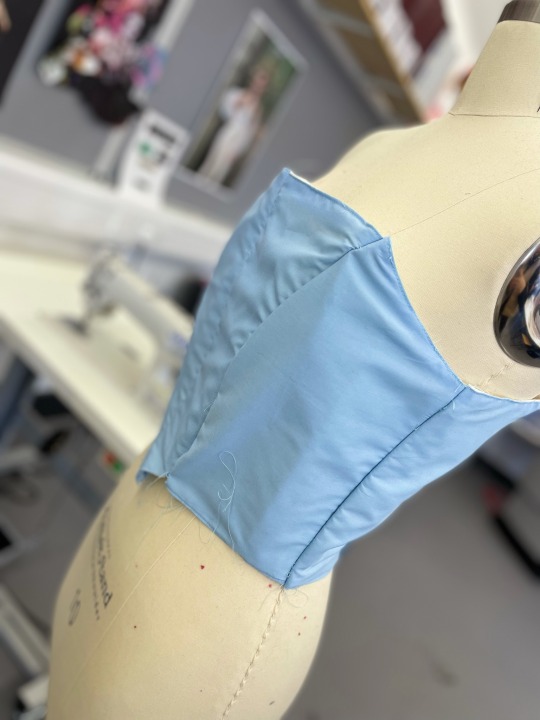
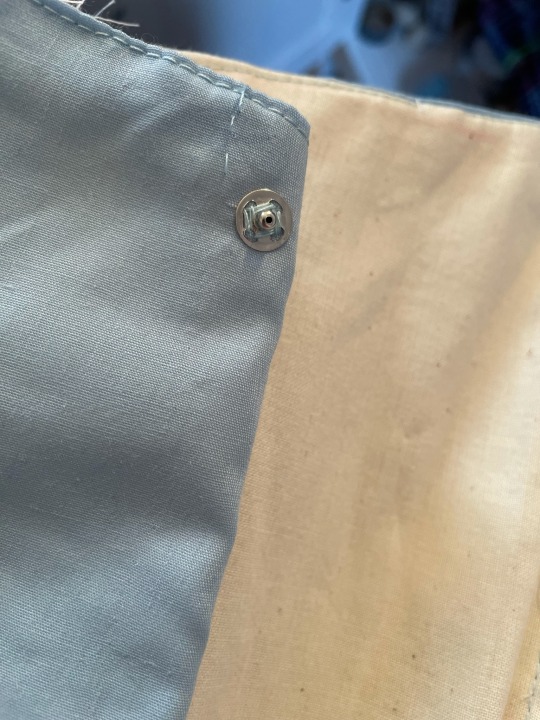
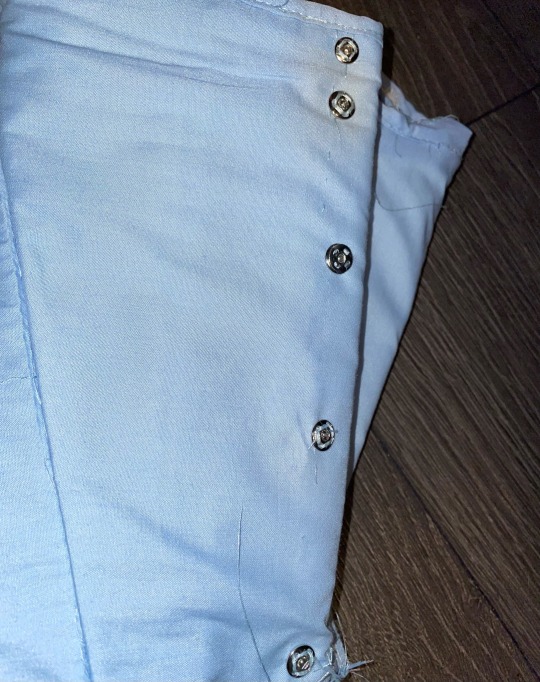
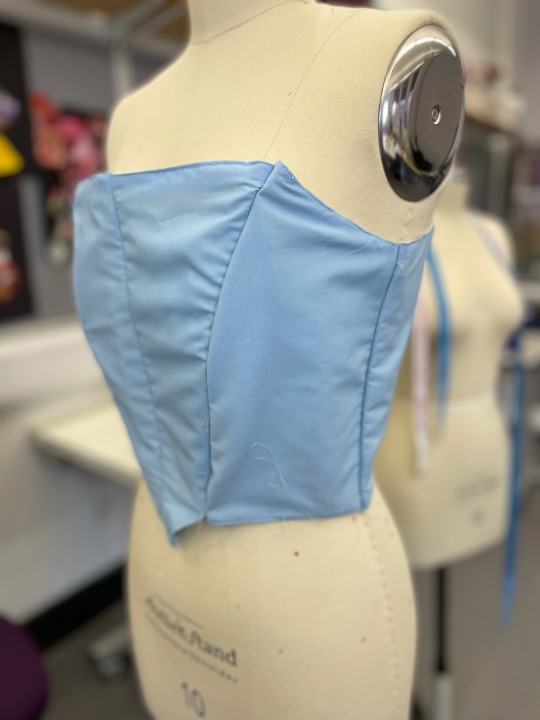
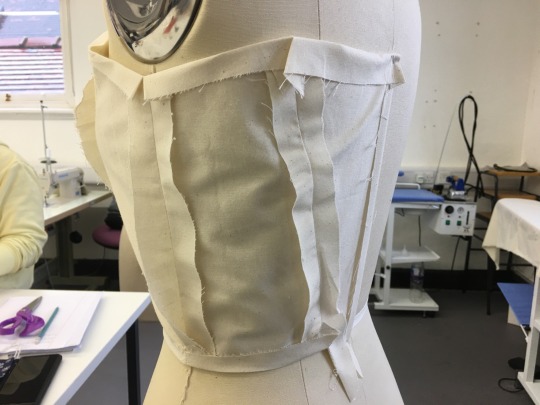
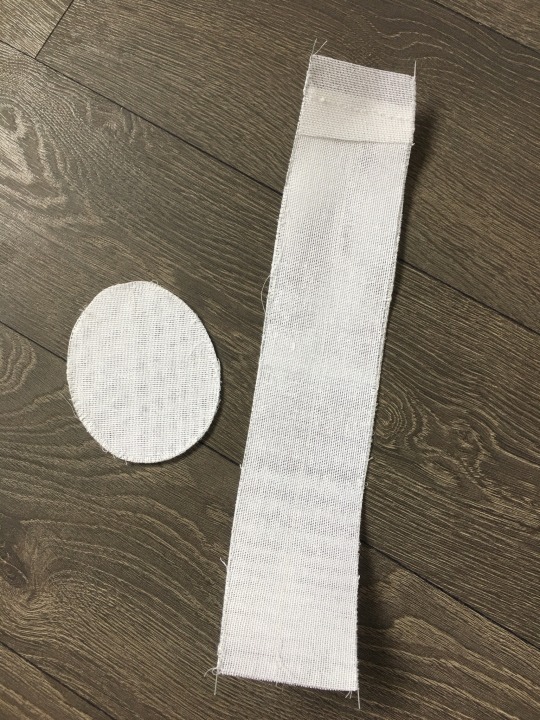
In the break, I had completed the main structure of my bodice. To finish it off I added some binding around the top and bottom edges. Originally I was going to insert eyelets as my fastening however, I didn’t think it suited the style so I have opted for poppers that I have hand stitched on. The bodice defiently had challenges but it was a good experience considering this is the first bodice I have ever made. This is my completed bodice with the popper fastenings both on a mannequin and on a size 10 model. It fits the mannequin and model both very well. I didn’t end up adding any extra details to the bodice as I wanted the focus to be mainly on the construction. It is also helpful for when I make my next one, I can clearly see what to improve on. If I was to make this again from the beginning, I would of maybe incorporated straps into my patten pieces meaning it would give the bodice more structure and frame. There would also be a better chance of fitting more snug to the body.

0 notes
Text
YEAR 2 - WEEK 12 - 14th DECEMBER 2021 - COSTUME DESIGN FOR THEATRE - DESIGNING FOR STAGE
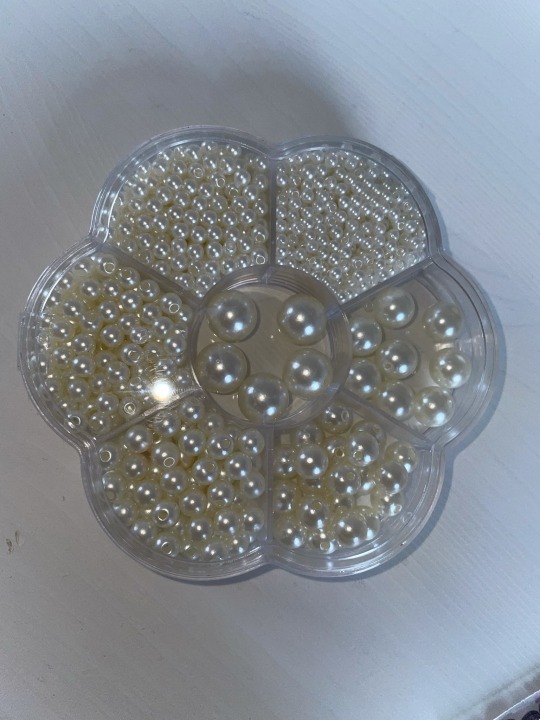
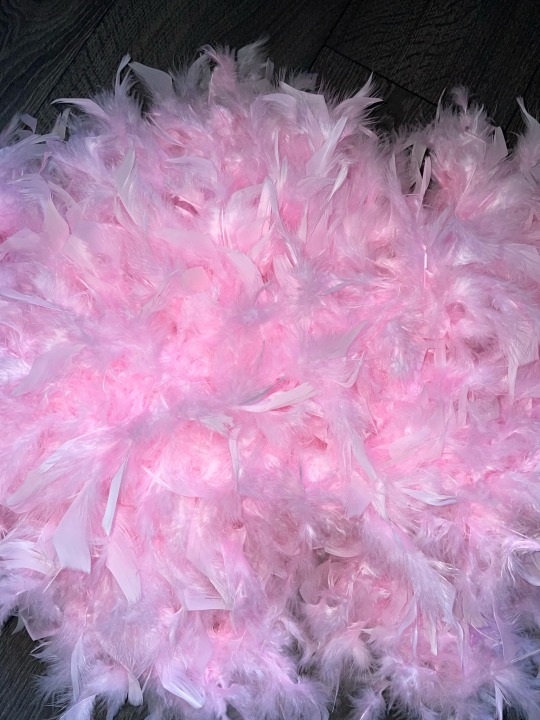
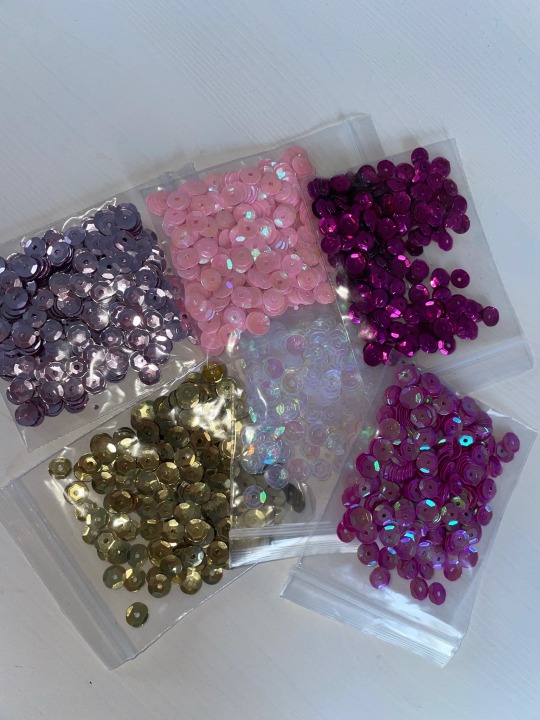
This week I had source my garment pieces to get ready to make my Audrey costume. We have to stick to a £25 budget so a lot of my items I already owned especially the embellishments such as the sequins, pearls and the shoes. I bought my main dress and duster coat co ord form an online fashion website in the sale and the pink feather boas were from Amazon. I want Audrey’s costume to be very feminine. I will be making the costume as it would look as she is looking for Seymour and then the same costume but I will add different elements such as rips and fake blood for when she is pulled out of the plant. It’s important to show the before and after so there is an idea of how clean she looked beforehand. I will mainly be adding to the dress and overcoat instead of making everything from scratch as this fits with the brief well and I can add lots of different elements to the costume. I want to make accessories for the costume such as a plant tendril which I can use within the photo shoot to creep up on Audrey and just to develop the picture story line instead of just being a before and after shot.

DEVELOPING PROFESSIONAL PRACTICE: COSTUME DESIGN
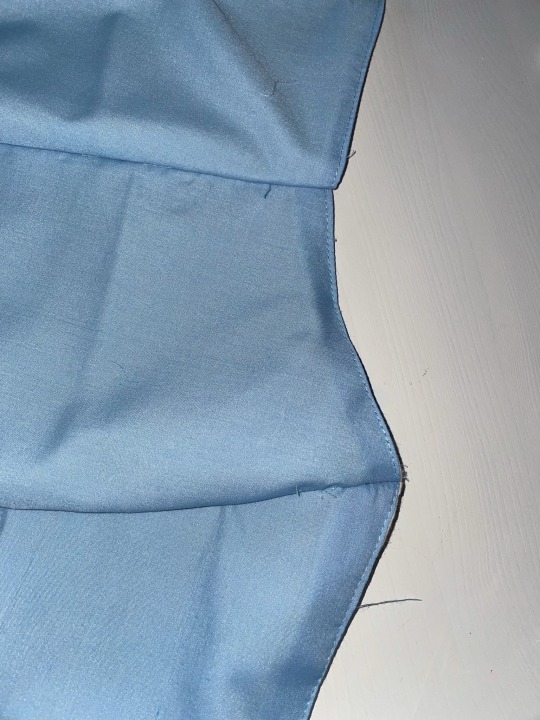
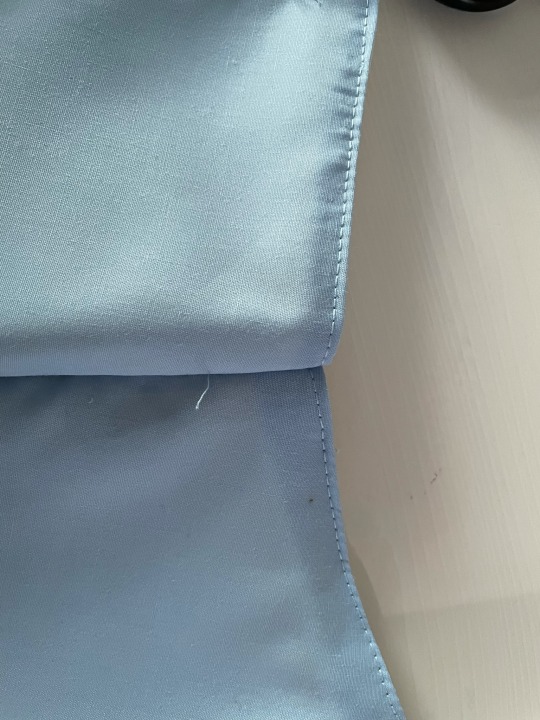
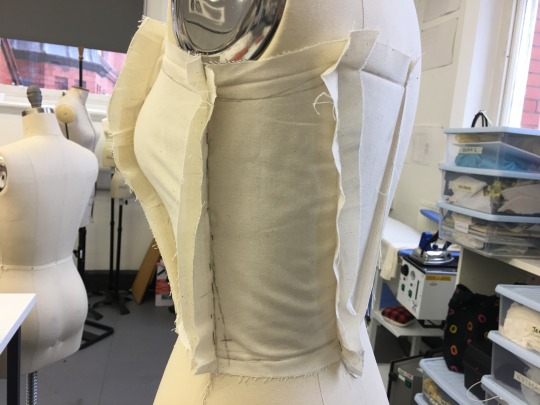
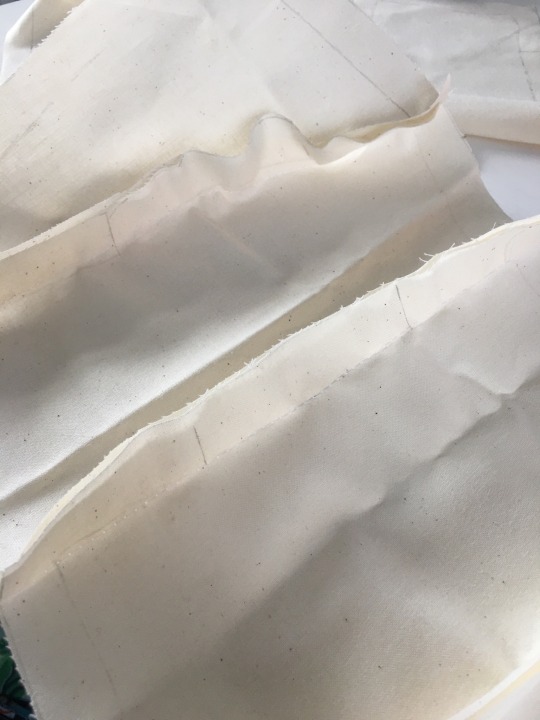
This week I finally saw the bodice coming together. After matching my main material to my patter pieces, I went ahead and overlocked all the sides leaving out the top and bottom. I didn’t go all the way to the edge of the pieces as there was extra material incase anything needed to be altered. I trimmed all the sides down slightly before overlocking to make it more manageable. I sewed all the pieces together leaving the back pieces open. After sewing the pieces with the machine, I then neatened the neckline and the bottom. This took a lot of time as I wanted to make sure there was no bumps where the material was being folded over as well as making the top stitch neat and equal on all the pieces. After doing the top, the bodice was looking so much neater and crisp. I had to do the same process on the bottom however before I did that I inserted all of the boning into the channels. This gave the bodice a lot more structure especially since mine is a strapless. After I went ahead and finished the edges on the bottom. This again took a lot of time as I needed to make sure all the bottom pieces were equal as well as making sure the top stitch looked equal to the stitching at the top of the panel pieces.


0 notes
Text
YEAR 2 - WEEK 11 - 7th DECEMBER 2021 - COSTUME DESIGN FOR THEATRE - DESIGNING FOR STAGE
After last weeks session with the garment breakdown, I had a much clearer idea of how I wanted to go about doing my costume. My chosen character is Audrey and I’m creating a costume for her for act 2 scene 3. Audrey is the main female lead in “Little Shop of Horrors” and she has a crush on her fellow work college Seymour. However before he mysteriously disappears, she is dating her abusive boyfriend Orin. Audrey stood out to me in the script because of how Orin was treating her. I also think she is misunderstood throughout the script. Orin is a crazy dentist who wears a leather jacket and rides a motorcycle. He abuses Audrey by giving her black eyes but this certainly doesn’t get unnoticed by the other characters especially Seymour. Audrey is freed from Orin after he inhaled too much laughing gas and then is fed to Audrey II by Seymour.
I wanted to design for act two scene three because it’s a scene that would require a costume change on stage. In this scene, Audrey heads to the shop to look for Seymour however she ends up in the same room as Audrey II. As it is night time she would be in a night dress. While looking for Seymour, Audrey II try’s to eat Audrey ripping her night gown, giving her deep cuts and sores. Seymour comes in just before it’s too late and pulls Audrey out of the plant. I want my costume to be a before where she’s in the shop looking for Seymour and then an after where’s she’s pulled out the plant all bloody and about to pass away.
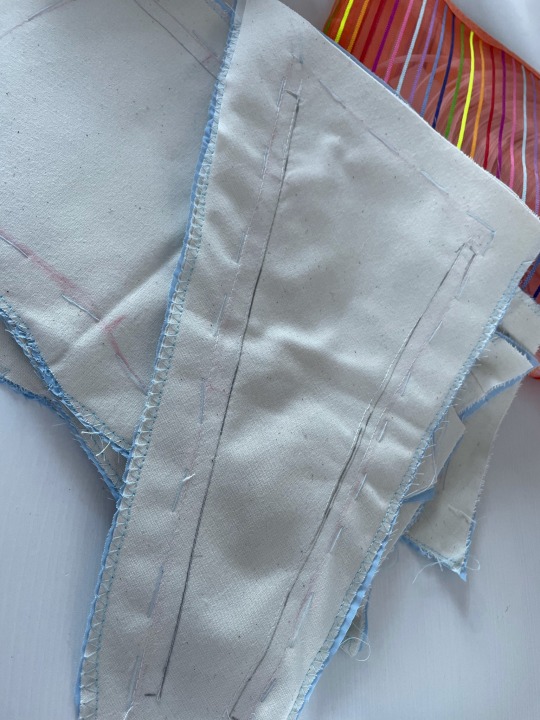
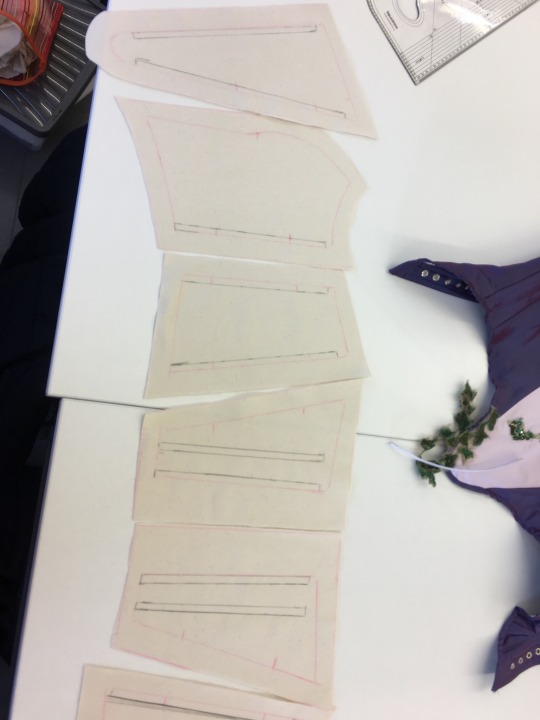
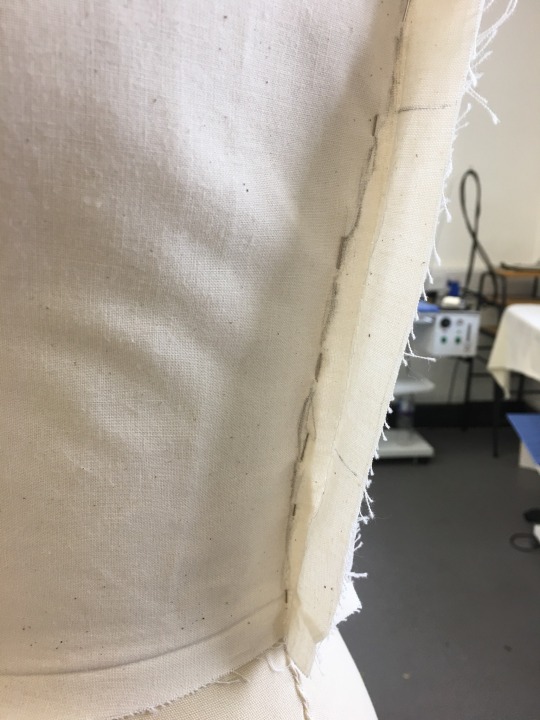
DEVELOPING PROFESSIONAL PRACTICE: COSTUME DESIGN Last week I had drawn in my boning channels then stitched them in, to do this I used my sewing machine and stitched in the sides and tops of the channels making sure to leave the bottom open so the boning could be inserted. Doing this also made sure both pieces of the calico were attached. I cut my pieces out of my final fabric. I have opted for this sky blue poly cotton as I want mine to have a princess theme and I can add lots of embellishments when it is completed. I then tacked it to the calico leaving about a two cm space from the edge.

0 notes
Text
YEAR 2 - WEEK 10 - 30th NOVEMBER 2021 - COTUME DESIGN FOR THEATRE - DESIGNING FOR STAGE
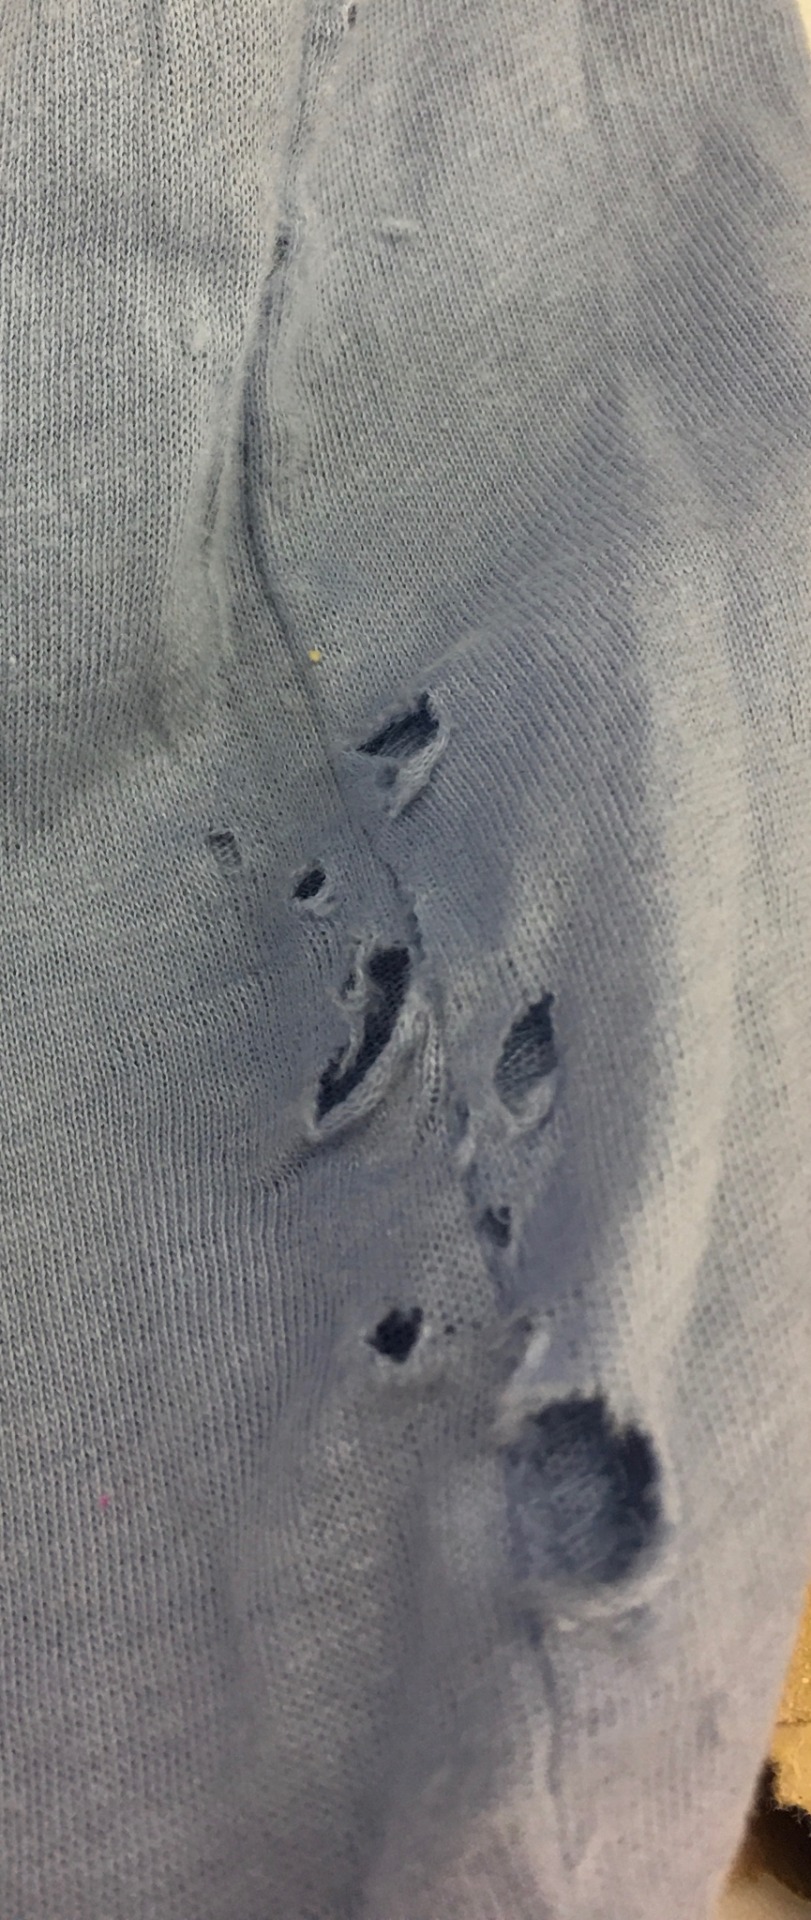
This week we had a session with Ruth that focused on breaking down garments and the different methods you can use. We had to bring in an old garment to breakdown, I brought in an old t-shirt. We were taught that you can use basic house hold items to breakdown down clothing for example if you needed sweat stains Vaseline works really well as it has a glossy effect and when it’s set into the material it’ll still show up. Sandpaper is used to create rips or worn hole in garments this is one of the techniques I used. When it comes to fake blood I mixed mine with a bit of water so it wasn’t as thick in some areas however, you can add corn flour to create a lumpy texture. I found the breaking down workshop very interesting as I hadn’t done anything like it before.

DEVELOPING PROFESSIONAL PRACTICE: COSTUME DESIGN
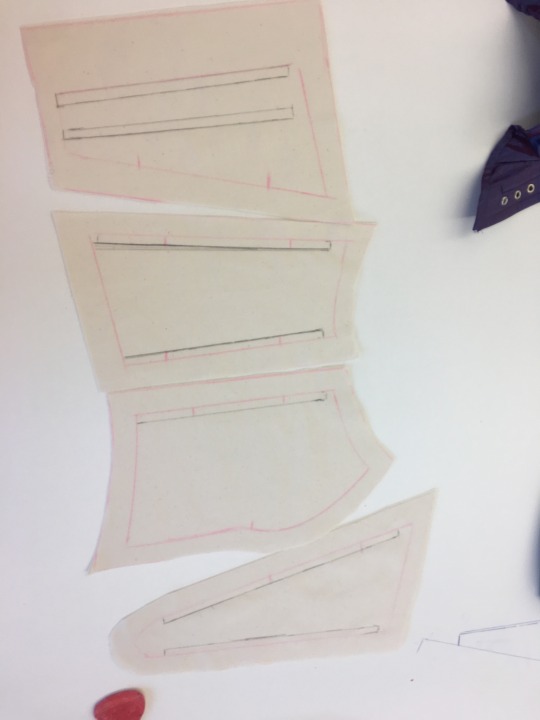
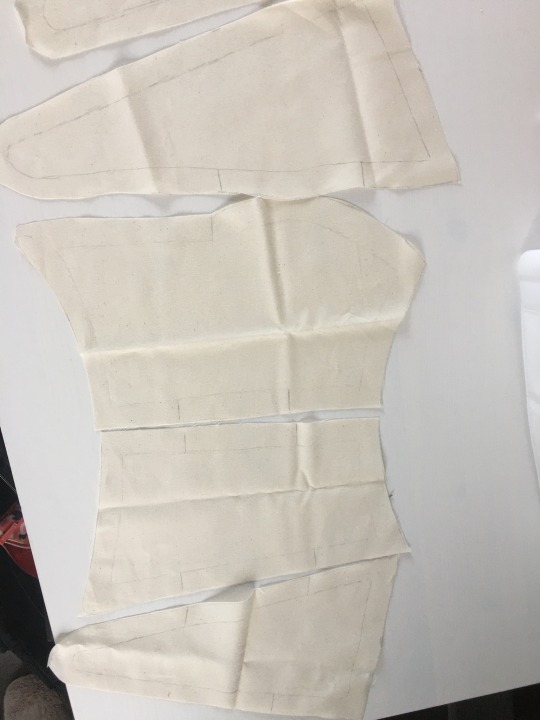
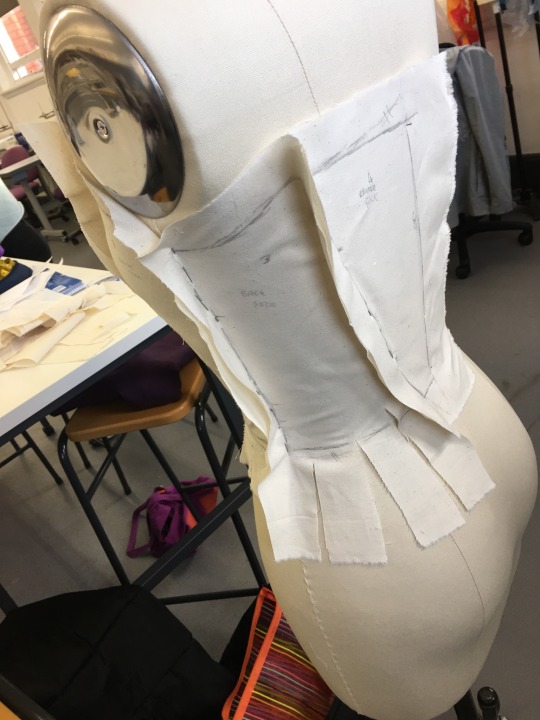
This week I had finished by initial toile and was ready to start to make the real thing. After removing the toile from the mannequin, I drew the pattern pieces out on paper. I then had a large piece of calico folded it in half and drew around each pattern piece twice creating 8 pieces. As my bodice is strapless it requires a lot of support and extra boning. The boning I am using is 8mm. With Ruth’s help she showed me where I should insert boning into each panel making sure it doesn’t go right to the top of the bodice. After completing this I ironed all my pieces out and repeated the boning placement on the other side.
0 notes
Text
YEAR 2 - WEEK 9 - 23rd NOVEMBER 2021 - COSTUME DESIGN FOR THEATRE- DESIGNING FOR STAGE
This week I did an initial breakdown of the script on one note. I went through and highlighted key points that stood out to me, the characters, description of the characters, props, costume considerations,reference to costume, scene setting/ synopsis and which act and scene it is. When I was annotating, I really focused on where the costume quick changes would be as this is a theatre production and everything is happening in real time. We also discussed how the quick changes happen and who needs to be involved for what character. It’s really important the cast and crew practice the quick changes before the actual show so everyone knows what they are doing and it all happens in a calm manner. I also looked into all the different characters and their personalities to help me decided on who I wanted to design for. Tracy asked us all to complete some costume idea sketches for the chorus, the three girls that help narrate what is happening in the play. They are described as “street urchins” so I dressed them in very casual clothing.


0 notes
Text
YEAR 2 - WEEK 8 - 16th NOVEMBER 2021 - COSTUME DESIGN FOR THEATRE - DESIGNING FOR STAGE
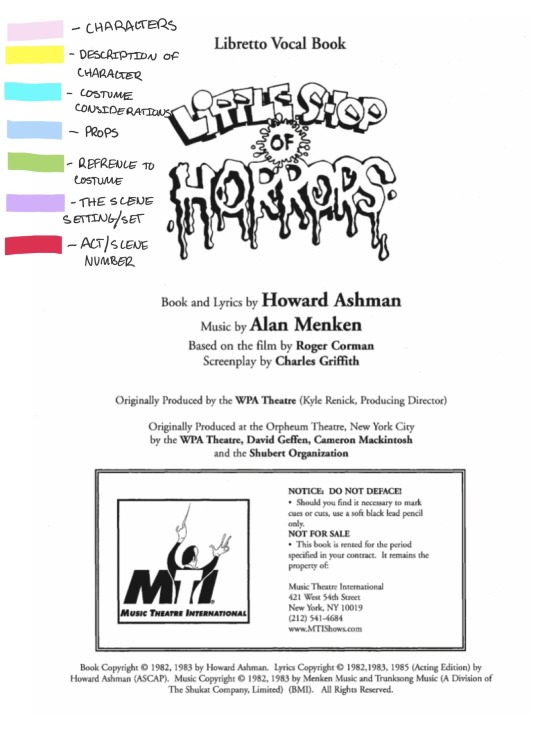
This week we had a module launch for our new module costume design for theatre, designing for stage. This is a 9 week module all based on the script “Little Shop if Horrors”. Little shop of horrors in a sci-fi horror musical with a 1960s pop rock feel it’s created by Alan Mencken and Howard Ashman. The original script was first made in the 60s for theatre but had since been made into a film with a different ending. It follows the plot of how a nerdy assistant of a floral shop, Seymour Krelborn comes across a strange plant which he names “Audrey II” after his crush at the shop. Little does he know this unusual plant will develop an unquenchable thirst for human blood. As Audrey II grows bigger and meaner, it promises Seymour limitless fame and fortune as long as he keeps proving the blood. However just when it’s too late Seymour discovers the plants true drive for world domination. With the script we need to create a costume for one chosen character but needs to be in the budget of £25. We need to create a sketchbook presenting our designs and processes, a A3 illustration board, the fully finished garment and finally we need to present at 10 - 15 minute presentation showing our process. I’m looking forward to this module and have some good ideas already on what to create.
DEVELOPING PROFESSIONAL PRACTICE: COSTUME DESIGN
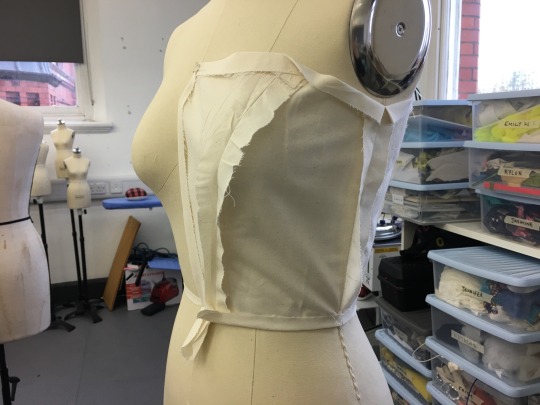
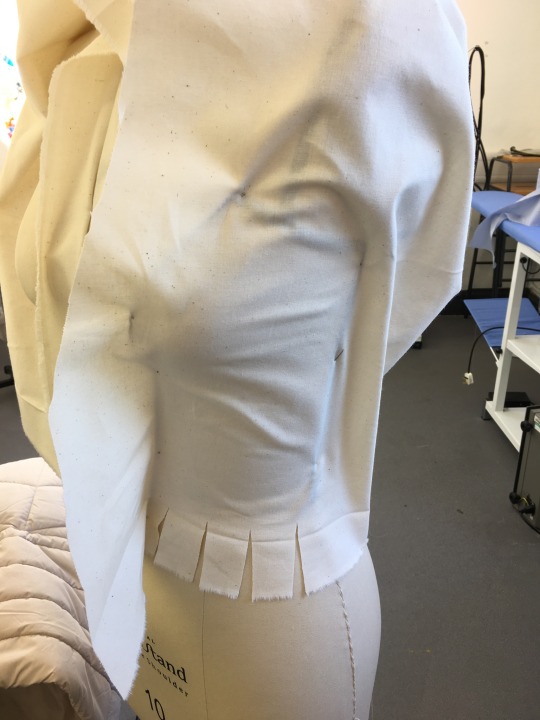
We were making and amending our calico bodice. After sewing mine I noticed some bagging on the front side panel. To fix this I unpicked the stitches on the panel and re-pinned it following the shape of the mannequin but making sure I wasn’t pulling at the piece and creating more bagging. After pinning I re-sketched in to the calico with pencil creating a new line. I had to think about the line I wanted for going under the arm as mine in a strapless bodice. I decided to keep it relatively straight but not so it would be uncomfortable.

0 notes
Text
YEAR 2 - WEEK 6 - 1st NOVEMBER 2021 - DESIGNING FOR COSTUME DRAMA
This week was our hand in week of all elements of this module. I made sure everything was ready to hand in both digitally and physically by printing out my sketchbook and illustration board. Task 2 of this module was to perform a presentation that had to be 10 - 15 minutes long talking about everything we learned, the making process of our hats, illustrations and relevant research. I made my presentation slides on power point including a range of photos, some screen shots of pages from my sketchbook and final pictures of my hat. I had note cards to help prompt mr through talking about each element of the presentation. I felt as if my presentation went well as I was very confident with what I was saying as well as feeling very proud of the work I achieved.
I’ve really enjoyed the designing for costume drama module with looking at the script Pygmalion and researching into 1912 London and learning to make a hat out of buckram which is definitely a technique I will be using in future modules.
DEVELOPING PROFESSIONAL PRACTICE: COSTUME DESIGN
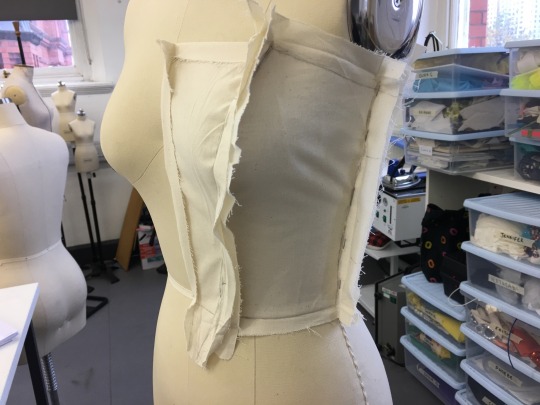
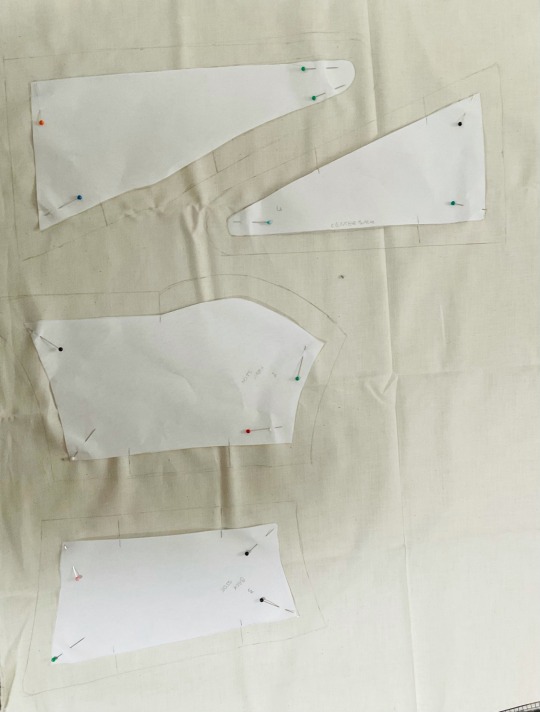
This week we began to draft a bodice using calico. For this process we traced around each of our paper pattern pieces then added a 2cm seam allowance to allow movement to the bodice if needed. I cut 8 of my pieces 4 on each side. I stitched one half of the pattern pieces together making half a bodice.
0 notes
Text
YEAR 2 - WEEK 5 - 25th OCTOBER 2021 - DESIGNING FOR COSTUME DRAMA
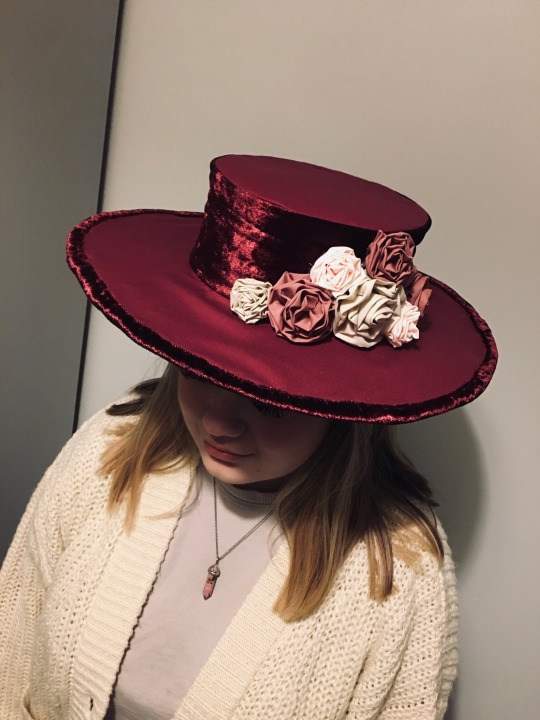
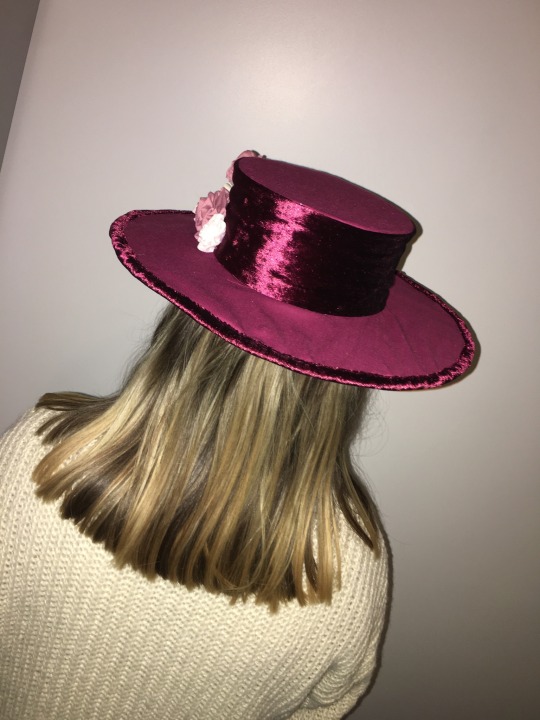
I completed my final hat last week this week I was concentrating mainly on refining my sketchbook book. We had to reference all images we had used in our sketchbook our own included. I had a friend of mine model my hat for me. I put her in a oatmeal coloured cardigan as it really went with the colours of the flowers in the hat. I got some different images of the hat. It looked really good on and was very secure and sturdy. After getting my photos, I edited some of them to really enhance the colours and lighting of the images. Now that I had my final images I went on and made my A3 illustration board. I drew my hat and Clara’s full costume by hand on Procreate. I annotated everything including what materials I used and the details of her costume. After printing it out, I attached small squares of each material I used to the side of my board. I really enjoy making the illustrations boards as it a chance to really refine all your drawings and ideas.


0 notes
Text
YEAR 2 - WEEK 4 - 18th OCTOBER 2021 - DESIGNING FOR COSTUME DRAMA
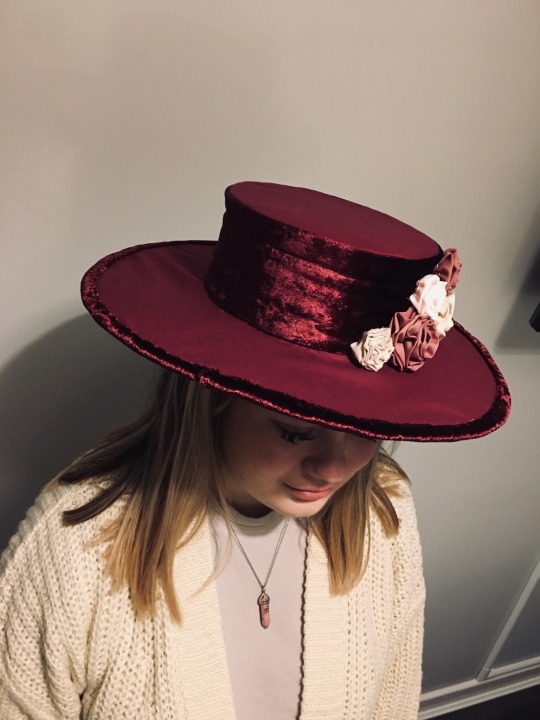
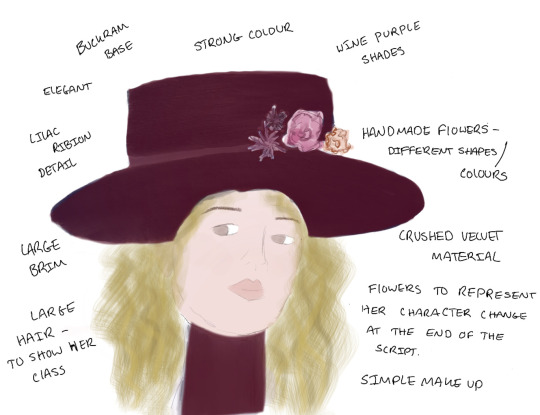
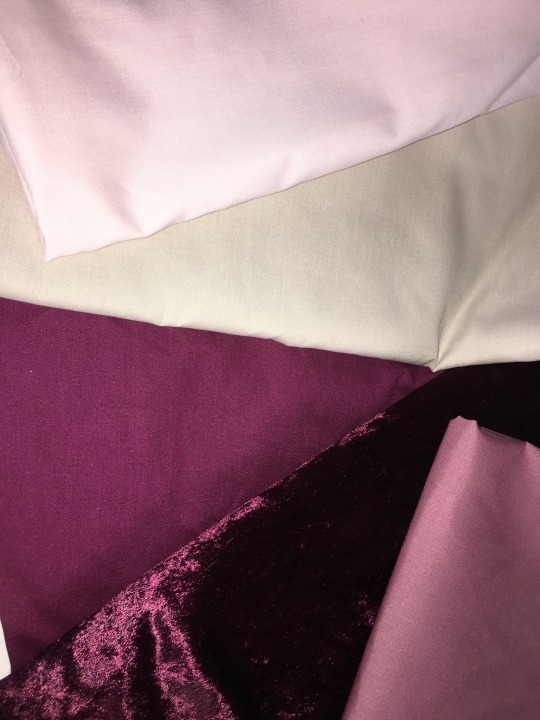
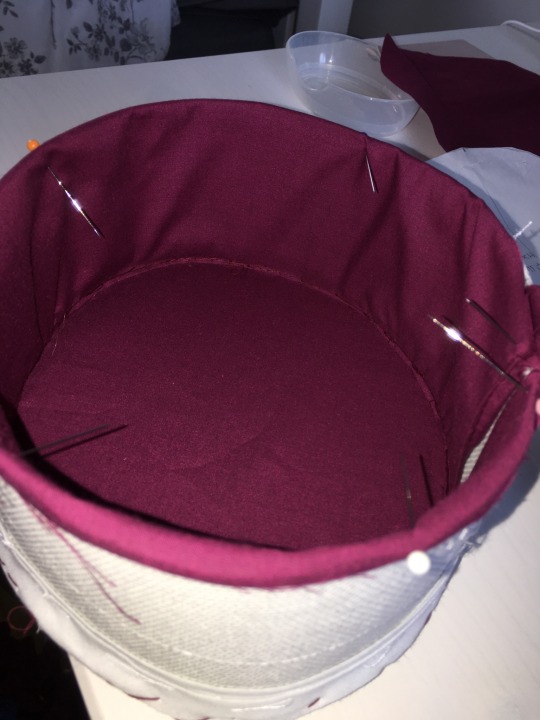
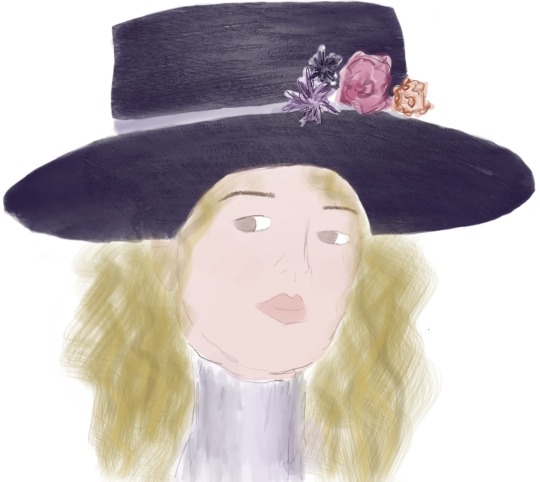
In week 4, I was concentrating on making my final hat design. I have completed my final design ideas for Clara's hat and had an idea of what she would wear for her costume. I decided on a bold colour for the main of the hat and wanted to use the combination of velvet and poly cotton fabric. I also decided to go ahead with making the flowers to represent her character change at the end of the script.
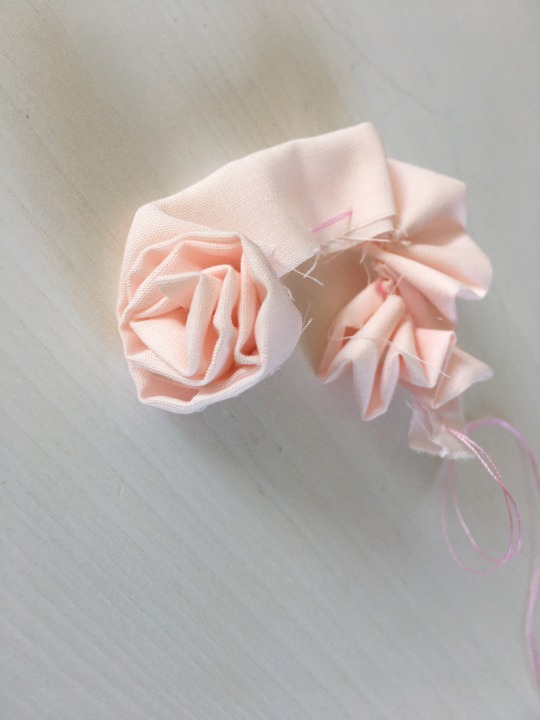
The actual making process of the hat was exactly the same as making the small buckram hat. I really enjoyed the whole making process of the hat but it was a lot more time consuming than the smaller one. I stitched all the wire on by hand as I think this makes it a lot more secure especially on the larger brim. When it came to my materials, I went to a local fabric store to me, Leon’s, and bought a range of materials. For the main body of my hat I went with a dark raspberry colour in both poly cotton and velvet, for the handmade flowers I went with a range of muted pinks and stone poly cottons. After making the hat, I started by lining the inside of the top hat. I followed all the same covering process as the sample hat and loved the way it came out. It was bold and strong but not to over the top and it presented Clara’s character well. Making the flowers was very simple to do. I stitched thread in and out of the strips of material then gathered them and hot glued them into place. I’m overall so pleased with how my hat turned out and how it relates with my chosen character.


DEVELOPING PROFESSIONAL PRACTICE: COSTUME DESIGN
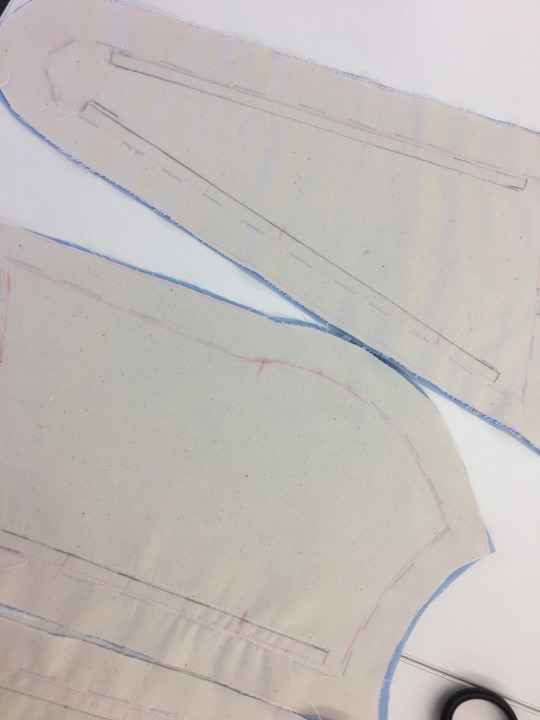
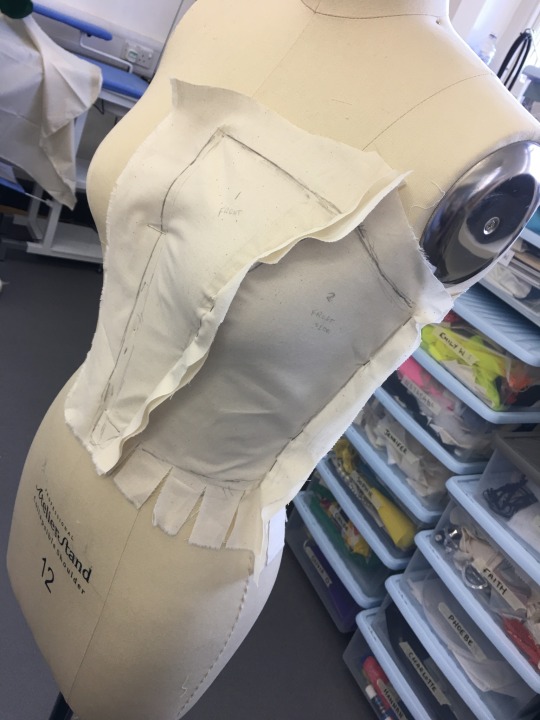
We went over the first pattern pieces we made for our bodice and refined them. I cut excess fabric away and neatened up my lines. I then got pattern paper and traced over the pieces of calico giving me the pattern pieces to use. This was a very technical process as all the lines had to be very precise.
0 notes
Text
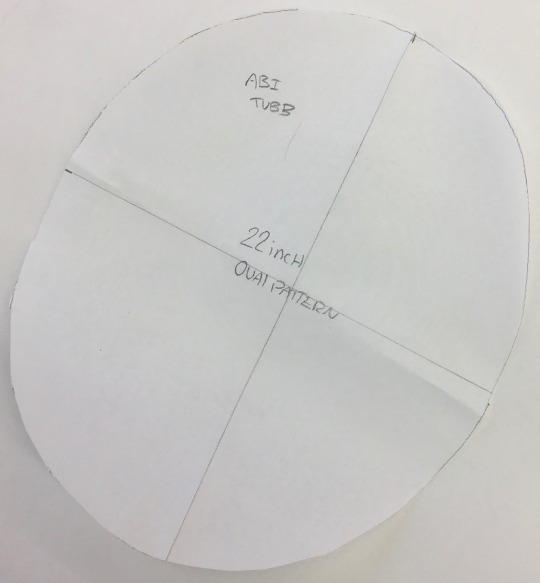
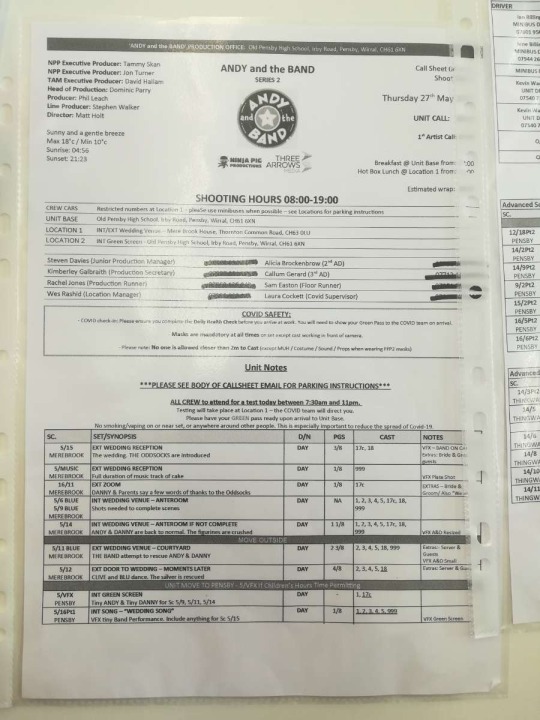
YEAR 2 - WEEK 3 - 11th OCTOBER 2021 - DESIGNING FOR COSTUME DRAMA
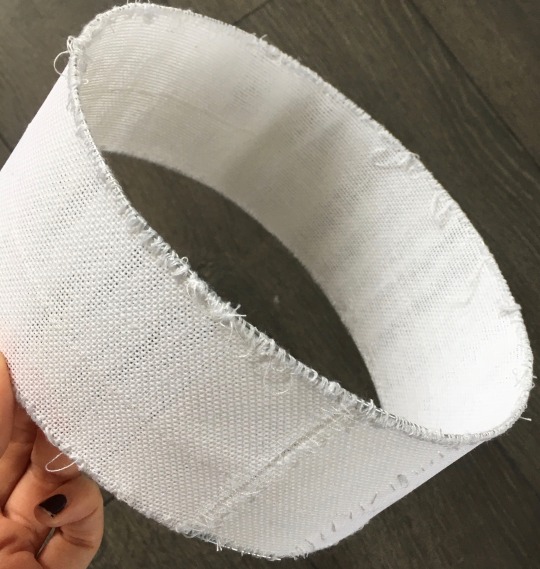
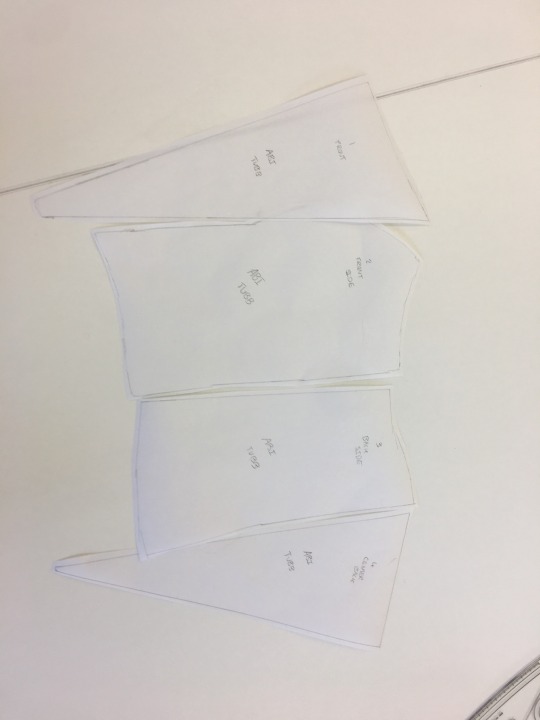
In week three it was our last week of making our small buckram hats. I had finished mine and went through the stages of covering it using a sage green poly cotton. I’ve enjoyed making the buckram hats and I am excited to start making my final one. As I had completed my sample hat, I cut the pattern pieces I will be using for my final hat. I’m doing mine based on a average women’s head size, 22 inches, with a large brim. I wanted to get all this prepped including all the wire so I could begin my making process. In our second session of the day, we looked into a section of the script from Andy and the Band just to compare the differences between our script Pygmalion compared to a script for children’s TV. We also looked in-depth into the responsibilities of the production and costume teams as well as the key roles and what they consist of. This was really helpful as in our sketch books we have to include all the responsibilities as well as the scheduling of the production and what has to take place. Regarding my sketchbook, I had made a few more initial sketches of Clara but also trying to figure out what her final look will be. I did some research into 1912 London to get a better idea as to what was going on at the time, what big events happened and how people lived.
DEVELOPING PROFESSIONAL PRACTICE: COSTUME DESIGN
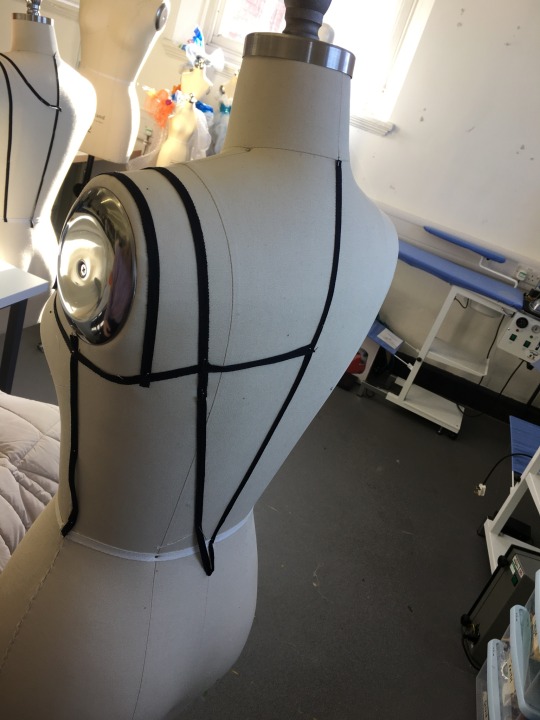
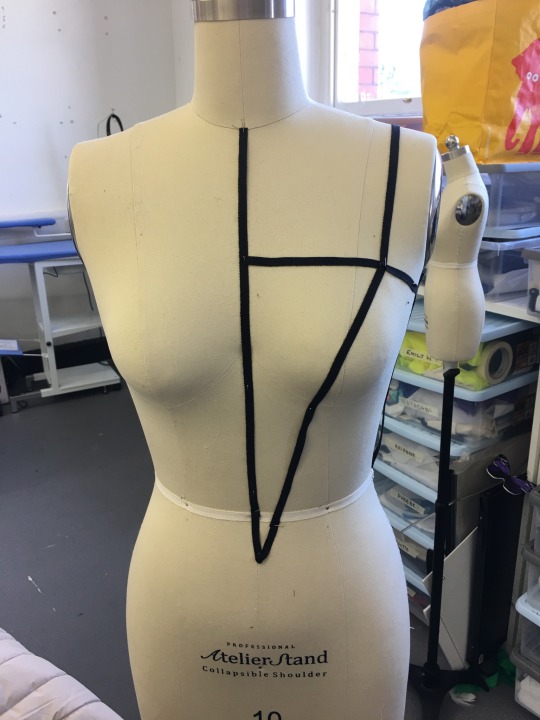
In this weeks session, we were deciding on the design of our bodice and draping on the mannequin. I have decided on making a bodice with a square neckline and no straps. We started the process using black tape and on half the mannequin making the shape of the bodice. As I haven’t done this before, I’ve stuck with a 4 panel bodice. We took a section of calico and started to cut and make our panels. It was really important that the calico was smooth to the body and had no bagginess. We left a large seam allowance to allow the bodice to be altered. After doing our panels, we drew in where the black tape was showing through creating the shape of our panels. I’m really enjoying these sessions as it’s very different to the draping I’ve done before as it’s a lot more technical.
0 notes
Text
YEAR 2 - WEEK 2 - 4th OCTOBER 2021 - DESIGNING FOR COSTUME DRAMA
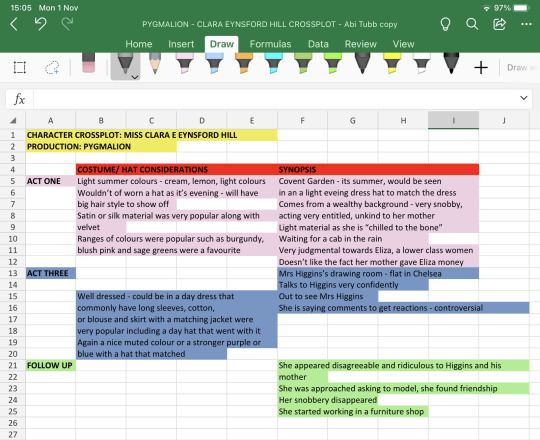
In our second week of this module we looked more into what goes on behind the scenes for a production in the costume department. We also analised a previous call sheet. The call sheet is a extremely vital part to any sort of production as it is a full day plan. We also discussed the importance of each role within the costume department and the responsibilities they have. The call sheet is often a document made by the assistant director and it is sent to all cast and crew members. We were carrying on with making our small buckram hats. I am really enjoying the process of the buckram hat and something I will consider when making my final hat for this module. I finished making the structure of the hat and was ready to cover it. I did some initial sketch ideas for my chosen character Clara as well as completing her character cross plot. Clara Eynsford Hill is the daughter of Mrs Eynsford Hill and the sister of Fred. She is extremely demanding rude young women. I think this might be caused by her frustration of how desperate she is to be in a wealthier class. I imagine her being very fashionable on a budget but wearing mainly deep darker colours.


DEVELOPING PROFESSIONAL PRACTICE: COSTUME DESIGN
On the Thursdays session for developing professional practice, we learnt about all the different measurements we would have to take to make a costume for someone. We were put into partners and had a list of all the different measurements and took it in turns to take each other’s. We also disscused padding of costumes and now different costume designs would need certain types of padding such as if on actor was playing a character who was pregnant there costume would need over layers to smooth the bump as well as access to the stuffing so it can be altered if needs be.
0 notes
Text
YEAR 2 - WEEK 1 - 28th SEPTEMBER - DESIGN FOR FILM AND TV PRODUCTION - DESIGNING FOR COSTUME DRAMA
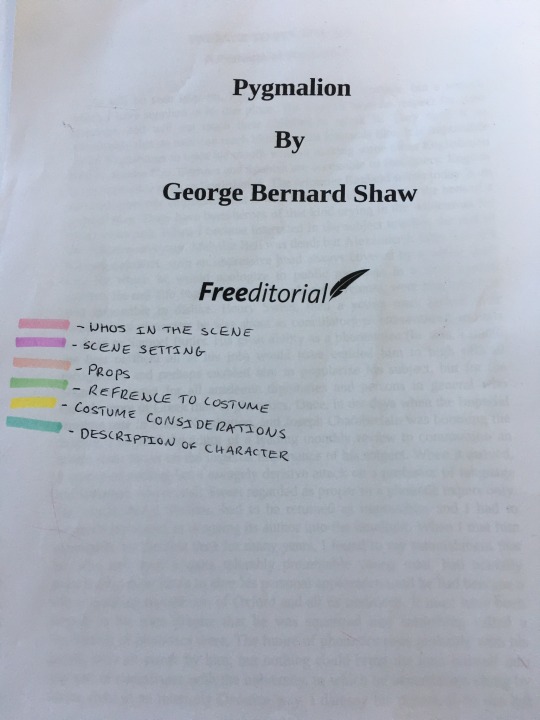
Our first week of level 5 of the module launch, designing for costume drama. Within this module launch we were given the script Pygmalion. We need to complete an A4 sketchbook, a A3 illustration board and a fully functional hat or millinery piece.
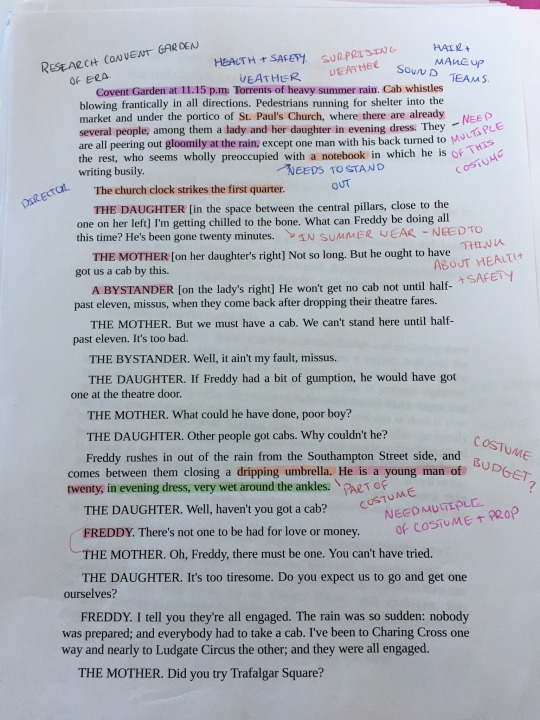
Pygmalion is a script written by George Bernard Shaw. The play is set in London in 1912, Edwardian era. It follows the story of a young, poor flower girl who has been misunderstood and disrespected because of her appearance and now a wealthy upper class men helps her. We went through act one and broke down each section including costume considerations, health and safety of the actors, costume budget and how each character is portrayed. I initially broke down the script by hand and then I went on and did a master breakdown of the whole script using Microsoft excel.

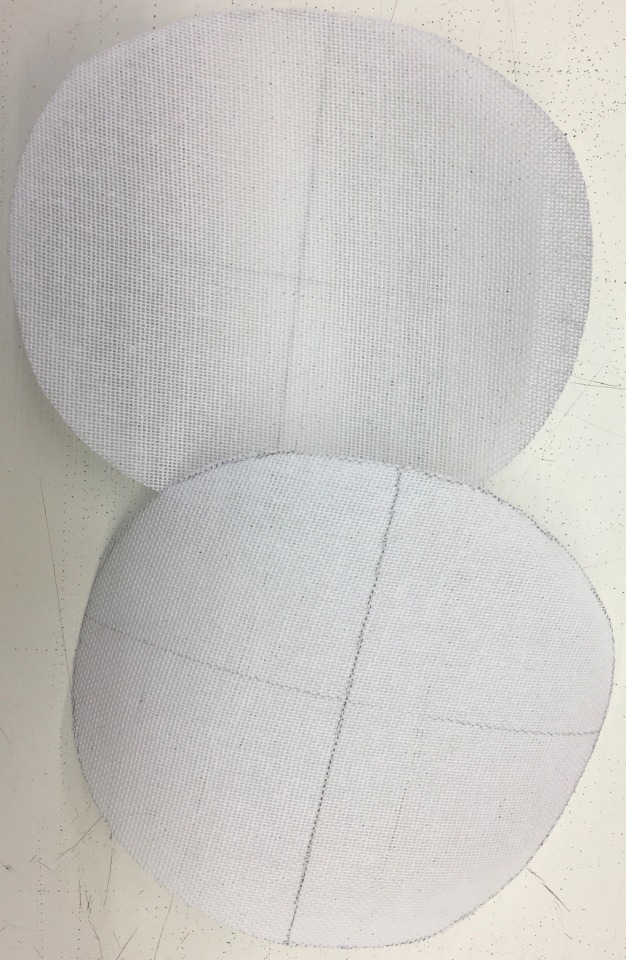
In our sessions with Julia, we are making a small buckram hat so we know what to do when it comes to making our final one. I am really enjoying these sessions as this the first time I've ever made something like it. We cut two sets of or pattern pieces out then proceeded to stitch the relevant pieces together. I then stitch wire to the edges of all the pieces as this makes the hat sturdy.

0 notes
Text
I have throughly enjoyed this establishing professional practice for costume design module. I really enjoyed illustrating before the module but now I have had to push myself out my comfort zone and throughout doing the weekly tasks, trying new drawing techniques and incorporating my own unique style I feel I have created very strong work and have become a very confident illustrator. I have surprised myself when trying new ways to draw thinking I would struggle or dislike it but would now incorporate it more often such as continuous line drawing. I’ve loved presenting my work each week on the digital padlet gallery as well as seeing how other people have chosen to take on the tasks I’ve also enjoyed creating this blog showing the process of different illustrations as well as drawings I didn’t show in the digital padlet. Even though I found some of the weekly tasks challenging, it was definitely good to push myself and trying things I might not of done otherwise.
0 notes
Text


WEEK 10 - 6th MAY 2021 - FANTASY ILLUSTRATION
This weeks task was our final one before our hand in. Using all the illustration skills, techniques and processes we have developed over that past few weeks we had to illustrate a character from a fantasy film or production and our characters could be human or nonhuman. We could use any mediums and had to spend 30-45 minutes illustrating it, my illustrations took about 2 hours to complete.
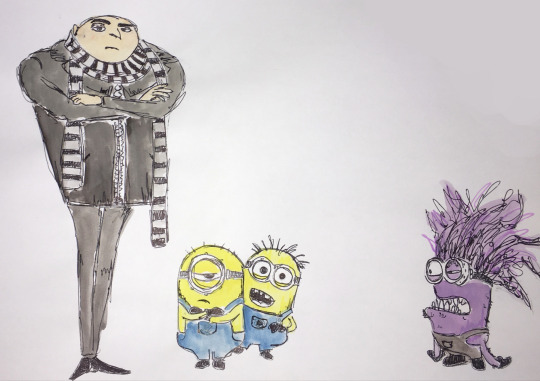
As it was a fantasy production we had to choose from, the first film that came to mind for me was Despicable Me as even though it is a cartoon it contains “human” and nonhuman characters. The top picture was my reference photo and I thought it would be perfect as it contained the range of characters I wanted to draw.
I planned it out first using very faint pencil lines sketching out the proportions. As this was the final task, I wanted to use the mediums which I am most confident using which is watercolour and black biro pen. After adding in the colour, I went ahead and added all my detail in with biro where I added texture to the clothing, hair texture, facial features and accessories. I wanted to add more tone to the “Minion” characters as there body’s are all one colour and don’t have much detail. To achieve this I used pastel coloured highlighters to add some slight shading as well as adding another shade to the purple ones hair. As I did use watercolours I had some colour swatches in the top right corner and before posting it to the digital padlet I wanted that removed so I put into pro create and blended the swatches out.
I loved creating this piece and presenting it as the characters I had chosen were so different to everyone else’s. Before adding this piece to my storybook, I am going to add a background relating to the film but still make my characters the focal point.
0 notes
Text

WEEK 9 - 29th APRIL 2021 - FABRIC DETAILS AND EMBELLISHMENTS
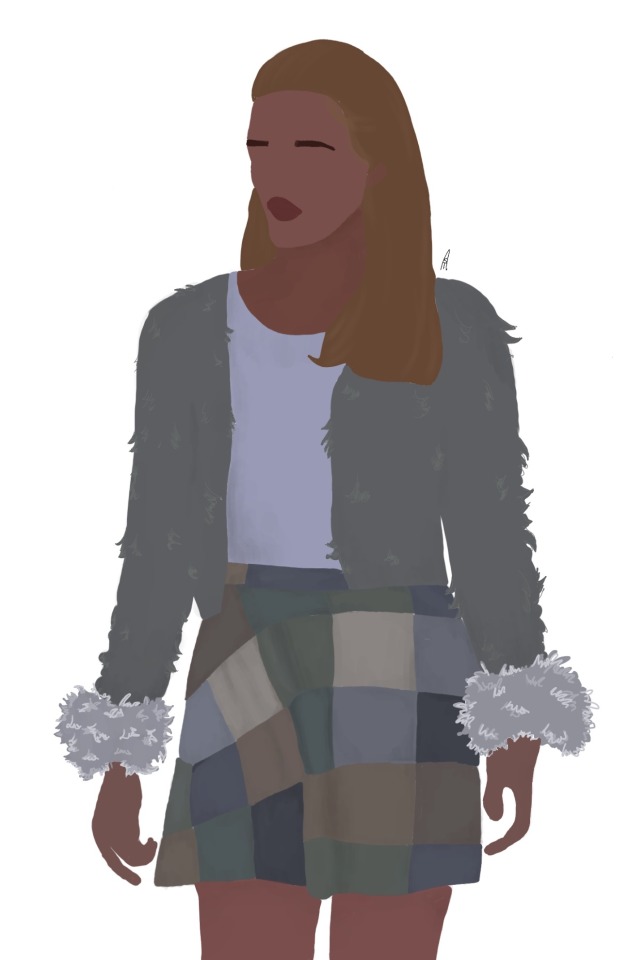
This weeks task was all on focusing on fabric textures. We had to select two different fabrics to illustrate and incorporate on a character of our choice, I chose Cher Horowitz from the film Clueless, and we had to illustrate our characters making sure to include colour, texture, detailing and shading and we could use any mediums we wanted.
I chose Cher as she is iconic for the amazingly bold outfit choices she makes. I absolutely love her style throughout the film and as she has so many different outfits I had a lot of choice. I loved this outfit she is sporting on the left so I decided to use that to get inspiration from. I loved the fluffy cuffs and the slight fur on her green jacket. I decided to do this task digitally as it’s not what I would usually go for and I also thought I could add in the different textures, details and highlights easier. I love the way my illustration has come out especially with the highlights on the jacket and the movement in the skirt. I added shading in on her t-shirt as well to add some more depth on a plain piece of clothing. If I was to do this again I would attempt to add in some more facial details.
0 notes
Text
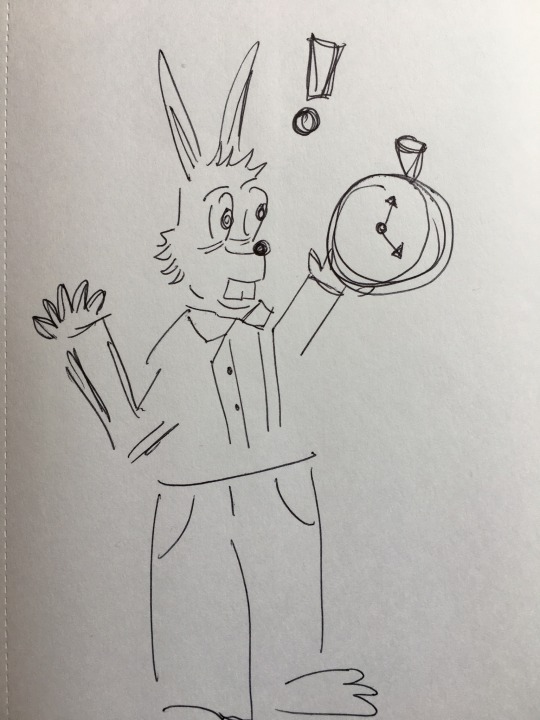
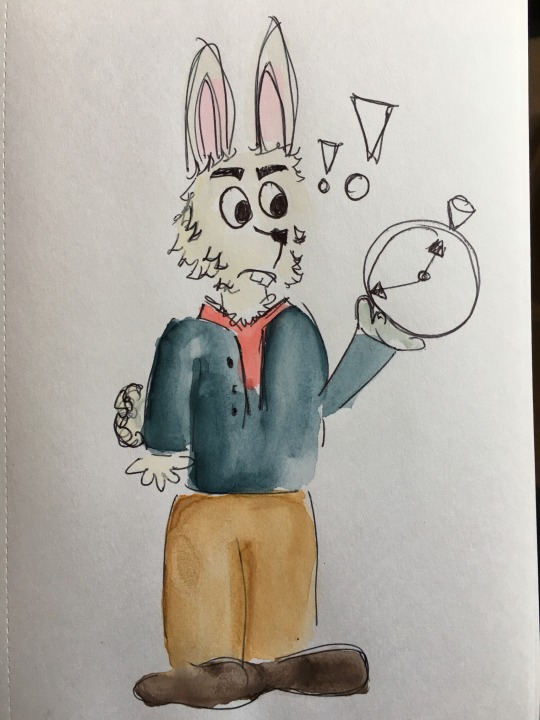
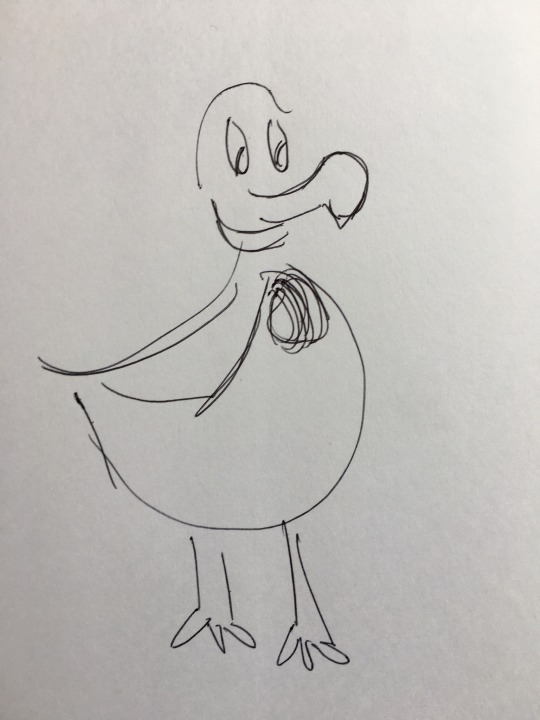
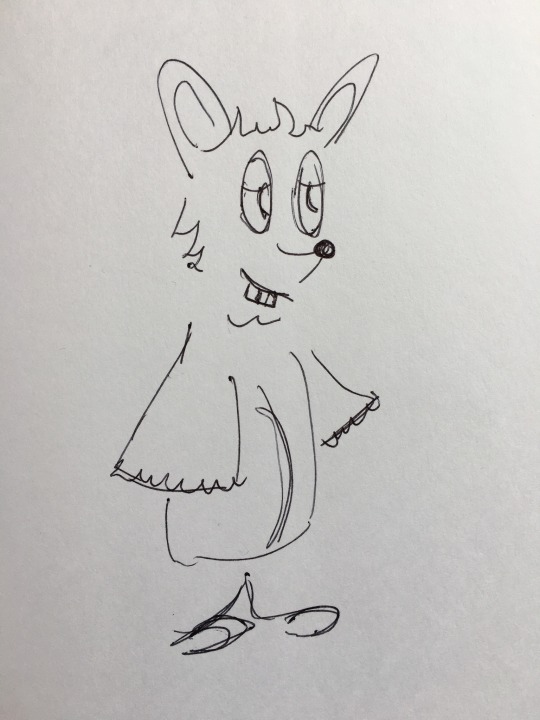
WEEK 8 - 22nd APRIL 2021 - NON HUMAN ILLUSTRATIONS
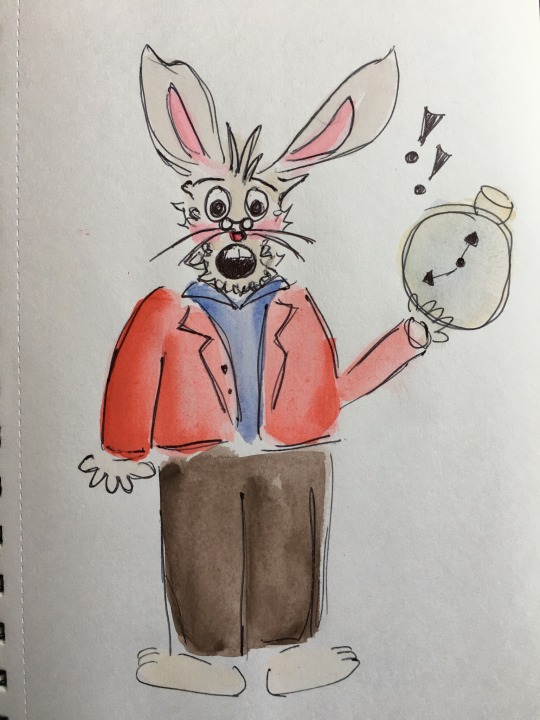
Our week 8 task was to use our Communication and Realisation Alice in Wonderland land script as our reference and from it we had to select three non-human characters to sketch and work into to define them. We could use any materials, I went with my favourite traditional mediums biro and water colour.
I looked into multiple of the non-human characters as they all stood out to me. I did some quick sketch drawings of first the French mouse, the dodo bird and the white rabbit. I preferred the white rabbit over my other two drawings as I liked how I could translate his nervous expressions into my drawing.I decided to draw him with different facial expressions to create a range and see which I preferred as well as adding some different colour ranges to him. The very top white rabbit in the white jacket was my chosen piece to add to the padlet as I loved his facial expressions, as the white rabbit is quite an anxious panicky character I wanted to try and get that across. I also love the colour palette I used as it’s quite similar to the Disney version of Alice in Wonderland. Next time I would challenge myself and try recreating one of the cards or maybe a different animal. Overall I really enjoyed this task as it was challenging doing a non-human character but I love the Alice in Wonderland theme.
0 notes
Text

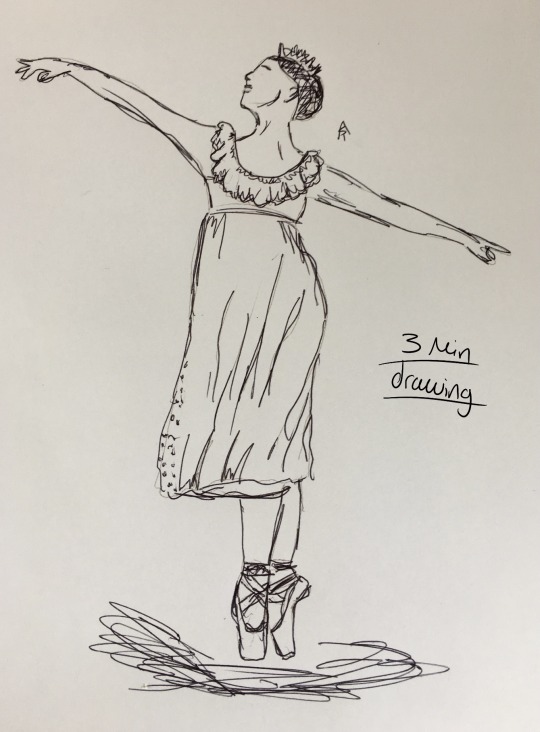
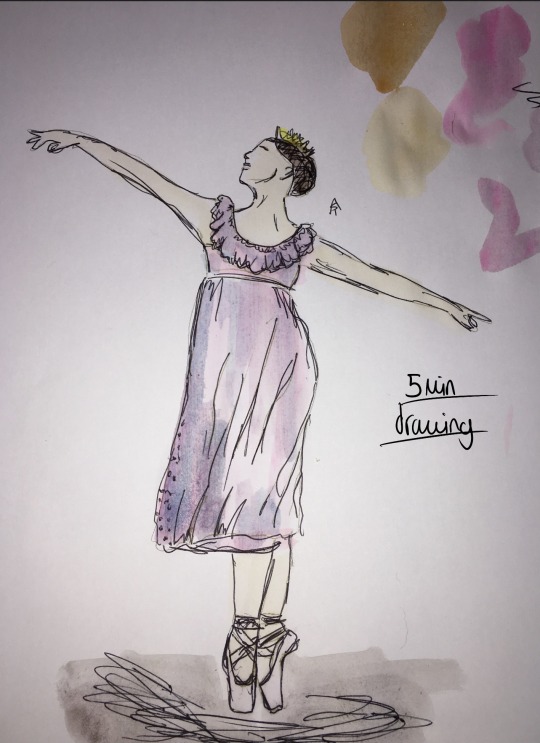
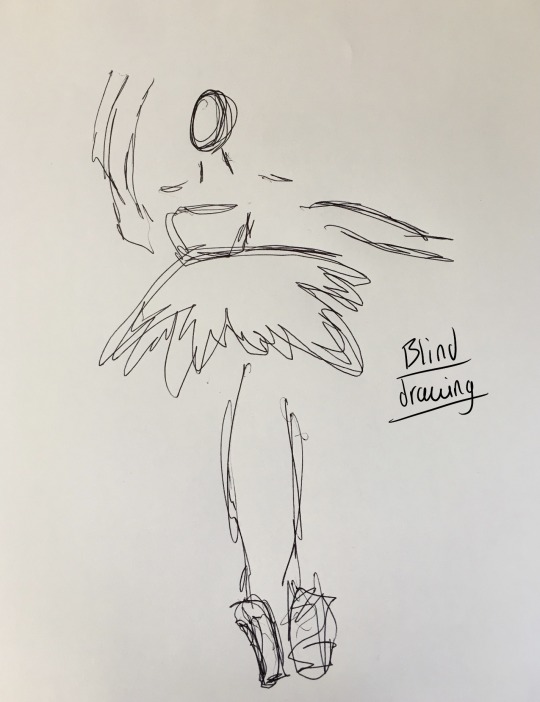

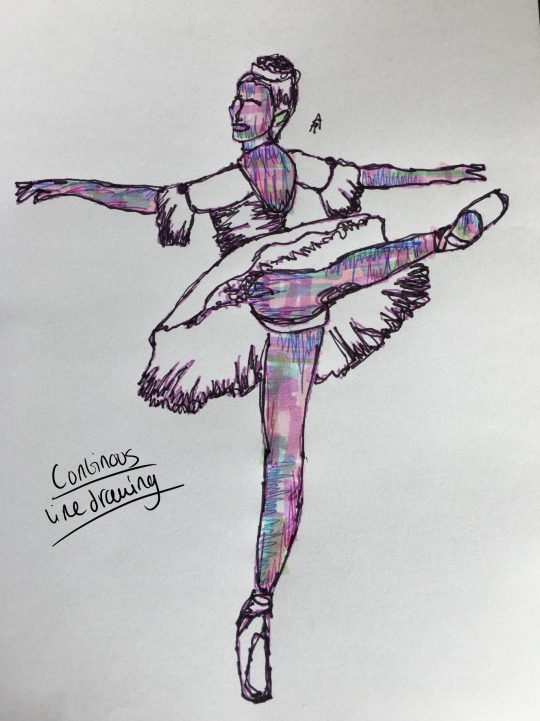
WEEK 6 - EASTER TASK - 2 CONTINUOUS LINE, 3 TIMED DRAWINGS, BLIND DRAWINGS.
Our Easter holiday task was to look at footage from a live stage performance, I chose the ballet The Nutcracker, and at various stages of the performance pause and capture the scene. Our sketches had to focus on movement and encapsulate the style of the performer. We could use any mediums and methods apart from digital. I chose mediums I was comfortable with using which included water colours and biro pens.
The Nutcracker is a beautiful Christmas ballet about a little girl that goes to the land of the sugar plum fairy. There is many different characters, costumes and dance styles throughout the ballet so I had a lot of options to work with. For both of my continuous line drawings I chose the focus on the sugar plum fairy. I took a photo of her mid dance so it was easier to capture details. The first one as she’s doing a mid air leap, I used black biro to create the first out line. I then went in with coloured biros as her dress was white but the stage lighting made it look like all sorts of colours so I thought it would be interesting to add in that element of bolder colours. With my second one when she is facing the back but her body is turned I used the same methods as the first as well as adding in felt pens to get a greater range of colours. This was definitely more challenging with the awkward position she was in but I love how bold and strong it has come out.
I enjoyed doing my timed drawings as I just decided to stick with the same character, Clara, and pose she was in but add more detail with in each time slot. I started with quick biro lines for 2 minutes, then at 3 minutes I added more detail with the shoes, crown and her garment, then finally for 5 minutes I added in watercolour to add depth and movement to her costume. I love the way this turned out and the different stages it went through for the final product.
I found the blind drawing the most challenging out of them all. I decided to focus in on one of the snow flake dancers as there costume was a classical tutu. It was difficult to try and get proportions correct as well as trying to incorporate the movement of the dancer. I used only back biro for this drawing.
1 note
·
View note