
aylahetaexperimental
Experimental Surfaces Ayla Heta
79 posts
Don't wanna be here? Send us removal request.
Last Seen Blogs

dokidobe
yellow.dr.monv
enteisabo
Thank you for being alive.
09yards
nineyards

reviewguru1
Untitled

gnova-biotech
GNova Biotech
Text


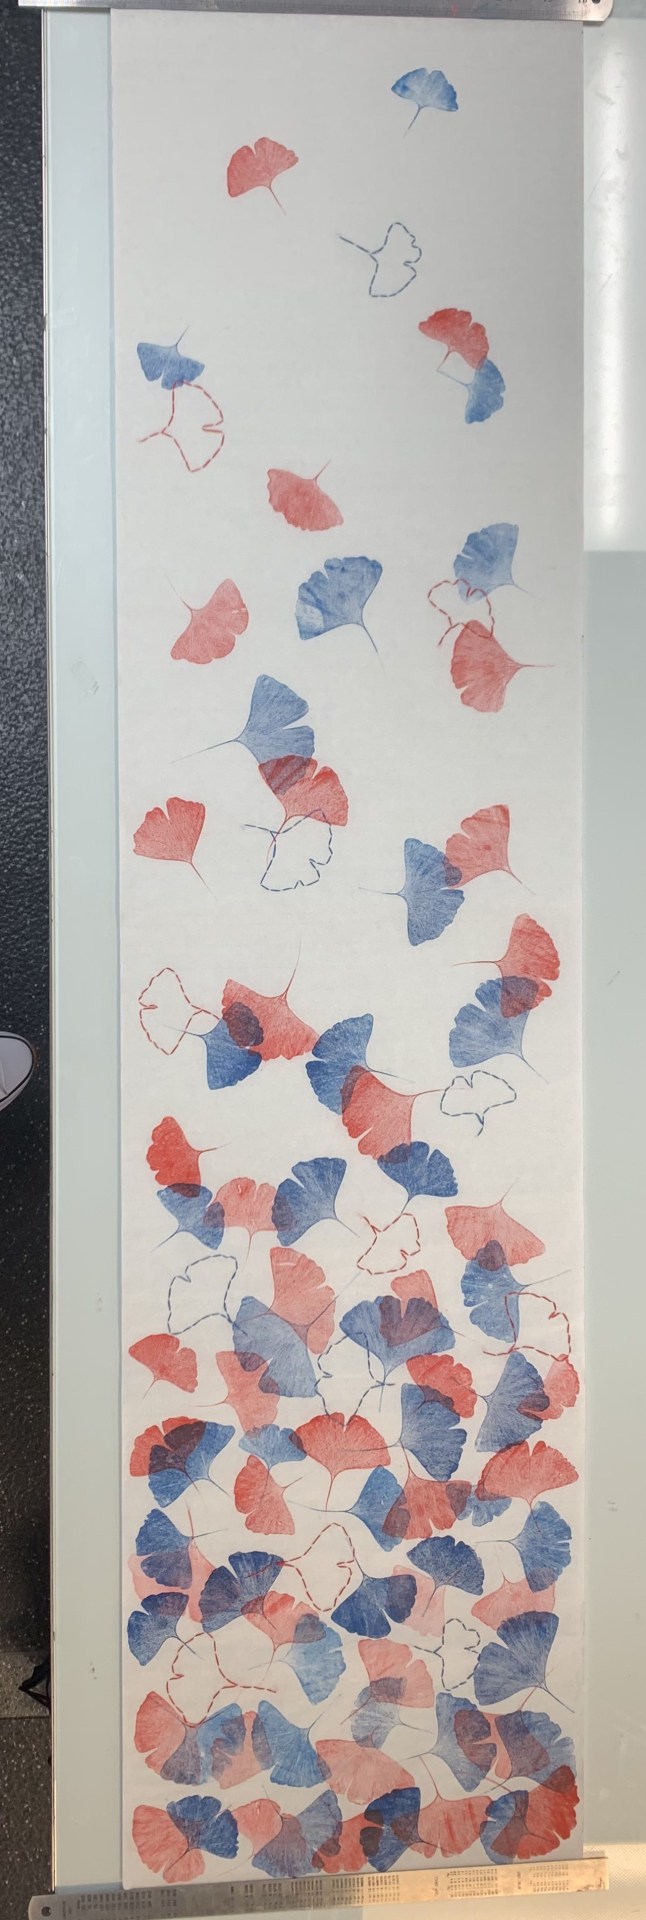
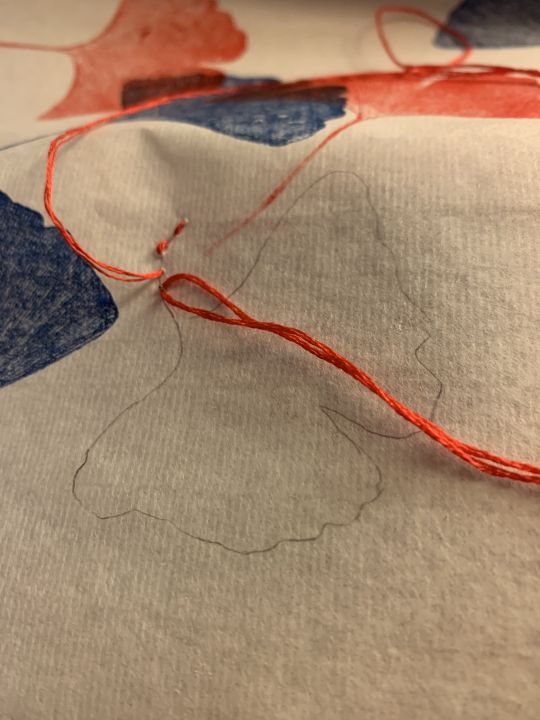
Final physical hand in piece!
I am very happy with how the final piece turned out. The contrast between the details, colour, and size of the leaves turned out just how I envisioned it and I am happy with the final resolve. I have experimented with many different materials and media along the way, learnt a whole lot of techniques for future projects and so forth.
The embroidery turned out really well in the spaces I left behind for them, the colours work really well together and people are always surprised to find out that I printing the details on to the paper with real leaves and ink.
The only thing I will comment on with the final physical piece is that it is not as pretty from both sides as I originally hoped for. I have just remember after finalising the embroidery that the back does not look as good as the front.
Overall I love where this project has taken me, am satisfied and can't wait to do more in the future!
0 notes
Text
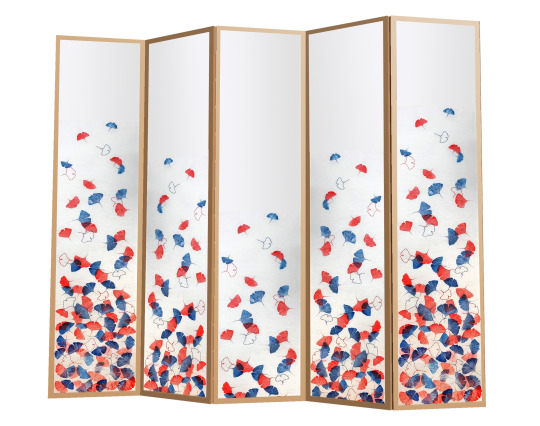
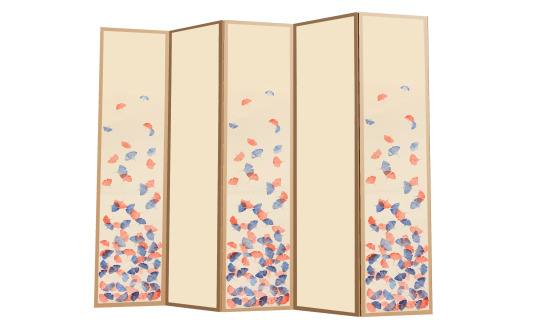
Final visualisation of the full 3D divider. I have just repeated and flipped the pattern on the middle three panels but moved the pattern down a bit so it doesn't repeat as much and so there is more negative space.
0 notes

Text

While doing the final embroidery, I found it hard not to create knots in the thread mid-way through stitching which was annoying and time-consuming to fix which set me back a little every time it happened. It also took me a while to be able to embroider on a long piece of paper and I had to make sure it was rolled up so I wouldn't crinkle the paper.
0 notes
Text


Attempting more embroidery but this time just as an outline with out the leave print in the middle. I really like how this turned out and think it stands out a lot compared to the outline of the leaf one I did previously. I also noticed that it stands out a lot more compare to my previous attempt as well as when held up to the light, you can not see the stitching as much and it creates the full outline of the leaves. I will be including this into my finalised piece instead of outlining a could of the printed leaves. If I do this version of the embroidery, it means that they stand out more and I would have to do less in the long run which means less time consuming.
0 notes
Photo

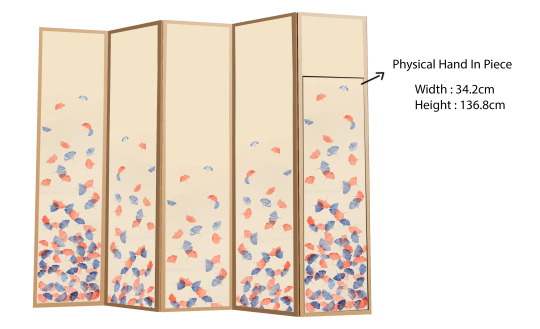
Three different final designs with the same pattern on each panel but can be slightly changes. The bottom design is the final visualisation of the piece with the section cut out on what I am physically handing in. I have yet to include the embroidery which will be coming soon.
0 notes
Photo
Final Full Design!
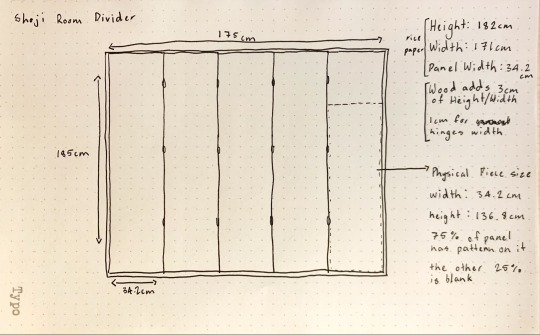
Shoji divider sliding doors
I am sorry if the measurements are a bit confusing as I was still finalising this. I want the final piece to be a divider that folds/slides open. I will be designing part of the panel that is mentioned above.
I could also make my final piece into a wall paper but I feel like it might be too delicate and I would like light to be able to shine through the divider from both sides.
0 notes
Photo


Removing the red leaves, photo of the backup paper and adding in the blue leaves!
I am really happy with how the overlaying came out in the bottom photo! You can see all the details and how nice the contrast is between the red and blue. I did the same with the blue as I did with the red. A lot, cluttered together at the bottom and the gradually place less as you progress up the panel.
0 notes
Photo

A photo of the test trial for my final piece. Still a couple of mistakes with this one but overall the pattern I would like to finalise
0 notes
Photo

The making of my final piece!
These are a couple photos of the process that I went through when making the last piece/pattern. At all times I would keep another piece of rice paper on top so I could press down on the leaves as well as create a backup piece on top just in case something happened to the original and I would not have time to make a new one.
0 notes
Photo

I was unable to test these patterns out by hand (overlaying the blue) since I ran out of time in the studio. To improvise and visualise what I wanted to attempt, I copy the patterns into photoshop and overlaid them. My opinion has not changed on the pattern to the left, I still think it is a bit boring and too repetitive.
With the images to the right, I wanted to see what it would look like if I put the red and blue leaves of different sides to meet in the middle. This is quite nice but I do not like how much space would be fulled at the top. It feels too busy and needs more space to breath so I will not be going with either patterns.
0 notes
Photo

More test layouts that I ran out of time to print blue leaves onto.
The two on the left hand side are mirrored off each other because this is another attempt and creating a softer pattern. This is definitely not my final layout as it is not very interesting. It may catch the viewers eyes but it looks almost repetitive when lay out like this and I am not satisfied quite yet.
The very right hand one is a test run of my finalise layout that I wasn’t happy with. I didn’t press hard enough on a lot of the leaves and lots too much details so I will reattempt this layout until I’m satisfied.
0 notes
Photo

A side by side comparison of testing another layout on a smaller piece of paper as well as the excess ink creating the effect I wanted to test out for a softer finish. I like both but I am still in love with the amount of details in the main, hard press ones so I will move forward and most likely use this in my final design.
0 notes
Photo

Behind the scenes of inking up the leaves. I would always try to reuse the leaves (in the same colour) so I knew I would have enough for the other colour instead of going out and picking up more. I also reused the same ones because I knew that the leaves print nicely already. I did all the red leaves in parts. I would ink up about 5-8 at a time, press them down with another piece of rice paper and then leave the leaves there for a little while so the ink has time to sink into the paper while I move on to the next section of leaves. After the next section was done, I would then go back and remove the previous section of leaves so I could check them as well as so I could reuse the leaves and repeat until finished.
0 notes
Photo

Placing and figuring out the final pattern for my physical hand in piece!
Once I knew where I wanted to go, I started placing the leaves onto the rice paper before inking the leaves so I knew how I wanted to position everything. With this method, I could add and subtract the leaves at ease and also look at it from a far to get the gist of how t looks. These leaves would only be red for now and then I will later figure out where I want the blue.
0 notes
Photo

This is an overview of all the patterns that I have attempted hung up onto my wardrobe in an attempt to visualise the final piece. Having it laid out like this and then taking a step back to see it as a whole really help in the process of where I wanted to go next.
0 notes
Photo

Layering the blue leaves over the first four attempts of finalising a pattern. At this point I had the pressure of how hard to press on the leaves to create the perfect details down packed. The overlaying effect is definitely going to be in my final wall cover as it creates really nice contest between the pattern in the leaves and colours. I am still going to combine the two left hand patterns together to create my final one.
0 notes