
Don't wanna be here? Send us removal request.
Statistics
We looked inside some of the posts by bearspraynew-blog and here's what we found interesting.
Average Info
Notes Per Post
1
Likes Per Post
1
Reblog Per Post
0
Reply Per Post
0
Number of Posts By Type
Text
1
Last Seen Tumblr Blogs


Fun Fact
US Tumblr user growth rate is estimated to slow down to 4.1%.
Text
7 Tips Every Camper Should Know About Campfire Cooking
A little scared about cooking over an open flame? Try not to be. Open air fire cooking is simple with these privileged insights, beginning with: Pack a Dutch stove.
Manufacture the Right Fire
First of all: Never light a fire until you are certain you are building it in a protected spot. In the event that you don't have a flame pit, search for a detect that is free of free earth, grass, and garbage inside a 10-foot border of your site. Scout for any tree roots, as well, says Sarah Huck, coauthor of Campfire Cookery: Adventuresome Recipes and Other Curiosities for the Great Outdoors ($30, amazon.com): They can without much of a stretch burst into flames. Also, avoid low-hanging branches. A decent standard procedure is to have multiple times the stature of the flame in unhindered overhead space.
Following stage, says Huck: Determine the motivation behind your open air fire. On the off chance that it will be utilized distinctly for cooking, she prescribes "the tracker's flame": Position two lower leg thick bits of dead, dry wood in an unpleasant V shape, with the sticks six to eight inches separated at the top and three to five inches separated at the base. Spot tinder (Huck uses dry pine needles, greenery, or folded paper) in the V. Utilizing little bits of bark wood or twigs (between the thickness of a match and a bit of chalk), construct a teepee around the tinder. Light and gradually feed the flame extremely dry logs that are about the size of your arm (Huck's preferred kind of wood is maple or oak; she says they are the most steady when consuming).
In case you're hoping to cook over a flame that will later be utilized for amusement purposes (i.e., singing pit fire melodies, recounting to apparition stories), Huck prescribes the conventional teepee technique, which will consume longer and all the more relentlessly. Spot the tinder in your assigned flame zone and manufacture a teepee of bigger stays it. As the flame consumes, keep on including greater logs; cautiously position them with the goal that they edge toward the flares to abstain from covering the flame. Include each sign in turn, enabling it to consume a piece before including another; along these lines, you'll abstain from making a flame that all of a sudden ends up unmanageable.
Get the Right Gear
The conspicuous likely bears rehashing: Plastic can dissolve, so utilizing metal utensils is significant, says Julia Perry, an educator for the REI Outdoor School in Chicago and the Wilderness Medicine Institute. For a similar explanation, she prescribes skipping pots and skillet with elastic covered handles (rather, utilize an aluminum pot lifter, similar to Open Country Aluminum Pot Lifters, $4; REI.com). Your most logical option is to go with utensils that are explicitly made for the outside. Her pick: GSI Outdoors Pioneer Enamelware Chef's Tools ($25 for a spoon, scoop, and spatula; REI.com).
Hard core calfskin gloves and durable close-toed shoes that can take heat from nearness to an open air fire will likewise give a layer of assurance from hot surfaces, coals, and ashes.
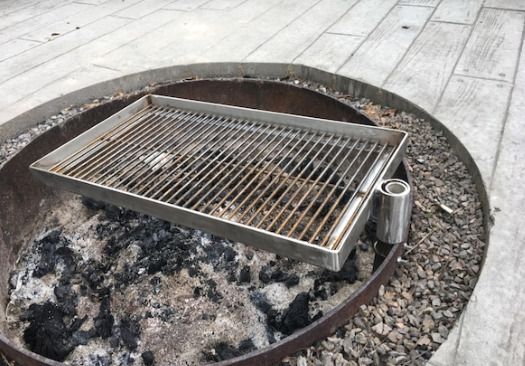
Pick Your Cooking Method
There are an assortment of approaches to cook over a pit fire, contingent upon your nourishment decision. Stick to great good old stick cooking on the off chance that you are wanting to broil marshmallows or wieners. Need to grill? Swing an open air fire amicable metal barbecue grind over the blazes. (The Texsport Heavy-Duty Swivel Grill can without much of a stretch be staked into the ground and situated over a flame pit at a tallness that is ideal for safe open air fire barbecuing; $44, amazon.com.) Paul Kautz, maker of CampfireDude.com, likes cooking with a Dutch stove when outdoors; he feels the pot gives you about as much adaptability as cooking in the kitchen. Cast-iron Dutch broilers ($36, amazon.com) can be really substantial, so they are most appropriate for long haul stationary outdoors, he says. Pick an aluminum or hard anodized Dutch broiler ($68 to $140, amazon.com) for progressively easygoing excursions.
Comprehend What Not to Cook
Nourishments that can make hot, drippy fat as they cook—duck bosom, steak, bacon—may cause flare-ups and ought to be kept away from, says Huck, regardless of whether you're cooking them in a dish. In the event that conceivable, renounce nourishments that should be seared or require any sort of oil. In the event that you should sear around the open air fire, Huck proposes utilizing a Dutch stove, which offers more solid warmth than a skillet with included assurance from splatters.
Know the "Threat Zone," Too
Hauling crude meat or poultry out of your ice chest for your trip? Ensure you keep the nourishment all around pressed in ice paving the way to flame broil time: Bacteria can develop hazardously on nourishment that warms to between 40 degrees Fahrenheit and 140 degrees Fahrenheit, conditions that make a reproducing ground for nourishment borne pathogens. Make certain to pack up remains immediately, as well: Food ought to never sit out for over two hours—or 60 minutes, if the open air temperature is 90 degrees Fahrenheit or higher, says Shelley Feist, the official executive of the Partnership for Food Safety Education.
When barbecuing, consistently utilize a meat thermometer. Nourishment should be warmed to between 140 degrees Fahrenheit and 165 degrees Fahrenheit to slaughter any nourishment borne pathogens. "You can't tell if nourishment is cooked by seeing it," says Feist. For more in-depth information I highly recommend metal grill grate .
1 note
·
View note