
blog posts and updates on progress simplified and things learnt during project, incase you are wondering why i havent put my name on here, its for privacy and safety concerns
Don't wanna be here? Send us removal request.
Statistics
We looked inside some of the posts by blog-imtsupdates and here's what we found interesting.
Average Info
Notes Per Post
9
Likes Per Post
9
Reblog Per Post
0
Reply Per Post
0
Time Between Posts
5 days
Number of Posts By Type
Text
17
Last Seen Tumblr Blogs


Fun Fact
Tumblr Inc. has $15.1M in annual revenue.
Text
week 19?
I made a little drawing to put on the front page of the presentation bc i didnt like the corporate artstyle stock woman that we were using for our last few presentations, also make it feel more personal and doubles as promotional material
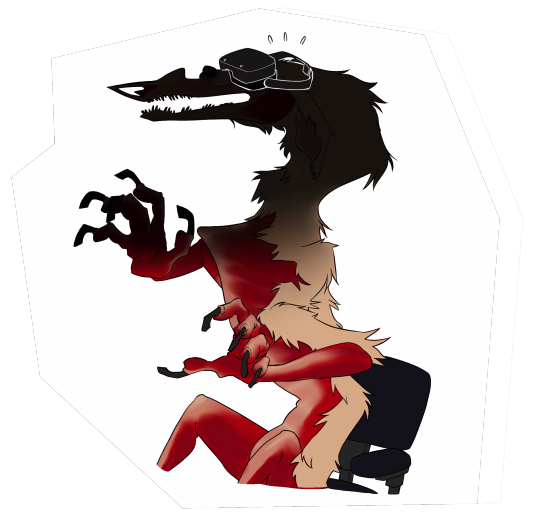
made final version with the head blacked out to fit the lighting in the VR experience and to not spoil exactly how the creature looks? kept it fairly 2D stylized, its a presentation it needs to be readable and i don’t have oceans of time to render a goofy little sticker
1 note
·
View note
Text
finished jumpscare animation!
The head was a bit tricky i wanted it to cock its head but i didnt have enough time to have it rest its head for a bit making it look rushed.
If theres anything ive learned its very important to include time for the model to rest in or near a key frame for a little bit, if theres too much movement happening with little to no pause its cluttered and hard to follow.
So i had to redo the movement becaus efrom the top of my head wasnt working. I had trouble finding a refrence, not a lot of people like to get near animals that want to maul you so that narrows the pool of refrence material a bit. https://youtu.be/Dzyt3yFkmG8?si=e1FrmzJDW39MKf5r found this though, it worked well enough for opening and closing the mouth, not much inspiration for the movement of the head itself. https://youtu.be/KCX_3ZFbN8Q?si=QkMugXhUbImZI0AG after a couple more videos this one has a lot of head movements that could be applied here, i want to include the moving the head to the side to look at something better instead of cocking the head like its confusing, i feel like it fits better
youtube
youtube
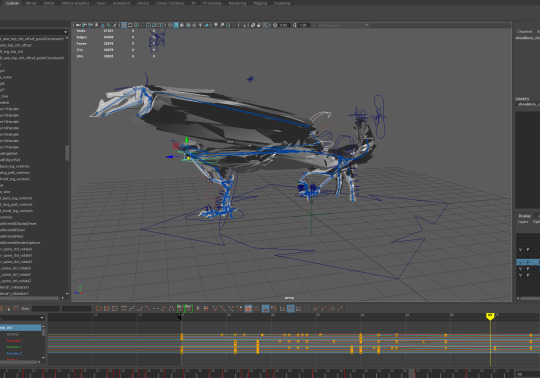
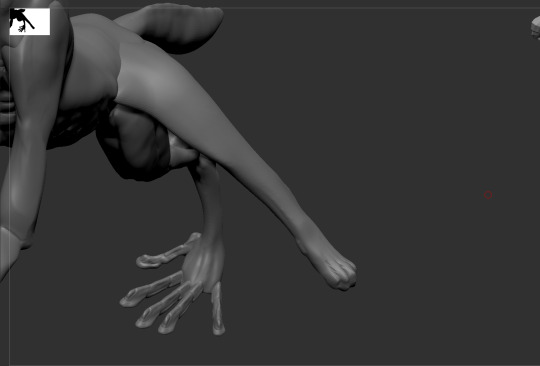
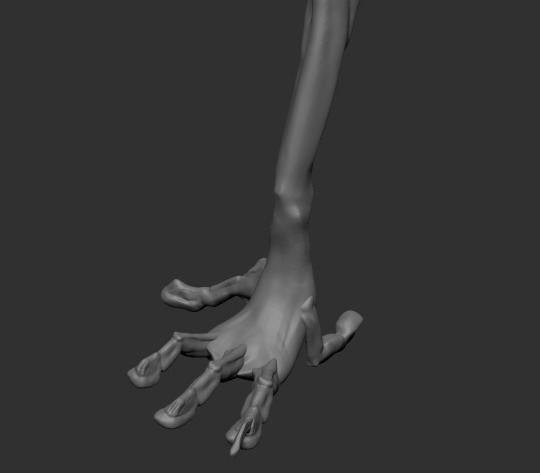
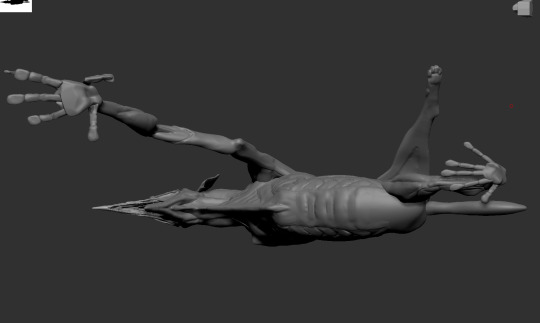
Anyway after th ehead movement was done i watched the aniamtion a couple of times to determine what was missing and then added all of the little details like the impact on the fingers, follow through on the ears and pelt legs, jaw opening and shutting quickly and gave the tail a bit more movement. I had to get rid of the controllers on the pelt legs, they limited the movement on the flappy legs way too much.
i tried to keep tempo in the animation because of the test results but theres a chance that the person that implements the animtion will cut the first part to have it be more unpredicable.
1 note
·
View note
Text
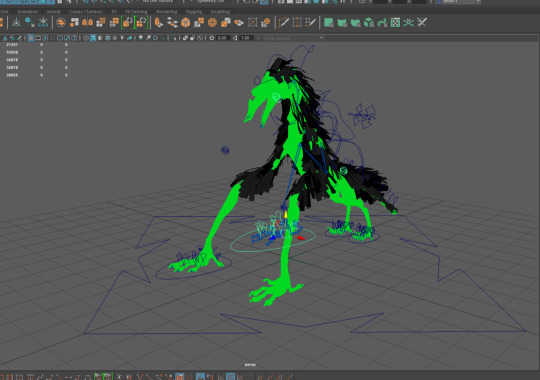
base animation redone :) still has some timing issues and need a couple of tweaks, ill be able to see where those are needed when i have the rest of the movement on the limbs done
because the creature is “top” heavy i wanted the hind legs to feel like they are a lot lighter, the hynea refrence has the same effect to a lesser degree where both hind legs are in the air but hes running and this guy is doing a weird gangly stumble so hynea dialed up to a thousand
1 note
·
View note
Text
i used the hyena refrence for this but most of it was acting out movement in the mirror. (got that from waltdisneys “tricks of our trade”). i also kept the information from doodley’s video in mind, mostly the weight, sticking the feet, exaggerating the jumps more than you think
Here i again started with animating the base movement per part. Starting with the upright walk and landing on all fours. The way that i made the base animation for jumping left to right ended up giving me a lot more troubel than it was worth, i had grabbed the seperate spline controls and moved them already trying to emulate some impact and weight. After a couple of hours of trying to get the back to behave in a less jittery manner i decided to delete the jumping motion onad re do it using the peanut shaped conctoller that controls the entire back in one go and then add the impact on the parts of the spine later.
the neck game me some trouble to. when i tried to key on of the neck controllers it would stay put and create a mess, i tried to key the neck but i couldnt get the timing right and it looked awful, ididnt record it because i stopped trying very quickly, kalina said she had to get rid of the spline ik in the neck just as i did so i figured its best if i just left it. and moved the head instead
i did take a screen shot.
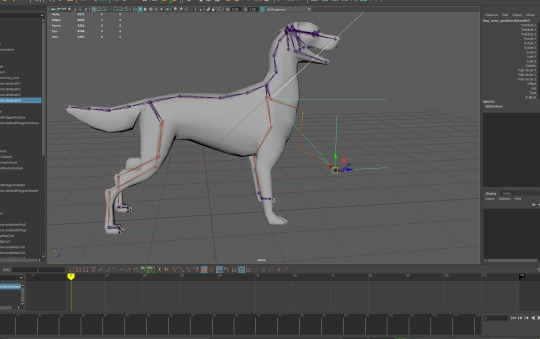
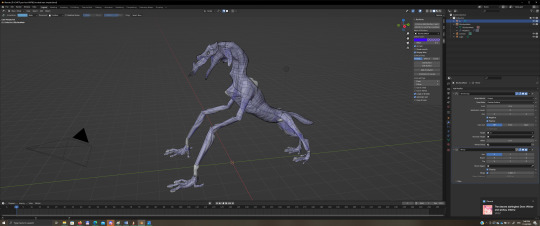
Backtracking a bit to before I started on the animation. When opening the file kalina provided with the finished rig, maya refuses to have the mesh move with the joints as is.
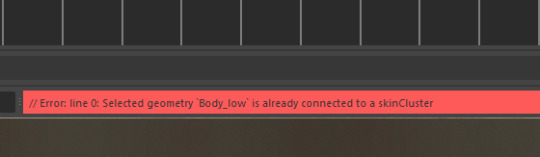
kalina and I looked at this together. unbinfing the skin and then rebinding it didnt work eitehr and i couldnt project the skin weights on to a copy of the mesh or an import of the mesh. I ended up having to import a seperate file for the model and then re do the skin weights roughly because when exporting the animation i dont need to export the mesh. i only need to know where what goes not waste time on weightpainting kalina already did much better.
1 note
·
View note
Text
finished dog animation tested in unity. added the rest of the main movement and the follow through on the ears. took a while to get the movement to look natural but slowing down movements when they get close to the key frame seemed to work well for the head movement and the oppisite of starting slower and speeding up with follow through after the key worked well for the crouch
when trying to export the animation to test in unity i tried this method first, i chose the video because it was relatively recent compared to other videos and it looked more professional: https://youtu.be/YEyo1WkgDgE?si=2d05sK1X9gnLbgKD this did not work for some reason. it was aimed at unreal but that should work for unity to. we are working with unreal but i would like to check if the mesh and animation run in a different engine to so i found a different tutorial https://www.youtube.com/watch?v=i8cmDK_O-1g which worked on the first try and was very easy to follow along tough it was a lot older and my unity was.
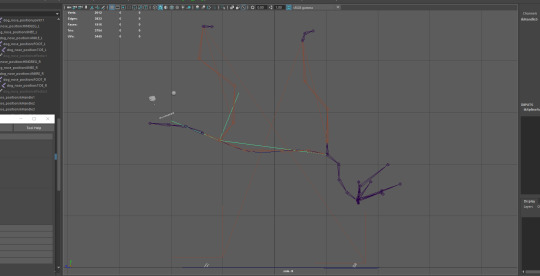
later while exporting the final animation of the dog jumping diego told me to just export the origin point of the rig and the mesh wasnt necessary but could be included. Much more similiar to the video by Blackthornprod but still different steps.
1 note
·
View note
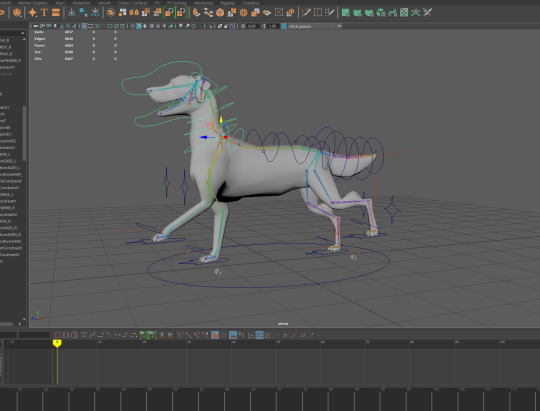
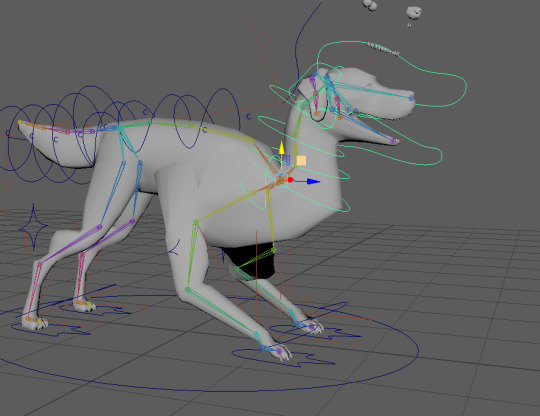
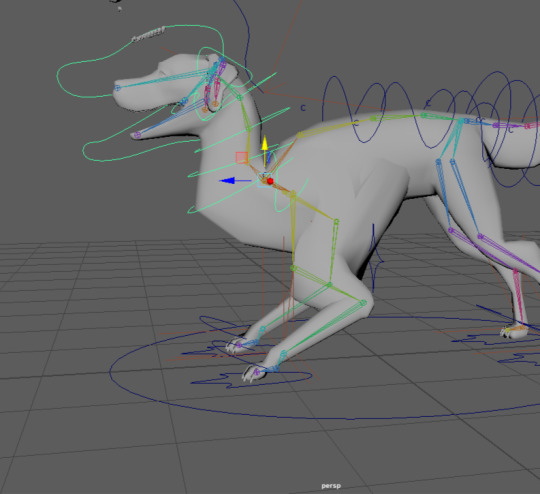
Text
My rig is far from perfect as I really didnt have time to be picky but it honestly works pretty well. As mentioned i had remove the IK spline on the neck because it gave trouble with the spline in the back. A little bummed about it because it would have been really helpful to keep the head steady like a hunting tiger. I wanted it to feel unatural fo a dog but still natural enough to not immediatly set off alarm bells.
while working on this i decided to visit a channel Ive watched in the past, his videos are fun and informative and i figured he might have something i could use. https://youtu.be/6lGPvMLE8Oo?si=MUXtHVdp1KyVJlbm
this video proved useful, i automatically made sure the feet wouldn’t clip through the floor but this video made me realize i was doing that. thag was interesting but i also made me realize i need to make sure that the feet slide the same amount of space in between frames, one limb cannot push away faster than the other without accelerating the whole body. i hadn’t done that in some frames so i went back and fixed that.
the jumping part will come in handy when i get to the jumpscare im exited to see how far i can push the model without having it look too cartoony
youtube
the impact was a little exaggerated on this walk cycle, I had already lessend the bounce on the tail but the head needed to be more controlled and so did the whole body
Kalina said the head moving like that instead of being steady might actually help the animal look more creepy which is good so i tried to lean into that at bit more but i did end up toning it down in the final version.
0 notes
Text
I needed to make rough story boards for the animations so my team mates and I know what rough movement the creature should follow and so they have refences to make sure they dont get lost.
the storyboarding vidoes i watched at the start of the project often mentioned how the sketches were just that, sketches, i made the story boards more deatiled because i wanted to make usre the client and team understood exactly the mood and evniroment i had in mind. But for this i decided it would be a good idea to apply the siple version, no detail is needed, we know what the model looks like, the sketches needs to be clear and simple.
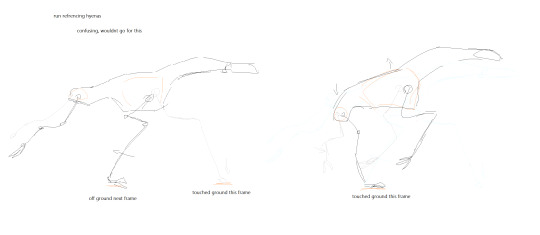
For the run i first decided to refence a hyena, they have a similair sloped back and the movement is very intersting on these animals. How ever they are way smaller than our creature and they carry themselves lighter but they have a really intersting and gnarly looking run cycle. I think you can slow down the movement a bit and increase the impact of the landing you could make it look bigger but that might be finicky for beginner animators. However while drawing it i got confused a couple of times and realized that this might be difficult to pull off so after finishing this version idecided to look for a different animal that might work a bit better.
I chose this video because the animal is very visible and doesnt dissapear behind bushes before the run cycle is complete. https://www.facebook.com/latestsightingskruger/videos/spotted-hyena-running-in-the-road/402268607082672/
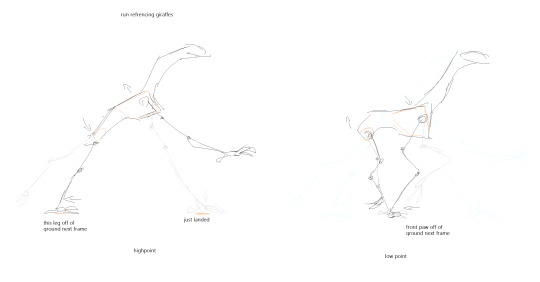
This time I decided to refrence giraffes as they have that sloped back that the creature does as well and run with a lot of weigth. the creature isnt as big but it helps figure out how to let the impact effect the body. i used this video as there werent a lot of videos of giraffe running online that held the camera steady and didnt have the animal partially be covered before the loop was completed. I found thier movement easier to follow than the hyena https://www.youtube.com/watch?v=MuanfpL1o18&t=8s
the knock isnt very complicated, i intended it too look more humanoid with maybe a slight idle. but my team members decided they wanted a more animalistic aproach so when kalina animated it its more like a chimp attempting to jump through the glass pane.
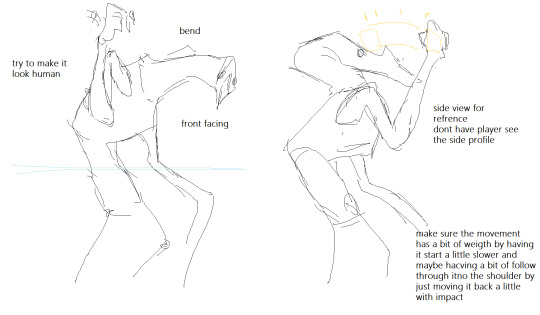
this was an older sketch for the jumpscare where i had a longer pause planned to build tention but that was rejected because of the test results.
I will animate the jumpscare because i want to practice with complex movement. i had to be more pterasaur/pelican isnpired but Diego told me the movement had to be faster because the test results of players showed that fast movement was seen as scarier. the moving the hand away from the door was cut.

made the dog disguise storybaord and got started on the aniamtion as i made the rig. i didnt have time to make it easy to use so i wont put that on someone elses plate.
the animation itself:
I animated some simple characters in maya almost two years ago ive forgotten nearly all of the infromation necassery so i needed to do some research. this video proved helpful https://www.youtube.com/watch?v=HSTRBRq3WqQ its very old but simple and straighforward.
this video was also fantastic as both a refrence and information on maya animation itself, its very long so i didnt get to watch the full thing but great stuff https://youtu.be/-G-ZDo1UXhU?si=Ri5nBL_t37NS-JGp
i started with the dog walkcylce and jump and did the jumpscare after. kalina did the knock and borja was going to do the run cylce of the creature but couldnt figure it out so either kalina makes it or i do.
for the dogs walkcylce i used this aniamtion as a refrence. suprisingly i couldnt find a live action video of a dog walking on a tread mill or something. none of the videos were clear enough and most were the dog running which wasnt what i needed. this video worked great as a refrence too bad it was animated because if teh animator as in innacuracy in there then i might copy that mistake. https://www.youtube.com/watch?v=ji7uis-tFqw
when referencing the dog animation i kept the survival guide by my side and made sure that i referenced the most important frames, contact, up, contact again, and down, doing this one limb at a time and continually checking the video and the book to make sure the poses made sense
When I started on the first animation, the dog walk cycle, I followed the book 'the animators survival kit' page 38 for timing and 94 for starting with the base movement. I started with just the movement of the chest and the front legs to get a feel foor the timing and how the hips should follow. after I had fixed the timing on those i started animationg limb by limb, i couldnt copy movement from one to the other unfortunately but i managed to keep them looking pretty similar.
had to screen record this video because it saved as an mkv and i cant opload those here.
I am also limited to one video per message so the other progress videos will be seperate posts.
0 notes
Text
week
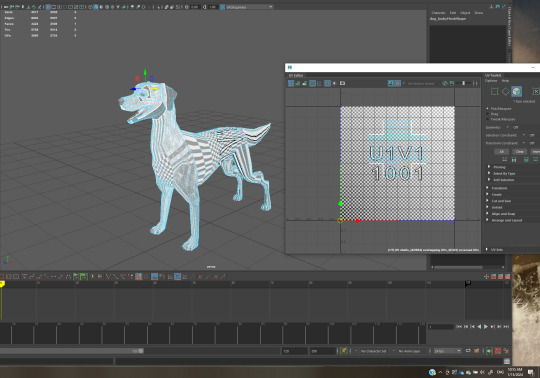
uv unwrapping the finished dog model, used these videos to figure out how to do so: https://www.youtube.com/watch?v=GdAGPtW7Q_I&t=37s https://www.youtube.com/watch?v=t5Co6SuzoQw
ran into issues with"non manifold", used these sources to figure out what the issue is and how to fix it: https://www.youtube.com/watch?v=iGHpIb3kYa0 https://help.autodesk.com/view/MAYAUL/2023/ENU/?guid=GUID-16CEC87A-F927-4AED-9B60-A772481F8FD4
I none of these methods are good fixes or just dont work. i cannot seem to attach these forms to the head in maya, im going back to blender to blender to unwarp the dog there instead
never uvd in blender for what that information is worth to you here are the videos i used to figure out how to do so: https://www.youtube.com/watch?v=Y7M-B6xnaEM https://www.youtube.com/watch?v=scPSP_U858k
didnt run into any issues in blender, very straigforward very happy with this. importing it back to maya mainted the uv map. moving on to uv mapping the rest of the objects, will be doing that in maya because i dont expect to run into issues with them.
did not run into any issues. moving on to rigging. using these videos: https://www.youtube.com/watch?v=HaTpXxG5OJg for wireframe, the video is old but after clikcing through two videos that didnt help this one was the most clear and helpfull.
https://www.youtube.com/watch?v=Qunol1EYdd8 the video is older but its very clear and straight forward
https://www.youtube.com/watch?v=urC_TBQQA7o this video was great for basics of maya, ive used his tutorials before and he makes and sells his own plugins.
and a refrence for the bone placement

none of the videos omwatching are willing to tell me how to put my joints infront of my mesh, a little annoying https://www.youtube.com/watch?v=lHRqG5OCFuw found it. this video shows me the icon for joints in front but im still unable to select my joint it keeps grabbing faces on the mesh. https://www.youtube.com/watch?v=5kiRB1pSU3M never mind i was in UV mode instead of object mode.
select D key to move a single point on your rig :-) didnt know how to do that: https://forums.autodesk.com/t5/maya-forum/repositioning-only-one-joint-without-any-effect-on-the-other/td-p/6705384
I implemened IK handles on both the front and hind legs(follwoing mainly the dashund video) and I'm not running into any issues, I'm on an adreneline high right now, last time I worked on a project this was hell on earth
Most videos for setting up the spline were using paid plug ins liekthis one. https://www.youtube.com/watch?v=KiqpzKUJKt0 its still a very usefull series and its very easy to follow but this part isnt very usefull for me rigth now.
and this one was very useful: https://www.youtube.com/watch?v=UaUDLHAfed8 another very old video but there werent a lot of options because maya isnt open source and it is a paid program. Had we been working with blender I think it would have been a lot easier to find free plugins and tutorials but I digress. It worked great, over the moon for it.
never successfully set up a spline IK, I ran into a major issue BUT following this specific tutorial was great. desipte the rig flipping upside down the spine was actually deforming correctly after a couple or attempts!
after detaching the spines that needed the spline IKs everything went smoothly! wow!!

While wathcing rigging tutorials i found these really cool plugins. they are paid and i dont have time to figure them out right now but Im saving these because they would fantasic to speed up animation on future projects. https://www.youtube.com/watch?v=2iz_g8rij-k https://www.youtube.com/watch?v=vtF7wwvuBkk

had to adjust the IKs in the front legs a couple of times to get the bend to work better/be more natual
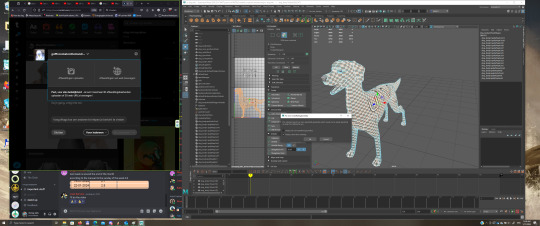
finished weightpainting. i remebered how to do that, didnt run into any issues.
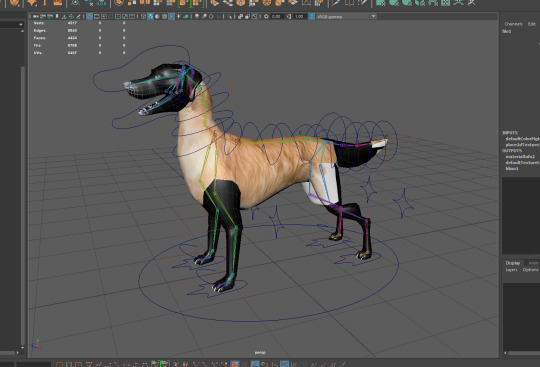
(i rembered how to do that from a year or so ago) onto texturing. didnt know how export a UV map as a png: https://help.autodesk.com/view/MAYAUL/2024/ENU/?guid=GUID-26F3DFAB-A6D9-4F9E-A11A-2BD9EF1C3DF1 now i do.
didnt know how to apply said png to the model: https://www.youtube.com/watch?v=8oT6Xt4HX5E
now i do. gonna continue editing dog pictures for the fur coat because i do not have time for drawing all those hairs, it should get covered by fur, itll be relatively low light, i did ask team if they had time, one said no, the other said maybe, i decided id do it anyway as that wasnt a very solid yes.
i looked for videos on photobashing textures for 3d models and couldnt fidn anything. i didnt have time to install 3d substanc painter and learn to use the new program so i opted to just photobash in my regular art program.
these are the finished textures applied to the model, it doesnt line up perfectly and i messed up the uv map on the dog snout a little which made the end of the snout very very low res but it works pretty good in the final scene as it is far away and in low light, im pretty happy with the result! it also took a lot longer than expected, getting the cut up images to line up and blend together and color adjusting it to work well enough was a lot more tricky then i thought it would be.
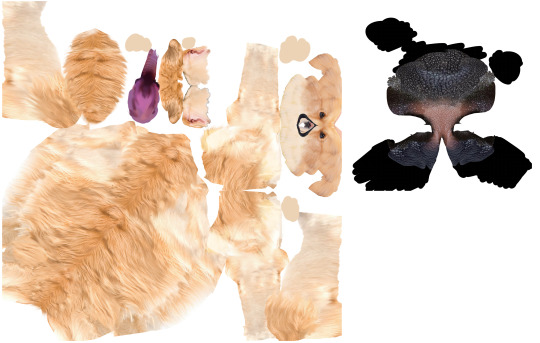
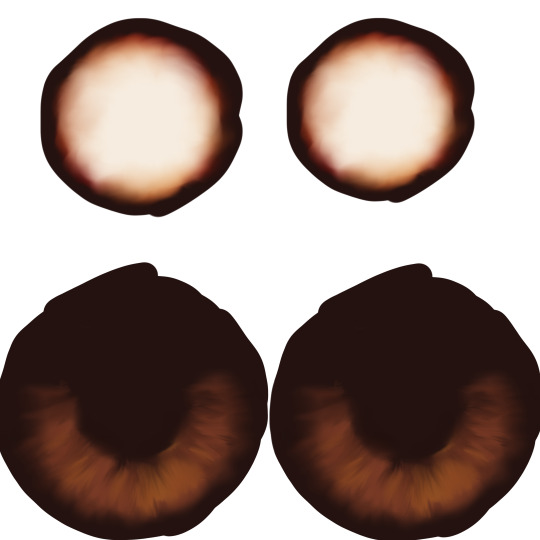
the other textures like the eyes and teeth i decided to paint as they didnt need a lot of detail and that was faster
0 notes
Text
week dffsa
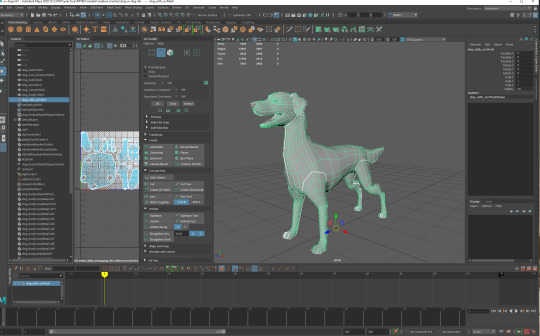
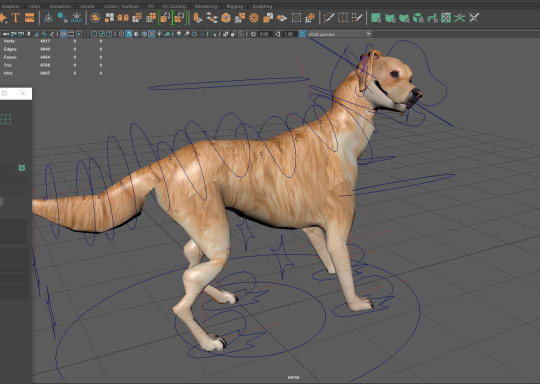
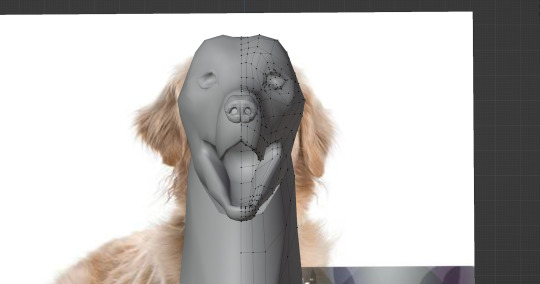
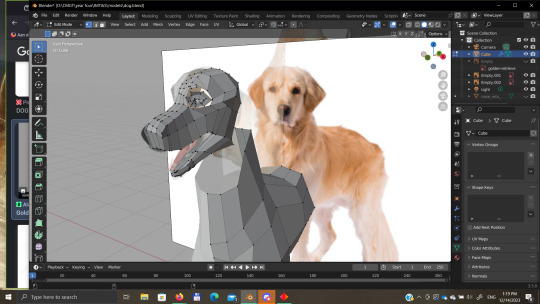
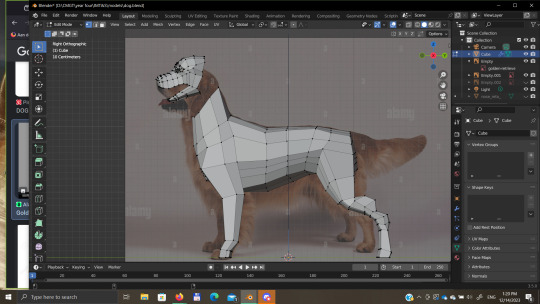
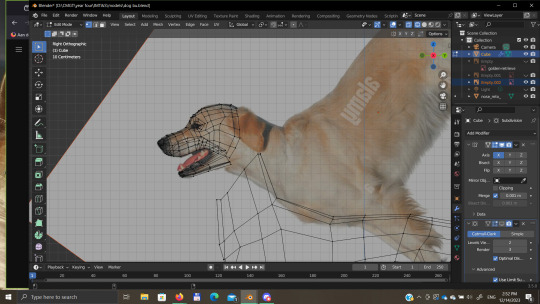
Finishing up the model, making sure the head lines up with a golden retriever. Took a bit of finicking but the cheek bones and eye shape proved to be very important. the legs needed some more loop cuts to allow for proper aniamtion later and the ears needed to get repositioned so that they could be animated while still being in a close to nuteral pose.
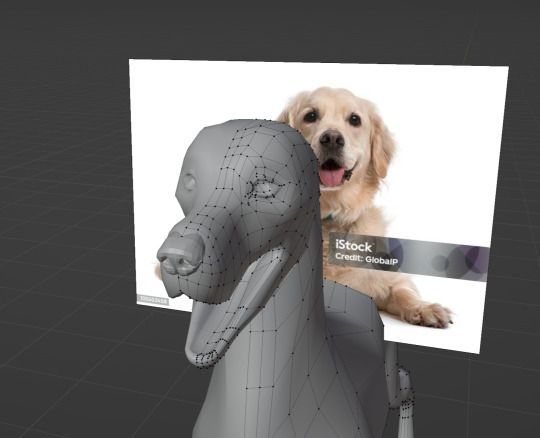
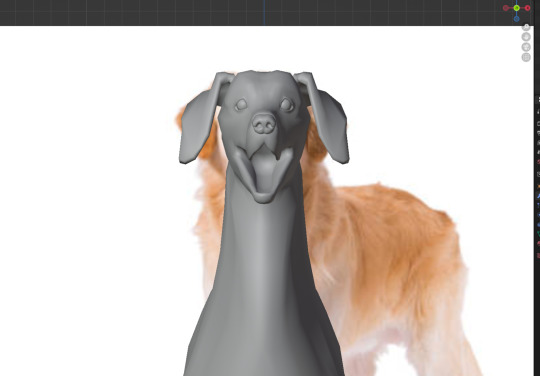
Some more shots of the model now fully finished, kept the toes simple as they wont move
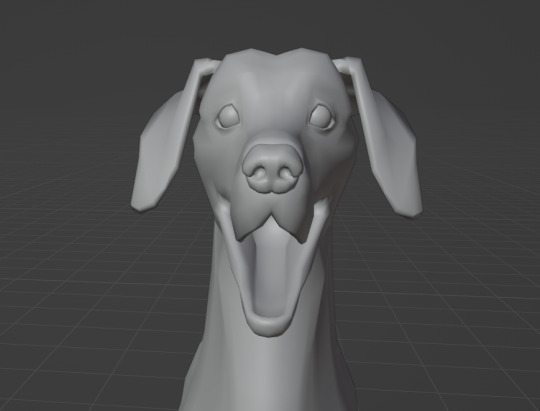
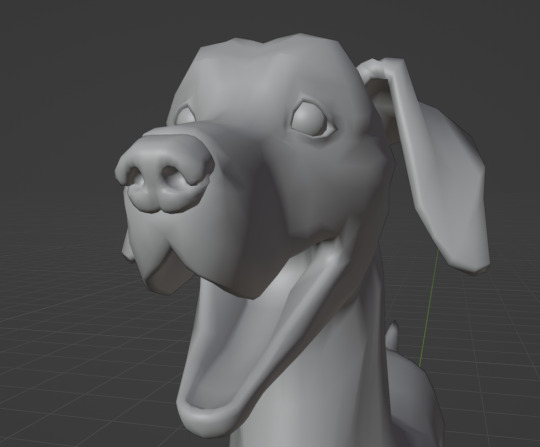
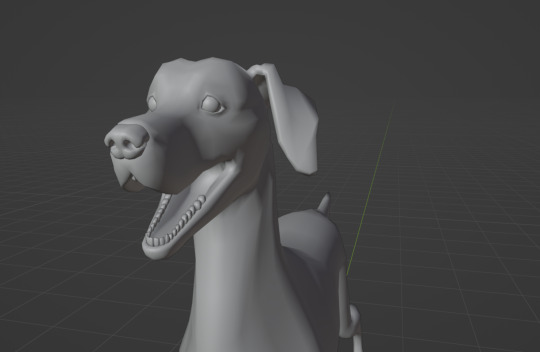
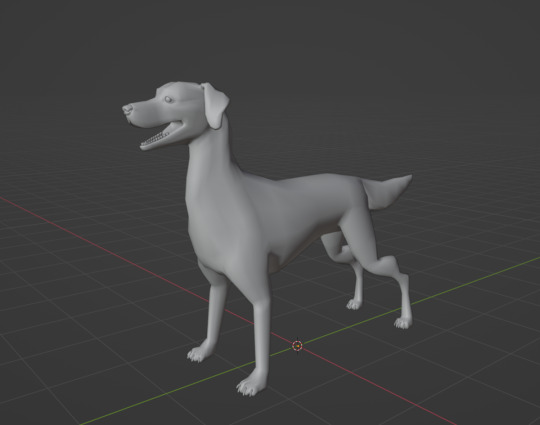
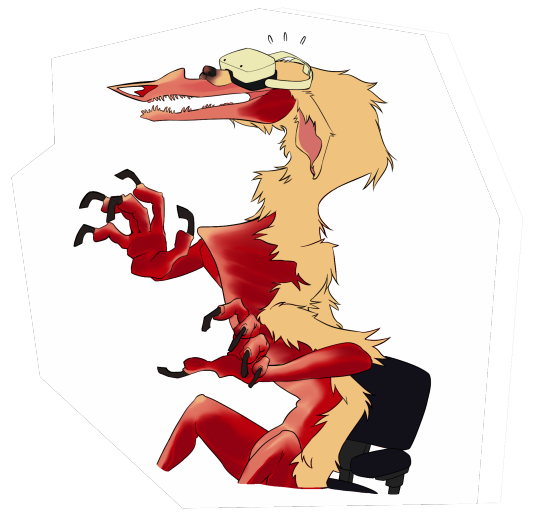
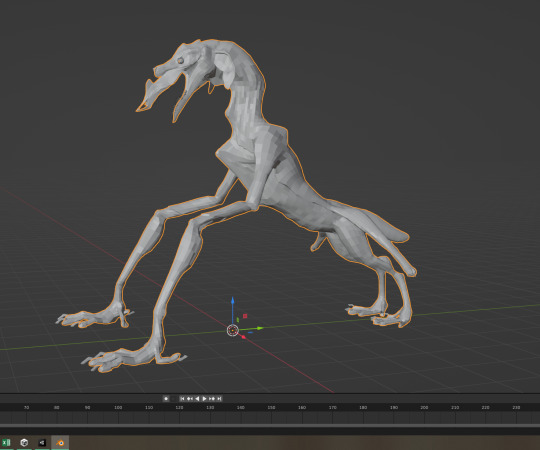
Im going to clarify that this dog is the creature. its neck is too long, its hind legs are wrong, its got human teeth. It's supposed to be uncanny making the viewer unsure of wether it is friend or foe. Its not your friend but it wants you to think it is.
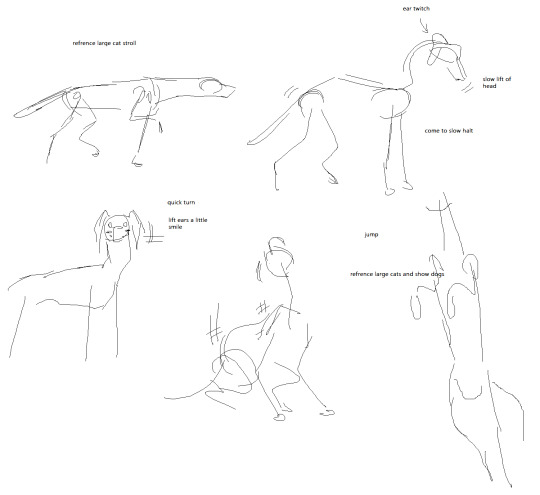
decided to collect some isnpiration for the animations.
for walk cylce creature
youtube
youtube
youtube
youtube
youtube
creature runcylce
youtube
youtube
walk cycle dog
youtube
youtube
dog jumping to second floor
youtube
https://www.youtube.com/watch?v=-vaUNnR9V_g
0 notes
Text
week 13
working on the dog model.
After watching a couple of "speed paint" like vidoes i saw that they were using the sulpt tool to form thier model more instead of moving every single verticy by hand.
examples: https://www.youtube.com/watch?v=mlqiICzACA0 https://www.youtube.com/watch?v=Cfrj8-MJ8LA i just had these playing in the background as refrence, why these? these werent the only ones but these proved to be most usefull interms of tools they were using or atleast things i could try. one of these also uses the subdivide modifier, itried it but i found it actually got rid of some of the detail so i ended up not using it but good to know its there. also i have to use the mirrior moddifier if i want the sculpt to be symetrical there is no other way to symetrize, i shoudl have known thsi as i used it when retoplologizing the creature but regardless the videos reminded me that thast how you do that.
It was a little hard to see what i was moving so i looked for a way to make it easier to see and turning on the wireframe using this video really helped https://www.youtube.com/watch?v=dVr9x3qcLJQ
had trouble with the origin point of my dogs mesh. the eyes were off set for somereason as i coulnt properly apply the mirrior modifier. i thought the eyes were off but the bodies mesh was actually off center. had to look for the tutorial for how to reset my cursor and origin point and then realized i had to also apply the transformations i might have done in object mode on accident but i didnt rember how to do that because i hadnt really done that and a colleage explained it to me over half a year ago. Just looking up "apply transformations blender" gave me my answer, in object mode "ctrl+a" and click apply all tranformations.
0 notes
Text
week 12
mostly retopology of the creatures teeth which was a lot of repetativbe fiddeling i looked for solutions but none were really any faster or let alone accurate.
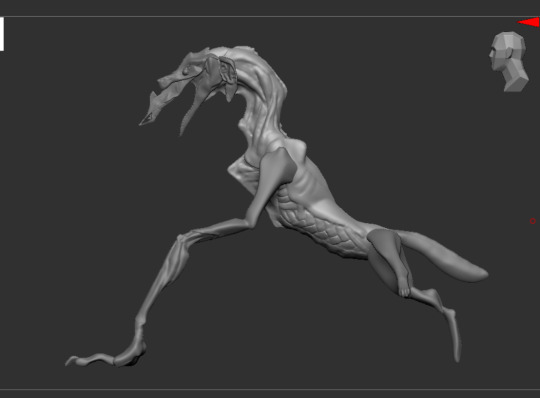
here is the fully retopologized model:
I had previously asked if i could start work on the rough key frame sketches for the animations so we would have a guideline when animating. But i realized that if we do not inlcude the dog from from the creatures design at all we lose a lot of ambiguity and the design of the final form makes a lot less sense. So i decided i would quickly model the golden retriever model in blender, doing it this way would save time on retopology as it would already be good for animation. I will have to look for tutorials on how to add detail when scupting in blender and modeleing in general in blender. I have never made a character model fully in blender like this

0 notes
Text
week 11
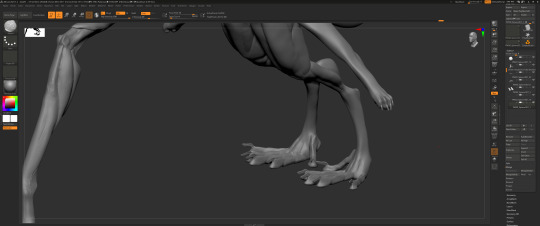
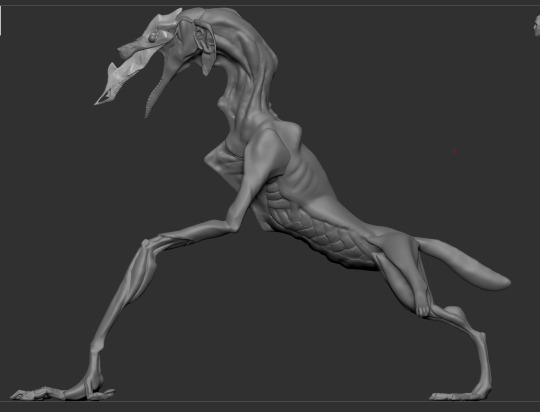
finished up the body retopology. added loopcuts to parts that needed it to connect them together and so that the the mesh is allowed to move coreectly when rigged, still refrencing the retopology video to make sure im not missing any parts(did know i had to make sure jionted areas had a couple of loops).
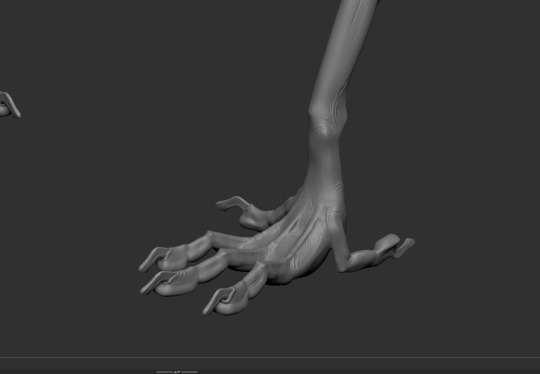
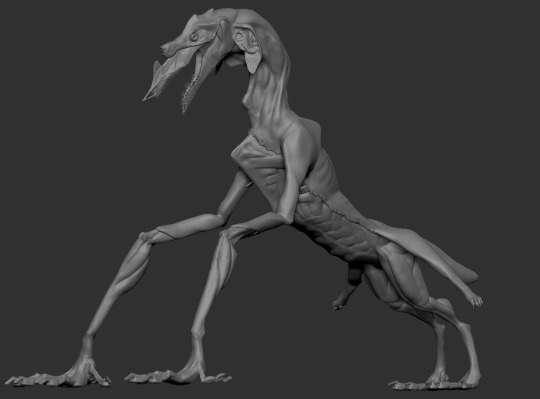
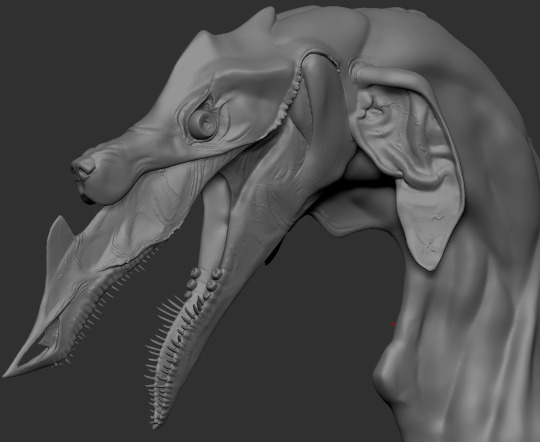
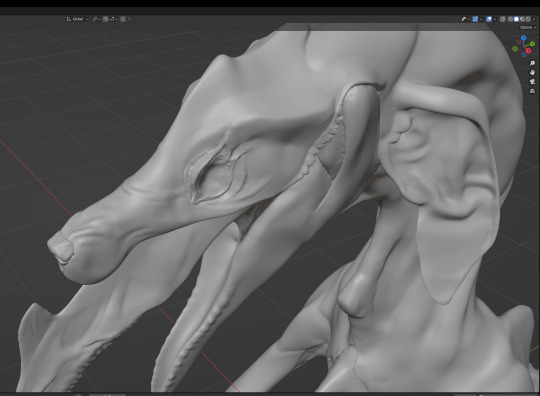
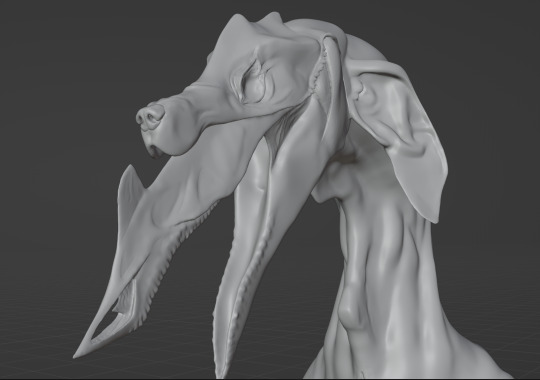
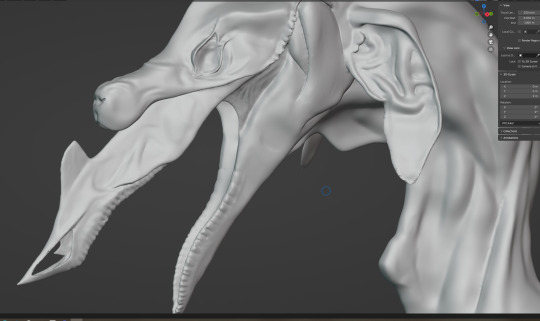
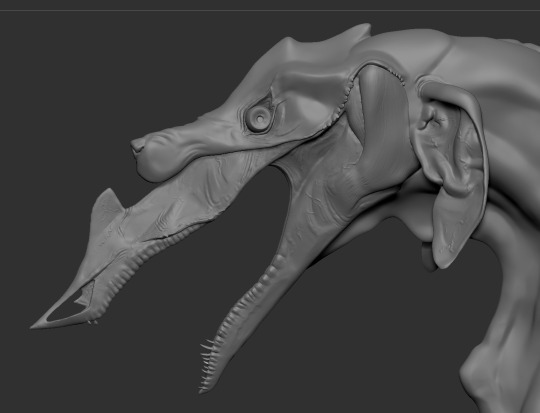
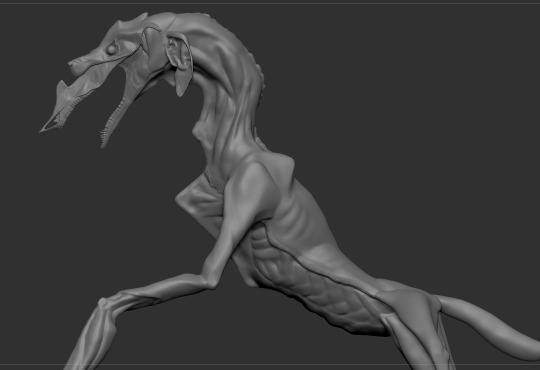
im still adding more detail to the body sculp as well as adding the teeth and nails. Here i referenced coolio's model the one i metioned previously. finished up the muscles, redefinied them and added that grainy texture by hand. i couldnt find a brush that created the texture i wanted so i had to chisel, smooth and then chisel again for every grain in the muscle. Repetetive but works great. I didnt detail the back as, again, aniamtion takes a lot of time and I'm already way behind on shedule, i dont want to hold bakc the texturing progress either AND since were putting fur on it, detail wouldn't be noticable even on close inspection. here are the results. i also added a bit more detail in the face and of course the teeth.


spent the rest week foccusing on retopology of the other parts like nails and eyes.
when i copied meshes the pivot point would snap to meshes that were near it in the view port and rotate to stick to the surface of said mesh instead of just moving through it without deforming
tried it again with shrink wrap modifier on, that just snapped my retopologized nails onto one side of the high poly mesh, all flat and mangled. i had already wasted nearly the whole day on this so I decided I should just retopologize
0 notes
Text
week 10
still having trouble with zbrush crashing often but nearing being done with the sculpt so it should be ok.
after a bit of discussion with my team on monday we decided it would be more convenient if I start on the retopology soon so kalina can start rigging.
this is my first time doing retoplology in blender and I had already forgotten most of the controls again so it took a bit of research to get into it. https://www.youtube.com/watch?v=X2GNyEUvpD4 This video was very helpful at ive watched it a lot. I tried the cube shrink wrapping method from before inbetween just as a test because I had completely forgotten about it and just started following this new method. The cube seems to work well, its a bit frustrating because its harder to get the base loops in. I deleted that, interesting but not right now. https://www.youtube.com/watch?v=K-L2eIHu7ic
continued, forgot to get a screen shot of the very early stage but here are some images from the end of the week. I had almost completed all of the sections where i could start adding loopcuts to start connecting them.
im still adding more detail. Here i referenced coolio's model the one i metioned previously. finished up the muscles, redefinied them and added that grainy texture by hand. i couldnt find a brush that created the texture i wanted so i had to chisel, smooth and then chisel again for every grain in the muscle. Repetetive but works great. I didnt detail the back as, again, aniamtion takes a lot of time and I'm already way behind on shedule, i dont want to hold bakc the texturing progress either AND since were putting fur on it, detail wouldn't be noticable even on close inspection. here are the results. i also added a bit more detail in the face and of course the teeth.

other videos 1 watched as retopology refrences:
the video has been watched a lot and it is relatively recent, he also has a lot of experience with making models and it give me a good point of refrence for how i should place my faces
youtube
0 notes
Text
week 9
having a lot of trouble trying to get the mesh to a poly count where i can add detail. the mesh kept giving me small artifacts. after getting it so that that wouldnt happen anymore, my program kept crashing allowing me to lose significant progress multiple times over despite trying to remeber to save more frequently.
at this point the whole file wouldnt open anymore. i had managed to export the mesh and open it in blender so i could atleast take screen shots of the progress i had made but safe to say my computer does not have the hardware to make highly detailed sculpts. I am going to try to remesh the more detailed mesh and see if i have better luck adding detail in blender. I want this mesh to be grotesque and i need detail for that.
I had re done the lower jaw atleast 6 or so times and still no luck as it kept crashig either before or during saving/exporting the mesh.
I have had Zbrush crash upwards of twenty times, blender crashed five times and my entire computer shut down seven or more times. Ive lost track.
ive had quite a rough week, i am making progress and i keep working but its worth mention this does not help with morale.
on friday i decided to start doing "detail work" in blender using an older version of the mesh that i had remeshed to have lower poly count.
Ive watched quite a lot of videos on sculpting and all of the detailed sculpts are very high poly very quickly so i really didnt expect this to be that much of a problem. A lot of these vidoes were busts but it should still be posible to make a detailed model.
I was incredebly unhappy with how little detail i could get in and concidered painting over the normal map to just draw on the detail instead but was really worried that would take far too long and would get really confusing. (the most detailed I could get it shown here v smooth shading applied because it was horrendous)
i kept trying to open the higher poly files in zbrush and blender because i really wanted that sculpted detail but the programs wouldnt budge and my computer crashed another two times. Until it didnt!
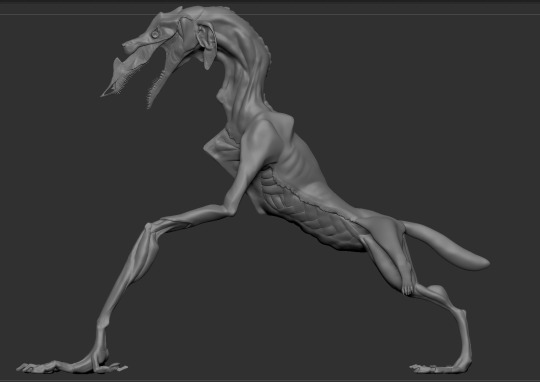
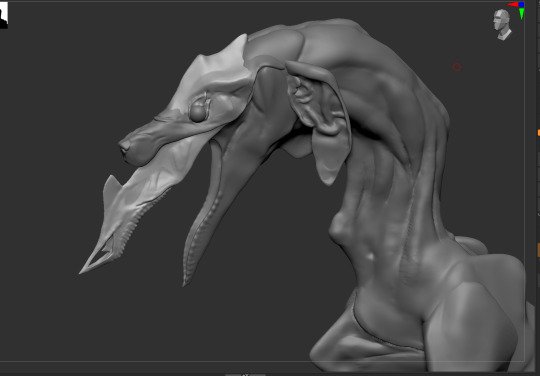
I dont know what i did differently but suddenly it worked again. I was so exctatic that i could finally do some proper work that i ended up working through the weekend to atleast finish up the details in the face, started the teeth, and started with some more definition on the body.
getting to the more detailed work is great i get to refrence a coupe of folks i found on youtube https://www.artstation.com/chrismasna https://www.artstation.com/joanna_kobierska/albums/1907802 have some incredible work, im trying to do that but more vein-y. i am also refrencing the way coolio art was sculping the feet on one of his models because they are very cool and wrinkly https://x.com/Coolio_Art/status/1724144572903616535?s=20
I do feel rushed and i dont get to work in all the detail i want or the adjustments i want to make because of the limited time we would have for animation if i take much longer. the model will be mostly shrouded in darkeness so it should be ok and animation is very very important for conveying the animal and the scares so it needs time.
some more videos i watched while working on the sculpt: https://www.youtube.com/watch?v=-QoLorR9qpY https://www.youtube.com/watch?v=Bgnq1jDYMmw
I have found a video on the work flow for cinematic animation
youtube
it look liek the retoplology that is done on modles is still very high poly because its all pre rendered anyway. im still going to look into it more as i clearly dont have strong enough of a computer but maybe someone has found a solution for independent artists that want to create animations that arent for games.
this one is on weigth painting, i dont know if ill be doing that but last time i made a model i had trouble with this so this was usefull incase i do have to weight paint https://www.youtube.com/watch?v=EaVG_KOKRnA also preperation for retopology and what to look out for when i get to that
and ofcouse
a cost calculation

hourly pay / hours spent up until the midterm / mid term cost
1 note
·
View note
Text
week 8

this week i blocked out all of the major parts of the details and the limbs so i could go finish up the detialing in higher quality after all of the objects were welded using dynamesh
already messed around with poly counts to see how i could utilize the function
sculpted it by going back and forth between refrences to keep it accurate, had to move the skin snout, the skinned legs and the ears so they could be properly rigged.
look at some videos for refrence of the work flow https://www.youtube.com/watch?v=Sb_zA-hLMO4 this video mentions no retoplology what so ever which is scary and definitely not something im goingt to curse my team mates with but im going to try and look into more of the work flow of modles for animation specifically instread of video game animation. i though all had to be retopologized or your pc would blow up.
https://www.youtube.com/watch?v=uFPpsWv_HWs this video mentions hes going to use this model for his game which is not really what i was looking for but im having a lot of trouble even finding a speedpaint of someones process of making a model specifically for cinematic aniamtion. this retopology method in blender is very interesting though i might try it when i get to that point.
1 note
·
View note
Text
week 7
started working on the sculpts proper shape, hope to have it done next week.
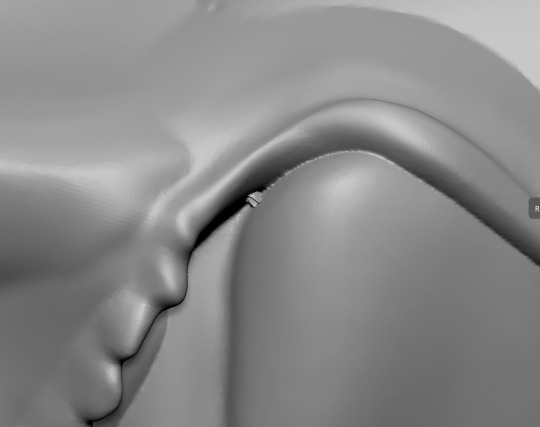
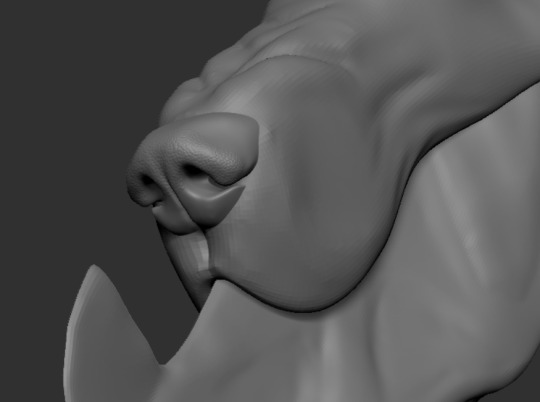
costantlty chekcing refrences and i am starting to stray a bit from the refrence i made when i feel i can make it look more believable with slight adjustments. examples: i made the snout skin lay flatter on the nose so i feels more weighted and fleshy, changed the shape of the lower jaw to be more unique and fit the upper jaw better
that is a pretty tight shedule for me as I am also studying my drivers exam that i have next week but i hope i can make it.
1 note
·
View note
Text
week 6
due to not working on applied research much the past few weeks ive opted to spend a conciderable time working on my paper and poster this week thus leading to less progress.
I had to make a side view ref for the model because the final design pose wouldnt work well.
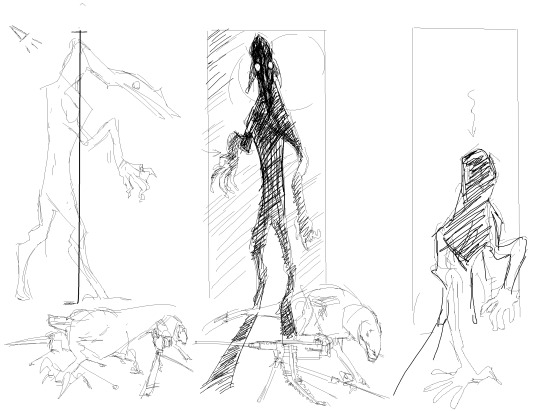
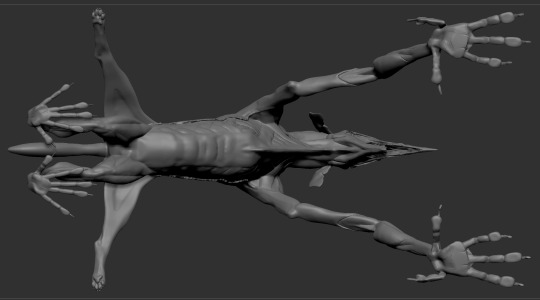
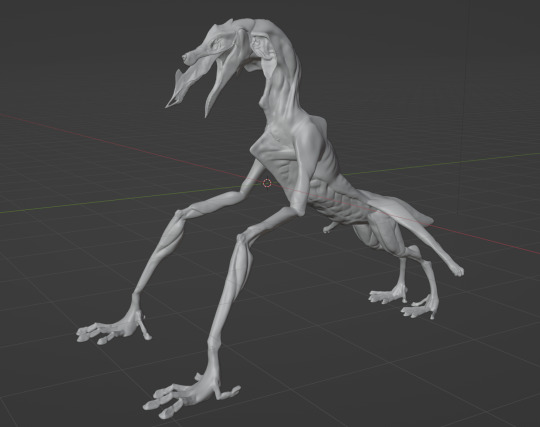
I made a refrence for the creatures 3D model, adjusted it slightly to be in a more A pose like state and slightly more humanoid, for the rig the fingers need to be splayed out to prevent weird deformation but it also helps it look more human. Posing it more upright also helps.

and started working on the base model and its basic shapes.
I havent touched Zbrush in over 9 months so I have to relearn the controls.
I justed these videos as a refrence point of where i should start and how to move forward from there.
https://www.youtube.com/watch?v=rGFBd6YmJ7c https:// this video for basic controls and brushes.
www.youtube.com/watch?v=J2_uiUEcY7w this video for how to build up your model.
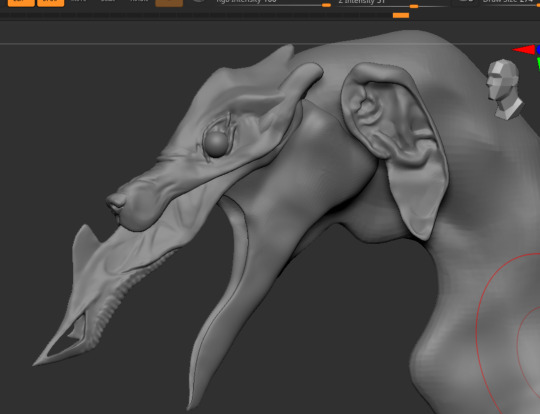
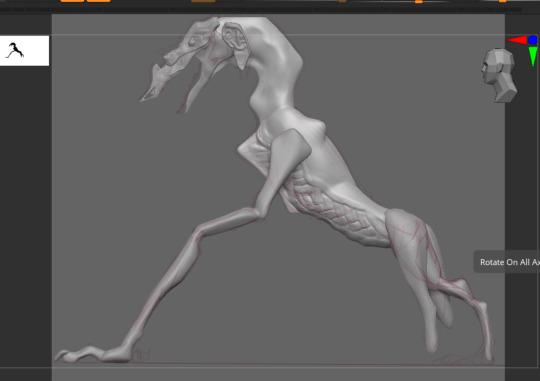
Hereby i present: this guy
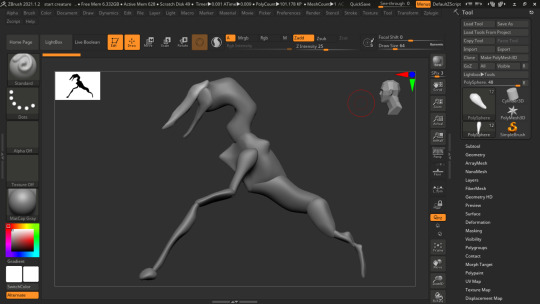
the head looks crazy big but thats good its a pterasaur inspired build they look even more cartoony, i concidered making the head smaller but i felt that would be detrimental to the weight of the design

1 note
·
View note