
Statistics
We looked inside some of the posts by blogging-from-itp and here's what we found interesting.
Average Info
Notes Per Post
2
Likes Per Post
2
Reblog Per Post
0
Reply Per Post
0
Time Between Posts
17 days
Number of Posts By Type
Text
17
Last Seen Tumblr Blogs


Fun Fact
Tumblr.com is the 103rd most visited website in the world.
Text
Uploading images to Firebase - issues and debugging steps
The goal of the project was to upload images to Firebase database and then display it on Glitch.
Things I tested so far:
1. Sending timestamp for database
I tried sending humidity sensor initially. The sensor didn’t work but I eventually send the timestamp to Firebase Realtime Database. See the previous post.
let gpio = require("onoff").Gpio; let firebase = require('firebase'); let app = firebase.initializeApp({ databaseURL: "https://daylight-analysis.firebaseio.com/" }) let humtemp = new gpio(4, 'in'); let n = 0; // console.log(humtemp) // console.log(humtemp._readBuffer.toString()) let database = app.database(); setInterval(() => { database.ref(Date.now()).set({ temperature: n }) console.log(n) n++ }, 2000)
2. Sending images to database storage using Node
This took sometime to resolve. Firebase has multiple products. I had to send two types of data: image and timestamp. I assumed, partly due to how all the Firebase apps are branded, that I can use Realtime Database.
I spoke to Stuti, who used Firebase. She told me to use Storage for data and Realtime Database for the metadata. Firebase is good for for running apps but not images or videos. After a long weekend trying to debug why I couldn’t post an image to Storage, here is the following I figured out:
1. No support for Node: Based on the link ↓↓↓

2. Firebase Storage uses Google cloud as a dependent ↓↓↓

Code that I used based on Firebase Get Started >> Web >> Node along with Firebase Storage >> Web >> Node:
//Initialize on Cloud Functions // The Cloud Functions for Firebase SDK to create Cloud Functions and setup triggers.
const functions = require('firebase-functions');
// The Firebase Admin SDK to access Cloud Firestore. const admin = require('firebase-admin');
admin.initializeApp({
credential: admin.credential.cert(serviceAccount), apiKey: "<INSERT>", authDomain: "<INSERT>", databaseURL: "https://<INSERT>.com", projectId: "<INSERT>", storageBucket: "<INSERT>", messagingSenderId: "<INSERT>", appId: "<INSERT>", measurementId: "<INSERT>" });
// Initialize Firebase // firebase.initializeApp(firebaseConfig); // firebase.analytics();
var storage = firebase.storage(); var storageRef = storage.ref(); var imagesRef = storageRef.child('images'); var database = firebase.database();
//admin.initializeApp();
//nodejs as a FileServer for CRUD //read a file from path and provide standard output //If encoding is specified then this function returns a string. Otherwise it returns a buffer. //ref: https://nodejs.org/en/knowledge/file-system/how-to-read-files-in-nodejs/ fs = require('fs') fs.readFile('/solarlapse/cam.jpg', function (err,data) { if (err) { return console.log(err); } else { console.log(data); let fileName = '1'+'abc'+'.jpg' let mountainsRef = storageRef.child(fileName); let file = data; ref.put(file) .then(function(snapshot) { console.log('Uploaded a blob or file!',snapshot); //snapshot might contain the link to the image //might be a json ---> figure out which filed contains the url // store it in url variable // let url = snapshot.url;
});
***
There might be some code issues since it’s been updated a few times but you will get the gist.
The following image show some of the errors like “firebase storage is not a function” etc.
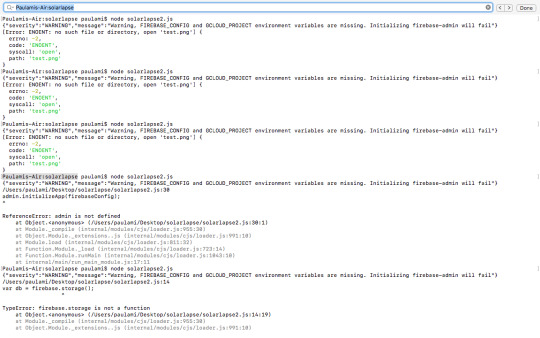
I went over the Firebase documentation once again and noticed the notes that mentioned about Node support or lack of it.
Next step:
So we thought a bit more and thought that it might help to use Mongo Atlas. More on that in the upcoming post.
Contributor:
I had Jason, Tushar, Atharva, Arghya help me with debugging.
0 notes
Text
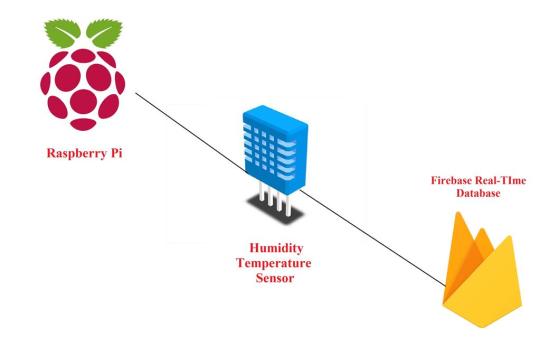
Working with Pi - 2
Connecting to Firebase
This week I spent time figuring out how to capture images using the Pi cam and sending data to Firebase.
Pi cam
There are four parts to it.
Capturing a picture: ✔️ This is the article where I started but it work, based on Alex’s suggestion. My issue was working with installing Imagemagick. May be it’s lack of experience, but based on Google search, I couldn’t find a simple workaround to use it. So I broke down the steps and started doing each step individually. Pi’s timelapse documentation came in handy.
Setting up a Cron job: ✔️ Tom Igoe’s page was super helpful.
Saving them in a folder: I think it’s about definig the path. But I couldn’t figure out a way to do the Cron job by storing the images in a folder. So my Home quickly got crowded with images. All of which I had to manually delete.
Sending it to Firebase: Read below.
Useful references:
This has good documentation on how to take photos: https://picamera.readthedocs.io/en/release-1.13/recipes1.html#capturing-to-a-network-stream
Sending data to Firebase
Before using Firebase, I was inclined to use MongoDB. Based on research, it turned out to be a slightly harder to send images. It’s easier to send text files. So I switched to Firebase.
One of the challenges working with Pi and hardware in general is that there are different ways to do the same thing. So a big chunk of my time was consumed in reading and looking for good documentation with clear explanation.
⇩ This one didn’t work:
Setting up Firebase: This was the easy part. I followed the steps from this article and created a project.
Since I didn’t know how to send images to Firebase, I tried to work with a sensor. I picked the DHT sensor. Little did I know how fragile and finicky it is.
I started with this documentation. As I went about debugging the Python script, I went into a rabbit hole. The problem: I used the Thorny Python IDE to run the script. It turns that the environment is in 2 but my script was in 3.
Issues: I noticed that the console was throwing each line as an error. So I started debugging line by line. It started with missing libraries. A lot which I installed but the part that eventually made me start from scratch was the missing Adafruit DHT library. Akash (Software background) did a quick check and told me that it was deprecated. So I asked a classmate, Nick Boss, who knew CS to help me find a workaround. Initially we tried to rewrite the code but it was still throwing errors. It came down to GPIO pin library. I am still not sure what the exact problem was. Nick used iPython. I don’t think I understood it but after adding another GB of library and no clear solution, I realised that it’s best to pause.
⇩ This is in progress:
I found a much cleaner set of instructions in this Github repo.
So far, I finished all the steps and currently figuring out how to add the Pyrebase wrapper for Firebase.
⇩ This worked. Yay!
Eric offered to help me yesterday connecting Firebase with Node. I don’t know Js plus I haven’t much enough documentation with it so I let me give this a shot.
His first question was how are we connecting the DHT to the Pi. So we searched for node Serial port and found the Serial Port link.
Next, we had to find a way to read the GPIO pins. I couldn’t comprehend the need but nevertheless. We searched for “gpio reading node js” and then found the w3 school documentation on OnOff module for NPM. We used the blinking LED for code reference.
Following up, we searched for the OnOff NPM package.
Next, we had to figure out how to read OnOff dht value. The article here was useful. Alongside, we referred to Tom’s code on GPIO pins here.
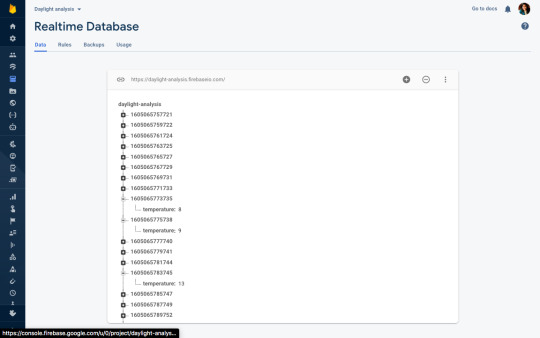
The code finally worked and we started to get reading. Or so we thought. The reading was in binary. So we spent some more time to figure it out. We tried to refer to this article but it didn’t finally work. After a while we realized that the sensor isn’t working. Given that it has no role in my project, I instead thought of sending some random data or message to Firebase.
Two things were helpful. Setting the interval as described here and getting a timestamp in Js.
The image above is the screenshot of the same.
0 notes
Text
Working with Pi
Setup
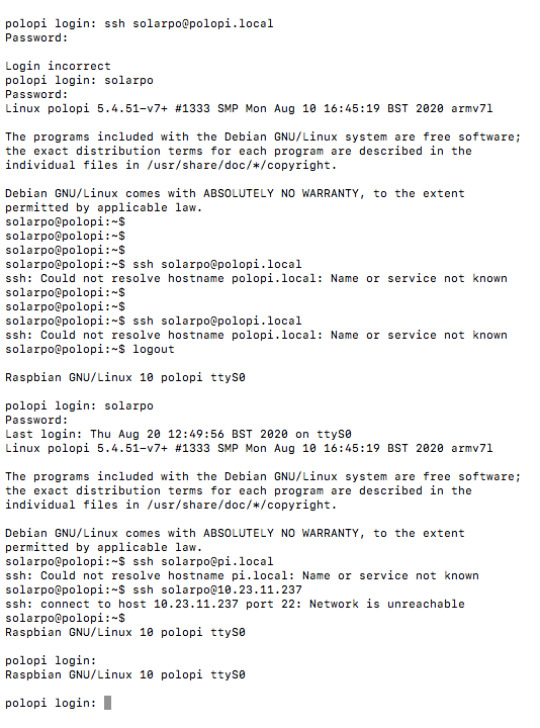
I followed Tom’s tutorial for setting up the Pi. I followed all the steps and placed the SD card in my Pi. That’s when I saw the missing Wifi signal/no option for Wifi in the GUI.
I assumed that probably I didn’t configure the Raspian correctly. So reconfigured and ran the SD card in my Pi to add .local. As you see in the image below, I got stuck. That’s the error that lead me on a rabbit hole trying to debug over three days.
Wifi issues debugging steps:
There are a couple of things I did. First tried to ping Google using 8.8.8.8. Next a wifi scan to see if it can detect any network. Eventually, tried to check the network credentials. No luck. I finally took help from Tushar and Tom to get to the bottom of this.
Resolution
I switched to an Ethernet cable to rule out any driver issue by updating and upgrading the system. Next checked if the system can detect the Wifi hardware spec. It did. So we unblocked the Wifi, in case of any frequency issue and list the Wifi. The Wifi still failed to work. So finally I switched to a new board, and voila! it worked. Our conclusion was that the wifi was busted in the previous board.
Below are some keywords/Google search I did to sort it:
Tried a different network
Checked DEMON - all network credentials were added
sudo raspi config to check for wireless network + sudo iwlist wlan0 scan
wpa_supplicant.conf raspberry pi (link)
How to “rpi restart wifi service”: https://vicpimakers.ca/tutorials/raspbian/restart-raspi-services/
Using raspi config : https://www.raspberrypi.org/documentation/configuration/wireless/wireless-cli.md
Analysing error: wlan0 interface doesn't support scanning: sudo iwlist wlan0 scan (link)
Checked for drivers: https://www.raspberrypi.org/forums/viewtopic.php?p=462982#p462982.
http://downloads.fars-robotics.net: Didn’t work
pi /etc/network/interfaces: Tried to understand the difference between Differences between /etc/dhcpcd.conf and /etc/network/interfaces? (link)
Not useful but found it during the search: https://wiki.debian.org/NetworkConfiguration
ERROR: wlan0 interface doesn't support scanning device or resource busy (link)
Finally, went back to Tom’s notes: Connecting To the Network via WiFi
Nothing worked. I switched to a different Pi and the Wifi finally worked.
0 notes
Text
Thesis
Assignment 1/Mission:
Passion: Food, farming, hardware, design. - Prior to ITP, I worked as a product designer with both startups and MNCs and designed a no. of applications in the travel, education, compliance space etc. - On the side, I also took classes in culinary arts and permaculture. I have been experimenting with different cuisines, ingredients etc and hope to keep pushing the boundaries of food. - But before all of this, a decade back, I used to paint, print, took photographs, backpack. While I have moved away from most of them, I still enjoy doing things hands-on.
Goal: To collaborate and build things together. - Some of the people whose work I follow - Orijit Sen, Andrew Quitmeyer, Raqs Media, CAMP etc - have made some of their best work while collaborating. I don’t have a clear idea of how, but it will be great if I can have thriving studio. - In terms of work, I would like to work in the realm of design, tech and food.
Intention: ?
What you want to achieve: ?
Vision 50yrs from now: This is more of a 25 yr plan. I want to open an alt school for kids, build my own curriculum and teach. I have been teaching passively for more than a decade - special needs kids, middle school students, adults etc - mostly art & design.
0 notes
Text
Understanding network: tracking & analysing packages
I used Wireshark to track and analyse packages at ITP. This is the link to the filtered file of packages. I applied tcp.port == 443 || udp.port == 80 to search for relevant packages.
Laptop activities:
I had ~10 tabs open in Chrome. Most of them were not loaded though.
I also didn’t quit Firefox plus I took a Zoom call.
These were the major IP/website I found in the list:
lga34s31-in-f5.1e100.net: Google Safebrowsing feature in Chrome
edge-star-mini-shv-01-lga3.facebook.com: Facebook, NY
d27xxe7juh1us6.cloudfront.net: NYU
ec2-35-170-0-145.compute-1.amazonaws.com: Amazon AWS
cc-api-data.adobe.io: Surprised. I am not using CC plus I think I uninstalled the whole suite.
ets-prd2-uw1-coll-elb-2013165758.us-west-2.elb.amazonaws.com:
e11408.d.akamaiedge.net: AkamaiGHost/ Akamai Technologies, Inc. is a global content delivery network, cybersecurity, and cloud service company, providing web and Internet security services. Akamai's content delivery network is one of the world's largest distributed computing platforms, responsible for serving between 15% and 30% of all web traffic.
172.253.122.188: Google, California
d27xxe7juh1us6.cloudfront.net: Cloudfront is Amazon Edge server and content distribution network (CDN) and point of presence (POP) used to cut latency. It is a standard product offering available to any AWS customer but Amazon uses Cloudfront as well.
193.122.250.233: Oracle Corporation, Virginia.
www.Zoom.us: I had a Zoom call.
f-log-extension.grammarly.io: Have extension installed Grammerly and it’s switched on at all times.
gateway.fe.apple-dns.net: Not sure why this appeared.
safebrowsing.googleapis.com: I am assuming that this is part of Chrome.
Client.hola.org: Not sure why this showed up. The VPN was turned off.
Protocol:
Most of the packages used UDP or TCP.
TCP = 5537
UDP = ?
TLSv1.2 = 4960
ARP = 30
DNS = 114
MDNS = 14
SSDP = 27
Protocol hierarchy:
I am not sure if it’s useful but I grabbed a screenshot anyway.

Some unexpected packages
Adobe Daemon: I had Adobe CC at some point but it was later unistalled. I checked my Activity monitor later to find that it still has Adobe Daemon running in the background.
Hola VPN: My Chrome has VPN installed has an extension but it’s mostly turned off. So I was surprised to see that the package showed up in Wireshark.
0 notes
Text
Oct 5 - 11
Things I worked on:
Solar for Artists: Ironed out some of the concepts for the Solar project in more detail.
Understanding Network: Ran Wireshark to track and analyse packages.
Game design: Presented on how behavioural economics is employed in the tabletop game Carrom.
Detailed report
SOLAR FOR ARTISTS
I started with brainstorming few ideas:
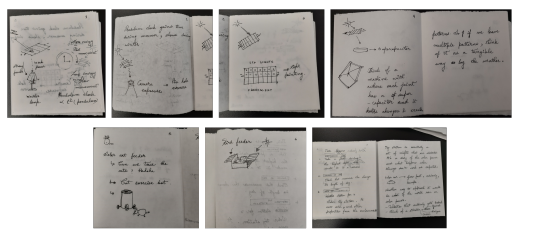
Clockwise, top left to bottom left: a lamp that changes light and brightness based on solar power; a camera that shoots when the capacitance is full; a neon pixel board that paints based on the solar power; a tactile sculture that changes form based on specific input from solar power; a cat feeder; bird feeder; data logger for seasonal change/day length.
Finalising on the ideas:
There are 2 ideas that I am excited about:
The data logger: WHAT: I am interested in understanding how data is collected, the challenges of installing a sensor and gathering data over a period of time. Part one is data collection: This aligns with my interest in farming and biology. The idea is to place it in a park like Prospect park and let it sit over few months to collect bird sounds. Part two is analysing. Part three is visualisation: I haven’t given much thought on it but I am interested in exploring non-digital way experiencing data. HOW: There will be 2-3 installation. One at ITP, another in my garden and third in a friend’s patio. This will use a Pi camera. It will take pictures when the capacitance is fully charged. Timelapse would be better. The Pi will send the images to a virtual server >> then pick images with max brightness>> upload it to a website. View link
The camera that operates based on solar: WHAT: This is interesting theoretically. It’s based on the idea of ticket to talk technologies which focuses on sharing tid-bits about people who are acquainted to each other but are physically distant. The image will work as a conversation starter to questions like “how is the weather” “did you go out” etc. Think of two people, me and my Mum who is in India. The camera captures the photos and shows up as our screensaver. We don’t act on it and are passively aware of it. So when we actually talk, we can add on to that passive knowledge by asking more questions. HOW: The idea is that the camera shoots when the capacitance is fully charged. The problem is that most of the focus here is on building a camera. I am not sure if I want to devote as much time to making a camera versus actually taking a picture. View link
Reference links:
Bookmarks: Projects, references etc
Ticket to talk technologies
0 notes
Text
Readings
A History of Solar Power Art and Design Chapter 7
Notes:
Overview of artists who explored solar power as an artistic medium.
Different approaches to exploring sound art.
Not understood: Artists exploring this effect with battery-less systems are likely to be interested in the expressive possibilities of variability and precariousness that result from frequent changes in light conditions directly impacting the sound output.
Autonomy w.r.t no sunlight; analog electronics.
Critique of P.V Collins book: the book doesn’t consider the opportunities for unique aesthetic outcomes when working with solar.
Analogous sound, Max Nauhaus.
Needs elaboration: All of Blasser’s work, but especially his solar sounders incorporate elements of biomimicry...
Unregulated power supplies? (Brassier)
Question/comments:
The book is called the History of Solar Art. I want to understand more about the author’s approach. Based on the chapters shared, most of the artists are exploring solar as a medium, not as a thematic subject.
I noticed that most of the work is described in terms of what it was and did, specially how each artists stretched the limits of the medium. It would be nice to hear the artist’s thoughts behind each of these pieces. For eg: what was the conceptual need that led me to push the edges of the medium. For eg, did Giddy do similar experiments before? If yes, what were those and what led to the final exploartion. It would be nice to know more about Bálint, Lucier and Jones. For eg, did they play with mediums, initial drawings, failures etc.
Also, if the focus is on the technology, then adding schematics/illustrations can be a good way to explain some of these works better. For eg: the portion that talks about photovoltaics can be explained better diagrams.
Satisfaction - Smallwood. Why is this important?
It will be also nice to know how/what made the artists/composers experiment with solar as a medium?
The Design of "Living" Biomech Machines: How low can one go? Ref link
Notes:
I get the overall concept but it will be better if we can discuss it. For eg terms like non-linear took me on a rabbit hole and while I get the gist of it, I don’t think I understand enough to apply it.
Similarly, a lot of the diagrams are hard to understand. I would like to more about the physics behind it.
0 notes
Text
Assignment 2 - Mapping websites using traceroute
Assignment brief: https://itp.nyu.edu/classes/undnet/assignments/
Traceroute mapper: https://stefansundin.github.io/traceroute-mapper/
Traceroute results: https://drive.google.com/drive/folders/1b0HeUe0kHTX_B-xsSk7hgIiLwmYceIDi?usp=sharing
Websites tracked:
(a) www.paulami.in, (b) www.irctc.co.in, (c) https://linkedin.com/, (d) https://youtube.com/, (e) www.slack.com
Locations:
NYU, 370 Jay St
Downtown Brooklyn
Home
MTA
Hotspot
Results:
NYU 370 Jay st
Notes:
NYU
Notes:
Home
Notes:
MTA
Notes:
Hotspot
Notes:
#tagsClose
0 notes
Text
All maps lie
Final project proposal/Lockdown in India
Demography: India
Topic: COVID data - what we know, what we don’t know and what might be missing
Introduction: I plan to work on how the COVID related lockdown affected India. Why? India’s lockdown was declared in a haphazard manner. It came into effect the same night it was declared so those who could afford started stocking up on food. Police unaware of the entire rule beat up the essential workers like delivery people. The circular stating that all essential services will be open was released a day later after the lockdown. Unfortunately, migrants started to rush home on foot since they are the most affected by the lockdown.
So my project is focused on the affect of the lockdown.
Bibliography:
Govt request’s SC to censor COVID data https://cpj.org/2020/03/indian-supreme-court-denies-government-request-for.php
Statewise stats: https://app.powerbi.com/view?r=eyJrIjoiNWEyNThlZTItYTY3MC00NDM5LWEyYTgtZDBiMzc4MmNlNDdiIiwidCI6ImM4ZWNhM2NhLTEyNzYtNDZkNS05ZDlkLWEwZjJhMDI4OTIwZiIsImMiOjl9
Datameet repo of non-COVID death: http://projects.datameet.org/covid19/
Statewise legal order repo: https://covid-india.in/
View on India’s lockdown: https://scroll.in/article/956932/interview-suppression-wont-work-in-india-slow-down-the-coronavirus-this-will-be-a-long-haul?
Prime minister’s announcement on the lockdown: https://timesofindia.indiatimes.com/india/india-lockdown-for-21-days-all-of-india-under-lockdown-for-3-weeks-due-to-coronavirus-in-india/articleshow/74801459.cms
A critique on the haphazardly planned lockdown: https://theprint.in/opinion/modis-poorly-planned-lockdown-wont-save-us-from-coronavirus-but-will-kill-economy/388056/
More reports: https://www.theguardian.com/world/2020/apr/04/i-just-want-to-go-home-the-desperate-millions-hit-by-modis-brutal-lockdown
Thejesh GN explaining the dataset: https://thejeshgn.com/2020/04/05/datameets-covid-19-india-datasets/
NYT report: https://www.nytimes.com/2020/03/24/world/asia/india-coronavirus-lockdown.html
Wikipedia: https://en.wikipedia.org/wiki/2020_coronavirus_lockdown_in_India
Effects on migrants: https://www.theatlantic.com/ideas/archive/2020/04/the-pandemic-exposes-indias-two-worlds/609838/
Migrant worker population: http://www.aajeevika.org/labour-and-migration.php
0 notes
Text
All maps lie
Week 1: Capturing bike lane orientation through Streepmapper
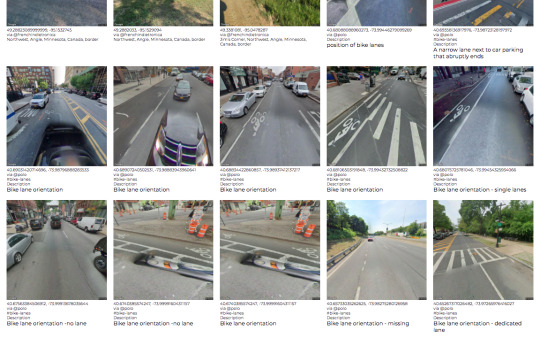
Until last year I used to cycle a lot in my home-country then I watched videos like this and a near fatal accident in San Francisco made me extremely fearful of biking in NYC.
So one of the first things I started to notice when I landed in NYC are signages, more specifically signages for bike lanes. Bikers in the USA ride at extremely high speed making it super dangerous for slow bikers like me. Additionally the placement of biking lane makes it tricky. Why, as you see the images captured above, there is no consistency. There are very few places that has dedicated bike lanes with a partition between passerby and vehicles. The images say it all. I tried to track the road from my school towards Hamilton-Parkway because I have used the subway in this direction a lot so I wanted to see what the bike ride would look like. I also avoided narrow roads and followed only the main roads as those are the roads with dedicated bike lanes. Again, since I was searching in inconsistency, this is not a linear path.
0 notes
Text
Monitoring temperature using Raspberry Pi

ERROR: Sorry could not find a PTY.
1 note
·
View note
Text
Setting up Mongo DB
GOAL:
Make a ToDo app and learn by doing.
---------- REFERENCE LINKS:
Homebrew
Running MongoDB
Step 1
Setting up Mongo DB
Medium link to setup and install MongoDB using Homebrew
Workbook
ToDo list tutorial using Express and Mongo
---------- REVISION OF KEY TERMS:
Node.js: Node.js is a platform built on Chrome’s JavaScript runtime for easily building fast and scalable network applications. Node.js uses an event-driven, non-blocking I/O model that makes it lightweight and efficient, perfect for data-intensive real-time applications that run across distributed devices.
MongoDB: MongoDB stores data in flexible, JSON-like documents, meaning fields can vary from document to document and data structure can be changed over time.
Express: Express is a minimal and flexible Node.js web application framework that provides a robust set of features for web and mobile applications.
CRUD: CRUD stands for Create, Read, Update and Delete. The basic operations that a simple web app would be designed to achieve.
Rest: If you didn’t hear about REST before, you can read more about it here.
---------- DISCLAIMER: I have purposely not used the workbook because if you don’t know what’s happening, then it is easy to copy and not understand a line. Hence, I followed the ToDo list tutorial to a T. In my log, you will some edits I made and glitches I bumped into but overall it has a good explanation for each line of code.
----------
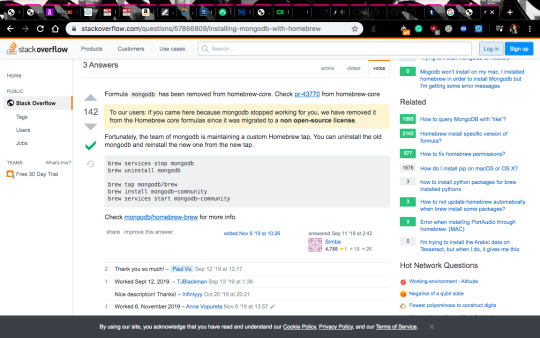
1. Installing Homebrew to run MongoDB.
/bin/bash -c "$(curl -fsSL https://raw.githubusercontent.com/Homebrew/install/master/install. sh)"

It turns out that Homebrew is no longer open-source hence I can’t install MongoDB. The StackOverflow Q&A explains the problem better. So I decided to go back to the documentation.
2. Making a Todo App
I decide to go back to the tutorial from the workbook and quickly I realize that it’s not of much use. So I refer to another tutorial.
Before I install Mongo, I tried running npm init in the terminal. I tried a bit but couldn’t make it work.

So I reread the tutorial.
This time I ran it in the VS Code terminal and it works. Next, I installed all the packages.
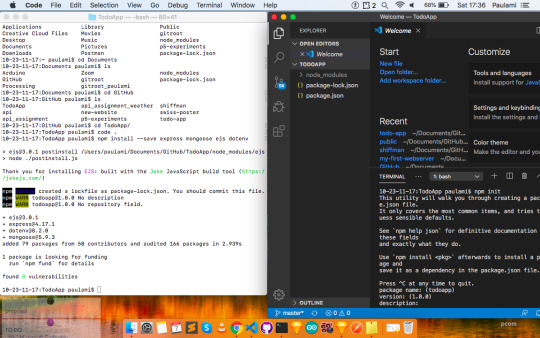
And it works! See below the code and the browser.
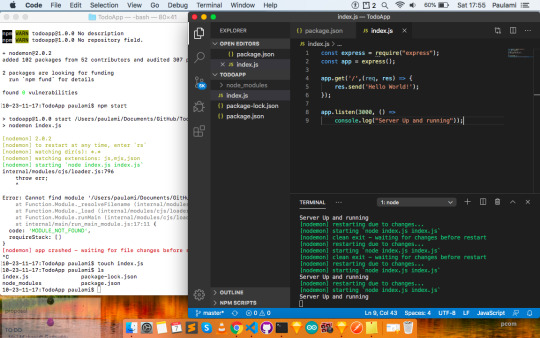

Next, I bumped into a problem where the tutorial says that the browser should show the app, but it wasn’t working.
So with the help of Sarah, we debugged the code and edited the following:
- Replaced send with render

And updated the path of CSS sheet.
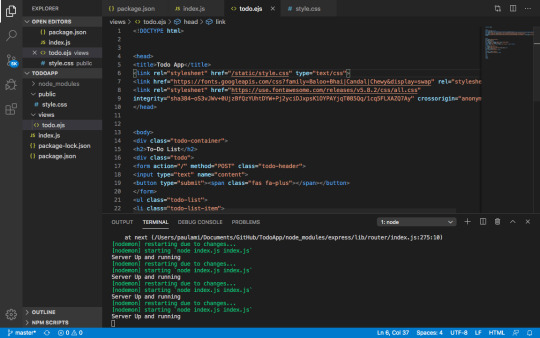
And as you see below, once the is data added, it shows in the terminal of VS Code when we run the server (node index.js)
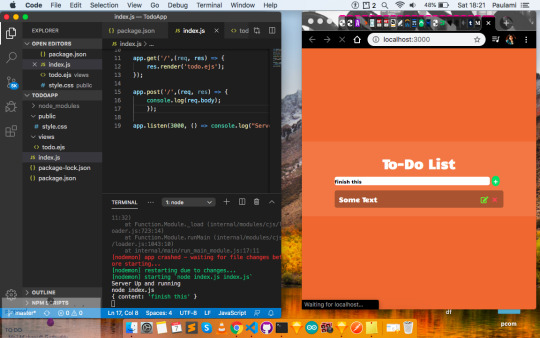
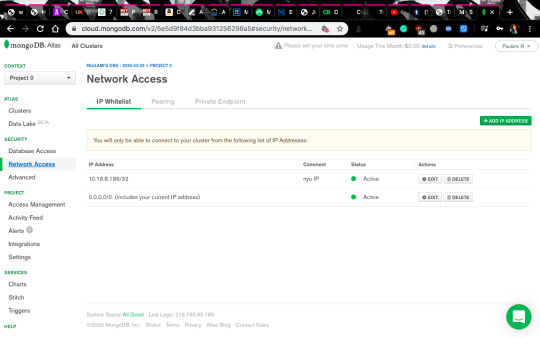
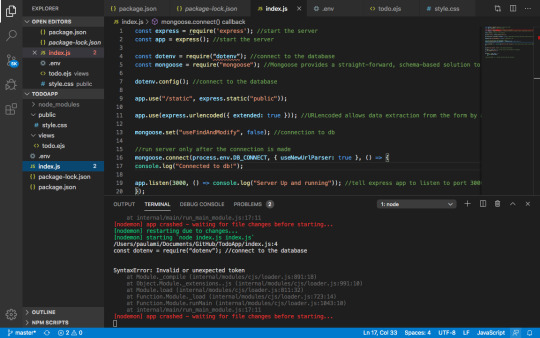
3. Integrating MongoDB
I followed the tutorial but there are some differences in the UI. So the screenshot captures the updated version.

Next, we connect to do the database and get the construction key as shown below.
Error: I am not sure why it’s logging this problem - is it a syntax issue or is it something else?
0 notes
Text
Lynched 🗡️
A performance piece developed from the 5 yr data of the word “Lynched” in India. Source Google trends/News.
Intro I am raised in a secular and democratic country so the recent developments or rather the deterioration in the political climate has made me question my beliefs and understanding of the constitution and the place I belong to. This project is a response to the news and the events that have engulfed the country and decide the destiny 200 million-plus people.
LYNCHED /lin(t)SH/ verb past tense: lynched; past participle: lynched (of a mob) kill (someone), especially by hanging, for an alleged offence with or without a legal trial.
Why is my data based on the word Lynched? Before going ahead, it will help if you read this NYT article on hate crimes and thewire.in article. Hate crime, coupled with fake news and increasing unemployment has created a polarised society where your freedom is tied with your class, caste, religion, political views, sexual orientation and gender.
So anyone who doesn’t fit in is at risk of getting persecuted by gangs or followers of political parties based on assumptions or fake news. Lynching is an easy way to suppress voices using mob violence and swords and daggers.
The concept Enacting the mindless act of using a knife on wooden board collectively to scratch and make violent marks till the time is exhausted.
Data I fetched the 5 yr data from the News section on Google Trends. It starts from 2015 and goes on untill February 2020, in sync with the current government coming in power.

Below is the image of the data being cleaned and converted into time.

Development I initially planned using ketchup and focus on the loss of life, similar to Imran Qureshi’s work but later decided against it. When we talk of lynching, the following are the possible reaction:
Sympathise the people whose lives are lost
Indifference towards data, especially when violence becomes normal.
Bitterness towards the political regime
My goal is to use this performance to reflect on the act of lynching - the absence of consciousness, the rigidness, the monotonous, the repeatedness and the collective joy of doing together.
Material: I iterated with paper, metal and wood. Paper is too fragile and can’t last the intensity of knife marks. Metal, on the other hand, is too hard to get scratch marks. Ideally, I would have preferred cement but for now, I decided to stick to MDF. It’s hard so as not to break but soft enough to register the knife marks.
I finally decided on the combination of MDF board + knife.
The setup
The MDF board will be set up with a min of 2 participants.
The participants will be silent room so all they should hear is the sound of the scratch marks.
Each round will be time-constrained based on the data.
Also, once the participant has agreed to start the round, they can’t lift their knives from the board.
0 notes
Text
Designing an API
Ref URL:
Class tutorial
Designing your own Restful API
Tania’s tutorial
Shiffman’s tutorial
Things I have done/understood so far:
1. How to setup the frontend code.
2. Connect with an API that will get updated with user input.
3. Use the API to show specific type of data for the user or the user can enquire/ask for specific things from the API. For eg in the weather API implementation, the user can type the name of the city and find it’s weather.
Things I am doing this week:
1. This time the user can update the API.
2. Imagine a job portal where the user can add/edit the actual database.
3. So if you have a list of candidates and you want to update their details, you will have to do server-side programing.
Steps:
TUTORIAL PART 1
This is where I try out playing with the terminal + node.js. Here we are using Node as the brain to do basic maths.

Next, I set up a .JSON file to store timestamp using the terminal.

I tried following the tutorial but I am missing something here. Ideally typing the node index.js in the terminal should have produced the JSON file with the timestamp. I tried checking the syntax line by line but it’s not helping.
TUTORIAL PART 2: INSTALLING PACKAGES
I realized that I am running out of time and there aren't many people on the floor to help me debug so I decide to move on to next bit of the tutorial.
The following screenshot is about running the server locally using the ‘npm init’ command.
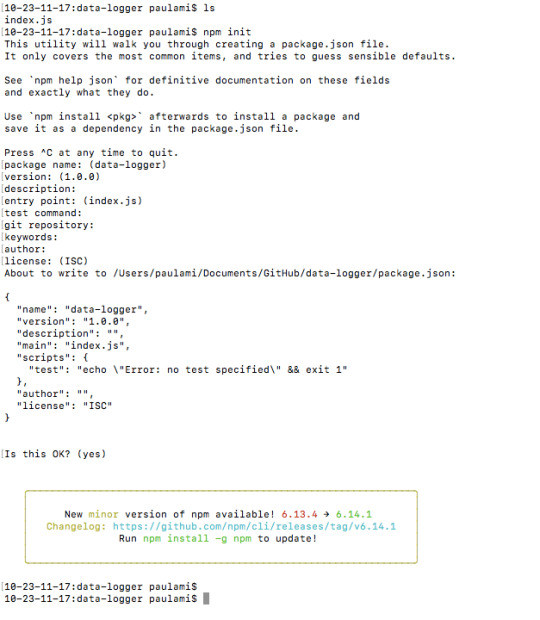
In the image above I didn’t realize that I have to add data to all the questions, so I cmd + C to quit and then one more round of the same command. Again, not working. I seriously don’t what’s wrong.
TUTORIAL PART 3: SIMPLE EXPRESS.JS WEB SERVER
So far so good🤞

Thankfully, this works!

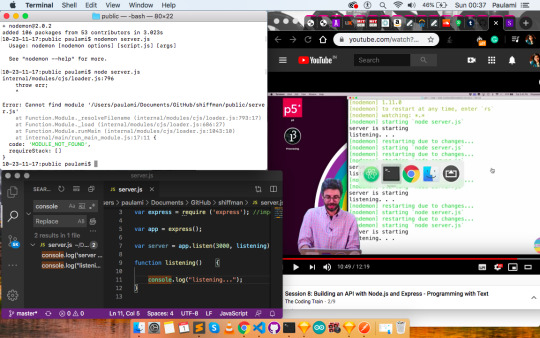
Next, I decided to watch Shiffman’s video on how to build an API from scratch.
Error: MODULE NOT FOUND
0 notes
Text
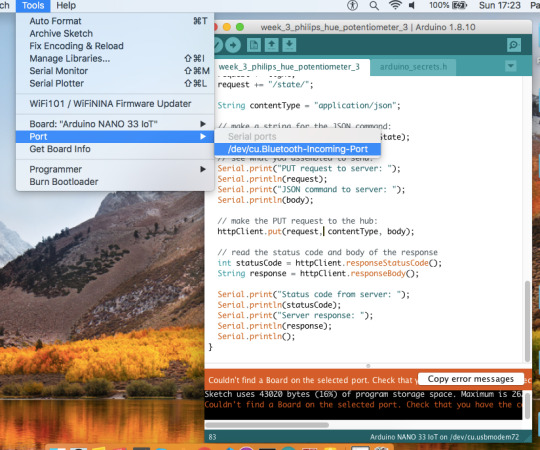
[cont.] Philips Hue hub - Interface for Connected Device
Playing with rotary encoder. The images below include the stages as I debugged the circuit.

0 notes
Text
Interfacing with an API to show data
Part 1:
I started by doing a step by step of Tania’s tutorial of how to connect an API with javascript.
Briefly, there are five major steps.
Set up the HTML, CSS and Javascript file. The code is already there so you can just copy the whole thing.
Set up the Javascript file. This is where you need to mention XMLHttpRequest Get request and URL of the API endpoint.
Then add an if statement to check if there are any errors and if yes then what type is it.
Now introduce the Json.parse to convert JSON into Javascript object.
Finally, to display the data, we will use DOM for Javascript to communicate with HTML. Once done, you should be able to recreate this page.
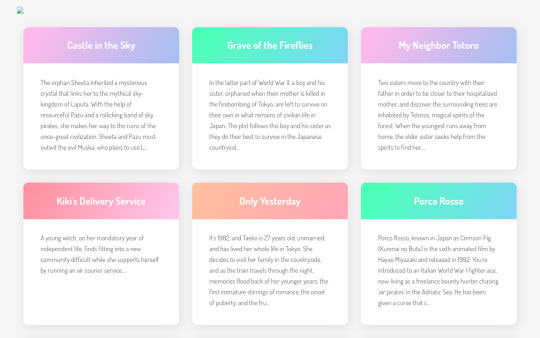
Note, there is a broken image on the top left because I didn’t download the actual logo.
Part 2
I decided to stick to making a basic weather app - with a search option and weather data. If time permits, add some nice weather animation. Nothing fancy, mainly because I am in the middle of a difficult housing situation that has left me with limited time. Also, there are a lot of new terms and concepts that I am still getting acquainted with. So I decided to keep things simple and understand all the steps that I am doing well.
This is a simple sketch I used as a starting inspiration.

Next, I searched for code examples that used the weather API. I have attached all the links below.
Links
Refcode available here.
Link to weather API.
CSS gradient link.
Animated illustrations link.
So the first thing I did was to get the API from openweather.org.

Next is the gradient, I tried to customise my gradient using the CCS Gradient.


Now that this is working, what I want next is to have a dynamic background and image based on temperature like this, without the card or tabs:

Since this is from Copepen, every time I tried running the code locally, I realized that it was showing an uncaught .container error and the image splits like this:

Based on the guidance of Ashwita, I started searching for specific error issues and unknown syntax types like the line below:
var container = $(".container"); var backSVG = Snap("#back");
I also searched for the following areas:
1. How to call a functino in the DOM? 2. jQuery CDN 3. Uncaught Reference Error: $ is not defined 4. javascript - Uncaught Reference Error: snap is not defined 5. Uncaught Reference Error: Snap is not defined 6. Using Snap in Jquery
This is what the new updated code looks like.
The next step is to insert the weather-based elements into my main code. As you notice below, the screen seems to be split into 2. Now, this is where it gets tricky. The Codepen code includes syntax that I am not familiar with so I decided to do this through elimination.

Current status. After more discussion, I realized that while rewriting the code is a great idea, it’s not something that I can achieve in the limited time I have. So I decided to skip this part and merge the CSS and HTML code and spend the rest of the time to understand the Js file line by line including how the animation is happening in the first place.
Ideal goal: I would like the weather-related animation to play in. the background depending on the adjective.
0 notes
Text
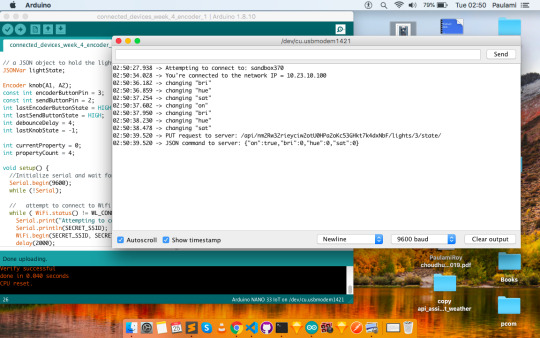
[cont.] Philips Hue hub - Interface for Connected Device
8. Code reference: Arduino HTTP client & HTTP client Get JSON.
[Not resolved] What is the use case of the SPI library?
Circuit:

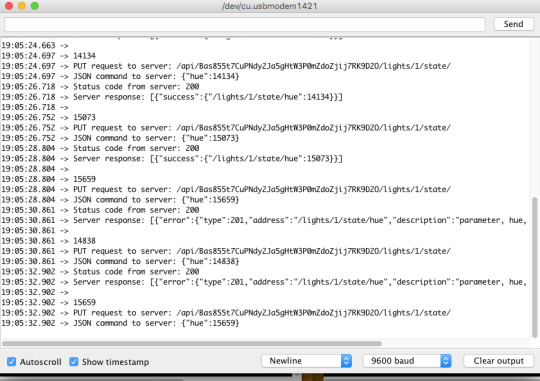
When I ran the Arduino code, posted here, this is how the command line worked.


...The errors happened and then the serial monitor went blank.
9. I tried the JSON code before going back to the previous code. Now I have a new error. My Arduino stops responding and I have to reset every time I upload the code. Not sure why.
10. Skipping any debugging with the previous code, I got back to the previous code. I had Alvaro helped me understand the code line by line. Following are some snapshots of debugging and updating the code.
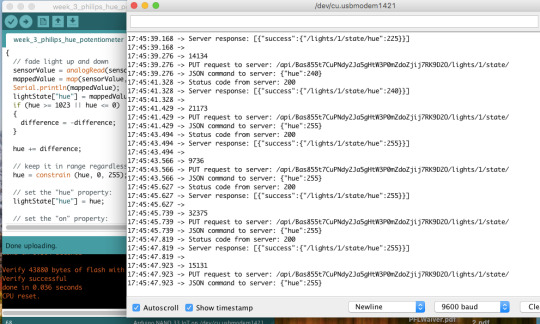
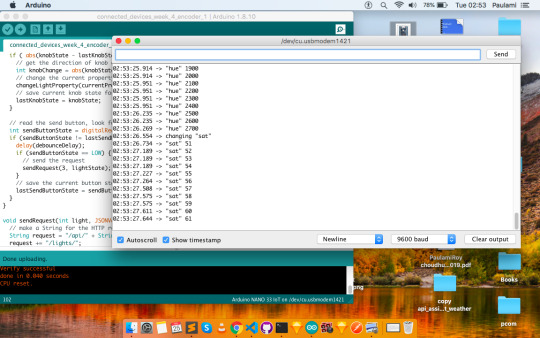
I will do a comparison of the old with the new code. Here is all that I updated:
mappedValue = map (sensorValue,0,1023,0,60000); 1023 is the potentiometer range 60,000 is an arbitrary number for the bulb
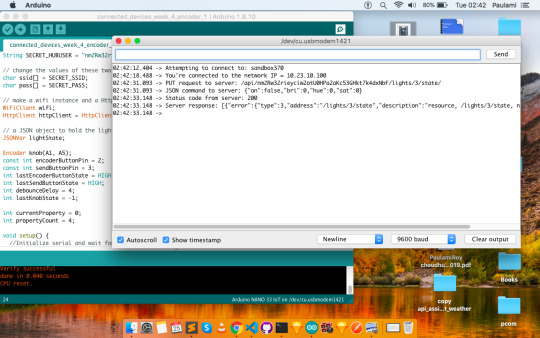
lightState["hue"] = mappedValue;
And that’s it! The last image is a screenshot of the serial monitor when the bulb changed its hue.
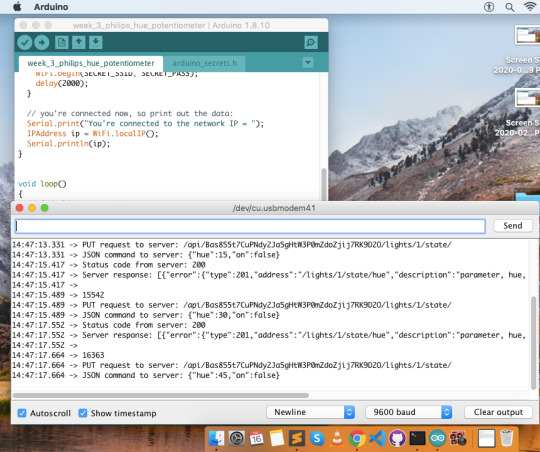
11. Glitches: It takes a while for the hue to get updated. Based on feedback so far it seems that the server is getting jammed with the data.
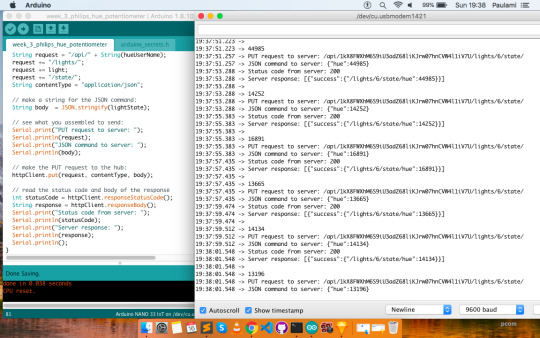
12. Debugging: I introduced an if statement.

It basically says that if the potentiometer knob is rotated more or less than 50 compared to the old value/reading, then update the bulb. But as you notice in the image above, data is sent even though I haven’t touched the knob at all in the beginning.
13. So I introduced another if loop, as recommended by Jason, to check the sent request.

As you notice in the above code, there are 3 iterations. In the final iteration, I introduced two things. First, to reduce sensitivity, don’t update the hue until the request is more/less than 50 wrt the existing code. Second, don’t keep sending data.
1 note
·
View note