
Statistics
We looked inside some of the posts by bradcrotchet and here's what we found interesting.
Average Info
Notes Per Post
1
Likes Per Post
1
Reblog Per Post
0
Reply Per Post
0
Time Between Posts
6 days
Number of Posts By Type
Text
10
Last Seen Tumblr Blogs


Fun Fact
Hackers stole 65M passwords from Tumblr in 2013.
Text
Conclusion
All in all, my skills have improved in the areas I wanted them to and feel slightly closer to being qualified at composing. I would call this plan effective and would argue that this plan should be followed if you have similar aims to me. I would, however, say that this plan was only designed for eight weeks and that I would recommend extending the plan to learn more scales and rudiments, for more long-term goals. My execution of the plan, however, could have been better and if I had the available resources, I would have spent more time at a piano and at a drum kit. I would also reflect on the fact that drum practice and scales is much more effective when done to a metronome, this will avoid making sloppy and wonky timing a habit. I'd say the piece turned out exactly as I wanted showing that the skills practiced have made a huge difference to my writing capability, this is a big success considering one of the aims was to make me a better composer. I feel that the music theory aspect of the plan was more successful than I’d hoped after completing my grade one syllabus slightly weeks earlier than I’d expected. At the end of week six, I completed a mock test and I passed 70/76, scoring what would be a distinction. In conclusion, I learnt new skills and used them to improve my ability at my chosen field successfully and completed each goal I had set myself.
Test
0 notes
Text
Week Eight
I spent week eight working on composing a track that would utilize the skills I have been building to showcase the efficacy of this plan. For the piano I aimed to write in C minor, the one I was most familiar with after my practice. I also utilized both of my hands to play both chords on my left and lead on my right. I played in a second lead in post that would add harmony and compound the chord progression. Because of all the time I spent on a piano I felt more comfortable playing around and making unusual choices and ended up using some modal interchange in my chord progression. When writing the drum parts I found it easier to write more complex rhythms and I made a point to include flams in my drum beat for variation. I also felt like I understood how to make more complex rhythms and chose to use syncopation in my drums. I had written and recorded some drum parts and piano parts but had lost the files when it came to the time to use them. This was inconvenient but made me mentally recontextualize the beats I was playing when I had to convert them into midi. It helped, being able to visualise the drums as I made them, and knowing what tricks I could throw into the rhythm section. In my chord progression I made use of augmented chords and diminished chords which I knew how to construct and use thanks to my theory lessons. I think the track showcases a sizeable improvement on my behalf and I would not have had the ability to produce such a track 8 weeks ago. I also found that this week gave me an opportunity to fiddle around on the keys and refine my writing ability.
My final lessons on music theory are that tonic triads are built using the first note of the scale and then the first and fifth. Secondly, Ties are curved lines that connect two notes of the same pitch and combine their length (typically done across bar lines), when this done between two notes of different pitches it is known as a slur.
week 8

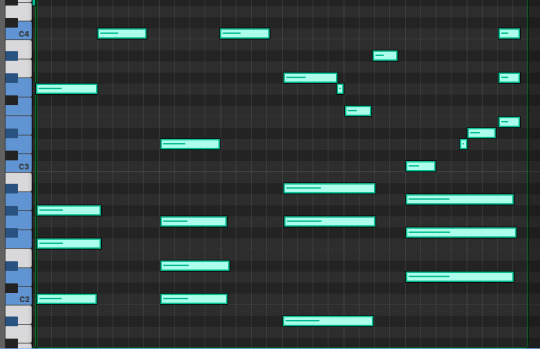
These are the two main chord progressions that alternate throughout.
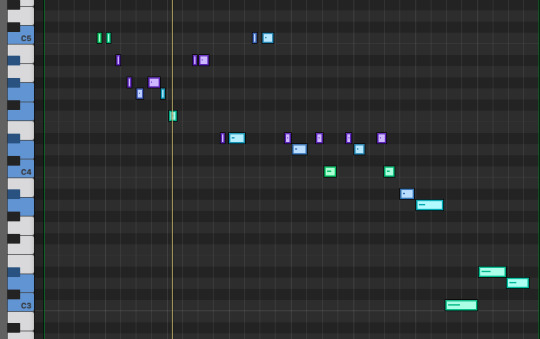
This is the piano roll part for the main lead.

This is the piano roll for the intro piano section.


This is the drum beat repeated throughout the track.
0 notes
Text
Week Seven
The aim of week 7 is to learn a short composition on piano that makes use of both hands, to give me an insight into how skills on a piano are translated into composition. For this I learnt a version of fly me to the moon that I thought was appropriate to my skills level. There are many ways to play this song, ranging from complete beginner single note melody to jazz connoisseur, however, I choose something in the middle but a little on the easy side, from a pianist's perspective. I was taught it as a single note melody in my left hand and a single note bassline on my right, using my music theory knowledge and my knowing of the C major scale I converted these single bass notes into triad chords (thanks to the music theory lessons) for more interesting harmonic content. I practiced this, from the start of the week to the last day, playing on repeat for roughly an hour, and finally recorded me playing it on the last day. This not only served as a challenge but made me feel as if I had gained an insight into how compositions can be arranged on a piano. This was made harder by having to play the chords in correct form which means that I would be using pinkie, middle finger and thumb, this is used because it allows pianists to switch chords and fingers quickly. Playing and learning fly me to the moon gave me the opportunity to see how modal interchange can be incorporated into a piece to create more, slightly unorthodox, and unique resolutions. Learning new compositions is a good way to improve your skill and take writing tips from the best writers. It's also very important in various jobs in the industry to have many songs in your arsenal to perform.
When writing notation, you must be careful to consider the direction of the stems, when above the middle note of the stave they must point down (look like a p) and when below the middle line in the stave they point upwards (look like a d). Remember that semibreves do not have stems. It is important to remember that when writing music notation in 4/4 the 1st and 3rd beat must be obvious because these are the stressed beats, in other words, don’t beam across these. Beaming is when the stems of the notes are grouped together to make reading it easier, however the only notes that are beamed are quavers and semiquavers. When deciding whether beams go above or below the stave, remember to use the direction of the note which is furthest from the middle line. The beam should also tilt in the general direction the notes’ pitch.
week 7
week 7.1
week 7.2
Fly me to the moon basic tutorial
0 notes
Text
Week Six
Starting week 6 I set out to learn 3 more rudiments and this would serve as the final week focusing on drums in the plan. During this week, whilst watching back some videos of me playing I realized that my timing and fluency and stamina are quite awful and grating to listen back to, I wouldn’t count this as a flaw in my plan however because even professional drummers have spent years and continue to practice rudiments. The rudiments I focused on were, pataflafla, ratamacue and 5 stroke roll. 5 stroke roll goes as, RRLLR and then you play the same but alternate, which would be LLRRL, keep in mind the last note should be accented. I recommend practicing your rudiments to a metronome, which is something I wish I had made a note of doing. Next up, is pataflafla, this one I found rather difficult to perform at anything but an extremely slow pace, the sticking pattern for this one is R(flam), L, R, L(flam). After that, is ratamacue, this one was quite fun and easy but probably sounded awful to an actual drummer. The ratamacue combines the single stroke four and a drag and is played as triplets. This sticking pattern is hard to explain especially at my amateur level rhythmical comprehension. Compared to the other rudiments I had learnt the ratamacue seemed to be most applicable to drum fills. On top of the rudiments this week, I also spent time playing other things and experimenting and began to feel as though my drumming had overall improved and felt confident to try new things.
Five stroke roll tutorial resource
Pataflafla tutorial resource
Ratamacue tutorial resource
During this week I reached the end of my grade one music theory syllabus and began learning my grade two, but I made a point to continue revising my grade one topics. Grade 2 expects you to learn more keys, more time signatures, and more scales (a more in depth look at minor scales). You are also expected to be able to convert between time signatures, so far this has been relatively easy, for instance, if you were to convert something in ¾ to 3/2 you would simply change the three crotchets to three minims and double the length of each note. However, doing more grade 2 lessons made me realize I had moved on from grade 1 too quickly and should have paced myself better. If I wasn’t splitting my focus over drums as well as keyboard and theory, I would probably progress at a greater rate considering that my music theory and keyboard development are well connected.
The next thing we need to learn for grade one theory is the stave. The stave is comprised of 5 lines, these lines and in between the lines are spaces to place notes, each part representing a different pitch. The pitch of these lines' changes depending on the clef. In treble clef the lines go as; E, G, B, D, F (this can be memorized as every good boy deserves fudge, the notes in between these can be memorized as F, A, C, E, (or face in the space). In bass clef, the lines are G, B, D, F, A (good bikes don’t fall apart), in between these lines it is A, C, E, G (all cows eat grass). These are the only clefs you need to know for grade one and treble clef is above middle c and bass clef is below it.
Now we reach the final review point of the plan. My progress in music theory has been steady but slightly quicker than I'd expected and the past two weeks of rudiments and scales have been challenging but not too much so.
week 6
week 6.1
week 6.2
week 6.3

0 notes
Text
Week Five
The aim for week 5 was to learn and practice C major and C minor and that I did. I had prior experience with both of these, so I not only found it relatively easy but rather fun, though two-handed scales was as difficult as ever. I even spent some time just noodling and writing some stuff in these scales, showing I was growing more comfortable on the piano. The C major scale is just all the white notes starting at C played in order and then back down again at the next C. Because of the music theory practice that I've been doing daily since the start of this, I could figure out both these scales myself. This is because I know that major scales go: tone, tone, semitone, tone, tone, tone, tone, semitone, and minor scales go: tone, semitone, tone, tone, semitone, tone, tone. So, if you want to know a scale, you can just apply either of these starting at a certain note, to find your desired scale. Whilst I have seen slight improvement in fluency and coordination, especially in my left hand, I have found that it has not been such a dramatic improvement as I had hoped for, but this is an error in my estimations. In hindsight I would add more weeks of piano skills to the plan as I am not progressing as I had initially planned. C major goes C, D, E, F, G, A, B, C, and C minor is, C, D, Eb, F, G, Ab, Bb, C. It came to my attention that in week three I had been playing the scales wrong, because it is required that you play the scales with the correct fingering, so it was my aim to fix that for this week. I had managed to perform them with the correct fingerings during week 3, but only on my right hand. On the right hand it goes; 1, 2, 3, 1, 2, 3, 4, 5 and then in reverse order. On the left hand, however, it goes 1, 2, 3, 4, 5, 1, 2, 3, and then in reverse when descending. This increased the difficulty of playing these scales as it gave me another thing to think about, especially when playing with two hands simultaneously, which was a huge learning curve. Despite the difficulty having to relearn these scales, playing with correct fingering will improve your fluency, speed, and will help with memorising the notes in the scale, when grasped and incorporated properly. By the end of the week I did manage to play both scales with the correct fingering on both hands at once, which I had not been able to do in week 3, the immense challenge of this has improved my fluency and ability to think about both hands at once. I also went back and learned A major and A minor in the correct fingering on my left hand.
Continuing our music theory, next, we’re onto Italian terms for speed. First, we have accelerando, which means to gradually speed up, rallentando (or ritardando), which means to gradually slow down, then we have ritenuto, which means to hold back. Next, there is adagio (slow), allegro (quick), allegretto (fairly quick), allegro moderato (moderately quick) and andante (at a walking pace).
week 5
week 5.1
week 5.2
week 5.3
week 5.4
week 5.5
week 5.6
week 5.7


0 notes
Text
Week Four
For week 4 I set out to learn new rudiments starting with the double paradiddle. Despite spending the better half of an afternoon learning and practicing it, the rhythm still perplexed me. During this time, I further practiced the rudiments I already knew and began to move parts of the paradiddle around the kit as way to develop my coordination and mobility. I also learnt the double stroke role which was a challenge to play even and in time, especially on my left hand. This rudiment is essential to increasing your drumming speed. Though I did feel a slight improvement in my capabilities on the drum kit, I found my progress disappointing. In the video below (4.1) you can see how I began to feel comfortable practising other skills on the drum kit as well.
Double paradiddle tutorial resource
Double stroke roll tutorial resource
Next, we move onto the musical terms that you should know. Starting off we have crescendo (rise in volume) or decrescendo or diminuendo (decrease in volume). The scales of volume go in order, from quietest to loudest as ppp,pp,p,mp,mf,f,ff,fff, with p meaning piano, m meaning mezzo and f meaning forte.
Looking back on the past two weeks at this review point, I have found the rudiments this week and the scales in week three, quite difficult and I have not been able to learn and adapt to this to the degree that I'd hoped. This plan would go more smoothly if I had a drum kit and piano at home so I could spend more time practicing.
week 4
week 4.1
week 4.2
0 notes
Text
Week Three
Going into week 3 I knew I would find it the most challenging, because of my lack of prior experience in this field. I would be spending week 3 learning and practicing the A minor and the A major scale going up and down on the piano with two hands separately and then simultaneously. Syncing up my left and right hands whilst playing correctly and in time was a big challenge. Doing both minor and major shapes will improve my dexterity and get me used to playing multiple different types of scales. It was very difficult and whilst I managed to do it fluent on my right hand, when I attempted to combine the left hand with it my fluency immediately suffered and I started making much more mistakes however considering I have many more weeks of practicing keyboard skills I have faith I will get to the point I hope to be at. I decided to focus on getting it right on both hands individually first. I found A minor to be a relatively easy scale as it was quite similar to c major (hit all the white notes essentially) except it starts on the A, this is because A is the relative minor to C major. I made the mistake of not learning the correct order of fingers to play, which ended up sounding quite messy, and made my job a lot harder. A minor should have been a step up in difficulty, but I found it surprisingly easier, and I could play with more fluency but was harder to synchronize with two hands. To perform a scale all one needs to do is to start at the note and play the right. Notes up until reaching the octave of the root note, and then descend. You will have to memorize the pattern of notes in between, but there are plenty of resources to teach scales on the internet. For reference, A minor is A, B, C, D, E, F, G, A, and A major is A, B, C#, D, E, F#, G#, A. I found I was almost completely unable to perform these scales with two hands simultaneously with the correct fingerings (this is now my goal for week 5), but, I did manage to do this correctly when separate.
week 3
week 3.1
week 3.2
week 3.3
week 3.4


0 notes
Text
Week Two
Unfortunately, after week one I could not move onto week two because I did not have access to a drum kit to practice rudiments. I did attempt to make use of inanimate objects like a cushion to imitate playing the drums, but the recoil and bounce was not the same. At least from this I learnt the pattern and the coordination even if it was not the same playing experience. The purpose of practicing rudiments is to enhance my ability to play and mentally process more complicated rhythms and more precise control in my hands. I did get some time eventually to learn and practice the paradiddle, the single stroke roll and the flam. The paradiddle has the sticking pattern R, L R, R, L, R, L, L. To play the single stroke roll you just need to play left hand, right hand repeatedly, the difficult part is to make all the notes even and unaccented and perfectly in time. I did have some difficulty keeping time and accenting the right notes because I'm right-handed. The Flam is a quite simple one, the goal is to hit the same drum head with two hands at almost the same time, creating a slight delay between them, this is achieved by raising one arm slightly higher than the other. I would recommend purchasing a practice pad, if you find that a drum kit or an e drum kit is not available to you. Some practice pads even simulate the feel of hitting a drumhead and are portable which would be a worthy investment. I found that I could perform these rudiments successfully by the end of the week, they did, however, need some cleaning up to make sound more professional.
Expanding upon time signatures, mentioned last week, these are a way of understanding rhythm. The top number represents how many beats are in a bar and the bottom number represents what type of beats these will be. For instance, if you count all the beats correctly in a bar of 4/4 it should be equal to four crotchet beats, this same principle goes for 2/4 and ¾. This will make more sense once you grasp the value of these beats, which are, semibreve is a whole note, minim is a half note, crotchet is a quarter note, quaver is an eighth note and semiquaver is a sixteenth note. There are also dotted notes which have the value of the note plus a half.
Paradiddle tutorial resource
Single stroke roll tutorial resource
Flam tutorial resource
The second week marks the first review point. So far, everything is going according to plan as we're not that far into it. I hope that, going forward, resources are more available to me, as I did not get as much time practicing on the drum kit as I would have hoped this week.
week 2 practice
week 2.2
0 notes
Text
Week One
Starting week one I began using the free online music theory tools I had discovered. I would use mymusictheory.com to learn and musictheory.net to quiz me. On top of this I also had some test sheet resources and the ABSRM grade one music theory book (which isn't free). I completed my goal of spending at least half an hour a day practicing theory. In grade one you'll be expected to know the time value of semibreve, minim, crochet, quaver and semi-quaver (and the rests), you’ll also be expected to understand the time signatures 2/4, ¾, 4/4. You should also know the notes on the stave for the treble and bass clef. On top of this the scales; G major, D major and C major all will show up on the test. A moderate knowledge of Italian classical terms will also come in handy, which I frequently quiz myself on. You will be expected to know intervals and in general be able to interpret and understand basic pieces of music which they may give you as an example. The biggest challenge for me was remembering the small things like which way stems point and remembering how to write the symbols etc. Starting with scales, C major is recognizable through the fact that it has no accidentals, whereas D major has F# and C# and G major has just G#.
www.mymusictheory.com
www.musictheory.net
0 notes
Text
Introduction
As a budding composer or solo artist, finding your way into the industry and building the necessary skills can be daunting. So, I’ve devised a plan to help me acquire the skills I need over the next eight weeks. I started off laying the groundwork of what I needed to do, followed by a skills audit where I evaluated specifically what areas needed improving. After this, I built an in-detail plan, informed by my research. The first skill we’ll be looking at developing will be my knowledge of music theory. This will help me communicate and further understand ideas when composing (this is a very important skill to have in the industry). The second and third skills I will be improving will be my skill on the piano and on the drums. I’m hoping that at the end of the eight weeks that I will be a big step closer to being a self-sufficient solo artist/composer and multi-instrumentalist. Along the way I'll also be investigating potential career and education opportunities that would take me to the next stage in my career and how we get there. The aim is to teach myself around two rudiments and practice two scales every other week. At the end of this I aim to show a practical application of this by showcasing a small composition using the skills learnt, to show the efficacy of my plan. I have very little experience in all of these fields so it should be fairly easy to judge any improvements, this will be aided by the fact that I will be documenting my skills building.
I have chosen these skills specifically because they are exactly where I am lacking and what I need to advance my career and seek out my desired career options. Finding your way into the industry is hard, so most composers start off doing some work for free, building up their reputation and portfolio and once they have credibility people will start seeking them out. It is also important to network to meet others in the field and potential future clients so I recommend going to university, which will put you in this type of environment and offer education possibilities. It would be ideal to meet film students and game design students as they may need your assistance at points. Doing sound for game will require you to learn how to use the specific software needed to integrate sound into games like Fmod or Wwise. University courses like songwriting will help refine your ability, this course is offered by most universities but i would recommend LIPA, because of their prestigious reputation. However, LIPA (and other prestigious universities) expect a DDM, this means two distinctions and a merit at least, therefore you will have to study a related course in college and receive high grades. You can also find work on websites like Fiverr, where you will be paid small amounts for various types of work. One way to gain attention as a composer, is to post your work to social media like YouTube or TikTok to gain some notoriety and get your name out there. Furthermore, my learning of music theory will prepared me to work, document and communicate whilst in professional or educational environments, especially where composition is concerned. Being competent on instruments essential to your projects means that you don't have to spend time looking other people who are (this is especially important as, starting out, you may not have many resources at your disposal). Playing live is a good way to promote and sell a musical product. A good way to get into performing is at open mic nights, there are multiple in most towns and cities and are a good way of meeting other performers and event organisers, who may offer you gigs.
I'll be supplying all my evidence in this folder in future weeks.
Proposal
Skills audit
Plan
1 note
·
View note