
Statistics
We looked inside some of the posts by brid-jagtap and here's what we found interesting.
Average Info
Notes Per Post
1
Likes Per Post
1
Reblog Per Post
0
Reply Per Post
0
Time Between Posts
3 days
Number of Posts By Type
Text
17
Last Seen Tumblr Blogs


Fun Fact
China blocked Tumblr because of pornography and censorship problems in 2013.
Text
Production Blog#1
Semester C begins with an introductory class with Saint. During the first week, we focus on completing the planning folder, which is due by the 27th. Once it’s approved, I’ll be able to officially begin the production phase of my Final Major Project.
0 notes
Text
Pre-Production: 26
Blog#48
25/04/25
I found this video by Abe Leal 3D on YouTube,
youtube
In this video, he demonstrates a clever method for adding high-resolution engravings on any surface in ZBrush. To achieve this result during the sculpting phase, he took a few extra steps, which led to very accurate results, rather than manually painting the masks.
He created a low-poly mesh in Maya by performing retopology on the high-poly model and also unwrapped this mesh before importing it into ZBrush. Using a UV map as a reference, he designed an engraving pattern in Photoshop. He then imported this map as a texture into ZBrush and created a mask using the texture, ensuring it was applied to the correct locations on the unwrapped mesh.
After that, he inflated the engravings and added manual variations. Although this method is tedious, it provides extremely high detail on the high-poly mesh.
References:
Abe Leal 3D (2023). How to Create Ornaments and Other Details in ZBrush. [online] YouTube. Available at: https://www.youtube.com/watch?v=5IYoMOTQkCw
0 notes
Text
Pre-Production: 25
Blog#47
23/04/25
I plan to create a benchmark asset at the very early stage of my final major project.
This asset will serve as the quality standard for all the other assets I produce. I have chosen to create a dagger (khanjar) used by Chhatrapati Shivaji Maharaj as my benchmark asset.
This prop is ideal because it incorporates various elements, including a steel blade, a metal handle with engravings, and a cloth pouch for storage.
The presence of different material types in this single prop makes it a great choice, and its smaller size allows me to complete it early in the project.
I have started with the high-poly model of the dagger to get a head start on the final major project.


0 notes
Text
Pre-Production: 24
Blog#46
20/04/25
I have been trying to resolve the issue with X-Gen paintmaps, but I haven’t been able to figure it out. I conducted all the troubleshooting I could and followed Professor Neil's suggestions, but unfortunately, I had no success. I wasn't sure if the problem was related to Maya or the mesh, so I decided to move forward with the send method instead. To start creating the hair in Blender, I used the same base mesh of the head. First, I sculpted a rough shape of the hair using Blender's sculpt mode.

This mesh will be used as the hair volume reference for the guide that will be placed. This step is crucial when creating the long hair for the final character in the project.
Once I was satisfied with the shape of the guides, I added modifiers to Blender’s geometry node hair system. This was the result I achieved in Blender.

Since I am more familiar with Blender tools, this method was easier for me. However, I found that the modifiers in Blender weren't as effective as the ones in X-Gen.
With both methods, I can either convert the results to hair cards and further optimize them, or I can export them as Alembic curves to import into Unreal Engine. For the main character, I might take both approaches. I'll use Alembic groom for high-quality renders and use the hair card as game game-optimized model.
References:
Autodesk.com. (2025). Help. [online] Available at: https://help.autodesk.com/view/MAYAUL/2025/ENU/?guid=GUID-C0470142-600B-4615-8110-EC779934DF5F
Blender.org. (2024). Hair Nodes — Blender Manual. [online] Available at: https://docs.blender.org/manual/en/4.0/modeling/geometry_nodes/hair/index.html
0 notes
Text
Pre-Production: 23
Blog#45
17/04/25
I have mainly been following JHill for character art tutorials. Here’s a character creation playlist I found, which includes some of the videos I mentioned earlier and various stages of character creation.
youtube
This tutorial series features some highly useful videos that align perfectly with what I was looking for. I plan to follow this series alongside other videos and resources I've gathered so far. JHill has covered topics such as skin details, skin texturing, creating hair for games, how to make realistic eyes for games, and more.
I also found another tutorial playlist by 3D Mutiny that focuses specifically on creating game eyes. This series delves into the detailed process of making eyes for games, emphasizing real-time rendering without path tracing. Achieving realistic eyes can be quite challenging in this context.
youtube
References:
3D Mutiny (2025). How To Make Next Gen Game Eyes in 10 Minutes. [online] YouTube. Available at: https://www.youtube.com/watch?v=mt-UoWQ74DU
J Hill (2022). Rendering Characters in Unreal Engine 5 | Tutorial. [online] YouTube. Available at: https://www.youtube.com/watch?v=yqGlyhPXy5A&list=PLIOnfh4l_Ymb6Fldo-UgjFQMOgBJXMiEp
1 note
·
View note
Text
Pre-Production: 22
Blog#44
13/04/25
Last semester, for my assignment, I focused on creating clothing for a doctor character. I rigged the asset in Blender and posed it, but since it was just weighted to a basic human rig, the shirt's sleeves appeared very stiff. I want clothing to animate better and interact more naturally with the body.
For my final major project, I aim to understand how to rig and simulate clothes, ropes, and other similar objects for game animations. I found a couple of helpful tutorials on YouTube that explain cloth simulation in Unreal Engine.
youtube
This is the first method I found by TriGon, where he used the proxy mesh technique in Unreal Engine to simulate cloth with Chaos Cloth. He explained the entire process, from creating a proxy mesh in Maya to integrating it in Unreal Engine for improved cloth interaction. This method could work well for me since I have a similar drapery style for my character.
youtube
This is the second method I found, where he used a blueprint and additional techniques to achieve much better cloth simulation results. I’ll test which method provides the best outcome.
References:
TUF (2025). The Only Cloth Simulation Tutorial You Need – Full Workflow By TUF – The Unreal Forge. [online] YouTube. Available at: https://www.youtube.com/watch?v=Z57ggNKZDy8
TriGon (2021). Unreal Engine 5 Cloth Simulation - For Characters. [online] YouTube. Available at: https://www.youtube.com/watch?v=zXjpX-SirM0
0 notes
Text
Pre-Production: 21
Blog#43
11/04/25
I decided to explore the character creation pipeline in depth. I watched a talk by Raken Khamesh from Blizzard Entertainment's Overwatch team at the 2023 ZBrush summit.
youtube
In this video, Raken discussed the importance of first blocking out the character shape. He emphasized the significance of shape language when creating the block out for the game character.

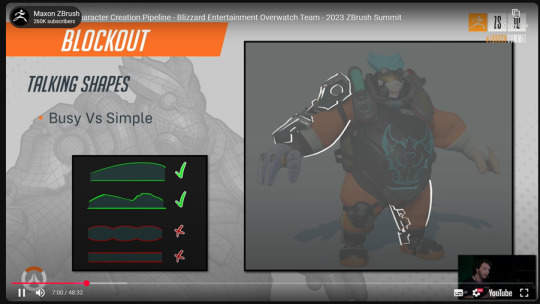
Furthermore, the more he talked about silhouette readability, the more it can make or break the character designs.

Even though I am aiming for a realistic style in my final project, this talk was incredibly helpful in understanding the fundamentals of character design for games.
References:
www.youtube.com. (n.d.). Overwatch Character Creation Pipeline - Blizzard Entertainment Overwatch Team - 2023 ZBrush Summit. [online] Available at: https://www.youtube.com/watch?v=FRZtVXpAokc
0 notes
Text
Pre-Production: 20
Blog#42
10/04/25
Today was the last class of this semester, and I was able to present my pre-production document progress so far.
Both Eden and Neil are pleased with the progress made on the project so far. They appreciate the proposal and are invested in its outcome. Their feedback includes a suggestion to provide more background information on the character. Eden noted that, based on the character breakdown, it would be beneficial to explain some of the materials and elements in order to maintain historical accuracy. They also requested separate slides for face references, clothing references, armor, weapons, and similar items.
During the pre-production stage, the focus will be on research and testing various elements. Additionally, Neil offered a solution to the X-Gen hair issue I encountered earlier. They also recommended including more references from the games.
0 notes
Text
Pre-Production: 19
Blog#41
09/04/25
I recently saw a post on LinkedIn featuring an artwork by Alexander Kolakowski that depicted a limping skeleton. I was especially impressed by the realism of the cloth simulation and the quality of the cloth shader, as they closely align with the visual goals I have for my project.
I reached out to Alexander to gain insights into his techniques and better understand how he achieved such convincing results.

References:
ArtStation. (2025). Legions of the Shroud Messiah, Alexander Kolakowski. [online] Available at: https://www.artstation.com/artwork/Zlold0.
0 notes
Text
Pre-Production: 18
Blog#40
09/04/25
I wanted to try and test the hair workflow in the pre-production stage, as I had never done the game hair before.
From the methods I have found previously, I decided to tackle the hard one and try X-Gen for the first time.
I followed J Hill’s tutorial, I just wanted to learn the basics of X-Gen grooming and the tools. So I went with a basic male haircut.
I created a new Project in Maya and started a new scene. I used the same head base mesh I used while blocking out the scene. I created the guides and applied different modifiers to get he desired look. But right now the hair were interpolating across the whole scalp mesh. I wanted to paint the mask. But when ever I tried to create a paintmap I was getting an error I tried different ways to solve this but I could not find any solution.


I’ve posted my issue on the 3D hit forum, and I hope to find the solution from my peers soon.
0 notes
Text
Pre-Production: 17
Blog#39
07/04/25
I was researching the Game hair workflows, I found there are a few different methods to do the game-ready character hair. The most optimized method is the hair card, but there are a couple of ways to create the hair cards.
X-Gen curves to hair cards
Blender Geometry hair system, converting it to the hair cards.
Finally manually placing the hair cards using curves in Blender or ZBrush.
The other useful method I found for offline hair rendering using Unreal Engine is the Alembic Groom method. This method is still heavy on the system as it uses spline instead of mesh like hair cards.
I found a few tutorial on making hair card. Here’s a couple of most useful tutorials.
youtube
In this video, Vineet shares his workflow for creating realistic game hair. In this tutorial series, he used three different methods for making the hair cards, as I mentioned earlier. This tutorial mainly shows a workflow using Blender, which I find easier to understand as I am already familiar with most of the tools.
youtube
In this video, JHill demonstrated how to create hair using X-Gen in Maya. Since this was all new to me, I attempted to grasp the basics of X-Gen. I've also found a few other tutorials, which I have listed in the references below.
References:
Vineet Kumar (2023). Realtime Hair Cards Tutorial : 01 Intro and Blockout. [online] YouTube. Available at: https://www.youtube.com/watch?v=QkQuNoPp1ts&list=PLkjPp9ZUlSLRB3rZQB1IjPfiE5J_VsXzo
JHill (n.d.). How to Make Custom Hair in UNREAL ENGINE 5. [online] www.youtube.com. Available at: https://www.youtube.com/watch?v=9yVNdvBmJz4
J Hill (2021). How to Make DOPE CG HAIR | XGen Tutorial. [online] YouTube. Available at: https://www.youtube.com/watch?v=hvNcRaPmWoE&list=PLIOnfh4l_Ymb6Fldo-UgjFQMOgBJXMiEp&index=7
Eyes On CG (2023). 3D Real-Time Hair : From Concept to Game. [online] YouTube. Available at: https://www.youtube.com/watch?v=nA4ez-8aU_U&list=PLBI2Z2PMJ9P-8FFv7OnTxzfxHKbbp6-RG
HazelBrownArt (2024). Realtime Hair Tutorial - Introduction. [online] YouTube. Available at: https://www.youtube.com/watch?v=0cDDq9PA7jk&list=PLiLd_15JJI_FPcPvrVcTThkNkoizHhWPU
0 notes
Text
Pre-Production: 16
Blog#38
06/04/25
I wanted to get the camera fixed right at the beginning of the project, so I established my composition reference in Blender and set up the camera accordingly. I started by blocking out the scene in Blender, ensuring that I completed this step early on to establish a sense of scale. For posing, I used Reallusion's Character Creator base mesh as a placeholder.


I intended to create a rough blockout, but I ended up adding more detail than I planned. I have completed the modeling of the throne and the architectural elements. For now, I will leave everything as it is and shift my focus to developing the character first.
References:
Reallusion. (2024). Free 3D Rigged Human Model - CC Character Base. [online] Available at: https://www.reallusion.com/character-creator/free-3d-character-base.html
0 notes
Text
Pre-Production: 15
Blog#37
05/04/25
Following Eden's explanation of the Art Bible workflow, I established my key references.

Then I did the Composition breakdown.
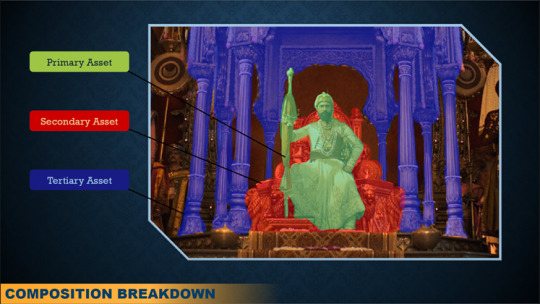
I organized my composition into three main assets: the primary asset is the character, the secondary asset is the throne, and the tertiary asset is the surrounding architecture.
Similarly, I did the character breakdown as well to separate elements for UVs, texturing, and shaders.

Considering the modular workflow, I have divided the character into four UV sets for now. I may revisit these in the future.
0 notes
Text
Pre-Production: 14
Blog#36
04/04/25
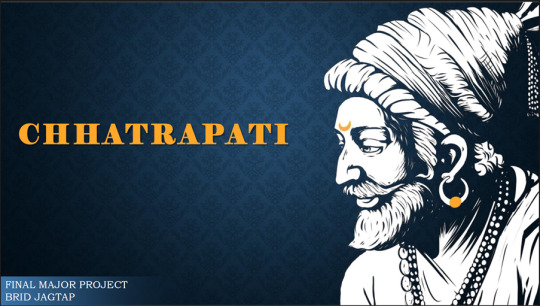
I have started with the preproduction document with my previous research. I decided title for the final project.
“ Chhatrapati”
Chhatrapati is a Sanskrit term composed of two words: "chhatra," meaning parasol or umbrella, which symbolizes protection and royalty, and "pati," meaning lord or ruler. This title was adopted by the head of state of the Maratha Empire.
Chhatrapati Shivaji Maharaj was the founder of the Maratha Empire and the first person to hold the title of “Chhatrapati.”
In my research about Shivaji Maharaj and the Maratha Empire, my uncle recommended a book by V. S. Bendre that focuses on Shivaji Maharaj. V. S. Bendre discovered the first portrait of Shivaji Maharaj, sketched in 1677 by Herbert de Jager. This portrait serves as the earliest reference to Shivaji Maharaj's appearance. Additionally, I found other famous portraits of Shivaji Maharaj, one of which is housed in the British Museum.
0 notes
Text
Pre-Production 13
Blog#35
03/04/25
I've been quite busy this week working on the submission for my Exploring Professional Practice module. However, I wanted to share some insights from another assignment where I created an artefact, specifically a character designed using two different approaches: the GenAI workflow and my usual character creation method.
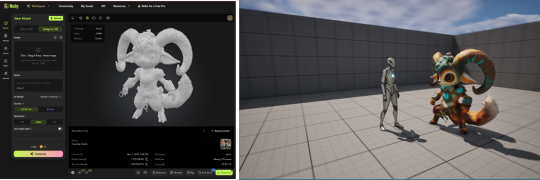
In this project, I explored various tools and techniques to enhance my workflow. I began by using ChatGPT to generate ideas for a bipedal game character. Then, I utilized this concept to create a concept art image with the help of ChatGPT.

After a few attempts, I settled on this concept art that I liked. I then used Meshy.ai to generate a 3D model based on that concept. To quickly rig the model, I utilized Mixamo. After addressing the obvious weight painting issues, I imported it into Unreal Engine for testing.
The result was quite rapid, taking me just a couple of hours to reach this stage. However, it didn't meet the standards necessary for games. While it could be useful for background assets in the distance, it is definitely not suitable for hero assets in its current state.
In my second approach, I applied the same concept, but this time I focused on developing my own workflow. I aimed to identify AI-powered tools that could help me speed up repetitive tasks such as UV unwrapping and retopology. Unfortunately, I was unable to find any particularly useful tools. The best AI-powered tool I encountered was Cascadeur, which is an AI-driven animation software.
I spent roughly one week working on this character, as this assignment emphasized research more than my artistic skills. This was the result of my workflow.


References:
Cascadeur.com. (2018). Cascadeur. [online] Available at: https://cascadeur.com/
Meshy.ai. (2021). Meshy. [online] Available at: https://www.meshy.ai/workspace
OpenAI (2025). ChatGPT. [online] ChatGPT. Available at: https://chatgpt.com/ Adobe (2019). Mixamo. [online] Mixamo.com. Available at: https://www.mixamo.com
0 notes
Text
Pre-Production: 12
Blog#34
28/03/25
During my last lecture, I presented my project proposal to the class and received valuable feedback from the professors. Both Neil and Eden liked the project idea and found the main character, Chhatrapati Shivaji Maharaj, really interesting. They expressed a desire to know more about his history and significance to me.
Eden also pointed out that I had included a shot from the movie Chhaava as a reference in my PureRef board. This shot, taken from a high-budget Bollywood film, serves as an excellent reference for composition. Since significant research and effort went into this shot, it provides me with a human reference through the actor for scale. Furthermore, it works well as a guide for lighting and shot composition for my final renders in Unreal Engine.

They mentioned that my project scope is currently quite broad, and it's essential to break it down into smaller components. As Eden has emphasized the importance of the Minimum Viable Product (MVP) multiple times during the lecture, the modularity of my project aligns well with that concept. My primary focus will be on developing the character step by step. I will now begin organizing everything in the document.
References:
IMDb. (2025). Chhaava. [online] Available at: https://www.imdb.com/title/tt27922706/
0 notes
Text
Pre-Production: 11
Blog#33
27/03/25
During my research, I discovered this artist, and this particular artwork caught my eye. It is one of the entry from a finalist of the 2024 Rookies Awards.
I found it hard to believe that this work was done by a student for a university project. This project demonstrates exceptional attention to detail, reminiscent of Paul Widelski's artwork. The level of detail in the fabric texture is outstanding. I aspire to achieve the same level of detail in my own project. The artist seems to have utilized dynamic grooming and hair cards in their work. They also employed Substance 3D Designer for the fabric patterns and embroideries.
I haven't tried Substance 3D Designer yet, but I plan to explore that option as well. This project has definitely served as an inspiration for my final major project. I intend to reach out to these artists to gain insights into their creative workflows.
References: Velikova, D. (2025). Kuker, Denitsa Velikova. [online] ArtStation. Available at: https://www.artstation.com/artwork/AlOeDW
0 notes