
Don't wanna be here? Send us removal request.
Statistics
We looked inside some of the posts by bubbleload528 and here's what we found interesting.
Average Info
Notes Per Post
1
Likes Per Post
1
Reblog Per Post
0
Reply Per Post
0
Time Between Posts
8 days
Number of Posts By Type
Text
8
Last Seen Tumblr Blogs


Fun Fact
Tumblr was attacked by a cross-site scripting worm deployed by the Internet troll group GNAA on Dec 3, 2012.
Text
Minitool Partition Wizard 8 Portable
Minitool Partition Wizard
Minitool Partition Wizard 10 Download
Minitool Partition Wizard Portable Cracked
Minitool Partition Wizard Portable Sinhvienit
Screenshot for MiniTool Partition Wizard Free Edition « DriverPack Solution 17.11.44 MiniTool Partition Wizard Free Edition 12.3 360 Total Security 10.8.0.1234 » Comment Rules & Etiquette - We welcome all comments from our readers, but any comment section requires some moderation. As Partition Manager alternative, Aomei Partition Assistant Home Edition is the latest and completely free partition manager software. It carries out magic hard disk and partitions management, advanced system optimization, and easy copy wizard to keep your computer running smoothly and faster.
MiniTool Partition Wizard Free Edition 12 full là một trong những công cụ giúp bạn quản lý và phân vùng tốt nhất cho ổ đĩa. MiniTool Partition Wizard Free Edition sở hữu giao diện thân thiện, không quá phức tạp chỉ với vài bước tìm hiểu bạn có thể sử dụng thành thạo trình quản lý phân vùng này trên chiếc máy tính của mình. Vật làm thế nào để Download và cài đặt MiniTool Partition Wizard Free Edition 12 full + Portable thành công?
Ns_error_net_inadequate_security. >>> Thông tim thêm: Download UltraISO Premium Full Crack Premium 9 vĩnh viễn
Easeus data recovery wizard. Hãy cùng tip.com.vn tham khảo nội dung bài viết dưới đây sẽ giúp bạn tìm hiểu rõ hơn về các chức năng có trên MiniTool Partition Wizard Enterprise. Đồng thời gửi đến bạn link tải file cài đặt, hướng dẫn cài MiniTool Partition Wizard Enterprise 12 full trên máy tính hoàn toàn miễn phí.
Chia sẻ file cài đặt MiniTool Partition Wizard Enterprise miễn phí phiên bản mới nhất 2020
Giới thiệu tổng quan về MiniTool Partition Wizard Enterprise 12:
MiniTool Partition Wizard Enterprise được mệnh danh là thuật sĩ phân vùng với phiên bản 12.1.0 là bản mới nhất trong năm 2020. MiniTool Partition Wizard Enterprise cho phép bạn thay đổi kích thước, tạo xóa, hoặc định dạng phân vùng. Đặc biệt hơn, phần mềm có giao diện đơn giản, hiển thị phân vùng hiện tại trên chính hệ thống của bạn.
MiniTool Partition Wizard Enterprise có các hoạt động cơ bản hỗ trợ cho tác vụ phân vùng đãi, như tạo, định dạng, xóa, sao chép, đánh dấu hay xóa phân vùng exFAT. Song song đó, bạn còn có thể sao chép đĩa MBR sang đĩa GPT, bao gồm cả đĩa hệ thống.
Hơn thế nữa, bạn có thể sử dụng công cụ này để chuyển đổi từ MBR sang GPT. Và tất nhiên, sở hữu nhiều tính năng hữu ích như thế thì còn ngần ngại gì mà không tải và cài đặt từ công cụ này về cho máy tính của mình nào.
Các chức năng nổi bật có sẵn trong MiniTool Partition Wizard Enterprise 12:
Thao tác xóa tập tin vĩnh viễn một cách dễ dàng.
Thích hợp cho những người mới làm quen với máy tính sử dụng.
Di chuyển hoặc thay đổi kích phân vùng.
Chuyển đổi hệ thống từ định dạng MBR sang GRT.
Hỗ trợ hai chế độ chuyển đổi hệ điều hành khác nhau.
Hỗ trợ độ phân giải HD lên đến 4K, 5K.
Thay đổi ID loại phân vùng trên đĩa GPT.
Tạo, định dạng, xóa, sao chép, đánh dấu và xóa phân vùng exFAT
Có thể tạo, xóa và định dạng phân vùng.
Download MiniTool Partition Wizard Free Edition 12 Full + Portable mới nhất 2020
Để cài đặt công cụ phân vùng MiniTool Partition Wizard miễn phí trước hết bạn cần tải file cài đặt về máy thông qua 1 trong 2 đường dẫn sau đây:
https://drive.google.com/drive/folders/1j1yTom70PO6j9wyvHJmqBHsyuHdLiApg
https://www.fshare.vn/folder/C927M7T9LWGA?token=1605579606
Quá trình tải file có thể mất vài giây do đó bạn vui lòng kiên nhẫn chờ đợi nhé. Sau khi tải file thành công, bạn sử dụng công cụ giải nén và tiến hành thao tác cài đặt.
Minitool Partition Wizard
*Note: Phần mềm này bạn chỉ cần tải file về và cài đặt là nó sẽ tự động kích hoạt bản quyền. Vì thế bạn không phải mất nhiều thời gian cho việc tìm key hoặc crack công cụ này đâu nhé.
>>> Xem ngay: Cách Chia/Gộp ổ đĩa trên Windows 7, 8, 10 không mất dữ liệu
Minitool Partition Wizard 10 Download
Hướng dẫn cách cài đặt MiniTool Partition Wizard 12.1.0 đơn giản nhất:

Bước 1. Sau khi tải file cài đặt thành công, bạn nhấn vào file nhấp đúp vào file cài đặt hoặc nhấn chuột phải chọn Open.
Bước 2. Hộp thoại xác nhận hiển thị kèm thắc mắc bạn có muốn cài đặt phần mềm này vào máy tính hay không > Nhấn nút YES để chuyển đến bước tiếp theo.

Bước 3. Sau đó bạn tiếp tục nhấn Next > Trình thiết lập hiển thị thông tin điều khoản sử dụng, các bạn bắt đầu ấnNextđể công nhận và bắt đầu
Bước 4. Chọn khu vực cài đặt ứng dụng MiniTool Partition Wizard bằng cách nhấn vào nút Browse và chọn đến khu vực ổ đĩa cần cài đặt hoặc bạn có thể sử dụng nơi lưu trữ phần mềm mặc định theo gợi ý của hệ thống và nhấn vào nút Next.
Bước 5. Trình thiết lập cho phép các nàng đặt tên lối tắt cho chương trình trong Start thực đơn > Nhấn tiếp Next để chuyển đến bước sau.
Bước 6. Đ��n đây, dường như bạn đã hoàn tất các bước thiết lập cơ bản trước khi cài đặ. Hãy nhấn vào nút Install để hệ thống bắt đầu cài đặt tự động nhé.
Bước 7. Quá trình cài đặt có thể mất vài phút vì thế bạn hãy kiên nhẫn và chờ đợi đến khi hệ thống thông báo hoàn tất và chỉ cần nút Finish là công cụ MiniTool Partition Wizard đã được cài đặt vào máy tính thành công rồi nhé!

Minitool Partition Wizard Portable Cracked
Mong rằng với những thông tin chia sẻ về Download MiniTool Partition Wizard Free Edition 12 Full + Portable mới nhất 2020 trên đây sẽ giúp cho quá trình cài đặt của bạn diễn ra nhanh chóng và dễ dàng hơn. How to sync contacts from one google account to another.
Minitool Partition Wizard Portable Sinhvienit
>>> Tin hữu ích: Download Malwarebytes Premium Full key active vĩnh viễn mới nhất 2020
0 notes
Text
Office 2016 Mac Use Product Key

For security reasons, the full product key isn't displayed within Office. Instead, for Microsoft 365, Office 2019, and Office 2016, you can view the Microsoft account that Office belongs to. Office for Mac 2011 product keys. My product key isn't working. First, make sure that you're entering the key correctly on the right site. If you aren't sure which site to use, you can enter your product key using the Virtual support agent (English only). If your product key is valid, the Virtual support agent provides a link to download Office.
With the advent of the new technology, more people are switching from traditional record keeping methods to computer generated soft copies. Thanks to Microsoft Office for making the whole job of maintaining logs easier. Though there are many software utilities available in the market but Microsoft Office suite is the most commonly used software for handling documents, presentation, spreadsheets etc. Contrary to the fact that it is the most popular software for handling different types of text files, the Microsoft Office Suite is still priced higher for a normal user. Consequently, more people are looking for hacks and tricks to find the crack version of Microsoft Office Professional 2016 - my own personal choice!
For security reasons, the full product key isn't displayed within Office. Instead, for Microsoft 365, Office 2019, and Office 2016, you can view the Microsoft account that Office belongs to. After the license validates, it will activate the product, and you can click Start Using Word to open and start using Office for Mac. Multiple licenses and key already used error? If you try to activate a one-time install of Office for Mac and you get the error: Key already used, you will need to select another license to use.
These days many consumers could be found on the internet making a query-Microsoft Office Professional Office 2016 product key free. Most of the consumers are showing their faith in online key generators and direct key download links. The problem with these key generators is that their efficiency is comparatively less and most of the links expire after some time. I guess if you are reading this article then your query-'Microsoft Office Professional Office 2016 product key free' haven’t shown any fruitful results till this time.
Find Office 2016 Product Key using PowerShell Here’s another way of getting the product key of Office 2016. This requires creating our own PowerShell script to dig out the product key from the system. Don’t worry; it’s not difficult either.
This article provides you with simple methods to solve this problem. All you have to do is to copy-paste the keys given later in the article when the Office prompt window appears on the screen. To make things easier, we’ve also incorporated a Microsoft Office Professional 2016 license keys in the article and a detailed guide on how to use these keys for activation purpose.
Part 1. Free Office Professional Plus 2016 Product Key
As we mentioned earlier that we’ll be extending our support in every way possible. So here we’re with a list of free Microsoft Office Professional 2016 product key. Select any one of them, copy-paste them in Office prompt window and the crack works. Or, you can make a cmd compatible text file for saving the key.
NKGG6-WBPCC-HXWMY-6DQGJ-CPQVG
9C2PK-NWTVB-JMPW8-BFT28-7FTBF

PD3PC-RHNGV-FXJ29-8JK7D-RJRJK
GNH9Y-D2J4T-FJHGG-QRVH7-QPFDW

Office 2016 Mac Product Key
JNRGM-WHDWX-FJJG3-K47QV-DRTFM

DR92N-9HTF2-97XKM-XW2WJ-XW3J6
J7MQP-HNJ4Y-WJ7YM-PFYGF-BY6C6
Office 2016 Mac Find Product Key
Office For Mac Product Key
R69KK-NTPKF-7M3Q4-QYBHW-6MT9B
YG9NW-3K39V-2T3HJ-93F3Q-G83KT
869NQ-FJ69K-466HW-QYCP2-DDBV6
7WHWN-4T7MP-G96JF-G33KR-W8GF4
Method #2: How to Activate Microsoft Office 2016 with Product Key
The whole process of activating Microsoft Office 2016 using the above keys is very simple. It is to be noted that the steps mentioned below work for both Windows and Mac. The automatic activation process occurs when the system comes with a pre-installed Office package. All you need to do is to follow the steps listed below:
Step 1: The first step involves launching the Office application. Click on the Start menu> Microsoft Office Application.
Free Office 2016 Product Key
Step 2: For the initiation of the Microsoft Office Professional 2016 activation process, select the 'Activate' button as soon as the activation window pops up.
Step 3: The next step involves login into your Microsoft account. If you don’t have a previous Microsoft account, sign up for a new one.
Step 4: After signing into your Microsoft account, click continues to register Office by confirming your account. Once the confirmation process is completed, select the country and preferred language.
Step 5: If you have more than one Office product key then multiple products will be listed. All you have to do is select one of the Microsoft Office product from the multiple options listed.
Step 6: Accept the terms and conditions. Then go to File> Account> Office Updates and select update option. Click Update now.
Step 7: Following the above steps will update the Office. The last step is to Verify the account. For verification process navigate to File> Account and check for 'Product Activated' status under Product Information. Finally, you’re all ready to use Microsoft Office Professional 2016 for free.
Sometimes, there are chances that the product key may not work at first place and an error appears: 'The Product Key is not Working'. If this problem appears, all you have to do is to try another product key in the first place. If the problem still persists, the only option left is to run the Microsoft Activation Troubleshooter. Once, the whole troubleshooting process is completed and the problem is fixed, close the Activation troubleshooter and follow the whole Microsoft Office activation process once again.
Related Articles
0 notes
Text
How To Sync Contacts From One Google Account To Another

How can I sync all of my Gmail contacts to Contacts+?
Sync Phone To Google Account
Can't Sync Contacts To Google
Google Account Sync Settings
How To Transfer Email Contacts From One Gmail Account To Another
How To Transfer Google Contacts From One Gmail To Another
Sync Google Contacts To Phone
How To Transfer Contacts From One Google Account To Another In Android
1. Figure out where all of your Gmail contacts live. Here's a good place to start. Are they in your My Contacts? Other Contacts? Groups? Directory? Google has a few different lists.
Sync Phone To Google Account
Download and Upload. Go to Google Photos official website and log in your first account. One typical way of doing that is to download all the images and videos from your first Google Photos account and then upload them in your second Google Photos account. In case you don’t want to.
2. Are you using the new or old version of Google Contacts? The new version, called Google Contacts Preview, has a blue and white interface.
3. Make sure that all of the contacts you want syncing with Contacts+ exist in your 'My Contacts'. Contacts+ only syncs with the contacts in the 'My Contacts' list. If you need to move contacts to your 'My Contacts' (from another list), you'll find instructions at the very bottom of this article.
4. Once your 'My Contacts' list is in good shape, sync your Gmail account to your Contacts+ address book. You can do this here: Sync Sources.
Looking at the sync options, you can select, which Outlook contacts to sync (if you have more than one Outlook e-mail account and address book), choose whether to sync deleted contacts, and whether the program prompts you when deleting contacts from your destination address book. Export: Follow these steps to export your contacts: Open the Contacts app (on some devices, such.
Can't Sync Contacts To Google
5. From there, click Add Sync Source -> Choose 'Google' and proceed.
Do I have contacts in Gmail?
If you've created a Gmail account (and have sent at least a few emails), you have contacts in your Gmail address book. These are called Google Contacts. In other words, with a Gmail account, you automatically have a Gmail address book, you're just likely unable to find it.
How can I find my contacts in Gmail?
You can find your contacts in Gmail (also known as your Google Contacts) a few different ways:
Option 1: Click on this link.
Option 2: Log into your Gmail account, click on Mail in the upper right-hand corner, then click Contacts.Option 3: Log into your Gmail account, click on the Google Apps dashboard in the upper right-hand corner, then click Contacts.
Google Account Sync Settings
Am I using the old or the new version of Google Contacts?
You're either going to see the old or the new version of Google Contacts once you access your contacts in Gmail. If you're seeing a red and white interface on the left-hand side, you're using the old version of Google Contacts. If you're seeing a blue interface, you're using Google Contacts Preview (which is the new one).
Old version:
New version:
How many different contact lists does Google create for me?
Google will create a few different lists for you, such as My Contacts, Other Contacts, Groups, Circles, Directory, and more. You can read about these different lists here.
You'll want to pay close attention to your 'My Contacts', as this is the only list that Contacts+ syncs with. In other words, if you've connected (or are thinking about connecting) your Gmail account to Contacts+, the only list Contacts+ has access to is your 'My Contacts' in Google.
How do I know if I have contacts in my 'My Contacts' in my Gmail account?
Head over to your Google Contacts, then view your My Contacts in the upper left-hand corner.
To note: if you are using the new version of Google Contacts called Google Contacts Preview (it has a blue interface), you will not be able to easily distinguish between your 'My Contacts' and the other lists in Google.
We highly recommend that you switch back to the old version of Google Contacts to easily find your 'My Contacts'. Here are the steps to revert back to the old version of Google Contacts:
1. Click on More (left-hand side dashboard)
2. Click 'Leave the contacts preview'.
How To Transfer Email Contacts From One Gmail Account To Another
How do I add contacts from other lists to 'My Contacts' in Google?
To easily add contacts, either click the box next to each contact's name or you can bulk-select contacts & add them to your 'My Contacts'. In other words, to make sure all of your Google Contacts are in your Contacts+, move contacts from one list - i.e. your Other Contacts - to your 'My Contacts'.
In the new version of Google Contacts, you can individually add contacts to your My Contacts or bulk-select contacts and add them to your My Contacts (using the +Person icon). Click on the contact >> click on +person icon.
Is Contacts+ syncing all of my Google Contacts?
Not necessarily. Contacts+ is only syncing with your 'My Contacts' on Google. Again, while Google has a few different lists (My Contacts, Other Contacts, Directory, etc.), make sure any contacts you want syncing with your Contacts+ account exist in your 'My Contacts'. See our Getting Started on Contacts+ for more instructions.
To manually add 'Other Contacts' to Contacts+, go to your Sync Sources -> … next to your Google Account -> Select 'Search for other contacts in Google'.
What are Google's contact storage limits?
Google has three different storage limits for contacts, which are posted on Google Apps Help Page. These limits for Google Apps accounts also appear to apply to normal Google accounts.
The total number of contacts in a Google account must be 25,000 or less. Please Note: This includes Other Contacts as well as My Contacts. Contacts+ only brings in 'My Contacts' from Google, so it is possible that you may run into your storage limit in Google even if you have less than 25,000 total Google Contacts in Contacts+.
The total size of these contacts must not exceed 20 MB.
Individual contacts must not exceed 128 KB in size.
Yes. The tags you create in Contacts+ sync bi-directionally with your groups on Google Contacts.
Changing phones is a regular thing now-a-days. With the increasing improvements of technology, we are getting the advantage of using new phones all the time. Transferring your old contacts from your previous phone to your new phone can be painful if you don’t know how to transfer contacts to new phone easily. This article will help you to learn how you can easily transfer contacts to a new phone in a very short time.
Zelda awakening switch. The Legend of Zelda: Link's Awakening is a remake of the 1993 game of the same name. Announced during a Nintendo Direct presentation on February 13th, 2019, the game received a short teaser trailer. During E3 2019, a worldwide release date of September 20th, 2019 was shown.
Part 1. 1 click to transfer contacts to new Android/iPhone
Transferring contacts to your new Android phone or iPhone is easier with MobileTrans - Phone Transfer. With a very easy procedure and following some simple steps can help you to transfer your contacts from your old phone to your new phone. No matter you have Android or iOS devices, with the help of this tool you will be able to transfer all your contacts and important data from your old phone to your new phone. This tool is fast, reliable and unique and it will ensure no data loss during the procedure of transfer. Just follow these steps to learn the procedure-
MobileTrans - Phone Transfer
1-Click Phone to Phone Transfer
• Easy, fast and safe.
• Transfer photos, text messages, contacts, notes, and many other file types.
• Move data between devices with different operating systems, i.e iOS to Android.
• Supports iOS devices that run the latest iOS 14
• Supports over 8000+ Android devices. Works for all models of iPhone, iPad and iPod.
4,085,556 people have downloaded it
Download and install MobileTrans

You need to download the right edition of MobileTrans for your operating system and install the program on your PC. Now you can launch the tool from the shortcut icon of your PC homepage. Now you will be able to see the first interface of MobileTrans tool. You will have to choose “Phone Transfer” option from here.
Tips
No PC at hand? You can also use the mobile version of MobileTrans - Copy Data to Android. Just install this app on your Android. Then you can transfer contacts from iOS to Android directly, or get iCloud data on Android wirelessly.
Hi, Hi can anyone explain what is the difference between SSH version 2 and Version 3. Thanks in advance. OpenSSH 8.5 released March 3, 2021 OpenSSH is the premier connectivity tool for remote login with the SSH protocol. It encrypts all traffic to eliminate eavesdropping, connection hijacking, and other attacks. In addition, OpenSSH provides a large suite of secure tunneling capabilities, several authentication methods, and sophisticated. Determines if SSH shall use IPv6 or not (only used when HostAddress is set to any). Shell(Host) - shell(Host, Option) - shell(Host, Port, Option) - Types: Host = string Port = integer Options - see ssh:connect/3. Starts an interactive shell to an SSH server on the given Host. The function waits for user input, and will not return until the remote shell is ended (e.g. On exit from the shell). Enable SSH on a headless Raspberry Pi (add file to SD card on another machine) For headless setup, SSH can be enabled by placing a file named ssh, without any extension, onto the boot partition of the SD card from another computer. When the Pi boots, it looks for the ssh file. If it is found, SSH is enabled and the file is deleted. Ssh 3.
Connect Phone to PC
In this step, you need to connect your both old and new phones to your PC and wait till MobileTrans detects both of your phones. Then you need to check if your old and new phones are placed in the right category properly as source and destination. If they are not placed properly, you can click on the “Flip” button to change their categories. You're able to clear data on the target phone if you check the option 'Clear data before copy'. It's not checked by default.
Transfer Contacts
Now you will see a list of contents in the middle of the interface of MobileTrans. You just need to select the “Contacts” option and then click “Start” to start the transferring process.
Now the process will end in a very short time and then you can disconnect your phones from your pc to use them normally.
Part 2. Transfer contacts to new phone using Google account
You can easily use your Google account to transfer contacts to your new phone. Just follow this process to learn how to transfer phone contacts using Google account.
Sync Contacts in Your Old Phone
You need to go to the “Settings” option of your phone from the main menu and then go to “Accounts and Sync”.
Now you need to choose “Add Account” and then select “Google”. After that, tap on “Next”.
In this step, you need to sign into your Gmail account by using your login credentials. It doesn’t matter if you don’t have an old account. You can easily create a new one and then use that information to log into your phone.
After signing in, you need to select “Sync Contacts” option and then choose finish to end this process. Easeus data recovery wizard review.
Sync Contacts in Your New Phone
As you have already synced your old contacts into your Google Account using your old phone, now you need to repeat the account adding process to your new phone again. Just repeat the process by following the previous steps and then hit “Sync Contacts” so that it synchronizes your old contacts to your new phone. Your new phone will automatically start showing all your old contacts by syncing with your Google account.
Part 3. Transfer contacts to new iPhone with Move to iOS
You can easily transfer your contacts to your new iPhone by using Move to iOS app from your Android phone. Just follow this process properly-
Install Move to iOS app on Android and check
You need to install Move to iOS app on your Android phone and make sure that the Wi-Fi is turned on. You also need to make sure that both your Android phone and new iPhone have enough charge to carry out this procedure. This process will require you to have iOS 9 or later and iPhone 5 or later.
Move data from Android
When you setup your new iPhone you will find an option like “Apps & Data”. You need to enter that option and choose “Move Data from Android” option from the sub-menu.
Start the process on Your Android Phone
At first you need to open the Move to iOS app on your Android phone and hit the “Continue” button. You will be able to see the terms and conditions page appear. Now you need to accept those terms by clicking on “Agree” and then hit “Next” button from the top-right corner of the Find Your Code screen.
Wait for Code and Use It
You need to choose “Move from Android” option and hit the “Continue” button on your iPhone. You will see a ten or six digit code appears. You will have to enter the code on your Android device and wait for the “Transfer Data” screen to appear.
How To Transfer Google Contacts From One Gmail To Another
Transfer Contacts
At this step, you need to choose “Contacts” to transfer your old contacts from your Android phone and hit the “Next” button. If your android device shows you that the process is complete, you need to wait till the loading bar is complete on your iPhone. Within a very short time, the process will be completed.
Part 4. Transfer contacts to new Android phone from SIM card
You can easily transfer your contacts to new Android phone using your SIM card. Read this process to learn how to transfer contacts from phone to phone from SIM card-
Export to SIM Card
First, you need to export all your contacts from your old phone to your SIM card. Go to the “Contacts” option. Press the “Menu” button and then choose “Import/Export” option. Now you need to choose “Export Contacts to SIM card” and then mark all the contacts that you need to export. After that, press “Export” and a warning screen will appear, which will ask you if you really want to copy all your contacts to your SIM card or not? You need to choose “Ok/Yes” and all your contacts will be exported to your SIM card.
Sync Google Contacts To Phone
Import from SIM Card
Now you need to switch off your old phone, remove your SIM card and insert it into your new phone. You need to do the same thing again. Just go to the “Contacts” option. Press the “Menu” button and then choose “Import/Export” option. Now you need to choose “Import Contacts from SIM card” and then mark all the contacts that you need to export. After that, press “Import” and a warning screen will appear, which will ask you if you really want to copy all your contacts to your phone or not? You need to choose “Ok/Yes” and all your contacts will be imported to your new phone.
There are a lot of ways that you can transfer your contacts to your new phone. But the best way to complete this task is using MobileTrans – Phone Transfer. This tool will help you to transfer all your contacts easily to your new phone without any corruption of data. The process will be very smooth and you will be very happy with the tool. I guarantee that you will find your solution in MobileTrans – Phone Transfer.
How To Transfer Contacts From One Google Account To Another In Android
New Trendings
0 notes
Text
Ns_error_net_inadequate_security

poorandunlucky
Well-Known Member
Reaction score: 33 Messages: 368
Soo.. I finally gave-up, and installed Poudrière, and it took over 12 hours, it it managed to compile Firefox without a hitch; however, when trying to visit some sites like Google, Youtube, Bing, and Facebook, Firefox displays an error page that says:
NSERRORNETINADEQUATESECURITY indicates that the server initiates a HTTP/2 connection, but Firefox detects an invalid TLS configuration in the server response (server negotiated HTTP/2 with blacklisted cipher suites). Mar 03, 2020 2020 Release Wave 2 Discover the latest updates and new features to Dynamics 365 planned through March 2021. Release overview guides and videos.
Your connection is not secure The website tried to negotiate an inadequate level of security. www.youtube.com uses security technology that is outdated and vulnerable to attack. An attacker could easily reveal information which you thought to be safe. The website administrator will need to fix the server first before you can visit the site. Error code: NS_ERROR_NET_INADEQUATE_SECURITY
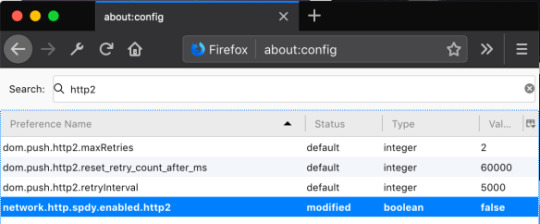
An immediate fix for this is to go to about:config and disable network.http.spdy.enabled.http2, though, I was wondering if anyone knows the real way to fix this (i.e. the real source of the problem, and the real remedy).
I upgraded Firefox on a Linux system running CentOS 7 to version 52.8.0-1 with yum upgrade firefox. When I opened Firefox afterwards and put google.com in theaddress bar, I saw the message below:
Your connection is not secure
The website tried to negotiate an inadequate level of security.
uses security technology that is outdated and vulnerable to attack. Anattacker could easily reveal information which you thought to be safe. Thewebsite administrator will need to fix the server first before you canvisit the site.
Easeus data recovery wizard technician. Error code: NS_ERROR_NET_INADEQUATE_SECURITY
When I went to another site, wikipedia.org, using HTTPS, I saw the same message. I checked to ensure that the web browser wasn't configured to use a proxy by clicking on the icon with the three horizontal bars at the top,right-hand side of the browser window and selecting Preferences, thenAdvanced, then Network, then Settings. The settingwas 'No proxy.' I then right-clicked on the 'Your connection is not secure' page and chose View Page Info. When I clicked on the Securitytab, I saw the 'Owner' value listed as 'This website does not supply ownership information.' In the Technical Details section, I saw 'ConnectionNot Encrypted' and 'The website www.google.com does not support encryptionfor the page you are viewing,' even though the URL listed was https://www.google.com/?gws_rd=ssl.
I disabled the NoScript add-on and tried accessing https://google.com, but saw the same message. I tried another web browser on the system, Vivaldi, but didn't see the issue within that browser. So I then opened Wireshark,a free and open-source softwarepacket analyzer and captured the network traffic betweenthe Google webserver and the CentOS host. When I attempted to access the Google serveragain, I saw a Domain Name System (DNS) query for the address of the server and the response from the DNS server, which indicated that the IP addresswas 172.217.7.174, which when I performed a reverse DNS lookup with the nslookup command equated to iad30s09-in-f14.1e100.net.
The 1e100.netdomain name is registered to Google - see What is 1e100.net? 1e100 is scientific notation for 1 googol, i.e., 1 raised to the power of 100, which is 1 followed by one hundred zeros. Google uses the domain name for its servers.So there wasn't an issue with some intervening system providing the wrongIP address for the Google server.
Ns_error_net_inadequate_security
I then checked the packets that followed the DNS response. I saw the expectedthree way handshake between the host and Google server, i.e., the host senta SYN packet, the server responsded with a SYN, ACK packet, and then thehost responded to the server's SYN request with its own ACK packet. I thensaw a 'Client Hello' packet sent from the browser on the client. The server sent an ACK back. Wireshark then showed a 'Server Hello, Change Cipher Spec, Hello Request, Hello Request'packet being sent from the server to the client. The client system thensent a 'Change Cipher Spec, Hello Request, Hello Request' packet and thenan 'Encrypted Alert' packet.
That packet was followed immediately by a FIN, ACK packet from theclient to the server. The server then sent Application Data in replyand the client reset the connection with a RST packet.
I thought, perhaps, that the system didn't currently support the latestversion of the Transport Layer Security (TLS) protocol, but the protocol listed for the TLS packets by Wireshark was TLSv1.2. When I looked at the place where the TLS version number is referenced in the Secure Sockets Layer (SSL) section in the 'Client Hello' packet, I saw that packet used TLS version 1.0 - Wireshark showed 'TLS 1.0 (0x0301)'for the Version.
The hexadecimal values for various versions of SSL/TLS are listed below:
OpenSSH 8.5 released March 3, 2021 OpenSSH is the premier connectivity tool for remote login with the SSH protocol. It encrypts all traffic to eliminate eavesdropping, connection hijacking, and other attacks. In addition, OpenSSH provides a large suite of secure tunneling capabilities, several authentication methods, and sophisticated. Determines if SSH shall use IPv6 or not (only used when HostAddress is set to any). Shell(Host) - shell(Host, Option) - shell(Host, Port, Option) - Types: Host = string Port = integer Options - see ssh:connect/3. Starts an interactive shell to an SSH server on the given Host. The function waits for user input, and will not return until the remote shell is ended (e.g. On exit from the shell). Ssh 3. Hi, Hi can anyone explain what is the difference between SSH version 2 and Version 3. Thanks in advance.
VersionHexadecimal ValueSSL 3.00x0300TLS 1.00x0301TLS 1.10x0302TLS 1.20x0303
But when I looked at the 'Change Cipher Spec' packet subsequently sentby the client system, though, I saw it was using TLS version 1.2.
And when I used the openssl utility to check the ciphers supported on the client system, I saw TLSv1.2 was supported.
So I thought the issue probably was not caused by use of an outdatedcipher on the client side. But, since I thought openssl was probably out-of-date, I updated it with yum upgrade openssl.
I then closed and reopened Firefox. I still saw the same issue forthe Google and Wikipedia sites when I restored the prior session. But Inoticed that I didn't see the security message in another tab that wasopen for https://noscript.net. I noticedthat a couple of other HTTPS sites open in other Firefox tabs were alsodisplaying normally, though when I tried https://bing.com, I saw the same issue. I refreshed the NoScript page and again it displayed normally. When I used Wireshark to capture the network traffic relatedto accessing that page, I noticed that after the client system senta 'Client Hello' packet to the server and the server subsequentlysent a 'Server Hello' packet to the client, that the server sent apacket that Wireshark categorized as 'Certificate' in the Infocolumn of its display. When I looked at the cipher selected by theserver in the SSL section of the 'Server Hello' packet, I saw thatthe Cipher Suite it selected from those listed in the 'Client Hello'packet, which tells the server what cipher suites the client supports,it was Cipher Suite: TLS_ECDHE_RSA_WITH_AES_128_GCM_SHA256(0xc02f). You can find an explantation of the packetsexchanged between client and server systems for TLS exchanges at Traffic Analysis of an SSL/TLS Session. That was the same cipher key Isaw selected in the 'Server Hello' packet from the Google web server.
I tried accessing several more sites via HTTPS. I couldn't access almostall of them, getting the same 'Your connection is not secure' security messagewith 'Error code: NS_ERROR_NET_INADEQUATE_SECURITY', but I was able to access the Juniper Networks website at https://www.juniper.net.
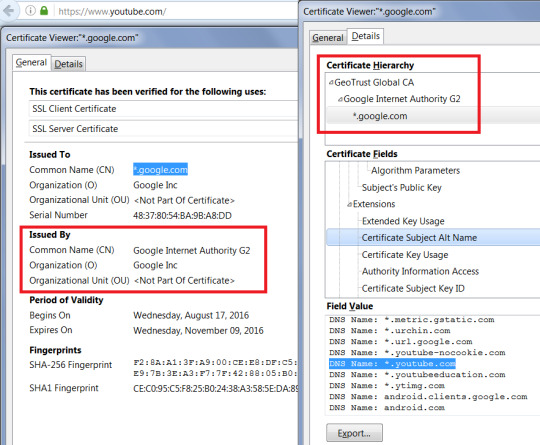
Since I was able to access the Google website using my MacBook Pro laptop on the same network as the Linux system, I thought maybe Firefoxon the Linux system had an out-of-date public key certificate stored for the Google site. I put about:preferences#advanced in the address bar then clicked on theCertificates tab, then selected View Certificates (you canalso get to that view by clicking on the icon with the 3 short, horizontalbars at the top, right-hand corner of the Firefox window and clickingon Advanced then seleting Certificates). When I clicked on the Servers tab, I saw a certificate for www.google.com,but no certificates were listed for either any of the other sites producingthe 'your connection is not secure' message nor those where I didn't havea problem, such as the Juniper Networks site.
And when I clicked on the View button to view the certificatedetails for the Google certificate, I saw that the serial number and theSHA1 and SHA-256 fingerprints were the same as when I checked the Google certificate on my MacBook Pro laptop running Firefox ESR 52.7.3 where I was not experiencing any problem accessing Google's website nor other sites.

I was finally able to resolve the problem after reading a comment atNS_ERROR_NET_INADEQUATE_SECURITY on opening www.wikipedia.de whereRichard W.M. Jones mentioned in a reply to the poster that an update tonss is needed. So I checked the version of the Network Security Services(NSS) rpm on the system and then upgraded it to the latest versionwith the yum upgrade nss command.
After I upgraded NSS and then closed and reopened Firefox, the problem was solved. I was able to use the Google and Bing search engines and visit the other sites that hadn't been accessible via HTTPS previously.
Related articles:
September 23rd, 2019 by Kyle Hanson The Legend of Zelda: Link’s Awakening gives you access to a lot of different items as you try to solve the mystery of and escape from Koholint Island. Many are important and key to your eventual victory, while others are pretty optional. Welcome to the Legend of Zelda Link’s Awakening Walkthrough. The walkthrough below is a complete 100% guide for Nintendo Switch remake of Link’s Awakening. It covers a full run through of the entire game, including strategies for all bosses and dungeons, the collection of all heart pieces, secret seashells, and upgrades that take you through the entirety of the game. The Legend of Zelda: Link's Awakening is an action-adventure game developed by Grezzo and published by Nintendo for the Nintendo Switch. It was released worldwide on September 20, 2019. Link's Awakening is a remake of the 1993 game for the Game Boy. The Legend of Zelda: Link's Awakening is a remake of the 1993 game of the same name. Announced during a Nintendo Direct presentation on February 13th, 2019, the game received a short teaser trailer. During E3 2019, a worldwide release date of September 20th, 2019 was shown. A full game walkthrough on The Legend of Zelda: Link's Awakening for Nintendo Switch. This covers all quests, levels and bosses of the game. Time stamps for. Zelda awakening.
References:
Ns_error_net_inadequate_security Edge
List supported SSL/TLS versions for a specific OpenSSL build Posted: December 11, 2014 Stack Overflow
Traffic Analysis of an SSL/TLS Session By: Álvaro Castro-Castilla Date: December 23, 2014 The Blog of Fourthbit
0 notes
Text
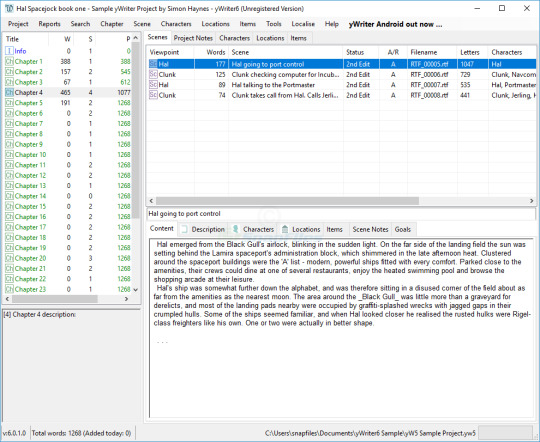
Ywriter

There are dozens of tools out there that are designed to help make the writing process easier, a lot of which are targeted towards non-linear writing. Today, I’d like to dive into yWriter and Scrivener, both of which are exceptional tools in this space. Both tools allow building of scenes and being able to arrange them on the fly or tag them. You can also track your word counts and progress in both tools, but they have a few differences. If you just want a raw comparison, here you go:
FeatureWinnerUser Interface/ExperienceScrivener, hands down – Drag & Drop functionality, color, and fewer bugs Metrics (Word Count, WPM, novel length) yWriter, very narrowly – Same metrics, yWRiter makes them more visible.Non-linear Writing CapabilitiesScrivener – You have a lot more power to structure things however you like, nesting documents and folders Backups and Restores Equal – Both possess good backup functionality. Writer’s Tools (tagging, metadata, labeling, etc)Equal – Scrivener has a LOT of flexibility here with custom metadata, page and project notes, POV, status fields, etc… But maybe it’s too much. yWriter has clearly labeled sections for Locations/Characters/Items, and lets you follow some very explicit (hardcoded) attributes for those items. This ends up being personal preference. Analytics yWriter – Although Scrivener can give you counts of the words you use so you can see if T”Throttle” is just coming up way too much, yWriter gives you the ability to see how many scenes features which characters or locations, how often a characters serves as a POV, and more.Price yWriter – Can’t beat free.
Ywriter Themes
That is the broad overview of the comparisons, but feel free to read on for the deep dive on each.
May 12, 2017 yWriter speaks strongly to my type A personality. Rich with stats and heavy on structure, this free app encourages writers to write in scenes, rather than chapters, because scenes are smaller. Download yWriter for Windows now from Softonic: 100% safe and virus free. More than 205 downloads this month. Download yWriter latest version 2021. YWriter, a free Spacejock program, is a great word processor for writers.It allows you to see your scenes, chapters, characters, settings—and just about anything else you can think of—all at a glance. You can watch my free yWriter video tutorial below.
Hi, Hi can anyone explain what is the difference between SSH version 2 and Version 3. Thanks in advance. OpenSSH 8.5 released March 3, 2021 OpenSSH is the premier connectivity tool for remote login with the SSH protocol. It encrypts all traffic to eliminate eavesdropping, connection hijacking, and other attacks. In addition, OpenSSH provides a large suite of secure tunneling capabilities, several authentication methods, and sophisticated. Enable SSH on a headless Raspberry Pi (add file to SD card on another machine) For headless setup, SSH can be enabled by placing a file named ssh, without any extension, onto the boot partition of the SD card from another computer. When the Pi boots, it looks for the ssh file. If it is found, SSH is enabled and the file is deleted. Determines if SSH shall use IPv6 or not (only used when HostAddress is set to any). Shell(Host) - shell(Host, Option) - shell(Host, Port, Option) - Types: Host = string Port = integer Options - see ssh:connect/3. Starts an interactive shell to an SSH server on the given Host. The function waits for user input, and will not return until the remote shell is ended (e.g. On exit from the shell). Ssh 3.
Scrivener Overview
Scrivener, made by Literature and Latte (https://www.literatureandlatte.com/scrivener.php) is a fantastic tool that I’ve mentioned a few times on this blog already. It is highly evolved and targeted initially towards Mac users (although they do make it available to Windows users as well).
Ywriter Tutorial
Everything works from a single text “unit” that can be labeled as a scene, a character bio, a location, or anything else. This creates a lot of flexibility. Do you need to track magic spells available for whatever reason? Just start labeling the documents that way and add icons.
The arrangement of scenes (or “texts”) is very intuitive and easy, built on a folder structure (which, incidentally can also contain writing). It’s very drag-and-drop friendly to arrange your scenes both from an order perspective as well as a hierarchical perspective. You also can add color coding to an outline view to give yourself detailed looks at content.
The cork-board view expands the concept of moving things around and arranging them where you like them. It really lets you get the feel of organizing notecards (which can also be color-coded and labeled) to decide where you want. Even aside from that, you can view your scenes in a single browser, compare scenes to each other in the same windows, and get lots of ways of looking at the data.
Keywords and Metadata attributes can be assigned to each scene (document). For instance, you could create a metadata field entitled “Location.” On each scene, you’d have the ability to type in the location and populate. Likewise, you could create a list of characters using keywords (with each new character having its own keyword). You then could assign a color-coded character to your scenes to make life fast and easy when scanning scenes to see who is in it.
You can get Scrivener for $40 USD, but if you time your purchase around one of the Nanowrimo events, you can pick a copy up with a discount, making it a great buy.
yWriter
yWriter by Spacejock software (http://www.spacejock.com/yWriter5.html) is another great tool, and also has the added benefit of being completely free. A few of its highlights:
While it lacks some of the flexibility and customization on its units as Scrivener, it has hardcoded several elements including Scenes, Characters, Locations and Items. These have their own properties and unique traits. This lets you add a lot of meta-information about them that are unique to that type of thing. Beyond that, you can see how these things relate to one another, and perform detailed analytics on those relationships. IE: Pick a character and see how many scenes that character appears in… How many scenes that character is the POV character for (which is just another thing that is hardcoded and thus can be reported on).
If you’ve ever read Dwight V Swain’s book Techniques of the Selling Writer, you’ve seen how he breaks apart scene structure as Action/Reaction and goals. This helps make sure that your scenes are actually bringing content to your story. Yes, I recognize that it is oversimplifying things, but it’s a great tool to use. A great reference book to read as well if you haven’t (heavy read though!).
Reporting and metrics are better. You can see in a quick window your word count per scene/chapter/section/etc. You can see your words per minute while typing. Everything is tracked and highly visible. Is this necessary? It’s a personal preference, but I know I like to see if I can keep my WPM up on a first draft to ensure that I am getting some writing done. By the same token, you also can track (and graph) attributes you’ve defined based on each scene, such as comedy, intensity, villain redemption, etc. Coupled with the graph, you can make sure your peaks and valleys are where you’d expect them.
Scrivener
All in all, both are great tools and worth looking at. https://bubbleload528.tumblr.com/post/657040467780894720/zelda-awakening. Which do you prefer? Something else all together?
0 notes
Text
Ssh 3

Provide SSH and SCP functionality for executing commands against remote hosts.
Minimum PowerShell version
5.1

This is a prerelease version of Posh-SSH.
Method 3: Use Putty Putty is a well-known and the most popular SSH client on Windows before the arrival of Windows OpenSSH client and Windows Subsystem for Linux. To use SSH with Putty, you need to download the Putty program from the official website and install it. Launch Putty from the Start menu. Most implementations of the SSH suite comprise three utilities - slogin (secure login), ssh and scp (secure copy) - that are secure versions of the earlier insecure Unix utilities: rlogin, rsh and rcp. SSH uses public key cryptography to authenticate the remote computer and enables the remote computer to authenticate the user, if necessary.
Installation Options
Copy and Paste the following command to install this package using PowerShellGet More Info
You can deploy this package directly to Azure Automation. Note that deploying packages with dependencies will deploy all the dependencies to Azure Automation. Learn More
Manually download the .nupkg file to your system's default download location. Note that the file won't be unpacked, and won't include any dependencies. Learn More
Author(s)
Carlos Perez
Copyright
(c) 2021 Carlos Perez. All rights reserved.

Package Details
Owners
Cmdlets
Functions
Dependencies
This module has no dependencies.
FileList
Posh-SSH.nuspec
PoshSSH.dll
AssemblyNewtonsoft.Json.dll
AssemblyRenci.SshNet.dll
AssemblySshNet.Security.Cryptography.dll
Version History
VersionDownloadsLast updated 3.0.0-beta1 (current version) 1,055 3/4/2021 3.0.0-alpha 449 2/1/2021 2.3.0 1,052,002 10/4/2020 2.3.0-Beta1 1,913 6/5/2020 2.2 2,275,416 5/12/2019 2.1 224,246 1/23/2019 2.0.2 700,517 10/13/2017 2.0.1 48,779 8/14/2017 2.0 1,648 8/11/2017 1.7.7 103,764 12/23/2016 1.7.6 43,525 7/29/2016 1.7.5 7,118 7/9/2016 1.7.4 28 7/9/2016 1.7.3 53,529 11/4/2015 1.7.2 687 3/26/2015 1.7 56 3/18/2015 1.6 347 8/17/2014
Ssh 3des-cbc
Show more
0 notes
Text
Easeus Data Recovery Wizard

Easeus Data Recovery Wizard Pro
Part 1: Basic Introduction to EaseUS Data Recovery. Easeus is known for developing powerful data utilities. EaseUS Data Recovery is one of its powerful software, which is also called as Data Recovery Wizard. Here are some basic information of EaseUS Data Recovery, keep reading to find more. What Is EaseUS Data Recovery?
EASEUS Data Recovery Wizard Free mixes up a user-friendly approach with a handy suite of features in order to help you recover files that you have accidentally deleted from your computer.
All-in-One Free Data Recovery Software for Different Data Loss Situations
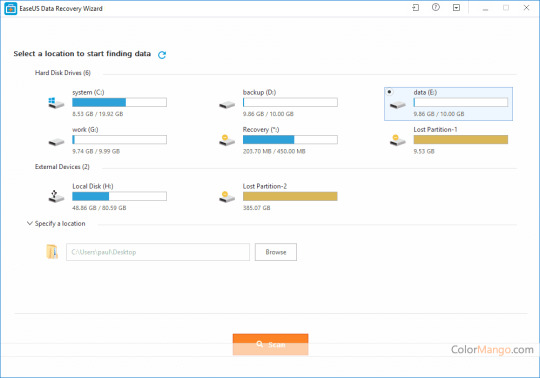

Being troubled by losing precious data, what would you do to rescue those files? It's no doubt that using EaseUS file recovery software is the most advisable choice. Be it photos, videos, documents, or more. This freeware can recover them from all kinds of data loss scenarios.
Delete operations like tapping 'Delete,' pressing 'Shift+Delete,' or emptying the Recycle Bin are the main culprits for data loss in daily life. Luckily, EaseUS data recovery software perfectly supports deleted data recovery in such situations.

Data Recovery Wizard Pro. Safe data recovery software to recover lost data from Windows PC, laptop or other storage media. Learn more Partition Master Pro. Cost-effective partition manager to resize partitions and make full use of hard disk space. Learn more Todo Backup Home.
Performing partition recovery is a necessity when partitions get lost, deleted, RAW, and inaccessible. The effectiveness-based file recovery software from EaseUS will recover files from the partition effortlessly.
Whether you format the storage device accidentally or intentionally, the consequences are the same: All the files on the storage medium will be lost. EaseUS Data Recovery Wizard is a long-proven solution to recover data from a formatted partition, hard drive, USB drive, memory card, and other storage devices.
It's quite upsetting when an HDD or external storage device gets damaged, corrupted, or inaccessible. With EaseUS Data Recovery Wizard, there is a high chance to retrieve files from a seem-to-be-dead internal/external HDD, USB drive, SD card, digital camera, video player, and other supported devices.
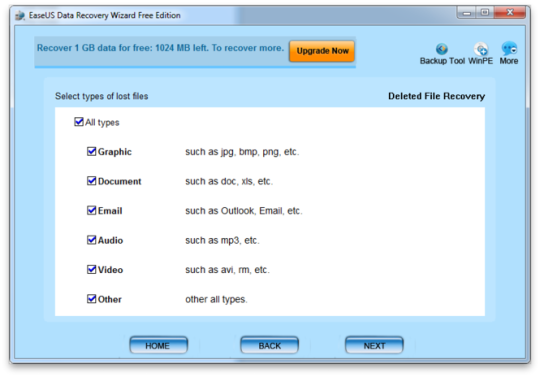
Easeus Data Recovery Wizard Pro
Although these happen less frequently, disasters like file-infecting virus attacks, unexpected system crashes, and severe boot failures come with data loss issues. It's worth trying to apply the pc data recovery tool to recover the files hidden and deleted by the malware or data lost because of accidental system shutdown.
0 notes
Text
Zelda Awakening


Zelda Awakening Switch
Zelda Awakening Map
Do you want to be the best player in this year's revamped All-New 2019 Edition of The Legend of Zelda Link’s Awakening? Than this Game Guide is for You. In it you will find essential tips, tricks and info that will help you beat the game, your friends and any obstacle in the different stages of the game.
Learn how to play 'Link's Memories: Zelda's Awakening' from Legend of Zelda: Breath of the Wild by Manaka Katoaka Watch the FULL Piano Tutorial, totally FRE.
The Legend of Zelda™: Link’s Awakening. Available now $59.99 Buy download. Eligible for up to points “Castaway, you should know the truth!” As Link, you awaken in a strange land away from.
Welcome to the Legend of Zelda Link’s Awakening Walkthrough. The walkthrough below is a complete 100% guide for Nintendo Switch remake of Link’s Awakening. It covers a full run through of the entire game, including strategies for all bosses and dungeons, the collection of all heart pieces, secret seashells, and upgrades that take you through the entirety of the game.
Help Link unravel the mystery of Koholint Island in this Game Boy™ Color masterpiece!
Players:
1 player
Zelda Awakening Switch
Publisher:
Nintendo
Game file size:
5 MB
*To enjoy the 3D effect of Nintendo 3DS software, you must experience it from the system itself. All screenshots and videos on this website have been captured in 2D mode.
Zelda Awakening Map
Use Parental Controls to restrict 3D mode for children 6 and under.

*If eligible for a Just for You offer, the final price reflects the combined Sale and Just for You offers. The Just for You offer is discounted from the sale price.
1 note
·
View note