
Statistics
We looked inside some of the posts by calliedigitaldesign and here's what we found interesting.
Average Info
Notes Per Post
5
Likes Per Post
2
Reblog Per Post
2
Reply Per Post
1
Time Between Posts
2 days
Number of Posts By Type
Text
17
Last Seen Tumblr Blogs


Fun Fact
Mobile Tumblr US users spend an average of 4.04 minutes per session on the app.
Text
Reference to new future blogs (will be updated when applicable)
2 notes
·
View notes
Text
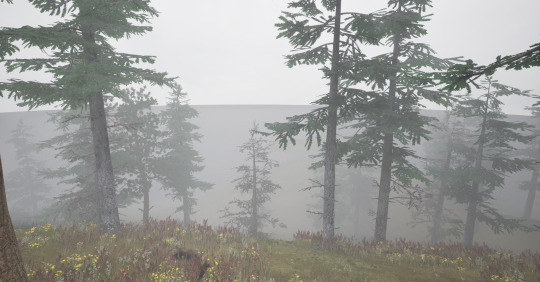
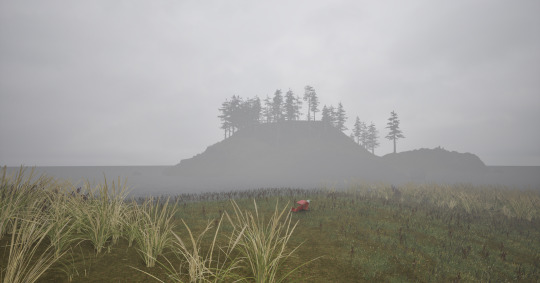
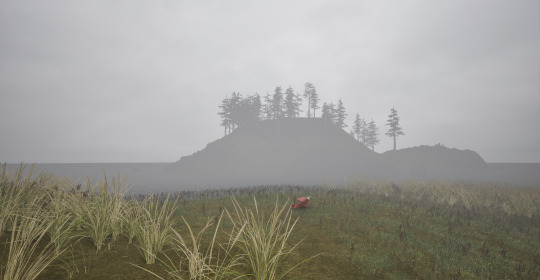
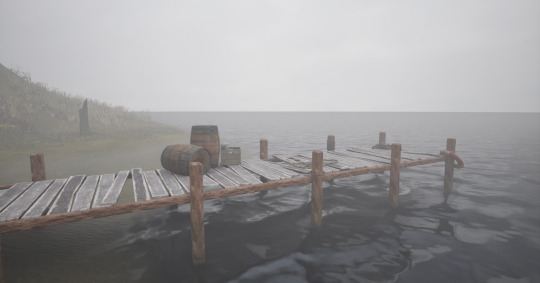
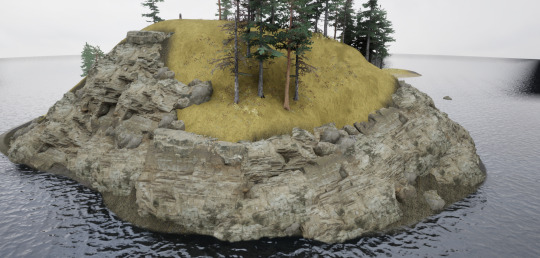
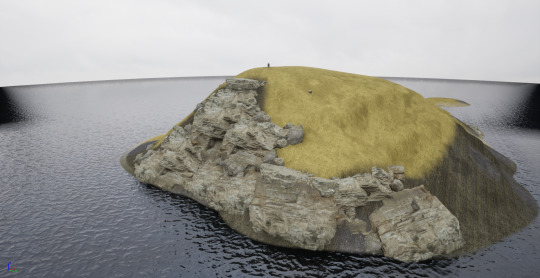
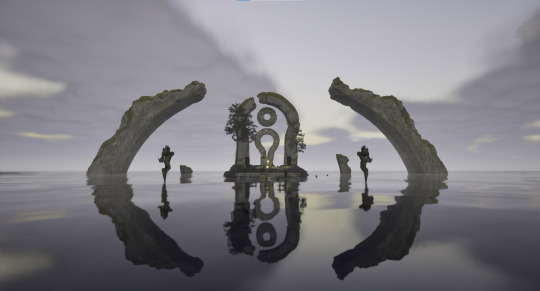
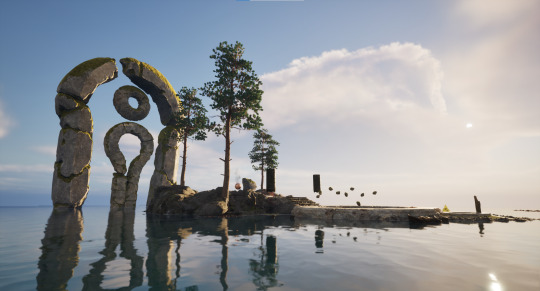
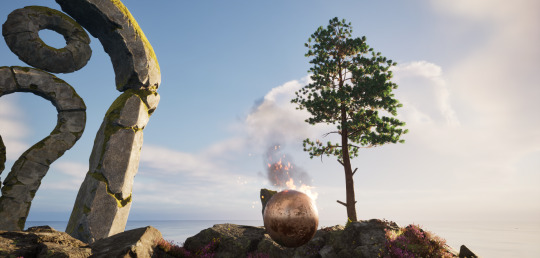
Final wrap up (for this Unit) - This Island has a Secret - "Venus' Folly"
After a treacherous maritime accident on the open oceans not far south of the Arctic Circle, your vessel was shipwrecked and you've washed ashore on a mysterious uncharted Isle, wreathed in a thick fog. It seems 2 other groups of people have been here before you in the past, but what brought them here and what became of them are a mystery that you might just get a glimpse of...
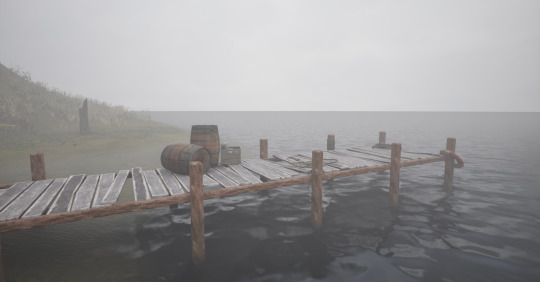
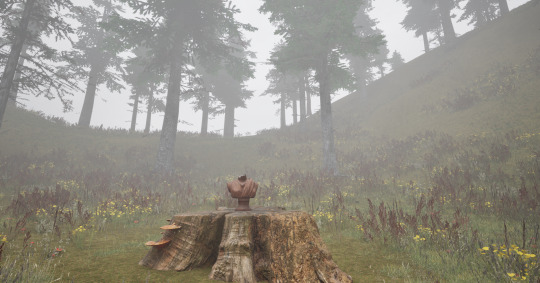
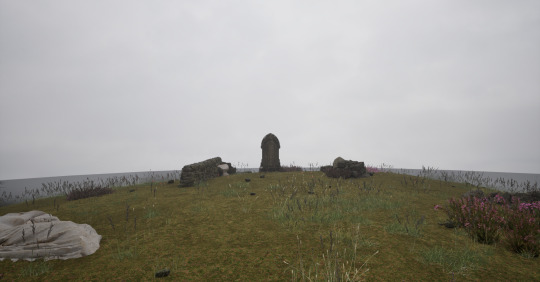
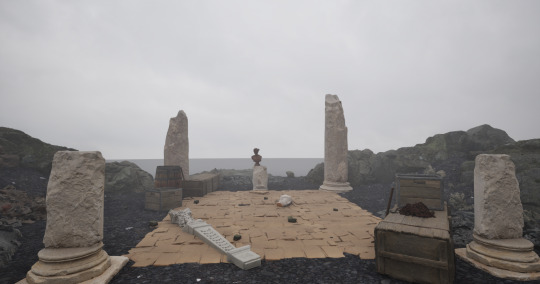
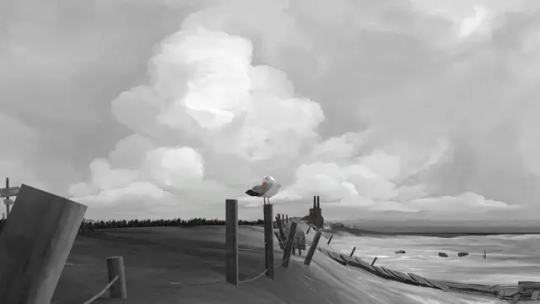
Shown below are a selection of Hero Shots of interesting or atmospheric locations around the Island (clicking to enlarge highly recommended).


Above is a short video giving a walking tour of the Island with all the interesting spots included. (apologies if the video is a little stuttery haha)
Not sure if future projects will be on this blog or not, if not I'll add a post with links to the sideblog I use for each unit for convenience.
1 note
·
View note
Text
Finishing touches to the project (Probably a short post)
after a little more adjustments to the foliage on the hilltop, and adding a little bit of driftwood around the environment for flavour, the project is almost finished.

as a final little embellishment, I migrated an asset you might be familiar with from earlier into the project and left it on the detached and somewhat barren Northwest Islet for people to find as a little easter egg.
Now all that's left is to get some decent 'Hero Shots" from locations around the island, Record a little walk-around tour on OBS, and bring it all together to submit the project.
0 notes
Text
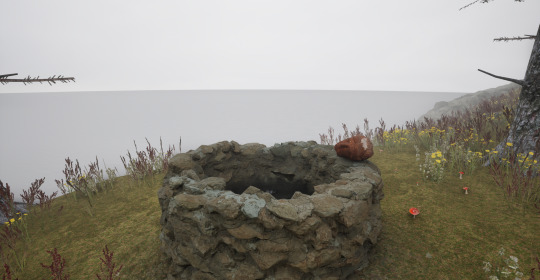
More foliage, Disused Jetties and abandoned excavations as the mists close in...
A lot of the earlier work I'll discuss mainly involved finishing off the foliage from last week, evening it out or intensifying it in areas where needed. after that, we got a helpful surprise new addition to our available assets that I'd been hoping for.. a wharf blueprint. I was able to use this to create a new point of interest on the southern beach of the island from which objects (some found at our next location) were once destined to be shipped to the mainland, a venture which seems to have reached a mysterious dead end for the island's second group of visitors...
next, I shifted my focus to the large, mostly flat section of headland at the Island's Southwest edge, which up until now I'd been using as a testing ground for new assets I'd been adding to the project from Quixel Bridge. I'd originally planned to create a lighthouse here, erected by the aforementioned later visitors after their arrival some time between 1870 and 1920, but as there were no assets available for it, this part of the plan and backstory were scrapped. I'd been having trouble deciding what to put there to lessen the flatness of the land and create more interest, and eventually today I began construction on an ancient shrine from the original Roman visitors that had been partially excavated and examined by the second group. To go with this I imported more ancient Roman assets from Quixel Bridge, and adjusted the landscape around the area to be more rocky and hilly to break up the flatness.

These two sites were a great improvement and along with these I also implemented a few more additions to the clifftop grave site that will be documented more if I make additions of interest tomorrow. Things are beginning to come together...
0 notes
Text
Plants spring up, the plot thickens, and an ominous Fog rolls in from the Sea...
Today has been busy, and I'm more excited to see where this goes than before!
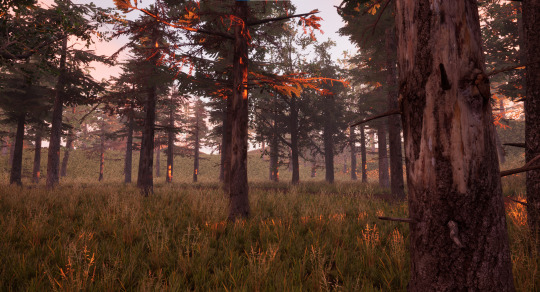
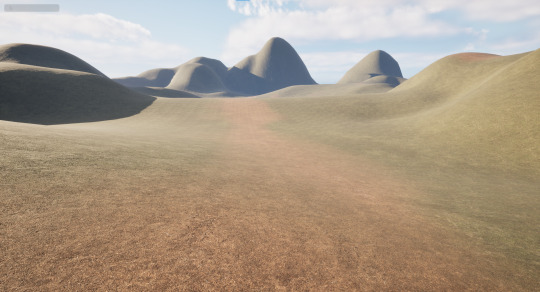
After finishing the cliff face at the island's rear (shown above) I began working on adding life and plants to the island via the foliage system. For this project, our assets have been limited to a selection from packs we previously used along with anything we can find on Quixel Bridge, but thankfully the assets have been curated with a specific style of biome in mind to ensure they fit together well. After laying out some suitable sandy tussocks near the beaches, I moved further in with northern forest ground flora and some lovely mushrooms I found on Quixel Bridge. Next up are trees and I primarily went for firs, with a few dead firs and medium scots pines mixed in for variety. On the subject of foliage, I generally ensure the foliage is randomly scaled between 0.8 and 1.2 times the default size to give a more realistic sense of variation than the default. While I'm pretty happy with the placement of the trees, which are generally a bit sparser than in my forest project, There are still quite a few sections of ground which still feel bare, which I'll have to work on more.

After this, I began workshopping my story more. While things are still a bit fuzzy, so far things are revolving around two distinct time periods in which other people have been to or perhaps been stranded on this island in the past. Why might they be stranded? Still mostly unclear, but my next addition might be part of it...
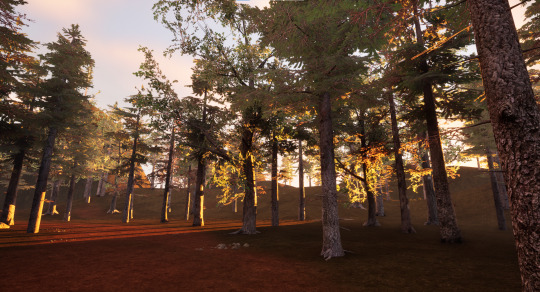
Next up really is the game changer for this in my opinion, which is of course LOADS of Volumetric fog. I have tweaked quite a bit in the settings to make it more intense and spooky than the default, but not *too* thick, as I still want people to be able to at least see where they're going a good amount. This greatly improved the ambience and is probably one of the main features of the atmosphere going forward, but I might need to turn it off when I'm working on more details.

I can't wait to see where things go next!
0 notes
Text
Making Landfall on an (as yet) Unnamed Isle, Giant Cliffs, Bubbles and other oddities
Making our new island is a challenge but I'm very hopeful to excel. Making an initial landscape with new materials wasn't much trouble with my landscape material ported over from my last project, with a water plane texture to go along with it. For this project, I imported an HDRI background texture to give the sky an overcast look.

shown above is a view from outside the HDRI texture. On the island, after painting materials around a bit, I began work on a large cliff face on the other side of the island from the intended path of entry. It still isn't finished yet, but it looks promising.
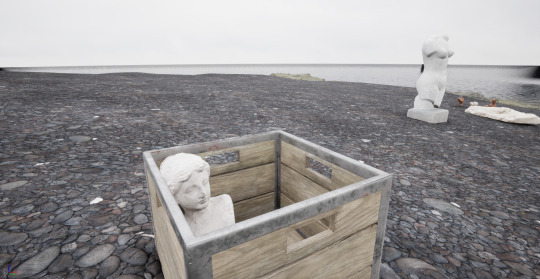
In addition, part of our brief includes adding visual storytelling to our environment, to convey the 'secret' through non verbal means. To begin this I imported several Roman statue models from Quixel Bridge. Not sure what they're for yet, but they look nice?
0 notes
Text


moodboard for final project - "this Island has a secret"
enjoy?
1 note
·
View note
Text
about a week of stuff I worked on (very long post probably)
We started off the week implementing displacement for our landscape material so our terrain could utilize built-in 3D textures. To do this we had to enable the experimental displacement plugin for Unreal Engine 5. After this we had to enable and build the landscape as a "Nanite Landscape" that could utilize these new textures properly. After this we had to go into the scripting for our landscape material, and as well as plugging in the textures we had to input new parameters to control the displacement.
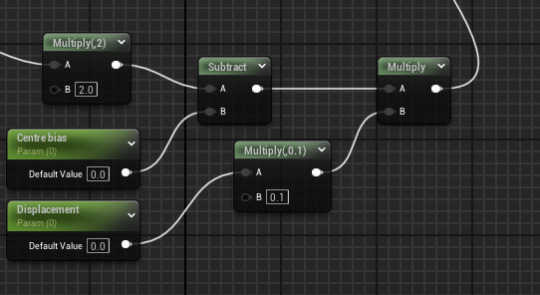
The displacement parameter controls the intensity of the displacement, and the centre bias parameter controls how far up and down from the centre of the landscape the texture is, which needs to be adjusted on a texture by texture basis. after a little while, our tests came out correctly!
Once this was done we had to individually implement it into every texture of our landscape material.

After this, we began implementing a Landscape Grass Type to populate certain layers of our landscape with grass. To do this we had to create an LGT actor and edit in in this menu.

after adding a few variants and adjusting their density and placement, we attached it into our landscape material through the script which finally got the grass into our world.
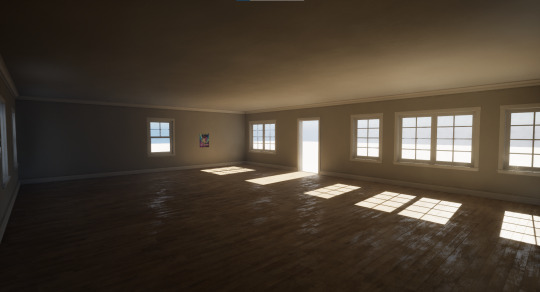
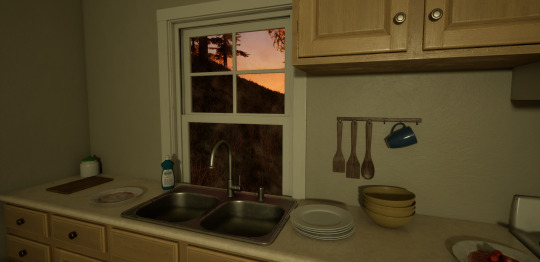
overall the grass looks pretty good in most places, but it does have lighting issues sometimes and looks bad on steep hills, but I'd call this a success. After briefly fixing a lighting problem where foliage trees weren't casting shadows properly (there was just a box we hadn't ticked) we moved on to this week's proper project: a house interior with lighting. First we made a new blank world and added in all the basic lighting and exterior features like the sky and volumetric clouds. After that we installed and atmospheric house kit and began snapping pieces together. This pack was pretty advanced and many of the basic building pieces included variants with different windows or doorframes, which was very helpful.
after this we began adding interior detailing touches and interior walls to give the house some interest.

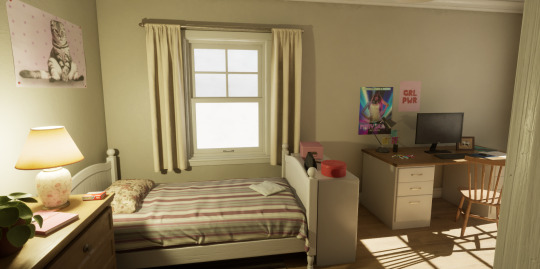
after creating some post processing effects that changed the intensity and quality of the interior and exterior lighting (gotta love God rays) this we began playing around with the blueprints of some of the light assets we'd added, like the table lamp in the dresser shown above, with the purpose of improving their functionality and making their light more customizable, which we did through more scripts.
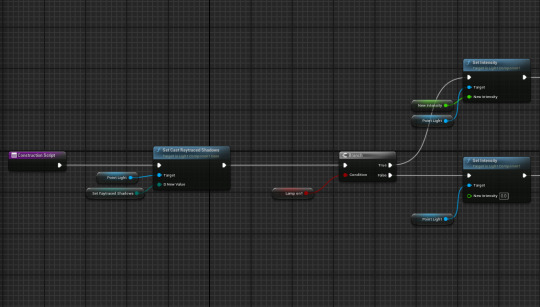
these adjustments allowed us to toggle raytraced lighting on an individual basis which we had implemented that same day, and directly control the lights intensity. After this we created an emissive texture, which resulted in an object emitting a glowing light.
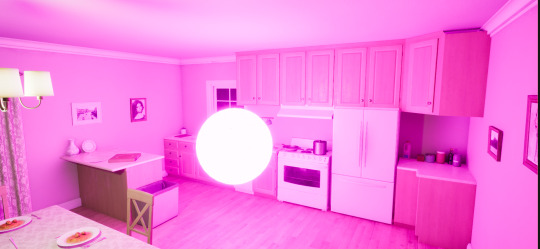
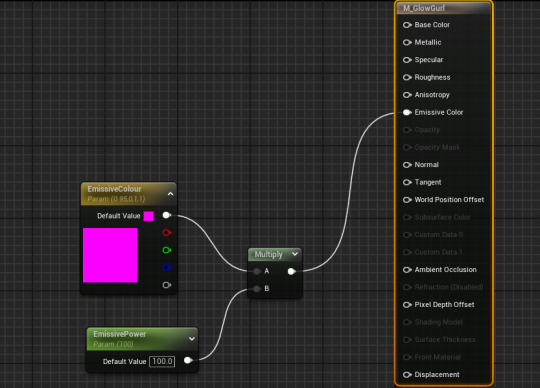
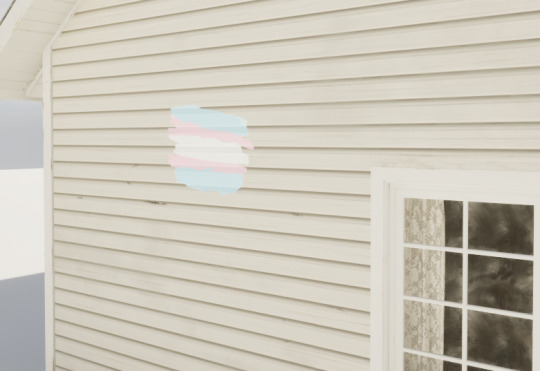
this works pretty much on the same system as other materials except we added extra parameters to control the intensity of the glow. After adding this we removed it from the level and continued on. At this point we experimented with creating a custom decal in Adobe Photoshop and importing it into Unreal Engine. After a few hiccups with file types and figuring out what sort of mask it needed, we were able to add our custom decal onto the wall of our house.
Finally, this morning, after fully furnishing the house, I gathered it all up and and pasted it into my forest along with the interior post processing volume, and it was a great success!
Next we we begin the independent project for this unit!
0 notes
Text
just adding SO many trees
just did a bunch of this with both the selection and foliage tools, finally starting to get somewhere.


so far so good. not liking much of the grass textures though, might have to find some better ones somewhere.
0 notes
Text
More experiments with the foliage tool
Today we went back to take a second look at the foliage system and properly adjusting the settings to create rock and plant formations. first we took a few rocks from an environment pack provided to us and by manipulating the scale range and density, were able to produce a pebble-like effect we were then able to compliment with larger rocks around the water features I built yesterday.


Before moving on it is also worth noting we experimented with a special type of volume texture to apply to the shoreline to give it and surrounding props a wet appearance. After this we began experimenting with water based plants from Quixel Bridge's library. to place them we had to adjust the foliage settings to allow us to place them on transparent/translucent surfaces first, which we turned off once finished. I am rather happy with how this area of the map has come out and hope the rest goes as well.


In addition, I also experimented with a post processing volume under the water to give a visual filter, but am currently unhappy with the results and thinking of removing it.

0 notes
Text
UE Keyboard Shortcuts
Hold right mouse for camera look
While holding right mouse use WASD and QE for movement
W = select and move
E = Select and rotate
R = Select and scale
F = Focus on selected object
G = Gamemode (toggle to hide all icons and outlines)
F11 = Immersive mode (toggle fullscreen viewport)
Ctrl + L = Hold while moving mouse to rotate directional light
Ctrl + Number Key = Bookmark viewport camera position. You can up to 10 positions
Alt + P = Play game. Useful when in immersive mode, ie fullscreen.
0 notes
Text
more water and more Landscape Materials, Oh My!
Using the channel I sculpted into the landscape yesterday, I duplicated a basic plane asset and edited it to remove it's collision to use for a body of water, which I then added to make a river and a small pond.


in addition, I also added a few new textures to my landscape material for Riverbeds, and riverside mud and rocks. We are currently planning to move to foliage finally tomorrow.
0 notes
Text
Material Displacement intro, Landscaping and Landscape Materials
After saying goodbye to the starter shrine map (for now),
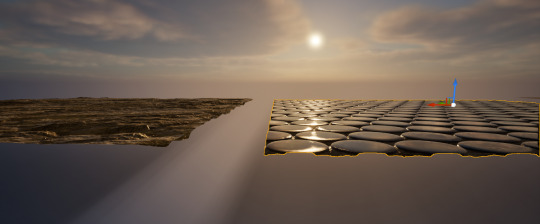
we began to move on to our second subunit for this week, Outdoor landscapes and environments. First we had a look at displacement , which can give placed materials extra texture and collision while changing it's shape to be more unique, which is very helpful when creating an Outdoor world-space. However, as implementing this is rather complex, we moved on after taking look at ambientCG, a website from which some of these materials with displacement sheets can be downloaded for use in engine. After this we used our new level to begin to get acquainted with the landscape tool, which allows users to relatively easily create, sculp and paint on 3D landforms. After creating a relatively simple hilly terrain, we were tasked with creating a landscape material, which is a subset of material which has multiple layers of different appliable patterns and textures, once again using the material scripting system.

this is rather complicated as it essentially involves creating and grouping together 3 individual patterns/textures, each with their own sets of texture sheets, combining them, and then unpacking all the combined groups. after this, we attached an instance of the LS material to the landscape, and after creating an info section for each texture, were able to paint them onto the land.

0 notes
Text
Lighting, blueprints, scripting and Volumes
yesterday afternoon we had a proper introduction to the lighting system, with point lights, and more directional spotlights and rectangular lights, and messing with their settings to suit our needs After that, we created a blueprint (which can combine multiple assets and effects into an actor) that combined a fire particle effect and a coloured point light so the fire can give off ambient light in my shrine, as pictured here at night.

however, because the light was still static, we wanted to animate it to flicker along with the particle effect. To achieve this we used the scripting event functions in the blueprint to create a loop that slightly changed the light's intensity at a random interval, which had great results.

After this we learned how to use volumes, which are invisible actors which can provide post-processing effects onto the map. we had some brief experiments with exposure settings, and auto-adjusting first, which can control how the game adds or removes brightness for visibility.

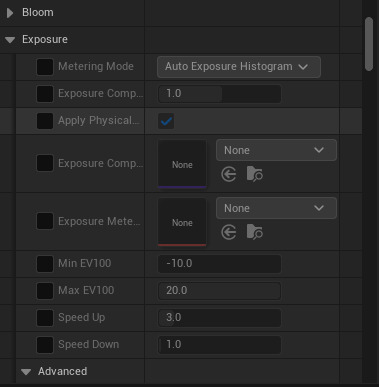
these are just a reminder of some settings to turn on and off if I need them lol. after exposure, we then moved onto saturation effects and colour grading, which are fairly self-explanatory. using these I could alter the shrine maps visuals to make it appear significantly more spooky and ominous than originally intended.

0 notes
Text
Continued Shrine progress, importing 3D models and textures, collision models and making materials
first I'll quickly cover the additional incremental improvements I made to the shrine in this image, with more pillars and some reworked rocks and foliage. Some of this is shown in the image below.

As can be seen above, we then took the time to import the mesh and materials for a small toy plane provided to us into the map.

shown above is the FBX import menu where we made sure to tick and untick various boxes in the menus, including combining meshes. after importing the plane we began to give it proper collision boxes so it would function better as a physics object, shown below.

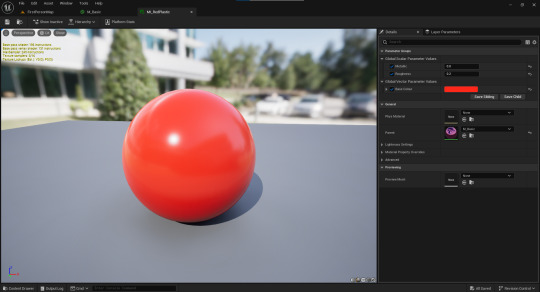
once done, the plane was much more accurate in how it could be manipulated around the environment. After this, we had a crack at making our own material for ourselves using the material editor.
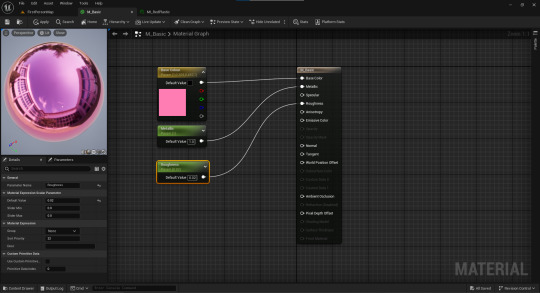
this was a matter of creating input slider nodes we could then snap on to the correct inputs and adjust, and once saved, we could use it for whatever we wished. if we turned these variables into parameters we could then create a seperate material instance which could then also benefit from those settings.
0 notes
Text
continued work on the map, foliage
after making some adjustments to the directional sunlight using a new keyboard shortcut, I continued work on the shrine built with Paragon assets, mainly focusing on the foliage system which can be used for placing or scattering groups of objects like grass or plants or rocks. I also experimented with the fire sprite.
0 notes
Text
First day File management and learning Unreal
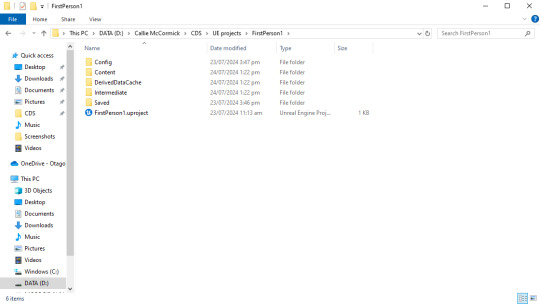
spent the first half of day one making folders and files within each other to save and log projects, images and other important data like project assets on the computer's D drive, adding the CDS folder to quick access. Shown above is the file for the Unreal engine project we started, with the bottom link allowing direct access to the project.

shown here is a project based on the first person template Unreal Engine provides, in which we were tasked to make a small shrine using free assets in a pack from a game called Paragon. this utilised various skills such as the move, rotate and scale tools, the player collision system. and the basics of the unreal marketplace.
1 note
·
View note