
Don't wanna be here? Send us removal request.
Statistics
We looked inside some of the posts by callumreyesfutureworksyear3 and here's what we found interesting.
Average Info
Notes Per Post
1
Likes Per Post
1
Reblog Per Post
0
Reply Per Post
0
Time Between Posts
10 hours
Number of Posts By Type
Text
17
Last Seen Tumblr Blogs


Fun Fact
After the announcement of the deal with Yahoo!, there were 170K signatures of unhappy Tumblr users petitioning to prevent the sale in 2013.
Text
Project Finished
My Honours project is now complete and I have created a trailer for the scene. The trailer features music taken from this youtube video:
https://www.youtube.com/watch?v=RScZrvTebeA
0 notes
Text
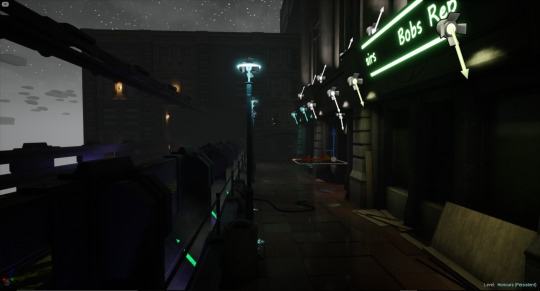
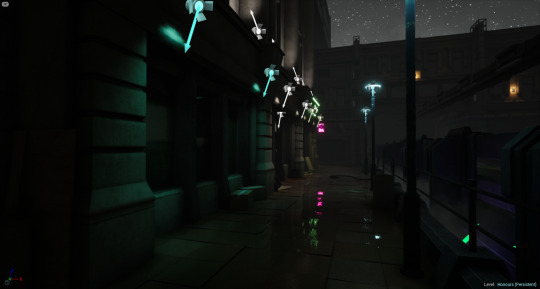
Final Lighting Pass and Scene Polish
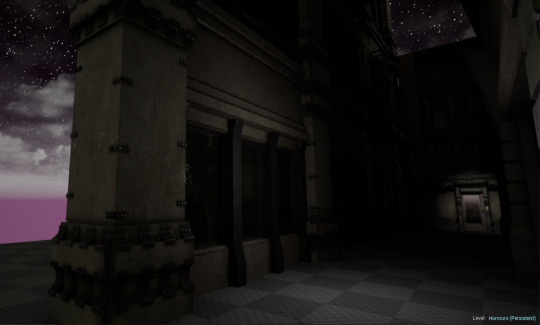
I have spent this week within unreal working on lighting and effects for the scene. I have finished the placement of all the assets in the scene also.
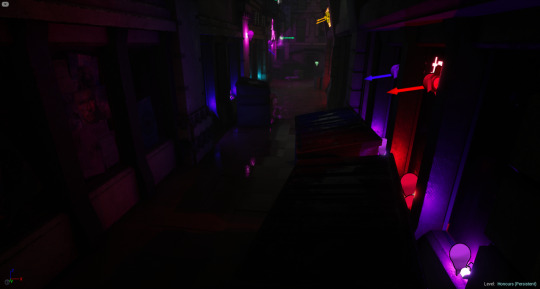
Where any neon signs are located I have been placing spot lights to simulate their casting of light. I have also placed point lights in locations where I have my small light asset. I have been placing these small lights on the sides of buildings and around some windows. I think they look visually interesting and I think the lighting looks very nice.
The steam along the side of the track is the base steam particle effect from unreal.

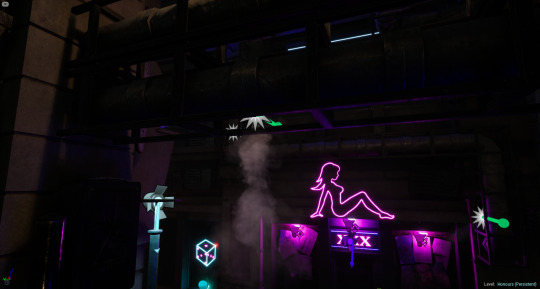
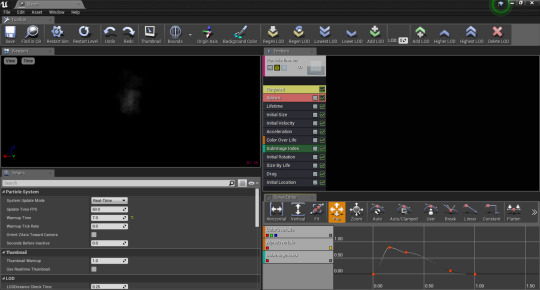
This is the steam particle effect I created after editing the base steam particle from unreal. I made it so that it looked like the steam was emerging out of a weak point in the pipes.
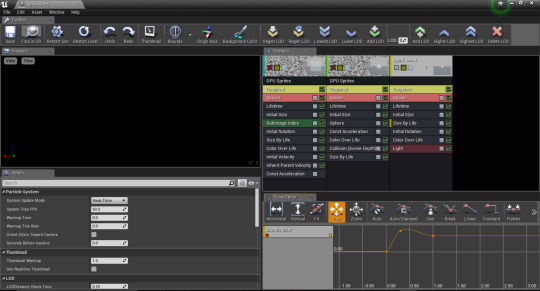
I also edited the base sparks particle effect to produce an effect that makes one of the electrical boxes look broken. There are two different particle effect I edited to make a more randomised spark effect.
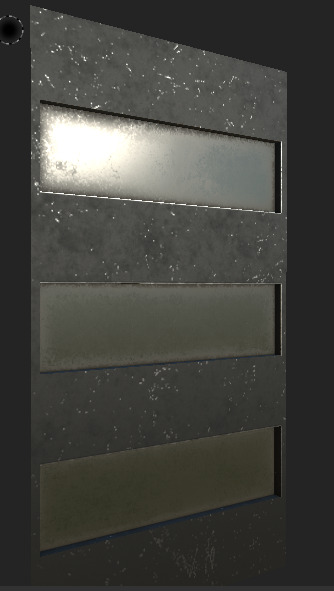
Initially my scene had a dry floor but after feedback a lot of people said that the floor would look good wet as it would reflect some of the neon signs. I managed to get vertex painted puddles working however I wasn’t pleased with the way they turned out completely. I found it strange how some parts of the floor would be completely dry and other parts puddles. I therefore decided to make the entire floor somewhat wet. Although I am not completely happy with the way it looks I do like the reflectivity and I also prefer it over the puddles by themselves. Note that the entirely wet floor still features puddles in places.
No wetness
Puddles Only
Wet Floor
I have now called an end to production on my scene. There are still changes I want to make and things I want to add for my degree show. For now however my scene is complete. I feel I have done a good job with the lighting within the scene. Overall my scene is something I am proud of and look forward to getting back to work on it.
1 note
·
View note
Text
Final Assets
I decided today I would make the final assets for the scene before I begin my final lighting pass and scene polish. These assets include some buildings for use in the distance and some posters to be used around the scene.
The poster were made from planes that I crinkled and warped.
It is in substance painter where these assets get their main aesthetic.
These assets took a while to texture. I used posters from Blade Runner and Blade Runner 2049
https://posterspy.com/posters/blade-runner-2049-5/
https://www.bing.com/images/search?view=detailV2&ccid=T8lBZ1b4&id=49819A4BA02D0C59701D71A20A31362017842939&thid=OIP.T8lBZ1b4U55k85gzyPMidAHaDt&mediaurl=http%3a%2f%2fwww.theterminatorfans.com%2fwp-content%2fuploads%2f2016%2f12%2fBlade-Runner.jpg&exph=1000&expw=2000&q=deckard+poster&simid=608018353138894030&selectedIndex=11&ajaxhist=0
I tried to make the posters look very warm and fading. Aside from the Blade Runner posters I tried to make poster fitting to the scene. I wanted them to hint at bars/ drug venues. One poster was a wanted poster mentioning a character from Blade Runner.I felt this was an interesting little Easter egg for people to possibly notice.
These are the buildings I created to be used in the distance. They are quite simple and also to a very large scale compared to the other assets in the scene. I plan on texturing inside of substance painter.
This is what the assets post texturing look like within the scene. I would like to have made more but I feel that I need to spend time with lighting and effects within the scene instead.
0 notes
Text
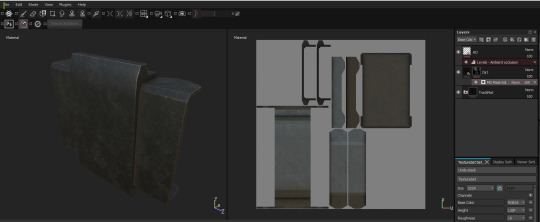
Final Structural Assets
I wanted a few more structural assets to make the buildings less repetitive in the scene. These assets would conform to the sizes of the the original windows and separator pieces that I made at the start of the project. To help make these assets different I want them to be more metal based rather than stone.
These are the assets I came up with. Visually they are quite different from the other stone based assets. The separator piece took the longest to produce and UV map. I am happy with all the assets however and they all have the same modularity as the other structural assets.
The separator piece is the only piece I plan on having any stone present. I used the same materials as the original shop window for texture continuity. I added patches of low roughness to the stone to have some shine in places and as always I added some edge damage and dirt to the asset.
The walls and windows feature no stone whatsoever. I used the same techniques on these assets as I have in the past on other similar assets. The windows themselves are to be used on the different walls rather than texture the windows as part of the individual walls.
Also I decided to create some models for the tops of the buildings as they looked out of place and unrealistic. Within substance I used my stone material which I then added some patches of low roughness and edge wear. These assets were reasonably fast to do but make the scene look a lot more realistic.
This is a car I modelled as I wanted some flying cars in the scene. One of which I plan on having fly over the scene casting light down. I didn’t want to spend too long on this and as such it isn’t a greatly detailed vehicle. It serves its purpose fine however.
Post edit*
Today Maksym helped me create some blueprints for the flying cars and I have now got these in my scene which is good news.
0 notes
Text
Metal Signs
Today I made some metal signs for the scene. After looking at Blade Runner and cyberpunk scenes I wanted more assets to decorate my scene and settled on some metal signs.
The models are very simple as most of the visuals will come from the textures.

I tried to make the signs look a little rusted and as though they have been in the environment for a decent amount of time. I did this by having the colours of the signs look warn and eroded off especially towards the edges.
Also I made the decision to have different things on both sides of the signs. I did this as it would reduce the amount of textures used whilst also getting the most out of each sign.
0 notes
Text
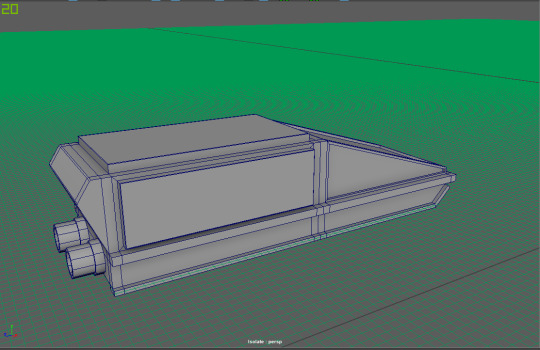
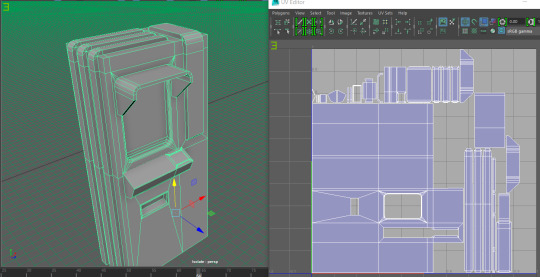
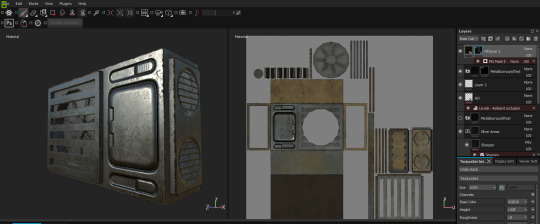
ATM Machine
Today I have been working on an ATM machine for the scene. I took inspiration from real-life examples and added my own spin to the design to try make it fit the scene better.
This is the final product I ended up with. Overall I am happy with the design and I think it wouldn’t look out of place within the Blade Runner universe. Some parts of the model gave me some issues such as the cover above the screen. I made a mistake initially so it took longer than it should have to get the shape that I was after.
As if often the case for me, the tools, bevel, edge loop and extrude were used frequently on this asset.
I tried to to give the model good topology and I think I did a decent job. I maintained some vertex locations in case I want to do any vertex painting later down the line.
The unwrap wasn’t too complicated but it did take some time to get all components unwrapped the way I wanted.
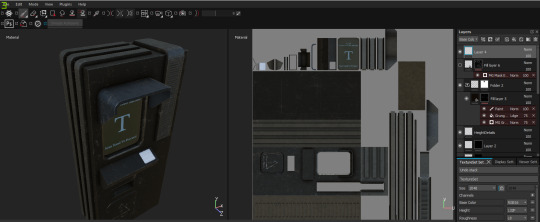
I just finished the texturing within substance painter. I used some areas of emissive in places such as the text on the screen and also the hand scanner. The rest of the asset compromised of metal for the body of the ATM and glass for the screen. I made certain components of the asset different colours to visually communicate the different parts of the machine.
Like my other assets I have added some edge wear and dirt to the model to make it match the rest of the scene. I also added some details via normal maps.
0 notes
Text
Street Props
I was looking around my scene today and I felt that it was lacking props for the streets. The scene wasn’t looking very lived in so I decided to start producing some props to be placed around the scene.
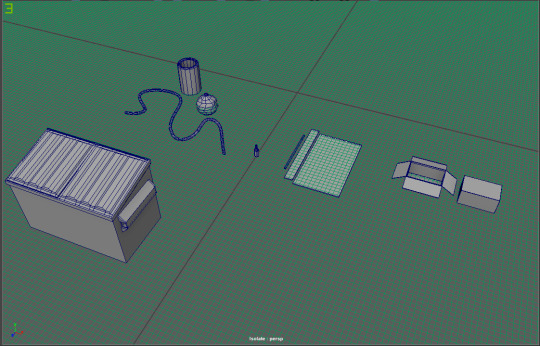
I made some assets such as; bins, cardboard boxes, wooden planks, bin bags, bottles and loose pipes.
Additionally I made an air conditioning unit to be placed on the side of buildings and by windows. This asset I felt would help break up the buildings and it is also an asset that is featured heavily in cyberpunk type environments. Most of the details I added within substance painter with the use of normals.
Most of the assets were simple to model with the large bin the only asset that took a while to model and unwrap. This time last year the pipe would have taken a long time for me to do but with my learning of new techniques I created it rather quick.
finished bin bag within substance painter.
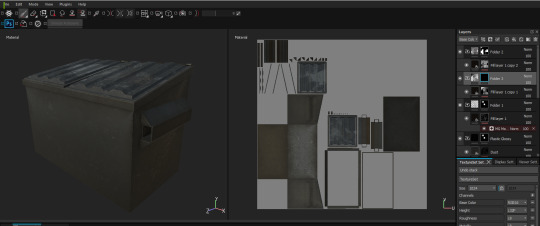
Final Large bin inside substance painter.
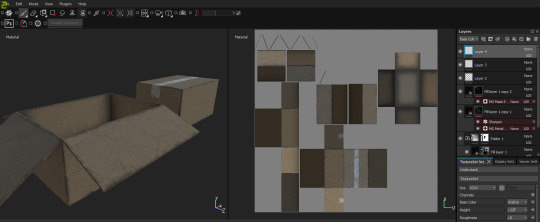
Finished cardboard boxes within substance painter. I think this asset turned out really well. With manipulation of some base substance painter materials I managed to recreate a cardboard resembling material, which I was quite pleased with.
Scene shot with new props in.
After putting the props inside the scene I decided I would do one last thing today and create a street light asset.
The design for this light was that the light would be cast straight down without any light pointing upwards. I felt it worked in terms of matching a Blade Runner aesthetic. Cylindrical mapping was the way to go for the unwrap and it came out quite nice.
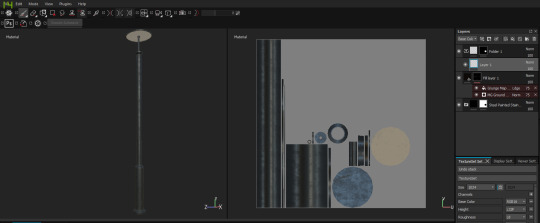
I made the actual Light source of the light a grey emissive. This will allow me to change the colour of the emissive to anything I want inside of unreal. The light is metal and I have added some dirt/grime to it to make it more fitting to the scene.

Capture from unreal featuring newly imported assets like the street light, bins and air-con units.
0 notes
Text
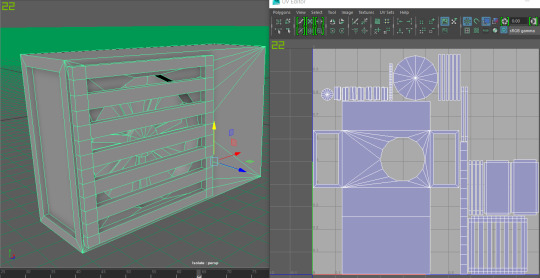
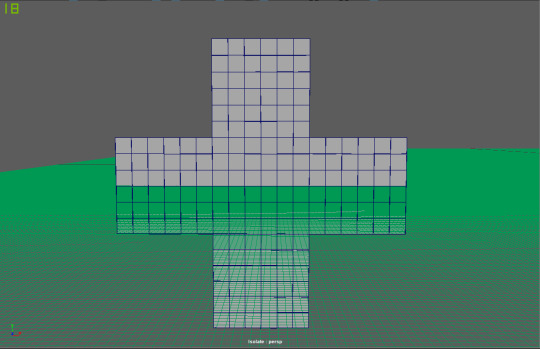
The Floor
The lack of a proper floor has been bothering me for a while so I have decided to create that asset today.
I wanted a tiled floor as I liked the ability I would have some of the tiles raised or sunken. I also felt that the tile design in my head would suit the scene quite well.
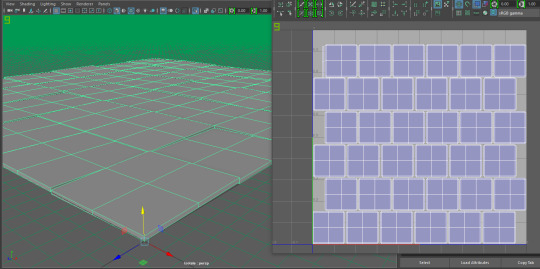
This is what the end product for the model looks like. I started off with a single square tile which I duplicated to form a larger square. I then altered the height of these tiles to make the floor look more interesting but also more believable in my somewhat run-down scene.
Foolishly I didn’t unwrap the first tile so I had to go back and unwrap each tile individually. The unwrap was simple but it took a while because there were so many to do.
For texturing I put 4 of these finished models together so that I could see if the texture was seamless within substance painter.
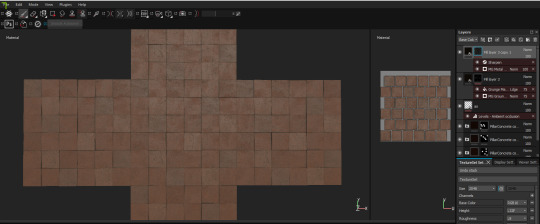
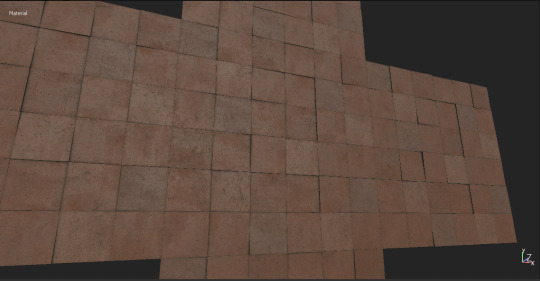
I used my stone smart material as a starting point and changed the initial colour to make a more red/orange/brown tile aesthetic. I also added different colours to a few select tiles to break the texture up. I added dirt based off the ambient occlusion map for the asset, making the gaps between tiles to feature more dirt. I also added varying roughness masks to break the texture up even more. Seeing multiple instances of the model was very useful for this texturing process.
0 notes
Text
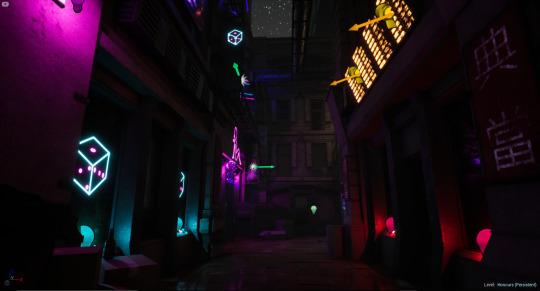
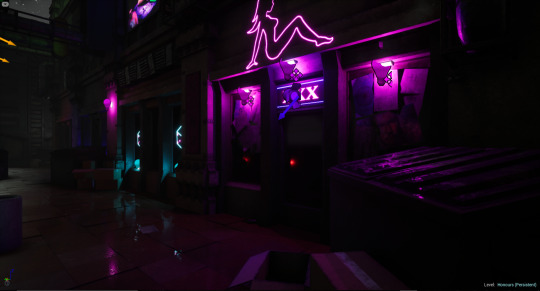
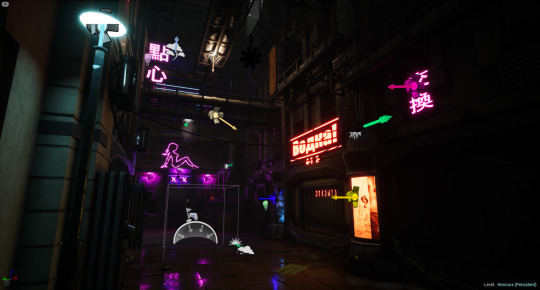
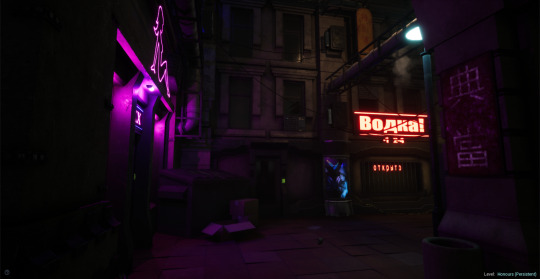
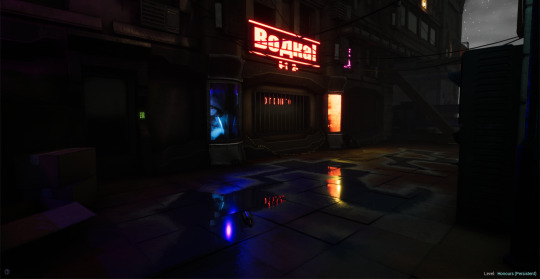
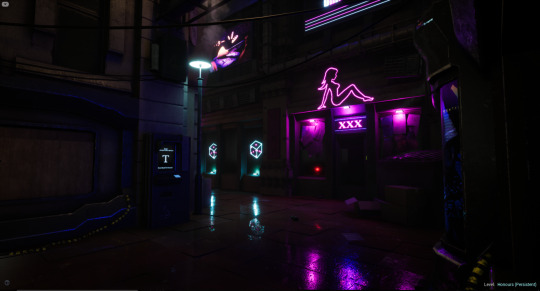
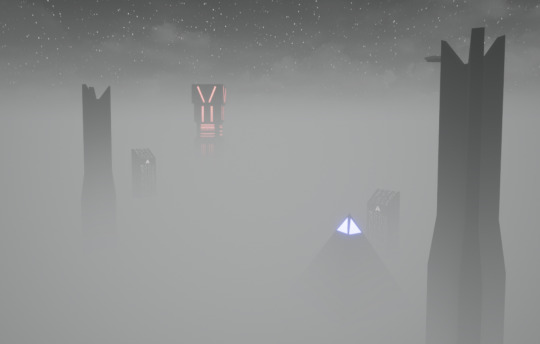
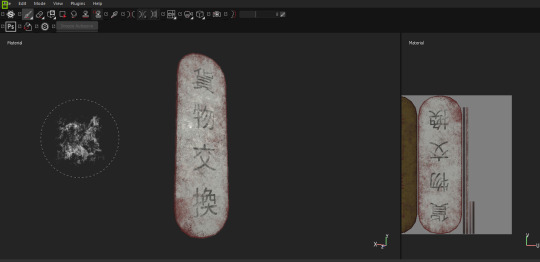
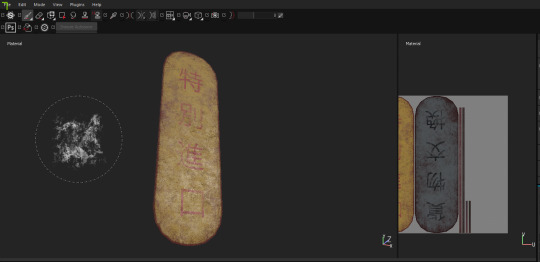
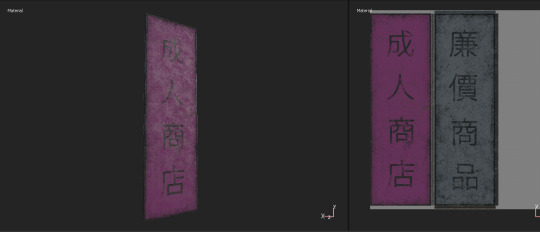
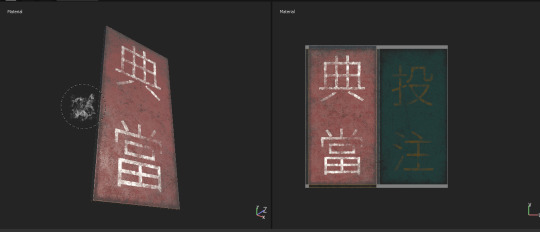
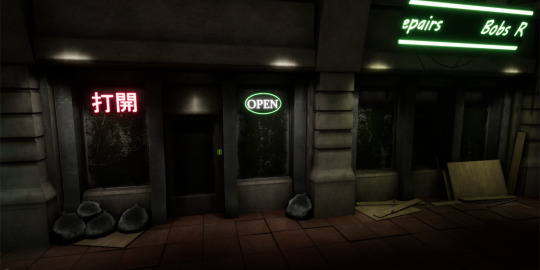
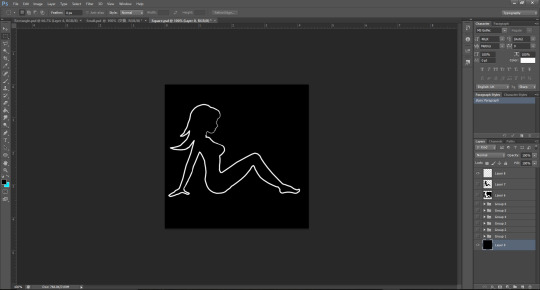
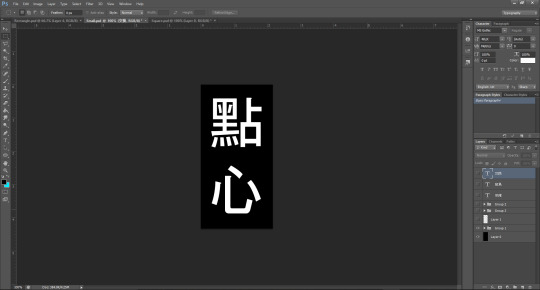
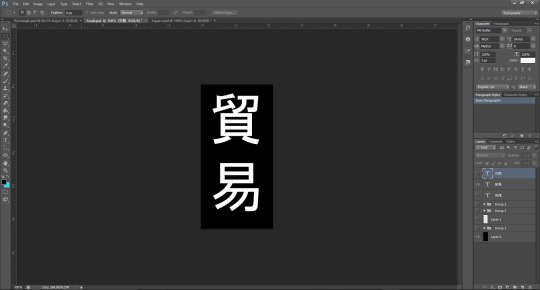
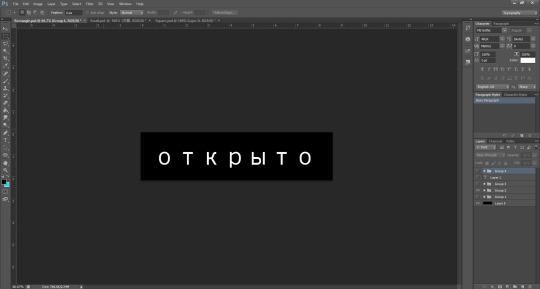
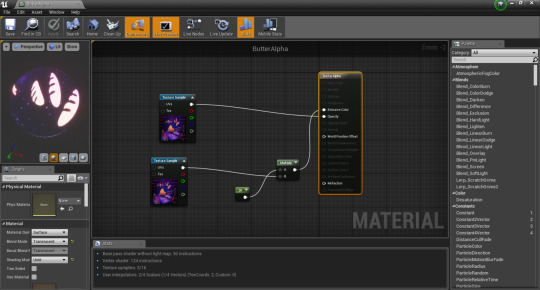
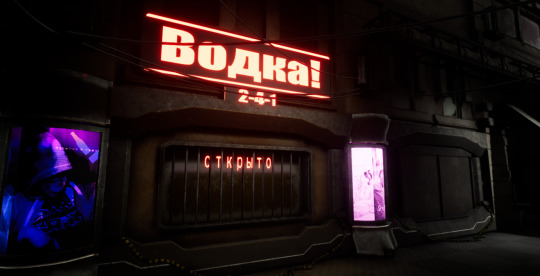
Neon Signs
This week I wanted to work on some neon signs for the scene. I have got a good portion of 3d assets into the scene but I think the scene is lacking the neon signs I want in the scene. I went into photoshop and began to create some alphas that I could use in the scene via an emissive material.
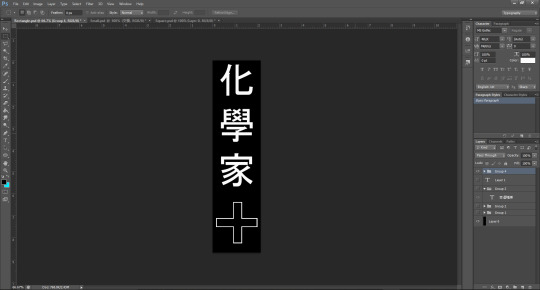
Here are some I made. I wanted a mix of languages to suggest a mix community like the ones present in Blade Runner.
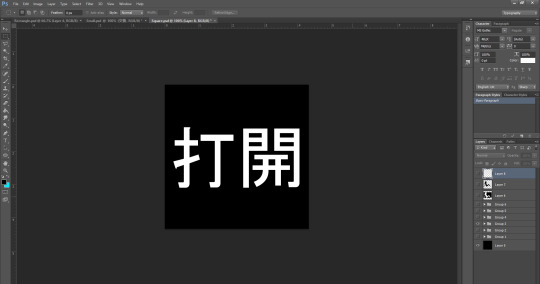
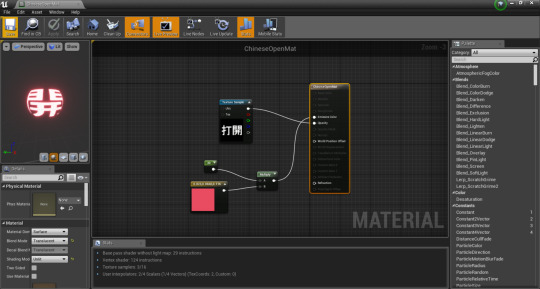
Open sign in Chinese

Vodka in Russian for a bar
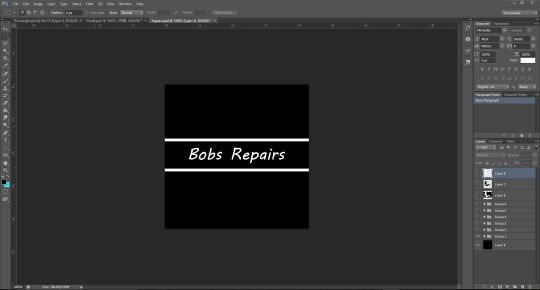
Sign for a repair shop
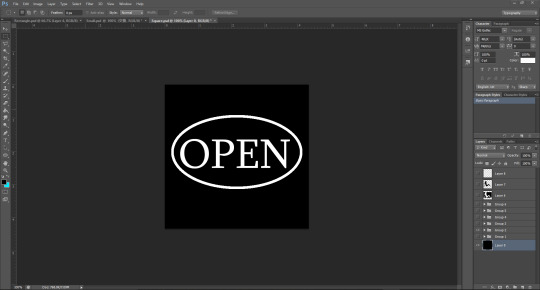
Open sign
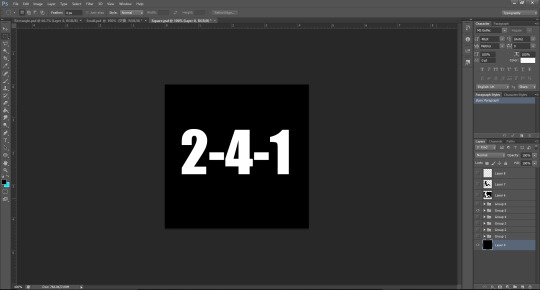
2-4-1 sign for the bar
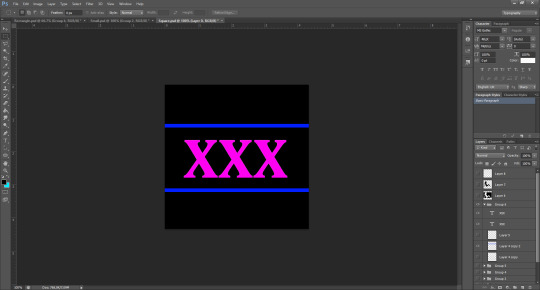
Sign for a XXX club

Dice Sign for casino


Electronics sign
Open sign in Russian

Chemist sign in Chinese
Chinese betting sign
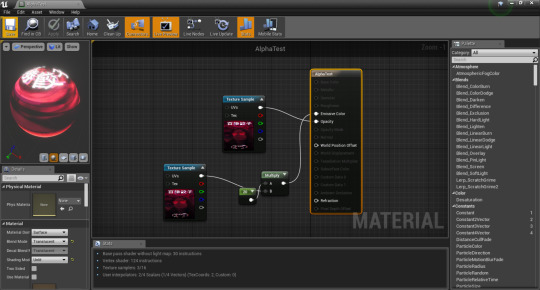
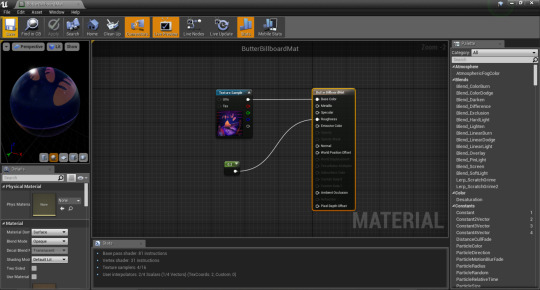
Hooking up these alphas in unreal was quite simple. I used colour node to determine the colours of the signs and a constant and multiply node to determine the strength of the emissive.
Whilst most of the materials shared this same method some needed extra input. For example I wanted some of the signs to turn on and off and also some signs to scroll from one side to another.
For the scrolling signs I had to hook a panner node which would have the alpha move on a loop in whichever direction I desired.
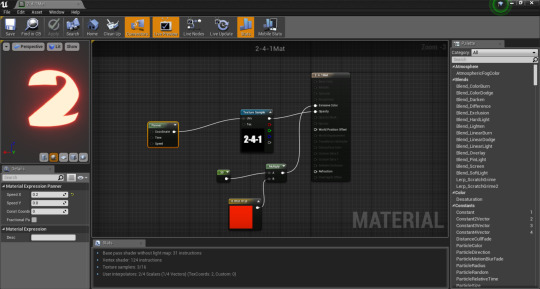
The signs the go on and off are a bit more complex but are still quite simple. I used a time node along with sine, add, divide, cheap contrast, etc. The time for the sign being on and off is changeable within these nodes.
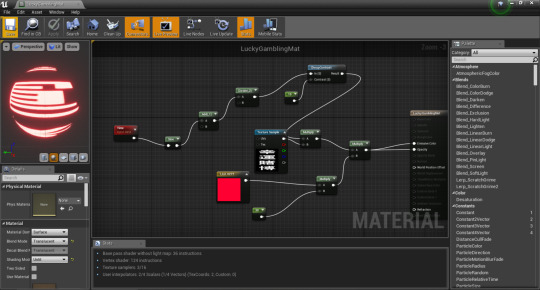
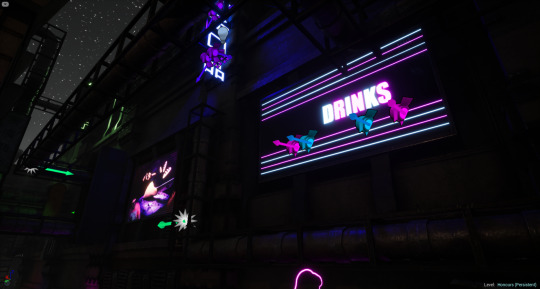
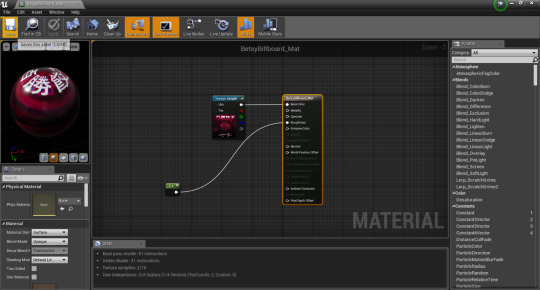
I also worked on some signs created by Betsy Jones for my level.
Emissive for Betsy sign 1
Shine for Betsy sign 1
Emissive for Betsy sign 2. I am using the base images from Betsy as the opacity mask.
Shine mat for Betsy sign 2
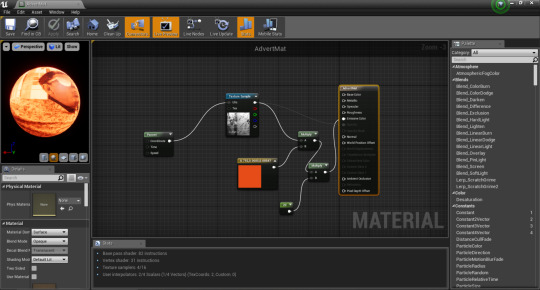
Betsy sign 3 with emissive. This material I am using on one of the advert machines and therefore I gave it a panner.
I did the same with the final sign from Betsy.
I made One more sign for the scene to go above the XXX club.
Emissive material for drinks sign.

Shine material for drinks sign.
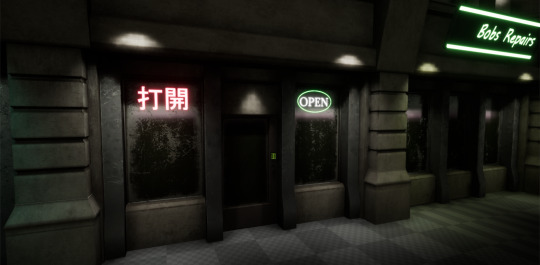
Examples of some of the signs inside unreal.
0 notes
Text
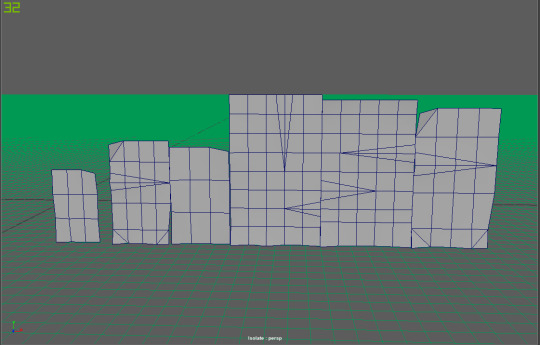
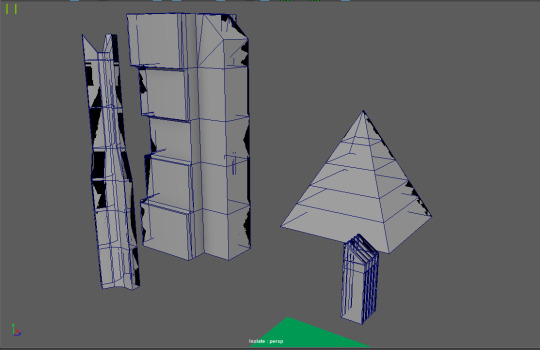
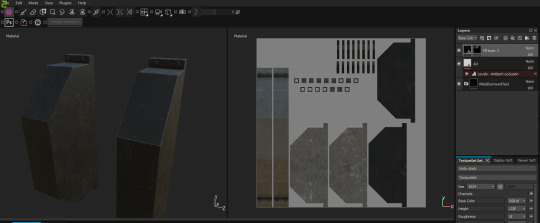
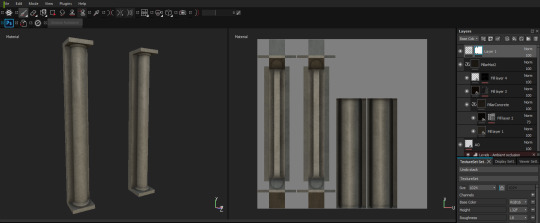
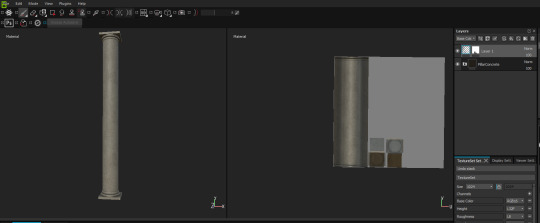
New Structural Assets
Today I began modelling some new structural assets to add some variety to the buildings in the scene.
The first thing I modelled was a door version of the initial shop window asset I made near the start of the project. I decided that I would just reuse the door I had already made for a different asset. I made sure that this asset matched the design of its accompanying shop windows.

I feel like I maintained the aesthetic design quite well. Making sure the topology was good took a decent amount of time. The model featured quite heavy use of the bevel tool which caused a few instances of bad topology that I spotted of which I tried to improve. These same areas of beveling were the only parts of the mesh that became tricky when I was unwrapping it. The issue was with seam placement. After some trial and error I am happy with the end result of both the model and UV map.
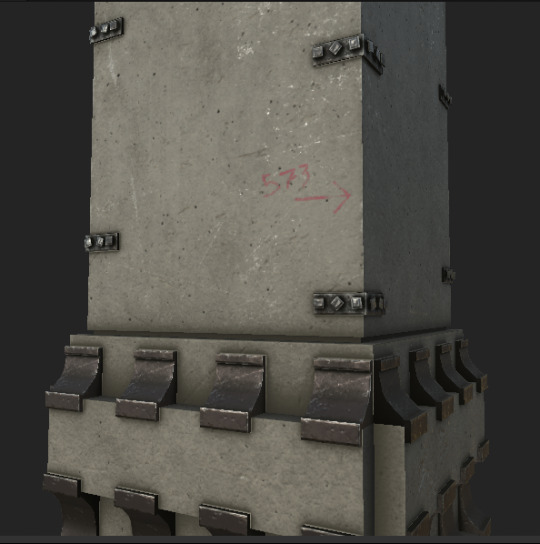
I have moved onto building a pillar for a new building in the level. I want this model to look structurally strong. It is also important that it can be used modularly. I have used the vertical windows I made the other week as a basis for this.
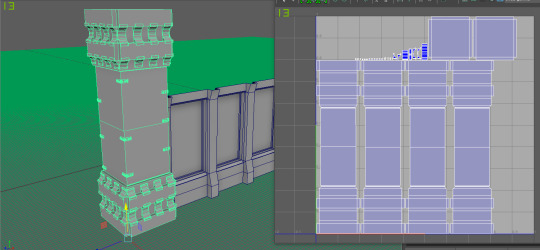
This is what I eventually came up with. I duplicated certain features of the model to save some time. However I unwrapped these duplicated components before they were duplicated. I did this as I wanted to save space on the UV map, I didn’t want each individual component to have its own unique space on the map so I stacked the shells on the UV map. Hopefully this will be the correct decision on my end.
The model was influenced by the work of Josh Van Zuylen and his cyberrunner scene.
After I finished this model I created an asset to accompany it for modular purposes. This model is to be used above and below the window models. The model is quite simple but effective.
I will texture the assets later.
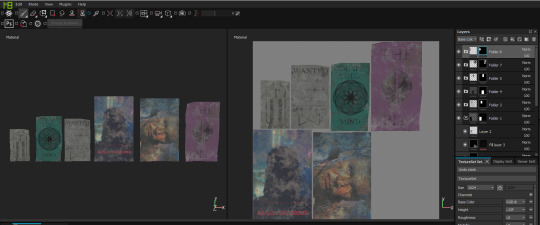
I have now taken the pillar into substance painter and have been texturing it. I have used two of the smart materials I created at the start of production as a base. I have tried to make each side of the pillar unique to add more depth in terms of modularity.
I really enjoyed texturing this asset and I think it has come out well.
I almost forgot but l luckily remembered and went back and textured the doorway asset I made.
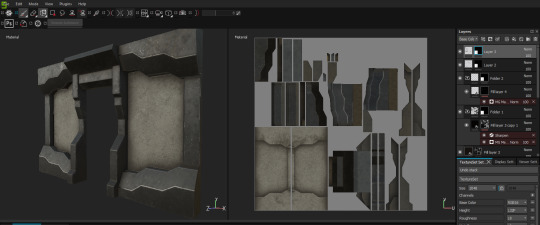
The smart materials I have made really have been extremely useful. Although its been a while since texturing the original shop window, the smart materials have let me maintain texture consistency. I tried to use the same methods I used on the original asset (along with new techniques/methods I have learnt along the way) to reproduce a similar aesthetic.
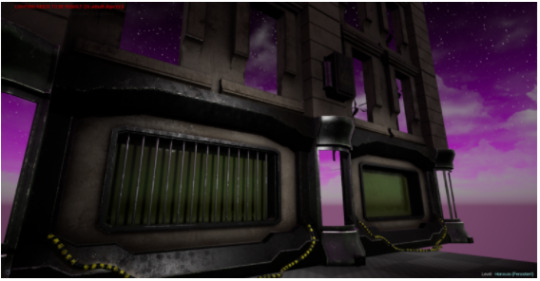
I have imported and hooked up the textures for the assets and I am happy with the way they have turned out. Although this Image does highlight to me that I need to get working on the lighting within the scene.
0 notes
Text
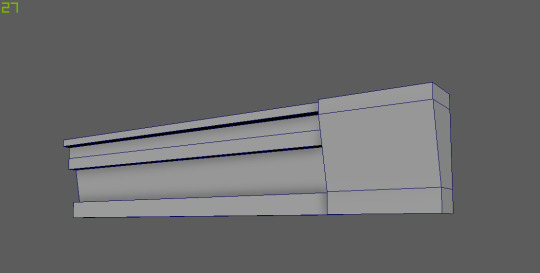
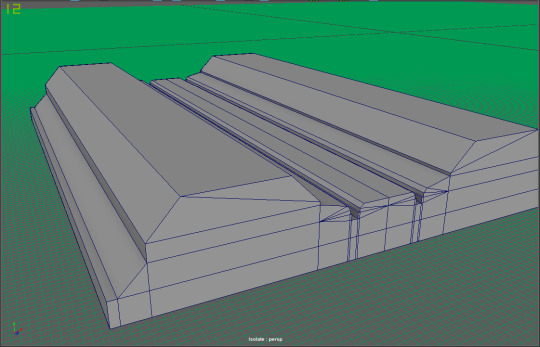
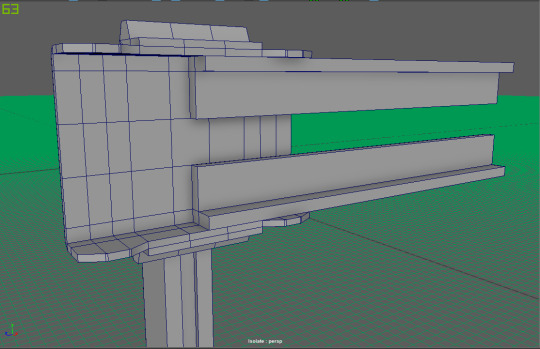
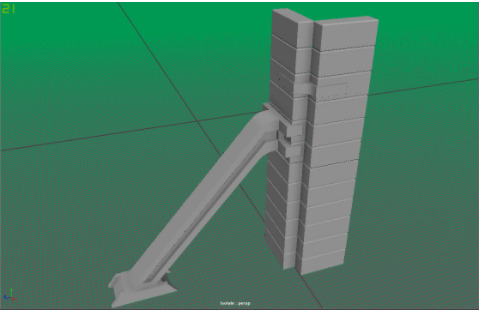
The Train Track
I didn’t achieve much in terms of progress last week as I was trying to create the train track for the scene but I couldn’t decide on how it should look. This weeek however I have come up with a design I am happy with, one which I feel matches the scene.
The track itself is designed to look strong and that it can take a good amount of weight. The track asset itself is quite simple but I plan on adding more visually interesting things via texturing.
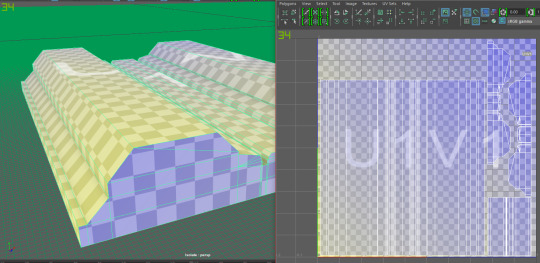
Now that the base track has been created I have been modelling the other components of the train track.
These assets are for the side tracks that my train track features. To me this added more of a sci-fi aesthetic to the train track as a whole. I tried to make the construction look realistic/functional. Also I have made these components modular so I can make the train track as long as I need it.
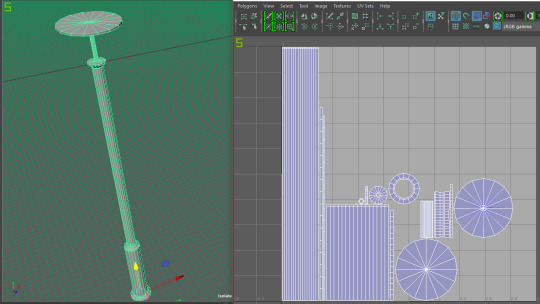
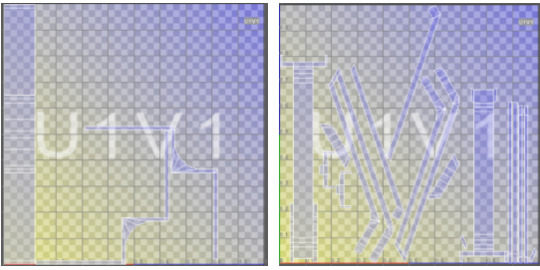
I have just finished the unwrapping of these assets and they were quite easy to do. My normal technique of automatic mapping and then cutting where needed then moving and sewing where needed worked fine. I also unfolded the UV shells where that was necessary.

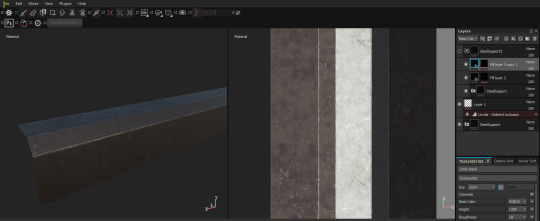
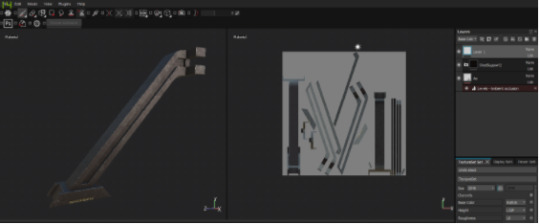
After all the components were unwrapped I started taking them into substance painter. The main track was the first asset I textured today.
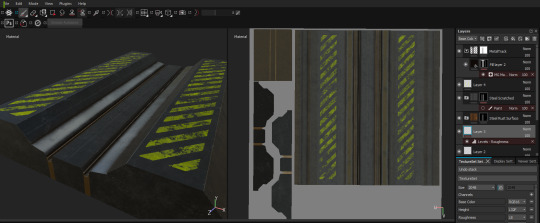
The yellow hazard lines on the model I produced via the use of stencils. I then removed areas with grunge alphas to make it look like the paint has been wearing away. I also made parts of the model chrome-like. I added subtle scratches along the inner sides of the track to insinuate that the trains had been in contact with the track.
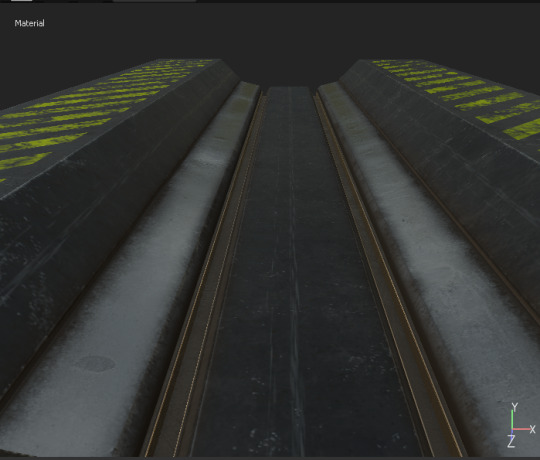
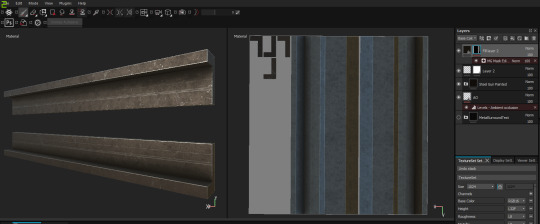

I have imported the train track assets into unreal and hooked up their textures. I am happy with the way these assets have turned out.
0 notes
Text
Back to Modelling
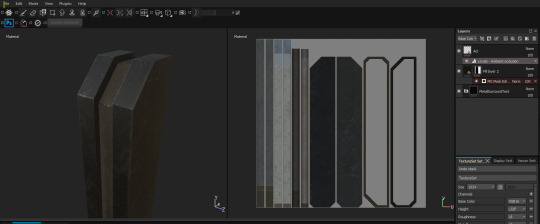
Today I started modelling some modular pipes for the scene. I wanted to work on some assets that made the scene feel more like a Blade runner style environment. I wanted the pipes to be modular as I wanted them to feature quite heavily within the scene so it was important that they could be used in varying ways. The model was a little tricky to do but I managed to get it working properly as a modular asset after some changes.
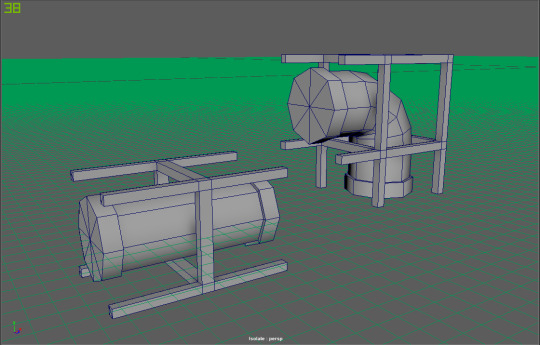
To get the curve in the pipe I had to use the bend tool. During the modelling process I had to make sure that both models functioned correctly with each other in terms of modularity.
The unwrapping process took quite a while for me to do. This may be down to my techniques but the pipe supports required a lot of cutting and moving and sewing.
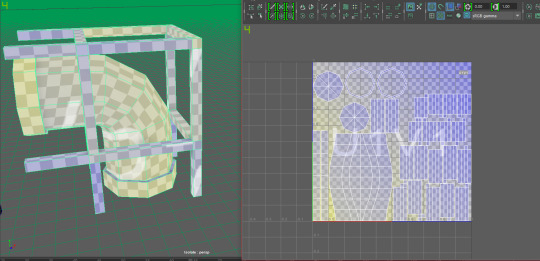
I have now moved onto texturing the assets. I have used the iron material with substance painter as a basis for these assets as I felt it really reflected what I was going for in my head for the textures.
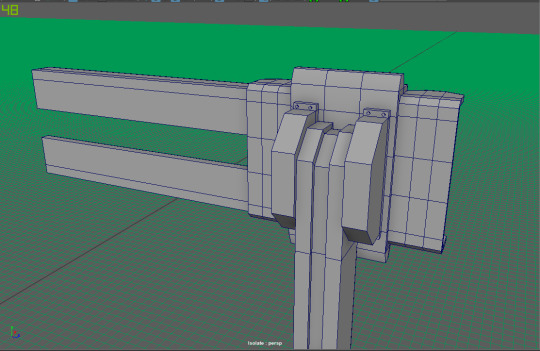
Today I also made the handrail for the scene. This is to go along the side of the walkway next to the planned train track. I wanted to get this asset done as I needed it to communicate definitively where the walk-able space cuts off.
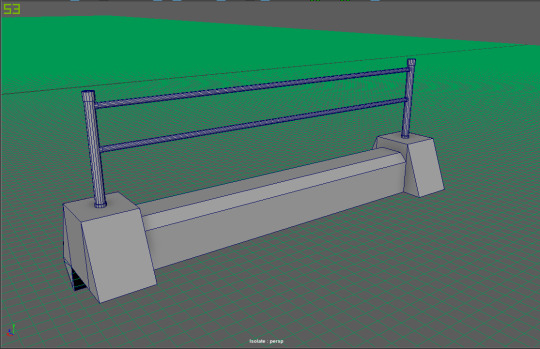
The hand rails components are separate and modular so I can make the rail as long as I want. Although the design is pretty simple I feel it matches my environment well aesthetically. Bevel and extrude were the main tools I used creating this assets
The unwrapping process was rather simple and didn’t take too much time. I used cylindrical mapping for the cylindrical parts of the models and automatic with move and sew and unfold for the other parts.
I used the the brown-tinted metal smart material that I had created for the steel supports earlier in the project. I felt this was a good choice as it communicates a stronger construction focused material, to me at least. I repeated the texturing process for the other parts of the hand rail.
0 notes
Text
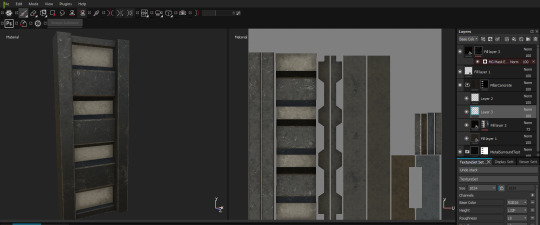
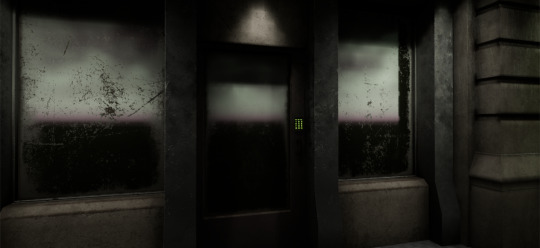
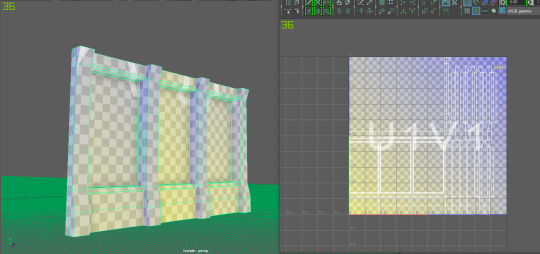
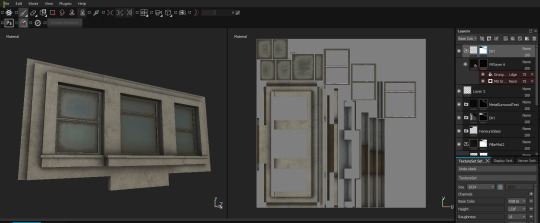
Texturing Shop Door and Windows
Today I textured the new shop windows and doors. I was happy with the UV sets so I took the assets into substance painter. I used the smart materials I had created earlier in the project as a base again. I tried a new design/technique for the windows where I added more dirt and scratches to them as I wanted a bit more of a worn/non-maintained feel.
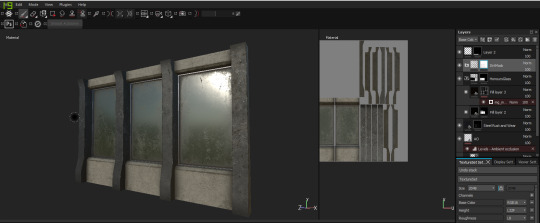
I added edge wear to the model and patches of dirt to communicate this aged feel. I used a mixture of techniques to achieve the final product, fill layers with masks and alphas and grunges for example. I am happy with the way the assets have turned out.

I am also happy with the way I have maintained continuity in textures between the two seperate models. As I have mentioned continuity is important for the scene to be believable.
The door model was quite simple to do. I was really in a flow after the previous two models and used the same techniques I had used on them to produce the door. I included some subtle details like a faint hand print on the glass to suggest use by people.
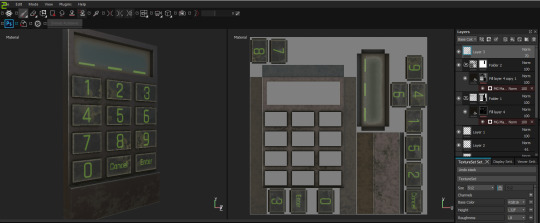
The keypad was fun to do. I again used similar techniques as the previous models but added a few more details. The numbers and letters were created in a green emmisive channel which will allow me to make them glow inside unreal. I could have made the keys painted but I liked the idea of light emitting from the key pad.
With all the assets textured I can now put them into engine or move on to modelling some more assets first.
I decided to go ahead and put the models into unreal. I am very happy with the way these assets have turned out and I am planning to use them more than I currently have in my scene.
0 notes
Text
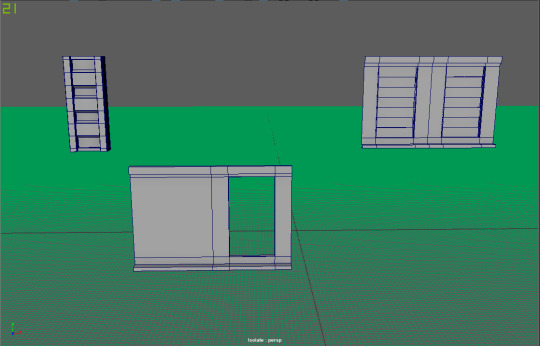
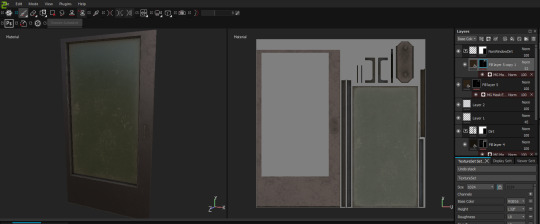
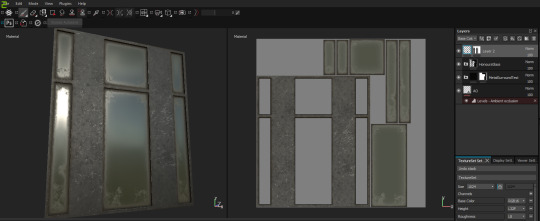
Shop Door and Windows
I didn’t create the shop doors and windows for the new ornate building last week so I have been doing so today. Again I wanted to maintain a similar style to the other assets within my scene. I wanted a mix of stone and metal, like my other shop window, but in a different style.
For this model I decided to make the window asset and door asset more vertical rather than horizontal, as was the case with the other shop window I made. I felt this would add some subtle variation.
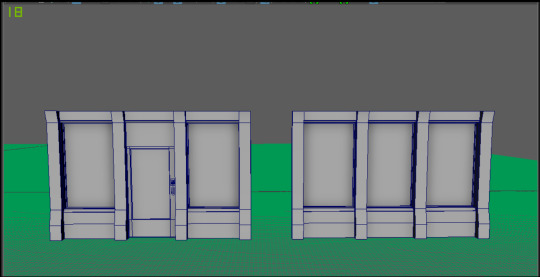
These are the two assets I generated. I created the windows (right) first and then edited the model to make the doorway asset (left). The segments along the sides of the windows are planned to be metal and the other components, aside from the windows, will be stone/concrete.
I also made the door the doorway along with a handle and keypad to go with it. As with my other models the creation of the assets involved the use of edge loop, extrude and vertex/edge manipulation. Whilst creating the models I made them within the constraints of the ornate building.
This is the UV map I have created for the window asset. Again I have used the same techniques as I have uitilised to generate my other UV maps (automatic, cut, move and sew, etc.).
0 notes
Text
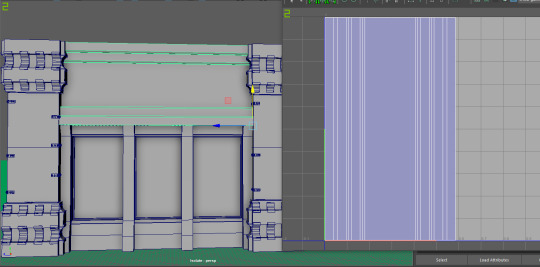
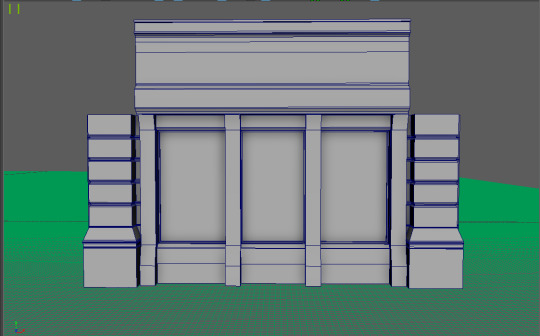
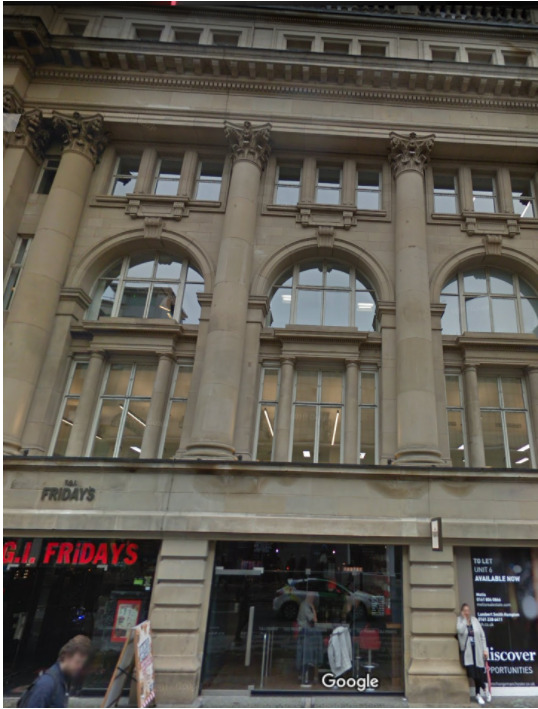
Ornate Building
I haven’t been that productive this last week as I have been debating what aspect of the scene to do next. I decided that I wanted the front of the scene to have something similiar to the neoclassical buildings found in manchester. Components such as large pillars and other impressive stone work has always caught my eye and it is also something that is used within Blade runner to an extent (repurposing of old buildings).
I have used google maps to get an image of the type of building i’d like my asset to vaguely resemble.
This model took quite a lot of concentration to model correctly whilst also maintaining the ability to be used modularly in the scene somewhere else. Due to this I haven’t recorded the individual production of each component as I have been going. However this is how the model turned out in the end.
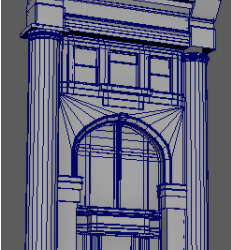
I only created this part of the building as I don’t plan on the building being too wide in the scene. I will be able to have multiple instances of these models next to each other with the pillars being the seperators. This building as a whole is a lot larger than the other assets I have created for the scene and as such I decided not to put the models into one single model. This maybe be a bad way of doing it however I want to be able to have specific details in the texture which i may find difficult if they all shared one UV map or one tiling texture.
I left the bottom open for a shop front/windows. The windows took the longest amount of time to produce and involved the use of edge loop, extrude and quite a lot of vertex manipulation. The other components were easier to produce and involved mainly edge loop and extrude again, with vertex manipulation but in a more limited manner.
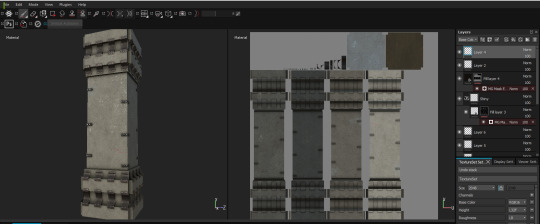
After modelling the “ornate” building last week I have been texturing the models today. Since its based on a neo-classical building the majority of the building comprises of the stone/concrete smart material I generated on my first object. My decision to stick to certain materials and creating smart materials of these, is proving to be very useful.

The continuity of my textures and my limitation to a select few materials is really helping the scene look connected. There isn’t a disjointing mix and match of materials that could easily lead to the scene looking a little off. For example the fact that the stone work on both this ornate building and the stone work on my other structural assets share the same stone material, means that the assets appear like they have been created from the same source. This would make sense in my mind. If the actual stone material on these assets varied from model to model it would look disjointed and the scene would come across less believable, at least to me.
I made use of the rain particle effect within substance painter again and used a similar method of a brown colour with quite low roughness it give a subtle look the the model that it had been rained on not too long ago.
I have now put the models into unreal and hooked up their corresponding textures. I am really pleased with the way the building as a whole turned out.

0 notes
Text
Back to Modelling
Now that the first set of assets are textured and inside unreal and I am happy with them, it is time that I get back to making models. Today I made some steel supports that would connect with the seperator pieces. Although these are little details and I still have a small scene inside unreal at the moment, these assets have helped me visualise the scene a bit better. I had to make sure these objects had the correct pivot position so that they would fit properly inside unreal. In terms of production process the main tools used were edge loop and extrude. Also toggling retain component spacing when I want it on or off is very useful and time saving.
The uv maps of the models came out decent. I think a straighter layout for the large steel support would have been better however.
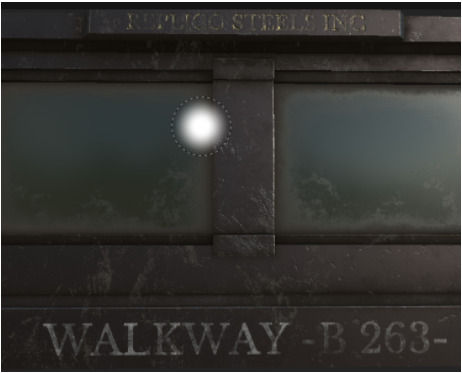
For texturing I used the metal smart material I had created from the shop model and changed the colour around to make it have a brown tint. I used masks to add dirt in cracks and crevasses. I also added a logo with height details and in gold reading “Replico steel inc”. An easter egg to Blade runner.
I went back to maya and modelled a connector bridge for the scene. Today I have been trying to visualise what some of the assets will look like in my scene and how they will match up with each other. Because ideas were clashing in my head I decided to just model the bridge connector with the aesthetic of it being strong and sturdy in mind. I wanted it to be made out of the same brown iron/steel material as the supports were made out of.
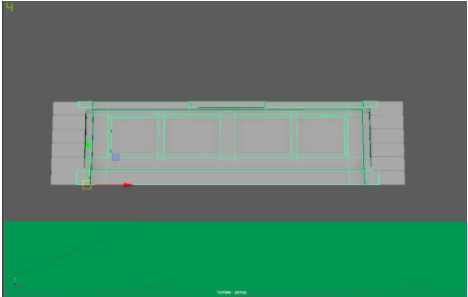
I am happy with my end result as I feel it communicates the aesthetic I was going for, even more so once I have textured it. I feel I was bogging myself down by trying to think too far ahead. I was struggling to see what to do next.
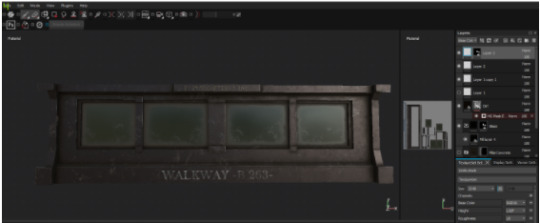
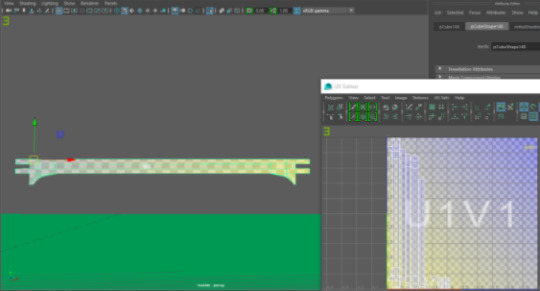
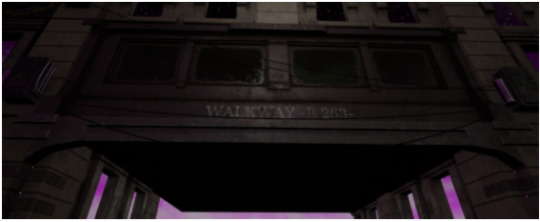
I have just finished the texture for the bridge/walkway. I am really happy with the way it turned out. I feel that it looks very fitting for the scene. I tried to make it look worn and aged along with communicating the vibe of the walkway being strongly built and sturdy. The text I added to the walkway I gave the effect of it being worn by remove parts of it with grunge brushes.
I have imported the walkway into unreal unreal and hooked up the textures like I have done with the previous models. I am happy with the way this model turned out but I feel like I need another model to go underneath to give it that extra believability when it comes to its sturdiness.
I have just finished modelling and texturing a horizontal support to go under the walkway. Like all the other structural models its pivot point is correctly placed to match up with the other models inside unreal. Although the model is quite simple in its function I feel like its addition was important to this aspect of the scene. The assets shares the same brown tinted iron/steel smart material I made.
0 notes
Text
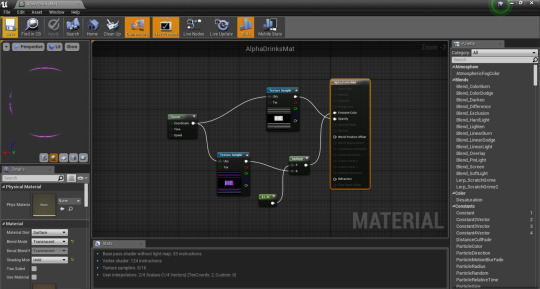
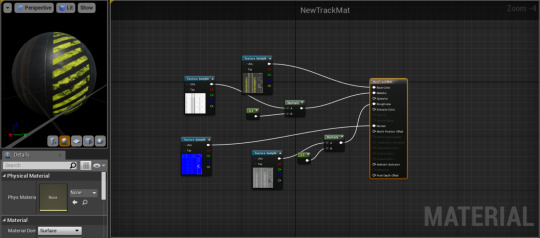
Unreal
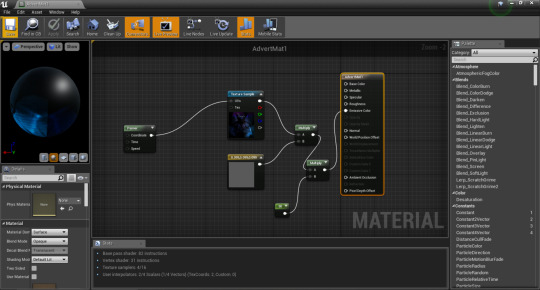
I have been putting my assets into unreal today. I have hooked up the texture for the assets, following the same process for each. I also noticed that I hadn’t textured the advert machine so I went and did that and added that to the scene too. Although its only a few base models in the scene I am happy that the scene is developing and I can see the visual style I am going for seems to be on track to being matched.
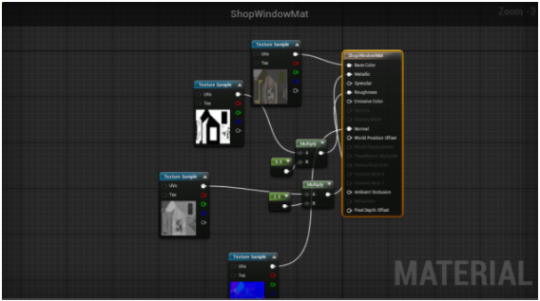
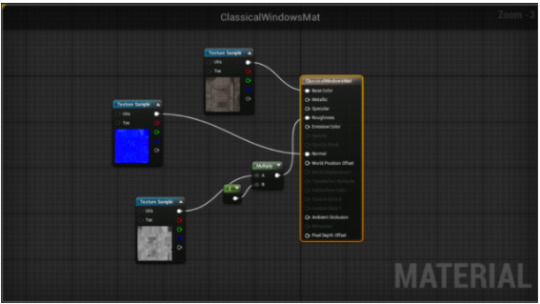
This is the standard material process I am using for my models. The nodes allow me to change the roughness and how metallic an asset is if needed.
0 notes