
chadsawyerphotography
Learn Photography with Chad Sawyer Photography
Are you new to photography or are you ready to take your photography to the next level? Learn Photography with Chad Sawyer Photography will teach you everything from basic photography settings to advanced techniques to capture stunning images. Follow award-winning and internationally published landscape photographer Chad Sawyer as he guides you on your photography journey
5 posts
Don't wanna be here? Send us removal request.
Last Seen Blogs

ctheathy
Your local seductress~♡︎

bfidbjd
sideblog

vb373684356
인천공항주차대행

solarpunk-amandarchy
Welcome to Solarpunk Utopia

jacquelinebeet1-blog
Discover The Auvergne
Text
How I edit With Adobe Lightroom while traveling and shooting Astrophotography
#lightroom#learn photography#landscape photography#adobe lightroom#astrophotography#editing#photoshop#travel photography
1 note
·
View note
Text
A BEGINNER’S GUIDE TO SHOOTING THE NIGHT SKY: Part 2

PLANNING YOUR ASTRO SHOOT
Location
Light pollution is a serious problem that all astrophotographers often have to overcome. You’ll need to be in a dark sky area to be able to capture really detailed images of the night sky, so make sure you head away from urban areas and street lights. There are some really useful websites such as Dark Site Finder and Light Pollution Map that will help you to find a suitable location to shoot. You'll also want to checkout the weather reports and apps like PhotoPills on where to point your camera when you shoot. The best stargazing apps only cost a few dollars, and they're extremely helpful when it comes to selecting your location and knowing the best time to shoot.
Composition
To create a beautiful composition, you’ll want to find a unique and powerful foreground.
Timing. Milky Way season is from March to October in the Northern Hemisphere; during the winter months, the galactic core (i.e. the brightest part of the Milky Way) never rises above the horizon. In addition, it is generally safest to venture out near a new moon to ensure that the moon doesn’t eclipse the brightness of the stars.
Camera settings. A whole treatise can be written about this topic, but again — if you are just getting started, start by focusing on the basics. You have to shoot in manual mode, and use the following settings:
1) The lowest possible F stop (typically 1.4-2.8) but I also use f4 when doing tracking, more on this in the future
2) ISO in the 800-3200 range; a higher ISO will make your image brighter, but also noisier. Most newer cameras have better sensors that don’t allow as much noise in the higher ISO ranges.
3) A very slow shutter speed in the 10-30 second range, or longer while using a star tracker. The shutter speed also is determined by the focal length you are using and aperture, and also what megapixel your camera is. This can get very confusing and who wants to do a bunch of math ??!! Using the PhotoPills app, you can determine how long you can keep the shutter open by putting the required information and presto!

Screenshot of PhotoPills App to determine shutter speed for pin sharp stars.
Photographing the Moon
The Moon is a great starting point for night sky photography because of its brightness. This brightness varies as the Moon goes through its phases. The fuller the Moon is, the less exposure time is needed. And as parts of the Moon pass into shadow, you get more definition on the craters on its surface. All of these differences make for an interesting variety of photographing experiences.
Before photographing the Moon, decide on when and where you want to shoot it. For extra-sharp detail, wait until the Moon is at its highest point in the sky. For location, try to avoid as much ambient light from street lights, and traffic. This may mean going off on a remote road or into a public park after hours, or at the very least turning off as many lights as you can.
For the best Moon photos, use telephoto lenses with at least a 200mm focal length, and zoom in as far as you can. Set the ISO to 100 or lower, and the aperture to f/11 to f/16, depending on your lens. You’ll want to play around with these settings a bit to find which ones work best for your camera.
Photographing the Milky Way
There’s nothing more incredible than seeing the grandeur of the Milky Way from a dark location. The Milky Way is best photographed during a new Moon—or up to one week before or after—as the Moon’s brightness will wash out the Milky Way.
When photographing the night sky, you need to account for the Earth’s rotation. You can only expose your image for a short time before the stars are no longer pinpoints and begin to trail in your image. Since you’re trying to capture as much light from the sky as possible, it’s important to use a wide-angle lens that has a large maximum aperture (f/2.8 or lower). A 14-24mm wide-angle zoom lens ideal to use on a full-frame camera, or a 10-20mm lens on a crop-sensor camera.
To calculate how long your exposure can be before star trails appear, remember to use your PhotoPills app. Also, you can determine how to create amazing star trails using the app.
You’ll need to experiment and adjust your exposure times accordingly. As you become more familiar with photographing the night sky, you won’t even need to reference it.
Switch your wide-angle lens to manual focus and focus to infinity. You can then shoot at values in the following ranges to produce consistently great results:
Aperture: f/2 - 2.8
Exposure: 10 - 30 seconds
ISO: 800 - 3200
Color balance: 4000 - 5000K (Daylight / Auto)
Try different settings in these ranges to find a combination that works best for your particular camera setup.
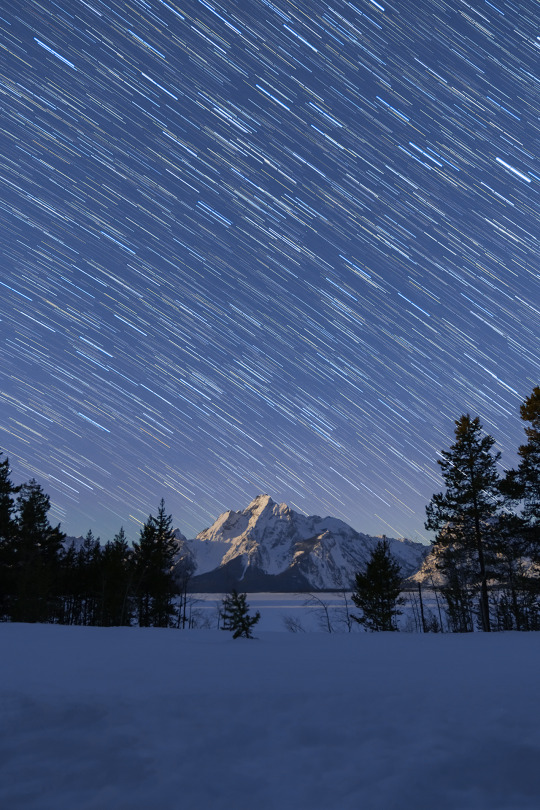
Capturing Star Trails

Star Trails over Grand Teton National Park in Wyoming
We do everything possible to avoid star trails when shooting the Milky Way, but sometimes the trails are exactly what we aim to capture. Long exposures of star trails create gorgeous images of the night sky that depict the passage of time.
In the northern hemisphere, all of the stars in the night sky appear to revolve around the North Star, or Polaris. If you shoot a long exposure with your camera pointed at Polaris, you’ll notice that all of the stars circle around it. Use Polaris as your guide when choosing a direction to shoot. The two outermost stars in the bowl of the Big Dipper point to Polaris.
You have two options when shooting long exposures of star trails. You can either take a single long-exposure photograph using a very low ISO, or you can take a sequence of images that can be stacked in software like Adobe Lightroom and Photoshop . For example, instead of a single 60-minute exposure, you can shoot 120 images of 30-second exposures taken consecutively which is the best route to go.
Stacking exposures is the recommended method. First of all, the longer your exposure is, the more your camera sensor heats and generates noise in your image. Secondly, the stacking method makes it possible to photograph star trails in light-polluted areas. Even if you’re in a bright city, you could shoot 1,000 images of two or three-second exposures and still capture star trails. Finally, many different factors could ruin a single long-exposure, such as a dead battery, tripod shake, or an unexpected light source entering the frame.
While a wide-angle lens is best for the Milky Way, you can use a lens of any focal length to photograph star trails. Note that the wider the lens is, the longer you’ll have to wait for star trails to fill the image.
Using a longer focal length is your best choice if you want longer star trails to appear over a shorter period of time. Use the widest aperture setting on your lens so you can shoot at the lowest possible ISO when exposing your image. Always remember that a higher ISO means more noise.
Place your camera in continuous shooting mode and set the shutter speed to your desired exposure time. By locking the shutter button down on your shutter-release cable, your camera will take consecutive images as each exposure ends until you stop it. Alternatively, you can use the built-in intervalometer on your camera (if it has one) to set the desired parameters.
Don’t forget to bring extra batteries and a lens warmer! Long exposures and cold nights will quickly drain the batteries and dew/frost can cover your lens.
Happy shooting!!!!
Photographing the night sky is a blank canvas of possibilities for a photographer. It will take a lot of experimentation to discover which settings work best for you. In the process, you’ll gain a deeper understanding and fascination for the universe!
#learn photography#landscape photography#basic photography#photography#travel photography#astrophotography#milky way#stars#full moon
1 note
·
View note
Text
Aperture in Photography

Aperture
You’ve heard of the word aperture but what is it, exactly?
Aperture is one very important part of what photographers call the exposure triangle, the relationship between ISO, shutter speed, and aperture.
These three settings work together to control the overall exposure of an image. When one goes up, another must go down in order to maintain the proper exposure.
Here I’ll go over:
•What aperture actually is (in simple, easy-to-understand terms)
•How you can use aperture to capture artistic images
•How to choose the perfect aperture for landscape photography, portrait photography, and more
And plenty of other tips and tricks!
If you can master aperture, then you’ll gain a huge amount of creative control over your photography.
Ready to take your photos to the next level?
Let’s dive right in, starting with the most important question of all:
What is aperture?
Aperture is the opening in the camera lens. A larger hole allows more light to hit the sensor, lightening your photos. A smaller hole allows less light to hit the sensor in your camera, darkening your photos.

Aperture is like the “pupil” for your camera system, which can open and close to change the amount of light that passes through. Note the nine blades in this lens, which form a diaphragm to block any light that tries to pass, except through the center.
When you walk outside on a bright sunny day, your eyes are being inundated with light. You’ll squint and hold your hand up to block the light while your eyes adjust, shrinking your pupils. Once your pupils are tiny little black dots, it becomes a little easier for you to see because less light is able to get into your eye.
The opposite occurs when you enter a dark room at night. With little light to help you see, your eye adjusts resulting in large pupils, which let in as much light as possible. After a few minutes, your eyes have adjusted and you can see more detail than you could when you first entered the dark room.
Keeping this analogy in mind, imagine your camera’s aperture as the pupil. Only instead of the aperture automatically adjusting based on lighting conditions like your pupil does, in manual shooting modes you must act as the brain for the camera and make the adjustments manually.
Aperture and f-stops
Aperture is measured in terms of f-stops, also known as f-numbers. Like this: f/2.8, f/4, f/5.6, f/8, f/22, etc.
As shown in the diagram below, the smaller the f-number, the larger the aperture hole:

As the f-number increases, the aperture size decreases.
Now, each full stop corresponds to a halving of aperture size. So when you go from f/2.8 to f/4, you cut the aperture in half. And when you go from f/4 to f/5.6, you cut the aperture in half again. (Of course, to double the aperture size, you just go in the reverse direction: from f/5.6 to f/4, and from f/4 to f/2.8.)
So f/2.8 is a much larger aperture than f/22. And f/11 is a much smaller aperture than f/4.
Does that make sense?
It can be confusing at first, especially because large aperture sizes correspond to smaller f-stop numbers and vice versa.
This causes a huge amount of confusion among photographers, because it’s completely the reverse of what you would expect at first. However, there is a reasonable and simple explanation that should make it much clearer to you: Aperture is a fraction.
When you are dealing with an f-stop of f/16, for example, you can think of it like the fraction 1/16th. Hopefully, you already know that a fraction like 1/16 is clearly much smaller than the fraction 1/4. For this exact reason, an aperture of f/16 is smaller than f/4.
How to Pick the Right Aperture
Now that you’re familiar with large vs small apertures, how do you know what aperture to use for your photos? Let’s revisit two of the most important effects of aperture: exposure and depth of field. First, here is a quick diagram to refresh your memory on how aperture affects the exposure of an image:

An illustration of aperture and how it affects exposure
Aperture and exposure
As you may already know, exposure refers to the brightness of a photo. In general, the goal is to end up with a photo that’s not too dark and not too bright; instead, you want a shot that’s just right, one with lots of detail.
Aperture is one of the three key variables that affect your exposure. (The other two variables are shutter speed and ISO.)
So where does Aperture come into play in all of this?
Remember what I said above? By widening the aperture, you let in more light, which brightens your image. And by narrowing the aperture, you let in less light, which darkens your image.
So if you’re photographing a beautiful sunset and your photos keep turning out too bright, you can always narrow the aperture to darken down the image. (In fact, using a narrow aperture is often a good idea when shooting sunsets!)
And if you’re photographing a forest and your photos keep turning out dark and shadowy, you can always widen the aperture to brighten up the image. (As you might expect, this is a standard low-light photography practice.) but you could lose depth of field.
Of course, aperture isn’t the only variable that affects exposure. If you want to brighten a photo, you can also lower the shutter speed or boost the ISO. And if you want to darken a photo, you can raise the shutter speed or drop the ISO.
In terms of exposure, widening your aperture by a full stop has the exact same effect as lowering your shutter speed by a full stop or boosting your ISO by a full stop. A key consequence of this: different exposure variables can cancel each other out. Increase your ISO by a stop while decreasing your aperture by a stop, and you’ll end up with an identical exposure.
The point here is that, while aperture does determine exposure, you can’t think about it in isolation. Aperture, shutter speed, and ISO work together to give you a well-exposed (or poorly exposed) image.
Aperture and depth of field
Aperture also affects the depth of field in your photos.
What exactly does that mean?
Well, depth of field (DOF) is the amount of your shot that is in focus. So a photo with a large depth of field will have most of the image in focus, like this:

Do you see how sharpness stretches from the foreground to the background? That’s thanks to the large depth of field.
A photo with a small depth of field, on the other hand, will have only a sliver in focus, like this:

As you can see, the effect is pretty artistic; you get a sharp subject but a blurry background. Neat, right? Because a blurry background helps the subject to stand out, this is an effect you’ll often see in portrait photography.
As for aperture, the wider the aperture (and the smaller the f-number!), the shallower the depth of field.
So an image with an f/2.8 aperture will have very little in focus and an image with an f/16 aperture will have all of the scene in focus.
What’s important to know is that the aperture offers you creative control as a photographer. Want to create a blurry background? Pick a wide aperture. Want to keep your shot sharp throughout? Pick a narrow aperture.
Of course, you also have to remember the effect of aperture on exposure, which is what makes things a bit more complex (but a lot more fun!).
Adjusting the aperture on your camera
Now that you’ve made it this far, you might be wondering:
How can you actually change the aperture on your camera? What do you have to do?
Fortunately, adjusting the aperture is easy. You just set your camera’s shooting mode to Manual or Aperture Priority. Then rotate the relevant camera dial to change the f-number. (The specific dial will depend on your camera model; if you’re struggling, consult your manual.)
Which Aperture is Best
When photographers first learn about aperture, this is a question that crops up constantly. But as you’ve hopefully learned from the sections above, there is no single best aperture that you can use all the time. Sometimes you’ll want a deep depth of field or you’ll want to darken down a too-bright shot, in which case you’ll need to use a narrow aperture. Other times you’ll want a shallow depth of field or you’ll want to brighten up a too-dark shot, in which case you’ll need to use a wide aperture.

That said…
There are apertures that get used consistently in certain genres. I’ll cover them briefly below, starting with:
The best landscape photography aperture
Landscape photographers gravitate toward small aperture settings, such as f/8, f/11, and even f/16.
Why?
When you’re shooting a sweeping photo of the land, sea, or sky, you often want to keep the whole shot sharp. That way, the viewer can appreciate every little detail of your majestic scene.
Plus, a deep depth of field makes the shot feel more real, like the viewer could physically step into the scene.

The best portrait photography aperture
In portrait photography, it can be handy to have your subject perfectly in focus but the background nice and blurry. That way, your main subject stands out and the background doesn’t become a distraction.

In other words, use a large aperture to ensure a shallow depth of field.
It’s a trick used by family portrait photographers, headshot photographers, fashion photographers, and more.
Conclusion
Hopefully, you now have a good understanding of aperture in photography and how you can use it to gain creative control over your photos.
But if you’re still a little confused, that’s okay. Grab your camera and do some experimenting. Find a subject – an apple works great! – and shoot it with different apertures. Watch as the depth of field changes.
Pretty soon, it’ll all just click. And your photos will never be the same again!
1 note
·
View note
Text
A BEGINNER’S GUIDE TO SHOOTING THE NIGHT SKY: Part 1
This is the first in a series of entries covering night sky photography for beginners. If you're just starting out in Astrophotography, this session will covers what gear you'll need to have a successful, and enjoyable, session.
Before getting into the camera setup I used to capture star trails and the Milky Way, let's first review what items I use to capture my night skies.
THE RIGHT WEATHER
Okay, so you can't bring this with you but there's no point in venturing out if it's going to be cloudy, or worse. Be sure to check the hourly forecast in addition to the daily. Just because it's cloudy at sunset doesn't mean those clouds won't move out of the area before the stars come out (and, if shooting the Milky Way, you may have several hours before it rises, well after sunset).
THE RIGHT CAMERA
I use a Sony a7r iv, a full frame, 61mp camera body. You'll want a body that can handle higher ISOs without adding a lot of sensor noise, especially as you'll be taking potentially hundreds of shots for star trails and building up some sensor heat.
THE RIGHT LENS
Generally speaking, you're going to want two things out of your lens for astrophotography: wide angle and fast. I usually take two lenses with me. Since I'm shooting with a full frame and not a crop sensor (APS-C senor). I take my Sony 16-35 2.8 GM and my 14mm 1.8 GM primary lens. If you have a crop sensor camera and lenses, you’ll want to bring your widest lens with the widest aperture, preferably 2.8 or wider.
THE RIGHT TRIPOD
Be wary of relying on a light weight or flimsy tripod as you don't want your camera shaking during longer exposures (or, even worse, falling over). Ideally, you'll have a model that has a center hook from which you can hang your camera bag or tripod weights to help with windy conditions. I prefer and use SLIK Tripods and ball head. You can purchase directly from Slik Tripods website or on Amazon.
THE RIGHT APPS
I used PhotoPills to identify when and where the Milky Way or Polaris if I’m doing circle star trails, moon phase and position, and much more. It also has built in tools to help you: calculate your maximum exposure time to avoid star trailing (accounting for your camera's sensor size and your lens' set focal length), plan for time lapses, find hyperfocal distances… and a ton more. There is a lot to absorb and play around with and, fortunately, the developers provide tutorials for using all the tools (I spent about 90 minutes watching videos the night before the group outing). The mode I found most useful, however, is the night AR (altered reality) mode. Click on this and you're taken to a live view of your surroundings with an overlay of the sky. You can use this view to scroll back and forth through times and dates to preview where the Milky Way will be in the future; a great tool to plan your shot well in advance, especially when it won't be visible until 3am! Additionally, you'll likely discover that a star finder app will be useful, if you're trying to find/identify constellations or just need help finding the North Star (and can't remember your basic education, like me).

THE RIGHT STUFF
Jump past the Milky Way for a rundown of some other items you'll need, or should consider, for night sky sessions.
TRIPOD WEIGHTS
If wind is in the forecast, consider some weighted bags for your tripod. I found some on Amazon for a good price and filled them with play sand from the local hardware store. The set I ordered has four bags, enough to place one on each tripod leg and to hang one from the tripod's center hook. If you don't want to use weighted bags, or forget them, you can always hang your camera bag from the hook in a pinch.
EXTRA CAMERA BATTERIES
More important for star trails than shooting the Milky Way but you'll want an extra battery or two. Shooting 240 30-second exposures for star trails chewed through about 70% of a fully charged battery for my Sony a7r iv, and I ended up using all three batteries I brought for the overnight session (only one was completely drained, the other two each had roughly 15-20% left). The next worst thing to not checking the weather forecast beforehand would be having perfect conditions and running out of juice halfway through your shooting.
INTERVALOMETER/WIRED REMOTE AND EXTRA BATTERIES
Another must-have for shooting star trails. Yes, you could shoot manually but who wants to stand or sit next to your camera for 2-3 hours hitting the shutter button every 30 seconds? I also discovered that the built-in interval timer on the Sony a7r iv allows for up to 9999 shots, but some cameras only allow up to 99 shots. As for batteries, the intervalometer/remote probably doesn't draw much power but, again, you don't want to get halfway through your shots only to have the batteries unexpectedly die. I always bring spare batteries and a portable battery charger just incase. It’s always nice to be prepared then not have it.
RED FLASHLIGHT/HEADLAMP
A headlamp is a must. Make sure it has a red lamp mode. Also I always carry a compact flashlight just incase- for light painting, getting around, and for emergencies - and a head lamp that has a red light option. I only used the flashlight a few times to sweep the foreground during long exposures of the Milky Way but I used the red headlamp frequently as I walked to and from my camera and my chair or car, or as I needed to check various things on my camera or intervalometer here and there through the night. Remember, ideal shooting conditions are during the new moon; between that and (hopefully) being far away from light pollution, it will be much darker than you expect!
OTHER ITEMS TO CONSIDER
Chair
Snacks/Drinks
Bug Spray
First aid kit
Balaclava (best purchase I've made for chilly nights!)
Blanket
Pillow (I caught a snooze in the back seat of my car... the pillow helped... some)
Extra memory cards
Lens cleaning tools
And a lens warmer. This is needed for those long cold nights or high humidity nights where frost or dew can form on your lens over time. There’s. I thing like shooting a 700 image star trail or time lapse and seeing the last 200-300 images are hazy due to frost or dew.
This covers what I typical bring and equipment I use for Astrophotography. You can always add to list as the nights are long, or you can always kick back while the camera is clicking away and read some more of my blogs or checkout my tutorials and adventures on YouTube. But keep that screen light away from your camera, you don’t want to introduce any unwanted light pollution!
Don’t forget to subscribe and stay update with new blogs and more!

3 notes
·
View notes
Text
Going to Horseshoe Bend: A Traveler’s Guide
If you’ve seen pictures of Arizona, or even advertising USA travel in general, I’m almost certain you have seen the famous Horseshoe Bend.
If not, here it is!

Horseshoe Bend is where the Colorado River makes a giant sweeping horseshoe-shaped bend in the canyon. It’s a picturesque area on the Glen Canyon National Recreation Area, where you get a wide panoramic view of the Colorado River before it reaches the famous Grand Canyon – one of the seven natural wonders of the world.
I especially loved the clear turquoise water of the Colorado River below, which is not a color you typically see on the Colorado River.
Where is Horseshoe Bend, Arizona?
Horseshoe Bend is one of the top places to visit in the Glen Canyon National Recreation Area and is about 10 minutes away from the town of Page in northeast Arizona, close to the Utah border.
The parking lot is near the Horseshoe bend trailhead, which is located off US Highway 89, approximately 5 miles (8 km) south of the Carl Hayden Visitor Center.
Plenty of handicap-assessable parking is located near the trailhead.
Horseshoe Bend has become so busy, the best time to visit is early mornings or early afternoon. There is a fee of $10 per car to get in and there is plenty of parking. If there is no parking nearby, you can always take the shuttle, which costs $5 per person. Sunset is the busiest time as there will be hundreds of people trying to get a view of the sun setting behind the mountains to the west, so get here early to get a good spot to watch.
It is slightly less busy in the off-season – running from October through February. Spring or Autumn will have the best weather being neither too hot nor cold. It’s the desert so during summer there will be high heat and little shade.
June until September are considered the monsoon season, so you might even expect rainy (and even stormy) weather during this time of year.

#horseshoebend#arizona#landscapephotography#chadsawyerphotography#learn photography#travel photography
1 note
·
View note