
Don't wanna be here? Send us removal request.
Statistics
We looked inside some of the posts by characterstring-game-design and here's what we found interesting.
Average Info
Notes Per Post
1
Likes Per Post
1
Reblog Per Post
0
Reply Per Post
0
Time Between Posts
9 days
Number of Posts By Type
Text
6
Video
1
Photo
1
Last Seen Tumblr Blogs


Fun Fact
In 2020, 44% of users from Denmark used Tumblr daily.
Text
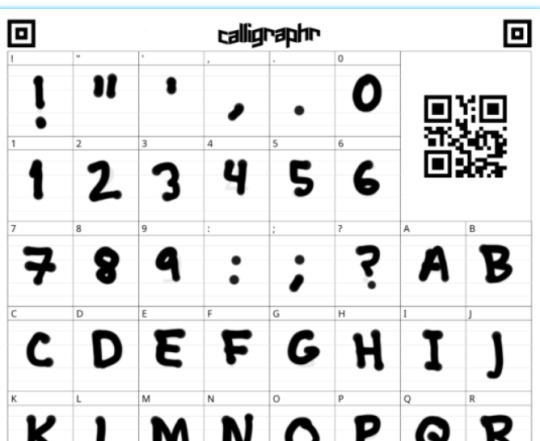
Main menu now added. I made a font out of my own handwriting using the site calligraphr.com to help establish a goofy vibe, and a fat outline for the title to make it feel more cartoonish and help it stand out against the flatness of the main graphics.
I had trouble getting the buttons styled the way that I wanted. I wanted to remove the gradient and the box border but couldn't figure out how. I started playing around with using the image option to set the boundary of the button but ran out of time to try what I wanted to do, which was use some images of sketchmarks/scribbles. Will play around with that more when I revisit it.
Also want to take a stab at adding a pause command to the FPC/level. Found a good video that I watched but there were a few more extra steps than I had time to attempt.
youtube
I spent more time than I had intended on getting small animations attached to my llamas and imported into Unreal, but eventually got the mystical sequence of steps just right so that they functioned exactly as they had in Blender. One of the key things I didn't grasp early enough was that once you start adding armature, all vertexes must ultimately be associated with a bone. I was leaving sections of my model unassigned simply because they weren't themselves part of the animation, and it doesn't really work that way. Once I started joining static elements and giving them bones, everything started coming together. So, I recreated a motion of a grazing llama that my professor used to demonstrate simple rigging to me and then applied that learning to the original animation of a munching mouth that I had attempted. The munching mouth still needs some work because it's a little hard to notice as is.
May need to make the animation more drastic to make noticeable. Will also try to add some grass into their mouths if I have enough time after getting most of the game done. Still couldn’t figure out how to attach the animated mouth to the animated head so that both animations were on one figure, but I think I understand the armature/parenting/vertex group concepts well enough now to sort it out.
I'm still in the process of coding up my primary game loop (nothing to show just yet) which is basically as follows:
Talk to llama to reveal pennies
Collect 25 pennies
Talk to other NPC (will eventually be a "local" character) and exchange pennies for a quarter.
Take quarter to feed vending machine and collect feed
Take feed to llama for next dialogue.
Ideally, I'd like to have multiple variations of this loop but expect I'll just be concentrating on getting one loop perfectly executed for my final submission. Still have a lot of building out of the physical environment to do which I'm a little behind on mostly because it's taken me this long to visualize what I want it to look like. I've got a better idea of what to do now, so should be able to move at a steadier clip going forward.
0 notes
Text
Learning How to Add Sound and Getting Started with working in Unlit/Low-Poly Style
Most of my last week has been spent three things:
1. Actually thinking through how the game is going to work and how the story will support it
2. Building some initial assets in Blender and getting the beginnings of a stage set up in Unreal to test my understanding of working in this style. Want to make sure I'm not committing myself to something too painstaking before I start building out the map.
3. Learning how to add sound.
Game Story & Mechanics
Initially I was envisioning a more narrative game, but I want the end result to use as much of the mechanics we've learned in class as I can, so after giving it more thought and being more realistic about what I can do in the time we have, I'm making it more of a collecting game. My inspiration for this game is a mountainside Antique Mall in my home town in Vermont that also has a small Llama stable/petting zoo next to it. I really want to do a whole game set at this Antique Mall, but for now I'm re-envisioning it as a dedicated Llama petting zoo that's simply reminiscent of it.


The player is going to discover that one of the Llamas can talk, and is very good at giving advice. The player has a problem they could use some help with but the Llama doesn't consult for free...you have to pay them in feed. The feed dispenser only takes quarters, though, and you have no cash. So you have to go around collecting errant pennies and exchanging them for quarters with several locals in the area. A few will only agree to the exchange if you can fetch things for them. It'll basically be three stages of collecting things, each time allowing you to continue your conversation with the llama.
Game Assets
The assets I managed to build successfully were the penny, a llama and the feed vending machine. The llama is just a first attempt....I don't necessarily want to go for a completely blocky low/poly effect, but I need to take another pass at one to try out some other ideas. If I don't toy around with shape, then I at least want to explore hand drawn/illustrated material textures to make the visuals a little more interesting and not so typical of the aesthetic.
I actually wanted to try importing a small animation with the llama (a simple chewing animation to go with a grazing sound effect I wanted to use), but though I was successful building the animation in Blender, I couldn't manage to successfully import it into Unreal. Had to give up on it for now and just go with the static versions. There are definitely small animations and motions I want to include in the game (like with the feed vending machine) so I hope the learning curve isn't too steep for figuring out how to do it.
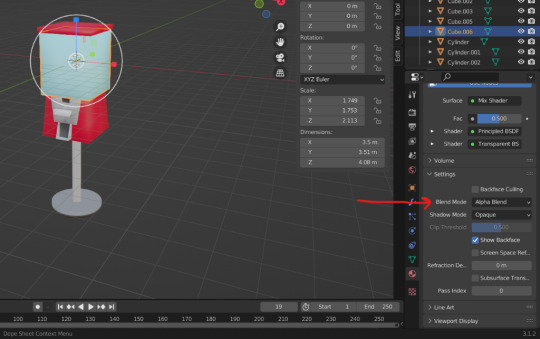
The vending machine I'm especially pleased with. Took some time to figure out how to get the glass container to be transparent, but it was immensely satisfying when I did. Turns out there's a dedicated Shader Node for transparency: Transparent BSDF. You simply use a Mixer Shader to pipe an alpha-controlled version of your color in along with your primary one. The you just use the Alpha slider in your Principled BSDF node to adjust the amount of transparency.

You also have to change the Blend Mode in the Material Properties Settings to one of the Alpha options.
Color selection and management ends up being the heavy lift when working without lighting. You have to make every material emissive and you have to be clever about varying colors on objects that overlap, otherwise you'll lose all sense of shape, depth and distinction.
Sound Design
In my first attempts at incorporating sounds, I wanted to add a suitable effect to the coin collection, and I wanted to try out having several layers of sound to place you in a wooded setting with a pack of llamas.
The coin effect was simple enough, messing around with ChipTone, but I decided also to add in a small jangling coins sound effect that I coded to execute right after the first one. Wanted to make it sound like you were adding to a stash of coins, and I think it works.
For the llamas I wanted the sound of generic woodland atmosphere, but then the sounds of the llamas just going about, so either light stomping, or huffing or something to that effect. I found a generic sound effect of horses grazing in a stable that came pretty close to exactly what I wanted. Since some of my llamas are actually eating grass off the ground, I added in another sound of more audible chomping of grass, pulling the attenuation in close so that you only hear it when you're up close to them in particular.
I put the coins around a body of water, so for kicks I added some splashing sounds that execute if you wander over it. I didn't actually tie it to the navigation event triggers, but I'm interested in figuring out how to do that.
Also spent some time this weekend just playing around with the sound machine apps, which I was having a blast with and getting way more into than I was thinking I would, so I went ahead and just created my own music for this initial sound test. I think I'll actually keep pecking away at it and make it one of the custom elements of my game.
This is the program I ended up using for the music I eventually included and a video on how to use it:
BeepBox -- Brutally Easy Music Software (Free & Open Source Too!) - YouTube
The challenge I envision for sound is working out the sound effect for the vending machine. That's a little more specific and I didn't find anything that would work online, so I think I'll have to go gonzo with that one and make a trip over to the Central Park Zoo to make my own recording. Luckily the weather has gotten warm just in time!
0 notes
Text
Final Project: Art Style
How I would describe the style I'm aiming for.
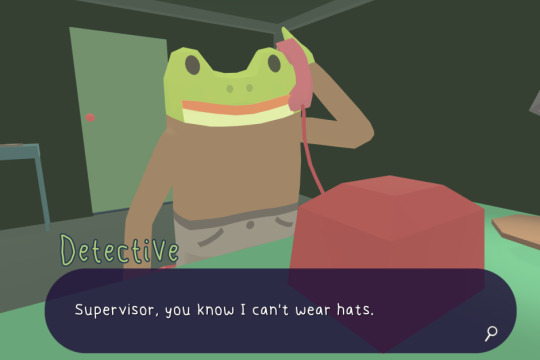
At first I misunderstood what it was I was trying to emulate. I was thinking of the style as what it technically is: low-poly, flat texture, unlit, using vibrant, cartoonish colors, and potentially with touches of line-drawn elements. Games I had in mind as references were somewhere in the range of Donut Country, Stikhold, Untitled Goose Game, Frog Detective, Wattam, Before Your Eyes and Virginia. Frog Detective is probably more squarely what I'm gunning for, with a simple, graphic style as it seems like it would be a little easier to accomplish. What I didn't realize was that this style is what is considered cel shading. I thought cel-shading was specifically when you put cartoon stroke lines around all of the images. So, I wasted a little time trying to logic through how to accomplish cel-shading from scratch not realizing I could just follow a cel-shading tutorial (though there isn't really a lot of step-by-step instructions/tutorials out there for doing it).


Why I've chosen this style.
I enjoy games with a tonal imbalance, where the look and feel seems cheerful, but the subject matter is a little more serious. I'd love to try a PS1 style game with a dark and weird aesthetic but with themes and subject matter that ends up optimistic/cheerful, but for now with this game I think the more common cutesy but serious combo will serve my story best. A main theme of the story in my game is that a main character doesn't feel comfortable opening up to people, but discovers a llama in a petting zoo that she weirdly feels comfortable opening up to and, to her surprise, the llama can talk and happens to be a skilled psychologist who helps her process an event she is currently dealing with.
How to technically achieve this look.
Based on my initial understanding, there's two possible ways to go about this. Both methods are attempting to removing lighting and reflection and replace it with emission and color palette to create whatever sense of depth I need.
One method is to remove shadow, normals and textures from individual materials, add roughness, and substitute lighting effects with emissive colors; the other is to apply a shader in the post process volume (I don't really actually know what this one means but that's what It's doing) and playing around with emission values.
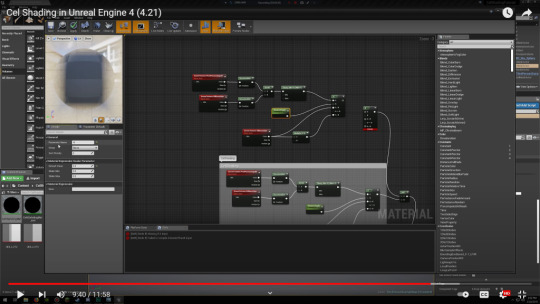
The node map for constructing a post-production shader is a little complex so I haven't attempted to build one out yet. This is what it looks like from the tutorial.
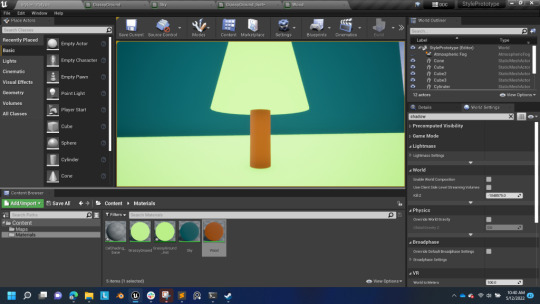
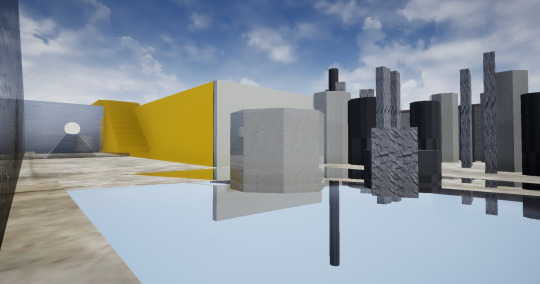
I've gotten some of the basics applied for the other method, though still working on what a more complete aesthetic would look like. I started by eliminating casted shadows through world and object settings and by deleting primary sources of lighting, but I'm still trying to figure out how to substitute Unreal's default baseline environment (the sky) with the bare minimum lighting/materials to still make my environment visible.

It took me awhile to figure out that the effect ends up being pretty straightforward to set up by simply funneling your material color into the Emissive Color parameter instead of the Base Color parameter in your nodes. You then simply attach Multiply/Param nodes to control the strength of the emission.
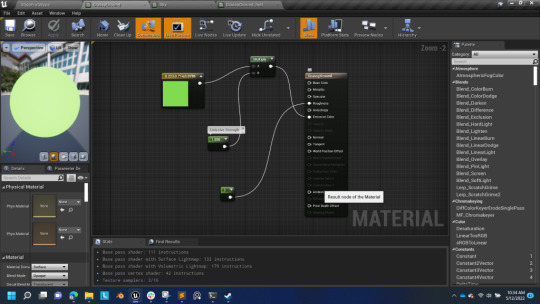
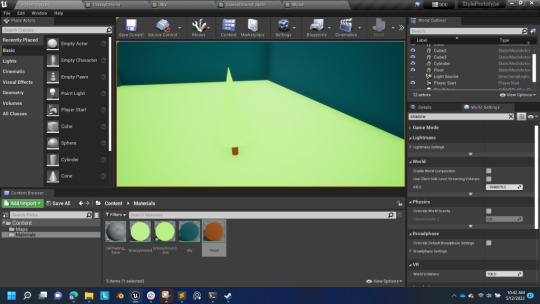
This is how things start to look once you've remove shadows/lighting from the materials:

I'm not yet sure how to make adjustments to the material instances. So my grass and tree and still the same color/emission, making them blend into each other. I want to change the tone of the green in the tree without creating an entirely new material.
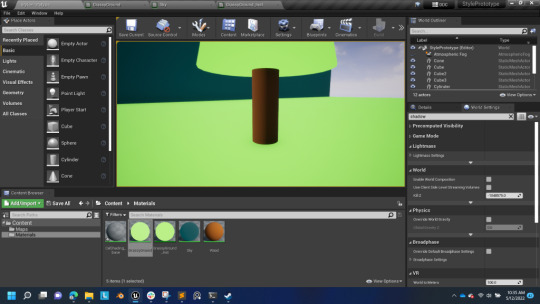
This shows how changing the Emission Color, though, ultimately removes the shadowing from the object.
0 notes
Text
My First Build

Two complete levels, each with a passageway that needs to be unlocked. You don't know where you are, or how you got there, you just know that you have to return--though circumstances would suggest that returning may not be possible.
Free to play! https://www.dropbox.com/s/onl8uyt0hykh6p9/DeaconWorrell_FPS.zip?dl=0
0 notes
Text
Trying to Get Two Messages to Display Consecutively
Here is how I eventually set up the back to back messages after capturing the key. I went through several attempts (over several frustrating hours) to get the messaging sequence correct. Originally, I wanted there to be one message saying, "Congrats" when you first grab the key, have it disappear when you move away, then have a second message telling you to proceed either once you started moving again or when you reached a certain location on the map. I set the events for the "Congrats" message on the key collision box itself, thinking I could trigger the first message with OnComponentBeginOverlap and the second message with OnComponentEndOverlap. It took me FAR too long to discover, however, that you can't do anything with the EndOverlap if you've just destroyed the entire actor object! I tried a couple of different ways to trigger a second message from the key's event graph without an EndOverlap event because I wanted to keep all of the functions as self-contained as possible, but none of them worked. I thought that I could then trigger the first message with the key collision and then turn it off and trigger the second message with another box collision placed on the way to the door, but for the life of me I couldn't figure out a way to have a box collision control a widget that it didn't itself create, so that one box would add the message and a second box would remove it. So I finally just moved all the messages to a standalone box collision that I superimposed over the key and used Delay functions to space out when they appeared/disappeared.

First, I created widgets for both messages and set them as variables.
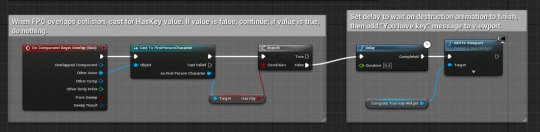
Then checked to see if FPC already had the key or not and displayed the message if it didn't (after a few second's delay to wait for the destruction animation to finish.

Then when leaving the overlap, removed the message after a slight delay...
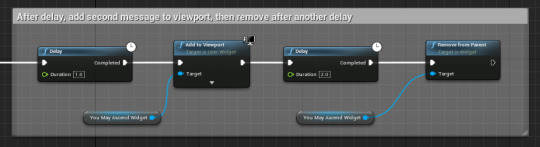
....and after a few more seconds add the final instruction to proceed.
In the end, it worked out the way I wanted to, but I still hope to find a way I could have triggered the second message through either an event executed by the FPC's movement or through a second box collision that could turn off a message it couldn't create.
0 notes
Text
About This Project
My game so far is not really intended to be much more than a demo of the capabilities we are learning. I haven't started with a particular design in mind but am simply inventing as I go along and seeing creatively where that leads me for this first project. In general, I find that I'm much more comfortable being creative when I have a surer footing with my fundamentals, so I'm not putting too much pressure on myself yet to be thematically cohesive or purposeful in my overall design. Hopefully by the time we are done learning new mechanics I'll have found a way to tie it all together. The game's directive at this point is simply to find your way to the end, navigating a simple obstacle course, and find the key that will allow you to exit (though I'm not explicitly telling the player what the key is for, they have to kind of figure it out.
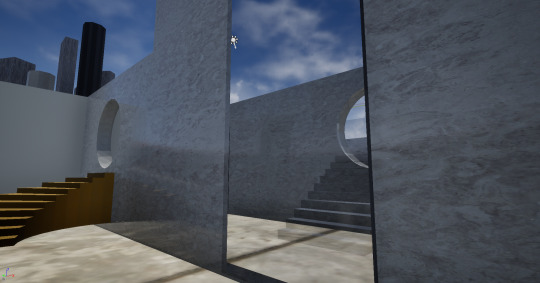
So far, my brain seems to be gravitating towards some kind of theme around the subversion of expectations and the threat of an unreliable narrator (was always the thing I loved most about Portal). The open sky of the default level felt very liminal and mystical to me, so my first level sort of built up in response to that with an end goal of a mysterious ascension that is being omnisciently presented as an accomplishment. Then suddenly the second level lesson had us plunged into darkness, switching from a feeling of ethereal solitude to one of menacing isolation, which feels sort of like someone's messing with me – I'll likely just be expanding that second level out as is, in a similar vein. That was the vibe I originally started playing around with using glass materials in my first level to lead you to wrong conclusions about where you can go and once I learned how to import sprites, I thought the presence of 2D objects in a 3D space felt kind of on that same theme, so made that part of the directive for locating the key (two keys are fake, only one is the TRUE key). I'm especially fascinated with all the ways you can incorporate words into the view and space and want to do more with that, to make even this simple first project seem more intentional.
Things I'm pleased with so far:
Making the door a two-panel sliding door and the quick flash of color I added as a "DENIED" visual cue when you try to unlock it without the key. May still want to add a message telling the player they actually need to go get the key, though.
Setting up a sequence of messages after capturing the key. It feels like they are being triggered by the player's movements, but they're really just carefully timed. Took a lot of trial and error to land on a solution.
Organizing and commenting the node sequences on my event graphs. Taking the time to write out what each sequence is doing in my own words in the comments helped ALOT with internalizing how it all works. It especially helps get you more precisely familiar with object and function terminology that is specific to Unreal, which still is a little swampy in my brain (e.g., is a widget a distinct object that a widget blueprint becomes associated with?)

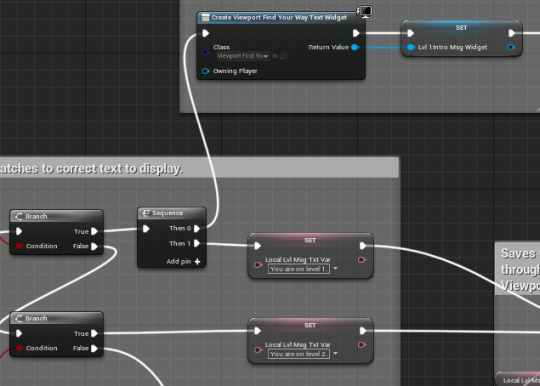
Discovering the "Sequence" node. Allows you to run more than one sequence off of an event dispatcher which helped me load both of my level status messages as well as a separate level intro "instruction" message at the same time. Plan on reworking this so that the conditional logic that dictates the level status message will dictate both messages.
Things I'm curious to learn how to do now that I've reached the point where I'm at:
Making sprites and/or text appear on walls
Making materials fade in/out on actors and text fade in/out in the viewport
Using collision events on one blueprint to make changes to an actor/blueprint somewhere else (like to make the door physically open when you get the key as opposed to it opening only when you collide with it).
A more efficient way of re-using box collision BPs to trigger unique messages in the viewport. Would like to be able to re-use a single BP (that references a single particular text widget BP) but apply a custom text value for it.
I'm learning Blender for this first time this semester so hadn't gotten the hang of it enough to try importing objects earlier, but I'm a little farther along now so next will be working on creating assets there and moving them over.
0 notes
Video
tumblr
Video of the teleportation mechanic between levels, with global variable fades/colors (using a single actor for all events) and text actors.
0 notes
Photo
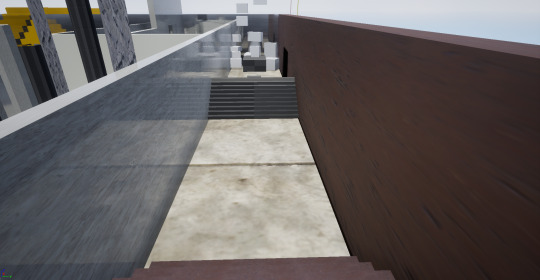


My first level is a simple sequence of platform obstacles that I put together mostly to get an initial handle on Unreal’s basic toolset.
1 note
·
View note