
Statistics
We looked inside some of the posts by chenonetta and here's what we found interesting.
Average Info
Notes Per Post
39
Likes Per Post
24
Reblog Per Post
14
Reply Per Post
1
Time Between Posts
1 month
Number of Posts By Type
Text
2
Last Seen Tumblr Blogs


Fun Fact
1,644 Tumblr posts in 1 second.
Text
Cricut Hacks #2 - Template frames
Last time on Cricut Hacks we took advantage of Cricut’s scaling calibration to cut our graphics at a larger size than they were actually designed at in Cricut Design Space.
This time we’re going to use a template with registration marks to tell the Cricut where to perform cuts on a separately printed sheet of paper.
If you’re familiar with your Cricut, you probably see the below photo and have an immediate intuition about how to go about this hack! But I’ll share my method regardless.

Why?
Once again, we’re trying print larger than Cricut wants us to. This time, our reason for doing so is to avoid having to lose as much material to the registration marks as Cricut demands we sacrifice. It’s nearly 2cm around each edge, and if your printer already can’t print borderless-ly, you’re losing so much material!
Practically speaking, if you want to make A6 sticker sheets, you’d fit two on an A4 page, and if you wanted to make A5s you’d fit one, as shown in the diagram below.

I’m willing to reduce my sticker sheet to 200⨉140mm, but Cricut still won’t let me fit two of those on a page. So let’s get hacking.
Drawbacks
Before we launch into the method, here’s some things to keep in mind:
You’re no longer going to get perfectly aligned cuts, as the manual alignment introduces room for error.
If your printer has a skew, this will become particularly noticeable as you might be rotating graphics in a way that exacerbates the skewing.
You’ll have more manual overhead for preparing your sheets.
I’m pretty fast at preparing my files now, but you still need to cut out each sheet to give to your cutting machine, which feels a little silly because the machine was meant to take that work away from us.
You need more software than just doing everything in Design Space.
I mention Adobe Suite software here, but others will be able to do most of this fine! I’m just indentured to Adobe. Don’t be like me, learn your hotkeys and workflows in the Affinity Suite and support perpetual licensing in software!
Method
Step 1: Prepare your sticker graphics
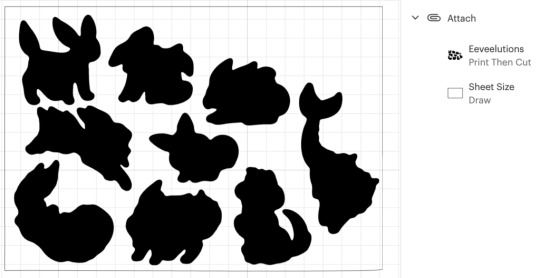
I prepare my images and vector cutlines outside of design space. This means I can have areas of the sticker sheet that aren’t cut out, like my logo and social media links.
The first file you need is the one you’ll be printing. Repeat your design on your page as many times as you can fit, and then also place some marks for manual trimming. Here’s my example file (sorry about the watermarks). Notice the black lines in each corner of the page, and the lines in the middle of the page.

Print this file at 100% scale. Your printer might try to automatically scale your graphics to comply with your printer margins. Make sure that doesn’t happen!
Step 2: Prepare the cutlines
I generate the shape for each sticker by selecting the character in Photoshop, then use the Select => Modify => Expand menu item to add a border. I usually go with 20 pixels, which is a little more than 1.5mm at 300dpi.
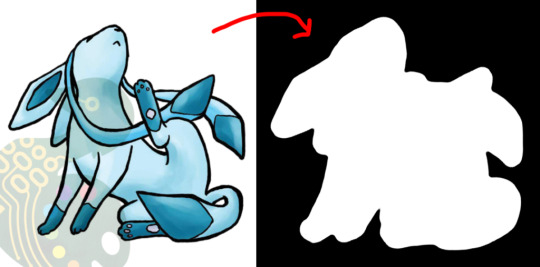
I then pull the black and white shapes into Illustrator and use the Image Trace tool to generate the vector outlines that will be used for cutting. I generally use the “Silhouette” preset, and then apply some smoothing to the lines (Object => Path => Smooth…).
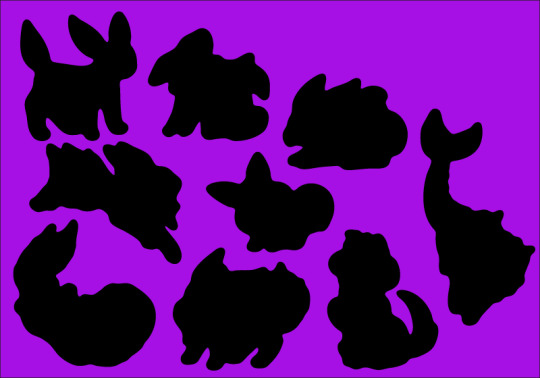
Make sure to have the outline rectangle for your graphics as a separate image object as the rest of your graphics (you may need to “release compound path” or delete the outline and replace it with a rectangle, this will also get rid of any wibble that might have come from the image trace)
After these tweaks, I have a file ready to import into Design Space. Export it as an SVG (In my experience, the scale will be accurate if you use the Export menu item rather than the Save As, but other methods can cause scaling issues so just check the size once imported)
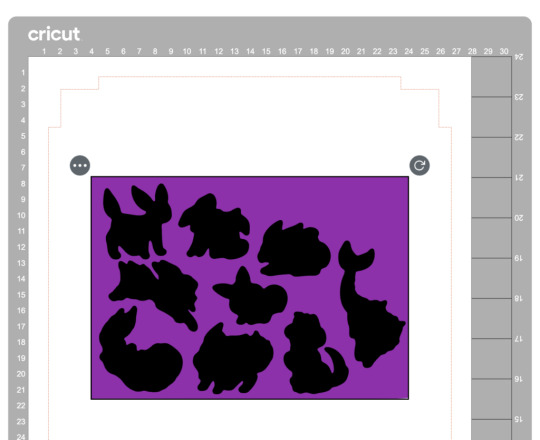
Step 3: The Template
Import your SVG into Design Space. Then, make sure all objects are grouped in an “Attach” group so that they’ll print and cut with your pre-prepared arrangement, and mark them all as Print and Cut.

Click Make, but we’re not going to be sending this file to your Cricut yet.
In the alignment page, move your graphic about 3 inches down the page, which will be enough clearance so that you can place and remove the sticker sheets into the templates without needing to unload the cutting mat.
Then in the “Send to Printer” dialog, choose to “Add Bleed” and “Use System Dialog”. The system print dialog will pop up (or under, if you’re on macOS – drag the Cricut window away to find it) and you can print your file to a PDF.
Open your PDF in a graphics editor and make a white rectangle in the middle that matches your sheet size – in this case 200⨉140mm.
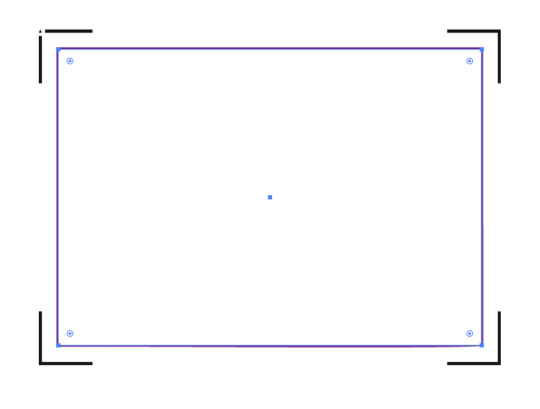
Print this file and use a craft knife and ruler to cut out the white rectangle. Try to be as accurate as you can!
PS, you could create the white void space and print the file directly from Design Space, but I like doing this because I can control a few extra things.
For example, Design Space won’t let me place my A5 graphic in landscape on an A4 page, but this way I can specify a larger paper size, then align the landscape image on the A4 page I’ll send to my printer.
Step 4: Cutting prep
Take the sheets you printed in step 1 and use your craft knife and ruler to trim them to size. Again, I’ve chosen 200⨉140mm for my sheets.
Place your template file on your cutting mat, taking note of the position of the void space.
Place your trimmed sticker sheet in your template, aligning it with the void. Use the extra border around the void to help judge how square your sheet placement is.
It’s almost time to hit Make, but we need to do one tweak in Design Space.
We don’t need to cut the outline rectangle of our sheets, because we’re trimming them to size before aligning them into the template.
Removing the rectangle, or setting it to a “Guide” line type will cause the print and cut margins to change. Instead, I denote the rectangle as a Pen line. We won’t be loading a pen, and the machine will waste a little time on this, but we’ll also be able to tell whether it’s aligned correctly while it traces the outline in thin air.
Step 5: Make
Press that make button!
Drag your graphics so that they roughly align with where you’ve placed them on the cutting mat.

Then on the next page, say “I’ve already printed” and select your paper type. The Cricut will suggest you load a pen tool and the blade – don’t bother with the pen tool
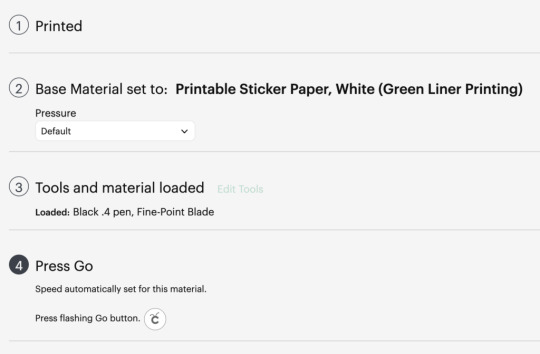
When you “Press Go”, the machine will start scanning for the registration marks.
It will then start drawing the outline of the sheet in thin air. While it does this, you can stare down the barrel of the empty toolholder to confirm that it’s aligned correctly with your page – if it appears to have misread the registration, you can cancel the job and try again. If it’s correct, your cutlines should also be correct.

And when the job is done, and all your cutlines are correct, you don’t need to unload your mat. Remove your sticker sheet from the mat by curling it away from the paper. Now you can place your next sticker sheet into the void and press the Go button again and it will cut your next sheet without reading the calibration marks again. After adding a bunch of extra steps and work into this process, it’s nice to get a little timesave!

Closing Remarks
Once you make a template for a particular sheet size, you can reuse it for all your files that share the same size. Consider cutting your template from a thicker GSM paper to extend its lifetime and make it easier to affix without skewing.
And finally, here’s the template with all its whitespace – that would have been wasted sticker paper if I cut this with the default workflow – next to the actual wasted material from my sheets. And a reminder, the sheet on the right fit two copies of the artwork vs the one on the left fitting only one!

Thanks for reading, if you found this useful please let me know!
“Cricut Hacks #2 – Template frames” was originally published on Chenonetta Creations
1 note
·
View note
Text

🎶 Sailing to new waters, The rush of a new day 🎶
Fanart for Stray Gods: The Roleplaying Musical!
I wanted to associate each of Grace's love interests with ways of navigating out of being lost at sea.
Pan gets the sail, he's a free spirit, well versed with wandering with the winds.
Persephone has her throne, sitting in the captain's seat. She's familiar with taking charge.
Apollo has the signal lamp, referencing the lighthouse motif that appears in Phantom Pains. He's a little aloof here; while he's not the most confident about being around his Idol family he's certainly still here for the ride. (Yes, his romance songs are my favourite)
And finally, the Adrift reprise when Freddie is along for the trial says Grace has "oar in hand" - and who better to hand it to her than Freddie, a proven adventurer that has been handy with equipment during the course of the story?
38 notes
·
View notes