
chraneness
Some Writing Stuff
Heeey! Welcome to my writeblr! My name is Archer and I use he/they pronouns. I reblog and post about writing stuff, and I am trying to post more of my original works here, along with other fun stuff. I’m always looking for more friends! Message/ask me anything, i will respond!
1725 posts
Don't wanna be here? Send us removal request.
Last Seen Blogs

nozoyuri
Thank You, Symphogear

streamilykae
StreamilyKae

nova-n-i
Nova

broken-filth
sorry not sorry

thaisbretas
thais bretas
Text
Me looking for a job, thinking I just don’t wanna work 60-70 hour weeks again……
I know I don't shut up about this but frankly not enough people are angry about the 5-day/40 hour workweek (and I am AWARE a lot of people work even more than that). I feel like a lot more people should be absolutely furious that we only really have two days a week and some occasional hours in the evening to socialise, run errands, do chores, or relax.
It's no wonder so many people are profoundly lonely and disconnected from their communities when maintaining a social life in what little free time we have is incredibly difficult. If you have kids, a second job, a very long commute, or other responsibilities, it's nearly impossible.
We literally aren't meant to live like this and I'll never stop being shocked how many people just take it as the natural state of things and don't want to throw a brick through a billionaire's window every time they think of it.
#maybe my bar is too low#summer 2022#where working 12 days were the easy days#fucking love theater sometimes
82K notes
·
View notes
Text
Right now, my most controversial opinion is "Genocide is bad."
#I feel this#I’m a trans-masc queer punk#my dad is a cis-het white trump supporter#this is literally what he labels as left extremism
30K notes
·
View notes
Text
just write a shitty poem, what do you have to lose
97K notes
·
View notes
Text
Worst types of country songs:
Alcoholism rules
God bless the USA
Truck
Diet christian music
Love a small town blue eyed girl
Best types of country songs:
Just a specific ass situation
I hate this damn job
Woman kills those who've wronged her
Alcoholism sucks
#this literally could not be more accurate#as someone obsessed with older country#the new shit on the radio is bullshit#thank u for coming to my tedtalk#have a great day/night
138K notes
·
View notes
Text
I’ve heard them called ��knives”, like, if you are out of spoons you use knives and they work ok but they hurt you in some way, either when you use them or after.
One thing I don't think the Spoon metaphor has helped able-bodied people understand is that you can overdraw.
Generally, for most conditions, running out of spoons doesn't mean you collapse, doesn't produce an effect they can actually see. What it means is that you run on life support, quite possibly unsafely, until you get to a safe place and can stop. But you'll owe those spoons back, with interest. You'll have hurt yourself to do it.
Sometimes I hang out with a friend and they'll be like, wow, I'm really glad you had a good day. And I have to decide whether to make them feel bad by explaining that in fact they did not catch me on a good day, and tomorrow will probably be bad. I just made choices.
62K notes
·
View notes
Text
how to sew a drawstring bag for your tarot deck — version 1 (unlined)
Sometimes I get really annoyed with the packaging that my tarot decks come in, and I want to replace that little cardboard box with something of my own creation. That’s where these drawstring bags come in! This version (without a lining) is the first of two potential bags you could make (or you could make both versions; I’m not judging you).
If you’re new to sewing and/or on a pretty tight budget, I would recommend this version, since there’s less fabric involved and fewer seams. However, you will be able to see the internal seam(s) on the inside of the bag. If that bothers you, check out the lined version of this tutorial (coming soon). A sewing machine is useful for this project, but there will be a hand sewn portion toward the end (even if you’re using a machine) and you can sew the whole bag by hand if you so desire.
For my closet witches — if someone asks you why you’re making a bag, you can always say that the bag is for keepsakes or other small odds and ends. You can also use this bag for storing crystals, runes, or dice! However, a tarot deck requires the most measuring, so that will be our example.
Project Difficulty Level: Easy/Beginner Friendly
All measurements are Imperial (inches).
Materials
For this project, you will need:
fabric (for the body of the bag, not optional). For one bag, you won’t need more than a “fat quarter” (18x21 inches). If you go to a physical craft store for fabric (quilting cotton is often cheap, comes in lots of fun prints, and is ideal for this project), the person at the cutting station will recognize this measurement. If you don’t want to buy fabric, look around your home—do you have an old shirt, bedsheet, tablecloth, or pillowcase that’s no longer in use? That will work too! If you’re new to sewing I’d advise avoiding slippery-smooth or very stretchy fabrics like spandex or silk charmeuse, because these are more difficult to sew.
polyester ribbon, twill tape, yarn, leather or braided cordage, or a pair of shoelaces (for the drawstrings, not optional). The length depends on the size of your tarot deck. Measure the short side of your tarot deck, then double that measurement, then add 6 inches—that’s the length of 1 drawstring. You’ll need two drawstrings (they’re the same size).
1 cutting tool (not optional). This can be scissors (ideally fabric shears) or a rotary cutter, though for the latter it’s advisable to also have a cutting mat.
thread (for machine sewing and hand sewing, not optional)
1 needle for hand sewing (not optional)
1 thimble (for protecting your fingers while hand sewing, optional)
sewing/quilting pins (for holding together the fabric pieces, not optional). You can also use safety pins, but they’re a bit more fiddly.
1 sewing machine (optional; I will provide instructions for how to sew the bag entirely by hand. However, if you have access to a sewing machine, this project will go a lot quicker).
1 marking tool (for reminding yourself where to cut, optional). You can use chalk, a pencil, or a special fabric-marking pen. You can also just use pins to mark a line.
1 measuring tool (for a straight edge for marking + measuring, optional). A plain old ruler works just fine for this, though there are all sorts of fancy quilting rulers as well. If we’re being completely honest, for this kind of project you can absolutely measure just about everything by eye, but some people like the reassurance of knowing exact distances.
1 iron + surface upon which to safely use the iron (for pressing seams, optional). This will make working with your seams so much easier, but you can do without one if you need to.
Fray Check liquid glue (for finishing raw edges, optional). There are a multitude of ways to finish raw edges, but you will need to finish them; if you don’t, sooner or later the fabric of your bag will fall apart. (I’m listing Fray Check as optional only because it’s not the only finishing method; read on for more). You cannot wash your bag if you use Fray Check on the raw edges.
1 pair of pinking shears (for finishing seams, optional). Another, less permanent, way to finish off a raw edge and stop it from fraying is to trim it with pinking shears that make zig-zag, triangle-shaped cuts.
NOTE: if you don’t have access to Fray Check or pinking shears + you’re sewing this bag entirely by hand, you can use French seams and enclose the raw edges within a larger seam allowance. French seams require a bit more fabric and some measuring (and they add a lot of bulk to the corners of the bag) but if you need/want to use them, keep an eye out for the appropriately labeled sections.
Step 1: measure & cut your fabric (standard seam + French seam version)
Take your tarot deck and secure the cards together (a rubber band would be good) and place the cards onto your fabric. If you have a 90° corner to work with, that would be perfect. Leave enough room around the edges of your tarot deck to account for a 5/8-inch seam allowance + sufficient room for the volume of all the cards and/or whatever else you would like to store in the bag. You will need extra height beyond the top of the deck (about 2 inches) to account for the fabric of the bag that will get folded over to encase the drawstrings. Mark the edges of the amount of fabric you’ll need—if you don’t want to do math, eyeball it to the best of your ability; the tarot deck doesn’t need to fit super snugly, so when in doubt go a bit bigger than you think you’ll need.
The French seam version and the standard seam version require very similar amounts of fabric. (Spoiler alert: in the photo below I ended up needing a LOT less fabric for the French seam version than I thought I would; the bag is comically big).
The rectangular panel you’ve outlined will be one side of your bag. Cut it out of the larger piece of fabric, and use it as a template for cutting out your second piece of fabric. You only need two pieces.
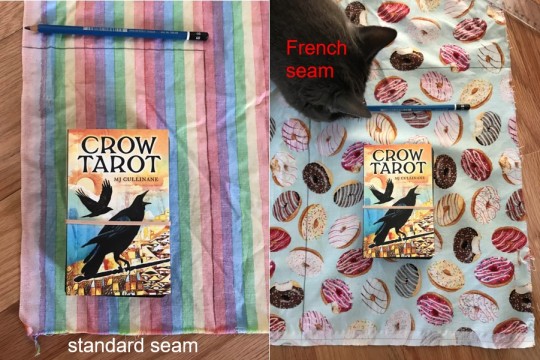
I used some leftover quilting cotton from my fabric stash (both prints were acquired at Joann’s, if you’re looking for donut or rainbow-printed cotton). I also used a 6B pencil for fabric marking in both cases. (Pic on the right features Feline Assistance, since I am an incompetent sewist without The Furry Tyrant supervising me).
We’re going to focus on the standard seam version of the bag for the next step, and will return to the French seam version later on.
Step 2a: building the drawstring casing + finishing the edges (standard seam version)
First, fold the edge of the top of the bag over just a little bit. You don’t need to formally measure this. Then, fold it over again, larger, to make a tube that the raw, unfinished edge is enclosed inside. This edge, because it’s enclosed in the drawstring casing, doesn’t need to be finished, but the rest of the edges do. This tube needs to be big enough for both of your drawstrings to be threaded through. Pin this drawstring casing in place on both panels of your bag. (See pictures below for a visual aid).
Now, there are several ways of finishing a raw edge—aside from using French seams—that have been mentioned previously: using pinking shears to trim the raw edges (workable, but not recommended), and using Fray Check to glue the raw edges and thereby stop them from fraying (and also render the finished product un-washable). Use these methods if you so desire.
If you have access to a sewing machine, there is also a third option: the zig-zag stitch.
For the zig-zag stitch: on the sewing machine, change your stitch width to a much wider setting than usual. I’m using my mother’s Polish behemoth from the 1980s, so I can’t give you a one-size-fits-all guide for changing the settings on a sewing machine. If you don’t know how, your sewing machine should come with a manual explaining how to use it, or you could find the brand + model number and look up tutorials online. Once the stitch width has been changed, you need to know how much of your bag to sew in this stitch.

Going as close to the edges of your fabric as possible, sew the zig-zag stitch around the single-layer edges of the sides and bottom of the bag (the topmost side in the photo). DO NOT sew any part of the drawstring casing; that will come later. At the beginning and end of your stitching, go back and stitch 1/2-inch of what you’ve already sewn with the machine. It will look a little ugly, but this forms a knot that ensures that the stitching won’t come undone (and when the bag is finished, you won’t be able to see this from the exterior).
Do this for both panels of your drawstring bag.
Step 2b: building the drawstring casing (French seam version)
It’s exactly the same as the standard seam version. The raw edges of French seams will be entirely finished after they are seams rather than just edges, so you only build the drawstring casing here.
Step 3a: seaming the panels together (standard seam version)
Put the 2 panels together with the “right” sides of the panels facing each other. (If you’re using printed fabric, the side of the fabric where the print is brighter + more visible is the “right” side). If you’re using solid-color fabric, the right vs. wrong side of the fabric probably won’t be visible enough to matter. Pin the panels to each other so they remain together.
If you’re using a sewing machine, change the stitch width back to its normal, narrow width. Using a 5/8-inch seam allowance (there will likely be a guide on your sewing machine’s throat plate, near the needle—if not, you can draw a guideline for a consistent seam allowance with a marking tool), stitch along the bottom and sides of the bag to seam the two panels together, leaving an opening at the top. At the beginning and at the end end of your seam, backstitch at least 1/2-inch over your work to ensure that the stitching doesn’t come undone. DO NOT sew over the drawstring casing or under it; your finished seam should make a sharp-cornered U-shape. Remove the pins if you haven’t already.
If you’re sewing by hand, thread your needle with a single strand and tie a knot at the tail end. Using the back stitch (video tutorial here), sew along a 5/8-inch seam allowance in as straight a line as possible (it would help to draw yourself a guide beforehand) to make that U-shaped seam. Tie a knot once you’ve reached the end of the seam, and remove the pins if you haven’t already.
If you have access to an iron, iron the seam open as best you can so that the two wings of the seam lie flat against the body of the bag. DO NOT IRON if you’re using velvet; ironing will crush the “pile” of the velvet and ruin it—permanently.
Step 3b: seaming the panels together (French seam version)
This is very similar to the standard seam version, BUT instead of the seam having a U-shape, you’ll instead be making 2 vertical lines; you’re only sewing the side seams, and the bottom of the bag will be left open for now.
Step 3.5b: finish the raw edges + sew the bottom seam (French seam version)
Remove ALL the pins if you haven’t already, even the ones for your drawstring casing. Unfold your drawstring casing. Take one of the raw edges of the side seams and fold it under itself, so that the edge is out of sight. Do this for the unsewn, topmost portion of the bag that forms the drawstring casing, too. If you have access to an iron, press this edge so that it holds this shape and the raw edge stays hidden. If you don’t have an iron, use pins. Do this to both sides of both seams.
Next, sew the wings of the side seams into their folded position so that they cannot unfold and the raw edges are permanently hidden away. This stitching will be visible regardless of whether the bag is right side out or not, so be neat here if aesthetics matter to you. Because these seams aren’t going to take a lot of strain, you can use a running stitch (video tutorial here) rather than a back stitch if you’re sewing by hand. It’s quicker.

After that, take the bag and turn it right side out. If you want to get into good sewing habits and do this “properly,” then you’ll mark a 1/4-inch seam allowance along the bottom edge. 1/4-inch seam allowances aren’t common except in quilting, but if you were making a garment you’d want this seam to be 1/4-inch and then the next seam to be 3/8-inch, and therefore your final (French) seam will be exactly 5/8-inch just like a standard seam—thus, the propriety of sewing is preserved.
But, for a project like this where we don’t spend a lot of time looking at rulers, that level of precision isn’t necessary. My advice, if you’re new to sewing and you’re using a machine, is to have all your seam allowances be the same size for this project. (You compensate for this uniformity by needing slightly more fabric, however).
Therefore, sew the bottom seam of the drawstring bag with either a 1/4-inch or 5/8-inch seam allowance—whichever your heart desires. Make sure your side seams are at the sides (the above photo series was twisted around just to demonstrate the stitching) if aesthetics matter to you. If the side seams aren’t at the sides when you sew the bottom seam, the finished bag will be oddly-shaped and close crookedly. Use a back stitch if sewing the bottom seam by hand. Next, trim down the excess seam allowance to approximately 1/8 of an inch (it doesn’t have to be exact). Yes, you will cut through parts of your side seams when you do this; I promise they won’t unravel once the bag is complete.
Once this is done, turn the bag wrong side out again and (if you have access to an iron) press the bottom seam as flat as you can. Then sew another seam further up the bag from the previous seam you just made, ideally at that 3/8-inch seam allowance.
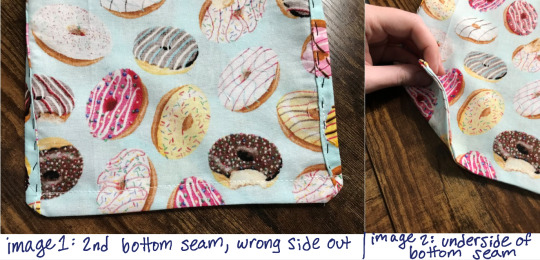
The bulk of the side seams at the ends will be difficult to sew through. If you’re hand sewing, a thimble would be useful here. If you’re sewing by machine, go slowly; you don’t want to break your needle. If you did this correctly, turning the bag inside-out where indicated, then the raw edge of your first bottom seam should be completely encased within the tube created by the second bottom seam and thereby protected from fraying. If it isn’t… pick apart your stitches and restart from wherever things went awry. You can do this!
Step 4b: sew down the drawstring casing (French seam version)
We’re moving from the bottom of the bag to the top. Do you remember those folded-over tubes from Step 2 that encased the raw edges of the top of the bag and formed the drawstring casing? You’ll need to refold and re-pin the top of the bag now. If you’re using a sewing machine you can sew down that fold, staying as close to the edge of the fold as possible to maximize the size of the tube.
DO NOT sew the ends of the tube shut; you’ll want them open so that the drawstrings can slide through. DO NOT sew the two halves of the bag together; there needs to be an opening so you can put your tarot deck inside. If you’re sewing by hand, use the whip stitch (video tutorial here) to tack down the folded fabric and hold it in place.
Turn the bag right side out.
Step 4a: sew down the drawstring casing (standard seam version)
Step 4a is largely the same as Step 4b, BUT before you fold down and pin the top of the bag, you need to fold back the vertical raw edges that haven’t been finished, tuck the raw edge under the bulk of the fabric, and then sew them into place. This always involves a tricky arrangement of pins when I do it, so I tend to do this part by hand with a whip stitch.
Once this is done, fold and tack down the drawstring casing the same as you would in Step 4b. Turn the bag right side out.
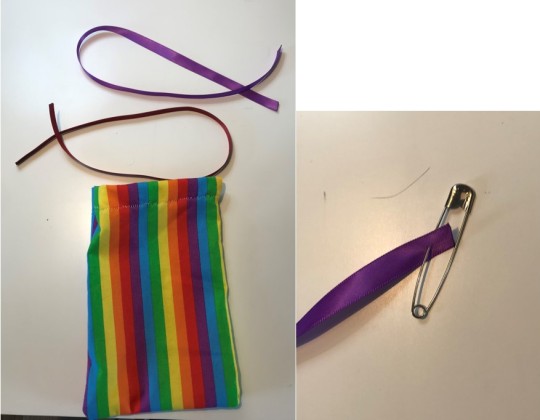
Step 5: insert the drawstrings (standard seam + French seam versions)
I generally use polyester ribbons as drawstrings, since I have altogether too much ribbon at my disposal. However, you can also use twill tape, braided fiber or leather cordage, yarn, or (in a pinch) a pair of shoelaces.
The method of threading your drawstring through the casing is the same in all cases: take a safety pin and attach it to one end of your drawstring, then begin feeding the safety pin through the casing. Go all the way around so that the two ends of the drawstring poke through on the same side. Remove the safety pin. Do the same thing for the next drawstring, but start and end on the opposite side of the bag.
Leather will not fray. Shoelaces, so long as the aglets are still attached, also will not fray. Polyester ribbon, however, frays very easily. If you’re using polyester ribbon, the easiest way to prevent it from turning into a bunch of loosely-connected string is to take the ends and briefly hold them near but not inside a candle flame—not close enough that the polyester catches fire or smokes, but just enough that the polyester (plastic) melts and forms a hard edge at the very end of the ribbon. If you don’t want to involve fire with this project, you can also use Fray Check OR tie a hard knot.
If you want to add beads and/or charms to the drawstrings of your tarot bag, now would be a good time to do so. You can tie the ends of the drawstrings together to hold the charms/beads in place.
And we’re done! Congratulations on finishing your drawstring tarot bag!

(Optional) Step 6: add decoration
Your bag is complete! However, if you want to add some personal/decorative touches, absolutely feel more than free. Some ideas for decoration are:
felt appliqué
embroidery
beading
iron-on patches (I would recommend sewing them, for extra security)
Thank you so much for reaching the end of this tutorial. I’m really proud of you for even just being interested in this DIY project; it’s always good to learn how to make your own things when and where you can! If you’re struggling with any aspect of the tutorial, please feel free to send me questions, and I’ll help out to the best of my ability. A version of this bag with a lining to hide the internal seams is coming soon!
73 notes
·
View notes
Text
[Event] Writeblr Secret Admirer 2022 // Today's the day!

Happy Valentine's day everyone!
A grand total of 123 people signed up for this event! That is such a huge number, and I am absolutely delighted that so many people wanted to spread the love.
Participants, please read this carefully!
If you have signed up for the Writeblr Secret Admirer event, today is the day you should be sending out asks! You should’ve already received your assignment in your inbox: If you have not, please send me an ask off anon. I will not be able to help you if I don't know who you are.
When you receive your Secret Admirer message, please post it and tag it with #writeblr secret admirer
You must send in your ask today on February 14th!
Please specify that you are their assigned Secret Admirer so that they know that they have received the message they have been waiting for.
If you have any questions, please look at the FAQ first.
If you have a question not covered in the FAQ, please send me an ask.
If you have an issue concerning your assignment (i.e., they don't have their ask on), please DM me.
If you don't receive a secret admirer ask, don't panic and please be patient! Give it one more day; it might be because of time zone differences.
If it is February 16th, and you still have not received your ask, please submit your URL to this form. This form is currently closed, and I will open it up for responses on February 16th, 8AM CST. Do not DM me, I will DM you.
Please consider boosting this post! Not every participant has followed me, so there's a possibility that they will not see this important announcement. Every single reblog helps increase the likelihood that everyone who needs to see this will.
Thank you all so much for participating! I'm so excited that over a hundred people signed up for the third year in a row. Although I'm just the organizer and I'm not participating in the event, I'm planning to pop into some people's asks as well. If you have any feedback or thoughts about this event, I'd love to hear it.
I hope you have a lot of fun, and that you feel loved and appreciated today 🥰
Writeblr Secret Admirer event: Today's the day!
60 notes
·
View notes
Text
If I could do data systems work on a switch I would get one so fast
they shouldnt put video games on the switch
60K notes
·
View notes

Text
Really needed to be called out like that
Is there something deeply evil living within me or am I just up past my bedtime
77K notes
·
View notes
Note
tag the oc pairing:
“For the record this is self-destructive.”
“For the record, I’m aware of that.”
.
176 notes
·
View notes
Text
Stuffed animals go to heaven
all stuffed animals have a little bit of god inside them a little soul
16K notes
·
View notes
Text
by even allowing the question "which trans people are fake?" to enter public discussions within our community we are reinforcing the idea that fake trans people exist which is then used by cis people against all of us
11K notes
·
View notes
Note
I’m still here, just became active again, I forget exactly what year I joined but it was around 2018-ish
Hello undine, can you help spread this? I feel like all the writeblrs from 2018 era are gone now and that makes me sad. Are any of you still around? I hope everyone is doing alright
First of all, I'm a writeblr from the 2018 era so make a note of that. "Undine is alive and kicking still, and we can't get rid of her no matter how hard we try." Write that down, word for word.
And there are still several writeblrs around from back when I joined writeblr for the very first time in 2018!
Just off the top of my head there's @incandescent-creativity @roselinbooks @writings-of-a-narwhal @madammuffins @bexminx @souliloquyyy @promptsforthestrugglingauthor @stories-by-rie @kainablue @abalonetea @leave-her-a-tome @she-who-fights-and-writes @ohlooksheswriting @cabaretofwords @farrradays @bookishdiplodocus @ink-flavored @caitwritesstuff @quilloftheclouds @iparisaltanwing @bookenders @reeseweston and I'm sure there are ton of others that I'm missing!
I did just check every single one of their blogs, and they all should have been active at least once in the past month or so. I don't all know for sure if they're from the 2018 era (I myself, was from October 2018 so I was only around for a little bit) but they're all people I remember chatting with and looking up to back in ye olde days of writeblr around 2-3 years ago when I was super, extremely active and in my writeblr prime (and popular 😉 jkjk).
I definitely understand what you mean though. Not only has there been a huge generational shift in modern-day writeblrs, a lot of people are inactive, and I've also realized that I haven't talked to most of these people in a really, really long time.
No wonder why no one knows who I am these days. I'm very much a relic of 'old writeblr' now that's not super relevant anymore, aren't I? Resting on my withered laurels and all.
But yes! If you've been a part of writeblr for 3+ years, please sound off! Tag your friends! Let's find each other again! As much as I love and appreciate new writeblrs, I'd love to find and reconnect some of the older writeblrs still around. Please, please hit me up 🥰 I miss you all dearly, and would love to meet/catch up.
515 notes
·
View notes
Text
Omg can I be adopted too?
I’m pretty much a fucking demigod at this point.
i need to know if the percy jackson tumblr fandom is still thriving. because like those books literally kept me alive in the hardest times of my life and they are so dear to me and i feel like officially joining the actual fandom would be such an honor
37 notes
·
View notes