
Don't wanna be here? Send us removal request.
Statistics
We looked inside some of the posts by christopher5418183 and here's what we found interesting.
Average Info
Notes Per Post
45
Likes Per Post
23
Reblog Per Post
0
Reply Per Post
22
Time Between Posts
5 days
Number of Posts By Type
Text
11
Last Seen Tumblr Blogs


Fun Fact
The total number of visits Tumblr.com received during January 2021 is 327 million.
Text
Week 10

This whole course we have been learning how to create physical sketches, physical sketch models and digital models. This has provided many different opportunities to learn new skills and improve on old skills that can be used for future course as well as during full time work.
The first few week of the course, we learnt how to use engineering tools to create a variety of different types of sketches such as orthogonal, auxiliary and perspective sketches. I have quite a bit of experience sketching orthographic views in high school so relearning how to do them was not that hard. However, I definitely think I have improved from my high school days as I have learnt how to format my page better, add additional relevant information to the title block and used fineliners with different line weights to create a crisp sketch. Auxiliary views took a bit of time to wrap my head around, but once I understood its purpose and how it was drawn, it was quite easy to sketch. These first few weeks for the first assessment were relatively fun and interesting. Next time I will try to improve on my speed since the drawings did take some time but also would like to make less mistakes when I create the sketch such as misplaced lines and measurements. This can be remedied through continuing the practice doing more and more sketches.
For the next assessment we learnt how to do create perspective sketches, free hand sketches and digital rendering. Perspective drawings were definitely much harder than learning auxiliary sketches but I slowly got the hang of it. It was challenging to figure out how to draw some of the detailed areas of different objects accurately. But the more perspective sketches I did, the easier it became and the quicker I could do them. We also learnt how to free hand sketched different designs of a perfume bottle and use many drawing techniques to create something realistic. I was never really good at drawing and the decent drawings I create take me a long time. However some of these drawing techniques were able to assist me to make cleaner sketches. However I struggled quite a bit when creating a perspective sketch for the perfume bottle since there was so much more detail compared to the previous perspective sketches I made. It took a while but in the end I was satisfied with my result. Digital rendering was quite intimidating to me because I have virtually never used photoshop before. Because of this, I chose bottles that looked similar in size and didn’t have super complex shapes. In the end I was pretty happy with how it turned out. Overall this assessment was definitely a step up for me but I think I was able to manage relatively well. I enjoyed the perspective sketching but not so much the freehand sketches and digital renders.
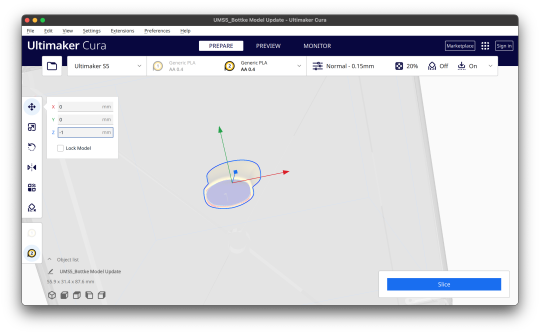
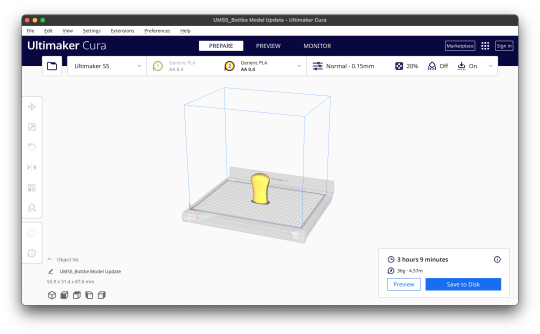
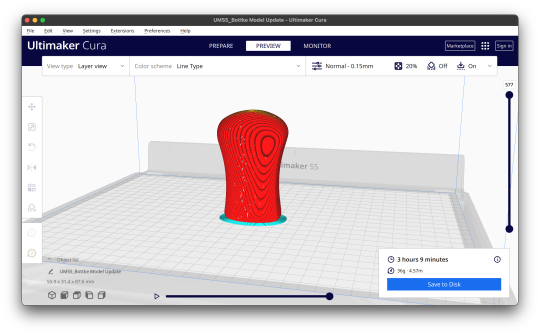
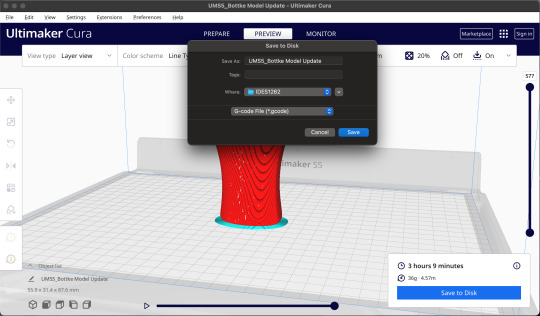
For the final few weeks we learnt to create physical models and use a 3 dimensional modelling program to create models and clean up digital scans. Creating the physical model wasn’t too hard. Because I love creating craft at home and have had 5 years of experience in wood working at school, I didn’t find it too difficult to create a foam model. The only setback was that I had very little experience with foam so I was definitely a lot more cautious than usual and took a lot more time and care. This was worth it because I’m quite pleased with my end result. However, when I began using 3ds max it was quite a roller coaster. I have little to no experience using autodesk apps and 3ds max was a completely new experience. I followed the videos for tutorials and it took a bit of time to understand but was not super difficult. But when I tried making my own model in the program, I was not sure where to start. I found it hard to think of what functions I should use to make any object. I eventually figure out how to do it but it definitely wasn’t the best model and quite a painful experience. We then learnt how to prepare a 3d scan in rhino and 3ds max so that it can later be 3d printed. Considering my last encounter with 3ds max I was quite intimidated but in the end I didn’t find it that difficult. It was honestly quite interesting how we could modify a scan of a physical model digitally and then create digital iterations to be later 3d printed so we could have physical iterations. After that we learnt how to put it into the 3d printing software to be printed at any time. These final few weeks I found were equally as challenging as the previous three. This assessment had its ups and downs but overall was helpful for future projects.
All in all, this course has definitely been helpful and useful. Not everything was that enjoyable but most things were definitely informative and helpful. It was definitely useful to look at my peer’s work to share our knowledge and advise with each other to improve on both our strengths and weaknesses. I look for to be using these skills I’ve picked up sometime in the future.
6 notes
·
View notes
Text
Week 9
This week I learnt how to prepare a 3d scan for 3d printing using 3ds max. We were first given a base scan of an olay bottle which we would clean up and modify in rhino and 3ds max which we can then export as an stl file so it can be 3d printed. The first step was to quadify the mesh model so it is easier to manipulate later on. We did this through importing the file into rhino and using the quad mesh tool which was not that hard.
We then exported as a 3ds file and the opened it up in 3ds max so it can be further refined. To make it easier to fix up later, we first had reorient the bottle to make it more manageable. This included things such as positioning the bottle in the centre of the base of the bottle. There were quite a few steps that were involved so it took some time to get it right but overall not too hard to figure out.

After finishing off the bottle’s orientation, we could begin cleaning it up such as making it more smooth, removing any dents and more symmetrical. To remove the dents, I had to convent the mesh into an editable polygon to make it easier to edit different points and area of the bottle that need fixing. After removing the imperfections, I used the symmetry command to make the bottle more even and symmetrical. The symmetry tool left a seem on one of the sides of the bottle so I used the relax paint deformation command to smooth it out. Cleaning the bottle was not too hard to do but was tedious because it took time to find just the right spot that needed to be.

After cleaning up the bottle into a nice uniform shape, I could begin reworking the model into a different figure. To do this, I converted it to an editable polygon again and then used the FFD function in combination with the taper and symmetry commands to create a slimmer, taller and more ergonomic bottle shape. This was not difficult since I just repeated some of the steps I did previously. This could then be exported as an stl file so it can later be 3d printed. Overall, considering I don’t like using 3ds max and not very good at using it, I am satisfied with my end result.


6 notes
·
View notes
Text
Week 8
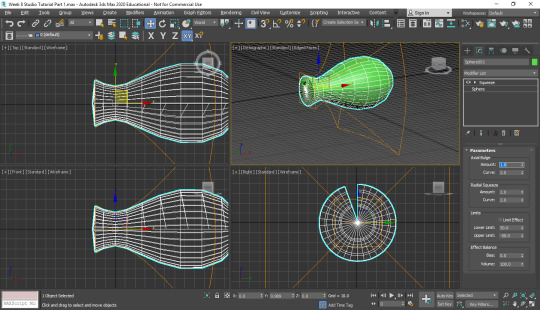
This week I learnt how to use 3ds max to create 3 dimensional models. For Part 1 we first learnt how to use some of the program’s functions and properties in order to understand how the interface worked. Initially I also found it quite hard to get used to because I own a Mac. PCs have different keyboards and functions and 3ds max only runs on windows so every tutorial online runs on a PC which made it quite difficult to figure out how to use some of the functions. One example is the 'delete' key on a PC is equivalent to the 'delete' and 'fn' keys on a Mac. The 'alt' key is need for panning or enlarging view ports. Although google says 'option' on a mac is the same as 'alt', holding down the 'command' key is also needed when panning or enlarging views. This definitely took time to get used to and was quite frustrating but I eventually go the hang of it.
Once I got used to it I was able to go through the functions in the interface. I learnt that there were so many different functions with so many slight variations that can be used to create virtually anything. I was messing around with some of the functions on sphere base and it resulted in pretty interesting shapes that looked nothing like a sphere. I also realised that switching the order of the functions changes the shape of the object quite significantly which can be seen in the photos below.


For part two I learnt to use some of the polygon modelling tools and learnt to create some models through following the linked videos. I found it relatively easy to follow the videos and wrap my head around some the of the tools and how they work. I also found modelling the bench not too hard.

However when it came to creating my own model, I was quite stuck. Following the steps to create a model was one thing but think about how to create your own and the steps and functions necessary to create it was another. Because I found it quite difficult I tried to think of something simple to create and make it to the best of my ability. I eventually settled on a coffee mug and tried search up some videos of the methods used to create one. I eventually found one not too hard to follow but I did not want to copy it so I modified the way I created it slightly and am contempt with the final result. Overall I am satisfied with my final model and found out that using 3ds max as a modelling program was much harder than some other programs I had experience with.


4 notes
·
View notes
Text
Week 7
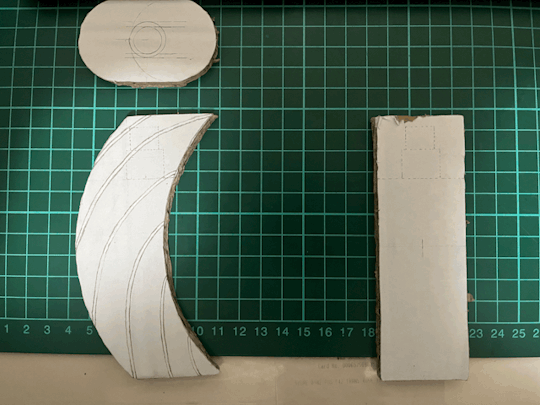
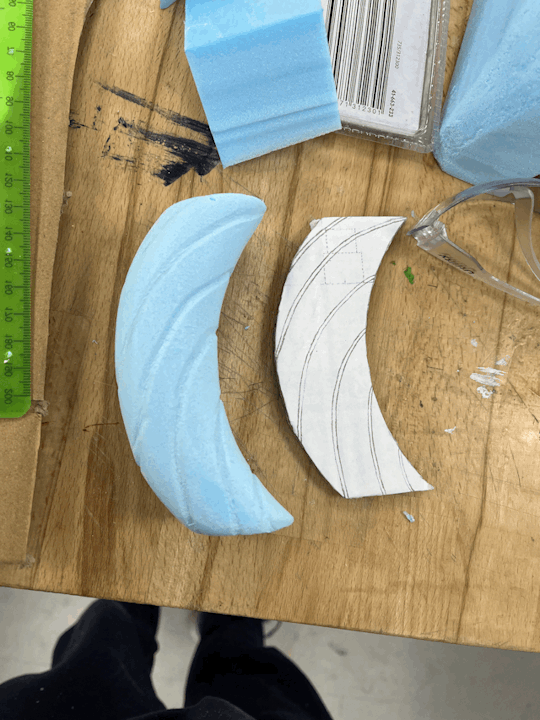
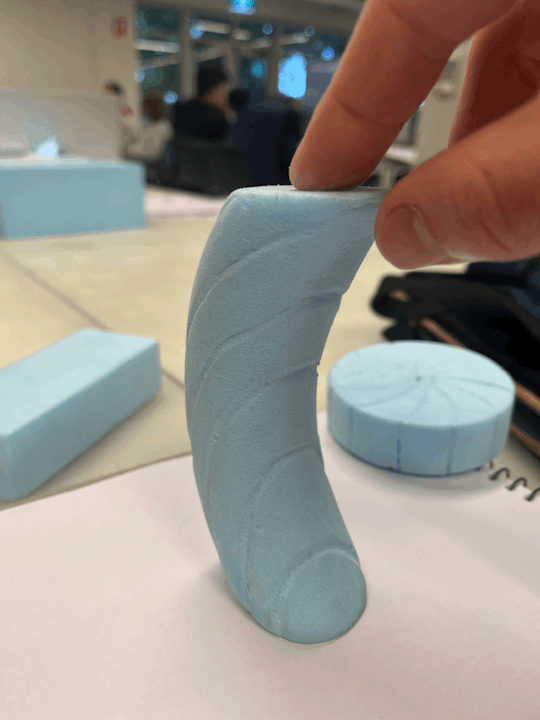
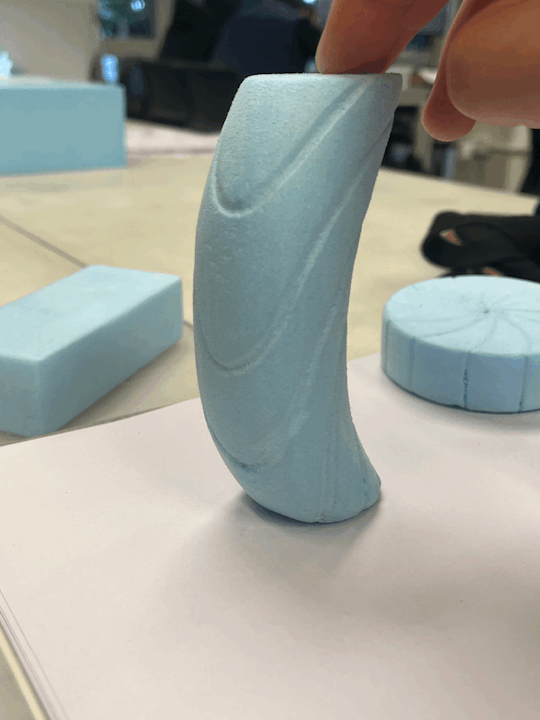
This week we learnt how to create a model of our perfume bottle design using blue foam. The first step was to create an orthogonal sketch of our bottles which I didn’t find that difficult and did take too long because we have done quite a few orthogonal sketches in the past weeks. By gluing each view point on a piece of corrugated cardboard and cutting out the shape using scalpels and box cutters, I was able to extract templates that could be used to assist in shaping my bottle. This wasn’t that hard but making sure that the curves were perfect was not super quick.
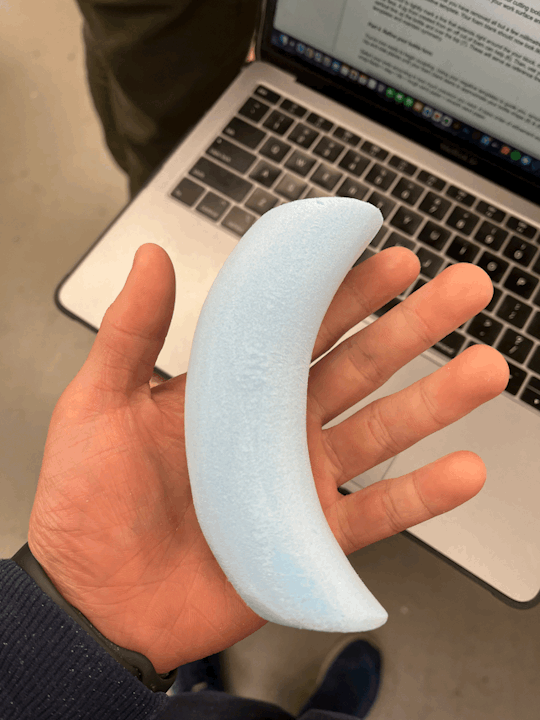
After creating the templates I was able to draw the rough shape on a block of foam and used a range of tools and machines to create the rough curved cylindrical shape of the bottle. This was quite enjoyable but not that easy since it is difficult to make the bottle perfectly round while maintaining the curved shape. It also took a decent amount of time.
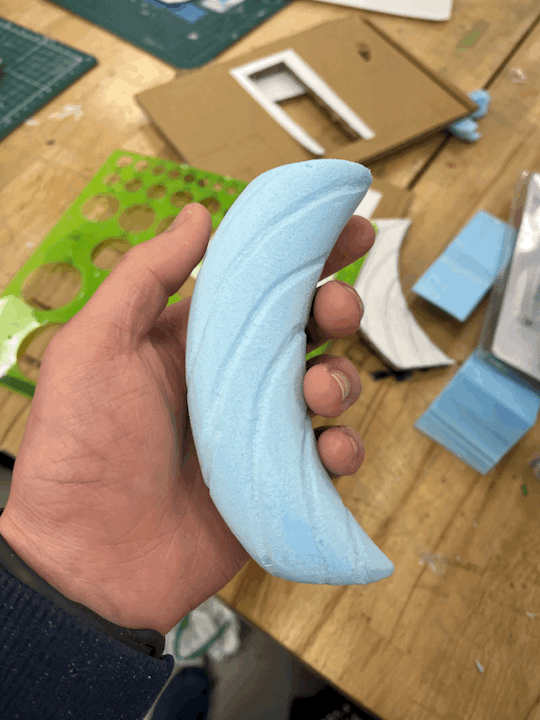
Because the decorative curves on the bottle are quite difficult to get accurate I decided not to make them straight away but first use a pencil and used to template as a guide to mark the highest and lowest point of each curve and then free hand the curve using the pencil making sure they were equal on each side and didn’t go too deep into the foam. This was definitely tedious and I made a few mistakes here and there but nothing that couldn’t be fixed when I create the actual lines.

To create the lines I used a round file to go over each of the grooves making sure all the lead was removed and mistakes were remedied. I believe the initial pencil marks were worth it because I am white happy with the end result. Overall I am definitely happy with the end result. One thing I could improve on is making the decorative grooves a little more semless and make it flow around the bottle better because it is a little straight and inconsistent on smart areas.
4 notes
·
View notes
Text
Week 6
This week I rendered a few of my concept perfume bottles in photoshop. I have not used photoshop since year 8 so this was essentially a whole new experience for me. I first picked 3 bottles that looked roughly the same size and used the same overall dimensions a placing of parts to remedy my mistakes last week. Learning to render my sketches was definitely challenging since I was new to how the program worked. For a first attempt, I believe I did alright. I was not able to create an outline for the bottle but was able to shade the bottles and create sketch marks to some areas of the bottles. I was also able to create a few contour lines. One thing I also found hard was creating smooth curves for some areas of the bottles. It was difficult to keep the computer mouse steady and move it in a seamless manner. Creating the shading took sometime to create and adjust but I believe I did quite well for that component of the bottom. I chose this tone of blue because I wanted to create a frost glass look on the surface of the bottle and the shadow and highlights make the cap have a silver finish. I also chose the yellow background the make the bottle stand out more. I also was not able to create the detailed lines in some of the bottles because were too difficult.

Over I think I did not perfect but good. It was challenging at times and I couldn't do everything I would have like to but it was relatively enjoyable.
5 notes
·
View notes
Text
Week 5
This week we did some drawing sketching drills to help get used to free hand sketching basic shapes and objects as well as adding details to help a person visualise sketches better and make them look more detailed. Sketching straight lines free handed was quite difficult and took time to get used to. I don't think my lines are close to perfect but I do think I improved overtime. I also found that drawing horizontal lines where much easier than vertical. Plotting dots and connecting them was quite a strange exercise and i don't believe I created anything very artistic. Drawing circles and ellipses was challenging to get smooth and spherical but I get much better overtime. The ellipses in perspective I also found not too hard. Sketching the cubes and contour lines wasn't too bad but did take some time. Shading 3 dimensional forms was a little more challenging because it took time to understand how light and shadows behave when meeting certain objects.


After doing the drills, I moved on the creating difference designs for an object. This object was an olay bottle. However the tutor stated that we could combined with our studio class and create different design for perfume bottles instead. This could have been useful but I side tracked quite a bit and resulted in quite a few mistakes. I focused too much on the brief for another subject that I did not completely follow the brief for the task. I made 12 even rectangles but didn't create 12 perfume bottles roughly equal size which was required. I also need the heads of the perfume bottles to be equal in height which I also missed. I also create quite a bit of detail which wasn't necessarily against the brief but it caused me to lose focus on the main priorities.

For the perspective, I chose one that that similar height and size compared to the rest of the bottles and then used those dimensions to create a 2 point perspective drawing. After creating 3 perspective drawings, I was able to lay out my reference lines and orthogonal perspectives much faster. However a perfume bottle is much trickier compared to a box so it took roughly the same amount of time as my first perspective sketch. I first created a box with the maximum dimensions of the bottles so it would be easier to sketch inside. I then added contour lines and shading to create its shape. The lines on the bottom for detail can also can be confused with the contour lines which was also another problem.

Over this task was not something that I believe I was able to complete to a high standard. I made a lot of mistakes and problems for myself. Making these mistakes, I have learnt to concentrate primarily on the brief given and focus on other optional areas if possible and only if it does not steer away from the aim of the task. These mistakes lead to quite a bit of frustration resulting in me not enjoying this task very much.
4 notes
·
View notes
Text
Week 4
This week we had to draw in two point perspective. I have never drawn anything accurately in perspective before so this was a new experience and quite challenging to begin with. I first had to wrap my head around how everything should be laid out so I draw all the necessary reference lines before I started sketching my chamfered box. It was initially confusing and took a bit of time to get used to all using all the necessary components and points but didn't take too long to understand.

After I sketched all the reference lines, I began sketching the chamfered box in perspective before I sketched the top and front view. As I was sketching I was getting confused on how i could draw the box accurately with the correct measurement and then quickly realised that i had made a mistake and need to base my perspective of the orthogonal perspectives using my actual measurements. Drawing the top perspective was also quite confusing coz I found that the box didn't have right angles but later found out that it was not supposed to.

After I sketched the two orthogonal perspectives I could create the two point perspective and use the points from the orthogonal sketches as references. One of the common mistakes I constantly made was sketching lines from SP to RVP and LVP instead of BL. Wasn't a huge problem but just took some time to get used to. But other than that, it wasn't very hard to create the overall shape of the box.

However I did find it quite challenging to figure out how to create the chamfer on the box in the exact position it needed to be on the corner of the box. I took a few minutes to think about it. I looked at what I could use in the other two sketches to create it and what methods I used to create the frame of the box and then figured it can be created virtually the same way. I just need to find the 3 points which wasn't too hard and join them together. I cleaned up all the reference line and then finished the box with black marker.

Once I drew my first two point perspective sketch, the rest were much easier to understand I could create them much faster. The second part required the viewing point to be slightly further away. Changing the viewing point made the perspective sketch slightly taller since the top of the box was more visible. It was also required to add boxes on the 3 exposed faces of the current box. The front two boxes appear much larger than the initial box. The top box seems slightly smaller since the top is almost in line with the HL. I then cleaned it up and traced them over with a black marker. This was much easier than the first task.

The final task wasn't too hard. The only part that made me a bit lost for a while was finding the major and minor axis of the circles. Figuring out how to draw the circles in perspective didn't take too long but was hard to get accurate and smooth. It took a while to understand where the major and minor axis should be in relation to the surfaces and VPs and I made quite a few mistakes such as matching the wrong vanishing points and surfaces or labelling the axes wrong but I eventually got the hang of it. I then cleaned everything up and marked the two axes in different colours so they are distinguishable.

I learnt how time consuming and involved perspective drawings can be and how much harder they are compared to isometric and orthogonal. Overall this was definitely challenging and new experience for me but quite enjoyable.
4 notes
·
View notes
Text
Week 3 Studio Tutorial
To sketch out the front, top, sectional and auxiliary views, I first created simple free hand sketches to gain an overall idea on how each of the perspective would look. I positioned each perspective in a way that would allow me to use some of the points on each sketch as references for each of the other perspectives. Roughly sketching what each perspective would look like on the page was quite easy.

Once I could picture what I should be sketching I began with creating a border and title block. I then used the space within the border and divided the page into quarters and found the centre of every quarter. I then began using the measurement provided to find the maximum dimensions was slightly too large and the front and sectional drawings would go below the top of title block. This was slightly annoying but was not that much of an inconvenience. I just erased the faint pencil line I marked for the centre and raise just enough for the sketches of the tapered box to fit. After raising the lines centre line slightly, I drew the maximum dimensions for the front, top and sectional view. I also checked with a ruler whether the auxiliary sketch would fit using a ruler and I had just enough room to fit it in.

After drawing the lines out for the maximum dimensions, I began sketching each perspective within each of the boxes starting with the front. I then moved on to top view and the sectional view. After creating the sectional view, I was able to use some points to create the auxiliary view. This was especially helpful and necessary for the auxiliary projection as the measurements given do not inform you on all the dimensions of the taper and they can’t be worked out using simple addition and subtraction of the taper. By referencing of my sectional view, I didn’t have to do as many calculations such as figuring out the height of the trapezium so I could work out the length of the sides. By freehand sketching previous, I was easily able to check whether the rough shape of each view was correct. This was also not that hard.

After drawing everything out, I used 3 different fine liners with varying thicknesses to go over my lines. The thickest was used to draw the outlines of each perspective while the thinner one was for the internal lines and the thinnest was for the parallel lines indicating the cross section. I then rubbed out any pencil marks that weren’t relevant anymore. I also redrew the lines showing which points line up front each view as well as added in all the measurement necessary for recreating this sketch or object. I also create a dashed line indicating where the object would be sectioned. This took a decent amount of time but was not very difficult. I also accidentally moved my fine liner out of place in the top view ruining the sketch. I could avoid this next time by not pressing to hard against my ruler when going over the pencil marks. Overall I reckon this was a relatively fun activity.

5 notes
·
View notes
Text
Week 2 Studio Tutorial
To make the 5 sided box, I first measured out the width length and height of my object (chewing gum container) using combination of tools such as the circle template and set squares. After finding them, I added 10mm to each dimension and then uses those measurements to create a template for my box. I definitely could have marked out my template a lot better. I realised that the main reason why I made quite a few mistakes and didn’t have square lines at times was because my t-square was faulty. Another mistake I made was making my construction lines really dark. Next time I should press my clutch pencil lightly on the page so that they could easily be erased. After creating my construction lines as perfect as I could make it, I created all the required cuts, erased the construction lines as much as I could, labelled each side and then assembled the box using masking tape.


After creating the box, I could use it to easily picture each side I should free hand sketch. I drew rough sketches of the top, front and sides. After drawing the third angle projection, I needed to measure out my object in order to accurately sketch a scaled orthogonal drawing. Grabbing all the measurement was actually more difficult than anticipated because a lot of the dimensions were rounded.

After finding all my dimensions, I set out a new page for my orthogonal drawing. I first created a border, then created a title block and divided the page into quarters. I then found the centre of each of the quarter so I could position each perspective perfectly. After finding the centred. I drew a box in 3 of the 4 quarters for each drawing containing the maximum dimensions of each of the drawings. After finding the maximum dimensions, I began to sketch the front, top and side perspective of the object. This was quite hard with the faulty t square but manageable. It was also quite hard to make sure I drew the measurements correctly since the measurements are quite small and leave little room for error. Creating my sketches using a combination of my sketching equipment, I went over them with 2 different thickness fine liners. The thick fine liner was used for all outside lines of each sketch as well as the title block and border will the thinner fine liner was used for the internal detail of the sketches and measurements. This was relatively tedious but not difficult. Despite the difficulties I had, this was relatively enjoyable.


2 notes
·
View notes
Text
About myself
Hi, definitely a little late but I’m Chris. I’m just a dude who likes going climbing, woodworking, bubble tea and Marvel+DC. Looking forward to learning more in this class about using each of the different sketching instruments as well as techniques and knowledge I can use to improve my sketching as it is definitely useful for the designing process of different projects.
0 notes
Text
Week 1 Studio Tutorial
This week we learnt how to use a range of drawing instruments to create different shapes and patterns on our page. Part 1 of the exercise included drawing two different figures. I initially was going to draw the first figure by trying to calculating where all the points the star would touch the circle but then i realised that there were no need for calculation since i had the top and bottom point of the circle and could use the set square with the 30 and 60 degree angles to create the equilateral triangles. Taping my page down on the page and using a combination of the t square and set square, I was able to easily and accurately create the required.
The second figure was slightly trickier but was not too hard since I had now gotten used to how I should use my instruments. I first drew the circles, including the circles required for the rounded objects using a compass, and the smaller circles using the circle template. By using the set square with 45 degrees I could create a cross in the centre and then offset it to the required length on each side connecting the two inner circles. After creating the shapes inside the circle, I could then round the edges using the circle template and complete the pattern. One thing I could have done better on my second figure was the outer circle. I pressed to hard into the centre create a large hole and slightly offset my circle which can be seen on the right of the circle.

Part 2 required creating a shape using the different instruments but also cutting the same shape out 4 times. The triangles in the shape required helped me picture how I could draw my shape. I also knew that I didn't need to draw all the triangles to create the shape. By creating an equilateral triangle with sides of 120mm, I could easily measure the base of the triangle and create a 60 degree angle using the set square on both ends of the bottom of the triangle. after creating the bottoms I could then use the 60 on the set square again to create a line from the bottom right point of the shape to the top left of the triangle. I was then able to cut out the shape using a metal ruler and knife and create 4 even shapes. All the shapes were quite close but not perfect. After I created the first shape, I should have drawn the following shapes and then checked them using the shape I had. I should have also cut on the outside of the line slightly so that I could slowly remove material and constantly check them using my first piece.
5 notes
·
View notes