
It/he/they || occasional incomprehensible brainrot || the sun, the stars, and the moon are in love
Don't wanna be here? Send us removal request.
Statistics
We looked inside some of the posts by coffeestainedlives and here's what we found interesting.
Average Info
Notes Per Post
2K
Likes Per Post
2K
Reblog Per Post
460
Reply Per Post
22
Time Between Posts
9 days
Number of Posts By Type
Text
13
Photo
1
Note
2
Last Seen Tumblr Blogs


Fun Fact
Tumblr is used by 21% of adults online aged 18-29 years.
Text
Suddenly feeling the Post-Good Day Guilt and Doom™
8 notes
·
View notes
Text
Do you love the colors of the sky? How it is ever present and ever changing? Does it's overbearing presence looming over you in every moment bring you comfort? Have you ever laid down and tried to comprehend even a little bit how large it was and found that you couldn't? Do you look up? Down? Around? It is everywhere. You are nothing compared to it. And there is so much more beyond it. If you love the colors of the sky. You'll enjoy sky blue.


all photos by me! :•)
42 notes
·
View notes
Photo


Sometimes I really want to read a short summary of what to expect from a game… and thankfully people can also submit their summaries of games they played and help me (and others) find games that cater to their interests!
submitted by @lairofsentinel
(click here for other videogames)
what to expect from ROAD 96
You play several teenagers that want to reach the border of the country. There is no customisation, but there are also no scenes that show your chars.
The country you are leaving is called Petria, a fantasy mixture of north of Mexico and communist Russia, where the tyranny is led by Tyrak. Mainstream media is completely bought and altered by him.
There is a meta plot that covers several in-game weeks, where the events evolve depending on the choices of the teenagers you control. Each NPC has a subplot associated with them that evolves depending on the teenager’s choices and how the meta-plot evolves. The stories occur on different levels. Personal story [the main teenager you control], NPC’s personal stories [related to the chars you meet along the road] and a meta story, general and broader. The way ones affect the other is amazing.
By the end of the story, most of the NPCs you met in your different roads are related to one another. There is a lot of humanity in them. Each of these chars is multilayered, with a background that makes them more complex and grey.
Every teenager you control, depending on their actions, can be arrested or die on the road, finishing their travel before reaching the border.
The teenager you use can pick their answers from 3 alignments: brigadier [ rebels that believe change can only be done with extreme measures], democrats [moderate ones who think voting fixes a tyranny], and apolitical view [self-centred]
Along the road, each teenager learns “tricks” such as hacking safes, or lockpicking doors to steal cars. These skills remain available for future teenagers.
The game has decent graphics.
Game fully voiced.
Several different endings.
Short game, around 10 hours of gameplay.
——- Plot? ——-
You are one of the many teenagers that have been disappearing “mysteriously”. The truth is that this country where you live, Petria, is a tyranny and in an attempt to find a better life, you, as a teenager, start a trip to the border. There is no guarantee of success. Many perish along the way. The road is filled with dangers but also with good people. Each road is a different story. This game is purely narrative with light elements of “puzzles” but they are immensely easy.
——- Gameplay? ——-
You have to pick which means you are going to use to continue your road: hitchhiking, walking along the road, stealing a car, using a bus, or calling a taxi. With each option, at a different place along the road, you trigger a different scene with different NPCs. Sometimes, interacting with some NPC will bring changes in the ending.
——- Characters? ——-
The many unknown teenagers you control, besides several npcs that carry their own stories and interact with the main plot.
——- LGBT? ——-
Nothing that I could have noticed.
——- Sadness level? ——-
Bearable level of sadness in some char’s backgrounds and in the endings.
——- Happy ending? Deaths? ——-
Keep reading
27 notes
·
View notes
Text
He is so just some guy and I will defend him until my death
9 notes
·
View notes
Text
CW: swearing
I apologise for my bad writing and explaining I just wanted to get my point across.
I'm not a fan of being serious but I keep seeing people talk about stuff about the TSP fandom that's just kind of making me really sad to see.
Can people stop shitting on artists for how they draw or characterise any TSP characters, specifically Narrator. So what if the desgins are different compared to others, unless the artist isn't hurting others or themselves by drawing a character the way they draw them then people should just mind their business.
Artists are drawing a character with no physical appearance, he can literally look like anything. And also so what if people write/draw him out of character, it shouldn't matter because people are having fun and enjoying themselves and expressing themselves via these characters. Sticking so closely to the source material would destroy any originality to the desgins, everyone having their own idea of the narrators is what makes it and the fandom so fun!
You're allowed to have an opinion on how you think the narrator or other characters look and act but that doesn't give you the right to shit on anyone else's desgins and comment negitive things.
This fandom is full of wonderful and skilled and talented artists and writers, they are having fun with what they do. The uniqueness and creativity is what makes this fandom shine and be as fun as it is.
Every desgin is beautiful <3 remember that.
Stop harassing artists.
892 notes
·
View notes
Text
I want to see Stanley parable content where when the narrator becomes human/takes a physical form and starts narrating his own actions as well as Stanley’s. And like. He eventually stops, but if he gets stressed/scared it starts happening again?? Does this make any sense?? Who knows
#tsp#the stanley parable#narrator tsp#brainrot#so much brainrot#tspud#tsp headcanon#??#kinda?#not really though#screaming into the void
30 notes
·
View notes
Note
Was there any meaning behind the different effects space had on the characters?
Yes! All of the characters were effected by the “space crazies” differently to reflect their personalities/flaws. Calypso always had a “toxic positivity” mindset, and often overworks themself, in space that mindset gets amplified by a thousand. Marly gets overwhelmed very easily, so having random knowledge beamed into her head at different points was an overstimulating sensory nightmare for her. Xander was deeply terrified of his feelings for Simon, and he had been repressing them for a long time. Adil has endless energy and being physically hindered by quite literally rotting from the inside out drove them to madness because they’ve never been able to sit still in their life. Lastly, Simon has really bad trust issues and has felt isolated his whole life, so all of his friends going crazy around him causes him to have an existential crisis.
39 notes
·
View notes


Text
Masks and Remaking Kandi Blah Blah
this is my THIRD time writing this post up
Soooo let's talk about that briefly. Why would you remake kandi?
Maybe the string is wearing thin. Maybe you don't like a color you used, or the type of beads or string you used. Regardless of, the general consensus is that remaking kandi you were traded for a reason beyond changing the string to renew it isn't a good idea. Obviously kandi is ever-changing, and this idea might change. Who knows?
Once you've decided you wanna go through with the remaking process, you've gotta disassemble it. I'd suggest starting from the bottom or top and just cutting the string, taking off the affected beads, and cut again. I'd advise going slow so you don't lose any beads. If you're also like me and have really bad vision-- hello y'all-- I'd suggest sorting apart colors you get confused. Otherwise you're gonna be shining a flashlight in your bag of beads for an hour wondering 'is this black? or dark blue?' Plot twist: it's neither and it's dark purple.
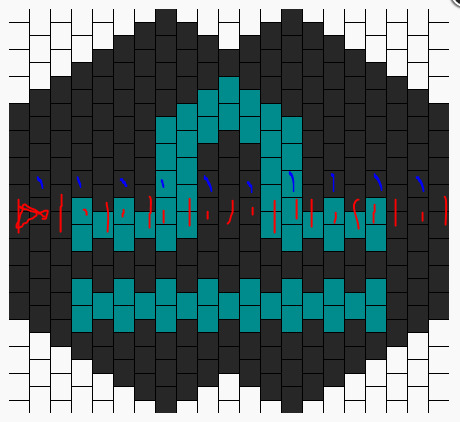
Today I'm gonna be using a modified version of this pattern by T3TR1S, with the old mask pictured below. Never too late to start on Halloween preperations, right?
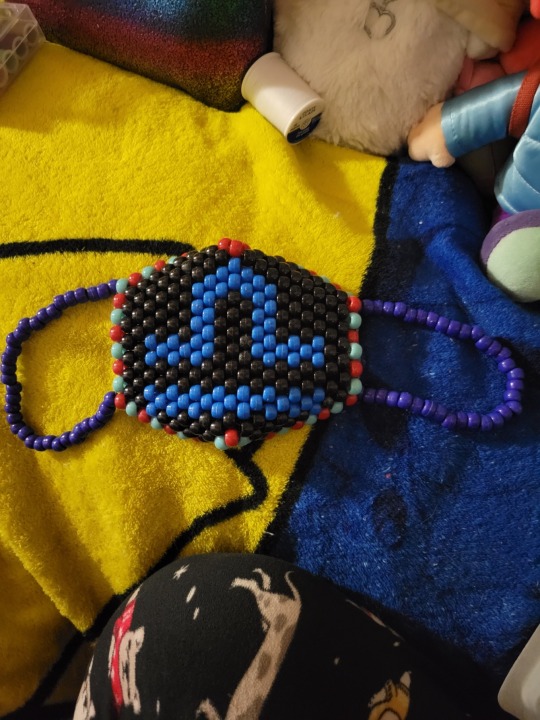
[Image ID: An uncropped photo of a kandi mask. It's 21 wide by 14 tall. The straps are a dark blue. The mask is black with a red and light blue alternating border, and the mask has a libra sign on it in a more cerulean color. End ID]
look i felt too lazy to crop that last night.
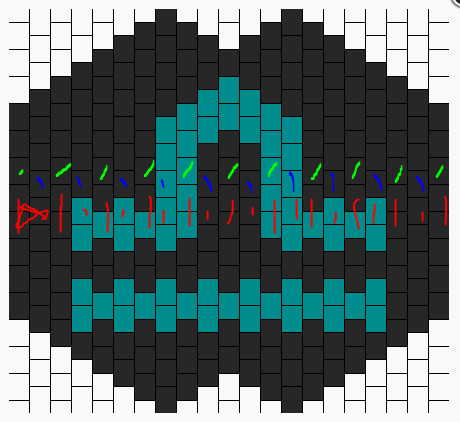
Regardless of the pattern you decide to use, it's gonna look something like this when you enlargen it/click on it.

[Image ID: A picture, once again 21 high by 14 wide, of the patten for the mask above. This is the unmodified version. It lacks the red and light blue border, and the sign on it is more of a darker teal color. End ID]
There's no numbers though, right? If you recall from one of my multi-stitch tutorials, this is because masks can be started from a few different places and can be finished in a couple of ways that're all similar. Having numbers would likely get confusing.
First, you're gonna be chosing a place to start your mask. I personally like to pick somewhere around the middle of the pattern. You need to start your mask from one of the straight sides, and there has to be at least two beads to start off with. For instance, starting from the two beads at the bottom of the left side would work, but using the very last bead-- only one of them-- wouldn't. This is because of how brick stitch-- or more commonly called peyote stitch-- works, which will be explained shortly. AKA, right now.
First, you're gonna wanna grab some string. I suggest about two arm's length is good for now. Take that, and fold the two ends together like so--
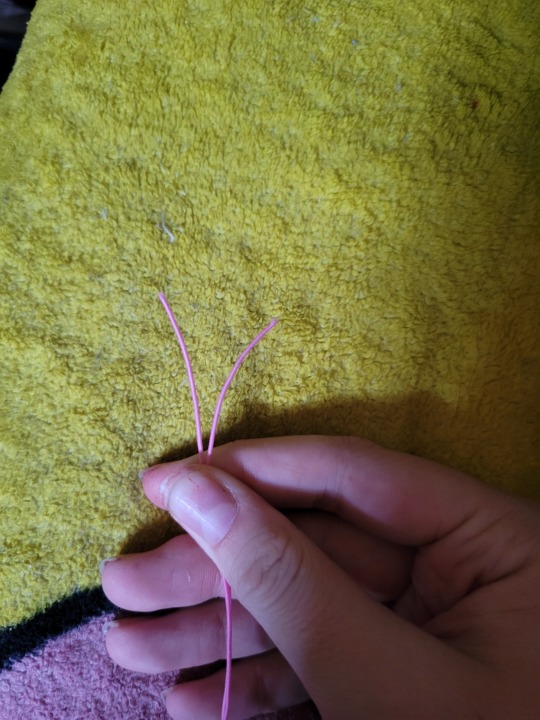
[Image ID: a picture of me holding a piece of pink string. It's folded together, and the two ends of the string are pressed together. End ID]
This is why we need where we're starting to have two beads, because that's how we start peyote stitch! I'm not going to go too much into detail on that here, because I plan on writing something on peyote stitch anyway.
Follow your pattern across whatever row you chose. It should be a straight-shot across-- there shouldn't be any weird curving or anything yet. You're gonna put on those two beads, then the one bead depicted in the middle of those two. Like this--

[Image ID: A picture of the same mask pattern from before-- but with red marks depicting the two starting beads, and the one after. End ID.]
This picture shows where I'm starting my mask-- the two beads on the end then the one bead. You're gonna put the two beads on the string-- one per end of string you're holding together-- then you're gonna put your strings together and put the one bead through BOTH of the strings.
For this, I'm gonna end my row with two beads-- great! You... might not though. I think that's possible? Regardless, it makes everything a bit harder. At the end of your row, I highly suggest taping an end of your string down after pulling it tight, and taking the other end of your string and beginning building. You'd start building by putting on an end bead (a bead above/below where you ended, respectively) and going through the next bead that's sticking up (or the last two beads you put on). I'd build that for a row or two, and then build with the OTHER string for a row or two. From there, you can just keep going til the points, which I'll show how to handle shortly.
If you're gonna end with two beads-- great! Finish up that row, putting on the next two beads, then the one bead, then the two beads. Follow the pattern you have on hand for color changes, and make sure to keep track of which string is the TOP part of your row, or the BOTTOM part. Otherwise, you might end up with colors in the wrong place.
When you're done with that row, if you have two beads, congrats! You can tie that off using some square knots. Welcome to the building of the actual mask! The entire way this works is through putting a bead on, and going through the next one sticking up... for now. There's weird ways to starting new rows that I'll unfortunately have to cover. Look at your pattern.
[Image ID: A picture of the mask pattern, with red marks all along the first row. The next row is marked in blue. End ID]
In this picture, I've shown my first row. The blue marks will be representing my next row, building upwards. Building downwards would be the same thing, just toward the bottom of the pattern. In other words, the next row is depicted as the next raised beads near your last row.
[Image ID: A picture of the mask pattern from before. The third row of the pattern is highlighted in lime green. End ID]
Here, I've taken the liberty of highlighting the third row for you! But once you get to the end of that third row, you're probably wondering how to put that end bead on. This is the unfortunate part...
There's a couple of different methods to this. This is Vicky's old tutorial on masks, which could be useful and worth it to follow instead of this if this doesn't make sense.
I learned using iHeartRaves' video. You know, the one with people complaining in the comments about this part in particular? I spent about an hour figuring out how to do this, but I think I have the hang of it by now. So, here we go.
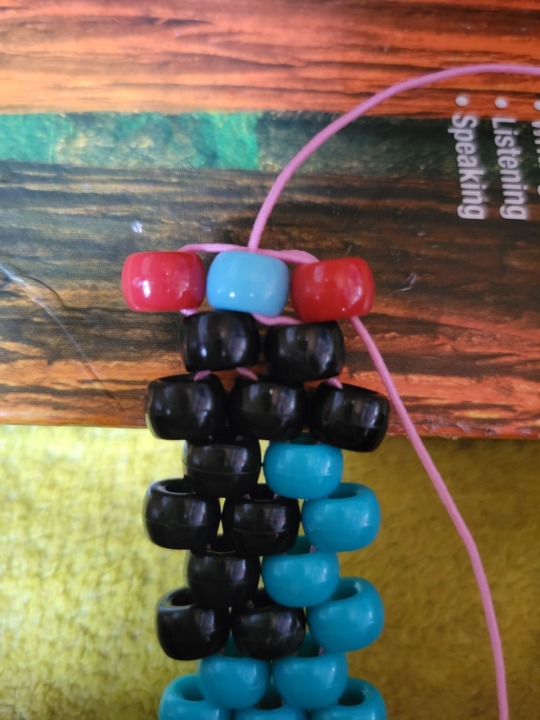
You're gonna put a bead on your string, the bead should be in the color of the last bead on that third row. For me, in the original pattern, it'd be black. For my modified version, it'll be red.
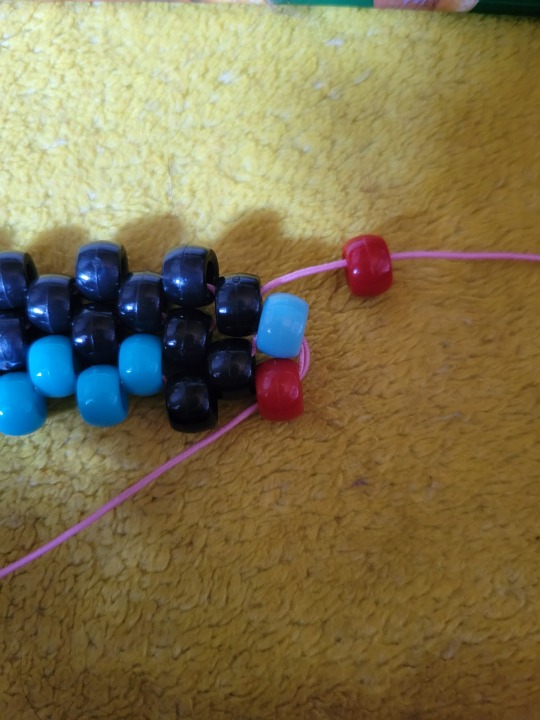
[Image ID: A photo of my mask progress. There's a red bead hanging on the pink string I'm working with to build upwards. There's a blue bead and a red bead below where the red bead will go. End ID]
You see that red bead to the side there? Below the light blue one? Stick your string through the top of that, like so.
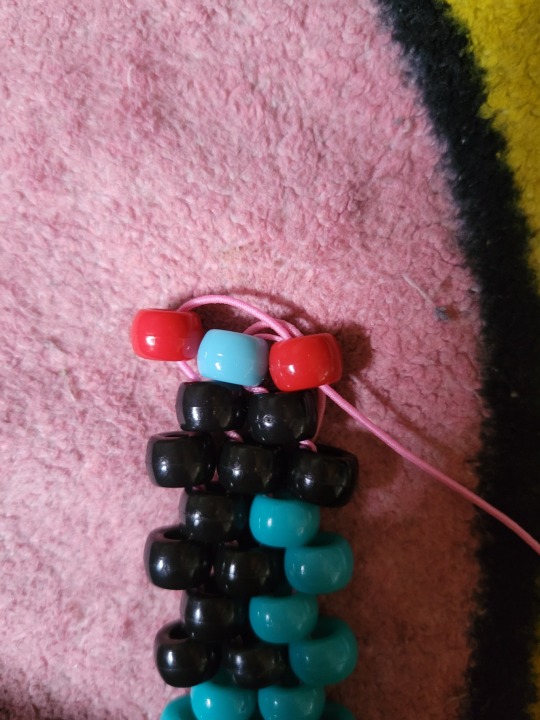
[Image ID: A picture of my mask work in progress. The pink string from before is going through the top of the rightmost-- or the bottom if the mask is looked at horizontally-- red bead. The string is coming from the bottom of the bead, and the new red bead we put on the string is posistioned next to the light blue bead in it's rightful place. End ID]
If you pull tight (and you should!) the bead will move to the top of those side beads. You can use your fingers to move it and hold it in it's proper place.
Now, take your string and go through the bottom of that light blue bead, like so...
[Image ID: A picture of my mask WIP. The pink string was pulled through the bottom of the light blue bead, and is coming out of the top of it. End ID]
That part might be a bit hard. Don't be afraid to move stuff around to get it in there, you can tighten it up and put the new red bead back in place after you get it through. From there, you put your string through the top of the new red bead, like so!
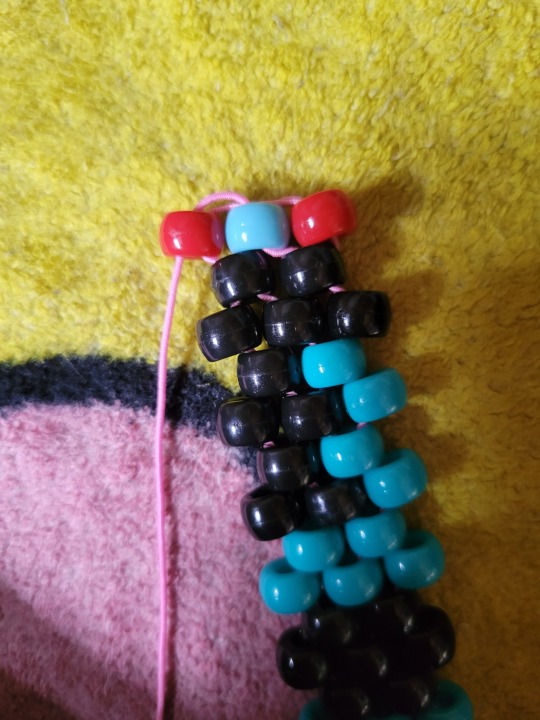
[Image ID: Another mask WIP picture. The pink bead is going through the top of the new red bead, and is coming out from the bottom of it. End ID]
From there, start row 4! Your new red bead should be secure now. Everytime you come back to this side, you'll need to do that. It'll always be the same process. Put new bead on string, put string through top of bead two beads down, put string through underside of bead one bead down, put string through top of new bead.
On the other side of your mask, you can just continue building by putting the end bead on, and going through the last bead you put on. Though I suggest pulling the string for the last bead really tight, this'll keep everything together better.
Keep following your pattern until you get to the spikes part around here--
--okay only 10 images allowed per post. fuck you tumblr. at ANY rate...
There's a part of your pattern where it doesn't go straight up anymore. It drops off and starts to make a spike. Vicky explains what to do about this pretty well here. But, even then, here's some text instructions. When you finish that row, and there's no bead to put above it to start another row, just shove your string through the last bead you put on. This'll start the spike shape. You'll just keep doing that as you go through to carry the spike higher and higher.
As you go, the spike will break off into two smaller spikes. This is fine-- just focus on one spike, building on that until it's finished. After you put that last bead on, take your string and weave it towards the middle of your mask so you can start the other spike, tie it off tight a few times, and start on the other spike. I hope that makes sense-- I swear I'd have pictures if it wasn't for tumblr's image limit. (actually you might be better off watching Vicky's video from here, I'm not gonna lie. If you wanna learn to tie off the mask and tie together the spikes from her, here's a timestamp for that.)
If you're still here, I'm sorry lol. But let's keep going! Build until the spikes and complete those on the top, then build on the bottom and make those. When you're done, you should have a shape resembling the pattern you're following.
okay ive been here for, about 4 hours. ill be back tomorrow (but in one second for you :) )
it's the next day, let's talk about lacing up masks! You're gonna want a small piece of string, doesn't have to be that long at all. You're gonna thread that through the bead in the middle of the spikes. For me, on the top, it's the black bead above the top of the libra sign. Even it out so the two ends of string are together and they're mostly equal. Then, you're gonna take the string on the left and put it through the right bead that's one up. The left string goes through the right bead one up. Then you take the left one, go one up to the right. Left one goes one up to the right. Right string goes through the left point, left string goes through the right point.
Pull that together! It should lace up into something a lot like this (photo by sarasunshine on KandiPatterns). See how her mask comes together at the top in a kinda point? That's what we're aiming for. Pull that tight and tie it off. Do the same to your bottom spikes.
We're at the final stretch! Specifically it's time for mask straps. This one is also hard to explain, so I'm gonna link you to the point in Vicky's video where she adds straps. In addition, she only laces her masks twice, while I do mine thrice. There isn't much different between the two, it depends on how you feel.
Straps. I'd highly suggest more stretchy fabric cord for this rather than clear elastic or something not so stretchy. I used all my fabric cord on this, so I'm gonna use this weird jelly glitter string I found? I genuinely have no idea where it came from. I do my straps in the same way Vicky does, and I think she can explain it better than I because she isn't limited to 10 images per post. Though, I will suggest you be careful, it's really easy to use too many beads, or to make the straps too tight or too loose. imo, i like to have a LOT of room on my string (seriously, i only used about 22 beads) because I move the beads around so they aren't on the back of my ears. by the time i'm done tying on my string, the straps are usually half string and half beads.
Just follow how Vicky does it, fiddle with it a bit, it's ultimately up to personal preference about how you'd like to do it.
okay that's all i've gotta say uhhh i should have something up on putting fabric in them for actual use soonish. go forth and make stuff.
21 notes
·
View notes
Text
tutorial videos are so annoying cause the creator of the tutorial has done it countless times so they think everyone else already knows what they’re doing cause they do and therefore the viewer has an incredibly hard time following along unless they’ve seen the video before and/or knows how to do what’s in the video, which they haven’t/don’t cause they’re watching the tutorial for that exact reason.
11 notes
·
View notes
Text
figuring out how to post on tumblr solely to announce the fact that John Ursus from Road96 would own one of those “Sawdust? I think you mean man glitter” T shirts and no one can convince me otherwise
#road96#john ursus#first tumblr post#road 96 game#headcannon#road 96 headcannon#connie probably bought it for him too
25 notes
·
View notes
Text
HOW TO BRUSH YOUR FURBY - AN IN-DEPTH GUIDE ! ! !

Hey Furby friends! Today, I’m making an in-depth guide on how to brush your Furby, AND how to pick out a good brush for your Furby.
Chances are, if you own a used Furby, the fur might look like the Tiger Furby skin as shown here on the right. In comparison to the Church Mouse Furby skin on the left, the fur has a “fluffed out” appearance, feels matted to the touch, and goes in different directions all over the place!
While this fluffy look is still pretty cute, if you want your Furby to look as if it came fresh out of the box, this small guide is perfect for you.
(I highly recommend washing your Furby skin before brushing it out. It will look a lot cleaner in the end.)
CHOOSING A BRUSH
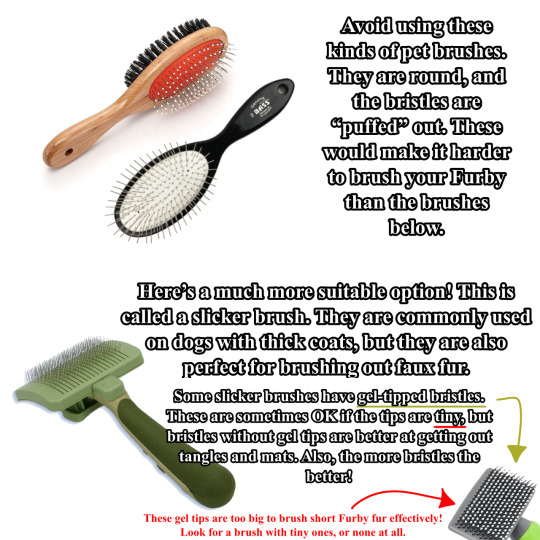
If you don’t already have one, now is a good time to pick out a brush for your Furby. Avoid using brushes like the ones on the top - they tend to not have many bristles, and are spaced out in a way that giving a consistent brushing is difficult.
Instead, choose a brush like the one on the bottom. This particular brush is called a slicker brush, often used for brushing animals with thick coats. It is rectangular and has many metal bristles that are relatively sharp, which are perfect for getting out little tangles and mats in faux fur. Some slicker brushes have gel tips on the bristles to make brushing less painful for the animal being brushed, but in this case, it’s best to skip out on the gel tips.
BRUSHING
Now that we know which brushes are best, it’s time to actually do the brushing! As I mentioned above, I highly recommend washing your Furby skin before brushing it out, so that the end result will be extra clean and soft.
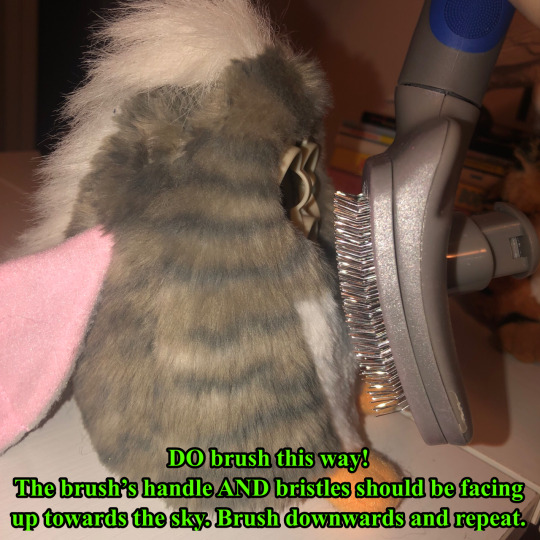
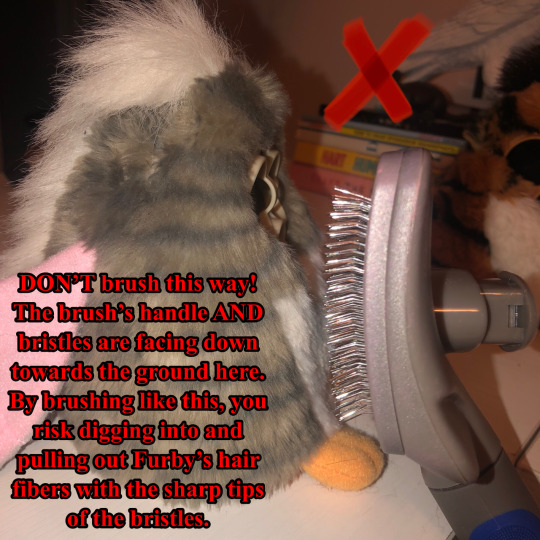
When brushing your Furby, it is important to use your slicker brush correctly. DO hold the brush upside down, as shown in the first image. The brush’s handle and bristles SHOULD both be facing up towards the sky, NOT down. Now, simply brush in the direction that the fur is flowing (brush downward). Brushing like this minimizes the chances of pulling out too much fur. After all, the bristles are sharp, and it’s easy for them to get caught in the fabric by accident.
DON’T hold the brush right side up, as shown in the second image. The brush’s handle and bristles should NOT both be facing down towards the ground. Please refer to the last paragraph on how to properly use your slicker brush.
RESULTS
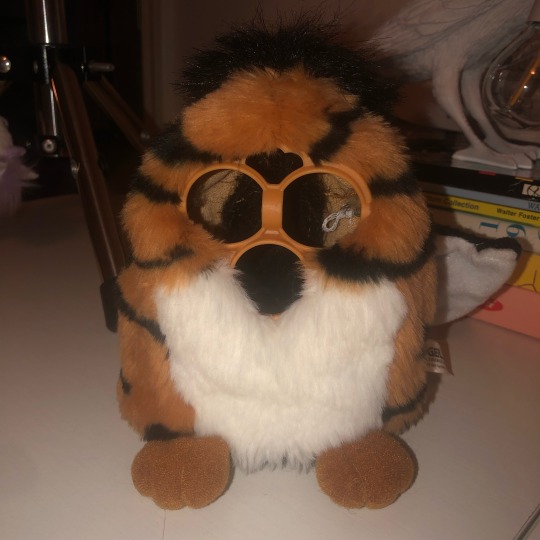
Remember that Tiger skin from the beginning? Well, here he is all brushed out. It might be a little hard to see any difference, but in real life, he feels so much softer and looks almost like he was never even played with.
I hope that this tutorial helped you or anyone who needed it! I plan on posting more tutorials very soon! Thank you for reading.
445 notes
·
View notes
Note
The it/it’s pronouns rep the world has been waiting for
What are all the characters sexualities, gender identities, and pronouns? I love queer rep and loved the musical a lot so I'm curious!
Simon: transmasc, bisexual, he/they
Adil: gender-fluid/non-binary, aroace, any/all prns
Marly: lesbian, Demi-girl (i think, I haven’t actually thought about it much), she/they
Xander: bisexual, he/they
Calypso: pansexual, transfem, they/she
Bobby: unlabeled, he/him
Azathoth: literally an eldritch horror, it/it’s
57 notes
·
View notes
Text
I payed Road 96 last week and it’s slowly becoming one of my hyper fixations so I decided to make a vine comp
227 notes
·
View notes
Text
Shows u a swirly optical illusion video. You wanna watch Rockabye the musical. It is the best musical you have ever watched. You want to watch it SOSOSOSOSOSO bad. (I am hypnotizing you again)
123 notes
·
View notes