Don't wanna be here? Send us removal request.
Statistics
We looked inside some of the posts by comfytea and here's what we found interesting.
Average Info
Notes Per Post
321K
Likes Per Post
100K
Reblog Per Post
220K
Reply Per Post
7
Time Between Posts
17 days
Number of Posts By Type
Text
13
Note
3
Photo
1
Last Seen Tumblr Blogs


Fun Fact
BuzzFeed published a report claiming that Tumblr was utilized as a distribution channel for Russian agents to influence American voting habits during the 2016 presidential election in Feb 2018.
Text
little bit of a rant ig. it's a bit annoying the number of people who enter mine and @cozysip server and immediately leave. especially considering the fact that we offer to send links to anyone like.... yall just have to ask for the gifs u want. it's not hard
1 note
·
View note
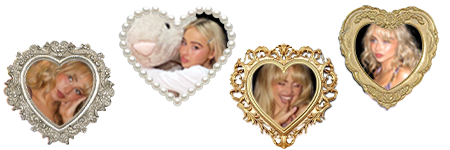
Text
*✶ sabrina carpenter in various interviews
— update — a total of #79 gifs ( 268x150 ) have been added to my sabrina carpenter gif page [ a total of #680 ]. to access the gifs please click the source link and you’ll be redirected to my gif server ( shared with @comfytea ) . if you are going to use my gifs like / reblog !
trigger warnings : body image.


123 notes
·
View notes
Text
GIFMAKING TUTORIAL: PHOTOPEA (for Windows)

Screencapping
Gif Width/Size Limit/Ezgif
Loading Frames
Cropping and Resizing
Rasterize/Make Frames
Sharpening
Coloring (not detailed. Links to other tutorials included)
Exporting
Obligatory Mentions: @photopeablr ; @miwtual ; @benoitblanc ; @ashleysolsen Definitely check out these blogs for tips, tutorials and resources, they're a gold mine. Finally I recommend browsing the PHOTOPEA TUTORIAL / PHOTOPEA TUTORIAL GIF tags. DISCLAIMER: English is not my first language and I'm not an expert on what I'm going to discuss, so if anything's unclear feel free to drop another ask.
1. SCREENCAPPING -> PotPlayer (the one I use) or MVP or KMPlayer
INSTALL PotPlayer (tutorial)
Play your movie/episode and press Ctrl + G. The Consecutive Image Capturer window will pop up. Click Start to capture consecutive frames, Stop when you got what you needed.
Where it says "Image Type -> Format" I recommend picking PNG, for higher quality screencaps.
To access the folder where the screencaps are stored, type %appdata% in windows search, open the PotPlayerMini64 folder (or 32, depending on your system) and then the Capture folder. That's where you'll find your screencaps.

Admittedly MVP is a lot faster but I prefer Potplayer because it generates (at least in my case) higher quality screencaps. MVP kind of alters the hue and it made it harder for me to color my gifs. Still, if you're interested in how to use it, I recommend this tutorial.
As for KMPlayer, every tutorial out there is outdated and I couldn't figure out the new version of the software.
2. GIF WIDTH/HEIGHT, SIZE LIMIT, EZGIF OPTMIZER
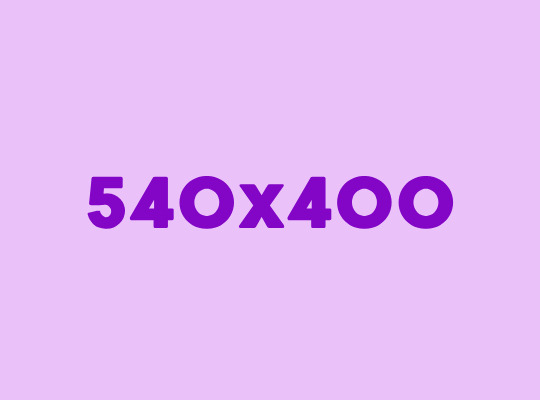
At this point you should already know how big your gifs are going to be. Remember the ideal gif width(s) on tumblr are 540 px / 268 px / 177 px. These specific numbers take into account the 4 px space between the gifs. No restrictions on height. Here are some examples:

You can play around with the height (177x400, 177x540, 268x200, 268x268, 268x350, 268x400, 540x440, 540x500, 540x540 etc) but if you go over the 10 MB limit you'll either have to make your gifs smaller/delete some frames.
OR you can go on ezgif and optimize your gif, which is usually what I do. The quality might suffer a little, but I'm not really (that) obsessed with how crispy my gifs look, or I'd download photoshop.

Depending on the gif size, you can decrease the compression level. I've never had to go over 35. It's better to start at 5 (minimum) and then go from there until you reach your desired ( <10mb) gif size. Now that I think about it I should have included this passage at the end of the tutorial, I guess I'll just mention it again.
3. LOAD YOUR FRAMES
File -> Open... -> Pick one of your screencaps. The first one, the last one, a random one. Doesn't matter. That's your Background.
File -> Open & Place -> Select all the frames (including the one you already loaded in the previous passage) you need for your gif and load them.
(I recommend creating a specific folder for the screencaps of each gif you're going to make.)
WARNING: When you Place your screencaps make sure the Crop tool is NOT selected, especially if you've already used it and the width/height values have been entered. It will mess things up - I don't know why, could be a bug.
You can either select them all with Ctrl+A or with the method I explained in the ask: "when you want to select more than one frame or all frames at once select the first one, then scroll to the bottom and, while pressing Shift, select the last one. this way ALL your frames will be selected".
WARNING: Depending on how fast your computer is / on your RAM, this process may take a while. My old computer was old and slow af, while my new one can load even a 100 frames relatively fast, all things considered. Even so, I recommend ALWAYS saving your work before loading new frames for a new gif, because photopea might crash unexpectedly. Just save your work as often as you can, even while coloring or before exporting. Trust me, I speak from experience.
Now you can go ahead and delete the Background at the bottom, you won't need it anymore.
4. CROPPING AND RESIZING
Right now your screencaps are still smart objects. Before rasterizing and converting to frames, you need to crop your gif.
Technically you can rasterize/convert to frames and then crop, BUT if you do it in that order photopea will automatically delete the cropped pixels, even if you don't select the "Delete Cropped Pixels" Option. Might be another bug, unclear. Basically, if you crop your gif and then realize you cropped a little too much to the left or the right, you can go ahead, select the Move Tool (shortcut: V) and, after selecting ALL YOUR FRAMES, move them around on your canvas until you are satisfied. You won't be able to do this if you rasterize first and then crop, the excess pixels will be deleted. I don't know why, I found out by accident lol.
CROPPING
(Cropped pixels: the gray/opaque area outside of the selected area. That area disappears once you press enter and crop, but the pixels are retained, so you can move the frames around and reposition them as you like. In this case I could move the frames to the left and include Silver's figure [curly guy in the foreground] in the crop)
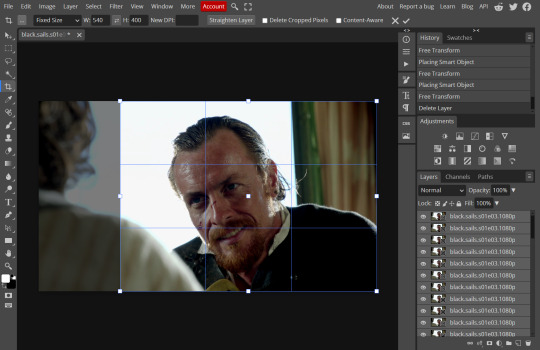
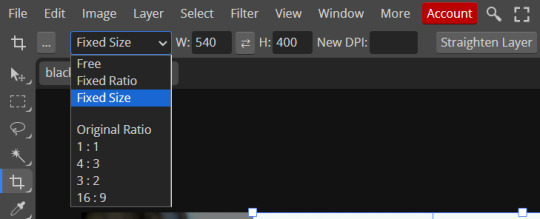
After deleting the Background, you will need to select all your frames (using the Shift key), use the C shortcut on your keyboard to choose the Crop tool. Or you can click on it, whatever's more convenient. Once you do that, a dropdown menu is going to appear. You need to select the "FIXED SIZE" option, as shown in the following screencap.
Once you do that, you can type in your desired width and height. Do not immediately press enter.

Your work area should now look like this. Now you can click on one of the white squares and enlarge the selected area until the edges are lined up. You can then move it around until it covers the area you wish to gif.
WARNING: to move the big rectangle around, you're gonna have to click on a random point of the work area, PREFERABLY not to close to the rectangle itself, or you might accidentally rotate it.

See? When your cursor is close to the selected area it turns into this rotating tool. Move it away until it reverts to your usual cursor, then you can start moving the rectangle. Press Enter when you're satisfied with the area you selected.
RESIZE
This isn't always necessary (pretty much never in my case) - and it's a passage I often forget myself - but it's mentioned in most of the tutorials I came across over the years, so I'd be remiss if I didn't include it in mine. After cropping, you'll want to resize your image.
IMAGE -> Image Size...

This window will pop up. Now, should the values in the Width and Height space be anything other than 540 and 400 (or the values you entered yourself, whatever they might be) you need to correct that. They've always been correct in my case, but again. Had to mention it.
5. RASTERIZE & MAKE FRAMES
Now that your screencaps are cropped, you can go ahead and convert them.
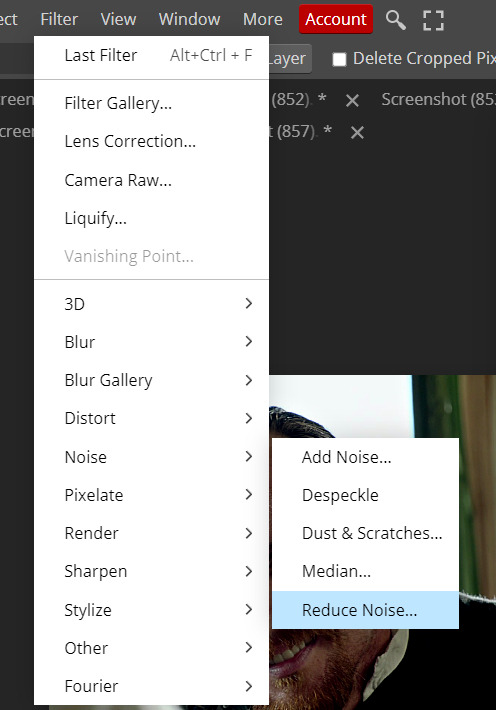
LAYER -> Rasterize (if you skip this passage you won't be able to Sharpen (or use any filter) on your frames at once. You'll have to Sharpen your frames one by one.
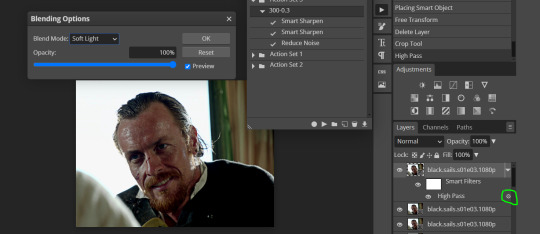
Photopea doesn't feature a timeline and it's not a video editor, which makes this passage crucial. When you select all your smart objects and try to apply a filter, the filter will only by applied to ONE frame. Once you rasterize your smart objects and make them into frames, you can select them all and sharpen them at once. Unfortunately this also means that you won't be able to - I don't know how to explain this properly so bear with me - use all smart filters/use them in the same way a photoshop user can. For example, you can sharpen / remove noise / add noise / unsharp mask... but you can't act on those filters in the same way a photoshop user can. When you work on smart objects you can change the blend mode - which is critical if you decide to use a filter like High Pass. If you simply apply a high pass filter on photopea you won't be able to change the blend mode and your gif will look like this (following screencaps). Or rather, you will be able to change the blend mode by clicking on the little wheel next to "High pass" (circled in green in the 2nd screencap), but you'll have to apply the filter to each frame manually, one by one.

Then you can rasterize/make into frames, but it's extremely time consuming. I did it once or twice when I first started making gifs and it got old pretty soon haha.
Layer -> Animation -> Make frames. This passage will add "_a_" at the beginning of all your frames and it's what allows you to make a (moving) gif. As I said in the ask, if you skip this passage your gif will not move.
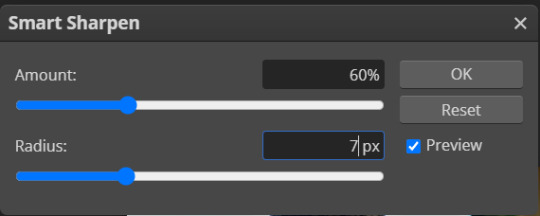
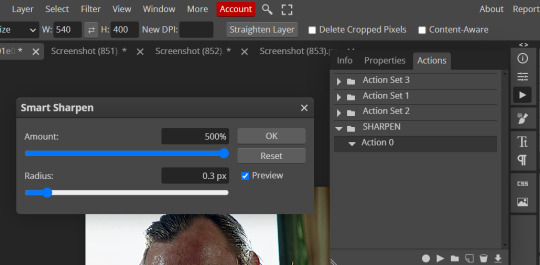
6. SHARPENING
Some people prefer to color first and sharpen later, but I found that sharpening filters (more or less) dramatically alter the aspect of your gif and already brighten it a bit (depending on your settings) and you may end up with an excessively bright gif.
Now, sharpening settings are not necessarily set in stone. The most popular ones are 500/0.4 + 10/10, which I use sometimes. But you may also need to take into account the quality of the files you're working with + the specific tv show you're giffing. I've been using different settings for pretty much every tv show I gif, especially in the last couple months. Some examples:

followed by
OR
AMOUNT: 500% RADIUS 0.3px followed by AMOUNT: 20% (or 10%) RADIUS 10px
You'll just need to experiment and see what works best for your gifs.
Some gifmakers use the UNSHARP MASK filter as well (I think it's pretty popular among photopea users?) but it makes my gifs look extra grainy, makes the borders look super bright and it clashes with my coloring method(s), so I use it rarely and with very moderate settings. Something like this:

Again, depends on the gif and on what you like. I've seen it used with great results by other gifmakers!
REDUCE NOISE
Sometimes - and this is especially the case for dark scenes - your gif may look excessively grainy, depending on how bright you want to make it. Reducing noise can help. Keep it mind, it can also make it worse and mess up the quality. BUT it also reduces the size of your gif. Obviously, the higher the settings, the more quality will suffer.

These are my standard settings (either 2/70% or 2/80%). It's almost imperceptible, but it helps with some of the trickier scenes.
ADDING NOISE
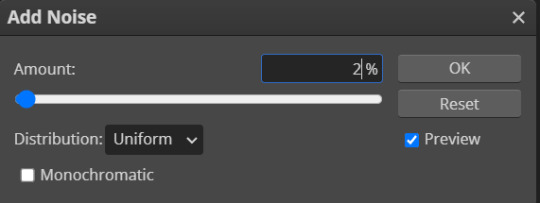
Adding noise (1% or 2% max) can sometimes help with quality (or make it worse, just like reduce noise) but it will make your gif so so so much bigger, and occasionally damage the frames, which means you won't be able to load your gif on tumblr, so I rarely use it.
You'll also want to create ACTIONS which will allow you to sharpen your gifs much faster.
HOW TO CREATE AN ACTION ON PHOTOPEA
The Action Button (shaped like a Play button as you can see in the following screencaps) may not be there if you're using photopea for the first time. If that's the case click on the magnifiying glass next to "Account" (in red) and type "actions". Press Enter and the button should immediately show up.
Once you do that, click on the Folder (circled in yellow)

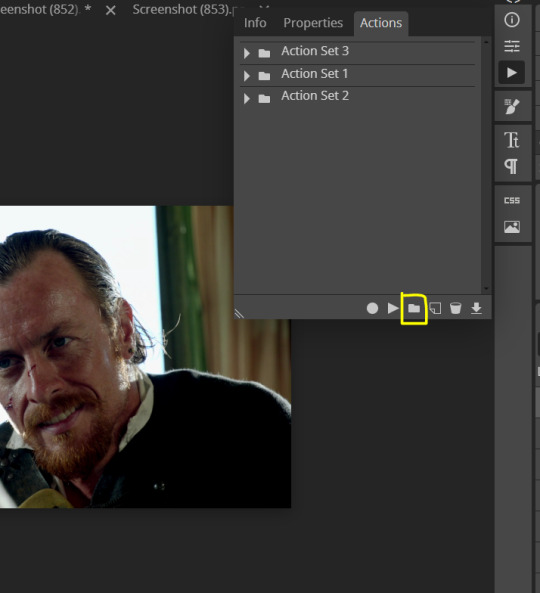
and rename it however you like.

now click on New Action (circled in red). now you can press the Recording button (circled in green)

Now
FILTERS -> Smart Sharpen
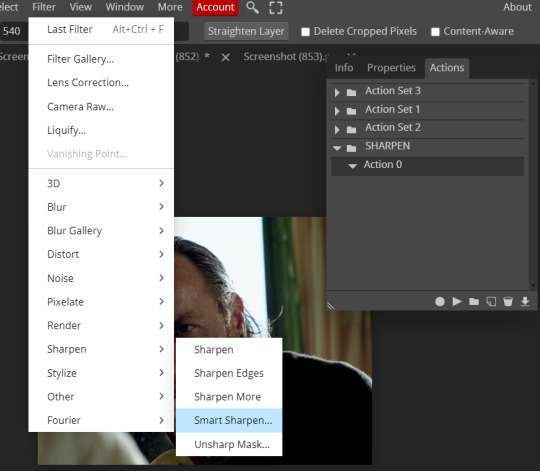
and you can enter your values. Then you repeat this passage (WITHOUT pressing rec, WITHOUT pressing new action or anything else, you just open the smart shapen window again) and, if you want, you can sharpen your gif some more (10%, 10px, or anything you want.)
Maybe, before creating an action, experiment with the settings first and see what works best.
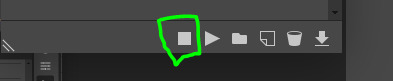
When you're satisfied, you can PRESS STOP (it's the rec button, which is now a square) and you can DOWNLOAD your action (downwards facing arrow, the last button next to the bin. Sorry, forgot to circle it) .
You need to download your action and then upload it on your photopea. When you do, a window will pop up and photopea will ask you whether you wish to load the action every time you open the program. You choose "Okay" and the action will be loaded in the storage.
When you want to sharpen your gif, you select all your frames, then you click on the Play button, and select the Action, NOT the folder, or it won't work.

Actions can also be created to more rapidly crop and convert your frames, but it doesn't always work on photopea (for me at least). The process is exactly the same, except once you start recording you 1) crop your gif as explained in step 4, 2) convert into frames. Then you stop the recording and download the action and upload it. This won't work for the Rasterize step by the way. Just the Animation -> Make Frame step.
7. COLORING
Now you can color your gif. I won't include a coloring tutorial simply because I use a different method for every tv show I gif for. You normally want to begin with a brightness or a curve layer, but sometimes I start with a Channel Mixer layer to immediately get rid of yellow/green filters (there's a tutorial for this particular tool which you will find in the list I mention in the link below)
[Plus I'm not really an authority on this matter as my method is generally... fuck around and find out. Two years of coloring and I still have no idea what I'm doing. 70% of the time.]
Simple Gif Coloring for Beginners -> very detailed + it includes a pretty handy list of tutorials at the bottom.
8. EXPORTING
Now you can export your gif. Some gifmakers export their (sharpened) gifs BEFORE coloring and then load the gifs on photopea to color them. I'm not sure it makes any difference.
FILE -> EXPORT AS -> GIF
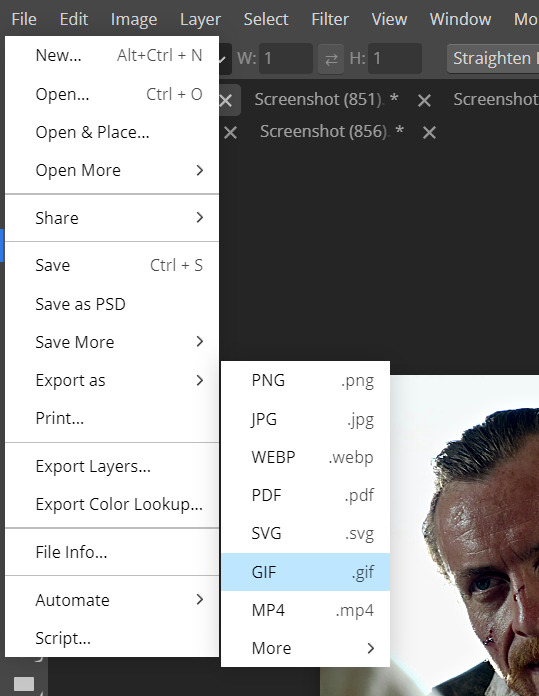
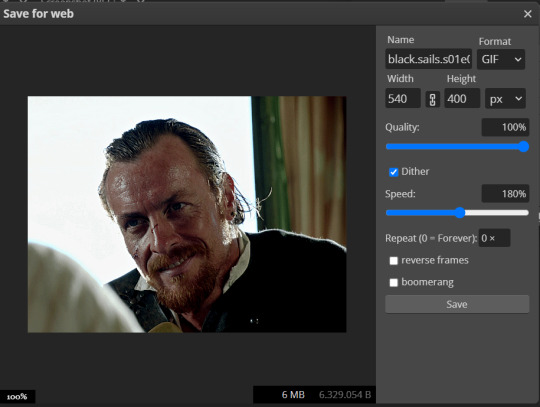
(not colored, just sharpened)
As you can see, unlike photoshop the exporting settings are pretty thread bare. The only option available is dither - it sometimes help with color banding - which, and I'm quoting from google for maximum clarity:
"refers to the method of simulating colors not available in the color display system of your computer. A higher dithering percentage creates the appearance of more colors and more detail in an image, but can also increase the file size."
SPEED
When you export your gif, it will play at a very decreased speed (100%). I usually set it at 180/190%, but as for every other tool, you might want to play around a little bit.
GIF SIZE/EZGIF OPTIMIZER (See Step 2)
And that's it.
P.S.: worth repeating
Save your work as often as you can, even while coloring or before exporting.
470 notes
·
View notes
Text
*✶ ava capri in pll original sin s2
— public commission — a total of # 26 gifs ( 268x150 ) have been added to my new ava capri gif page. she’s white, was born in 1995 and is part of the lgbtqia+ community. please cast accordingly and use appropriately. all of the gifs have been created from scratch by me. to access the gifs please click the source link and you’ll be redirected to my gif server ( shared with @comfytea ) . if you are going to use my gifs like / reblog !
trigger warnings : none
this gif pack will be updated.


78 notes
·
View notes
Text
*✶ jordan gonzalez in pll original sin s2
— update — a total of # 35 gifs ( 268x150 ) have been added to my jordan gonzalez gif page [ a total of #138 ]. to access the gifs please click the source link and you’ll be redirected to my gif server ( shared with @comfytea ) . if you are going to use my gifs like / reblog !
trigger warnings : kissing, smoking, drinking.


54 notes
·
View notes


Note
Hey friend! I learned how to make gif packs recently and really want to help the others in this community as I am a disabled human and struggle finding the content I need but I’m struggling with how to post my packs as like if i do a post I can only post so many. Could you help or put links or etc on how to make like a source link with all the gifs?
hey anon! sorry this reply is so late. below i've outlined how to create a source link for a gif pack.
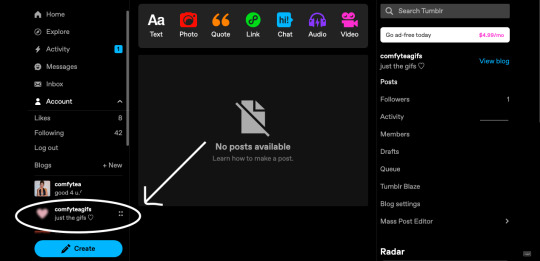
where you'd like to upload your gifs is based on personal preference. i personally upload mine on a separate sideblog, pictured below
open up the blog you are using (blogurlname.tumblr.com) and click the edit appearance icon in the top right corner. looks like this on mine!

click the add page button, again pictured below. you may have to scroll a bit. my links are protected via my discord server! you may always message me or @cozysip for links to certain packs if you are uncomfortable with discord.

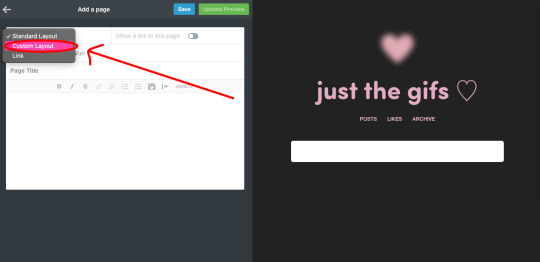
after that, your screen should look something like this!! here, you can keep it as a standard layout and start uploading your gifs from your computer and adding whatever sort of text you would like. or keep it blank and just add the name of the fc + their gifs. you can also change the layout to custom and add a page theme. i'll add how i do this below. free page themes are aplenty on tumblr, you just have to know how to search!

after clicking the dropdown menu highlighted above, you should see an option to switch it to "custom layout" as shown below. this may look a bit different if you: a) are on a browser other than chrome or b) are working on something other than a macbook. but the process to getting here should remain pretty much the same as far as i know!
uploading gifs this way will look a bit different than a standard layout. i usually open up a draft and insert gifs that way, save the draft, and then copy + paste the url into the page theme code. note you may have to remove a possible "v" at the end of each link. tedious, i know. from here you can paste the html for your page theme and begin editing the colors, fonts, etc.

adding these as a source link will look like copy + pasting the page url for your gif pack into a source link for your gif pack post. i'll attach screenshots of how to do this below.

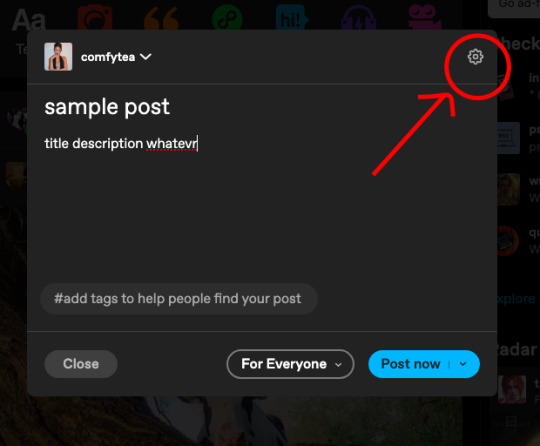


and voila! you should have a post with a source link now. it will not show until it's posted. a good way to double check that you have the right source link is posting + clicking the source link. i will link the creator of the page theme i use for gif packs below. if you need anymore help with this, feel free to dm me or send another ask! always happy to help.
0 notes
Text
*✶ no words
a template by cozysip.
by clicking in the source link you’ll find 04 different dash icon templates made by me from scratch. credit is not needed , but do not claim as your own ! if you enjoy this or you use it, please reblog or like this post . thank you !
528 notes
·
View notes


Text
you can click on this button once daily to help palestine and support other causes in the middle east for free. it takes literally 5 seconds and could help save lives so please take the time to click and share this link.
259K notes
·
View notes
Text
hi vi!! sending love and light from santa moneda! could we have a shoutout please? santamonedahq is a new appless apartment rp focusing on characters and connections in a space that emphasizes inclusivity and diversity, all against the backdrop of the lovely valparaíso, chile! our submit box has been opened and we would love for everyone to check us out!
Santa Moneda is a world-renowned apartment complex overlooking the beautiful coastline and city of Valparaíso, Chile. Famous for its romantic origins, its luxurious amenities, and its labyrinth-like architecture, Santa Moneda draws in people from all over the world—from the wealthy looking to have a lavish vacation, to the artistic searching for muse in the city’s colorful streets, to the people searching for someone to hold, or maybe for something in themselves. Santa Moneda has been refining jewels since 1942—what kind of jewel will you be?
shoutout to: santamonedahq!

0 notes
Note
hi violet! can we get a shoutout? ty! 𝐚𝐦𝐛𝐫𝐨𝐬𝐢𝐚𝐟𝐦 is a 21+, appless, riordanverse, discord rp that's six years following the second titan war. it takes place in a small town in montana, surrounded by beautiful mountains and lush trees. nymphs, legacies, satyrs are playable as well as demigods! you don't even need to be super familiar with the series to join! and we're currently setting a date to open! have a nice day! < 3
shoutout to you, ambrosiafm!

1 note
·
View note
Note
hi vi! could we get a shoutout pls? ty!
talesfm is a 21+ semi-appless roleplay heavily inspired by the movies of John Wick, drawing inspiration from its vast lore to build our world upon. Set in present-time London, our story begins two months after the mysterious death of Frontiniano ‘Fracasso’ Montebello, a crime lord murdered on the grounds of the Bastion - a safety net to the underground world. Focusing on character development, we aim to create a laid-back, diverse, long-term group filled with member-driven events to further expand our storyline and character growth.
shoutout talesfm!

0 notes
Text
Rashida Tlaib has set up a petition to send to the White House to recognize and stop the ethnic cleansing and forced displacement happening in Gaza. If you’re a US citizen please sign. I have no illusions that this will change policy, but the public outcry against their actions must continue. We will not be distracted or discouraged from continuing to object to these humans rights violations.
57K notes
·
View notes
Text
Hi! I have updated my shout out request rules as outlined above. Please read thoroughly before sending a shoutout request. Thank you.
As I do receive an influx of shoutout requests, I am going to make a general announcement for shoutout request rules, effective immediately.
Shoutouts for your group or blog will be honored no more than once every two weeks.
I do not give shoutouts to hp roleplays due to the transphobic and general problematic nature of the hp universe's creator.
I usually do a quick once over of every blog that requests a shout out but if for any reason I catch wind of your rp being problematic, it is grounds for automatic deletion of a request, any prior shoutouts I may have posted, and an immediate block.
If you make more than one request for a shoutout in the same two week timeframe, I may delete your second request and any request I may have already responded to at my own discretion.
A simple please / thanks is encouraged but not required.
Include descriptors and / or what sort of tags I should be using when I answer your request. If I have to guess how to tag your shoutout, I may delete the request at my own discretion.
This shouldn’t need to be said but if you are blocked or if you have me blocked, your shoutout request will be deleted. (Doesn’t matter if the account you are using is not the account you are blocked on… it will be deleted)
Thank you.
1 note
·
View note
Text


olivia rodrigo via instagram.
"today is my last day of being able to underage drink (hypothetically) !!!!"
10 notes
·
View notes
Text
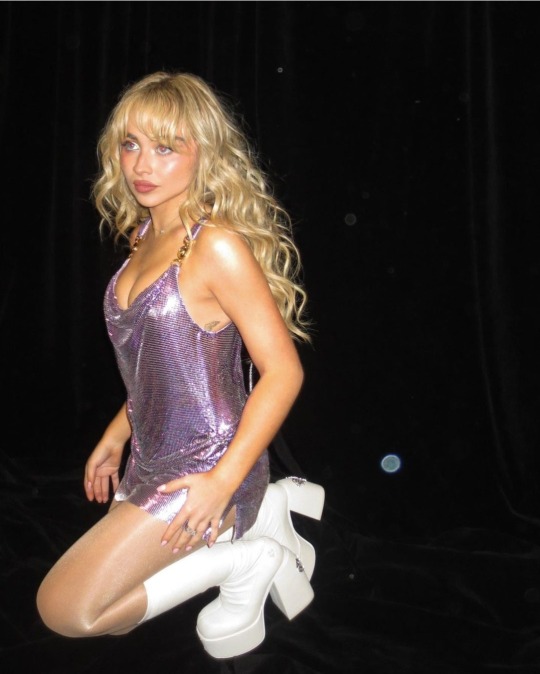

sabrina carpenter via instagram.
201 notes
·
View notes