
Don't wanna be here? Send us removal request.
Statistics
We looked inside some of the posts by coolmodelguy and here's what we found interesting.
Average Info
Notes Per Post
17K
Likes Per Post
11K
Reblog Per Post
6K
Reply Per Post
31
Time Between Posts
28 days
Number of Posts By Type
Photo
14
Text
1
Video
2


Fun Fact
Tumblr Inc. is using 66 technologies for its website.
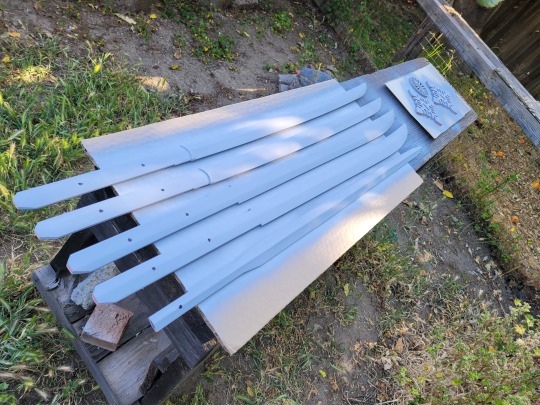
Photo
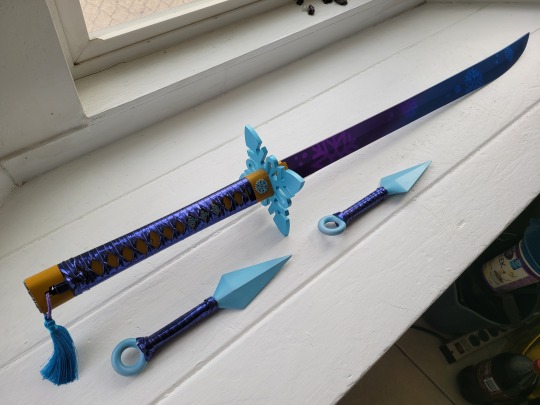

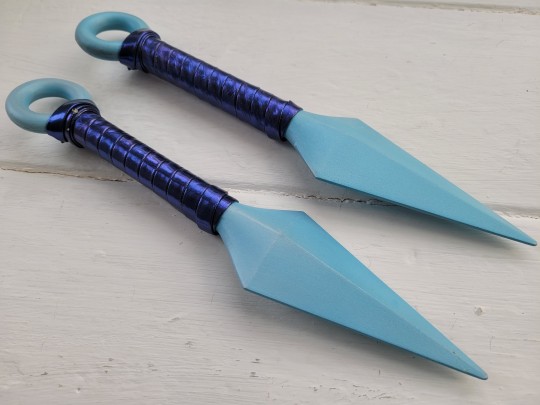
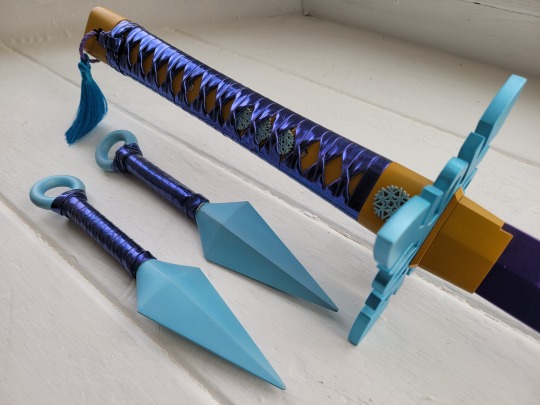
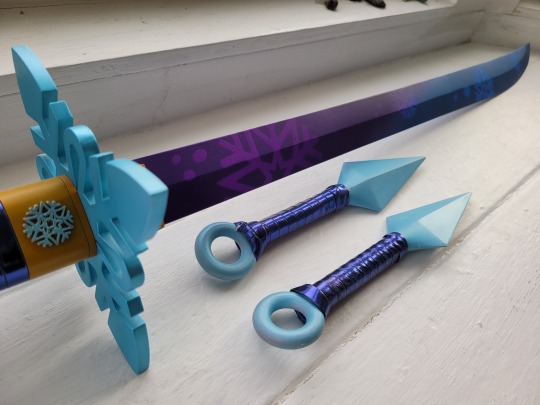
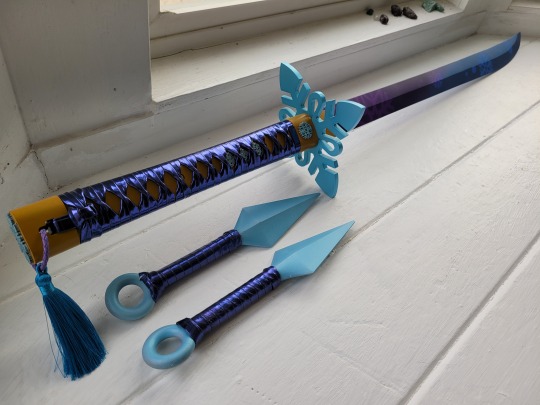

11/19/2022 - Projects Update.
During a past visit, my daughter created the 3D print file for a pair of kunai she thought would go well with my latest Mushi sword. At long last, after two moves and considerable time, the kunai are finished! The body was painted the same ice color as the icy hand guard of the Mushi sword and the handles wrapped in matching color.
The kunai are now hanging from the hand guard of the Mushi katana on my new Wall of Swords.
Speaking of handle wrap (ito-wrap), I was finally able to locate this same color and type on Amazon. After the supplier I usually used disappeared from eBay, I found it impossible to locate the stuff, but I kept doing searches over time. I needed two more rolls for the swords I have yet to complete. Then lo-and-behold, success on Amazon! I put in an order immediately, the wait time will be about a month but I am so relieved to finally find what I was looking for.
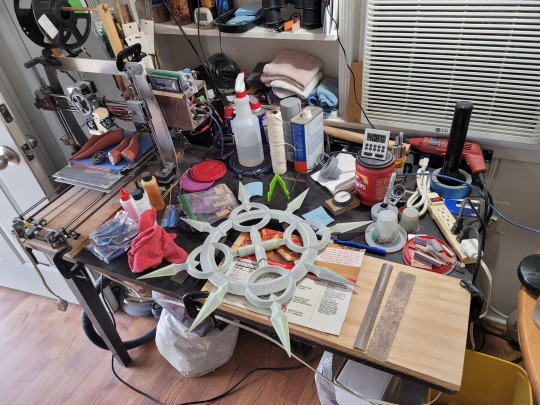
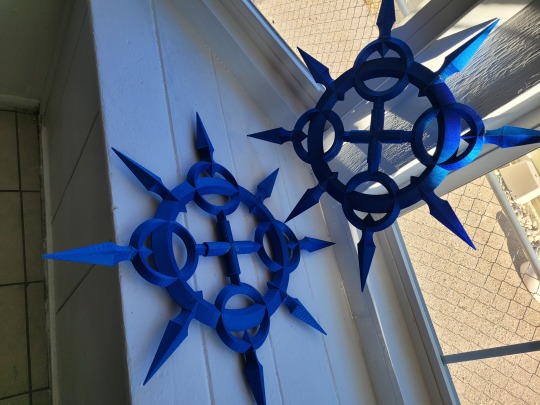
Meanwhile, since moved into a small one bedroom apartment, I was able to carve out a small shop area to work. It is a fraction of the size I am used to, as a consequence work goes very slowly. Currently I am working on printing and assembling a small number of chakram sets for the character Axel in Kingdom Hearts to sell in my Etsy store (coolmodelguy). The yellow and grey chakram on my work table is one of a pair I am preparing for fine finishing and a full paint job. The blue pair are fully assembled in rough finish, which simply means that the assembly work has been done but no finishing work. The print layer lines and print artifacts need to be sanded, filled with putty or gap filling primer, then painted by the buyer.
To finish up the last of the filament on my last roll of PLA plastic, I printed two sets of Homestuck Gamzee horns, now covered in Bondo glazing putty and calling the print table of the printer home for a little while. These I will finish and paint for my Etsy store.
This is how I am finishing out 2022. The remaining two Mushi katana’s are in need of blade painting and handle wraps. Since all painting will most likely need to be done outdoors, I will have to wait for the “opportune moment” when the weather cooperates. There are some ideas about creating a painting space in our bay window so I can paint indoors, if I can create the proper ventilation I would prefer that.
Happy New Year everyone!
#Kunai#3D Printed Kunai#Mystery Skulls Vivi#Vivi#MSA Vivi#Hellbent Vivi#Mystery Skulls Mushi#Mushi#MSA Mushi#Hellbent Mushi#MSA Mushi Katana#Mystery Skulls Hellbent#MSA Hellbent#Mystery Skulls#MSA Mystery Skulls#Hellbent#Swords#Katana#3D Printed#3D Printed Sword#3D Printed Katana#Heilos's Art Corner#Ice and Snow#Ice and Snow Katana#Ice and Snow Sword#Kingdom Hearts#Axel Kingdom Hearts#Axel#Cosplay Axel's Chakrams#3D Printed Axel's Chakrams
54 notes
·
View notes
Photo


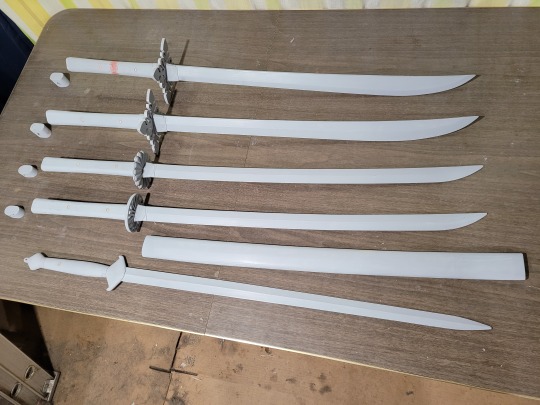
11/19/2022 - The Five Swords Project. Update.
Three swords of the five, completed.
I’m jumping over many steps in an effort to get caught up to the present day. During the past six months I have been able to work on the swords doing fittings and handle wraps, however the work times were very erratic due to other events happening in our lives.
My health was dramatically impacted by a bout of ammonia poisoning from the first house we stayed at after our move from Tracy. The man who owned the home had 20 unaltered indoor cats and only one litter box. The house was a mess, if you can imagine. Our deal was to get a room and access to his shop in exchange for cleaning up the house the cats had destroyed. The deal fell apart after I became very ill, but not until after we had cleaned out over a half ton of cat do-do and done considerably more work on the property. Beware of those trying to get something for nothing while seeming to offer a sweet deal, we should have known better.
To escape from the cat house from hell, we jumped at the first place we could secure. We now live in a tiny one bedroom apartment that is part of a duplex of tiny apartments. It will have to do for the time being. From this tiny apartment, I have carved out some space in the living room for shop projects, but this is a fraction of the shop spaces I’ve been using for the past two decades. I am hoping to use the bay window where these pictures were taken as a painting space for airbrushing on days when the weather is nice.
The three swords shown here today are the black blade Demon Slayer katana, a traditional katana with a silver blade, and a Chinese Jian style sword.
The Demon Slayer sword is the second I have built. I ran into a problem when I posted the digital STL files for sale on my Etsy store, someone objected to my use of the copyrighted title of “Demon Slayer” in the ad. To get around that I wanted to get images of the sword without the black blade, as a more traditional katana with a chrysanthemum shaped hand guard. This way I can make a new ad for digital STL files of a normal katana with multiple options for the hand guard, which should eliminate any copyright issues.
For the traditional katana I used artificial ray skin for the handle, which I painted the same blue color I used for the Mushi hand guards. The menuki ornaments in the handle wrap are burnished metal castings of leaves, from a plant I do not recognize. The hand guard was painted with pearlized white.
The Jian sword is also the second version that I have built. During the construction I paid very careful attention to the blade assembly, making sure the build was straight. I also spent a lot of time sanding the blade so that the center line would be clearly defined and straight. I really love the final results.
The two Mushi swords are yet to be completed. There is considerable paint work to be done on the blades yet. As we get out little home better organized, the work on the last two swords will continue.
#Sword#Katana#3D Printed#3D Printed Katana#3D Printed Jian#3D Printed Jian Sword#Jian#Demon Slayer#Demon Slayer Black Katana#Demon Slayer Black Sword#Black Katana#Tanjiro#Tanjiro Kamado
11 notes
·
View notes
Photo
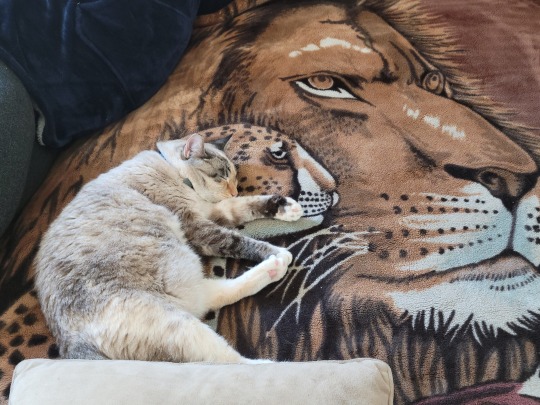
This is our cat “Minxy”. Sometimes you just walk into a room and find a perfect picture waiting to be taken. Glad I caught this one, sleeping with the lion pride!
#cat#cats of tumblr#Pretty Cat#Pretty Kitty#cat portrait#I'm finally at home!#awesome cat#she is the queen!
274 notes
·
View notes
Photo


11/12/2022 - The Five Swords Project. Update.
It has been over six months since my last update. Since that time, we have moved twice and suffered a considerable down-sizing as a consequence of those moves. We are still adjusting and I will tell that tale in an upcoming post.
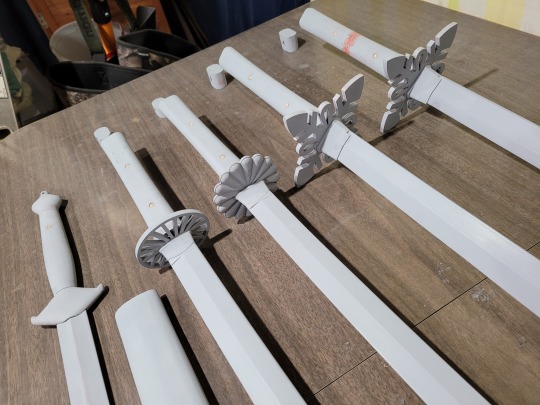
When I last posted, the Five Sword Project was in the primer and Bondo putty-filler stage. Knowing a move was imminent, progress toward painting was the highest shop priority since I had no idea what our new circumstances would be. As usual, I photo documented my progress but I am going to skip over that section this time around.
The first three photos show the swords after the majority of putty and sanding work had been completed. The swords were assembled to check the fit of the parts and to make sure that no parts fitted too tightly. There has to be a little bit of play in the parts fit at this stage because the color paint would add thickness to the parts.
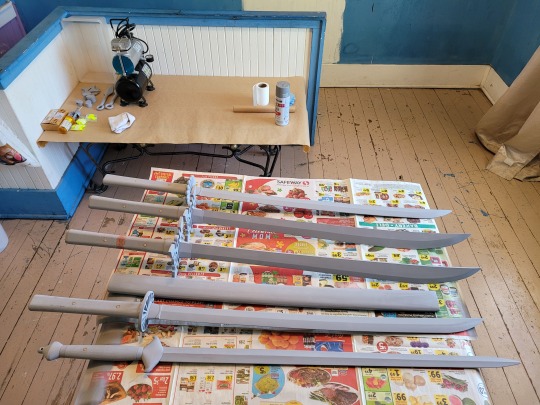
Photo #4 shows all the swords moved from the dusty shop to my painting “clean room” upstairs. In this room the swords would be disassembled for the painting of separate colors. The airbrush compressor and air tank are on the table in the background.
Photo #5 shows my collection of “Wicked Colors” airbrush paints, thinners, airbrushes and other painting supplies.
Photo #6 is a close up of the Demon Slayer scabbard, painted black with white on both ends. Unfortunately, I was not successful with this prototype scabbard, there was not enough clearance for a painted blade to slide into the scabbard which resulted in scratching the black paint on the sword blade. The scabbard came out looking awesome, later on I will split it open to add material until I can get a fit that will not scratch paint.
Photo #7 shows the first layer of flat white snowflake painted onto one side of both Mushi katana blades. I say the first layer, because these swords will have the snowflakes reapplied after each color layer. I’m continuing to experiment with the Mushi sword color scheme, I am hoping that multiple snowflake applications will add some depth and make them more visible within and against the colors added later.
Photo #8 shows all the parts after painting. I did not have time before our first move to complete the Mushi blades, but I did get all the other parts painted. I did assemble the Jian sword since all those parts were completed, it came out Awesome! After this step, all the sword parts were packed up for the move.
Photos #9 and #10. On April 14th, just prior to my last post, our beloved and most senior cat passed away. At the time I was too raw to write or talk about it. Sebastian Thomas Leopold III was my stalwart companion for 16 years. He was affectionate and aloof in equal measure. We always ate together, whatever I was eating is what he wanted to eat too. When I was single, he and I shared many a meal of cold roasted chicken and Cheezits. After I met Cindy, his palette was expanded considerably and he was a bona fide foody up to his very last day. After a litter of kittens were born under our house, he became the most respected and honored boss cat, keeping our adventurous and troublesome kittens in line as they grew up. We are glad he passed before our moves, he lived his final days in the place that he loved best. Sebastian was the first cat I ever had cremated, his ashes reside in a hand carved wood box now, with a very appropriate Christmas tree ornament as part of his shrine. We miss you Buddy.
#Kunai#Vivi#Mystery Skulls Vivi#MSA Vivi#Hellbent Vivi#Mystery Skulls Mushi#Mushi#MSA Mushi#Hellbent Mushi#MSA Mushi Katana#Mystery Skulls Hellbent#Mystery Skulls#MSA Mystery Skulls#Hellbent#Sword#Katana#3D Printed#3D Printed Sword#3D Printed Katana#3D Printed Jian Sword#Jian#3D Printed Jian#Heilos's Art Corner#Ice and Snow#Ice and Snow Katana#Ice and Snow Sword#Demon Slayer#Demon Slayer Black Katana#Demon Slayer Black Sword#Black Katana
23 notes
·
View notes
Photo


4/24/2022 - The Five Swords Project. Update.
Sanding. Lots and lots of sanding. Red powder everywhere. Good thing my Honey loves me!
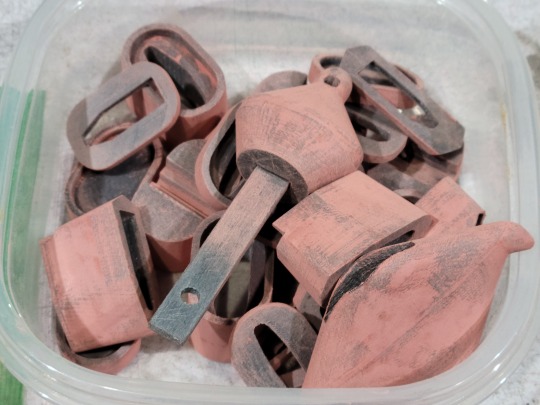
Picture #1: Plastic tub full of smaller parts for the five swords, all sanded and ready for their first coat of primer paint.
Picture #2: I had sanded down one sword blade and the guard parts for scabbard fitting, but there are four more blades to go and a newly epoxy coated scabbard to sand.
Pictures #3 and #4: The modified Mushi sword before and after sanding down the Bondo putty coating. The sandpaper used for this step was 180 grit.
Picture #5: Three blades sanded, two more to go.
Pictures #6 and #7: All of the smaller parts, the handles, the hand guards and the pair of kunai all laid out on cardboard, shown before and after the grey primer paint was applied.
Pictures #8 and #9: All five sword blades, fully sanded and laid out on a strong sheet of cardboard for primer painting.
Picture #10: These three hand guards needed repeat coating of Bondo putty and sanding before they were ready for primer paint.
I’m putting extra time into this project right now because the opportunity presented itself and the diversion was welcome. If things continue to go smoothly then painting colors is right around the corner. Yay!
#Kunai#Vivi#Mystery Skulls Vivi#MSA Vivi#Hellbent Vivi#Mystery Skulls Mushi#Mushi#MSA Mushi#Hellbent Mushi#MSA Mushi Katana#Mystery Skulls Hellbent#Mystery Skulls#MSA Hellbent#Hellbent#Sword#Katana#3D Printed#3D Printed Sword#3D Printed Katana#Jian#3D Printed Jian#3D Printed Jian Sword#Heilos's Art Corner#Ice and Snow#Ice and Snow Katana#Ice and Snow Sword#Demon Slayer#Demon Slayer Black Katana#Demon Slayer Black Sword#Black Katana
11 notes
·
View notes
Photo


4/17/2022 - The Five Swords Project. Update.
Since the last update: All assembled blades and parts sanded, check.
I’ve moved ahead on this project whenever I have some time. As usual I’ve taken a load of pictures of all the steps along the way, but there is no time right now for the long form presentation. My latest brainwave was to build a scabbard for one of the Demon Slayer swords, for which I needed a pre-paint blade for fitting. This first prototype scabbard was build from balsa wood with a fabric lining to hopefully protect the painted blade. Working with wood takes a long time, but it helps to create understanding of a new concept before designing in 3D modeling software.
Pictures #1 and #2: All five blades and tangs coated with marine grade epoxy, check.
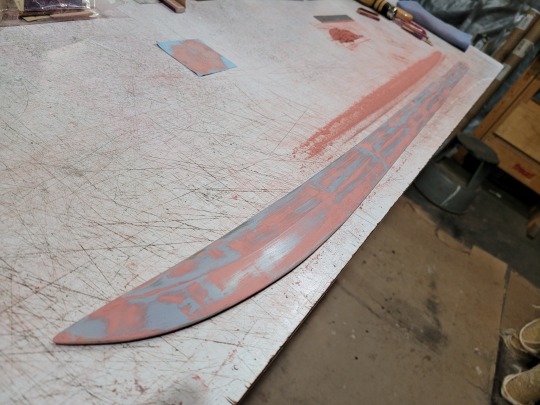
Picture #3: All the blades were sanded down until the epoxy layers were flattened out and smoothed. For the Jian sword, this round mailing tube segment helped sand the concave surfaces.
Picture #4: With the epoxy surfaces sanded down, all five blades were sprayed with primer paint. After the primer cured for a few days, Bondo glazing putty is applied over the entire blade surfaces of the swords. Glazing putty was also applied to the hand guards, handles and all of the smaller parts.
Picture #5: One of the Demon Slayer blades was selected to be fully sanded and prepared for use as a pattern for a scabbard.
Picture #6: Balsa wood patterns were cut out in the shape of both the upper and lower angled sides of the blade. The wood patterns were cut oversize in width to give the blade room to move inside the scabbard.
Picture #7: The patterns were used to cut out parts for both sides of the scabbard. The upper and lower parts were glued together while pinching the fabric into the glue joint. This was a bit dodgy on the first try as all new things are and the second try worked pretty well. The parts and the cloth were initially fitted over the blade to set the correct angle.
Picture #8: The two sides were joined with balsa strips on the top and bottom. Once I made sure that the sword blade fit without binding, I glued sheets and strips of balsa wood around the outside of the original sides to build up thickness. After building up the wood thickness, I sanded down the exterior to a oval shape along the length of the scabbard.
Picture #9: The blade guard and spacer in front of the hand guard are a different shape than the sword blade, so I built up specific wood fittings for the front of the scabbard for them. You can see the line in the wood where I glues this front section on, then sanded it to match the oval shape of the rest of the scabbard.
Picture #10: The wood construction of the scabbard is now completed, so now the entire outer surface is getting a coating of marine grade epoxy to harden up the skin.
That’s it for now everyone, Happy Easter!
#Vivi#Mystery Skulls Vivi#MSA Vivi#Hellbent Vivi#Mushi#Mystery Skulls Mushi#MSA Mushi#MSA Mushi Katana#Mystery Skulls Hellbent#MSA Hellbent#Mystery Skulls#Hellbent#Sword#Katana#Jian#3D Printed#3D Printed Sword#3D Printed Katana#3D Printed Jian#3D Printed Jian Sword#Heilos's Art Corner#Ice and Snow#Ice and Snow Katana#Ice and Snow Sword#Demon Slayer#Demon Slayer Black Katana#Black Katana#Black Sword#Tanjiro#Tanjiro Kamado
33 notes
·
View notes
Photo


3/05/2022 - The Five Swords Project. Update.
Before starting on the swords, there is history to catch up on. I’m feeling fine now, fully recovered. Since the last time I posted, I had major dental issues and have now been fitted with dentures. Not fun. Also during this time, I was deeply bitten on my left wrist by one of my own cats. Swelled up both my left hand and lower arm. Also not fun. Between these two events, I was laid up and out of commission. Not content, the universe struck again. Our rental house is being put onto the market ASAP. Many of you are probably familiar with the rental market right now, it is a disaster for renters. We have no idea where we are going to end up. Our criteria is to stay in California, keep our cats safe and have some space for me to do project work. Given the prices and credit requirements, this is a real challenge. We are a very rare kind of folk, we don’t use credit at all, so finding a place is proving very difficult because most landlords will not accept anyone without a credit report. The future is hazy.
Now, on to the five swords. Given what has happened, I cannot photo document all the steps as I have done in the past. Simon Says, get the sword blades assembled pronto. Assembly requires a large flat table, whereas the remaining steps can get by without the table, so getting the swords built is top priority.
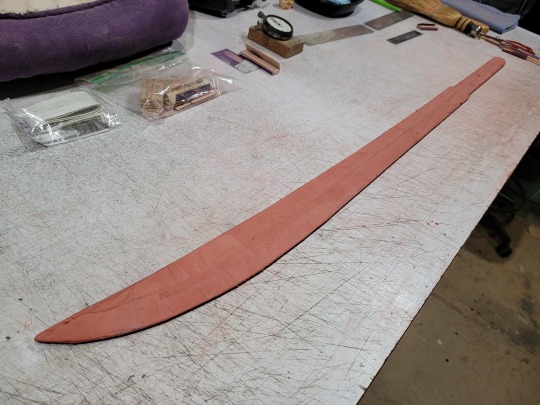
Blade sections are printed in two halves. All half sections were glued together. The first picture shows sections being joined with Five Minute Epoxy. The wood post at the top of the picture is the straight edge used on the sharp side of the Mushi katana blade segments to keep alignment. The balsa wood sheet marked with the numbers 3, 4, and 5, is curved alignment tool I made for the Demon Slayer katana’s. The top edge of the Demon Slayer blade sections are pressed against the alignment tool until the epoxy sets.
Picture #2 is a close up of my staging area, filled at this time with pairs of joined blade sections.
Picture #3 shows my entire work table. The epoxy section is in the foreground, with my large sanding block clamped to the table end. With this setup, I could pre-fit sections, sanding to make adjustments to blade thickness before joining the parts. The staging area is on the far side of the table, creating a lane in the center of the table that is crowded with parts and supplies. And of course, one of my cats is curled up asleep on my work stool at the far right.
Picture #4 is a view of the entire staging area as I started fitting larger sections together.
Picture #5 is a plastic tub with all of the smaller sword parts after their surfaces have been sanded for the first time.
Picture #6 is the Jian blade fully assembled, and put together straight this time! My first Jian has an unfortunate alignment problem at the tip, I was very careful this time to get the correct alignment (can’t use alignment tools with the Jian).
Picture #7 shows larger sections being joined. The classic Mushi katana is at the top of the image, one of the Demon Slayer katana’s in the foreground.
Picture #8 is a larger view with the staging area in the foreground. At this point, two of the swords are fully assembled and the other three are about to be.
Pictures #9 and #10 show all five sword blades fully assembled. The Jian is closest to the edge of the table, next to the pair of Demon Slayer swords, then the Classic Mushi katana and finally my modified Mushi katana.
With the swords assembled, I turned my attention sorting through our house goods, deciding what to keep, what to sell and what to get rid of. That process is nearly complete. We’ve had the best landlord that one could ask for in our years here. We want to do what we can to make selling their house easy, which would be best if we were not occupying it. When we have sold what we can, packed or discarded the rest, we will be putting our full attention and effort into hunting for a new place. Wish us luck please!
#Vivi#Mystery Skulls Vivi#MSA Vivi#Hellbent Vivi#Mushi#Mystery Skulls Mushi#MSA Mushi Katana#Mystery Skulls Hellbent#MSA Hellbent#Mystery Skulls#Hellbent#Sword#Katana#Jian#3D Printed#3D Printed Sword#3D Printed Katana#3D Printed Jian Sword#Heilos's Art Corner#Ice and Snow#Ice and Snow Katana#Ice and Snow Sword#Demon Slayer#Demon Slayer Black Katana#Black Katana#Tanjiro#Tanjiro Kamado
8 notes
·
View notes


Photo


1/22/2022 - The Five Swords Project. Update.
Happy New Year to everyone. The four sword project has been expanded to five. There will be two Demon Slayer katana’s instead of one, one finished as its namesake sword and the other as a traditional katana.
The theme of this update is sanding. Sanding. More sanding. Sanding is boring, non-stop, relentless and absolutely required. With five swords worth of parts, I have a lot of sanding to do. Three of the five blades have been processed through the sanding of surfaces and the opening up of the slots for tabs to fit into. (Picture #1). For the larger parts I have made it easier on myself by gluing a full sheet of 60 grit sandpaper to a bit of 3/4 inch plywood, then clamping the wood onto my work table. That is what Picture #2 shows, the classic Mushi katana hand guard having its broad sides sanded on the table.
While the flat sandpaper works well on flat blade sides, the Jian has only concave curved blade sections, For that sword, it is all hand sanding.
Picture #3 shows the Mushi katana hand guard from the side, where all of the outer edges, slots and angles must have the overhanging plastic flash removed from both the upper and lower surfaces. I do this with rough and fine jewelry files of various shapes, so I can hit every interior and exterior short vertical wall on the hand guard.
Picture #4 shows the slot and tab on the ends of each blade piece, The tab prints out normally, the slot requires support material so the blade body is not printed out onto thin air. Here the slot has been cleared, so it is easy to see how the parts are meant to fit together. On the left side of Picture #5 the support material is still on the blade part, on the right side the support material has been removed with a pair of pliers. The inside of the slot will need to be cleaned up with a Dremel sporting a 1/8″ mill end cutter, flattening out that plastic spaghetti.
Over the holidays my daughter came to visit. She had just completed a design course for school and came prepared to add some features to this project. Picture #6 shows two kunai as accessory weapons for Mushi, and three additional tsuba hand guards for the Demon Slayer katana. She designed the kunai and the Kikka Gata (chrysanthemum shaped) with the rounded petals. I designed the kikka gata with the flat petals and the four point Itomaki Gata tsuba. Pictures #7, #8 and #9 show closer views of these parts. I am going to finish all of the hand guards for the Demon Slayer sword, though I think I will find a new name for the second katana in order to differentiate them from each other.
The final picture shows one of the kunai being held up next to the hand guard for the Mushi katana. My daughters vision for these kunai is as accessory weapons for Mushi, with the entire weapon painted the same color of sparkling ice blue as the hand guard and the handle wrapped in the same color ito-wrap as the sword. Cool!
#Kunai#Vivi#Mystery Skulls Vivi#MSA Vivi#Hellbent Vivi#Mushi#Mystery Skulls Mushi#MSA Mushi#MSA Mushi Katana#Mystery Skulls Hellbent#MSA Hellbent#Mystery Skulls#Hellbent#Sword#Katana#3D Printed#3D Printed Sword#3D Printed Katana#3D Printed Kunai#3D Printed Jian Sword#Heilos's Art Corner#Ice and Snow#Ice and Snow Katana#Demon Slayer#Demon Slayer Black Katana#Black Katana#Tanjiro#Tanjiro Kamado
15 notes
·
View notes
Video
youtube
12/18/2021 The Four Swords Project, two MSA Hellbent Katanas, a Chinese Jian and a Demon Slayer Katana.
This is a short video looking at the 3D printed parts for the four sword project and hearing some of what I would like to accomplish this time around.
#Vivi#Mystery Skulls Vivi#Hellbent Vivi#MSA Vivi#Mystery Skulls Mushi#Hellbent Mushi#Mushi#MSA Mushi#MSA Mushi Katana#Mystery Skulls Hellbent#MSA Hellbent#Mystery Skulls#Hellbent#Sword#Katana#3D Printed#3D Printed Sword#3D Printed Katana#3D Printed Jian Sword#Heilos's Art Corner#Ice and Snow#Ice and Snow Katana#Demon Slayer#Demon Slayer Black Katana#Demon Slayer Black Sword#Black Katana#Tanjiro#Tanjiro Kamado
9 notes
·
View notes
Video
youtube
I spent a few months during the Covid lock downs carving opals. Bought rough stone from Etsy and used hand tools to carve and polish these gems. I’m thinking of embedding some of them into sword handles. What do you think?
4 notes
·
View notes
Photo


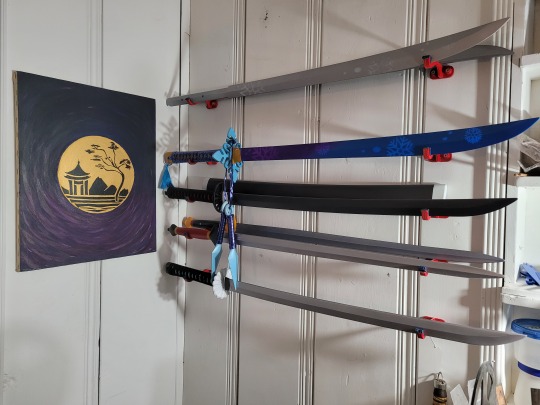
12/17/2021 - New Sword Wall Display and new Four Sword Project.
I’m trying something new! Well, not exactly new, but since I am considered by many to be an old fart now, and you know how much us old farts detest change . . . . this is all going to be new to me. Making Videos.
To bring forth this new thing, I had need to bring all three of the computers I use into the same space. There would also be a need for fitting backdrop, in case I needed it.
Hence was born my new wall display. The wall area was cleaned up and painted. Mounts for my three swords were installed. The picture was painted by my sister in 2015, it is titled “Tunnel Vision”. The painting is flanked by my daughters Chakrams from Kingdom Hearts, which fortunately for me, she forgot to pick up last time she had the chance!
So here is the way I figure it, I can get a lot more information and imagery into video than I can with photos. Plus it helps a lot that I’ve received a really cool new phone earlier in the year and had time now to get used to using it. Now I can dump the old SLR camera, because the phone camera and video is far superior (all you young’uns already know all about that, but I kept my old Star Trek flip phone for a reason damn-it, it was cool!).
The new project is going to be called “Four Swords”. The 3D printing stage has been completed, covering seventeen days since Thankgiving. I will be building a Classic Mushi Katana from MSA Hellbent, the Demon Slayer Katana, a Chinese Jian, and my modified Mushi Katana Version-4 (the one I have not come up with a snappy name for yet).
I have a pair introductory videos in the can, which I will post shortly. The first is a short video about the end results of one of my “Lockdown Projects”. That one is a surprise. The second video is about the beginnings of the Four Sword Project and what I am looking to accomplish this time.
See ya soon!
#Vivi#Mystery Skulls Vivi#Hellbent Vivi#MSA Vivi#Mystery Skulls Mushi#Hellbent Mushi#Mushi#MSA Mushi#MSA Mushi Katana#Mystery Skulls Hellbent#MSA Hellbent#Mystery Skulls#Hellbent#Sword#Katana#3D Printed#3D Printed Sword#3D Printed Katana#3D Printed Jian Sword#3D Printed Axel's Chakrams#Heilos's Art Corner#Ice and Snow#Ice and Snow Katana#Demon Slayer#Demon Slayer Black Katana#Demon Slayer Black Sword#Black Katana#Tanjiro#Tanjiro Kamado#Axel's Chakram
12 notes
·
View notes
Photo


10/15/2021 - Summer Projects displayed. Vivi/Mushi Katana’s, Demon Slayer Black Katana and Kingdom Hearts Axel’s Chakrams.
All made from 3D printed PLA plastic, all painted with Wicked Colors airbrush paint. Two of the swords on the wall now have new homes with my daughters, guess that means I must make another sword to fill the empty space!
#Vivi#Mystery Skulls Vivi#MSA Vivi#Mushi#Mystery Skulls Mushi#MSA Mushi#MSA Mushi Katana#Mystery Skulls Hellbent#MSA Hellbent#Hellbent#Sword#Katana#3D Printed#3D Printed Sword#3D Printed Katana#3D Printed Axel's Chakrams#Heilos's Art Corner#Ice and Snow#Ice and Snow Katana#Demon Slayer#Demon Slayer Black Katana#Demon Slayer Black Sword#Black Katana#Tanjiro#Tanjiro Kamado#Axel's Chakram#Axel's Chakrams#Cosplay Axel's Chakrams#Axel#Axel Kingdom Hearts
42 notes
·
View notes
Photo


9/11/2021 MSA Hellbent, Mushi’s Katana. The Sixth Blade. Build Log Ten.
Picture one: The first thing to do is fit the scabbard sleeve onto the tang. The blade steps down in width on both sides where it meets the tang, and the scabbard sleeve fits right up against the upper step.
Picture two: Behind the scabbard sleeve fits the front spacer. This image and the previous picture provide a really good look at the new blade angles. There is a taper on both sides of the center line, with the lower taper ending in a semi-sharp edge. Picture four will show the flat on the top side of the blade, which is 1/3 thinner than the top width of the previous Mushi swords.
Picture three: After the spacer the hand guard is fitted. So far no extra sanding has been needed, all the parts fit nicely.
Picture four: The rear spacer is added behind the hand guard. Check out the blade angle details in this image. The paint varies in brightness and intensity depending on the view.
Picture five: Now the sleeve is fitted behind the spacer. Note the depression inside the rear of the sleeve, that space is for part of the handle to fit into.
Picture six: With the handle now fitted and secured with two wood pegs, all the colors of the sword are together in one image. The menuki handle ornaments are slightly more subdued in color, yet they contrast well and stand out against the other handle colors.
Pictures six through ten: Now it is time for this Mushi sword to join its predecessors on the wall of swords. The top sword is Version-1 with the longest handle. The bottom sword is Version-2 with the longest blade, which came out with an Arabian flair due to the alignment of the blade parts. Version-3 is not represented here, though it is the sword that established the final blade-to-handle length layout. Each of the V-3 Mushi Katanas I created went to MSA Special Masters. The Version-4 sword in the center followed the same blade-to-handle length rations established with the V-3 sword, but the entire sword and its fittings were redesigned to fit my own personal design vision.
Epilogue: While it may last for a few more months, this sword wall configuration is temporary. The top sword, the Version-1 Mushi Katana is going to my youngest daughter, along with the pair of Axel’s Chakrams. The bottom sword, the Version-2 Mushi Katana is going to my eldest daughter. The Version-4 sword will stay with me and will be joined by the Demon Slayer Black Katana and my Jian on the sword wall.
#Vivi#MSA Vivi#Mystery Skulls Vivi#MSA Mushi#Mystery Skulls Mushi#Mystery Skulls Hellbent#Mystery Skulls#Hellbent#Sword#Katana#3D Printing#3D Printed#3D Printed Sword#3D Printed Katana#Heilos's Art Corner#Ice and Snow#Ice and Snow Sword#Ice and Snow Katana
72 notes
·
View notes
Photo


9/10/2021 Demon Slayer, Black Katana sword build. Build Log Eleven.
Pictures one and two: The paint needed to be sanded down so that the scabbard sleeve (habaki) would fit properly. I sanded lightly and fitted often in order to get a proper friction fit.
Picture three: This is the fitting of the front spacer (seppa) and the hand guard (tsuba).
Picture four: This shows the fitting of the rear spacer (seppa) behind the hand guard.
Picture five: This picture shows the fitting of the sleeve (fuchi) behind the rear spacer. The sleeve has an indented space that the handle fits into, keeping it properly aligned on the tang.
Picture six: The handle is now being fitted with two wood pegs, made from 1/4″ dowels, are pressed through the handle and the tang. This is a tight fit, so I used a small ball peen hammer and a flat head punch to tap it in.
Picture seven: To get both of the wood pegs in place, the cloth wrap had to be moved clear of the holes.
Picture eight: Once the wood pegs are in place, the cloth wrapping is moved back into position so that the twists are evenly spaced on the handle.
Pictures nine and ten: These are pictures I took immediately after completing the sword assemble. It looks freaking awesome! For my very first traditional katana style sword, I could not be happier.
#Demon Slayer#Tanjiro#Tanjiro Kamado#Demon Slayer Katana#Demon Slayer Black Katana#Demon Slayer Black Sword#Toonami#Adult Swim#3D Printing#3D Printed#3D Printed Katana#3D Printed Sword#Katana#Sword
39 notes
·
View notes
Photo


9/08/2021 MSA Hellbent, Mushi’s Katana. The Sixth Blade. Build Log Nine.
Tassel time!
Picture one: The wrapped handle, the tassel cord and the tassel still in its package.
Picture two: Close up of the tassel and the attachment cord. I used a flame on the ends of the cord to melt the strands together so it would not be prone to unraveling.
Picture three: The attachment cord is threaded through the tassel hoop.
Picture four: The tassel cord is passed through the slot on the end cap. The cord is going to overlap for a length a bit under the width of the end cap. Using thick CA clue, one end of the cord is cemented in place to form a loop.
Quick note here. I don’t want the tassel to hang down too far, so I cemented the cord to itself so that the cord hoop size has about 3/8 of an inch clearance over the end cap corners.
Pictures five and six: Picture five shows one end of the cord kinda sticking up, I found out some time ago that trying to glue the cord together in one go mostly lead to frustration and sometimes damage when the cord would attach itself where it was not supposed to. Trying to hold both ends together with one hand while using the CA accelerator spray, is a recipe for trouble. So I glue one small segment in place and then as picture six shows, glue down the other end after a few minutes go by. Much more reliable results this way.
Picture seven: The double width of glued cord is now tucked inside the end cap. To keep the glued section of the cord from rotating into view, I dabbed a small amount of CA glue to the cord where it touched the end cap. Just enough to keep the cord in place, but not so much that I could not remove the cord if I wished.
Picture eight: The end cap with tassel attached.
Picture nine: All the finished parts that make up the handle end of the sword. In this picture you can see the color saturation of the handle is very nearly the same as the tassel.
Picture ten: With my old socks on the work table to protect against scratches, the blade now joins the rest of the parts for a picture. Test fitting showed that all the parts fit well, so no paint sanding will be required.
Next stop, final assembly!
#Vivi#MSA Vivi#Mystery Skulls Vivi#MSA Mushi#Mystery Skulls Mushi#Mystery Skulls Hellbent#Mystery Skulls#Hellbent#Sword#Katana#3D Printed#3D Printing#3D Printed Sword#3D Printed Katana#Heilos's Art Corner#Ice and Snow Katana#Ice and Snow#Ice and Snow Sword
61 notes
·
View notes
Photo


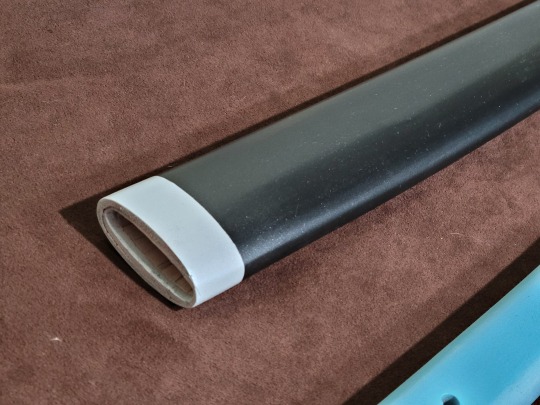
9/07/2021 Demon Slayer, Black Katana sword build. Build Log Ten.
Pictures one and two: When I wrote “That’s a wrap” to end the previous DS log, I didn’t mean it literally. These two pictures show the cut ends neatly tucked under the wrap and almost completely out of sight. Cool!
Pictures three and four show all the parts laid out on the table for inspection, prior to test fitting. I am really, really happy with the curve of this blade.
Pictures five, six and seven: During the test fitting, the white blade guide that goes on first, would not fit. All parts have been test fitted before painting, so the culprit was paint buildup messing with the fit. The old socks are to protect the blade paint from my scratchy work table. During the sanding I continuously checked the fit so that I did not sand off too much material. Sanding stopped when I got a good and snug fit. All the other parts fitted without issue.
Picture eight. The Black Katana has four bands of black wrap around the center of the handle. The ito-wrap was a little narrow in width for this, but I had plenty left over and nothing better, so I used it. After cutting a suitable length, I used a torch to heat up the ends to melting point (not cotton wrap after all), then used the painters knife to flatten the ends. Actually I flattened and rolled the melt that bulged out back onto the wrap, using the torch several times to carefully heat and manage the ends so that I could glue the ends together. I thought I was going to sew them together, but the cut ends were too messy for that.
Picture nine: Four completed loops.
Picture ten: I was hoping to get a snug fit. Then I was worried I had made them too snug to install, but I managed to get all four loops into place at the center of the handle.
Next: Assembly time!
#Demon Slayer#Tanjiro#Tanjiro Kamado#Demon Slayer Katana#Demon Slayer Black Katana#Demon Slayer Black Sword#Toonami#Adult Swim#3D Printed#3D Printing#3D Printed Sword#3D Printed Katana#Sword#Katana
4 notes
·
View notes