
Statistics
We looked inside some of the posts by cosplay-in-a-teacup and here's what we found interesting.
Average Info
Notes Per Post
124K
Likes Per Post
69K
Reblog Per Post
55K
Reply Per Post
85
Time Between Posts
1 year
Number of Posts By Type
Text
7
Last Seen Tumblr Blogs


Fun Fact
There were a total of 171.5 billion posts on Tumblr in 2019.
Text
EVERYONE SHUT THE HELL UP
look at this free pattern:
anyone wanna make this with me?
3K notes
·
View notes
Text
Guy helping cosplayers fix their outfit when they need it
26K notes
·
View notes
Text
i hate when ppl complain abt hot glue guns like sorry u havent gotten to know ur beast. its like a horse you have to have a bond and work together
95K notes
·
View notes
Text
Let‘s talk about Cosplay Motivation! :]
Lack of motivation and the search for new inspiration - Every artist is quickly unsettled by the incredible flood of online content. The constant pressure to produce content. Especially as an artist with a larger online presence and fan base. It's easy to forget why we're doing all this in the first place! And it´s totally valid to feel intimidated and overwhelmed. Been there- You´re not alone.
One thing that makes cosplay so special is gathering and sharing at conventions. After little to no conventions in the past 1 1/2, no group cosplays, no last minute crunching (!) and almost exclusively online interaction it is difficult to keep one's motivation.
Soo... How to stay focused and motivated for future projects?

There are alot of cosplayers out there writing about this specific topic and I wanted to share my personal experience and tips ;-)
1. A fresh new start
A thing that helps me is to clean and organise my workspace new - after I finish a small cosplay or even between worksteps of a bigger project. Create a place where you feel comfortable and inspired to work! Sometimes, something as simple as rearranging your work table, changing your work setup or pack away all your sewing supplies in a neat way, can help you find some inspiration to create something new!
///// OR finally setting up the new shelf you wanted to put on the wall for so long ..ops
2. Start simple
Sometimes a big project feels incredible intimidating and you cannot bring yourself to start. Reletable?
I personally always like to start with a costest, testing out some makeup for the character I want to portray and make due with things I already find at home. Scribble cosplay ideas on a paper. What is a cosplay you always dreamed of making? Make a small closet cosplay of your favorite character!
Make your life a little easier! I´m a person who likes making my entire cosplay from scratch, starting from the patterns which is unbelievable time consuming, especially if it´s a bigger cosplay or much detailed armor pieces etc... Sometimes it´s just nice to order a premade pattern online or commission a prop from your favorite small cosplay business.
3. Find your inspiration
Found a person, who is working on the same cosplay as you? Perfect! Maybe they can give you some useful tips or advice for the crafting progress and you can start exchange some positivity and love for the character you both love.
Remind yourself of the reason you started a specific cosplay. A character /costume you immediately fell in love with the moment you started watching a new show? Or a badass dream cosplay you wanted to do for years? Rewatch the movie/show or replay the game your cosplaying from. That always does the trick for me :]
My instagram for some more cosplay pics ~
- PART 2 COMING IN A FEW DAYS -
#cosplaymotivation#CosplayBlog#cosplay#cosplaypositivity#cosplayer#crossplayer#crafting#artistmotivation
0 notes
Text
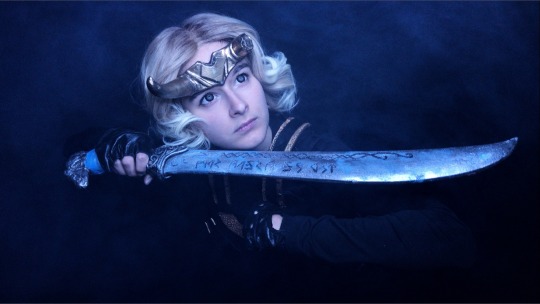
Tomb Raider Ice Picks - Eva Foam build

Material list:
Eva Foam in different thicknesses. (I highly recommend High density Foam because it´s way more solid and more practical for Props) I used 5mm Foam for the base and 2mm Foam for details
White fabric and some leather straps for the details

A sharp box cutter, scissors and a dremel
Hot air Gun + Hot Glue Gun
Your Primer of choice ( I always prefer Flexbond, wood glue for props because it gives the whole thing extra stability and makes it less wobbly + you can cover all your mistakes hehehe.. ) but Plastidip is fine too :)
Your Paint of choice (I used dark red and silver-metallic spraypaint)

Okay got everything you need? Let´s start..
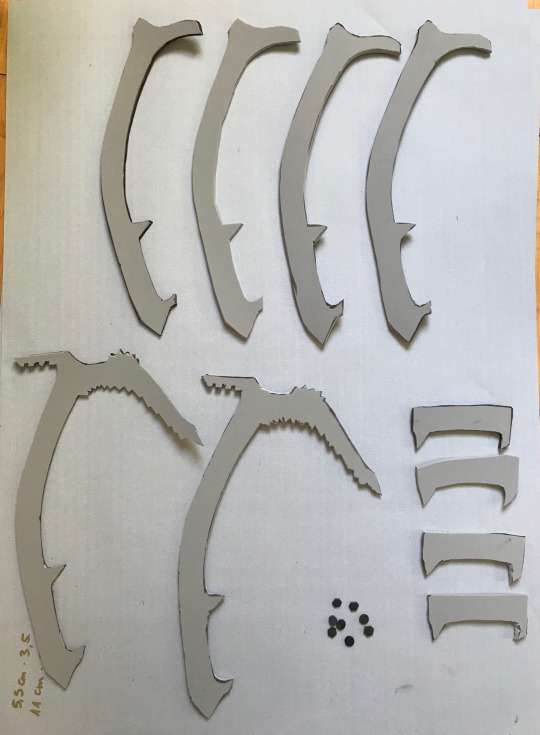
The First step is to find a good Blueprint. You can find plenty online or you can create your own (like I did) just make sure all the proportions are correct. I always work with alot of reference Pictures

Carefully cut out your Pattern and transfer it to your Eva Foam. My picks consists of 3 parts each (2mm Foam) + the two sepperate pieces for the handle (also 2mm Foam)
Next step is to glue everything together with contact cement. I added some small additional details with normal super glue.

Wear a mask and dremel the hecc out of it, until everything is smooth and pretty. I added some more details. Battle damage and the tiny hole at the bottom.
Now prime everything with your primer of choice. (Plastidip,Gummidip or normal Wood glue works just fine) I always use Wood Glue for props because it gives your prop the extra stability it needs and you can cover up all the mistakes you made. 4-5 coats until everything is smooth
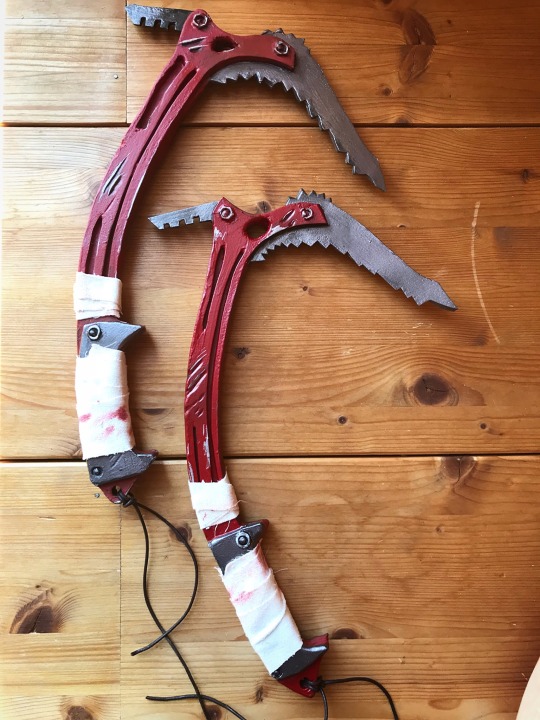
If you´re happy with the result it´s time for Paint :D
I used Spray paint for the main areas and acrylic paints for the details, but of course you can use whatever is available to you :) I let everything dry over night before I move on.

For weathering I took some black acrylic paint and mixed it with a lot of water, (Oil paints work extremely well, so if you have that definitely use it!) brushed it all over the prop and took most of it off with a dry cloth. This step is super important. It gives your prop realism and depth. I added some additional brown for rusty look to reinforce the general metallic look of the prop :)
Set everything with a shiny setting spray to protect your fine work!
Almost done!
For the last step I took some leftover white fabric, weathered it with some red,brown and black acrylics and added a leather ribbon to the bottom hole we made earlier. You can use some additional details, depending on what your reference pictures show you.
And you´re done! The whole thing took me around 2 days and I only used very affordable materials. I hope you found this tutorial helpful. Don`t hesitate to ask me if you have any more questions or need tips for your own cosplay projects.
Have fun crafting guys! :)
20 notes
·
View notes
Text
Tracer cosplay - graffity guns

Since I already finished my Graffity Tracer cosplay a while ago I´ve decided to continiue this Blog and start talking about how I made the Guns. I did both of them in like 3 days? You should be able to make those as a beginner cosplayer. I hope my little tutorial is helpful ;)
Material list:
10mm Foam (for the base); 5mm Foam and 2mm Foam (details)
Contact Cement or super glue (which is alot cheaper but I prefer Contact Cement)
regular Plastidip (or whatever you prefer for sealing)
acrylic paint / spray paint.
scissors and/or an exacto knife (I always use scissors for 2mm Foam cause you can cut smaller details alot cleaner )

STEP ONE
The first thing I did was looking for reference pictures and made my own Pattern for the base shape.( Dm me for the reference pictures I used)
Then I traced out my base shape on 10mm Foam (twice), cut both pieces out and glued them together with contact cement. I used a dremel to smooth out the edges until I was happy.
STEP TWO
As soon as I was happy with the base shape I started working on some details. I used 2mm Foam for this. I also did some details with my dremel and always made sure I smoothed out all of the edges nicely
STEP THREE.
more details! :´) I recommend looking at many reference pictures as you can to make sure you get all the details right.
DON`T GET CONFUSED WITH THE COLORS OF THE FOAM. IT´S THE SAME SIZE! I JUST USED SOME EXTRA PIECES I HAD LEFT AT HOME ;) SO THEY ARE EXACTLY THE SAME.
STEP FOUR
For the shape of the spray can I used a small paper roll. But any kind of roll should be fine. I wrapped 2mm Foam around my base-roll. The Foam piece, which connects the spray can with the gun I gave a round shape with my dremel and connected everything with contact cement.
TIME FOR PLASTIDIP
warm up the can in warm water for a few minutes (not boiling water! warm water ^^ ) this is gonna make the layers alot smoother and easier to aply.
3-4 layers should do it. make sure it´s even applied and not to thick.
If you use regular black plastidip, wait until it´s dry before spraying/painted averything white before applying more colors.
I used acrylic paints to paint evrything, since there are so many small details. You can even use an old makeup brush, so there won´t be any brush strokes. :3
When I was happy with everything, I sealed everything again with a glossy, transparent spray.
#tracercosplay#tracer#cosplaytutorial#overwatch#overwatchcosplay#overwatchtracer#tracertutorial#graffitytracer
9 notes
·
View notes
Text
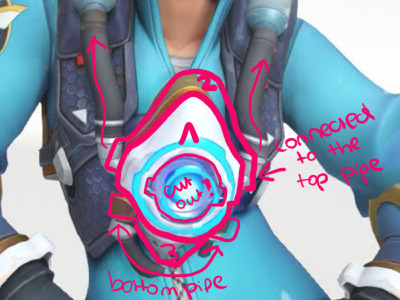
(Graffity) Tracer cosplay
Soo.. I´m starting my first blog with my Tracer cosplay, which I´m currently working on. I am not quite finish with it and I´m going to update you guys while I´m working on it ;)
If you have any questions feel free to dm me here or on Instagram!

First of all a quick summary of what material I used!
Material List(starting with the accelerator):
5mm and/or 1cm Foam
2mm Foam (I used some for details)
regular Worbla (that´s totally optional but I would recommend using it)
Contact Cement (to glue the foam together)
Plastidip (to seal the Foam before painting)
Led lights (I used led straps)
acrylic glass (white)
spray paint in white, red, gold, blue
super glue and hot glue gun
Scissors and exacto knife
(( You can use some acrylic paints too! if you prefer working with a brush or you can use a air brush If you have one! :) ))
If you working with Worbla and Eva Foam you have to use a hot air gun which you can find online and an dremel to smooth out the edges of the Foam ((this step is important to make everything look alot cleaner and nicer!))
Before you start doing anything search for Reference Pictures!! ALOT! if you don´t find enough online you can always just go in the game and look for details (very helpful ^^) I also like to do some sketches first just so I know what I´m doing :D
I´m usual sketch my pattern on huge sheets. ((You can use Newspaper for this aswell)) and important: make sure it´s the right size to fit on your body!
(( My front accelerator is 34cm x 24cm ))
If you want the exact pattern I used you can dm me on my instagram! I might do an digital version aswell for you guys to download :´)
As soon as you´re happy with your pattern you cut it out and pinn the pattern (I always use sawing pins) on the 5mm Foam or 1cm Foam and cut everything out. (I used 1cm Foam but 5mm Foam works too if you have that!)
When you cut out the front part make sure you make a hole in the middle. Make sure it´s the correct size and try to find good reference pictures for this part! I placed my acrylic glass in there after I painted the whole thing so I don´t get any paint on the glass. Now use the dremel to get everything nice and smooth!! When you glue everything together make sure you have a little curve in the whole thing to make it it to your body!! That´s very important otherwise it won´t fit right! you can use an Mannequin for this part to make it a little bit easier or you can ask someone to help you with this step. For this step it´s important that you have a hot air gun. To get that little curve you GENTLY! heat up the foam (if I get´s to hot It will burn the foam. you don´t want this! lol ). Until it´s warmed up you can carefully shape it to fit your body.When it´s completely cooled it will retain the form! :´)
Important: whenever you use a Hot air gun keep the windows open! Especially while working with worbla!
When I was happy with the shape I started covering the Foam peaces with Worbla. (that´s totally optional. You can use just Foam if you prefer!)
In case you don´t know how to work with worbla:
cut out the correct shape (make sure it´s a little bit bigger than the pattern we used at the beginning)
gently heat it up until it becomes flexible (make sure it´s not to hot for you to touch it!!)
place the worbla at the the Foam peaces (you don´t need extra glue for this step cause the Worbla will stick on the foam by itself. just make sure it´s hot enough!) and gently push the together. Make sure you use the "soft" Worbla side. The other side is far more rough and won´t stick as good to the foam!
Wait until it´s completly cooled ( wait a few minutes) and the worbla should be completely stiff.
For an even better result you can now smooth the rough side with a little bit of sanding paper! Personally I don´t do it because it gives the prop extra textur but that´s totally up to you! ;)
When everything looks good you have to seal your Foam with Plastidip or you won´t be able to paint it later! You don´t have to seal your Worbla tho! If you covered your whole thing in worbla you can skip this part. :3
In case you use Plastidip:
When you´re using plastidip always leave the window open!! Or just go outside if you can because Plastidip is toxic!
The first layer should be thin and shiny. Wait atleast 10 minutes before spraying a second layer. And Finally spray a thrird layer and leave it to dry at least for 4-5 hours!
make sure you u cover everything and don´t use to much for each layer (it shouldn´t drip!)
When everything is dry cover the whole thing in 1-2 layers of white paint, to make the other colors later pop!
The biggest part of the accelerator is white so you can just paint an extra layer of white and make a few details with sponges and little brushes with different shades of brown and you can use some bronze aswell (just to make it look more used and realistic) I sprayed the bottom part with a shiny silver and edit some details with black acrylics. You can now seal everything with a clear shiny spray. (it will look much better with it! )

That´s it for the first part I´ll upload the second part soon (including the led part and the back accelerator)
#tracer tracercosplay cosplaytutorial worblacosplayoverwatchcosplaycosplayergraffitytracergraffitytracertutorial#overwatch#tracer#overwatchcosplay#tracercosplay#cosplaytutorial#cosplay#graffitytracer#cosplayblog#cosplayer
4 notes
·
View notes