
courtneyneeson3danimation
3D Modelling
By Courtney Neeson
22 posts
Don't wanna be here? Send us removal request.
Last Seen Blogs

astronoras
ASTRONORAS

xrisakamp
It's too cold outside for angels to fly

the-cyborg-alpha
Hey!

musicistheair-blog
Music Is The Air

alijka
MARDY BUM
Photo

I know I do not need to do this as it is not asked of us in the brief, however, I feel it is a necessity whenever you do a large amount of work and when we were allowed to choose the subject line of that work.
Topic choice
My topic choice I will admit was no surprise to anyone in the class as everyone knows I have a larger than normal interest in the Transformers franchise, however, I do feel that I went a little further than the regular mainstream Transformers that people are more exposed to. Comic books need to be interesting to be loved by many people and of course, more people are going to watch a Batman movie than reading the comics, comics are often considered as child's books rather than a medium for story telling.
Because I choose a comic book character essentially I did set myself up to do something on the more difficult end of the spectrum as I had no references beside my figure which of course held it's own differences. Besides that I do feel I performed greatly in re-creating Tailgate as a character and this was reflected by sharing it with someone who not only works with Tailgate as a character but writes him in the comics.
James Roberts the writer of the comic More Than Meets The Eye that this incarnation of Tailgate appears in asked me to send him the final result after sharing a render half way through the build. He not only left me a nice comment but then shared my post to him on twitter which in return go another retweet and 15 likes.
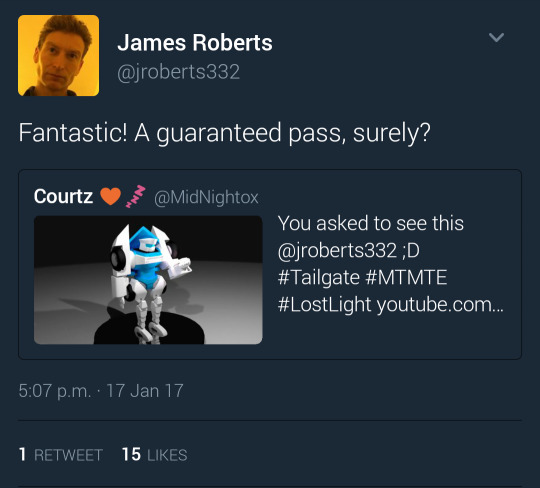
The fact he was willing to share my build and leave positive feedback shows that I must have done at least a decent job at portraying the very character he writes for a living and shows promise in my abilities to perform a task accurately.
Building Process
Having to keep a record of my building process was rather difficult as normally I would like to just sit down ad get stuck into it for hours upon hours at a time but I had to make sure I had a constant record of my building and other 3D related topics. There were times when I was either distracted whilst building or was simply too tired to keep proper track and thus lost some valuable screenshots of critical progress.
Besides losing some documentation I do feel I did not have any really bad struggle whilst building Tailgate other than not getting some of his parts done the first time. No problem I had during building lasted over 1 week and for that, I am thankful because some of my classmates had issues that lasted up until the presentation date.
Animation
A let down for myself I do feel lied within the animation of Tailgate, because of how long his build took me I had ultimately no time to give him proper animation and show off his rig. I had set up individual controls on his fingers and hands as well as putting bones into his double joints on his knees and heels but never had to time to show them off properly.
Because of this, I will understand if my reason for losing marks is because of this lack of animation but I did include camera motion which required me to set up another object and parent the camera which I had to learn how to do in Blender.
I had a total of 45 seconds in my final render and that included both content rendered from the Blender projects and stills showing the different processes I had to do to get the final result.
Written blogs
Doing the blogs I wanted to make sure I had some kind of structure to them and not just simply throwing them in whenever they were completed. I coloured coordinated the blogs so that every blog involving Tailgate would be coloured blue after his character and other projects would be different colours following the colours of the rainbow. I felt it gave the blogs a more interesting appearance than just a title and link to click.
Normally when I do large scale blogs including research and using others work for reference I would have a single references page however I learned whenever you go back and forth from page to page trying to find those references it is rather a waste of time so I made it a point to place each at the end of each blog. That way anything relating to that blog remains on that blog keeping all the files and references better organised.
To help improve my writing I downloaded a program called Grammarly which helped me spot mistakes in my speech and correct silly mistakes which in full honesty has been a huge life safe on my part as with my RSI I often type words that just do not exist.
Criteria
When it comes to the criteria I knew well in advance of choosing Tailgate as my target build that I would more than likely not fill it all in one project so I made it a priority to do what I call my day projects. These projects can be found in between the Tailgate blogs and even before them showing my understanding of the different techniques you can have at your disposal when it comes to 3D works.
I covered UV mapping, particles, vertice groups, physics generators, ridgid body controls, rigging and more techniques within my past works and the methods I used to get them. Now you might ask me why I did a blog about rigging in Blender when I did rig Tailgate, because before I finished him I feared I would not get that chance and made sure I had a blog to cover it should that situation arise.
Despite not using 3DS Max or Maya I do feel I have covered a vast majority of the criteria we had covered as well as some newer ones that were not really techniques we needed to depend on but would become useful down the line.
Feedback
After showing my build to not only James Roberts but my friends and family but finally my lecturers in my presentation I am overjoyed at the positive feedback I have received. Of course, people who do not know his character may not know any better than to just assume because I am addicted to the franchise that I did him to scale, because of that their opinion may be bias and those who do know his character may also be biased because of their love for him.
Whilst presenting my character to my lecturers I was thankful the only question they have for me was of the uncovered criteria which I was able to answer them immediately. With that being the only question they asked it did fill me with some positivity because I did have mixed emotions about the video I was handing over. I did not hate the video but I felt that is was incomplete when comparing it to the work of the other classmates.
Overall I am thrilled with the outcome of my assignment and the results I had received not only from myself but from recognised faces and I cannot confirm if 3D is a medium I want to pursue but I can gladly say I can put it on the table of skills I am able to utilize.
0 notes
Photo

As a final part of this assignment, we have to look at animations done by other people and then go into depth about what we feel their intentions were to create such a piece.
When you watch animation today we do all take it for granted, almost like having amazing visuals is some kind of standard today and anything below is deemed inferior or cheaply made. Sadly I do fall into this stereotype and when someone talks about 2D animation I immediately jump to cartoons and shows intended for children yet that couldn' be further from the truth. 2D movies have proved over the years their ability to perform and deliver difficult subjects and storylines for decades. 3D animation does bring a whole new realism to story telling but 2D animation can do that just the same for cheaper costs.
youtube
Borrowed Time (2016) Lou Hamou-Lhadj & Andrew Coats
For my first animation choice, I decided to go with “Borrowed Time” by Lou Hamou-Lhadj and Andrew Coats. What is surprising about this animation in that it was done by only 2 people and both of those people work for Pixar which was the first animation company to make the leap into 3D animation. Pixar has a high reputation to uphold as they were not only first in the game but also have competitors ready to take their place.
Because of this, they do have to keep themselves in check and not stray into areas deemed inappropriate for television for the audience they are attempting to target but that is where this animation comes into play. This was an independent animation that would not go into Pixar's profit and because of that, they were given free reign of the subject.
When you watch this animation you can immediately tell it is of a high standard, the details are striking from the stubble on their face to the dirt getting kicked up by the carriage and horses. But when you look beyond the animation the story it tells is rather shocking, a boy and his dad get caught up in what appears to be a prearranged attack and whilst his father struggles to climb to safety his son accidently shoots him.
The point of that I believe is to shock some awareness into the viewer, whilst I was watching it I could not help but notice the limp the son had when he was grown up and so I assumed he would fall off the cliff too but somehow survive but that did not turn out to be the case. After you see the event of the son’s father’s death, you can clearly see he cannot come to terms with what he has done and his grieving eventually becomes too much and he tries to end his life.
He could be doing this to punish himself, to escape the grief or simply be with his father again. It is evident that he was a strong figure in his life and the fact he became sheriff after him, shows how much of a role model his father was to him. Regardless of his reasoning as we may never know he decides to kill himself at his father's death sight but right before he falls he comes back to reality and catches himself.
Now, what does this animation teach beside the story of boys horrible accident and the death of his father? Well, that is just it, the whole reason is in the title "Borrowed Time". The son had evidently spent far too much of his young adult years griefing, not being able to move forward and find some peace to be able to move on. Problem is we do see him possibly starting that path in this animation but he is already grown, he has become Sherif like his father and has majored into the man we see him as but he cannot get all those years lost back.
The animators choice the dark subject ultimately because it is one which people deal with every day and thanks to the realistic visuals this only heightened the emotion and empathy the audience would have to the scene. The animation teaches people that it is okay to feel pain it is okay to feel sorrow or guilt, but do not let it consume you, we all have limited time in this world and wasting it will leave you with nothing good to look back on.
youtube
CGI Animated Short Film HD: "The Present Short Film" by Jacob Frey (2016) CGMeetup
The next animation I choice was one done by a Youtube channel and CGI resource named CGMeetUp. They do multiple different works for big budget films such as Jurassic World, Maleficent and even the hit series of Game of Thrones and in particular, anything to do with creatures or the manipulate of something that does not exist in the real world.
Whilst they are doing all of these crazy scenes they also do their own independent videos that either educate their viewers on the process or are an animation all on their own. I choose one of their animations because it actually caused mixed emotions on my part and I believe the animation was staged that way on purpose to make me have those feelings.
In the animation, you see a typical scene of what appears to be a teenage boy playing video games and being emersed in it so much he almost misses his mum trying to talk to him. Once he opens the package he receives a little puppy who at first he appears to love until he notices the left front paw and then rejects the puppy and throws it to the ground. This was when I got angry because I used to work with animals and throwing a puppy, even when it is old enough to be away from the mother can still sustain great damaged when played with roughly.
The fact the boy rejects the puppy after noticing its handicap makes you believe the boy has some kind of standard of gifts and he sees it as an incomplete puppy, he only threw it when he saw the leg. As he watches the puppy play his love for it begins to grow slowly and that is when they animators let us see the boy in full view as he gets up to play with the dog. He too is handicapped and has lost a leg on the same side as the dog. This is when it opens our eyes to what the boy’s emotions are and why he rejected the puppy at first.
I can remember when I broke my wrist when I was 12 and how much pain I was in at first and then not being able to do anything for months was frustrating and upsetting so I could not imagine actually losing my limb. Obviously, the boy found annoyance when his mum saw fit to get him a puppy just like him, it reminded him of his predicament and that is something he has been trying to hide from. I say this because of how emersed he was in the game, people and children will often bury themselves in virtual worlds to distract themselves from the real world and also that may be the only thing he can do now. Well that he believes anyway.
So what changes his mind about the puppy? I believe I understand what made his mind stop and actually think than just try and keep ignoring what condition he had and that was the puppies ability to keep going. The puppy obviously did not lose its limb as there are no scars or stitches so it was simply born that way and it does have balance issues, however, being an animal and knowing no better than the world it was thrown into just keeps going. He might stumble on his own legs, cupboards and even take 3 attempts to actually get what he wants to do but it doesn’t let that stop him or ruin his own happiness.
The fact the puppy could have this predicament and not be upset, angry or just plain down is interesting to the boy and at the same time a real world scenario, two people going through the same problem, one is upset and down whilst the other is positive and happy. People often look down on people like that or believe their problems may not be as strong as their own because they are still able to be happy but it could simply be a case of them not letting their problems stop them from having a life.
The purpose of the animation is to try and educate people to stop and think before judging someone and their actions, no bully started bullying simply for a power surge. The boy rejected the puppy because he saw it as a reflection of himself which is something he looked at as useless and incomplete due to his injury. After watching the puppy and seeing it stay so positive made him want to be a part of that happiness and such got himself to his feet and moved forward with not only himself but with a potentially new and educating friend.
The animation does lightly cover an issue people have been trying to educate to people for years now and that is no problem is bigger or small than another persons, if it is enough to annoy or stop you from performing then it is problem enough. What was stopping the boy was not stopping the puppy and that is what people need to understand, what may not kill you could destroy someone else and the fact it doesn’t kill you doesn’t make you tougher.
The final note I take from this animation is that no matter your predicament, no matter the obsticles try and make the most of it and when you see someone coping better do not shut them out out of spite but instead embrace them and join in their happiness to help creat your own.
References
Lou Hamou-Lhadj & Andrew Coats. (2016). Borrowed Time. [Online Video]. 3 January 2017. Available from: https://www.youtube.com/watch?v=gDnIEQhTJ_s. [Accessed: 19 January 2017].
CGMeetup. (2016). CGI Animated Short Film HD: "The Present Short Film" by Jacob Frey. [Online Video]. 8 February 2016. Available from: https://www.youtube.com/watch?v=96kI8Mp1uOU. [Accessed: 19 January 2017].
Bibliography
http://www.theverge.com/2016/10/17/13306394/pixar-borrowed-time-animated-short-interview
https://vimeo.com/187281621
0 notes
Photo

Today I delivered my final presentation showing off the process of making Tailgate and the final video. In my presentation, I could have made it shorter and more to the point, however, I did want to include where my ideas came from and previous decisions I had made in Tailgates design like I had back in my first blog about him.
I also included my previous level 3 assignment involving my Optimus Prime truck made of lego to help show my justification in keeping to the Transformers theme. Because I have a genuine interest in Transformers that alone was enough to persuade and encourage me to keep pushing forward with making Tailgate.
I talked about my justification for using Blender and not Maya or 3DS max because of my familiarity with the software and that way I'd be able to perform better than in the more difficult software. I understand its mechanics better and I also understand the different techniques in getting certain results which I demonstrated in my day projects and my older projects from 2014.
Whilst talking about the actual build after showing them the rendered video I made sure to include some of the renders at the end of each of his building blogs to help show the process. Now that I think about it screenshots of the building process might have been more educational than just the rendered images because the renders will always make it look good.
I was slightly worried about some of the questions my lecturers or classmates asked me because they may not know Blender like I do and not understand the terminology such as Cycles render or Blender render. The question they did ask me was about the other features we had learned such as UV map referencing and other 3D related criteria and I then informed them about my many day projects. Doing the day projects not only showed my understanding of particles, uv mapping, animating and others but also gave me 3D examples to demonstrate my ability to perform them.
Final presentation
https://docs.google.com/presentation/d/1Khcp5bxp0mwnL2Sah2IdcEuyN1M5TM1SLzTFXwikUNo/edit?usp=sharing
3D Animation Assignment | Courtney Neeson
youtube
0 notes
Photo
Before I can animate Tailgate I need to get all his pieces rigged which thankfully in my case shall be much easier than some of my classmates. For the majority of my fellow classmates, their rigs were pulling and pushing the wrong vertices or too many vertices which meant they had to go and paint their rigs to be able to control it better.
I did not have to do this because my rig would be a mechanical one and with all my pieces detached I can add individual bones and simply use the hierarchy system of parenting to get them to move correctly.
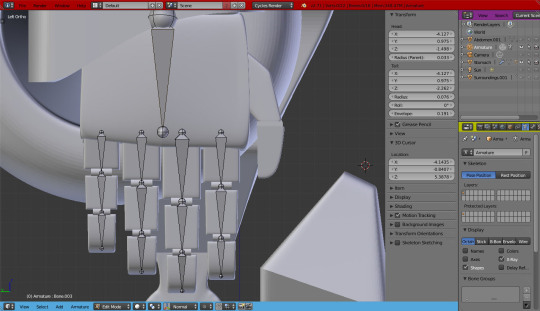
Here you can see me doing the most difficult part of the rig and that is his hands and fingers, I could have set up one control so that Tailgate could make a fist or close his hands however I did want to be able to pose him having as much control as possible. The thickest part of the bones is the point where it rotates, moves or grows in size, think of it as an origin point and the smaller end is showing where it connect to the next bone. When you set these up they automatically are parented meaning despite having to go and parent them to the objects themselves the hierarchy within the bones themselves is already set.
As you can see each circle is set to match the points at which the fingers are meant to bend and not further down the fingers because that way whenever the cylinders spin they do appear to be joints and the blocks of the fingers do not collide with each other.

In today Tailgate had 48 bones with some of them being mandatory and some being for posing that may not have been absolutely necessary. For example, some of the mandatory bones were the spine, neck, legs, feet and wrists, and some that do not be the second control on his thighs and each joint on his fingers.
The second bone in his thigh was to help spin the leg if Tailgate was to pose pointing his toe outward away from his body. The main control stays within the ball joint on his hips but the second control was not really needed but I felt should I need to pose him a certain way I can make it look more normal.
I did almost put in a control to spin the tires in his shoulders and hips however upon looking at it from a rendered view I have no real way of showing they are moving as they have no rim designs. Making the types spin would have made it look no different than when they were sitting still so they were not included.
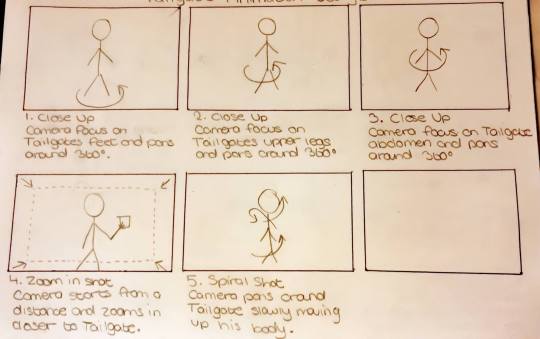
I do apologise as I am no artist as I have RSI in my drawing hand at the moment so these had to be very minimalistic but as long as I get my message across they still fulfil their purpose. Because I really have no time to animate Tailgate but what I can do is show off his model, I can set up the camera to stand in front of him and rotate around him. Having the camera rotate around him at different points will show off his model better but in panel 4 I intend to have the camera focus in on him whilst holding a cube.
In the Transformers universe, cubs are a common feature as their fuel is stored in these cubes and glow in the dark, I wanted to show this because that way it could show how I can control lighting through objects and also show how effective it is to use the Cycles Render feature to bring out the shadows better in darkened scenes.
To get the camera to rotate without actually touching the camera I instead set up a sphere and set it to 0,0,0 and then parented it to the camera with the sphere being the parent. Now when the sphere spins it will not move but the camera shall follow.
Getting prepared to position the camera for multiple shots I decided to create an environment for Tailgate to be in slightly. I put him on a reflective turntable to try and make the scene a little more interesting than him just standing in all the room backgrounds I have had for all his previous renders.
All that was left to do was enter the key frames which I did every 90 degrees on every 25th frame, this meant I had 5 key frames and a total of 125 frames her clip. Clips will all be shown below:
youtube
youtube
youtube
youtube
youtube
The blog will not allow me to include anymore links sadly, however, I do have 1 more render to show and in addition to that I shall have a link below to the actual video, the link is also available in my presentation blog.
Tailgate Render P8:
https://www.youtube.com/watch?v=5U6j7lwFkvI
3D Animation Assignment | Courtney Neeson
https://www.youtube.com/watch?v=ZYGrbK0Kg98
0 notes
Photo

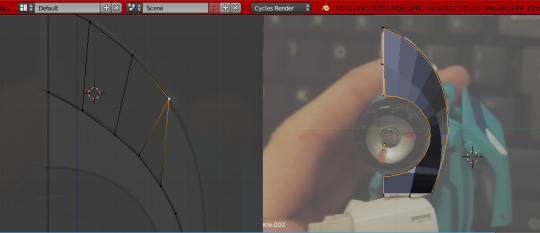
Final touch today was to Tailgates hood that sits at his back and shields his head. This is going to be a relatively short blog which I should have just put at the end of the previous however it was done on a different day so I want to keep my pattern rolling. To help fill this blog better I am going to show my methods of creating decent references of the figure to then use in Blender to re-create it.
Before I take the image I actually go and turn my lights off so it is pitch black in my room and then reach for my phone. I use the flash on my phone because not only are the photos better lit in terms of colour matching but it actually helps catch the shadows better and determine where shapes end and certain bends start. It helps this because for pieces like his shoulders the bends were not prominent enough and I had to physically draw them on.
Because obviously my figure of Tailgate is not in the digital world but the real world taking reference photos can be difficult because the opposite side will be different to the one your taking a photo of. It is because of this reason I will ignore the far side of the piece I am photographing and just flip the photo I took in Photoshop.


I did not end up not using these reference images because Tailgates hood simply wraps around his back and peaks for his head but I shall include them to give you an idea of the images I work with. When it came to Tailgates legs and such because they were on ball joints I could just take them off but when there is a fixed joint on Tailgate I simply pull it out as far as it will go and pose him according.

Making Tailgates hood was really simply as it was much like his arm cover plates in which all they did was wrap around his back with a little bit of extruding here and there. I actually left Tailgates back exposed all those weeks ago because of this piece, I could have covered it but when you look at Tailgate from the back in the comics you never actually get to see his back, just his hood, so it felt like a waste of time to build a piece that would ultimately become impossible to see.

This was a much shorter blog because there was only 1 piece left of Tailgate to build however I do want to keep it separate as the previous day was quite a large one and the next step of Tailgate is getting him rigged and ready for posing.
As of right now, I do not know if I will be able to animate him properly in time for my presentation however, I ca certainly try my best.
0 notes
Photo

Today was not only a long one but a day that lasted well into the early hours of the next morning. I had not intended to be away from this assignment for as long as I have, sadly due to my nature of work I was required to be there for a majority of days before and after Christmas. Other circumstances happened that did delay my work amount but thankfully in a whole day, I caught up dramatically.

First, of course, was the joint between his hips and thigh, it is a simple cylinder with a small design on the front of it that sits at a 45-degree angle. Its actual length will be determined once I finish the actual thigh piece as it has to fit snug into the gap, however, I do know it's height and width do match the lower piece of his hip so that is simple enough.
I am going to make this piece grey because I feel white makes it stand a little too much so that means turning one of my materials slightly darker which are no trouble with all my premade ones.

Now was the actual thigh which has been related to so much of my previously made objects. I did have to use a visual reference so I included that in the project and within about an hour had a reasonable shape going. The width stays the travelling down however once you get to about halfway up I had to take into account the space for the wheel. The front of the thigh comes across the wheel, however, the backend has the wheel exposed, this is because his thigh makes up the back end of his vehicle mode and the cover is the mud guard and the opened side is where the wheel touches the ground.
There does need to be an additional giant gap on the inside as this is where my hip joint slides in. All I had to do for this was scale the whole piece so it fit along the z-axis (up and down) and then changed it lengthwise to fit snuggly.

Next was the part I was dreading with the legs and that is the design on his shins. I first made a cube and stretched it to fit the length of his legs and the split them apart to create the rotary connectors for this heels. When you move your foot you can not only move it up and down but side to side and my figure does run on ball joints again here but on the actual comic edition they instead have double joints down there.
Once I had to basic shape going came what you see above, I had to loop cut many times lengthwise and heightwise because now I need to do the shin design. What I ended up doing was moving the vertices in place so that once I had them correct all I would have to do is extrude outward and start to have the design going.
Keeping track of the extruded faces did become difficult in terms of smoothing as I accidentally extruded inwards at one point to get the other side which needed to be corrected and meant I had to redo an entire section and Blender does not let you go back very far whenever the project starts getting larger in size.

After much struggling I had the design on Tailgates shins finished and was now moving to his knee cap. It was much easier to accomplish than the rest of his leg as it just required me to extrude some vertices upward and then use them to make the necessary faces. Because I made sure I had to the right amount of faces going vertically and horizontally beforehand smoothing took minutes. I learned my lesson the hard way whenever I made his lower arm to make sure the vertice count matched both axis.
I actually realised I had forgotten a touch on Tailgates thighs and that was his tires. These were a simple copy and paste from his shoulder tires and a mirror over so they were in the same place.

Before I move onto the feet it was time to connect his leg to his thigh with a simple circle extruded out and then duplicated and moved down the z-asix (up and down). I then extruded out some of their faces and then made them connect in the centre, this way I can change how far apart they are without touching the cylinders themselves.
I am putting a cut here because I have a confession and that is that between finishing his lower leg and the joint between them and creating his actual feet I had taken zero screenshots due to it being 5 am in the morning and I could barely think.
I do remember this section was relatively easy as his feet are essentially a cube stretched lengthwise and cut into 4 pieces with the section last bottom face pulled upward to separate his heels from his toes. I then smoothed them out and adding in a cylinder to help show where his foot connects to his leg.
The connecting joint between his leg and foot was duplicated from his knees however the bottom section was changed from a cylinder to a sphere to appear like the ball joints in his heels.

I understand screenshots are the key to this assignment but I was desperate to catch up yesterday and really I should have gone to sleep and returned with a clear head but in a way it shows my dedication to trying and get him almost completed as all that is left to do now is his hood.
0 notes
Photo

Today is a day I was really dreading, yesterday was long but relatively easy had I not mucked up his arms, however, today I plan on getting his hands and fingers done and make them so they look correct when posing. This would require joints between the fingers themselves and even connectors so they attach to the palm right.

Roberts, J, 2012. Transformers: More Than Meets The Eye #2. 1st ed. United Kingdom: IDW.
Roberts, J, 2015. Transformers: More Than Meets The Eye #47. 1st ed. United Kingdom: IDW.
Because of this, I had to go back to the comics and look at some of their hands as my figures fingers are all one piece of solid plastic so for this particular task I cannot use him as my reference. Of course with this being a comic the line artists like to add tonnes of detail to make them look as mechanical as possible, this doesn't help me, however, I do not intend to have as much detail as these examples.
You can see how the artist gave each of the joints these connectors to help them bend and straighten. That is what I want to incorporate into my model as that way they won't collide into each other when I bend the fingers and it will also look more visually accurate.

I first started off making palm and top of his hand, following the references I made it so that the knuckles of his fingers would be covered like in image 1. I raised the centre to help make it less flat however in terms of detail I do not want to go much further as when it comes to his hands I am more worried about functionality than appearance.

After the palm was finished I moved on down to the fingers and I actually came up with a relatively simple fix to making not only the fingers but the joints as well. What I did was placed a cylinder and rotated it so it would line up with the previous finger, then in the same object add a cube and stretch it away from the previous finger. That way the cylinder acts as the joint and the origin point is correct and the cube is the actual finger that will rotate following the cylinder origin.
Doing this for each finger makes it not only easier to control each joint but also saves me on a number of objects I have in the project overall. There will be 15 objects in the hands alone and he will have two of those so having the object count be as low as possible will help keep the project from lagging or becoming too large in size.

After doing repeatedly for each finger and joint and eventually ended up with all the fingers and to make them more accurate I changed each of their fingers length. I also went ahead and started on the thumb which was not much different than the rest of the fingers however it did need to attach sideways which only meant extruding it out a little bit.

To help save myself some time later down the line I decided to go and set up the heathery for each finger. Doing this simply means when I rotate or move a joint closer to the palm the rest will follow. As you can see above when I rotated the main joint connection to the hand the other two joints both in the centre and the tip of the finger followed without being selected.

I am actually really proud of myself because his hands were done with only references from the actual comics and not were placed within the project as backgrounds and they still look really good.
I did have to go over and redo the hierarchy for the other hand when it was copied however as the parent names remained the same whilst they all had different.
Besides that, I feel as though this was a very successful day on Tailgate and the next point of action will be his legs and although his lower leg may become a problem I'd like to at least attempt his feet also. With the holidays coming up I do see fit to take a break from Tailgate however because I have made wonderful progress however my other assignments demand my attention also.
0 notes
Photo

Today I wanted to start working on finishing Tailgates arms and start work on his legs by getting his hips done. I thought his lower arms would be a relatively simple task, however, I ended up making a mistake in the vertice placement which caused me to have to go back and fix all the faces.

Tailgate's lower arms start off as a square and thicken sharply as they get up to the joint connecting it to the shoulder to try and simulate a type of elbow. There is also a gap for the joint to connect to this piece and on the outside, he has a panel that travels higher than the rest of his arm which would only take a simple split and extrude up.

After doing this I discovered because some sections had more vertices going horizontally and not vertically proper smoothing was not possible and even if the smoothing was I could not add more vertices correctly to try and get sharper edges. Because of this, I had to go back and give them all the correct amounts and insert all the vertices individually which took a good few hours as I had to copy and enter amounts constantly. This was a pain but now that they are correct I was able to smooth it properly.

Although I spent well over 4 hours on his lower arm piece there is, in fact, a cover that shields 75% of it, sounds like a waste of my time however if I even want to go back and make him transform I have his under arm already made. This piece was not overly difficult hard to make as is bends around the arm and only needs to cover 3 sides and a curve travelling toward as you go around the back of the piece.

Here you can see I have duplicated the arm and cover over to his right side and mirrored them. I am also using the background reference option to have a look at how he is looking with regards to this hips which are next on the checklist. I could keep going and do his hands today however that requires more in-depth thought and I'd like to end this day on something simpler.
You can see in this image that on his hips the manufacturers put on ball joints so that posing the figure would be easier and also so if the legs were under stress they would not snap but simply come off. These will not be necessary for my build as it is digital however the grey connectors do make sense. Taking away those ball joints would bring the thighs in better so the arms have more room, on the normal toy the arms are actually pushed out because of those extended ball joints.

Using the same image I began mapping out the shape of his hips and this was relatively easy as expected as it was simply a lot of loop cuts and extrudes. Taking not from his lower arms I made sure to have the same vertices amounts going horizontally and vertically which made it very easy to smooth and add sharp edges.

After smoothing I actually noticed that his abdomen did not meet his hips correctly and had to make this slight adjustment and get the middle section to come down more.

It doesn't look like I did much today however with the problem with his lower arms and having to go back and redo all the faces and place individual vertices took much longer than anticipated.
The textures being the same as the previously made objects made it easy as all I had to do was select them however, I made a decision to have the joints that connect his arm to his shoulders be white, They are meant to be grey however I felt this made them stand out a little too much so I made them white and have them blend in better with the rest of the arm.
0 notes
Photo


Courtney Neeson (2016) Grass Plane
Something I have never previously covered, whether it be through practise projects or assignment based tasks, is UV mapping and Particle generators. I will be the first to admit that it has been an area I have wanted to avoid because upon first glance it is quite intimidating with the numerous controls and all their fancy names, but whenever you learn to basic controls you do get a better understanding of everything and today I spent some time, researched different styles that people used the tools for and ended up with the above scene.

I got this by first creating a normal plan and subdividing it by 12 points and then increasing the fractal amount to 0.32. Doing this causes the vertices to become unbalanced on all axis so it appears less flat and more like normal ground. Course no ground has true sharp points so to help smooth this out I simply added a subdivision surface modifier to smooth off those points without having more vertices put on the actual plane. Because I have separated the subdivide and fractal and the had the smoothing done through a modifier those starting measures are available for me to go back and change should I want to ground to be more balanced or further uneven.

The next thing I did was go online and source a texture for the ground of my plane. It did not need to be anything fancy and I, in fact, have an account with textures.com where I can download and use images. I will link my sources for all the images after I go through how I made the plane and whenever I had these images I split my screen in Blender and opened up both my Nodes and UV/Image Editors. Ignoring the Nodes for now what I did was open the image within the UV/Image Editor and then enter into edit mode on the plane and pressing U I open up the UV mapping selection and chose “Project from View”. This option does exactly what it says and projects the object from my current viewing position and projects it onto the image, then within the UV editor I scaled up the amount that would appear on the plane and then exited editor mode.
Now I could have left it alone as it was there, however, I will need to control this image better because I do want to give it some shadows and light to give it the illusion of height whenever it is actually flat. Next, I selected the plane and created a new layer and included an image shader of the image used within the UV editor.

Now that this image is within a texture and not just sat on the plane I can control it better and start giving it some weight. Adding a Math node and attaching it to the image and the material object I can now give height to the chosen blending option, I went with multiple meaning it will grab the darker or black sections of the image and push them down. Now all the little white spots will have the illusion as is they are sticking up from the ground like little pebbles.

Blender allows you to have different rooms/layers within one project and to improve the quality of the particles when I generate the grass I wanted to create new objects from which the particle generators would pull from. So on another layer I began designing my grass strands, they would be duplicated in the thousands so diversity did not truly matter but to get a slight bit of difference I designed 4 grass strands. One was curled, another greatly curled, one practically straight and one that was chopped off at the end.
The above image you can see on the closest strand of grass has a little orange dot, that is the origin point and that is the point the particle generator would begin generating the grass. I moved this so that is was located at the bottom of the piece of grass so that got generated from the correct point.

After they were positioned correctly and grouped together within a group I began adding UV maps to the objects with actual photos of grass. I got these images from a previous tutorial many years ago.Using photoshop I made changes to the current image and brightened it and strengthened the saturation and added that UV map to half of the strands. Like I said previously the grass will be duplicated in very large numbers but it still doesn’t mean they all have to be the same.

Now for the final touch and selecting the plane I went to the particles tab and adding a new particle. Because I made a grass in another panel and grouped them together I can then in the particles tab tell them to target that group and when they are selected we get the above result. The particle generator starts small because it can be rather heavy on the computer and of course this makes this look less of a grass patch and more of a dead or dying garden.

To correct this I had to mess with a few of the controls in the particles tab and those where the emission controls. The Number was increased to 10,000 and select random on both of the bottom controls, that way whenever they are generated they are rotated and appear on different parts of the plane. Because the emission is so high rendered mode can take a while to settle but that is the only setting I need to worry about now as that controls how much grass appears. I could change the hair length but whenever this amount goes down too much it starts to go through the plane and out the other side, so for me best to just leave it alone.
Finally, we get this, I could be more precise with the grass adding more diversity or even other objects such as sticks or stones but this was a demonstration of my understanding of UV maps and how to use the Particle Generator. It took a few times to get right and of course, I had never truly messed with any of those features before so there were times I either broke the program or caused my computer to freeze as it needs an updated CPU and GPU. A time this happened was whenever I was changed the emission number to one million and the system froze for a good 10 minutes as I mistakenly had it in rendered view.
The UV mapping took me a few attempts as well because one told me to un-warp it whilst another told me to project from view and I found out I had to view both the image and the plane the same way before I could do that.
The majority of the learning process of programs such as Blender, 3DS Max are through trial and error and I am far more confident about touching these settings now what I have better experience controlling them.
References

Textures.com, (2016), Grass0142 [ONLINE]. Available at: http://www.textures.com/download/grass0142/44439 [Accessed 19 December 2016].
Bibliography
http://www.chocofur.com/5-uv-mapping.html
https://en.wikibooks.org/wiki/Blender_3D:_Noob_to_Pro/UV_Map_Basics
https://en.wikibooks.org/wiki/Blender_3D:_Noob_to_Pro/Particle_Systems
https://www.packtpub.com/books/content/getting-started-blender%E2%80%99s-particle-system
0 notes
Photo
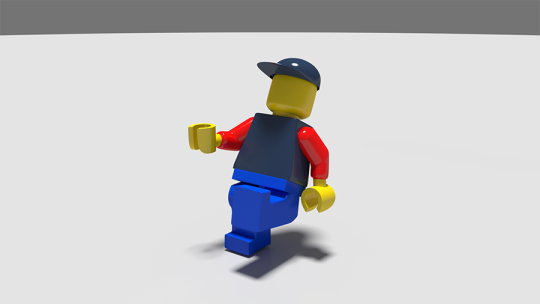
With everything built, textured and looking well overall and you feel like you have accomplished something, comes another difficult task, giving it bones and making it move.
Of course rigging all depends on your build and thankfully what I am about to rig is slightly easier because it is what I call a fixed build. If I was to rig an animal or person I'd have to take into account their skin and how much of it you want to stretch when the joints move, that to me is not a fixed build. A fixed build to me is one that cannot stretch but is instead a fixed mass that moves through a type of mechanical joint or piston, an example of this is machines.
Rigging machines is easier than something with skin and the example I am going to use is from a previous build I did back in level 3 and that is my little lego man from the Optimus Prime truck build. before I did anything I went back and unparented all the parts of him as to get the rigging done correctly I'd need to parent them to specific parts and not just the chest piece.
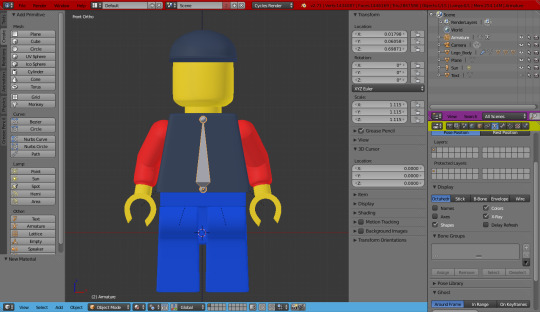
With my cursor placed at 0 on all axises, I then went down and added in a bone from the armature list. When doing skeletons in Blender the fatter end is the main area which shall be moved and the small end if for additional connections. Because I do not really need his chest to bend it wouldn't matter which way up or down I face this bone, however, thinking about his head I know I'll need to extrude that upwards so the connection side or thin end faces up.
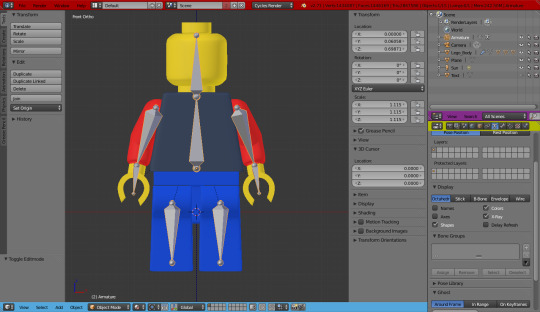
Now with all my bones in the correct places, it is time to parent them to those that need to move with others simultaneously. They were parented as follows:
Hand Bone > Arm Bone
Arm Bone > Chest Bone
Head Bone > Chest Bone
Hip Bone > Chest Bone
Leg Bone > Chest Bone
Everything besides the hands was parented to the chest because when I move the arm by itself the hand needs to come with it and if the arm needed to move with the chest the hand will automatically follow the arm.
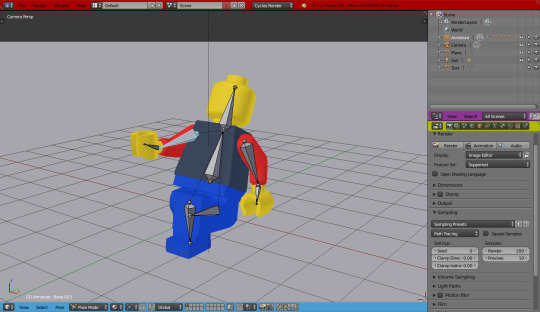
Now if I were to go into pose mode and rotate the armature you can see it all has successfully connected however the lego character does not move and that is because we still need to connect him to the armature.
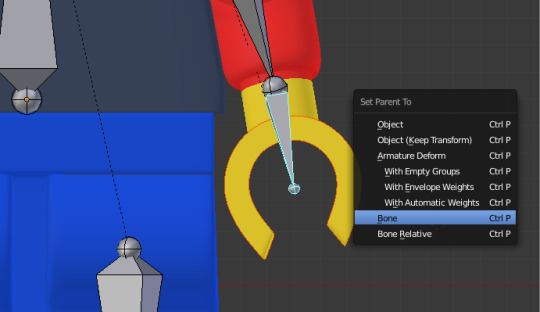
Now to trick to doing this is staying in pose mode whilst selected on the armature and then selecting outside it to the piece of the build you want it to connect to and then holding down shift select the bone. You'll know if this works because the actually build part will be highlighted in red or orange and the bone will be in bright blue and whenever you hit Ctrl+P you should see the following selections. All you have to do is select the option bone and then repeat for any and all bones.
You'll know if you've successfully rigged your model or not because after you have done all these steps all you have to do is simply start moving the bones. This was a rather quick demonstration but you can also restrict the bones movement on certain axis however most people won't do this as it just makes it easier to pose, majority of builders will know the restrictions of their build anyway.
In my previous assignment I could not understand rigging properly and posed my characters within object mode and I really wish I had learned this sooner as now I truly see how simple it could have been.
0 notes
Photo

For people starting out in 3D animation or building using the modifiers and their multiple settings can be both intimidating and confusing, however, Blender offers you the ability to add collision detection and gravity to specific objects without having to even open the modifiers panel.
For this, I am going to show you the final product both rendered as an image and a video to show the different between that and a previous project I did a few years. This time around instead of having just 1 object per modifier I am going to have multiple different objects, unparented, attached to one another to make it more interesting.

First I started with a regular torus and stretched it along the x-axis, using the subdivide tool I then added in 4 cuts around the top centre of the ring to try and get a more chain link like shape. There was no need to add any smoothing modifier as a torus is already got enough vertices whenever it is generated to give it a natural smooth look.

Before I start making copies of the link it is better to get the textures and materials set up that when I don’t have to go and select them all to add them afterwards. I used the nodes again as they are a more thorough and detailed way of getting your desired result and this time I set them up so that the links would use a texture but blend it on the dark layers. Then over on the normal materials tab, I changed the surface to Anisotropic which gives it this chrome look, and with the texture set on top it gives it these naturally small darker and lighter spots so it is not so shiny and unblemished.

After the material was set I began duplicating the chain link as you see above, I made sure that they were not touching each other but still connecting within the rings. Each time I duplicated a ring it was then rotated along the x-axis either by 90 or -90 depending on the previous link and as the chain got longer I was actually able to select more links for duplication so I didn’t have to keep rotating them back and forth and I did this until I had exactly 25 links.

Next, I highlighted all the chain links and then rotated them until they were positioned like so. If I were to let them fall whilst they were all in a straight line all they would do is rotate very slightly but like this, they will push into each other and have to find new places of rest.
Whilst highlighted I then went over to the physics tab on the left and my focus point is the 2 buttons called Add Active and Add Passive. The first button will give the object animation properties such as gravity and collision detection whilst the other one gives collision detection. With my links still highlighted and then went over and gave them the properties from the Add Active button which then turned their highlight from an orange colour to a green colour, this is how you identify if they have animation properties and if you make a mistake simply click the remove button directly below them. Then I had to give them something to collide with and I simply made a plane right in the centre of the project and scaled it out and then gave it the Add Passive properties, it will detect the links and not let them pass but stay where it is at the same time.

Now that was all left to do was hit play on the timeline and pause on the frame that the chains finally come to a stop on. For this particular project, that frame was the 149th which is longer than normal I will say and the chains were not at complete rest but the ones within frame were so I ended the simulation. Now I could have ended it here however whenever I noticed the chains I couldn’t help but notice how thin they appeared to be, and when you think of chains you think of these thick, tough metal objects that essentially stop you or stop you from reaching your goal and these feel more like a paper clip trail.
So to fix this I went back to the first frame so that the simulation would reset once played again and increased the thickness of the chains. This was slightly difficult as some chains were rotated so I had to use different axis to get the desired result but ultimately it took me no longer than 10 minutes to correct the situation.

Courtney Neeson (2016) Chains R1
After re-running the simulation and giving the plane a UV map of a table I got this result. The chains sit much better in this example than the last and with the extra width they appear bulkier now. As a final thought I did add in a world texture so that whatever way the camera is facing this image would be present and because of the textures reflective properties of the chains, they will also take into account this image.
Something I did whilst just making sure all the settings were under control I changed the texture of the table to match the chains and I actually ended up with a more interesting than I first started with. Because of the texture within the chains giving it a bump effect, it makes it look as those the chains are now resting on some kind of shiny, rough surface and because of the world texture image there are come colour differentiates. I rendered out this version too and asked a few people before I made my final design and I actually found that people preferred the version which had the single texture vs the multiple texture render.

Courtney Neeson (2016) Chains R2
I did go as far as to render this as an animation to show to chains falling and coming to rest. You can see the reflectiveness of the plane and how the chains collide with each other and even how the first link makes contact with the plane and the second link falling down before pulling the first link sideways. Despite this being done using controls from the creative panel on the left side and not by physics modifiers you can see the result is very pleasing. and quite natural looking and if someone was looking to make something like this happen and are uncomfortable going to the physics tab and their many controls this is another option out there.
References
Gennaio, (2015), Ground [ONLINE]. Available at: http://blenderitalia.altervista.org/wp-content/uploads/2015/01/ground.jpg [Accessed 10 December 2016].
Gennaio, (2015), Wood Texture [ONLINE]. Available at: http://blenderitalia.altervista.org/wp-content/uploads/2015/01/wood_texture.jpg [Accessed 10 December 2016].
Bibliography
https://www.blender.org/manual/physics/rigid_body/properties.html
http://blenderitalia.altervista.org/tutorial-italiano-blender-distruzione-cubi/
0 notes
Photo

For this blog, I am going to keep it more simple because there are a great number of tutorials for glasses and cups and the focus of this particular blog is that of vertice groups and the advantages of using them instead of new objects.
Something which I always found a problem during my uneducated years of trying to use 3D software was have multiple textures on a single object with many polygons. Should I need to change something or give it an entirely new texture could mean having to go back and reselect all the polygons to even make that change and the multi-selection tool is a keyboard shortcut in Blender so new people would have to shift click each one too. I know this because I one hundred percent had to do this until I mistakenly clicked ‘B’ one day.

First I had to start off my wine glass to help demonstrate my point and to get the inside and outside of the glass in 2 movements I simply took a normal sphere and flipped the top half and then dropped it inside again. Then I turned on a feature called Proportional Editing Mode which takes into account vertices close by to help make your change a bit smoother and less independent. Whenever this tool was turned on and set to smooth mode I grabbed the rim of the glass and stretched it upwards and then scaled it down because a normal glass is not just half a sphere it actually decreases in size the further you get from the centre.

The stock of the glass was done by grabbing the bottom polygons and extruding them downward until I felt was necessary. I made the transition from the stock to the bottom of the glass quite sharp but whenever I add on the additional subdivide modifier it will smooth it out better. After I have this done I then went ahead and begun selecting the polygon faces inside the bottom half of the glass, then I went over to the vertices tab and added a new group and then clicked assign, those vertices now were grouped together within that vertice group which I then named Wine. I did still need a top face however for the liquid amount to rest and so a selected the very top ring of vertices in the group and then generated a new face using them and also assigned it to the same group.

As a final touch, I begun adding in textures to the glass and here is where the vertice group I did previously come into play. First I gave the glass as a whole a normal glass texture and then going back to the vertice group panel within edit mode you now are given the option to select the group, doing this now means all the vertice within that group are now selected for modification and whenever I then go over to the textures panel and now it has given me the options of assigning new textures to the same object.

All I have to do here is now create the new texture which this time was the wine itself and then click assign, which then got me this result. Of course with a lighting fox and a plane for the wine to sit on the final result is far more satisfying than this.
Using vertice groups not only saved me a lot of conveniences but actually allowed me to get a fabulous result from a single object and if you can control everything from 1 source in 3D it is far easier than having to manipulate multiple different entities. One of those is definitely not having to reselect all the necessary vertices to make the texture changes and having only the single object meant I had to grab and position one entity. Of course other creators will have demonstrated a better example of how to use vertice groups and take advantage of them however I found the simplier approach more helpful in this scenerio.

Courtney Neeson (2016) Wine 1

Courtney Neeson (2016) Wine 2
References

Andrew Price, (2014), Beer in Blender [ONLINE]. Available at: https://s3.amazonaws.com/blenderguru.com/uploads/2014/06/beer_in_blender_32-12.png [Accessed 23 December 2016].

piziadas.com, (2014), Volume Absorption [ONLINE]. Available at: http://piziadas.com/wp-content/uploads/2014/04/volumeAbsorption.png [Accessed 23 December 2016].
Bibliography
https://www.youtube.com/watch?v=Z6bfWJwi8_k
http://piziadas.com/en/2014/04/volume-shaders-volume-absorption-blender-cycles.html
http://blender.stackexchange.com/questions/15683/make-a-gold-reflective-object
0 notes
Photo

Today I went back and tried to get a few previous things I did wrong fixed and also attempted his shoulders once more as they had been given me issues.

The first thing I went back and did was correct a mistake I made with the half sphere on Tailgates abdomen under his chest plate, I assumed it was round to help fill in that gap his chest plate leaves underneath but in fact, it doesn't stretch to the hole and is meant to be flat.
This does leave a fairly large gap in the build now and whenever I combed through the comics trying to get references to see under his chest piece but there were sadly none so I'll have to come up with a solution to that. I want my build to be accurate but I don't want there to be holes everywhere in my build.

Next part of the business was starting the design on his belly, whilst doing it I discovered it begins to muck around with the smoothing modifier and makes his abdomen more flat than round. Because of this, I did keep his original abdomen as a backup should I decide not to keep this detail but for now I shall have it included.
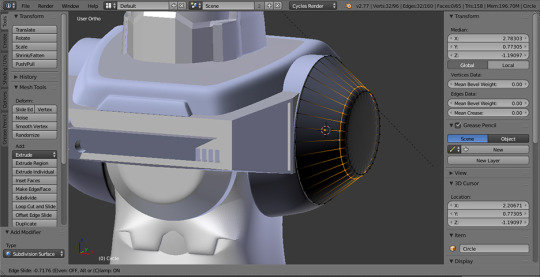
With his stomach done I and now preparing to move to his shoulders, he has a joint that separates his arms from his upper body and on the other characters, this can be a complicated set of pipes and pistons whereas thankfully Tailgates are all hidden behind a round cylinder. I will count myself lucky as the only difficulty I had with placing that mesh was making sure it matched the width of his shoulders.
(1) TFCon 2014 3rd Party (2014) TFCon
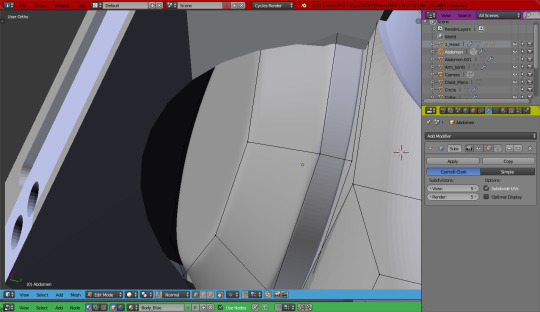
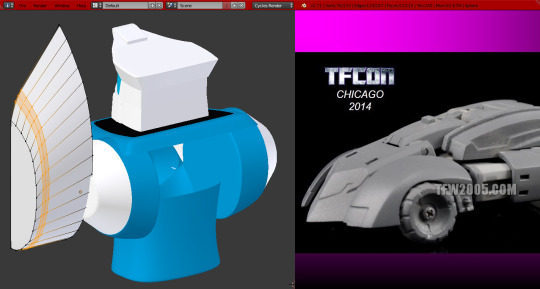
Because of the awkward design of Tailgates shoulders, I will easily say this was the most difficult part of the build so far. Whenever he is in vehicle mode these make up the type covers and particular bonnet of his car. The curves all have different lengths and heights as well as the coming straight toward to act mud guards and then there is a giant hole for the wheels to rest.
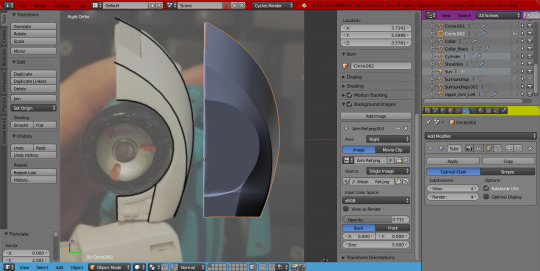
The model above shows one of my unsuccessful attempts that did manage to get pretty close but not close enough and what I ended up doing instead was taking a photograph of my figure from a side point of view, so I could see all the curves, and drop them into my Photoshop. I put them in photoshop first so I could then go and use the pen tool to draw a diagram of where the curves started and ended as it was rather hard to distinguish them on white plastic.
Because I now have a visual reference on my screen instead of in my hand I was able to get the vertices in the correct places and have the same number of vertices going across vertically and horizontally meaning whenever I adding in my smoothing modifier I could correct the wrong smoothing easier.
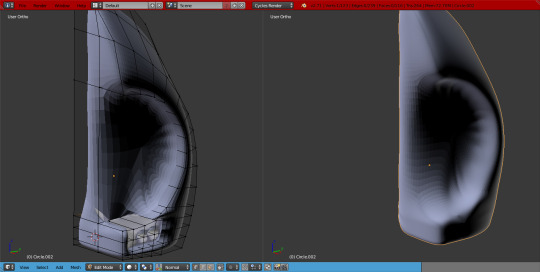
Of course, when it comes to a freeform build where I had to place each individual vertice fo course the program has misunderstood certain connections and extrudes I had performed and as such ended up with this result when smoothed. I actually smoothed it early on purpose to try and spot these very issues and as you can see at the bottom the vertices are being blended inwards instead of only with the immediate surrounding frames.
I did then single out the frames and delete all the edges connected to them and replace the faces and ultimately corrected the bad sectors.
After correcting the bad smoothing and then sharpening the edges I had what I can see as the most accurate attempt at making his shoulder and whenever you compare it to the visual reference it is as close as I am going to get as whenever I went back to view how many objects I had hidden this was my 6th attempt. Thankfully the only part of Tailgate that isn't a direct mirror is the design on his chest piece meaning to get this on the other side I had to simply duplicate it and mirror it over.
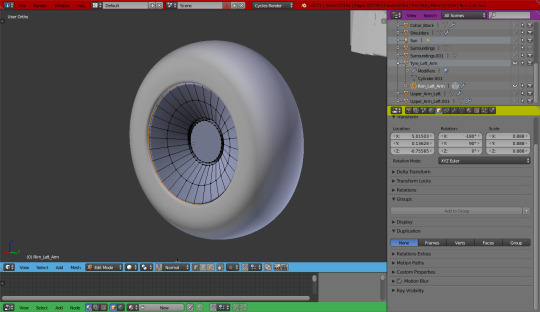
Of course, the second part of his shoulder is that of his rims and rubber tyres which were a much easier build than his shoulders whereas this was simply done with a stretched torus and a simple circle plane being extruded backwards and forwards.
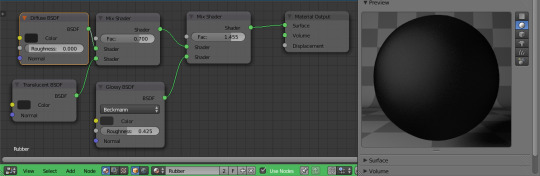
New textures were created for both the rims and the tyres as of course the tyres needed to be made of a rubber and I wanted the rims to be more chrome like so he was far less plastic looking. This was simply done by increasing glossiness on the default texture I had made and on the rubber textures I included a diffuse shader and a translucent shader coloured grey.
Using both the rims, tyres and the shoulder piece I began to position and resize them to match the figure as both ended up being too small and gave them their textures and finally placed them where they need to be. Once they were completely finished and their origin points put in the right place for positioning I then mirrored them over to his other shoulder joints.
It was by far a much more difficult build this time around and took a few days to finally get a better result but I am glad about the outcome and I got to show myself using an image as a reference within the program and not just sitting next to it in a preview window.
Next step shall be his lower arms and if possible his hips.
References
(1) TFCon (2014) TFCon 2014 3rd Party [ONLINE]. Available at: http://www.tfw2005.com/transformers-news/attach/1/TFCon-2014-3rd-Party-249_1414272612.jpg [Accessed 28 November 2016].
0 notes
Photo

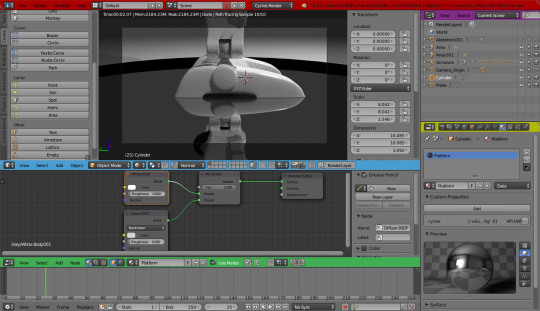
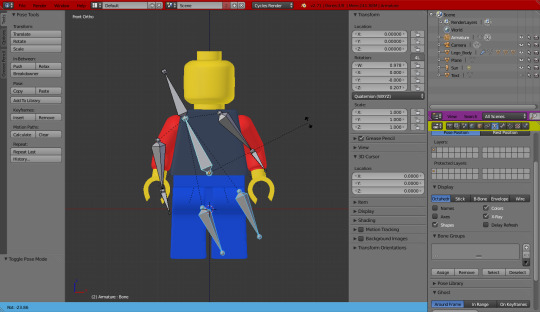
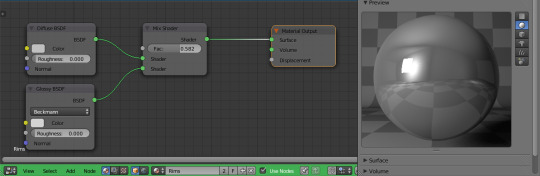
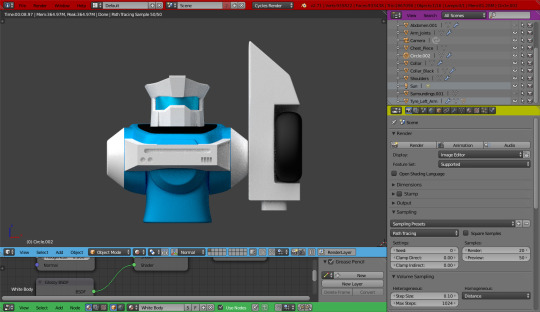
Before I go ahead and show to progress made today on the build I feel it might help to show my set up within Blender because they give you control over every function placement and you can go as far as to even remove entire critical sections for building or animating.

So when it comes to me building in Blender I like to have my setup like this, they are often subject to change however this is the setup I have every time I open a new project. The first section coloured red is my main command bar, this is where I open new or old projects, render button, window controls and even scene selection should I have multiple. Next is the most important and that takes up the majority of the space is my building area in blue. That is where I can my 3D view and smaller building controls like smoothing, extruding, merging etc.
The area under that changes depending on what is happening, green identifies that it si, in fact, the Nodes panel and in there I could control my textures, UV maps and environment appearances. However, when that is no longer needed and I need to render an image, for example, it becomes the render preview shows me a live version of the rendering in progress. Blender allows you to continue working despite a render taking place so I would often keep my workspace and render window separate should I discover a mistake or error.
Final two sections are that of the purple and yellow, the first purple one is my object list, here I can select lights, camera and parts of my build without having to rotate to find them on my 3D preview window and turn off anything I don't need. The yellow window under that is my properties, here I give objects, modifiers, physics, control textures again, set render settings, particles etc.
These colours are not a default thing but instead I took the time to go through them and give them appropriate colours that I could identify them with as when they are minimised they only have icons to tell you what is what.


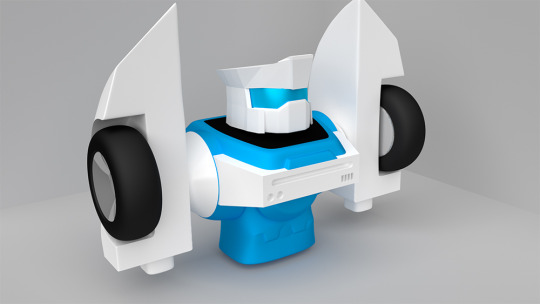
Now with that done I shall get right into the build, I wanted to work on the stuff directly surrounding his head such as his collar, shoulders, chest and abdomen. Tailgate has this round blue collar that rests around his neck so that seemed like the good starting point and was a simple square extruded outward, deleted the centre and started getting the shape right.

Before I went further I did make a pit stop back to his helmet as I discovered I forgot to do the centre piece on the forehead of his head. This required me to combine a lot of the vertices that made the edges stay sharp after the smoothing modifier and redoing them afterwards.

The first step of getting his chest done was that pesky grill, the designs have come and gone during the comic when it came to this but I decided to stick with the points that were always present. This was just a lot of adding shapes and cutting away faces and joining them to new planes and overall looked like a huge mess until I got it finished. Once I had the planes in the correct places I simply extruded them backwards into his chest to help make those designs stand out.

Now I was moving to try and get his shoulders in place, staying inside of the chest piece I started extruding backwards in line with his collar until I got about half way up. Once I got there I placed a circle and rotated it until it was alongside his collar, extruded it to look like a disk and duplicated it to the to the other side. These circles are where his arms attach to his chest piece and despite the front chest part being white and the arms needing to be white this connection is blue and so I needed to separate them so they didn't take their textures. To make it simpler and not affect his chest piece I turned it into a new object and began pulling the bottom half down on the inside. On the figure, you can see the tops are in perfect line with each other but when you look at the bottom they start to stretch further the closer to the belly they get.

As a final observation of his collar, I saw that they were not straight either but rather rounded when they moulded through his blue shoulders and so I subdivided them quickly and pulled them out slightly on the y-axis.

When we look a Tailgate's belly or abdomen he does have a simple flat one but instead he has this round piece that sticks out that matches the whole that is left by his grill and using that hole as a guide I made a low vertice circle. Sizing it to match the hole I then rotated it so it faces forwards and not downward like the first image shows and then extruded it forward several times. Then it was a simple task of making sure each point matched up with the hole of the girl and then adding an additional smoother to take away the roughness.

As a final touch, I grabbed the outside vertices along the side of the half sphere, they were then extruded down and give a face to make up the rest of his belly and then backwards and up again for his sides and back. I do not have to worry about his back at all because he will have a larger hood covering that at a later date. After giving a texture and making sure it was in the right place I did once again a render of today's work and as such here it is.

Once again I am very happy with this progress and I did find some errors from the previous build but otherwise, I would call this a successful day.
0 notes
Photo

Today I started work on my Tailgate model and go as far as the head, mask and visor built as well as getting the correct textures for his different body parts. This was also a kind of test run to see how well it looked within Blender using the cycles render function. I’ll cover what I mean by cycles render in another blog as you really need a better example than this to demonstrate its superiority when it comes to realistic rendered images and animations.
Although I said before that all models involving the larger build would be done within Blender I did attempt to try 3DS Max one more time and sadly spent far more time undoing mistakes and redoing entire mesh than manipulating it to get the result I wanted. It may not have worked out in the end but I am glad I did attempt the software in freeform one more time before I went ahead.
Building

I first began by sculpting his helmet first and that started off with a cube subdivided into 3 by 3 sections and then stretching it until I had the back of this head shaped. grabbing the outside faces on one side of the helmet I then extruded them forwards to help create the side panels that cover his face. I had to subdivide them as well so that the top could be slanted.
Taking the very top faces of the back of the helmet I then extruded them upwards and then increased them along the x-axis (red line). The top of Tailgates head is bets described as half a hexagon and the front of his forehead is not flush with his face but instead comes much further out and to get that I simply extruded the faces forward and shrunk them down along the x- axis again. The very front of the top of his forehead part of his helmet consists of a stretched square and all I needed for that was to grab to the top vertices and push them up and increase their distance slightly.

Although he does have sharp edges on his helmet he does have smooth angles and bends so I'll need to add a Subdivision Surface modifier. However, when using a modifier it smoothes everything including the edges you don't want so I had to do a loop cut and slide to help create additional vertices. The smoothing modifier grabs vertices that are far away and makes vertices between them to help soften them however if the vertices are close together it cannot soften as well. So doing that for every edge and every point that needed a sharp edge.

The next step was making his optic visor and this was a very basic edit and was a simple circle cut in half and extruded upward twice. The vertices at the top did need to be moved slightly inward as they collided and breached the outside of the top of his helmet.
It too was given a subdivision surface modifier as was also given additional vertices to keep the outside edges sharp.

The final build was his mask and this was just a simple as the optic visor, starting as a cube it was increased along the z-axis and the back vertices raised higher than the front. It was then extruded out the sides and twisted so it would fit alongside his visor. It was finally given the smoothing modifier and sharp edges fixed aswell.

Everything fits very snuggly and overall looks right to me whenever I look at it from different angles. Step two of this make is now getting the correct textures going for Tailgate, this is actually a problem for me as the comic is a flat digital colouring meaning you cannot truly see their materials. Cybretoniains are typically metal and only in special circumstances and incarnations would they be made of anything else but metal textures in 3D problems are very reflective and the characters within the comic and the figure are certainly not reflective.
Whenever you have the figure in hand you can tell he feels like plastic and although he is small and seems he could easily break he feels very sturdy. I am going to base my textures off of the figure because he is not reflective like the comic version and also because I have previous materials from older projects that I can pull from meaning I am using my own references rather than others.
Textures
I made a total of two textures to get them started, first, a simple white one that has a slight shine but not a dramatic one so it looks more plastic than metal. This helps tie into the comic look because the majority of the time they look like the flat colours but occasionally in the right lighting have this nice shine to them but are still not reflective.


The blue texture got increased glossiness because these are his eyes after all and would be the shiniest and most clean part of their body because it is their essential part of their sight. When it comes to Cybertronians in the comic More Than Meets The Eye all of their optic sensors are projected by coloured glass and when they have a visor that is simply an extension of that glass. The glass is needed to see through and not see yourself back in so I need to make sure the reflectiveness stays down and that may require additional changes later should they build get more delicate int eh details but for now this will do just fine.

For day 1 of making this model, I am pleased with the result so far and look forward to making the rest of his piece by piece.
0 notes
Photo

So, I have been undecided about my assignment for a very long time now and I have finally decided that I am going to create one of my favourite characters of all time. I always stated in my previous blogs that I was more interested in the building aspect of 3D over animation when it came to what I like doing better and I did want to do something a bit different but something that also was to my natural tastes.
Transformers are the number one franchise anyone will associate with me because I have been passionate about it since my junior years. However, in the past 2 years, I have become aware of a few different mediums such as the comics and graphic novels. What is different about them to the movies, games and series and that there are zero 3D models, they contain flat digital or printed images which have been hand drawn and coloured by various artists. This could be the starting point of my assignment because if no previous 3D models of them created then why not make the first?

(1) MTMTE Cover 12 (2012) Alex Milne, Josh Perez
A particular character I became fond with was a fellow called Tailgate who was a mini-bot and a tier 2 character of the main cast of the comic series More Than Meets The Eye written by James Roberts. His personality caught my attention and I even purchased a third party figure of him from Canada during the summer break. This third party figure is the only time a 3D representation of him has been made that is close to his digital representations and of course, they will never release this model because of copyright reasons and to protect themselves from competitors.
This is where my idea to make him myself comes into play, because of this lake of 3D representation it gives me plenty of freedom and also will require to me to do something that is not often recommended, and create him totally from memory and understand of his physical appearance. His digital representations within the comic can be used for reference as that is where he is most present, they sadly cannot be relied upon because they are drawn by not 1 but many different artists and no one artist draw the same as the other.
Another factor I have to take into consideration is the development of the comic, like anything with time it changes and Tailgates physical appearance overall did not change but minor details of his body did such as bio lighting, damage and fixes so it will be up to me what generation of him I use.

(3) More Than Meets The Eye 2 & 29 (2012 & 2014) Roberts, J,
As you can see here Tailgate is shown first near the start of the comic series and then again in the beginning of season 2. Tailgate is first seen with only 2 single bio-lights and then in the second scene have over 10, his hood also increases in size and more joints and connections appear. The reason I choose this image is not only because they happened in different seasons but they were both drawn by the same artist Alex Milne. Milne does have to go from drawn references before the series every aired however, they are allowed some freedom in terms of character details so they have a medium to create their own portfolio and mark in media.

(3, 4, 5) Make Toys, (2016), MM-02 Rear End 1, 4 and 2
Because there are these constant changes in the character's appearance I do have to make some decisions on which form I should do but I have found a fix for this problem and that is to use my 3rd part figure as my main guide. His proportions are correct, a colour scene is accurate however all his orange details are not meant to be there.
However, when using my figure as my guide I have a live 3D reference to pull from and I can take his arms or legs away to get a better view of certain parts of his body and if I do them piece for piece I could even go as far as to transform him if I had to time to create that type of rig.
Transforming him may be out of my reach for the moment, however, I believe I have the necessary skills to get him done.
References
(1) Alex Milne, Josh Perez (2012), MTMTE 12 Cover [ONLINE]. Available at: http://orig13.deviantart.net/7207/f/2012/261/0/a/tf_mtmte_12_cover_colors_by_markerguru-d5f6o9r.jpg [Accessed 22 November 2016].
(2) Roberts, J, (2012 & 2014) More Than Meets The Eye 2 & 29. 1st ed. Unknown: IDW.
(3) Make Toys, (2016), MM-02 Rear End 1 [ONLINE]. Available at: https://s3.amazonaws.com/tf.images/reduced-galery_image_11120_17945.jpg [Accessed 22 November 2016].
(4) Make Toys, (2016), MM-02 Rear End 4 [ONLINE]. Available at: http://maketoys.jp/wp-content/uploads/2015/01/REAREND_02-779x1024.jpg [Accessed 22 November 2016].
(5) Make Toys, (2016), MM-02 Rear End 2 [ONLINE]. Available at: http://blog.kapowtoys.co.uk/wp-content/uploads/2015/07/FB_IMG_14373733895641.jpg [Accessed 22 November 2016].
1 note
·
View note
Photo

This assignment is not the first time I have had to create a three-dimensional object within blender or other types of the same software but actually I have been using this software well before. 3D has always been an interest of mine and even during my senior years of school and because of that I have been tinkering and experimenting. Sadly because of my inexperience and my lack of resources I could not properly use the software to the best of possibilities.
Whenever I reached the BTEC level 3 course we had a 3D module and that helped open my eyes more and get the resources I needed to better succeed in 3D modelling.

Cloth Animation (2014) Courtney Neeson
One of the first things I tried was making a dark transparent glass with a cloth hanging over the top of it and onto the table. There is a tutorial for this is on youtube and I shall link that closer to the end but whenever you first look at this it looks as if I have added controls to the cloth and made it sit like that because you can see it is rippled and not flat.
What actually happened was instead of positioning the cloth within a single frame I animated it, I hung it well above the glass at an angle and let it drop into the glass. In reality, the frame you see right now is closer to the 50-70th frame.

Whenever you think of how a table cloth works it does sit flat on the surface such as a table however whenever you look to the parts hanging off they are often rippled or overlapping. This can be because the surface is not the same shape as the cloth or weight issues but trying to achieve this sounds more difficult whenever you take into account the regular physics of everyday objects.
To get this kind of result I had to add physics to the cloth, glass and floor surface. To get the cloth to bend and react to itself act within blender I used a physics addon called 'Cloth'. Seems amusing yes but within this add-on, I can tell it to collide with other objects registered for collision and also add gravity to the plane. This add-on also gives you the option of taking its own collision into consideration meaning it won't fold into itself but instead stop and then move along its own polygons. I did have to add a subdivision modifier to the cloth so it had plenty of polygons so it could bend easier. If I hadn’t the best way I could describe what it would have looked like would have been trying to get a wooden board to bend around a corner without breaking.

As a final touch, I selected both the glass and the surface flooring and gave them both a collision add-on within the physics options. I didn't need to move or really do anything besides be detected by the cloth so nothing else was necessary with regards to these objects.
Within this simple tutorial, I learned about collision detection and physics manipulation for cotton or cloth-like materials and how to get a more natural look through the animation process rather than rigging and posing for a simple frame. I also learned about adding thickness to objects without touching the vertices or polygons themselves.
youtube
Cloth Animation Render (2016) Courtney Neeson
Although I did this animation well over 2 years ago now I did learn recently what is required of a machine to render this in HD. This lasts only 2-3 seconds, rendering this took well over 3 days and the real one lasted 4 seconds. My machine cannot render projects quickly and I will need to take this into consideration and have my assignment done weeks in advance to the assignment deadline to get it rendered successfully.

Ice Text (2014) Courtney Neeson
Another thing I tried doing was with liquid simulation in Blender and ultimately get an ice-like look to this text above. This can be done like I said in the previous by making the ice from scratch and building and positioning it to look like ice but there are other methods that work just as well.
To get this result I first, of course, started with some simple text which Blender is so nice to automatically positions facing up on the z axis so it had to be repositioned to sit facing the x-axis and then given a thickness. I did not need to have this put on through a modifier but simply through the text itself, Blender lets you give the text more weight without turning it into a mesh that can be manipulated. Unlike 3DS Max where you can have an add-on to edit mesh in Blender you must convert it for vertice changing and that is a one-way street, so Blender offers some features to the text in its text format to help prevent having to convert it.

Now to get the liquid simulation to work in Blender you first need the following setup. Course you need the text and then a cube place around it, the point of this is to create a container for the liquid as in Blender they both need a source and a domain. The text is positioned within the cube with the cubes flooring being the same level as the text floor, that way when the liquid starts to fall down it will collide immediately other than just fall straight down for a while.
First I gave the text liquid properties from the physics tab and then selected the fluid option. Now this instead of turning the text into fluid actually just gives it a starting point, the text is the volume and area the fluid will first occupy so whenever I innate the simulation the text will have to be hidden from the final render. Next, I added the fluid option again only this time to the cube surrounding the text and selecting domain as the type. That way the liquid now has an area to function in, like I said before the text is just the starting point of the liquid so now that the cube has liquid physics as well the cube will, in fact, become the fluid.

After adding a simple plane for the flooring and setting the background to be a darkish colour where I decided to go for blue, I finally went to activate the simulation. This can be found on the container of the fluid or domain fixed object, I have never done a liquid simulation on other software yet to I cannot say for certain if all these are the same, however, in Blender, the button found is labelled bake. What this will do is run the simulation for the given frames using the containers and selected objects to create the liquid, to help you out it does give you a measurement of how much data will be needed so it can run the simulation. Like anything the larger the amount the longer it is going to take.
Of course, whenever it is finished it will look like nothing has changed at first however whenever you go further down to the timeline and select another frame you can see the text start to move down and collide with the bottom of the cube. The further you go the more unrecognisable the text becomes so I didn't go beyond the 20 frame mark, this way the fluid just begins to collide with the cube making it seem like it is melting at the bottom.
As a final touch gave the liquid a glass texture, thankfully most 3D software come with this premade and the same goes for blender. That way the dark sections allow colour and other objects to be seen through the fluid itself and the light gets reflected back making it shine. I did select to use cycles render for this animation because so far every tutorial I watched had advised me that cycles render operate much more thorough than normal Blender render and whenever I did this the glass or fluid texture became much more detailed and shiny and in addition to that an automatic shadow was cast from the text which wasn’t there beforehand. whenever you think of a mass or volume light may hit it and pass through it but ultimately the same light will not emit out the other side so it will cast some form of a shadow or dull lighting.

Earth (2014) Courtney Neeson
A build that I did that was in fact 100% textures was my model of the earth which actually interacted with the light in the environment.
This build could not have been more simple, a sphere in the centre and a star field set as the environment background however when it came to making this globe and looking at the texture nodes it just lookbooks like a giant mess. I downloaded bitmaps and textures all relating to the earth which consisted of.
Spec Mask
Colour Map
Night Lights
Bump Map
Clouds
All of these came into play and because the project is a few years old now I cannot for sure say how I come them to set the way they did. But I do know how this texture works below.

Above are the controls which tell the sphere which textures to put at what time and this is essentially the heart of this build. Both images are linked to a Mixer and a Colour Ramp, what happens then is that the alpha layer which is white is present i.e the sun or light in the scene priority goes to Colour1 which is linked to the day image and if alpha is not present which would be on the dark side of the sphere then priority goes to the night image.
I cannot seem to find the texture nodes however I used the bump map to then grab the land and push it upwards on the globe because obviously, the land is higher than the water level.

Two additional spheres were made that were just slightly larger than the first and these were given the cloud images on top of it and the other was turned into an atmosphere which only appeared at the edges.
Again the project did take me a few times and with it being 2 years old I cannot remember where I put or named certain textures because I was slightly more careless in 3D software, however, I did have this present in my portfolio for joining this course and it was received greatly, despite it being completely made of textures.

Optimus Prime (2014) Courtney Neeson
This was one of the biggest builds I have ever done in my 3D adventures and was also my hand in for my 3D module in Level 3. My level 3 assignment required us to make an advert for a Lego company called Lego Works and the minimum we needed to have built was 2 lego bricks and 2 characters and of course whenever I am given freedom to do whatever I want I went straight to my lovely obsession with giant cybertronian robots and built myself an Optimus Prime in vehicle form.
I downloaded a Kreo building guide as this product does exist in the world as a toy and built each piece of Lego before putting it in its correct place. This lead to over 250 pieces being made/manipulated or cut to fit the right space and lead to my old computer at the time running badly whilst the project was open.

It took me well over 120 hours to build and I can say that for a fact as I recorded myself building it with a screen capture software and used them to help show my tutor progress or else I would have had thousands of screenshots.
This project will always be a favourite of mine and my grade only made me feel prouder.
0 notes