
Make Your Crochet Life Easier!* *Some hacks might apply to knitting, too.
Don't wanna be here? Send us removal request.
Statistics
We looked inside some of the posts by crochethacks and here's what we found interesting.
Average Info
Notes Per Post
122K
Likes Per Post
69K
Reblog Per Post
53K
Reply Per Post
145
Time Between Posts
15 days
Number of Posts By Type
Text
17
Last Seen Tumblr Blogs


Fun Fact
China blocked Tumblr because of pornography and censorship problems in 2013.
Text
Knooking FAQ
(based on my compiled posts from the knooking subreddit)

(meme credit: u/Use-username on reddit)
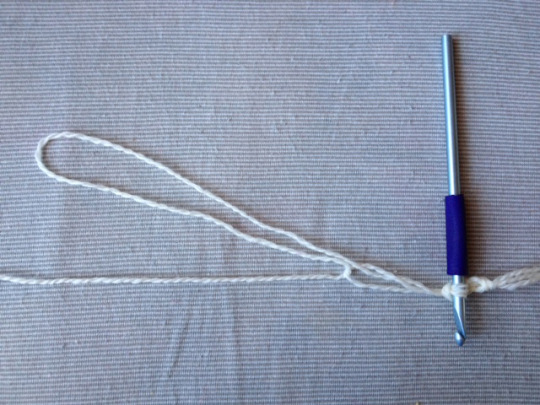
What is knooking?
knooking = knitting with a hook
Knooking is a method of making knit fabric. Instead of using needles, you're using a knitting hook, which looks like a crochet hook that has a hole at the far end, or a cord attached to it. The role of the second needle, feeding you the stitches to be worked, is fulfilled by a flexible cord.
Initially, I saw knooking as crochet's and knitting's bizarre lovechild. Not one, not the other, but a secret third thing.
After some time of practicing it, my perception has changed fundamentally to seeing it as just plain old knitting, but using a less common tool.
Why use a hook and not just needles?
It's a personal choice. It could be for comfort, maybe for accommodating a disability, or just because it suits the project better.
Many people are considered to be knitters, despite using different means to achieve their goals. You're knitting, whether you're doing it with straight needles, circulars, DPNs, circular or flat knitting machine - so why not include the hook in that list. It's not even big news - just think of how traditional knitters are fixing mistakes, binding off, casting on. Knooking is merely expanding the use.
I'm a knitter who wouldn't be knitting if it weren't for my favorite knitting tool, the hook.
What are the advantages/drawbacks?
My pros:
no unintentional dropping of stitches because they jump off the tip of your needle
great portability as your project isn't as stiff as a knitting WIP with needles in it
you can slide stitches off your hook anytime - forget about having to lift an entire row of stitches while working. I find it so much more comfortable to work with a hook that's not loaded with stitches, but only holding like 10-15, before they are moved to the cord.
no need to buy multiple hooks for multiple projects - you can remove the hook anytime, just like in crochet - you just need enough cords
particularly well suited for working small circumferences in the round, due to the flexibility of a cord vs. the rigidity of needles
My cons:
limited resources for learning - but after the initial learning curve, you'll be able to follow standard knitting tutorials/patterns
that lovely sock cast-on that I wanna do, but it requires two identical needles and I just have the one...
some knitting stitches are hard to follow, especially those that require moving stitches between needles multiple times
difficult to do without looking
Isn't knooking awfully slow?
Yes it is! :) If you're looking for pure speed, you're probably better of with a knitting machine.
Apparently, a typical, average knitter would do around 30 stitches per minute (so says the web), so 1 stitch takes them 2 seconds. When I timed my knooking after about a year of practice, I needed about 7 seconds per stitch. This is my "natural knooking" time, including adjusting the cord, doing a second quick-count to make sure all my stitch and row numbers are correct, working purls as well as knits, and also redoing one or the other imperfect stitch.
I like to take my time, relax - it's not a race, but rather a kind of calm meditation. For me it's so much more about the process than about the result. Although my socks are still really nice in the end! <3
Being slower makes the hobby cheaper, too! One skein of yarn lasts like a month for me, but if I had average+ speed, I'd probably need a new one every week. I'm happy just the way things are.
Is it expensive?
Not more expensive then the yarn you're using. Other than that, all you really need is a knitting hook and a cord to hold the stitches.
The cord is often already in your home. You can try using a ribbon, a length of yarn, a silky string, a thin shoelace, ...
The hook can be bought for a few bucks. You can even use a makeshift one if you want to test out the craft, and have a (non ergonomic*) crochet hook at your disposal. Just tape a piece of string to the end of the hook or even tape a tapestry needle or a smallish loop of something like dental floss to it if you want a fancy removable cord - and you're ready to go.
*If you only have ergonomic hooks around, it might still be possible to knook by adapting the technique: A user of the knooking subreddit has found a way to knook without sliding the stitches off the end of the hook - but it's not the "standard" method and seems way more demanding.
Is knooking difficult to learn?
Your mileage may vary.
I jumped over from crochet, and I found understanding it more difficult than actually doing it. Tension control, holding the yarn, project and hook, etc. is the same as in crochet.
It took me about a week of research to wrap my head around stitch construction in knitting. What I didn't know at the time is that there are two methods of wrapping your yarn (clockwise or counterclockwise), and knooking tutorials tend not to mention which one they use, or even mix them up without telling you so. After getting that, it was smooth sailing.
Practice your knit stitches and purl stitches for a bit, then grab any beginner knitting pattern and go for it. You're just using a needle with a bent tip instead of a needle with a straight tip. And should you get stuck on a special stitch whose construction neither google nor youtube can explain well enough, there is probably someone around the knooking subreddit who can get you going again.
Where to find knooking patterns/tutorials?
You can really watch all knooking tutorials, as there a very few in total. You'll find a compiled list in the knooking subreddit's wiki. Pay close attention though, as there as two "conflicting" techniques (Eastern/Japanese and Western) that wrap the yarn around the hook in opposite directions (clockwise vs. counterclockwise). As a result, half of the tutorials might confuse you...
I really enjoy Patronarte on youtube for Eastern knooking tutorials. The videos are in spanish though.
Also keep in mind that a lot of knooking tutorials are made by people not knowing what they're doing. They probably got sent a hook in exchange for doing a video, and just wanted to get it over with without bothering to acquire any knowledge beforehand. So: No, you cannot just do a yarn over instead of a yarn under. This gets you twisted stitches.
While there are not many patterns out there that are specifically made for knooking, you can pretty much follow any classic knitting pattern out there once you got the basics down. It's not a different technique, just a different tool. Knit and purl, increase/decrease, slipped stitches, cables, lace, colorwork, double knitting, shortrows - it can all be done. Some stitches might be harder to execute though, especially those that require moving loops between needles multiple times (like the Little Hearts stitch).
There are some "knooking only" patterns out there, taking advantage of knooking's way to let you naturally combine knitting with unfinished crochet stitches for visual interest, use elongated stitches, or easily add some picots during bind-off without having to change your tool.
How to cast on?
For starting out, especially if you're a crocheter too, the easiest way is probably a foundation chain just like in crochet.
For the "double" cast-on needed for toe-up socks, I started out with a simple chain 10, from which I drew up loops first on one, then the other side to get a closed round of 20 stitches.
When doing a cast on for a loop, I usually cast on one stitch more than needed. When closing the round, I slip the first stitch, and start knooking the second one. Later on, the first one will be knooked together with the very last one as a decrease. No idea if that's what the pros do, but it's what I came up with to help me with that pesky joining gap.
You can also use classic knitting cast-ons like long tail, or "Judy's Magic Cast On" for toe-up socks, although some cast-ons like the latter one won't translate well to knooking, as they require two needles. When I wanted to try the crochet cast-on method, but didn't have a second same-size needle to crochet around, I even made up a cast-on technique of my own.
If you can't fit enough stitches on your hook, try casting on like 20 stitches, then slide 15 of them onto the cord, keeping 5 on the hook to keep your tension right, then adding 15 more, sliding 15 off again etc.
What is "Eastern" / "Western" mount?
If you're knooking Eastern aka. Japanese style or if you're knooking Western style depends on the way you insert the hook into the stitches and wrap your yarn around the hook.
Looking at the tip of the hook pointing towards you, a clockwise wrap (like a yarn over in crochet) is Eastern, a counterclockwise one is Western - that's for right-handed people. If you have both kinds of wraps, one for knits, the other one for purls, then you're doing Eastern European style aka. combination knitting.
When going through tutorials, you need to be aware of this difference, and look for the ones that use the same wrap as you. Unless you know what you're doing and counteract it, mixing up the different wrap styles leads to twisted stitches.
(Also: Check out the knooking subreddit's wiki!)
What are twisted stitches?
Just like in classic knitting, your stitches may be twisted, either on purpose or accidentally. These stitches looks slightly different, have less stretch than their untwisted counterparts, and are slightly more difficult to work into.
This diagram finally made it "click" for me - it's really easy once you "get it". The purple stitches in it are standard untwisted, while the yellow ones are twisted.
Here's a link to may fav video going deeper into the mystery of twisted stitches, for those interested.
It essentially depends on the combination of the following factors:
Do you hold the hook in your left or right hand?
Doing knits: Do you enter the stitch from the left or the right? Do you wrap the yarn over or under the hook / clockwise or counterclockwise when looking at the tip?
Doing purls: Do you enter the stitch from the left or the right? Do you wrap the yarn over or under the hook / clockwise or counterclockwise when looking at the tip?
If you need a tailored answer to deal with your twisted stitches, please refer to the knooking subreddit, making sure to provide answers to the above questions.
What style/mount should I choose?
(The following is written from a right-handed perspective. Left-handed will be mirrored.)
If you already know how to knit, you have probably learned to insert your needle from left to right to make a knit stitch. You can keep doing the same in knooking, instead of messing around with any skills that you have already acquired. This should be paired with inserting the hook from right to left for purls, so also the same as usually taught to knitters in the english-speaking world. This is Western style.
It is often easier for a crocheter to do their knit stitches by inserting the hook from right to left, as this movement is pretty much the same as in crochet. This should be paired with inserting the hook from left to right for purls (which feels "backwards" for crocheters). This is Eastern / Eastern uncrossed / Japanese style.
As most knitting patterns and tutorials in the western world are written with Western style in mind, some things will need to be "translated" if you choose Eastern style - for example stuff concerning the leaning direction of decreases.
What hook is the best?
As with knitting needles and crochet hooks, this is a lot about personal preference.
I am used to working with the no name "locker hooks" from China that are sold all over the big marketplaces. They come in a set of 2.75mm, 4mm and 6mm.
In my preferred knooking style, I enter my stitches to purl "backwards" using the curved "beak" of the hook. This works marvelously well with the Chinese no names and their long slender beak.
I tried using different hooks that have a shallow fat head, much like the typical tapered crochet hook. Knit stitches work quite alright with it, as it is pretty much the same move as making a crochet stitch - but I found purling to be a pain. Entering stitches "backwards" with a fat head is a real challenge. And the yarn unders tend to escape the shallow beak's grip, especially with splitty yarn, or if the hook is on the thinner side of recommendations.
You can also use Tunisian crochet hooks (ideally interchangeables) as an alternative to the "classic" hook with a hole, but I haven't tried them yet.
What cord is the best?
You'll have to experiment a bit a see what suits you. Most common seem to be silk cords or simply a length of yarn, although yarn is just too fuzzy and splitty for me personally. Silk/satin ribbons are also among the better choices.
You're looking for something strong and durable, that is reasonably thick and stiff as to keep your stitches open, but thin enough to be doubled up through the eye of the hook with you still being able to slide the stitches onto it comfortably. It should slide well, not catch your hook, and of course not cost an arm and a leg.
Just give anything cord-like you have lying around in your home a try, it might just be the ideal knooking accessory.
My cord of choice is curling ribbon (the plastic ribbon that is usually curled up and taped onto presents to decorate them). I always use 2 strands doubled up, because a single ribbon strand is too thin once it's gotten a bit squashed.
It does fray, but I don't really mind. It stays strong, and you can't inadvertently poke through the ribbon and get it stuck, as you could with a length of yarn for example. And just in case the fraying gets too bad: I've got a sheer endless supply of new lines!
I also tried out plastic cords, which I found to be too stiff, but still useful when doing short rows. I even cut the cable from some broken earbuds to find out if I can knook with it. Silicone tubing / Purl Strings / Try-On Cords / Knitting Cords were another candidate, but sadly they're a no, as the silicone just doesn't slide well enough.
The long cord bothers me! What can I do about it?
If the long, tangly line dangling from the end of your hook gets in your way, just detach it while working. Do your stitches, reattach the cord to pull it through, then get rid of it again to continue making loops.
When starting out, working in the round with a long cord simply drove me bananas. You can't pull out a whole round all at once by tugging at the end of the cord. Instead, you have to inch it through bit by bit. You spend more time sliding stitches around than actually making stitches.
Nowadays, I prefer working with multiple shorter cords (20-25 cm) holding 10-15 stitches each, instead of using a single long cord. I put my first batch of stitches on a short cord, then use another one for the next batch, and so on. When done working over the first batch of stitches again, just grab the old cord section from below, swoosh it out, put it into the hook's hole, and slide the stitches from the hook onto it. Done. And ready to continue working on the next stitches. It looks a bit like knitting with double pointed needles, but in a flexible version.
Especially when working in the round, I really love the multi-cord approach that I came up with, and I'm encouraging everyone to give it a try to make their knooking life easier. If I hadn't cut the cord, I would never have finished my first project.
This is the hill I will die on. Team "Too Many Cords" Forever!
Pros:
One swoosh and the cord is out - no more inching it through.
If a cord gets yanked out by accident, only part of your project is in jeopardy.
Multiple cords divide your work into small sections, and make it easier to count stitches as you go, to immediately spot any unintended skips or yarnovers.
Cons:
It looks confusing when you're new to it - just like DPNs.
You have to pay close attention not to grab and tear out a cord section that is still holding live stitches... ..it happens.
Can I pause a project?
There's nothing easier: Your project is permanently sitting on a lifeline! Just remove the hook (or even leave it in) and throw your work into a bag/box/corner.
The cord usually doesn't slip out - that's if it doesn't it get caught on the project bag zipper or something. For extra security, you can tie the beginning and the end of the cord together in a knot when pausing, if you're using a removable cord that's not too stiff.
What can I do about laddering?
To compensate for stretching the stitches too much when moving them to the cord, I tend to change the exact point where I drop them off. Let say for row/round 1, I swoosh them to the cord between stitches 12-13. In row/round 2, I might transfer them between stitches 9-10. That way, I avoid building up any long loose ladders, as well as any vertical lines of tiny stitches pulled too tight.
I can't get the hook into my stitches!
The first thing thing that you can try is playing with the cord to slide the stitches on it closer together. This releases some of the tension they're under, thus allowing the loops to loosen up and get bigger.
If you still can't get into your stitches to work them, your cord might be too thin. When I find that my stitches get hard to enter, using a thicker, stiffer cord normally helps. I often just double up my current one - just fold it in half if it's long enough.
A good cord should keep your stitches open, so that you can slide the tip of the hook in. For me personally, it works best with a very smooth cord, so that the hook can just glide along it.
When watching myself knook, I noticed that I insert the tip of my hook very low on the stitch, below the cord. But I don't push it all the way through under the cord, instead I bring the hook back to the front once I've picked the stitch up - a bit like surface crocheting. Difficult to explain, so here's a video of me (very slowly) doing the knit stitch.
For "backwards" stitches, I enter my stitches using the curved "beak" of the hook. This works marvelously well for me with the Chinese no name locker hooks and their long slender beak. Again, here's a video of me doing that. I can grab the loop easier when tilting the work towards me and going in on the back side of the work, but it's not as ergonomic for me, so I tend to save it for stubborn stitches.
For extra-resistant stitches, you can insert the hook into the stitch below and pick up the live stitch's thread again through there - kinda like knooking the stitch from the row below again, like you had undone the one on current row to redo it.
Can I knook cables?
Knooking cables is even easier then knitting them, as you don't need an extra helper needle. I was struggling trying to knook them at first, until I discovered the ultimate "hack": slide your stitches onto the cord mid-cable before doing the skipped stitches. So much easier to go back and work them with an empty hook!
Can I knook socks?
Absolutely! Socks particulary well suited for knooking, and they are not intimidating at all if you dissect them.
You can knook one long tube, right? Right. So the only thing that could pose problems is the toe or the heel.
Depending on the direction that you're going with your sock, basic toes are just increases after picking up stitches on both sides of a chain, or decreases with sewing a hole closed at the end. You can do that!
Now heels are what I was afraid of as well. But you can practice them with any yarn before you go for a whole sock! Cast on like a dozen stitches, and do a mini-heel just to get a feel for it.
There are many variants of the heel, so you can chose your fave - based on look, ease of knooking, and later on fit. The most popular are:
flap and gusset: the classic, requires you to pick up stitches from the sides of your work
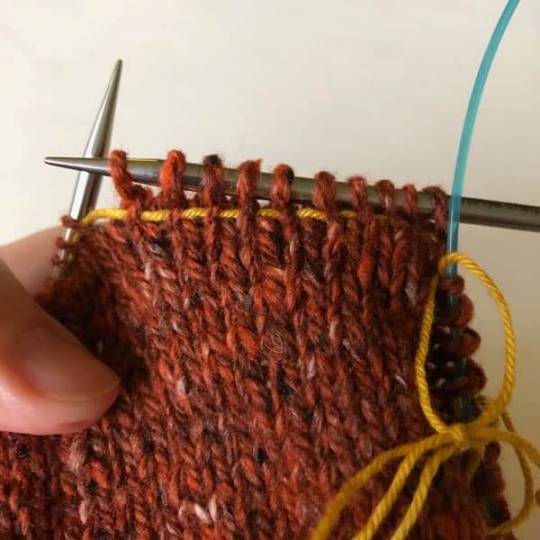
afterthought heel: literally allows you to do just a tube and worry about the heel later, ideal for contrast color heels, requires you to pick up stitches that are sitting on a length of waste yarn - which is the basic knooking move!
shortrow heel: my personal fave. I like the look of it, and unlike the afterthought it doesn't interrupt the flow by adding "doing a heel" to the end of your task list. Doing a heel after your sock is finished is like doing a border after your blanket is finished. I just don't feel it. lol
no heel: if the heel is just too much of a red flag, you can still go for spiral socks that do not require a heel at all!
So: Heels - check! Go for those socks!
Can I knook shortrows?
You sure can! My personal favorite are shadow wrap shortrows - a tutorial for knooking them can be found here. When starting out, I used to have to use a thicker and stiffer cord for the short rows, as my shadow wraps tended to shrink - but that problem faded with practice, and is also less prominent in increasing shortrows which I tend to use exclusively nowadays.
I was still curious how to do wrap&turns using a hook, and it works too.
Work till you reach the turning point => idem in knooking
To wrap the next stitch, slip the stitch purlwise => insert hook without twisting the stitch
Move the working yarn between the needles to the opposite position => move the working yarn to the opposite position (back/front) past the hook, not over it - just like you do when switching from knit to purl
Return the slipped stitch to the left needle => near impossible in knooking, so skip this step
Turn the work => pull cord through, turn the work
=> do the skipped "return stitch to the left needle" step by inserting the hook into the stitch without twisting it, while holding the working yarn below the stitch
Reposition the yarn for whatever stitch you are knitting next => idem in knooking
Once you are ready to knit over your wrapped stitches, pick up the wrap and place it onto your main needle, then knit the wrap and the wrapped stitch together. => put the hook through both the wrap and the stitch when it comes to working them
I need a stretchy bind-off!
On the cuffs of my socks that require a certain stretch, I always use a single crochet bind off - hook through loop on the cord, yarn over, pull through loop, yarn over again, pull through 2 loops on the hook.
I hope this has been helpful to you. Have a wonderful day, may it be filled with lots of yarn time to enjoy!
1 note
·
View note
Text
XVA crochet notation
As I keep coming across people wanting help with XVA crochet notation, commonly used for amigurumi patterns in Asian regions, here's a compilation of the translations to US terms for the symbols that I've encountered so far:

XVA = US
A = single crochet decrease
BLO = back loop only
C = chain / slip stitch ?
CH = chain
E = treble crochet
EA = treble crochet decrease
EM = treble crochet 3 together
EV = treble crochet increase / 2 treble crochet into one stitch
EW = 3 treble crochet into one stitch
F = double crochet
FA = double crochet decrease
FLO = front loop only
FM = double crochet 3 together
FV = double crochet increase / 2 double crochet into one stitch
FW = 3 double crochet into one stitch
greater-than signF = front post double crochet
G = 5dc popcorn
H = "back crochet" 2 double crochet
h can also mean row
K = skip
M = single crochet 3 together
N = reverse single crochet
NX = back post single crochet
NT = back post half double crochet
NF = back post double crochet
O = chain
Q = 3dc bobble
SL = slip stitch
T = half double crochet
TA = half double crochet decrease
TM = half double crochet 3 together
TV = half double crochet increase / 2 half double crochet into one stitch
TW = 3 half double crochet into one stitch
UX = single crochet loop stitch
UF = double crochet loop stitch
V = single crochet increase / 2 single crochet into one stitch
W = 3 single crochet into one stitch
WX = front post single crochet
WT = front post half double crochet
WF = front post double crochet
X = single crochet
Y = "back crochet" 2 half double crochet
Y = picot (ch3, slst)
(underlined) = back loop only
(line on top) = front loop only
5 notes
·
View notes
Text
No, I am not 'hoarding craft supplies.' I am sourcing materials for a very big project that will be revealed to me at a later date- perhaps in a dream.
57K notes
·
View notes
Text
How To Tame Fuzzy Yarn:


If working with fuzzy, furry, or otherwise funky yarn is driving you mad, have a try getting it wet (yarn permitting of course).
The water will temporarily make the fluff stick to the core, improving workability and stitch visibility.
2 notes
·
View notes
Text
Hello, so I just bought a yarn winder and I’m LOVING IT so I’m going through my entire yarn stash to wind them into cakes. However, I always prefer the center pull and was annoyed when the finished cakes would easily start coming undone when I dropped it (or when my cat stole it from me). Therefore, I have created something either really smart or overly complicated for a small problem that I could just learn to deal with-
So basically what I did was before winding the yarn, I put a small strip of cardstock and tied it to the shaft thingy with a coiled hair tie cut in half (for easy removal). Then I’ll wind the yarn and when I’m done, I just tape the two ends of the cardstock together so it makes a band around the yarn and then cut two slits for both ends of yarn. For the yarn that I have labels for, I write the name and hook/needle size on the paper.
The great thing is that (because I like the center pull and it doesn’t work with this method) I can just cut the band off when I need the yarn and remake the cake. The cake will get messed up when I use it anyways so may as well just remake the labels.
And here’s what it looks like:

And when it’s set up:

11 notes
·
View notes
Text
At this point it’s almost every time I open the app that I see someone revolutionizing a hobby I didn’t know needed it.
7K notes
·
View notes
Text

You think “oh it would be useful to learn how to identify my thrifted yarn and clothing” and before you know it you’ve been recruited by fiber witches giving out their spells willy nilly, again
19K notes
·
View notes
Text
Turn your thin yarn into thick yarn!
The Navajo / chain plying technique allows you to work with a triple strand out of a single ball - effectively tripling the yarn thickness. It's really fun, and easy as pie! Use up your superfine scraps in a big and/or sturdy project like a blanket, rug, basket, plant pot, ...
5 notes
·
View notes
Text
Make yourself a row counter!
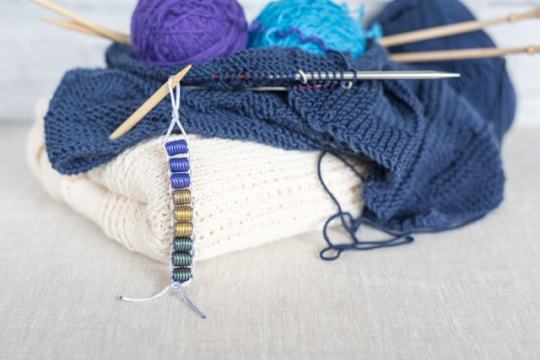
This abacus-style keychain is great for portable projects. It can be thown into the project bag, or attached directly to the project using a clasp / stitch marker, but also closed up and worn as a row counter bracelet. Using number beads instead of plain beads makes counting even easier! And while you're at it: Make one for each of your wips.

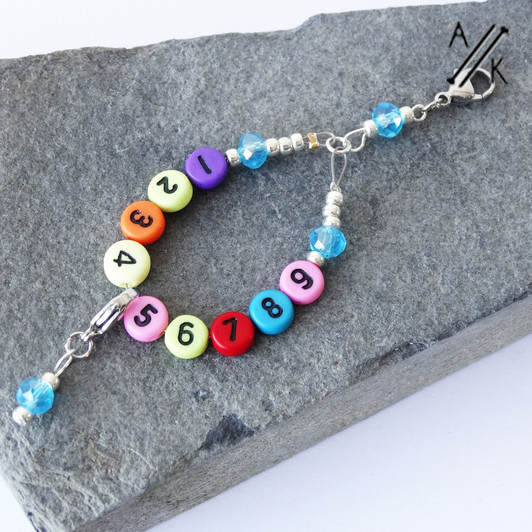
After a set amount of rows, I like to attach a stitch marker with number beads to the project as a backup counter.
6 notes
·
View notes
Text
What if I taught myself to tablet weave? I've never woven before but I bet I could just... Do it. Will report back.
13K notes
·
View notes
Text
honestly yeah, fiber arts is magic. you cast spell of warm gloves, spell of nice hat, spell of stuffed animal.
material component: yarn
wand: single hooked wand or double pointed wands, depending on caster's preference
mechanical component: specific motions repeated in a particular pattern
time component: a while
look seriously the first step in a knitting recipe is "cast on", and then it's a bunch of letters and numbers incomprehensible to anyone not versed in the arcane art. that's a spellbook. yes it's a book of knitting patterns but also. it's a spell book.
13K notes
·
View notes
Text
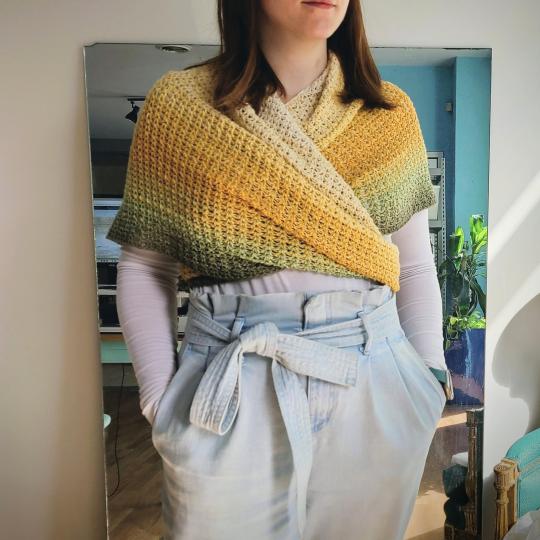
How to tie a shawl.
10 notes
·
View notes
Text
11K notes
·
View notes
Text
Well f you right back casey that’s no way to treat people thanks for nothing at least those stupid bears are gone now so that’s a win I guess
0 notes
Text
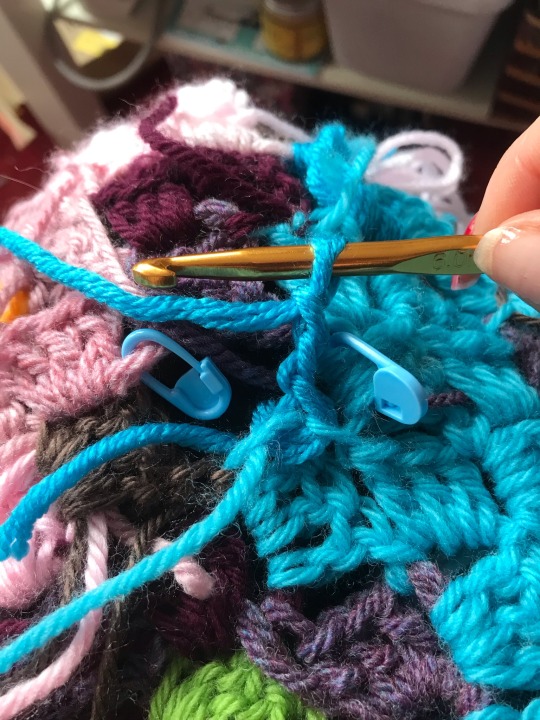
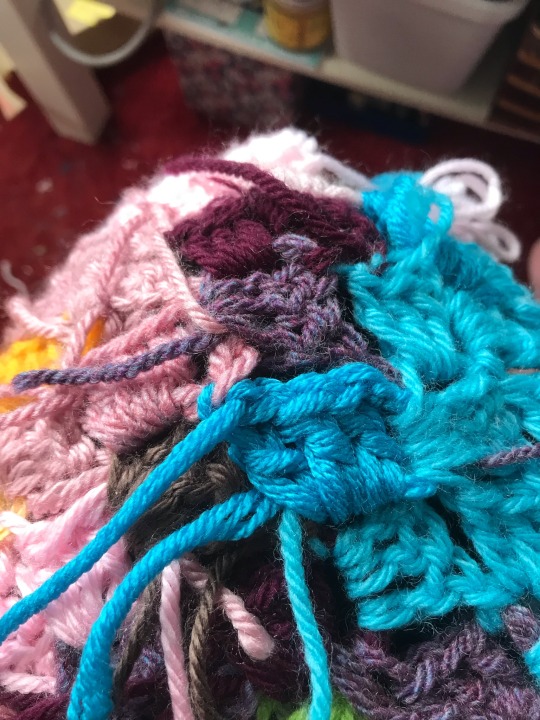
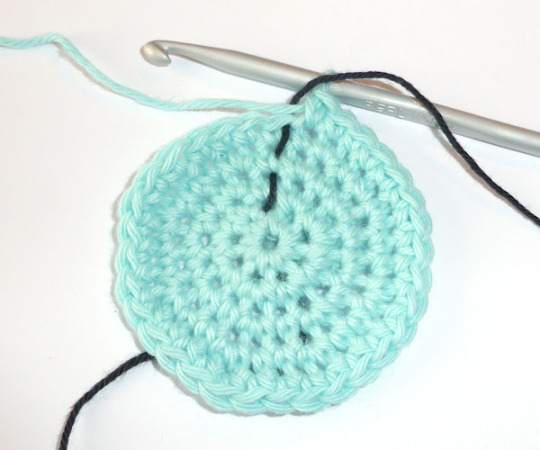
how to cut out and replace a square in c2c crochet because you fucked it up and didn't notice for several rows and quite frankly if you have to undo it now you will walk into traffic whilst screaming: a guide
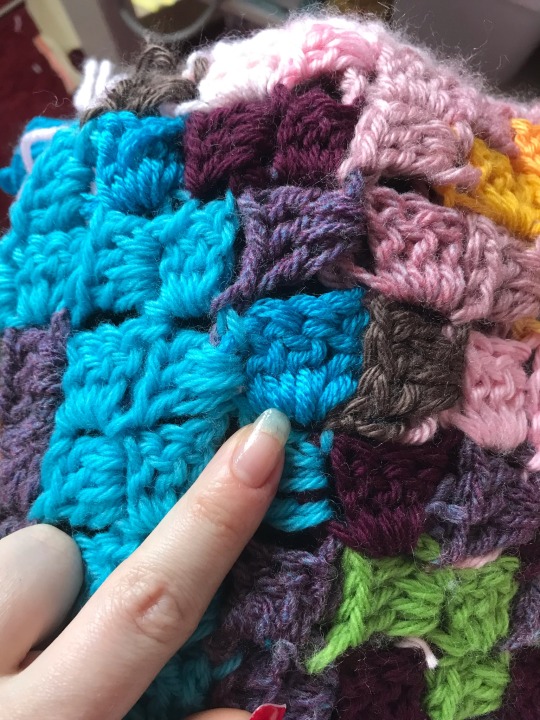
step 1: locate the offending square. this one is supposed to be turquoise, not pink
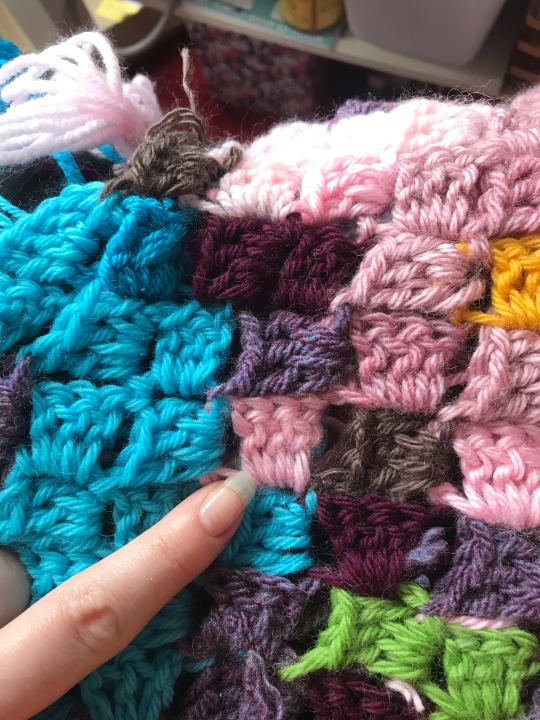
step 2: to work it the right way around, the initial chain 3 (that the next row will work into) needs to be on the right. this square was worked on the wrong side, so, flip that bitch over
step 3: run a stitch marker through all loops of the square above that go through the chain 3
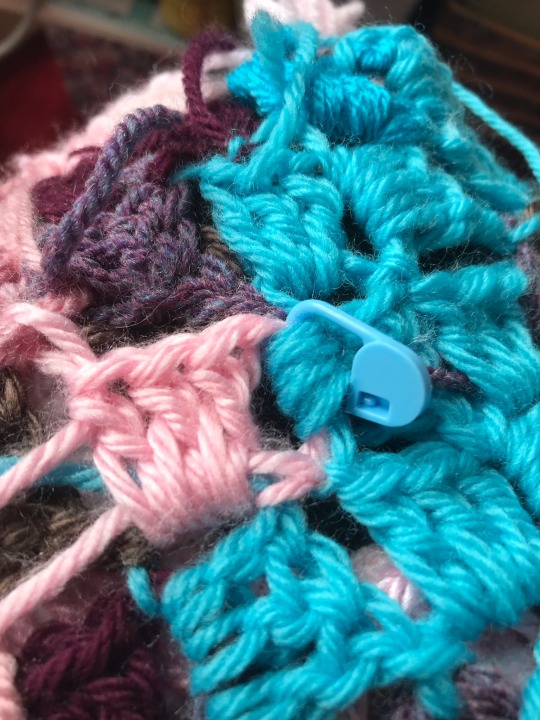
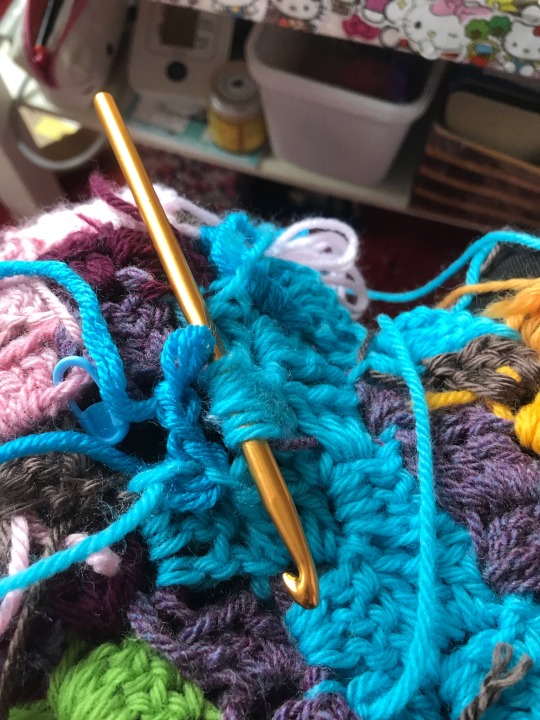
step 4 (optional): put a stitch marker where you would connect to the next square. nothing will fall apart if you don't.
step 5: put your crochet hook into the top of the last stitch of the preceding square. you know. where it would be if you were doing this for the first time and weren't a dumbass who can't count
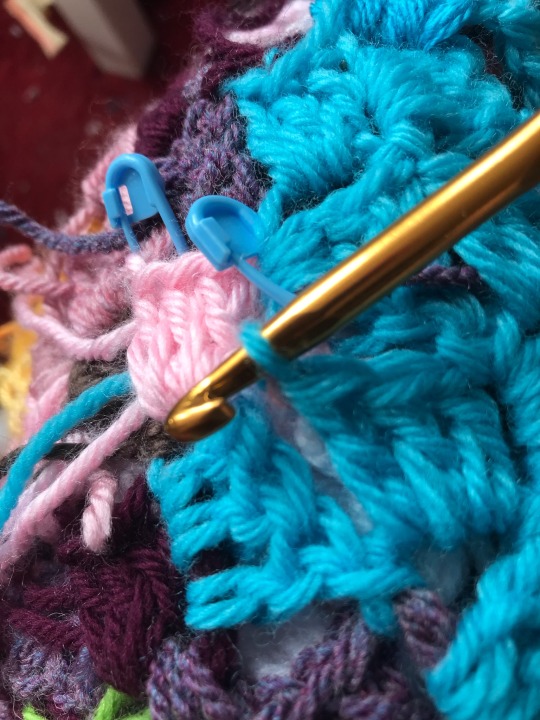
step 6: take a deep breath and CUT RIGHT THROUGH the middle stitch of the offending square and then unweave the rest of it
step 7: AHHHHHHHH jk lol it's fine
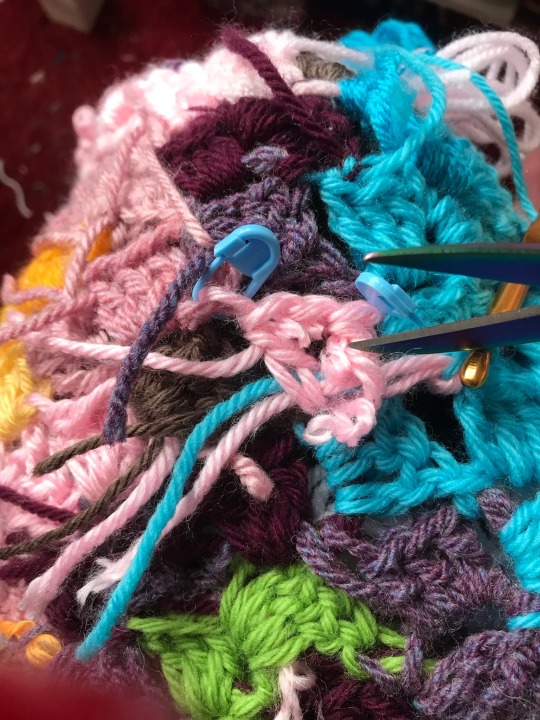
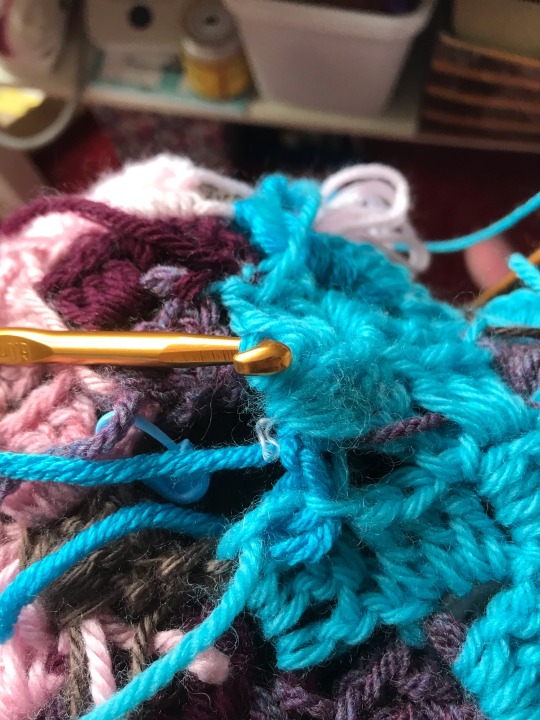
step 8: cut a long enough piece of yarn to work a square and attach in the usual fashion with a slip stitch and chain 3
step 9: remove the hook from your chain (briefly) and then run the took from top to bottom through all the loops from step 3. remove the marker
step 10: grab your chain and pull it through all the loops
step 11: keep pulling until you can grab the workin yarn and then pull the whole thing through
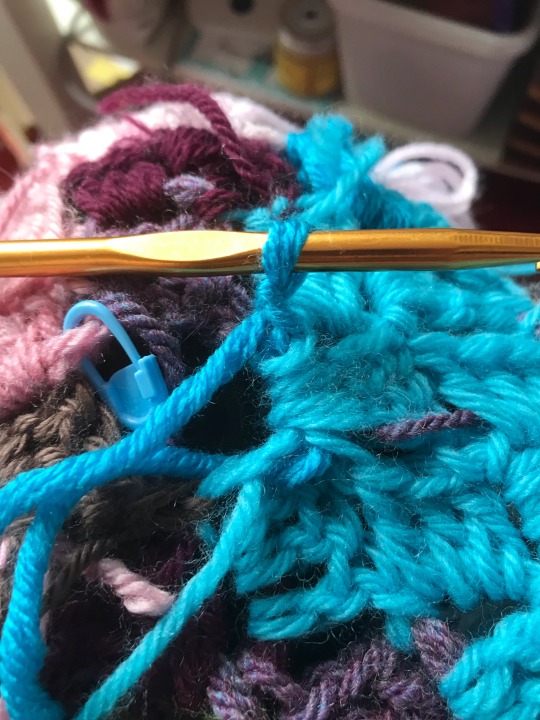
step 12: finish the square, attach to the next square with a slip stitch and fasten off
done!
2K notes
·
View notes
Text
Keep a box of dental floss in your notions / on-the-go project bag
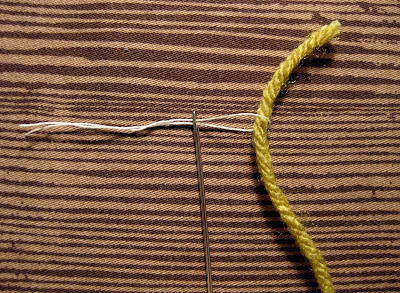
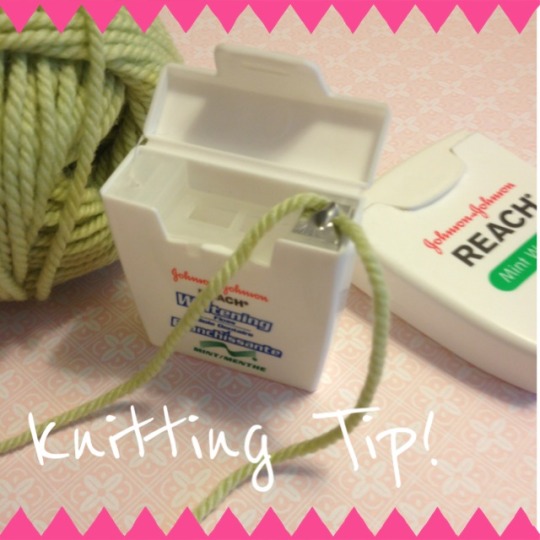
Not only can it be really useful as, well, dental floss. It can also help you thread a needle, and serve as a portable yarn cutter that is allowed wherever you go, even on airplanes.
In addition, it can serve you well whenever a length of waste yarn is needed, like as a running stitchmarker, or as a lifeline when knitting.
0 notes
Text
quantity over quality is the key when starting a new craft/hobby/whatever
It took me thousands of stitches to figure out the best way to knit, to purl, to tension my yarn. I tried English and continental. Circular and straight needles.
All the advice and videos and tips in the world won’t replace actually doing the thing. Over and over. And ripping it all up and starting over.
1K notes
·
View notes