
crocodile-tears-game
Crocodile Tears
An N64 inspired story game about a cyborg crocodile.
61 posts
Don't wanna be here? Send us removal request.
Last Seen Blogs
pilotcattaco
PilotCatTaco

blightedhamster
ε(*´・ω・)з
jake-meraga
rejecting humanity club
hommedessept
Homme Des Sept
murmullosdeviento
kat_is_a_cat.
Text
Evaluation
Media & Techniques - I decided to make my game 3D which meant creating 3D models. I used Blender to create these models, photoshop and Aseprite to make the textures and Unreal Engine 5 to make the game. At the beginning of this project I had never done 3D modelling before so I tried to do as much research on Blender as possible, this included watching timelapses of 3D models, explanations of the tools and how to navigate blender, and watching behind the scenes for models of my favourite games. As I started to model some buildings for my game I learnt a lot about Blender and by the end of the project I could comfortably create models from reference images and UV map efficiently. In my project proposal, I stated that I wanted this game to be a demo showcasing the 3D models and art I had created and I am very happy with what I have achieved, I also said that “I have opted for an N64 style of 3D modelling” which I have also achieved. In Unreal Engine 5, I learnt a lot about giving characters abilities and deconstructing other games. I added a targeting system for my game and in coding it, I was able to understand how my favourite games created these mechanics. Using Photoshop and Aseprite, I created textures and learnt how the N64 could use texture maps to optimise the way I used materials.
Purpose / Theme / Concept - My thought process throughout this project was to start with the core gameplay and build ideas off of that, it would also make creating the models for my game a lot easier as I would have an idea of what I wanted my game to feel like. I started by creating the main mechanic of my game, being the ability to possess other characters and I built my characters other abilities around the idea of what I would find fun. I also discovered quite early that I wanted my game to focus around the idea of expanding the play area based on each characters abilities which influenced the abilities and level design in my game. The grapple hook character and the bomb character were directly produced from this notion. In my project proposal, the only idea out of these I mentioned was the ability was the possession ability, because most of the ideas were created after my proposal off of the possession ability. My general idea didn’t change, in my proposal I said I was only going to create a demo although deep down I was hoping to be able to expand the world a bit more, however, I am extremely happy with how this project has turned out.
Conclusion - If I were to improve my game, a lot of the improvements would be on the art side. I think it would have been fine had I set out to focus more on the programming aspect of my game but I did state in my proposal that I was going to focus most of my efforts on art and it didn’t pan out that way, so if I had to improve anything, it would be the models and animations for the NPC’s as I didn’t get around to adding them for my game. Another thing I could have added would be UI improvements. It would have been good to add some sort of tutorial for what buttons to press to do certain things as the controls for my game are quite confusing sometimes. I would have also loved to explore post processing and effects as the ones I did add in my game improved it drastically. The rest of the improvements would be trying to add boundaries to stop the player getting stuck in strange places, adding a proper end to the game and creating some cutscenes. I have learnt a lot from this project so if I were to do this project again I think I could do with putting more of an effort to learn blender quicker than I did to make creating assets a lot easier.
Outcome - I think I set out exactly what I set out to do with my original proposal. I did end up leaning slightly towards the middle of the line between art and gameplay instead of just focussing a lot of my efforts on art. I met my own expectations and I ended up finishing the game to a point where I am happy with it. I think this is an excellent example of how far my skills and abilities have progressed through the year and this project has met a lot of the points in my proposal. There are certainly a lot of improvements that I would have liked to have made if I had the time in the form of polishing but the scope of this game was quite big so I am just glad I managed to finish it to an extent where I am happy with it.
0 notes

Text
Show evening
There is going to be an evening where we are allowed to showcase our games to our friends and family. For this, I am going to be getting a USB N64 controller for my game, and possibly a crt tv to play it on. I think my game would be better played like this as I designed it to be similar to an N64 game. I would also like to import some character models with different colors for the NPC's to differentiate between them, and possibly some form of tutorial.
0 notes
Text
Post processing
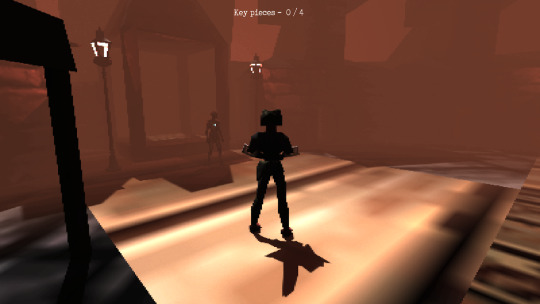
Because I am making a game inspired by the games released on the Nintendo 64, I felt it necessary to try and replicate the signature, low res and muddy texture look of the console. The N64 uses an anti-aliasing method called tri-linear bitmap interpolation, however, this would be quite hard to replicate so I decided to start with the thing the PS! and N64 had in common, they both look very pixelated despite being 3D. My first thought was to lower the resolution, however, I couldn't change the default resolution for Unreal so I had to do it for the computer itself. The computer only went down to 800x600 and I needed 320x240. The custom resolutions just ended making the screen really small. To get around this issue, I thought it would be easier to add a post process effect that makes the game look pixelated. To do this I had to make a material and then add it to the post process volume.
The second thing I wanted to do was to add some atmospheric fog. The N64 used this a lot to unload unused assets. There is already fog in the world, however it wasn't showing up in my level. I tried adding in the post process volume and it still wouldn't work. After changing a lot of the settings for the fog I decided to set the fog density beyond its set limit on the slider, which worked. I then just had to adjust this and the start distance until it felt right. I also changed its colour to be an orange colour to create the atmosphere I wanted.
0 notes
Text
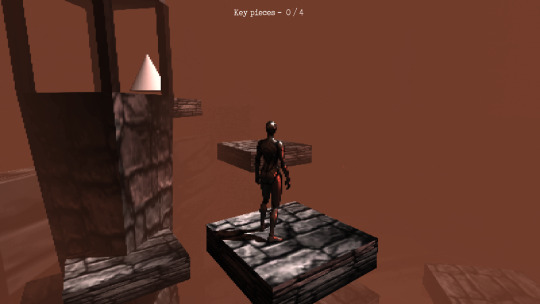
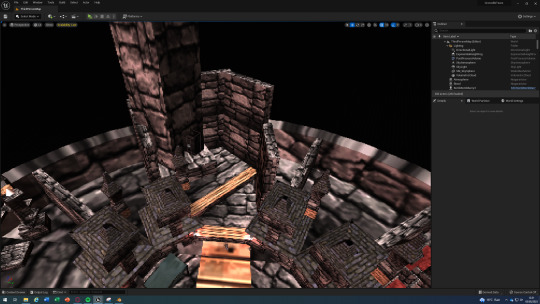
Level design
The way I have chosen to do my level design is by splitting my map into four segments, each one is built for a certain characters abilities. The first section I made was for my grapple character. I decided to use my tower models and place them so the escalated upwards to a collectable. Using the grapple character, the player would grapple to a tower which would then allow them to grapple to a higher tower.

The next one I made was some invisible parkour for my psychic character. It was comprised of a bunch of ledges, blocks and towers that would become visible when the player used this ability and lead them to another collectable.
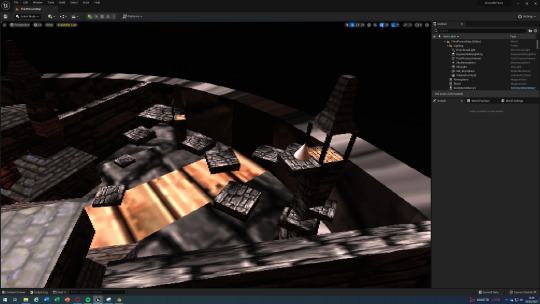
The next one I made was a maze filled with bombable walls leading to another collectable for my bomb character. The maze ended up looking really dark so I added a spotlight to the bomb character.
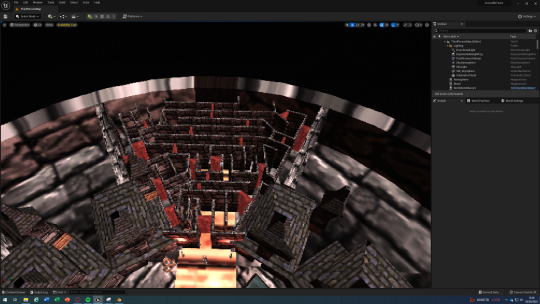
The last section I made was a tower that had rising lava in it. You would play as the character with enhanced speed and jump abilities doing parkour on the inside of this tower to reach a collectable.

0 notes
Text
Texturing my models


To texture my models, I saved pictures of textures off of the internet and then placed them into a 64 by 64 project on photoshop and made sure they could be repeated as well as changing their colors and painting low opacity greens for a mossy look. I made wood, stone, water, log and roof textures and put them all onto one PNG. Because all of my textures are low res, I can use a texture map to make my game run better. After this, I added seams to all of my models, imported the texture map as a material, unwrapped and mapped my models and they were all textured.


0 notes
Text
Teo - Rigging and animation
The general idea behind animating a model is to give it a skeleton and move the parts in pose mode adding keyframes where you want the bones to move between. I used an IK rig meaning the bones moved realistically to how they would in real life, for example if I moved the foot up, the knee would also move up. I used a YouTube tutorial for the rigging and animating. I added some extra armatures for the neck and tail bones.
youtube
I started by adding an armature and extruding off of it to create my characters spine, neck head, arm and hand bones. There are two bones in each arm and in the spine. I only added arms on one side of my model so I could mirror it later, I named the first bone I placed near the pelvis, "Root", the two spine bones; "Spine1" and "Spine2", the neck bone; "Neck", The head bone; "Head", the first arm bone "UpperArm.l" and the second one "LowerArm.l"; the hand, "Hand.l". All of the bones in the arm have .l after them because they are on the left side, when I mirror the rig, the right side will automatically have .r on the end of the bone names. After adding these bones, I duplicated the root bone and moved it roughly where the hip would be and moved the bottom to where the knee would be. I extruded this to where the ankle would be and then again from there to the tip of the foot, naming them the same as I did for the arm. I then used the side view to move the armatures to follow the models structure a bit better. I also add a bend in the knee and elbow to make the rig work better. Next, I had to set up the IK target and IK leg pole which will be used as targets in the IK modifier and will help maneuver the rig. I extruded off of the knee joint and pressed ctrl + p and clear parent to detach it from the rest of the rig. I moved it away from the knee joint along the Y axis. I named this "IKLegPole.l". Next, off of the ankle joint I extruded another armature. I pressed ctrl + p and clear parent again but I didn't move it away from the bone it was attached to. I named this "IKTarget.l". I also deselected the "Deform" check box on both of them. Next I selected the lower leg and went into pose mode. I added a bone constraint and then within that, I selected the inverse kinematic. I set the targets to the armature. The bone for the first one was set to the IK target and the second to the IK leg pole. The foot was facing outwards so I set the pole angle to 90. I then connected the upper leg to the root bone. I selected the upper leg, shift selected the root bone and then pressed ctrl + p and keep offset. When I tried this originally, I connected the wrong bones together and My IK rig wasn't working properly, luckily I we3nt back a couple of steps and redid that section of the instructions. Next I wanted the leg to follow the rotation of the target bone. To do this I selected the foot bone and added a bone constraint called copy rotation. The target is an armature and the bone is the IK target bone. I selected invert on the Z and Y axis. To mirror the rig. I entered edit mode, selected the rig, pressed F3 and searched for symmetries. To add weight, I selected both my model and the rig and pressed ctrl + p and armature deform with automatic weights . This connects the armature to the model, meaning I can now move the armature and it will move its corresponding body part. I had a few weight issues around the feet so I entered weight paint mode and tried to even out the weight around the legs.


youtube
Now the rigging was done, I needed to animate my character. This is quite easy to do. I entered the animation tab and changed the view modes so I could see the textures and shadows of my model. I changed over to pose mode on my model and changed from the dope sheet too the action editor. I renamed the animation "0TPose" and protected it with a fake user. I selected the rig and pressed I and location and rotation keyframe. This would be my characters default pose.
To add another animation I renamed the animation to Idle and enabled auto keying. Now I just had to change the body parts how I wanted, move to a different frame and change the body parts again and the animation will move between them.

I pressed new action and started to make my run animation using a run cycle reference sheet. I also used ctrl + c and ctrl + shift + v to copy and mirror certain parts.
0 notes
Text
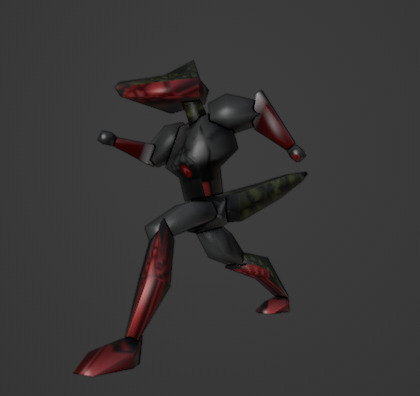
Teo - UV Unwrapping and Mapping
Now I had made a model, I needed to unwrap it and map the textures. The general idea behind UV unwrapping is that you need to mark seams that will turn a 3D shape into a flat one as efficiently as possible with the least amount of stretch to reduce how many textures you need and to stop textures stretching. The best way to visualise this is how you would turn a cube into it's net counterpart. You can already imagine how you would turn the left shape into the right one and I applied a lot of those concepts to the shapes of my model.


A lot of my seam placements were trial and error. One of the issues I had unwrapping my model was that I was unwrapping it wrong and causing overlaps all over my UV map. This was happening because I wasn't selecting all of my models edges and then unwrapping. There was still some overlaps and strange placements so I used the pack islands option to pack them more neatly. To create the textures, I used a lot of the base textures for the captain falcon model, however I edited most of them drastically to fit the look of my character. I added my textures to a texture map and added it as an image to the UV map, moving my unwrapped UV's over the textures. I also reused a lot of textures to act as different parts of the body, for example the red light on Teo's torso was used on most of the joints for the limbs to make him look more like a cyborg. The crocodile skin texture was reused all over the model. I also had some solid colours as filler textures.
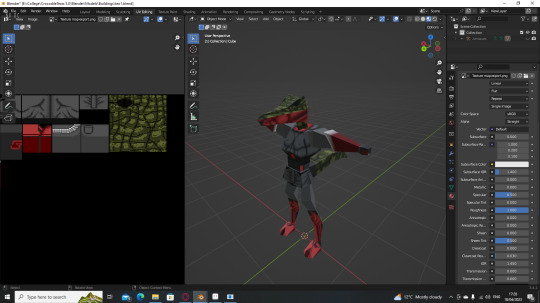
Here's the finished model I am very happy with how it turned out.
0 notes
Text
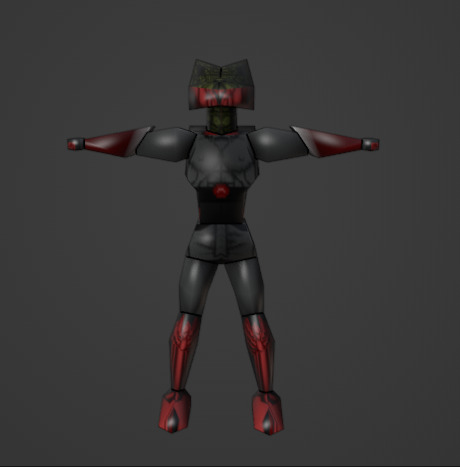
Teo Character model
I decided to create the model for my main character Teo. Teo is a humanoid cyborg crocodile so this was going to be interesting to model. I opened blender and saved a male reference image sheet. Because I have never modelled a character before, I also thought it would be easier to base mine on a preexisting N64 model. I chose captain falcon from smash bros 64. Partially because it's very similar to the physique I wanted for Teo, but also because the tutorial I used also used captain falcon as a reference. The video I used was a time lapse of the creation of a PS1 inspired power ranger character model.
youtube
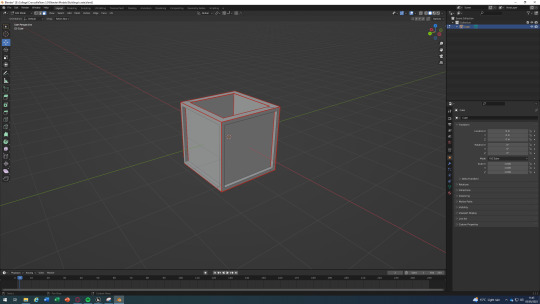
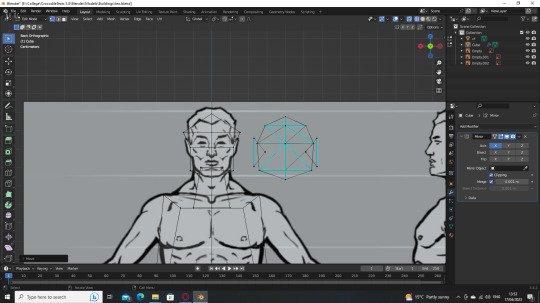
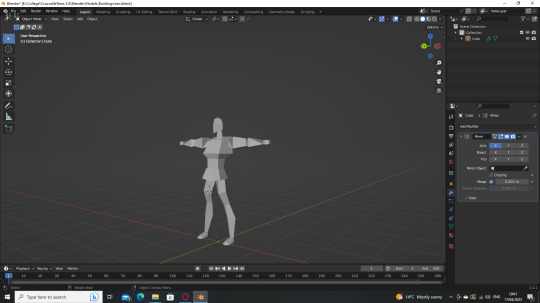
l started by duplicating my male body reference sheet. I pressed Y on the gyro to get to the front view and place one of the reference sheets, and then X for side view to place the other reference sheet. By moving one sheet into the other, I could create a cross reference sheet. After this using the front facing view, I added a cube and deleted half of it by adding a loop cut and selecting al of the faces on one side. I did this to add a mirror modifier so I didn't have to do the same thing on the other side. With my mirrored cube, I decided to start with the torso, I scaled the top of the cube to be the width of the shoulders and I used the grab tool to move the bottom to just above the pelvis. I switched to the side view and began to scale and move points of the torso to match the general shape of the reference images. Next, I moved on to the pelvis, I added another cube and followed the same process as with the torso, matching the shape to the general shape of the pelvis on the reference image. I then added another cube and rotated it 90 degrees and placed it by the leg on the reference image. It was important to rotate the cube to make a more angular leg. I grabbed and resized the square to match the shape of the leg, I also added a loop cut and scaled it up to define the upper leg a bit. I then duplicated this shape and scaled it down for the lower leg. I added another cube and rotated it 90 degrees for the neck. For the head, I moved the head of the captain falcon model and moved the vertices to match the captain falcon head. I followed the same steps I did for the legs, for the arms. The hands were just cubes with a loop cut in the middle scaling it up a bit. The feet were rotated cubes, moved around to match the reference image and the feet of the captain falcon model.
Now the model was done I needed to make it closer to what I wanted to have my model look like.
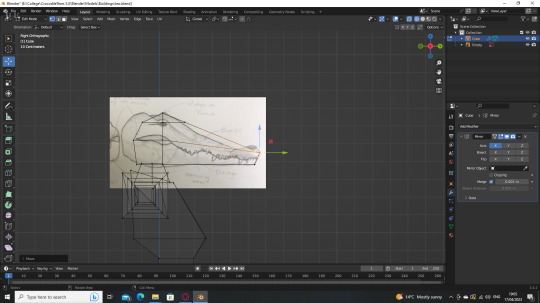
I started this by creating a crocodile head. I used the sketch of a crocodile head from my concept art to model the head on. I moved and added vertices to get it close to the shape I wanted. I also added a tail by adding another cube and moving and extruding certain parts of it that gradually get smaller.
This is the finished model with my own alterations.
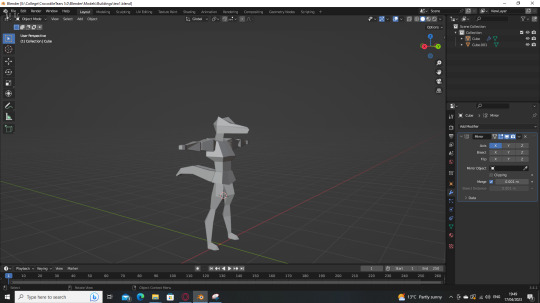
Overall this process was extremely fun and I can see myself focusing more on this in the future. Most of the stuff that went wrong came when I duplicated the arms and legs more than once, creating extra faces which made it really difficult to scale certain parts of the model, but this was easily fix by just deleting the extra arm/leg. Next, I have to UV unwrap and map my model to add some textures.
0 notes
Text
Possession mechanic - Research
The key game mechanic in my game is the ability to possess other characters to use their abilities. A lot of games utilise mechanics similar, if not the same as the one I intend to use as the centre piece of my game.
The first game being Oddworld : Soulstorm / Abe's Odyssey
youtube
I love the way this game manages to pull of the game mechanic and visually, it is very similar to the ideas I originally had to show possession in my own game which is why I have chosen to mention it. In these games, you can send out a representation of your characters soul and hunt down enemies, when you find one, you direct your soul into the enemy and you can then control them. I love the look of the soul and the effects it creates when you hit a possessable character. The other thing I love is the idea that you can use possessable characters as a way to get an advantage on the enemy. If I chose to continue this project over my summer holidays, I would love to add these sorts of opportunities.
The next game is command and conquer, specifically the unit called Yuri Prime.
youtube
Yuri Prime is a unit with the ability to control the minds of other units. Although it doesn't relate to the ability for the player to possess a single entity, I think it shows off the ability very well and is a very early example of this kind of ability being used. I also love this idea. Again, if I work on this in my free time, I would love to add an NPC that has an ability similar to this.
Another example would be the ability to control the mindless humans in inside.
youtube
This idea is expanded throughout the game and is the centre of a lot of the story an puzzles. I like the idea of using these NPC's to complete pressure plate and movement puzzles.
A more modern example of this ability would be that a build in cyberpunk also allows you to possess NPC's to an extent.
These examples are more obscure than the previous research post on this mechanic but I wanted to add these examples to show some variations on the mechanic I could have added.
0 notes
Text
Death
Death is a key concept in my game. The story orbits the inevitability of death and to explore how I want to make the character feel about death in my game.
I have compiled a few of the more interesting celebrations of life and the mourning of deaths to explore for a better understanding on how different cultures perceive the idea of the end and losing a loved one.
The first one I came across was mourning of death in China. the majority of China follow the Chinese Buddhism religion. In China, it is customary to wear white at funerals as white is symbolic of death there. What's interesting about how China commemorates life is that the mourning period usually lasts for 100 days and a lot of the time, families end up hiring professional mourners to grieve the death of a loved one. This is because they believe young children no longer know how to show the proper emotions that should be had at a funeral, and to also show emotion for the people who feel embarrassed to publicly show their emotions by reading up on their loved one, performing speeches and crying. I found this one particularly interesting because it almost felt like their society has ridiculed people for outwardly showing their emotions. I think the idea of peoples opinions getting in the way of grieving is a very interesting outlook on how funerals should be conducted. I think most of this idea of not being able to show the right emotion for these funerals stems from the length of the average mourning period and I admire that they can commemorate life properly for that long.
I love the cultures that celebrate the life of a loved one and the freeing of their soul, rather than the mourning and rather rapid acceptance of their death. I think these types of religions always come across as respecting the dead a lot more and most of these cultures remember the dead because of how they lived not how they died.
Death in the Hindu faith is seen as more of a liberation of the soul. Hindu's believe in karma (the relationship between a person's mental or physical action and the consequences following that action) so the body of a loved one will be cremated to free their soul quickly.
In Japanese culture death is also seen as more of a liberation. Often, acceptance of the end of the life of a loved one is seen as more important than expressing yourself. A lot of people often bring condolence money and bodies are cremated, however, the ash is normally separated from the bones and the remains are often divided up between temples, the family and even the employer of the deceased, I like this cultures celebration of life because it treats death as being more cyclical than linear.
In Mexico, they celebrate Día de los Muertos or day of the dead. This is a celebration held every year where they celebrate the lives of their loved ones and it is believed that it's the one day that spirits can visit the land of the living. Families give offerings to the spirits. The celebration dates back several thousand years to the Aztecs, Toltecs and other Nahua people who considered mourning the dead disrespectful.
Out of all of these cultures unique ways of celebrating life, I found Mexico's the most interesting. I love how much respect and love they give to the spirits of their loved ones and that it happens every year as to not forget the lives they lived.
My game is going to touch more upon the idea of cyclical rather than linear life. The main character will treat his own life as disposable as it will be cyclical, however, no matter how hard he tries, he won't accept the inevitability of his wife's death. The idea behind this is to portray Teo as being in denial and indescribably sad and alone. This is crucial in the entirety of the game because it perfectly encapsulates the overarching story of loss and the cyclical pain of losing a loved one, touching on the idea that this man would sacrifice his own life and memories just for a chance to see the love of his life one more time. Although a lot of these cultures don't show how Teo feels about his fate, it is important to think of them as a contradiction to his own decisions. His abandonment of the acceptance of death is the reason he is doomed to live like he is forever.
0 notes
Text
MoSCoW - Final week
M - Must have - A playable level to test gameplay mechanics, environment and player models, animations, three or more possessable characters with unique abilities.
O
S - Should have - Textures for the player and environment models, models for all playable characters, an goal, an end, a start screen, a pause screen, landscape beyond the beginning town. Fog, atmospheric effects, N64 anti-aliasing.
C - Could have - Music, sound design, an opening cutscene, an end cutscene.
O
W - Will not have - Playable areas beyond the town, animations for the NPC's.
0 notes
Text
Targets 19.4.2023
This week I need to create the world the player will explore, polish gameplay mechanics, texture my models, import any other assets I have, landscape the outside world and then if I finish all of this, model texture and animate my NPC's. to go into detail, I need to.
-Fix the players movement when grappling
-Limit grapple hook to certain blocks.
-Import my building models
-Import my character model and animations.
-Texture my building models.
-Build a landscape outside of the world.
-Post processing (N64 anti-aliasing, fog and atmospheric effects(optional))
-Model NPC's (Optional)
-Texture NPC's (Optional)
-Animate NPC's (Optional)
0 notes
Text
Development changes
Originally, I set myself a lot of work to do, I knew most of the work was going to stem from all of the characters I wanted to add. I have 5 characters including my main character, and each of these characters was going to need models, animations and textures to go with them. I have decided to take a lot of weight off of my shoulders by focusing on only creating my main characters model, animation and textures. This is because I have still got quite a lot of work to do in terms of textures, importing assets and polishing so I don’t want to have to worry about making and animating my models along with everything else in my final week. Instead, I will try to make and animate the models in my free time and only import them if I know they are finished and can definitely be put in the game without breaking anything. I am still going to model and animate my main character. I want to make sure I get the game working and looking as intended before I worry about making models for NPC’s.
0 notes
Text
Textures - Research
This post will go into detail how I will make my textures keeping my models in mind and how to create a texture atlas and implement the tri-linear bitmap interpolation without separation in the tiles (using buffer zones.
I am going to create my textures by taking pictures of odd looking textures in real life and then importing them into photoshop in a 64x64 canvas. After this, I can edit it to make it look how I want it to, possibly layering multiple textures on top of each other.
0 notes
Text
Concept Art
Concept art is art used to bring and idea to life. Concept art is crucial in the creation of Video Games, predominantly the creation of characters. Concept art also helps multiple variations of a character known. Most concept art is being constantly redrawn with different ideas in mind. My favourite example of the evolution of a characters conception shown in concept art would have to be from Twilight Princess.

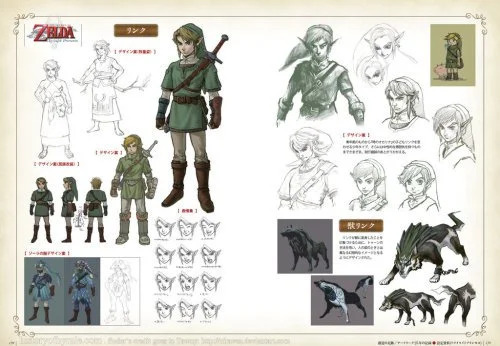
Midna in particular went through a lot of changes that are clearly shown in the concept art.
I have decided, that for my games concept art, I will sketch them from a culmination of different pictures, it might even be easier to use something like Photoshop to grab everything I like about the pictures on my Pinterest mood board. I will need to create one for each of the main NPC's because I need them to convey the atmosphere I want them to, and to show a lot of character.
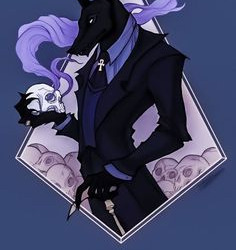
I'm starting by drawing the concept art for my main character Teo. Teo is a cyborg crocodile and I have found some pictures that I think best show what I want him to look like.
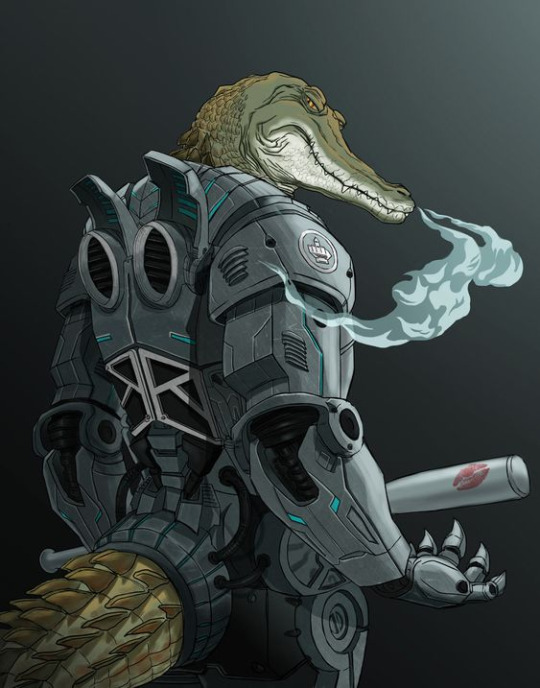

I will draw a front back and side view to Teo and will most likely use a picture of an actual crocodile for the face and take most inspiration of the suit using the image on the left.

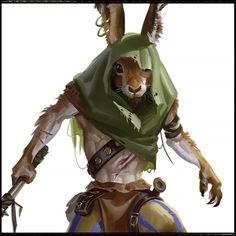
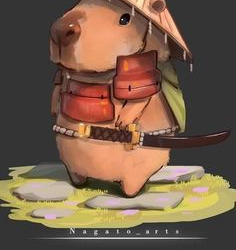
The next character I will make some concept art for is going to be Greg. Greg is the character that has the ability to grapple and is a frog. I am very interested in some of the ideas I have had for Greg so I think I could have a lot of fun drawing up concepts for this character. These are the images I will be basing my art off of, as well as a basic picture of a frog for reference.

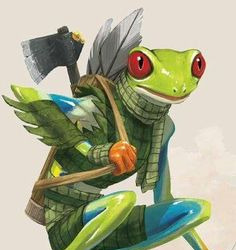
The clothes are going to be similar to the picture on the right, and the stature and look will be more similar to the picture on the right.
Next is my character called Barry who has the ability to place bombs. I am also very interested in how Barry conception will go because I had quite a cool idea for his character. I would like for Barry to have prosthetic limbs alluding to an accident with pyrotechnics. Barry will be jumpy and a pyromaniac. These images are what I will be basing my concept art on.


The figure and clothes will be taken from both of these images and the prosthetic limb picture is how I will create the limbs on my character.
The next character is Richard. Richard is my Cat based character that can jump higher and run faster than the other characters. Again, I will use a reference photo of an actual cat along with these photos.
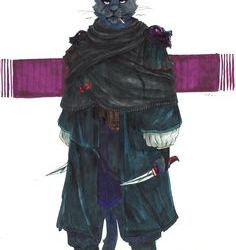
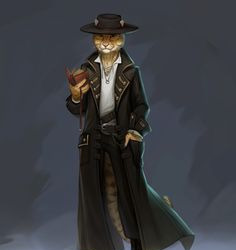
The clothes are going to be a 50/50 mix between the both of these. The figure, stance and colour will be closer to the picture on the left, and the facial expressions will be closer to the one on the right.
The last character is Steve. Steve is the character that can see areas that other characters cannot. I'm interested in the concept of this character because I didn't really know what I was going to be basing this character off of. There isn't an animal that immediately comes to mind when you think of a psychic power. I decided to go with a gorilla or a monkey as they are meant to be quite intelligent. These are the images I will base my concept art on.

I love all of the mechanism coming out of the monkeys suit in the left picture. The clothes may be similar to the picture on the right because I love the look of the suit and mood it provides to the character. The stature will be similar to the one in the left picture.
1 note
·
View note
Text
Other NPC's
These will be NPC's that you either cannot possess or can possess but they have no special abilities. I doubt I will have time to add any of these NPC's so this is mainly about the concept of each NPC that I couldn't add.
I love the look of all of these characters. I have decided I will not be adding them in the time I have been given for my FMP project but in case I end up working on this in my own time, I have decided to add my favourite designs.


These are some of the NPC's that I think would fit my game really well.


I particularly like the crow because of how I can imagine his personality being.
0 notes