
Don't wanna be here? Send us removal request.
Statistics
We looked inside some of the posts by daniel8395smith-blog and here's what we found interesting.
Average Info
Notes Per Post
1
Likes Per Post
1
Reblog Per Post
0
Reply Per Post
0
Time Between Posts
3 days
Number of Posts By Type
Text
11
Last Seen Tumblr Blogs


Fun Fact
70% of Tumblr users say the Dashboard is their favorite place to spend time online.
Text
Way to fix Bellsouth Email Login Problems
BellSouth Email Login Problems can also be an issue the user might encounter while using BellSouth Email Services. Just like any other service provider, the BellSouth Internet-based Email service provider is also one of the main communication providers to the global audience. BellSouth is a renowned email service provider that is based in the USA but it is serving the global audience. It was developed by keeping in mind that it will come into use for personal conversations but, timely progress and business requirements have turned this software into professional software.

BellSouth basically is known for its wireless internet services, cable and digital television services, short and long distance communication services, internet-based free of cost email services and much more and being a very popular and one of the most prominent companies of the world, it is catering to the needs of the worldwide audience in the most effective and efficient manner. But, what to do in the case where you are facing BellSouth Email Login Problems? Don’t Worry…!!! Not working issue is just the indicative of BellSouth Email server setting requires a check-up and minor fixes.
The reasons behind BellSouth Email Login Problems can be many. We are discussing the few major ones in the below laid bullet points –
Reason for facing BellSouth Email Login Problems over the BellSouth Email Platform can be the exhaustion of that storage capacity also. The total email storage limit offered by the BellSouth Platform is 15 GB / Per User / Per Account.
BellSouth Email Website server might be down or crashed for the time being. The reason behind can be that too many users are present at the same time and the server of the BellSouth Email site is to that much competent to take that sort of load.
Anti – Virus installed in the PC/ Desktop / Laptop might be creating a firewall and thus, resulting in that you are not been able to login to your BellSouth Email Account.
Frequent Use of Un-Updated web browsers or search engines for using BellSouth Email Services can also create a hindrance. Web Browsers such as Google Chrome, Mozilla Firefox, Internet Explorer, etc. are some of the top considered web browsers that must be used to avail of any internet service, whether mail or anything else.
The web browser installed in the system, the one the user is using for connecting with the BellSouth Email Services is filled with cache and cookies.
Web Browser add-on and plug-in are either become obsolete or irrelevant, thus, creating hindrance in between.
Slow Internet Speed offered or Improper Internet Connection provided. BellSouth Email Service server requires a decent internet connection to work.
Wrong Time and Date of your PC / Desktop / Laptop / Device. The location update also included in this.
Wrong Email configuration settings can be one of few reasons of Email Login Problems
Wrong Login credentials of the email account can also create a Login Problem.
Methods To Solve 5 Easy Ways to Fix BellSouth Email Login Problems are as follows
Method 1- BellSouth Email Account Password Reset
To do so, follow the below mentioned quick easy steps –
Open your web browser and open the given AT & T Website Homepage Link – http://start.att.net/
Click on the Account Sign-In Option available on the homepage.
Click on the Forgot Password Option available and you will reach the Account Recovery Page.
Enter the asked inputs in the prompt fields. All the fields are mandatory to be filled.
Enter Captcha and click on the Continue button and you will reach the identity verification page.
You will now have 2 options – Send Me a Temporary Password / I’ll answer the security questions.
Select any of the 2 options and follow the further step and your password will be recovered.
Method 2- BellSouth Email Configuration Settings
BellSouth Email won’t be able to work properly until and unless the user does not do the correct incoming mail server and outgoing mail server settings resulting in BellSouth Email Login Problems. If they are incorrect, then correct them as per the below-mentioned inputs –
For Incoming Mail Server Settings —
Username – In the username column, the user is required to mention his/her correct Email ID with the correct domain.
Password – In the next column, the user is required to provide the Login Password attached with his BellSouth Account Email ID.
Server – imap.mail.att.net
PORT – 993
Security – SSL / TLS
For Outgoing Mail Server Settings —
Username – In the username column, the user is required to mention his/her correct Email ID with the correct domain.
Password – In the next column, the user is required to provide the Login Password attached with his CenturyLink Webmail Account Email ID.
Server – smtp.mail.att.net
PORT – 587 / 465
Security – SSL / TLS
Method 3- BellSouth Email Service Site Crashed / Server Down
There is a huge possibility that BellSouth Email services site is down or crashed for the time being. The reasons can be many. Maybe too much website load or update is being done from the BellSouth’s end regarding adding or removing any feature in it. To identify whether the site is crashed or not, click on the given link on Google and the following screen will appear https://downdetector.com/status/att/
Method 4- Anti-virus Firewall Method
Temporarily disable the Anti – Virus installed in the system. There might be a huge chance that the Anti – Virus installed is creating a sort of firewall leading to improper functioning and working of the BellSouth Email account services and you are facing the BellSouth Email Login Problem.
5- Update/Reinstall/Change the Web Browser and BellSouth Email Application
Re-install / Update / Change the Web Browser that is being used as a platform for availing the BellSouth Email services. The same should be done over the mobile phone devices also, whether Android or iOS. Timely updates have been provided by BellSouth to its users and the same should be installed on a timely basis by the user and this will ensure that you won’t face BellSouth Email Login Problems.
If any of the above mentioned methods won’t work for you, then contact to the BellSouth Customer Help and Support team which is available 24*7 for your help. You will get a reliable solution to your problem that you can easily apply to solve your BellSouth Login Problem through your own efforts.
Source: Email support
0 notes
Text
How Can I Setup IMAP Settings In My Gmail Account?
IMAP is famous for providing internet protocol that allows access to communicate with various email services, Gmail, Outlook, etc. With the launch of IMAP server, the old protocols like POP3 and SMTP were suspected to be in less demand. But why? This is because; IMAP allows giving the status of mails, access to various mail inboxes on a single server. This article is all about Gmail IMAP settings. Thus, if you require a guide, you can go through this blog and understand the process.

How to Activate IMAP in Gmail?
Here activation steps of IMAP in Gmail have been mentioned. Follow it:
Go to a web browser and open Gmail
Navigate to Settings option located at top right
Choose Forwarding and POP/IMAP option
Next in IMAP access column, click Enable IMAP
Keep other settings on default
Lastly, click ‘Save Changes’
Gmail IMAP Settings for Incoming Mail
If you want to retrieve all incoming emails in one place, you need to set up IMAP.
To follow up your Gmail messages on other devices, apply the given details:
Gmail IMAP server address: imap.gmail.com
Gmail IMAP username: Gmail address
Gmail IMAP password: Gmail password
Gmail IMAP port: 993
Gmail IMAP TLS/SSL required: Yes
Gmail SMTP Settings for Outgoing Mail
If the clients are setting the incoming server, they may need an outgoing server to send the Gmail messages. To do so, here are SMTP settings:
Gmail SMTP server address: smtp.gmail.com
Gmail SMTP username: Gmail address
Gmail SMTP password: Gmail password
Gmail SMTP port (TLS): 587
Gmail SMTP port (SSL): 465
Gmail SMTP TLS/SSL required: Yes
Troubleshooting Tips
Any user facing any trouble with Gmail settings then you may consider these reasons:
The username or password space have wrong credentials. If you have mentioned the wrong password. Click on ‘Forgot Password’ and create a new one.
If server details are incorrect, then cross-check from the above details given.
When Two-factor authentication is enabled, you need to generate an app-specific password
However, if IMAP is not enabled in the Gmail Settings. Go to Setting and tick on Enable IMAP server settings
At times, the email client does not support the Google standards and is meant unsafe. Therefore, you need to update to the latest version
Technical Support Team
In case you are unaware of the Gmail IMAP settings, then connect to the technical team. Hence, experts are professional and can explain to you all the processes in a non-technical way to make you easy to understand. Along with that, you can also get the latest updates for Gmail and IMAP servers. Once you convey your issue to them, they will discuss with you all the points that may be the reason that resonates with setting up the particular protocol. Therefore, they will revert you instantly with a workable solution. Further, there is no time restriction, you can get in touch anytime as they are available all round the clock, 24*7.
Source: Email support
0 notes
Text
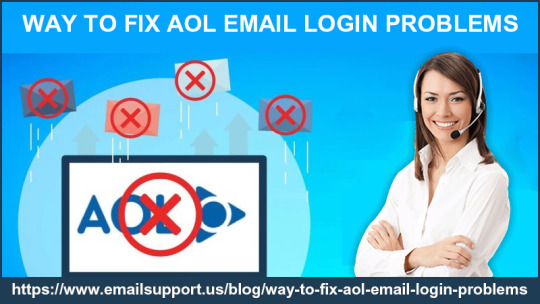
Way to fix Aol Email Login Problems
AOL Email is a free internet-based Email Service offered by the American firm, AOL (America Online) to its users. This Email service provider has not only changed the way Email service providing firms used to work but also came up with new and innovative ideas to make the Email service much more fun and easy to use. It is a web-based service having multiple numbers of features and characteristics designed to enhance the mailing service experience of its users. Having millions of users worldwide, there is hardly anything that you can’t do with the use of AOL Email. Personalization & Customization can also be done by the user as per his own requirements. There are many Email service providers available such as Roadrunner Email, Yahoo Mail, Rediff Mail, Gmail, etc. AOL email login problems is also one of them.
What to do when AOL Email has stopped working and you are facing trouble in logging in to your account?
Since AOL is also a technical man-made software/application, it can also misbehave sometimes and requires some minor fixes. Not working issue is just the indicative of AOL Email server settings requiring a check-up as with the time goes, the settings are always subject to change. This article will help you in troubleshooting your AOL Email in case you are having login problems.
But first, we are going to elaborate on the features and the benefits of using AOL Email Service.
Following are some of the features of AOL Email Service —
AOL Email offers the Email Attachment Limit of 25 MB and the entire storage limit of 25 GB to their user which is far more than the other email service providers.
Spam and Junk Email Protection
Virus / Malware / Digital Protection
Can be used after linking with Gmail and other Email Service providing platforms as well.
Supports the following protocols: POP3; IMAP; SMTP
AOL Email provides the benefits of customization and personalization to its users.
Creative and useful add-ons in your AOL Email Account.
Organizing emails in separate folders and subfolders.
What are the various reasons behind the AOL Email Login Problems?
I am listing below the possible reasons and scenarios where your AOL Email account has stopped working —
The user is mentioning the wrong Login Credentials majorly the login password to open his email account.
The user has crossed the maximum storage limit of the AOL Email account which is 25 GB / Per User / Per Account.
AOL Email Account’s server might be down or crashed for the time being.
Anti – Virus installed in the system might be creating a firewall and thus, resulting in you having trouble in logging in to your AOL Email Account.
Use of an un-updated web browser for using AOL Email can also create a hindrance.
The web browser is filled with cache and cookies.
Browser add-on and plug-in are obsolete.
Slow Internet Speed.
Use of Un-Updated AOL Email Software / Application.
AOL Email Settings are incorrect for both incoming and outgoing mail servers.
Kindly do the below-mentioned setting up gradations in your system in order to make your AOL Email Account work again —
Exhaustion of Storage Limit – Delete the unnecessary and junk mails from your AOL Email Account as the reason behind your AOL Email not logged in can be the exhaustion of the Maximum Storage Limit of the AOL Email Account.
Server Down or Crashed – AOL Email’s site might be down or crashed for the time being resulting in AOL Email not working properly. Do visit the website in order to see if any such notification is provided from the company’s end or not.
Internet Speed – Do make sure that you are getting enough internet speed in your system. Slow internet speed can cause slow or delayed working in AOL Email.
Update Password / Login Credentials – Try to Re – Login your AOL Email account by changing its password and other login credentials.
AOL Email Application Update / Re-Install – Update or Re-install the AOL Email Application / Software on your PC / Desktop / Laptop / Mobile Phone. Update it using the software from the official AOL Email site only.
Clean Browser – Clear your browser’s cache and cookies. Remove the unnecessary add-on and plug-ins, if any, from your web browser.
Firewall – Temporarily disable the Anti – Virus in your system. There might be a huge chance that the Anti – Virus installed is creating a sort of firewall leading to improper working of the AOL Email account.
Reboot Your Device – Reboot your device is the easiest step that one can take in solving his/her login problem. After Reboot, re-login to your AOL Email Account
Incorrect AOL Email Settings – Do check whether the AOL Email Settings for both Incoming Mail Server and the Outgoing Mail Server is correct or not. If they are incorrect, then correct them as per the below-mentioned inputs –
For Incoming Mail Server –
User Name – Provide your user name or login ID
Password – Put your correct AOL Email Account Login Password
Server – imap.aol.com
Port – 993
Security Type – SSL
For Outgoing Mail Server –
User Name – Provide your user name or login ID
Password – Put your correct AOL Email Account Login Password
Server – smtp.aol.com
Port – 465 / 587
Security Type – SSL / TSL
Note – Here AOL Email Account’s Email ID domain will end with @aol.com & the Password setting will be in your hand. You can make any password you want but it must be Strong with at least 8 different characters. The password should not be disclosed to anyone as it is the security feature of your AOL Email account.
Contact the AOL Email Team via Email or Toll-Free Number and they will solve your query immediately. Do the above-mentioned screening in your device and we are pretty much sure that you will be able to login to your AOL Email Account with ease.
Source- Email support
0 notes
Text
Pro Tips To Schedule an Email In Outlook: Learn How
When sending an email, there are times where we’d preferably not answer right away. In case you’re arranging, for instance, you might not have any desire to appear or to answer the client immediately. Or maybe you would prefer not to give customers the idea that you’re reachable at the entire hours of the day and evening. There are various reasons that you can have to delay a message and guess what makes it Outlook as simple as applying butter on bread. When you can schedule an email in Outlook in advance to send it later, then why replying immediately.

Sometimes email teams or the business developers use this service to generate and schedule the promotional email for their customers. Hence, this makes sure that you won’t forget after five days that you have thought of an idea for emailing for customers on Monday. This service also saves you a lot of time, schedule in advance and set the time according to you, and save yourself from forgetting about it.
No matter what excuse you have to create an email in advance and scheduling it, setting up a message to send it later, is very basic in Outlook. With a tad of work, Outlook can spare you the difficulty of remembering to answer messages later. You just need to enable the delay or schedule setting in the Outlook. Here in this blog, you will get to know-how, therefore let’s start with the steps.
Schedule an Email In Outlook For Delayed Delivering
For Microsoft Outlook 2019, 2016, 2013, 2010 and 2007:
Microsoft Outlook supports the scheduling of the emails, hence, using this feature in your Outlook you can delay the delivery of the messages and can schedule a reply or mail that you need to send in the near future. Follow the below instructions to do the task:
Select New Email, or close an existing mail and choose Reply or Reply All or Forward.
In the message window, compose and address the message.
Now go to the Options tab, and select Delay Delivery.
In the Properties dialog box, you need to choose Delivery options sections and then select the “Do not deliver before” checkbox.
Set the date and time when you want to send the email.
Select Close.
Now, in the message window, select Send.
Go to the Outbox folder to find the email messages that are scheduled. But you have not been sent yet.
Now change the delivery time or date, open the email is a separate window.
Select Options >> Delay Delivery and reschedule the different send times.
Now, to send a scheduled email immediately, open the message in a separate window and select Send.
Steps for Outlook 2003 and 2000:
In the email message window, select Options >> Options.
Under the Deliver options, you need to select the “Do not deliver before” checkbox.
In the drop-down list set the desired delivery date and time.
Choose Close.
Select Send.
Now go to the Outbox folder to locate the scheduled emails.
When you change your mind and want to send the emails immediately or before the scheduled time, then follow the below steps:
Go to the Outbox folder and select the schedule email.
Select Options.
Now, in the More Options group, select Delay Delivery.
Clear the Do not deliver before checkbox.
Select Close.
Now choose to Send.
And this is how you can send your scheduled email immediately in Outlook. In Outlook you can schedule not only one but all your emails. You must be thinking- how, right? Then let’s move to the next section.
Schedule All Your Mails In Outlook:
You can create an email message template that automatically includes a send delay for all messages you create and send. This trick is handy and works well in those situations that you want to change or cancel that you just sent or you have sent and then regretting sending hastily.
You can schedule an email in outlook by adding a default delay to all the mails and prevent them from being sent immediately. This gives you an opportunity to do correction, or cancel then if it’s within the delay you create.
Hence, to create a delay in all your email of Outlook, follow the below steps:
Go to the File tab.
Select Info tab and click Rules and Alerts.
In the Rules and Alerts dialog box, you need to go to the Email Rules tab, select New Rule.
In the Rules Wizard, you need to go to the Start from a blank rule section, click Apply rule on the message I send, then select Next.
In the Select Condition(s) list, select the checkboxes for options that you want to apply to sent messages.
To apply a delay send to all messages, clean all the checkboxes, and click Next.
When you clear all the checkboxes, a confirmation box will appear on the screen. Here select Yes to apply the rule to all sent messages.
In the Select action(s) list, select the defer delivery by a number of minutes checkbox.
In the Edit the rule description list, now choose the number of.
In the Deferred Delivery dialog box, now enter the number of minutes you want to delay emails before you deliver them. The maximum is 120 minutes, then click OK.
In the Rules Wizard, choose Next.
Now in the Specify a name for this rule, text box, type a descriptive name.
Next, choose the Turn on this rule checkbox.
Select Finish.
In the Rules and Alerts dialog box, choose OK to apply the changes.
When you select the Send for any email, it is stored in the Outbox or Drafts folder. Then it waits the specified amount of time that you have set, and then automatically delivers to the receiver.
After this, your message will move from Outbox to Send items. And this is how you can delay or schedule your emails in Outlook. However, if you face any issue during the process, or if any error troubles you, then you can immediately contact the Outlook experts for the help.
Source - Email support
0 notes
Text
Easy Methods to Set up Bellsouth email on Apple Iphone
Apple iPhone permits you to set up many email accounts on the apple phone for accessing to your Bellsouth emails from anywhere with the proper Wi-Fi connection, or an Internet connection. The Bellsouth emails are easily and quickly accessible via the apple phone’s mail application. The full, and proper set up of the Bellsouth account provides you the capability to send email messages from the apple iPhone. So, the set up process of Bellsouth email is very easy, hassle-free, and accurate procedure for the users. So, users must take care of Bellsouth email settings for creating Bellsouth email on apple iphone.
What you should do before setting up the process?
If you have created a Bellsouth email account, you need to add it to the apple Iphone account. If you don’t have ideas for Bellsouth email account setup, you can follow easy and right steps for completing the setup process. If you are new to set up email on an iphone device, you can follow the detailed procedure explained below to access the Bellsouth email account on your apple iphone. Apart from this, if you want to set up Comcast email on the apple Iphone, you can call online technical professionals to get full technical guidance. In addition, if you want to set up Comcast email on iphone, it is very important for you that you have full information on Comcast email settings. For any doubts, you can call trained technical professionals anytime.
The full and accurate setup process of Bellsouth email on Apple Iphone-
We are going to explain some important instructions to set up the Bellsouth email account on the apple Iphone. These steps are very helpful to set up the Bellsouth email account on the apple Iphone. For any technical doubts, you can call online technical experts to get quick support or specialized help.
Step1- For apple iphone, you need to launch the Bellsouth email settings app
Step2- Next, you need to hit on contacts, mail, and calendar option
Step3- You are needed to hit on add the account button
Step4- You should hit on other button and choose add account
Step5- Then, you should give the login credentials of the Bellsouth email account.
Step6- Apart from it, you must give the password of the account and give the full description of the Bellsouth account
Step7- In addition, for the Bellsouth email settings, you have to hit on the POP button and enter the hostname as inbound.att.net correctly
Step8- You should give the Bellsouth email address and password to verify the incoming server.
Step9- Then, you must click on the “save” button and scroll down to search the advanced button correctly.
Step10- Additionally, you need to set incoming and outgoing usages to SSL with 465, and 995.
Step 11- Finally, you can click on the “save” option to set up the Bellsouth email account on the Apple Iphone successfully. With the help of the proper Bellsouth email settings process, you can enjoy the emailing services with your account.
All these instructions are extremely helpful to set up a Bellsouth email account on Iphone. Apart from this, if you want to set up the Comcast emails on apple iphone, you should have knowledge of Comcast IMAP settings to set up the email. For any confusion, you can call online technical professionals to get full technical guidance or specialized assistance.
0 notes
Text
How to set up AOL email settings through IMAP?
If you are looking for downloading AOL email, IMAP is an excellent option for any email client. If any user wants to access AOL email and wants to work with another email account holder, then IMAP is very important. Initially, you have to maintain the particular information about AOL mail and after that you need to work upon IMAP server settings. All your messages can be easily accessible along with AOL Mail IMAP server. Therefore, you must have AOL mail settings to get back the notification message.
Why do users prefer IMAP server settings?
AOL strongly recommends using IMAP settings on SMTP and POP3. Even though these protocols are highly supported by AOL email clients. On the other hand, there are some important factors that IMAP hits in terms of amazing features.
What do you mean by AOL IMAP settings?
When you set up your AOL email account to other email accounts, you should enter all essential information. It permits other email account holders to use their AOL email account. Here are some important AOL IMAP settings to get AOL mail client:
AOL Mail IMAP server address: imap.aol.com
AOL Mail IMAP username: You should enter AOL Mail email address
AOL Mail IMAP password: You must type AOL Mail password
AOL Mail IMAP port: 993
AOL Mail IMAP TLS/SSL necessary: Yes
Which Striking Features are available on other mail applications:-
Message Status- Users are not able to access unread messages and the users can’t observe the status of the sent messages. AOL mail permits that in the right ways.
Spam- Users don’t obtain the permission to use the report option. On other hand, AOL mails provide easy access to inform spamming messages that are totally unsafe.
Remove Mail- Various email applications have varied settings. Some permit observing the removed emails and some don’t display the removed emails.
Easy Steps to set up AOL mail using IMAP on Android Phone-
Step1- You can start just by selecting the mail option from your screen. You should enter your email address and password in the correct ways. Choose the “Manual setup process” button.
Step2- Select “IMAP” Button. Go to the next step for AOL IMAP settings. Follow next step
Step3- When you have selected “IMAP” button to ensure that to type the below settings and click on “Next” button and set up IMAP server as imap.aol.com
Set up security type to none
Set up Port type to 143 for IMAP
Secure-Port menu: 993, and safety type: SSL/TLS
Insecure – Port option: 143 and Security Type: None
Step4- Choose the “Done” button. Now, you are ready to use your AOL email properly. Thus, you can set up an AOL email account using AOL mail settings.
With the help of all these above explained instructions, you can set up AOL email using AOL IMAP settings successfully. Still, if you have any confusion, you can call online technical professionals to get complete technical guidance for this set up process. Online technical experts are available at helpline number to guide you properly. For more information about Comcast email settings, you can take complete guidance from trained technical experts.
0 notes
Text
How to Set Up Comcast Email Using IMAP?
Comcast email is one of the professional emailing platforms that come up with numerous exceptional features. Most importantly, setting up your Comcast account using IMAP is wise. However, you can easily enable IMAP for your Comcast email by logging using your Comcast credentials. All you need to apply some changes in the Comcast Email Settings so that you can do so easily. Apart from that, you should keep some information in mind before you begin to switch Comcast POP to IMAP.
Things to keep in mind:
POP doesn’t connect to the Comcast server.
With POP, you can’t sync with multiple devices.
IMAP connects to the Comcast server.
With IMAP, you can easily sync with multiple devices.
Here’s How?
Go through the steps discussed below:
On your very first step, you should visit the official sign up page of the Comcast.
Enter you should enter the login credentials such as email address and password.
Navigate to the setting option and change the Comcast email to IMAP.
Once you are done successfully, you will have to re-add your email to your account to the device you’re using.
How to setup Comcast Email on your iPhone?
Setting up the Comcast Email on your iPhone is as easy as a piece of cake. Here are the quick guidelines via which one can easily set up Comcast email set up in IOS. Check out the steps and implement carefully:
First of all, you should open the ‘Settings’ application on your iPhone.
Now, you have to select the option that says ‘Mail, Contacts, Calendars’.
After that, you will have to choose the ‘Add Account’ option.
Next, you should select the ‘Other’ and then select the ‘Add Mail Account’ option.
Here, you should enter your Comcast email address along with the password.
Tapping the ‘Next’ option will be your next step.
Congrats! You can now leverage your Comcast Email at its best.
After login to the Comcast, you should check and configure the Comcast IMAP Settings so that you can smoothly work on it.
0 notes
Text
How to Configure AOL Email Settings Using IMAP
If you want to download email, IMAP is meant to be the best option for any email client. Now in case any user wants to access AOL Mail and work with any compatible email client, IMAP is necessary. First, mention specific details about AOL Mail and then work upon the IMAP server settings. All your messages can be accessed with the AOL Mail IMAP server. Thus, you need to AOL Email settings to retrieve the notifications.
Why AOL prefer IMAP server settings?
AOL suggests using IMAP settings over POP3 and SMTP. Although both these protocols are supported by AOL. However, there are a few points that IMAP beats in terms of features.
Like: IMAP has the potential to sync the particular service with the AOL Mail account. Thus, whatever actions you perform on an email service or app also shows in the AOL Mail interface at AOL. But, POP fails to do so. Instead POP makes a copy of the email.

What are the AOL IMAP Settings?
At the time when you set AOL email providers to various other email providers, you will enter specific details. This allows other providers to use your AOL Mail. Below are some IMAP Settings to receive AOL Mail:
AOL Mail IMAP server address: imap.aol.com
AOL Mail IMAP username: AOL Mail email address
AOL Mail IMAP password: AOL Mail password
AOL Mail IMAP port: 993
AOL Mail IMAP TLS/SSL required: Yes
Which features are unavailable on other Mail Applications?
Below this article includes what other apps fail to have the feature over AOL email settings:
Message status: Unable to access unread messages and the user cannot see the status of sent messages. AOL mail allows that.
Spam: Users do not get permission to use the Report button. Whereas, AOL Mails gives access to report spam any messages that are harmful.
Delete Mail: Different email applications have different settings. Some allow seeing the deleted emails and some do not show the deleted emails.
Note: In some mobile apps when you try to set up AOL Mail, there is no need to enable IMAP settings. For example: If we talk about the iPhone Mail app, you simply need to open the iPhone's setting>Accounts section>select AOL icon. This phone is preconfigured with IMAP settings. You only need to mention the username and password.
AOL SMTP Settings
If you want to send a new email from your AOL Account, fill the SMTP settings details during the account setup to send the outgoing emails from your AOL Mail account. Below given are the details you need to fill in the required space:
SMTP Outgoing server address: smtp.aol.com
SMTP port: 465
SMTP security: TLS/SSL
SMTP username: AOL email address
SMTP password: AOL password
Technical Helpdesk
Did you follow the above-given steps for AOL Email IMAP Settings? If in case you could not receive the final result then there must be some technical issue. However, it’s not any giant issue that cannot be resolved. To rectify the issue, get in touch with the technical expert team and acknowledge them about the persisting problem. They are highly-skilled and will not take much time to share the solution. Availability is 24*7. Thus, you can connect with the group anytime.
Originally published on emailsupport.us
#AOL email settings#AOL imap settings#AOL mail settings#AOL email imap settings#AOL email settings using imap
0 notes
Text
How To Configure Bellsouth Email Settings For Outlook?
In the United States Bellsouth email service is quite famous. As States has a large number of customers of Bellsouth, therefore they also get into so many troubles related to it. Hence Bellsouth email settings require a bit of expert advice if you are not aware of it. When you decide on this email service provider you have to do setup first.

Are you unaware of the Bellsouth email setup process? Don’t you know how to proceed if you face any technical issues in it? Well, don’t worry here in this blog you will get all the solutions. The issues generally users face are either related to sign-up or send/receive an error. So, if you are facing any one of errors or some other issues then take the complete tour of the blog to get complete knowledge about it.
As so many users also use Outlook as their go-to email client, hence there you will also find the email settings about how to configure Bellsouth.net account on Outlook.
Bellsouth Email Settings For Outlook
Setting up the Hotmail account in Outlook.com is as simple as it sounds. While doing this you don’t need to do any manual configuration of incoming and outgoing servers. Just enter the credentials and sink emails and you are done.
But it is not the same case with third-party email clients. As some of them need to manually approach when configuring POP3 SMPT servers. If you have knowledge about the procedure then obviously it will be easy for you. However, if not then don’t worry you can easily set up the Bellsouth email by following our guide. Below is the guide to setup Bellsouth email in Outlook on Windows 10.
Open the Outlook client
Select File and click on Add Account
Now select “Manual configuration server setting or additional server types”
Click Next >> Yes on the new window
Next, you need to enter the Bellsouth email address and name
Select IMAP and POP and click on Next
In Incoming Mail Server: ‘imap.mail.att.net’In Outgoing Mail Server: ‘smtp.mail.att.net’
When prompted enter your email address and password
Click on More Settings and check both “My outgoing server (SMTP) requires authentication” and “Use the same settings as my incoming mail server” boxes.
Now click on Advanced tab and make sure that incoming Server port number for POP3 is 995
And ensure that Outgoing Server Port has- 465
Now, under SSL disable- Use the following type of encrypted connection.
Click Finish, the email setup process is completed now
Now you can enjoy your Bellsouth and Outlook mail in one place. If Outlook is your go-to email service provider don’t worry you won’t miss your Bellsouth email mails, because now you can access them on Outlook as well.
Troubleshoot Issues:
While setting Bellsouth email, configuring Outlook, or signing up if you face any error, you can consult with Bellsouth email expert for instant solutions. If you are facing the send and receive an error, you should look for all kinds of configurations that you have done recently. And still, find yourself unable to solve the issue, consult the Bellsouth skilled technicians to get the best solutions of the error.
By performing the above Bellsouth email settings you will be able to send and receive emails without facing any issue. Outlook will allow you all kinds of configuration options and settings, therefore ensure that you customize it according to your needs.
Originally published on emailsupport.us
0 notes
Text
How To Configure Outlook IMAP Settings With Outlook.com account
If you are looking for the Outlook IMAP settings, then you have landed on the right page. As there is no point for roaming here and there just get complete information on one thing. But here you will get complete guidance on the Outlook IMAP setup process with the Outlook.com account. As outlook is a popular email service provider all around the world, because of its advanced features. It also allows users to manage all things in one place. After setting up IMAP you can access over Outlook.com accounts even if you use it on a browser or app.

You will get complete guidance on- how to configure outlook IMAP with outlook.com account. It includes a few steps and changes in Outlook settings that you need to save to apply the changes. Is it sounding a little daunting? Don’t worry below we have explained all the information step-by-step below.
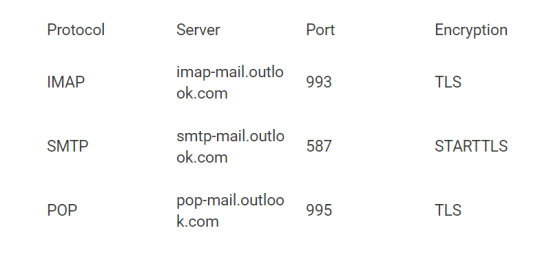
Configure Outlook IMAP Settings
To add your account to Outlook, Outlook on the web, Outlook.com or the Mail and Calendar apps for Windows 10, you need several pieces of information. The information includes account type, the incoming and outgoing server names, and the port and SSL settings.
And if you using a similar email service such as- Outlook.com, use the below-given table:
Follow The Step-by-Step Guide Instructions:
Open your Outlook and click on File Tab on the upper left corner of the Outlook Window

Now click on Add Account

Next, you need to select Manual setup or additional server types.
Click Next to proceed further.
In the Add Account window, under the Choose Service page, you need to choose one option among three.
Tick on Pop or IMAP. Click Next in the next window you will be asked to enter a few details:
Here you have to type your name and email address.
In Account Type drop-down – select IMAP.
Set Incoming mail server to imap-mail.outlook.com
Set Outgoing mail server (SMTP)to smtp-mail.outlook.com
Fill your Login information: Username and Password
After filling all the details you need to click on More Settings.

In the new window tap on Outgoing Server
Tick on My outgoing server (SMTP) requires authentication
After completing this, you need to tap on Advanced setting option
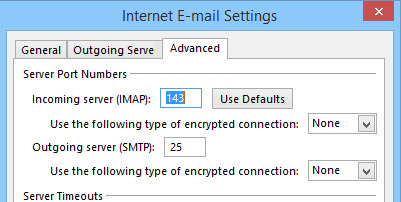
Under Server Port Number you need to fill information carefully
In ‘Set Incoming server (IMAP)’ enter- 993.
In ‘Use the following type of encrypted connection’ enter – SSL.
In ‘Set Outgoing server (SMTP)’ enter- 587.
In ‘Use the following type of encrypted connection’ enter- TLS.

Scroll down and click OK
Click Next and then Add Account window to test the settings.
Now Click Save to secure your changes.
Outlook.com IMAP Connection Errors:
While doing Outlook settings using IMAP, you may encounter an error if you configured your outlook.com account as IMAP in multiple email clients. Hence, to fix the connection in Outlook.com during the process you can try resolving with the help of the below steps.
Navigate to account.live.com/activity and sign in using the email address and password of the account that is affected.
In the Recent Activity tap, you need to locate for the Session Type event. This is a need because it will show you the exact time when you received the connection error. Click on it to expand.
Tick on ‘This was me’ to let the system clear authorize issues.
Attempt to connect to the account via your IMAP client.
If you want to get more information about- how to use the Recent Activity page, then you can go by- what is the recent activity page?
Conclusion:
Hence, the guide above will make you able to configure your Outlook setting using IMAP to access Outlook.com. However you find any issue while doing such, you can take expert help to solve it immediately. While configuring if you face any error other than connection issues, you can take expert help to rectify it.
Originally published on emailsupport.us
0 notes
Text
Easy Ways For The Configuration Of CenturyLink Email Settings
Want to create a CenturyLink email account? Well, for this first you have to perform a few CenturyLink email settings steps, after which you will be able to enjoy the amazing features. To enjoy the benefits of CenturyLink high-speed internet service, remember you should have the account. And today here in this blog you are going to learn about how to create the CenturyLink account. After creating the account you will be able to use its popular features about which you even don’t know.
Below we have given the best suitable steps to follow to create the Century link account and take all the benefits of it.
CenturyLink Email Settings Required To Create Your CenturyLink Email Account
As there are two ways to create the CenturyLink account and we have mentioned both the steps here in this blog. After reading about both, you can choose any option you want to go with. So, the first step is to create it when you install your service. And another way is that you can conveniently do it later when you feel like doing.
So let’s go with option one first.

Option 1: Create When You Install Your Service
When you install your new CenturyLink high-speed internet service, you will need its account as well to access it. Therefore, at the same time, you are prompted to create a login for your CenturyLink home page. And when you see that on your screen, do the following:
Choose “I want to create a new account as my login to my CenturyLink home page”
Click Next
Enter the email address or login
Then create the password to access
Next, when it prompts you to need to choose a secret question
Then give the answer corresponding to it
Now click Next
Congratulations! You have created your new CenturyLink email address successfully. If you face any technical issue while creating the account, you consult the experts for help.
Now let’s know the steps in option two.
Option 2: Centurylink Email Settings According To Your Schedule
If you have created at the time of installing the service, you can create it later according to your schedule. But in this option will need your Welcome letter or bill, so make sure that you have any one of those handy before you start.
First, go to centurylink.net
Next click on the Email button in green color
You will find it at the top right side
Now click on the Create Account button in green color
After performing these steps you need to follow on-screen instructions and choose your login or email address and create a password. Next, similar to the above option, create a secret question and then write the answer. It will help you to change CenturyLink email settings when you forget or unable to access your account.
If you have performed all these steps successfully, you will see a pop-up message on the screen of the new account. Now you can enjoy all the new and advanced features of CenturyLink email. With your CenturyLink email account, you will be able to access its high-speed internet service. After creating the account you should know how to access the mail and check emails. Hence, for this read further.
Check Your Mails Using Webmail
As you have successfully setup the email and can use it anytime you want to. Therefore, below we have mentioned the steps to use it successfully on Webmail. Follow the below steps:
Directly open the home of your CenturyLink email
Now click on the Email button
And then enter the username and password
Now click on the login button to see all your emails
The CenturyLink service provides you access to 10 additional customizable email addresses that you can use or share with other members of your family.
Conclusion
While using the CenturyLink email at any time if you face any issue or error that stops you to access your mail then you contact the experts. If you get send/ receive issue in your CenturyLink mail you can take the expert help. Other than this issue, if you have any other issues such as opening attachments or if you start seeing a mailbox full error, the expert can help you in resolving.
Originally Published on https://www.emailsupport.us/
1 note
·
View note