
Statistics
We looked inside some of the posts by darkcoffeeonly and here's what we found interesting.
Average Info
Notes Per Post
58
Likes Per Post
49
Reblog Per Post
9
Reply Per Post
0
Time Between Posts
5 hours
Number of Posts By Type
Text
4
Last Seen Tumblr Blogs


Fun Fact
Tumblr has 411 employees.
Text
Calibre & Plugins
After setting up Calibre, setting up FanFicFare, and changing the Look&Feel as you wish, the last step is to up your game regarding automatic synchronization.
Here it's where the Plugins come in.
I already covered FanFicFare and Spy Job plugins in the previous posts, now I'll go through some other plugins.
GoodReads
GoodReads Sync
Kobo Utilities (&Kobo Touch Extended)
Other Options
GoodReads

The GoodReads plugin allows you to download the metadata/cover from GoodReads.
Once you have it installed, you can search for a cover (from the Edit Metadata tool) and Calibre will search if it can find anything on GoodReads.
If you aren't satisfied with your match, and you know there's a better cover on GR, you can go to the GR page with the cover you want, copy the page url, go to the Metadata and click on the Identifiers icon. GR Id will be added to the Identifiers list.

Now that you have matched your calibre book with the GR page, you can search for the cover again and the new cover will be downloaded This is useful for your regular ebooks. Do not put fanfiction on GR!
GoodReads Sync

This plugin allows you to automatically update your GoodReads shelves from your Calibre (Set books as Read, TBR, etc)
The User Manual for this plugin is very clear, so if you wish to use this sync option, I strongly advise you to go through it.
This is useful for your regular ebooks. Do not put fanfiction on GR!
Kobo Utilities & KoboTouch(Extended)
These two plugins are very useful if your e-reader is a Kobo. I've been using a Kobo for ten years now, and I can sync my reading status and collections between my e-reader and Calibre through these plugins.
I've no idea if something similar exists for other e-readers/devices.
KoboTouch or KoboTouchExtended
These two plugins are used by Calibre when it sends the ebook to your Kobo (Send to device tool). They are very similar, the main difference is that:
KoboTouch is the default option (already available on Calibre) and it will send your books as epub
KoboTouchExtended plugin needs to be installed, it behaves mainly like KoboTouch but it converts the file from epub to kepub (Kobo own format) on the fly when you send your books.
The main features you can customize is in the Collections&Covers&Uploads tab

Here you can decide if you want to create collections on your Kobo created mirroring one or more columns on your Calibre.
And, most important when you dealing with WiPs, you can flag the option to "do not treat replacements as new books", so as not to replace the files when you are sending an update for a WiPs.
You can flag your needed options under Metadata and Extended so to suit your needs. For more information, check the mobilread thread
Kobo Utilities
Kobo Utilities plugin - among other things - allows you to sync the reading status between your Kobo and Calibre.
You need to create three custom columns where Calibre will take track of the reading %, the Last Read Timestamp, and a technical column (current reading location) that the plugin uses to calculate the %.

For more information, mobileread thread is your friend.
Once you set up Kobo Utilities plugin, when you connect your device, the plugin will search for any changes in your reading status and will ask you if you want to update your Calibre library:


At this point, you may want to automatically update also your "Read Status" column, so that it shows you "Read" if the % is 100%, "Reading" if it's < 100%, and DNF if you change the % to a negative value.
To do this, you need to create a custom column built from other columns.
In the template field, you need to insert the rule. This is the most difficult part of Calibre. There's a huge "help section" to understand how it works, but if you aren't technical-savy, you can search on mobileread if someone asked "how to do" something and copy&paste their configuration.
For example, a rule like the one I described above would need a formula like this (where #percent_read is my custom column with the % )
{#percent_read:'cmp($, 100, cmp($, 0, 'DNF', '', 'Reading'), 'Finished', '')'}

Kobo Utilities has also many more options (to replace covers already uploaded on the device, to update ToC for WIPs, to store/restore reading status TO the device and not only back to Calibre. For all these options, check the mobileread thread).
Other Plugins
These are only a couple of plugins that you may find useful, but not by any means the only one. Check the plugins list and Mobileread forum to check if there are other utilities you may like to add to your calibre.
Some other plugins that could be helpful are:
Reading List: To create Reading List in Calibre and sync them to the device, if needed
Count Page: To automatically calculate pages from any given ebook
Import List: To automatically update metadata from a CSV/other file
Epub Merge: To create anthologies
DRM Removal plugins (Not relevant for fanfictions, but you may want them for your regular ebooks collections)
Download your library books list
Finally, Calibre has the option to create a catalog of your books' list.
The tool is under "Convert books" menu

'Select the books you want to create a catalog for, then choose the format (CSV, others) and in the CSV/XML option flag which data (columns) you want to download.
Final thoughts
Calibre is an amazing and very powerful software that allows you to do a lot of things and to customize it to your needs.
These posts are in no way a complete guide: Learning the basics of Calibre is quite easy, but there's no end to the fine-tuning one wants to do. Once again, if you like it, mobileread (or the reddit sub) are wonderful places to ask questions and to check what other people are doing with their libraries. Good luck and have fun :)
11 notes
·
View notes
Text
Calibre - Look & Feel
After setting up Calibre, setting up FanFicFare, it's now time to change the User Interface so to personalize Calibre at its best.
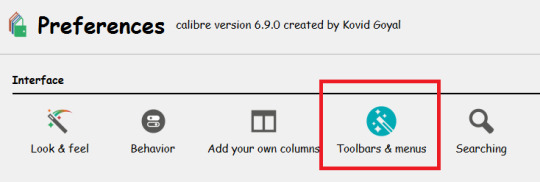
The standard Calibre UI can be changed by going to Preference -> Look & Feel menu:
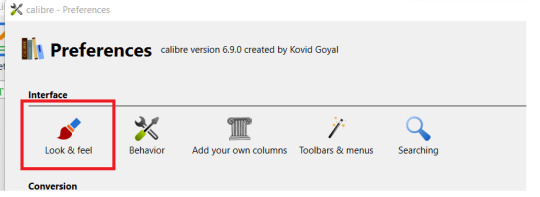
Main Interface
In the Main Interface menu you can play around the various options:
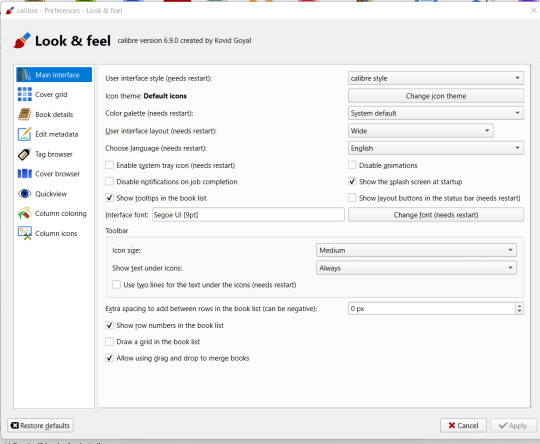
You can choose if you want to display the calibre style (and in this case if you wish to trigger the Night Mode, under "Color Palette") or your system default.
You can check and change the icon theme, by clicking on the "Change Icon Theme" button. Select the one you wish to try out and click on "OK"

Close the Look&Feel menu and the new icon set will be used instead of the standard one.
For example, this is the look of "Monstre" theme:
If you wish to have no icon at all on top, you can disable them. Or you can make them smaller (or larger). You can decide if you want to have the text displayed or not:

Finally, you can change the Interface font.
For example, if I don't want to have icon on the menu, and I want to use Comic Sans, this will be the final result:

Cover Grid
Calibre has two options to view your books list: the List View we talked about up to now and the Cover Grid, which shows the covers.
In the Cover Grid, you can tweak how you want your Cover Grid to look like. If you want to show additional information (the Title, or the Author, or whatever else), the background color/image, the size, etc.
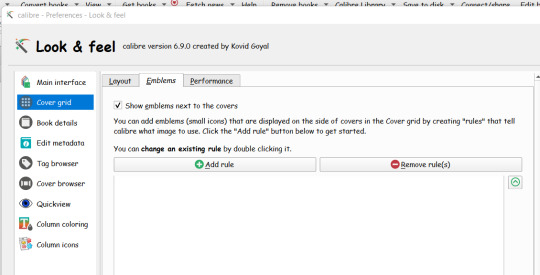
In the "Emblems" tab, you can choose to had an emblem to each cover following a rule. For example, let's say you want to show a "Completed" icon if the FF has been completed.
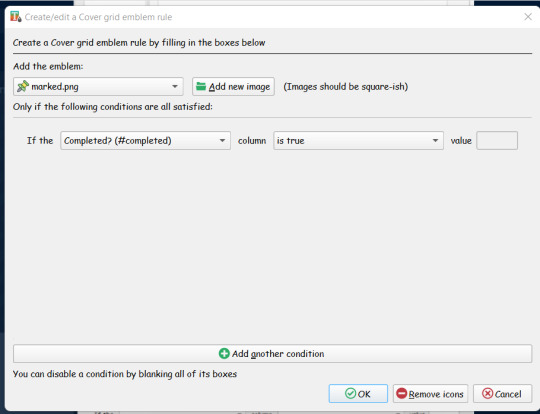
Go to Emblems, activate the "Show emblems next to the covers" option and then click on "Add rule"
When you click on Add Rule, you need first to upload the emblem you wish to use. You can search and find for icons on the web.
Then you can add your rule. When you click on the drop-down menu next to "If the", all your columns will be listed. Remember the "look-up" name of the column you want to test and select that one.
In our example, we want to test if a FF has been completed, so we will need to find the "#completed" column.
Once we selected the column, in the field next to "column" we can add the condition. Calibre automatically detects the type of data we are dealing with, so in this case we already have as option "is true"/"is false"/etc.
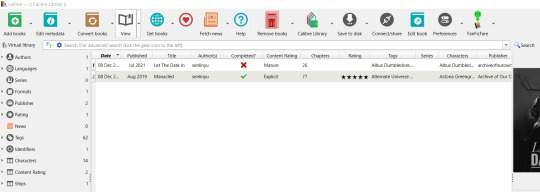
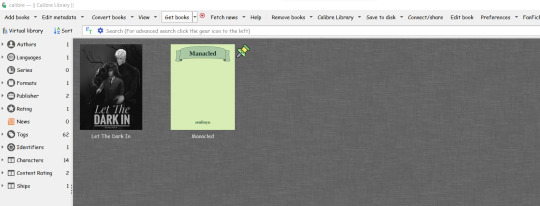
Confirm and go back to your books list. Click on layout on the right bottom bar and select "Cover Grid"

And here we are the final result:
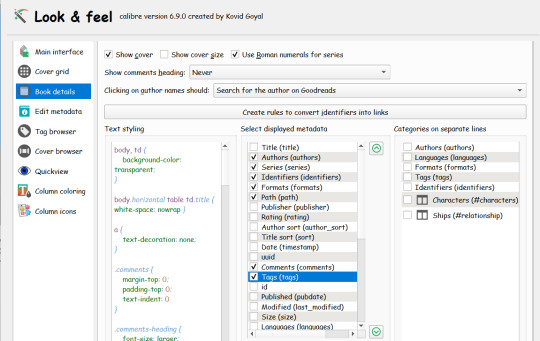
Book details
In the Book Detail tab, you can flag which infos are shown in the Book Detail (quickview) that is shown on the right side (if you are using the "Wide" layout option defined in the Look&Feel tab) or at the bottom (if you are using the "Narrow" layout option). If you are comfortable with CSS you can change the CSS, you can also order how the metadata should be shown, and select which action should Calibre do as default when you click on the Author name:
In the "Narrow" layout, the final result will be shown at the bottom:
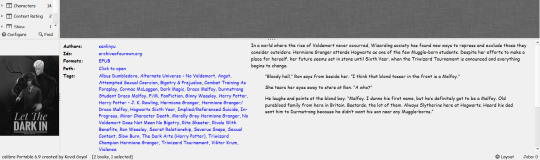
You can change its size (just drag the "three dots" around), or you can disable the "Book details" view from Layout -> Hide Book Details
Edit Metadata
The Edit Metadata tab is useful if you want to change the order of your custom fields in the "Edit Metadata" function and how they are displayed (separated from the standard one or together)
Tag Browser
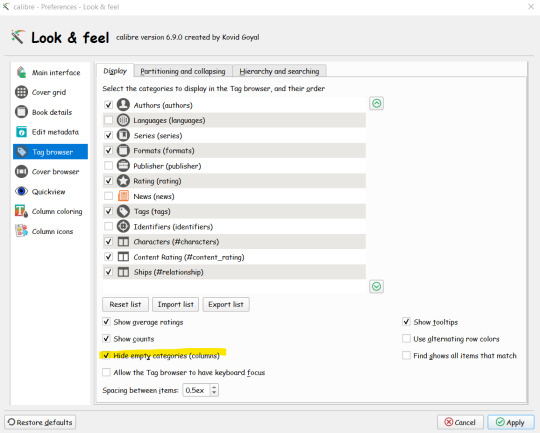
The Tag Browser defines how the tag panel on the left side is customized:
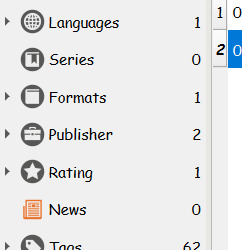
You can select which tags you want to be shown (you can hide/show tags also by right-clicking on the browser tag itself and hide/show the various tags). More importantly, you can decide to hide any tag that has no value
In the "Hierarchy & Searching" tab you can define which of your tags have a hierarchical structure.
By default all tags considered at same level, but Calibre allows hierarchical tags by interpreting the dot as your hierarchy separator.
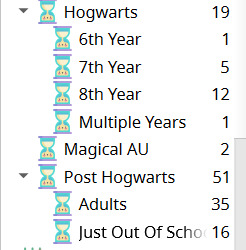
For example, if you want to create an "Era Setting" and use this hierarchy:
Hogwarts -> 6th Year
Hogwarts -> 7th Year
Hogwarts -> 8th Year
Post Hogwarts
Others
You will need to create a custom column (#hp_era_setting) and flag it as Hierarchical in the tag browser.
If you fill data as "Hogwarts.6th Year", Calibre will show the hierarchy like this:
Cover Browser // Quickview
I'm skipping this two tabs because I have never changed anything there. They can be used to change the Cover Browser and Quickview tools you can find under "Layout" icon (the same one you use to switch to the Cover Grid and to Show/Hide the Books details)
Column Coloring
Column Coloring tab is used to define how to change colors of a field based on any kind of rule.
For example, let's say you want to change the color of a row from black to gray if you have already rated a fanfiction.
You need to create a rule like this, in which you change the colour of all columns for all records in which the column "Rating" has been set
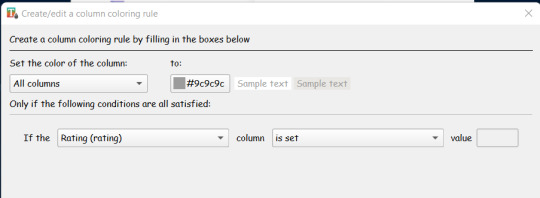
Here the result:

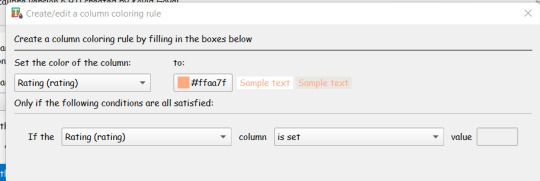
You can add multiple rules. So for example you want to change the color of your stars?
You need to add a rule in which you change the color of ONLY the Rating Column if a Rating has been set:

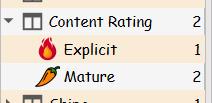
Column Icons
The last tab, "Column Icons" will allow you to add icons to column based on rules.
For example, let's say you want to show icons for the rating. You need to have rules like this one:
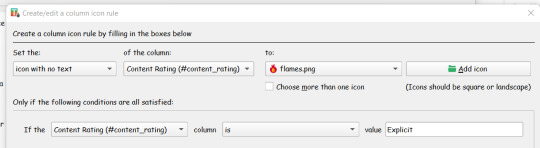
In which you are setting an icon (without text, if you don't want to see the actual column value) if the Content Rating value is "Explicit",
The result will be like this:

Changing the Tool Bar
You can also change the Tool Bar to add/hide menu options you are not interested in.
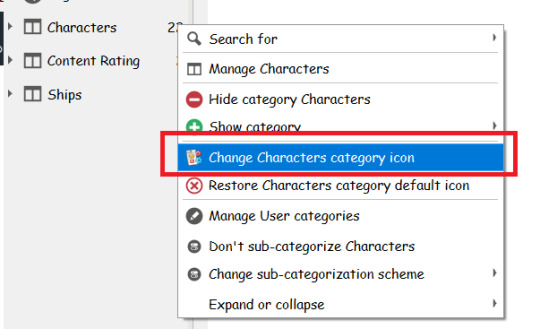
Changing the icons on the Tag Browser
You can change the icons in the tag browser by right-clicking on the tag you wish to change and selecting the "change icon" option:
Further customization
You can fine-tune the look & feel of your library through JobSpy Plugin.
JobSpy is a super complex plugin (which I won't pretend I know much about to start with) but for our needs we just needs two things:
Open the "Customize GUI Tools"
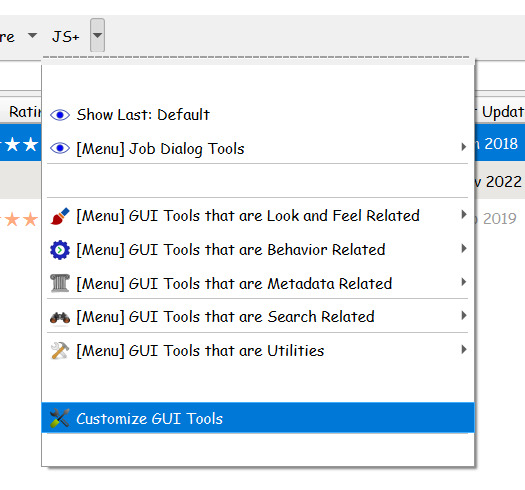
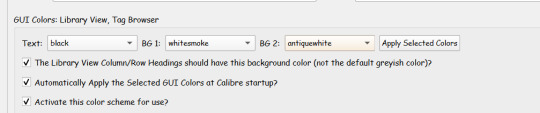
and scroll down till you find the GUI Colors: Library View, Tag Browser.
Here you can choose your color scheme and activate it:

2. By default when you change the icon on the Tag Browser, the new icon is used for all the items. But maybe you want to change the icons to match your "Column Icon" rule.
Select GUI Tools That are Look & Field Related -> Customize User Category Tag Browser
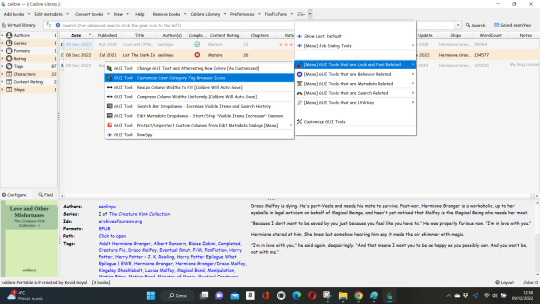
Select the tag you want to customize and the plugin will detect all the values currently used:

Browse your pc for the related icon and assign it to the value. You can review the assigned icon in the table.
Flag the option to apply them at Calibre start-up, and here you are the result:
Calibre Integration with GoodReads & your e-reader
In the next post I will go through some basic tools to integrate your calibre library to goodreads, to download goodreads cover and to set up your e-reader.
17 notes
·
View notes
Text
FanFicFare
You have downloaded and set up Calibre and added the FanFicFare plugin. Now it’s time to customize it.
After installing FFF, at restart a new icon will appear on your main menu.

Click on the arrow next to FanFicFare and select “Configure FanFicFare”
A pop-up will appear with all possible settings.
As with Calibre, I’m not expert, so I will go through my own configuration. If you need info/clarification, please refer to the official plugin page @ mobileread
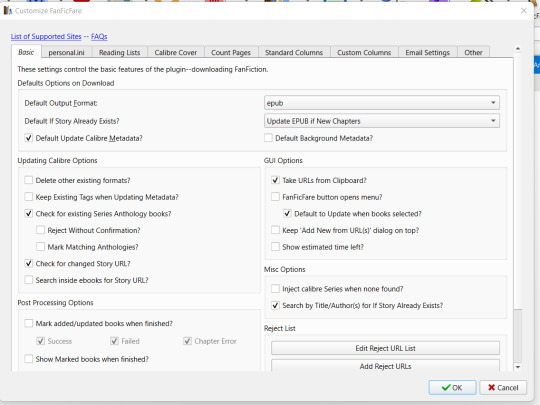
Basic Tab
As the name suggests, in the basic tab you can set the basic configuration.
You can choose the default output format (the type of file that FFF will download in Calibre).
You can choose which is the default action to be called on when you use the plugin.
You can hover with your mouse on the various options to get a short help. Personally, I haven’t changed any basic configuration.
Personal Ini Tab
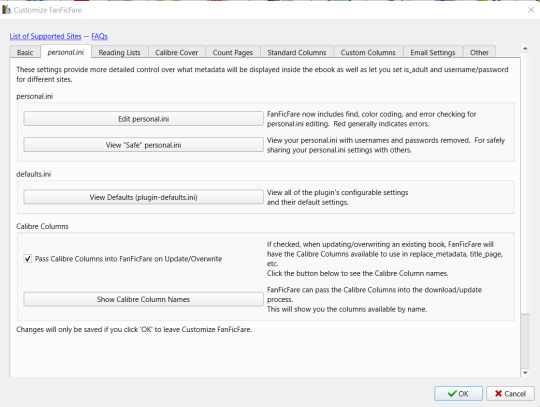
This is the most complex tab to use and configure where you can add more complex rules and metadata mapping.
Check the “Pass Calibre Column Names” to be able to use your custom columns.
Personally I’ve added only very few rules in my personal.ini and I still struggle with adding more complex configuration.
I’ll go into more details in a bit.
Reading Lists
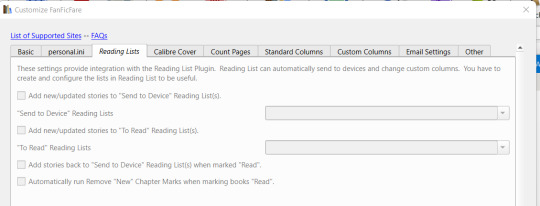
As the name says, the Reading List tab is used to configure how FFF interact with another Calibre plugin, the Reading List one.
Personally, I use it so to send automatically any new fics to my e-reader. I’ll explain more about this in a further post.
For basic FFF-Calibre integration, this tab is not necessary.
Calibre Cover
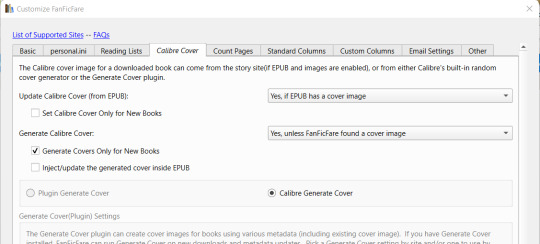
In the Calibre Cover you can decide what FFF needs to do with covers. You can set it to download the cover from the website (if present), or to generate a Calibre cover if none is found, or to use the Generate Cover plugin to automatically create a cover.
Count Pages
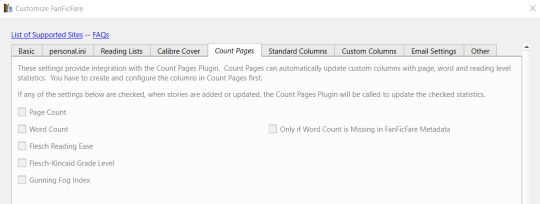
As the description explains, this tab is used only if you use the Count Pages plugin. If you have it installed, after any update, FFF will call automatically the Count Pages plugin to update data regarding Page and/or Word Count.
Standard Column
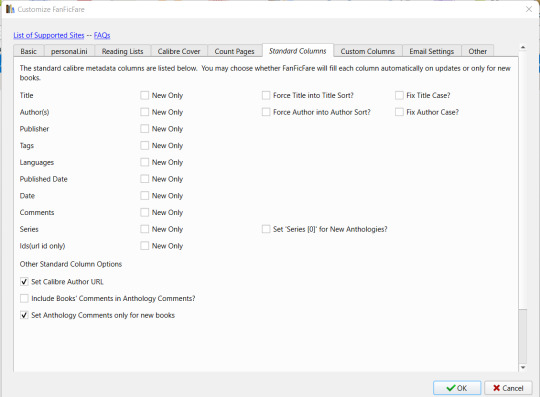
Here you see which are the standard columns FFF automatically maps. You can flag if you want FFF to update the fields at every update or only when it adds a fanfiction the first time.
Custom Columns
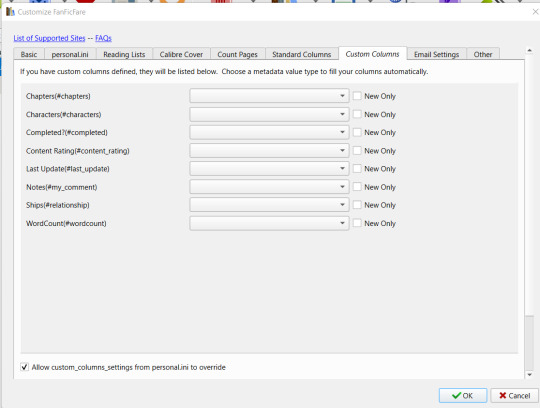
The Custom Columns is where you can add the automatic update of your custom columns.
The plugin lists all your custom columns and for any of them you can open the drop-down menu and select the matching metadata.
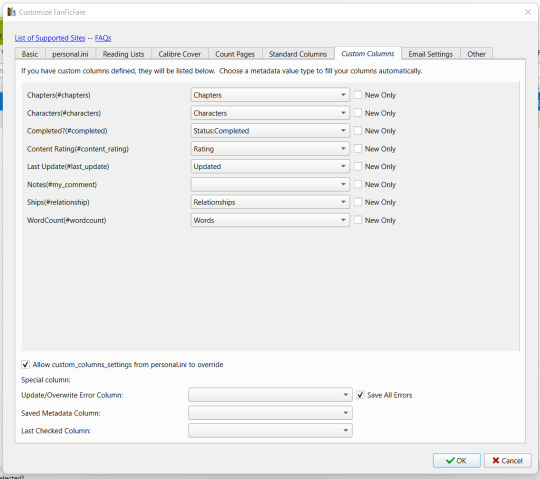
You can also set the special columns with debug kind of information. Personally, I don’t use them.
If a column doesn’t have a matching data (for examples, you have a “Kudos” column but you can’t find a “Kudos” matching data), you need to set this match in your personal.ini configuration under the appropriate website.
Email Settings
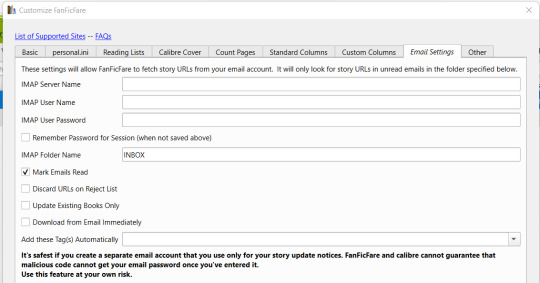
This are used to update automatically your fanfiction based on your email subscription. Personally, I don’t use this feature, I update the WIPs I’m following by manually triggering the update.
Once you are done, save your configuration.
Test it: download a fanfiction
You are now ready to test your configuration. Just click on the arrow and select “Download from Url” and copy & paste the url of the FF you want to download.
Click on “Show Download Options” to see which kind of update FFF will try to do and then confirm it by clicking on “OK”

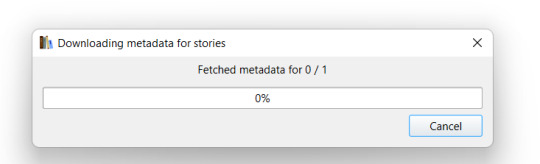
FFF will try and fetch your url:
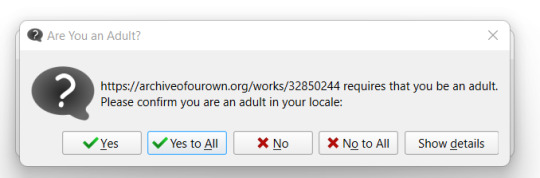
If necessary it will ask you to confirm you are an adult and/or to insert your username & passwords (if the archive requires them). You can avoid these steps by filling the needed information in your personal.ini:
After collecting the information, FFF will start the download. You can see the Job running on the bottom right corner
And at the end, it will show which kind of update is ready to do:
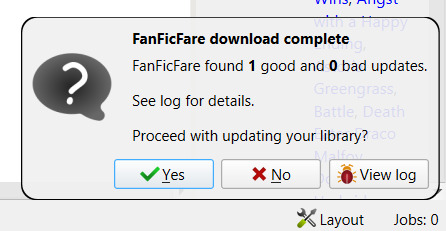
You can click on “View log” to review the update before going forward:

If you confirm, FFF will import the file and the data. And all the matching columns you have configured will be automatically uploaded as well:

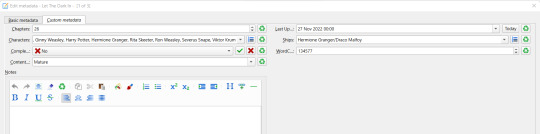
With no need to add anything manually. Of course you can now edit the data, but be aware that if you haven’t flagged the option to update the columns only on “New”, if you run an update for the FF your changes will be overruled.
If - for example - you want to change the tags, I’d suggest you to create a double column: the first one will be automatically updated everytime. The second column will be updated only on New OR never, and you will be able to maintain that without worrying for the plugin to change your data.
Massive download
The plugin can download more FF at the same time. You can either copy & paste all the urls in the “download from url” functionality or you can let the plugin search for urls in a given page.
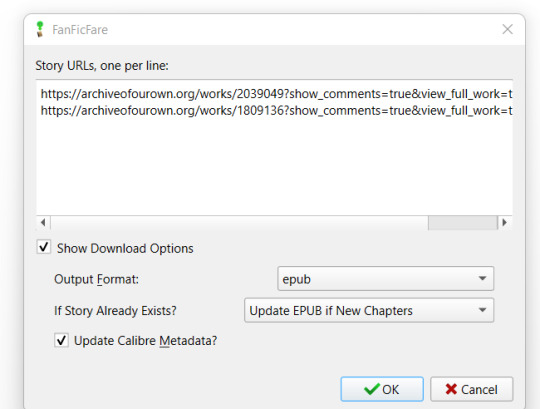
Let’s say you want to download all the FF you have saved in your “Bookmarks” page: just go to your Bookmarks page and then select the “Get Story URLs from WebPage” and copy&paste the url there.
The plugin will try to parse the link you submitted and list the individual story links:
and it will update your library with all the stories found.
Checking for Updates
You can check for updates at any time by selecting your fic(s) and clicking on the FFF icon.
The plugin will show you the links list and you can confirm your operation.
At the end, the log will show you if there is anything to be updated:
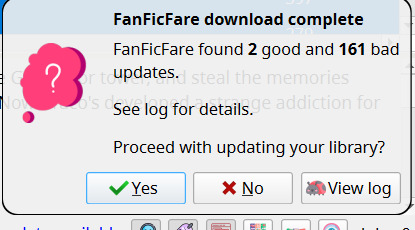
Again, you can the log to see what FFF found:

Confirm it to update your data and not only you will now have an up-to-date file on your library, but the metadata will be also be up-to-date:

Personal.Ini - Again
Now that I’ve explored some of the most basic options with FFF, let’s go back to personal.ini tab.
You may be tired to click on “Yes, I’m an adult” everytime you download something. Can you select “Yes” by default? Sure! Just go back in the personal.ini tab, click on “Edit personal.ini” and change the rule “is_adult” under default from “false” to “true”:

Do you want to stop typing user username and psw everytime an archive ask for it?
Just go under the archive name and add your username and psw:

You want also to track # of Kudos, Bookmarks and Fandom in apposite custom columns which are not available for easy “Custom Columns matching”?
Use the “add_to_custom_columns_settings” function and add them under the appropriate website. For example, this is my AO3 configuration:
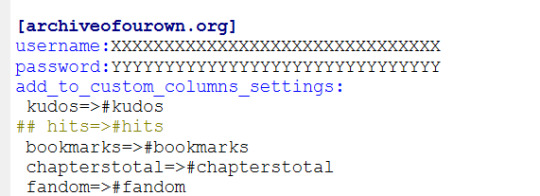
where I’m matching Kudos in my custom column #kudos and so on
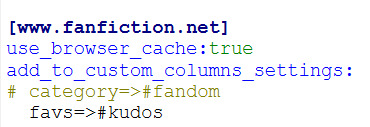
Then, since FF.net doesn’t have Kudos, but faves, I added that its “favs” needs to be matched with my #kudos column:
But speaking of FF.net, let’s go to its big issue: CloudFlare.
FanFiction.net issues
I’ll report what FFF help guide says on the matter:
Why am I having errors downloading from fanfiction.net? / Why am I getting 'Cloudflare' errors downloading from fanfiction.net?
As of ~Dec 2020, the site fanfiction.net has started using the Cloudflare service for protection from automated attackers.
Unfortunately, the distinction between 'automated attacker' and 'automated download tool' (such as FanFicFare) is a fine one.
For most users, Cloudflare blocks more aggressively than can be easily automated around. That's not surprising--it is their intention, after all.
There are two features in FanFicFare to side-step the issue of Cloudflare.
The first is the Browser Cache Feature, which, once configured, will look in your browser's cache for story chapter pages. See the Browser Cache Feature wiki page for further details.
The second is the Proxy Feature, which, once you have setup and run a separate proxy process and configured FanFicFare to use it, will run your requests through a proxy that has some ability to by-pass Cloudflare. See the Proxy Features wiki page for further details.
I still strongly recommend using email notifications for updates rather than using FanFicFare update to check for new chapters on lots of books.
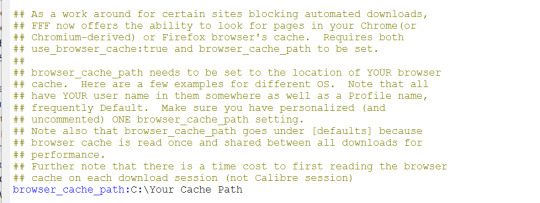
Personally, I’m using the Browse Cache Feature. To enable it, you just need to add “use_browser_cache:true” in your personal.ini under the configuration for fanfiction.net and to add in the default section your cache path:
At this point, you “just” need to go to FF.net, go through all chapters of the ff you want to download, and then run the plugin. Once the FF has been downloaded, when you need to update it, you need to go to the last/latest chapters before running the update.
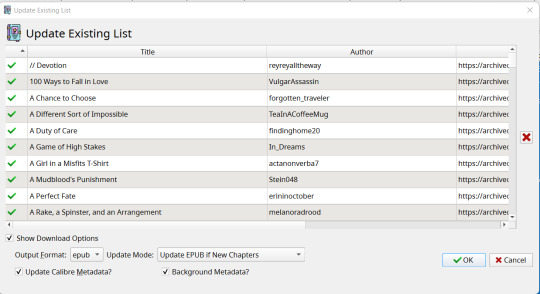
Adding new custom columns
If you add new columns over time and you want the plugin to update the metadata for the FF you have already downloaded, just run the plugin changing the Update Mode to “Update Calibre Metadata from Website”.
I don’t need to download the files, I just need the metadata
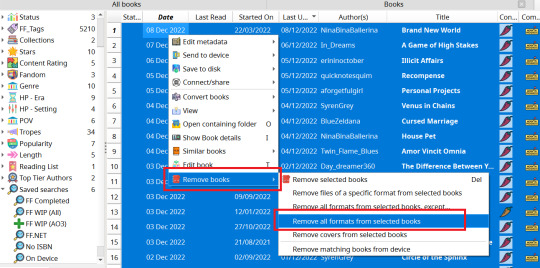
If you don’t want to archive a copy of the FF file on your pc, but you still want to take advantage from the automatic updates FFF can provide, you can remove the files from your library by selecting the rows and then go to Remove Books -> Remove all formats from selected books
This will move all the files to your bin folder, and you will still have all your metadata saved. You can also run again the update to match the metadata (remember to always select the “Update Calibre Metadata” option).
Prettify Calibre
Ok, now we have installed Calibre, got how FFF works, but the standard interface is not of my linking, how can I change it and make it prettier?
I’ll go over this in my next post.
15 notes
·
View notes
Text
Calibre & FanFictions
This post aims to explain how to use Calibre to create your own fanfictions collections, keep them updated and create (fancy?) main board for you to take track of your readings, your TBR and much more.
I’m in no way an expert of Calibre and I don’t know phyton nor I’m able to tweak beyond its basics. This post mirrors how I set up my Calibre over the years and some tricks I learnt on the way. If you wish to know more, refer to the official website and its resources (especially the mobilread forum).
What is Calibre?
Calibre is a free and open source software that allows you to organize your ebooks library, to convert between formats, to edit your ebook files (ie adding covers, ToC, changing the CSS), to transfer files to e-readers.
For a full list of its feature, please** refer to the official website**
Calibre is a pc (Windows, Linux, Mac) based software. It can’t run on Android/iOS (smartphone/tablet).
Download & Install Calibre
Calibre can be downloaded from the official website.
Once you have downloaded it, run the exe file.
It will ask you in which language you want to set the interface, where do you want to store your library (just pick/create a folder on your pc. Be aware that this folder will be the domain of Calibre software, you can’t change anything in it manually if you don’t want to corrupt Calibre database. You can select a folder shared over dropbox/onedrive, but to be on the safe side, be sure the sync process is disabled when you are running Calibre).
If you have an e-reader, select your brand and the device type during the basic configuration, otherwise just pick the Generic interface.

Click on Next and then on Finish. Your Calibre Library will open and it will show you something like this:

Calibre main tools
Adding Books Manually - Basic Procedure
On its own, Calibre can add and process any “ebook like” file (epub, mobi, pdf, etc) you have stored on your pc.
Let’s say you download a FF from AO3 using the “download epub” function.
Just click on “Add Books” and select the file. Calibre will add the file to its folder structure and will fill the metadata embedded in the file and that can be matched with its standard columns:

Clicking on “Edit Metadata” you can manually edit the metadata, generate a standard cover, browse your pc to add a cover, add links (to goodreads or archiveofourown) in the Ids (identifiers field).

For example, to add the link to archiveofourown, go to AO3 page for the fanfiction, copy it, go back to Calibre, click on the icon next to “Ids” and the link will be copied here.
Adding Custom Columns
Calibre comes with its own standard columns, but you will want to add your own columns to keep track of other things.
To add columns, click on Preferences -> Add Your Own Column. There you will see all columns available for the metadata.
Let’s say you wish to track also:
Characters
Relationships
Rating
AO3 Tags
Number of Chapters Posted
WordCount
When a FF was last updated
If a FF is completed or not
A free text where you can add your own comment
You will need to create 9 custom columns. Click on the “plus” icon to start creating them and choose which kind of column you wish to create.
For example, “Characters”, “Relationships”, “AO3 Tags” contain multiple values, so they need to be “Comma separated text, like tags, shown in tags browser” meaning that the text extracted from the “Characters” list will recognize the comma as separator and will treat each “text between commas” as a separate tag, to be shown on the tag browser.

Rating column will be a “Text column shown in tag browser” (since you don’t have multiple values)
Chapters and WordCount will be a Integers, since you will have numeric values there

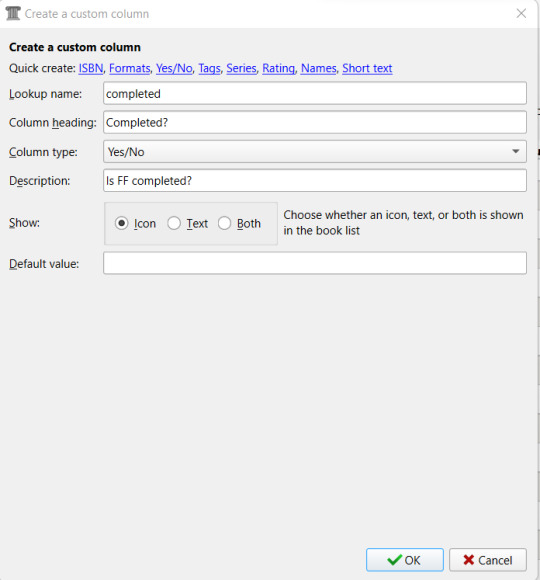
If a FF has been completed or not will be a Yes/No column
Last Update will be a date kind of column (where you can specify your preferred format):

And finally, “Your Comment” column will be a long text, “like comments, not shown in tag browser”. You can choose if it needs to parse HTML or not, and if you want to add a heading or not:When you have create the columns you need (but don’t worry, you can add/delete any column at any given time), click on “Apply”.
You can notice how all the custom columns you added are clearly marked.
Take also care of the “lookup name”. That’s how columns are referred everywhere else in Calibre.

After clicking on Apply, Calibre will ask you to restart so to load the new configuration. The new columns will be added at the end:

You can drag and drop them in any position you wish.
To add information, just click on the field or click on “Edit Metadata” again, where you will see now a second tab with the Custom Metadata.

Once you confirm, the data will be shown also in the main interface (where you can still edit them) and all columns you created as “to be shown in the tag browser” will be shown on the left panel:

FanFicFare - The Game Changer
Adding all infos manually is very time consuming, but you can save a lot of time using FanFicFare (FFF).
What is FanFicFare?
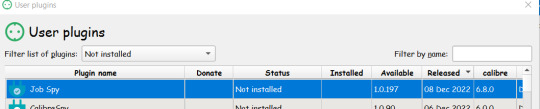
FFF is a plugin. As said at the start, Calibre is Open Source, meaning anyone can add to it and over the years many different people created various “add-ons” (plugins) to enhance Calibre experience. The plugins that have been officially validated can be found directly on Calibre by clicking on the arrow next to Preference and selecting the “Get Plugins to enhance Calibre” option.

Search for FanFicFare and install it (select to add it in the main toolbar):

In the next post I’ll go through FFF basics.
15 notes
·
View notes