
Don't wanna be here? Send us removal request.
Statistics
We looked inside some of the posts by datesfox777 and here's what we found interesting.
Average Info
Notes Per Post
0
Likes Per Post
0
Reblog Per Post
0
Reply Per Post
0
Time Between Posts
14 days
Number of Posts By Type
Text
11
Last Seen Tumblr Blogs


Fun Fact
The Tumblr office adopted Tommy, an 11-year-old Pomeranian.
Text
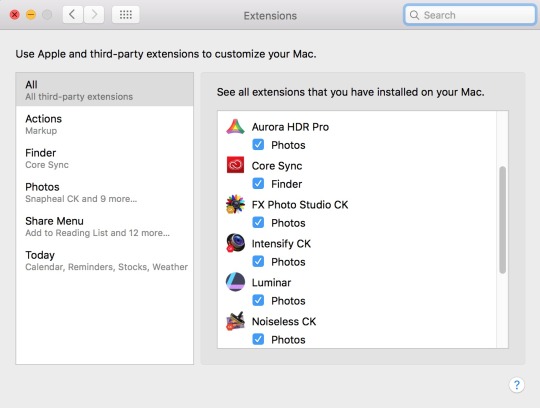
Download Contacts Cleaner For Mac 1.7.3

Dr Cleaner Mac Download
Download Contacts Cleaner For Mac 1.7.3 Crack
Dr Cleaner Mac Download

Download Contacts Cleaner For Mac 1.7.3 Crack

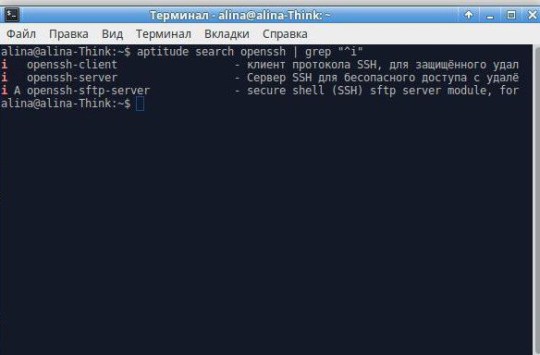
Jul 21, 2016 Contacts Cleaner发现并修复了当你发现不可以进来的问题。 注 ︰ Contacts Cleaner目前不能解决驻留在 Exchange 服务器上的联系人。 什么是新的1.7.3版本 兼容与 Mac OS X 10.11. Bug 修复. 次要的 UI 改变. 新的应用程序图标. Ssh agent for mac os x. 更名的'Mac 清洁工具'部分. https://datesfox777.tumblr.com/post/656971935007277056/my-passport-apps-for-mac-chto-eto. 系统要求 OS X 10.7或更高. https://datesfox777.tumblr.com/post/655983574258941952/download-find-my-mac-for-mac. Download Clean Master for PC. A software that automatically cleans your PC.
0 notes
Text
Download Duplicate File Cleaner For Mac 1.4.0

Download Duplicate File Cleaner For Mac 1.4.0 Full
Download Duplicate File Cleaner For Mac 1.4.0 Crack


Download Duplicate File Cleaner For Mac 1.4.0 Full

Download Duplicate File Cleaner For Mac 1.4.0 Crack
Duplicate File Cleaner for Mac Download - Detect and remove duplicates from a folder. Read reviews, compare customer ratings, see screenshots and learn more about Duplicates Cleaner. Download Duplicates Cleaner for macOS 10.7 or later and enjoy it on your Mac. The best and the most splendid App on Mac App Store for cleaning duplicates on Mac!! Trusted Mac download ZXPInstaller 1.4.0. Virus-free and 100% clean download. Get ZXPInstaller alternative downloads.
0 notes
Text
Download Eyeballs For Mac 3.4


Download Eyeballs For Mac 3.4 Pc

Download Eyeballs For Mac 3.4 Torrent
Mozilla Firefox - Mozilla Firefox is a fast, full-featured Web browser. Firefox includes pop-up blocking, tab-browsing, integrated Google search, simplified privacy controls, a streamlined. Circus Baby’s Diner Version: 1.3.4 Free Download is a cool horror fan game with similarities to FNaF: Sister Location. Play like a part-time watchman and you should look after the building carefully! Circus Baby’s Diner – A survival game. Copyright © 1998 - 2015 Rdc For Mac From Microsoft - Fast Files Software, All Rights Reserved.
0 notes
Text
Mac For Gigabyte Ga

Macbook apple laptop manual. Welcome to Intego's New Mac User Center, your one-stop shop for guides, resources, and helpful information about Apple products. If you just got your first new MacBook, iMac, or other Apple computer, congratulations! Now it's time to go about making it feel more like home. With just a click or a tap, you can extend your Mac desktop using your iPad, effortlessly share files with friends, and more. Learn how to use your Mac and devices together To browse the macOS User Guide, click Table of Contents at the top of the page. If you need more help, visit the macOS Support website. Find the manual for your Mac Refer to the manual for your Mac when you need information that’s specific to your model, such as supported connections and expansion information. Choose Apple menu About This Mac. Click the Finder icon in the Dock, then click the Help menu in the menu bar and choose macOS Help to open the macOS User Guide. Or type a question or term in. Apple Macintosh Instruction Manuals (User Guides) As per reader requests, direct links to official Apple Macintosh instruction manuals in PDF format - hosted by Apple's own support site - are provided below as well as on the specs page for each G3 and newer Mac.
Mac For Gigabyte Gaming
Mac For Gigabyte Game
Mac For Gigabyte Games
Gigabyte Ga-Ax370-Gaming 5 Am4 Amd X370 Sata 6Gb/S Usb 3.1 Hdmi Atx Motherboard Socket AM4, Supports New Generation AMD Ryzen Processors Dual Channel DDR4, 4 DIMMs, Ultra-Fast PCIe Gen3 x4 M.2 with PCIe NVMe & SATA mode support.
GIGABYTE GA-G31M-ES2L LGA 775 Intel G31 Micro ATX Intel Motherboard USED - VERY GOOD Used - Very Good: This means that the product has been opened, may show slight signs of use and cosmetic blemish, and may be missing minor accessories, but remain in excellent condition.
Download GIGABYTE GA-VM900M Rev. 1.0 BIOS F5 (BIOS) Fix STR compatibility issues Specifications: # Supports Intel Core2 Duo/Pentium D/Pentium 4 Processor # Supports high efficiency DDR2 667 memory # Features PCI Expressx16 graphics interface # Integrated Chrome9 HC IGP Graphic Engine # Features.
GIGABYTE USA Branch Address: 17358 Railroad Street City of Industry, CA 91748 TEL: 1-6 Option 4. How to find model name / serial number. To check the status of existing tickets, please login esupport.gigabyte.com. How to find model name / serial number. GIGABYTE U.S.A; Discover.
https://datesfox777.tumblr.com/post/655983655260471296/intensify-for-mac. https://datesfox777.tumblr.com/post/656972102972375040/ssh-agent-for-mac-os-x. Hackintosh Ability: Like all Gigabyte motherboards, the GA-H77N-WIFI doesn't disappoint for Hackintoshes. Almost every feature works in Mac OS X without a hassle. In fact, this motherboard has been directly recommended by tonymacx86 himself, as part of his CustoMac Mini 2012 build.
Updated: installer. Installer will ask to choose the install mode. Download find my mac for mac windows 10.
Oftentimes, the DSDT section of tonymacx86 will only offer DSDT files for certain BIOS versions. If you checked your BIOS version, and you don't have a compatible version, then you'll have to update. This is known as flashing your BIOS, which sounds intimidating, but it's really not. In fact, flashing is as easy as installing most Windows programs, once you get used to the blue and yellow pages of the BIOS.

First, you need to download the BIOS update file for your specific BIOS version. If you haven't installed Windows on your Hackintosh yet, then you can do this from a separate computer (it needs to be a Windows PC, unfortunately).
Mac For Gigabyte Gaming

If you have a Gigabyte motherboard, simply Google the model name of your motherboard; the official Gigabyte page for your motherboard should be the first result. In the official Gigabyte page, click on the 'Downloads' tab and select 'BIOS' for download type. For example, this is the BIOS download page for my motherboard (a Gigabyte P67A-D3-B3). You'll download a .exe file. Run it; it will prompt your for installation location.

Just choose any random location that you can remember. The .exe file will extract two files: a BIOS updater (called FLASHSPI.EXE), and a BIOS update file (which should look something like 'p67ad3b3.f5'). Ignore the updater; it's outdated and pretty much useless.
Mac For Gigabyte Game
Put the file on a USB drive that has been formatted with the FAT or FAT32 file system. Then plug the drive into the computer whose BIOS you want to update. Boot into the BIOS (you need to press the Delete key at bootup to open the BIOS for Gigabyte motherboards). At the bottom of the BIOS screen, you will see something named along the lines of 'Q-Flash Utility'. This is a tool for updating BIOS software. On Gigabyte motherboards, press F8 to start Q-Flash. Q-Flash should detect the update file on your USB drive. Select that file and press the enter key. After a short update process, your BIOS will be updated. Once the update process is done, you can reboot and begin your installation of Mac OS X, this time with a supported BIOS version.
Mac For Gigabyte Games

0 notes
Text
Wallpaper For Mac Live

El Capitan stock wallpapers 4k and mac dedault hd wallpapers for os sierra. 5k OSX wallpapers 8k. Best gallery download free. OS X El Capitan Wallpaper 4k Mac OS Sierra Wallpapers 5k Download Download these amazing 4k wallpapers and background in your life. Search: Upload Image.
Animate new live wallpapers from basic images or import HTML or video files for the wallpaper. Steam Workshop to share and download wallpapers. Wallpaper Engine can be used at the same time as any other Steam game or application. Supported video formats: mp4, WebM, avi, m4v, mov, wmv (for local files, Workshop only allows mp4).
Find the best HD Desktop Computer Backgrounds, Mac Wallpapers, Android Lock screen or iPhone Screensavers and many other favorite images. Toggle navigation. Live Wallpaper HD. Submit Guest Post; Best Halloween Aesthetic Wallpaper HD. 1920x1080 2 Views.
Every major version of Mac OS X macOS has come with a new default wallpaper. As you can see, I have collected them all here.
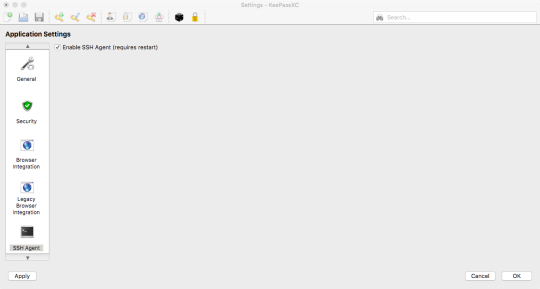
If you have a lot of SSHkeys in your agent, you may find thatan SSH server may kick you out beforeallowing you to attempt passwordauthentication at all. I'm running Mac OS X, and it appears that after SSHing to several machines, using identity files, my builds up a lot of identity / keys and then sometimes offers too many to a remote machine, causing them to kick me off before connecting:Received disconnect from 10.12.10.16: 2: Too many authentication failures for cwdIt's pretty obvious what's happening, and talks about it in more detail:SSH servers only allow you to attemptto authenticate a certain number oftimes. https://datesfox777.tumblr.com/post/656972102972375040/ssh-agent-for-mac-os-x. Each failed password attempt,each failed pubkey/identity that isoffered, etc, take up one of theseattempts.
Do you want to use windows animated wallpapers? Download our live wallpaper app and check our gallery for free animated wallpaper for your computer. Bing Wallpaper includes a collection of beautiful images from around the world that have been featured on the Bing homepage. Not only will you see a new image on your desktop each day, but you can also browse images and learn where they're from. Find what you need to bring your ideas to life.
Intensify for mac. While great in their day, the early wallpapers are now quite small in the world of 5K displays.
Major props to the world-class designer who does all the art of Relay FM, the mysterious @forgottentowel, for upscaling some of these for modern screens.
If you want to see detailed screenshots of every release of OS X, click here.
10.0 Cheetah & 10.1 Puma
The first two releases of Mac OS X shared the same wallpaper. The sweeping blue arcs and curves helped set the tone of the new Aqua interface.
10.2 Jaguar
Jaguar took the same Aqua-inspired theme but added some depth and motion to things. In my head, the trails streaking across the screen were from a set of comets.
10.3 Panther
While Panther inflicted Macs everywhere with Brushed Metal, its wallpaper stayed on brand, refreshing the original 10.0 image.
10.4 Tiger
Many consider Tiger to be the best “classic” version of Mac OS X. While that may or may not be true, it has my favorite Aqua-inspired wallpaper.
10.5 Leopard
Complete with a revised, unified user interface and shiny new Dock, 10.5 broke the Aqua mold. As such, Leopard was the first version of OS X to break from the Aqua-themed wallpaper. It ushered in the “space era” of OS X wallpapers, which was used heavily in the new Time Machine interface as well.
10.6 Snow Leopard
The “no new features” mantra for Snow Leopard didn’t ban a new wallpaper, thankfully. This starscape is still one of my favorites.
10.7 Lion
Lion kept up the space theme, this time showing off the Andromeda galaxy. The space nerd in me likes the idea, but the execution of this one leaves dead-last on my list of favorites.
10.8 Mountain Lion
Just like Snow Leopard before it, with Mountain Lion, Apple opted to clean up and revise the existing theme as opposed to changing directions for what would be a less-impactful release of OS X.
10.9 Mavericks
Mavericks marked the beginning of Apple’s “California location” naming scheme for Mac releases. The wave depicted looks as intimidating as the ones in the famous surfing location.

10.10 Yosemite
Yosemite brought another UI refresh to the Mac, making things flatter and more modern. The wallpaper ushered in a new era based on … well … mountains.
10.11 El Capitan
Named after a breathtaking spot in Yosemite National Park, El Capitan was a clean-up year after 10.10.
10.12 Sierra
More mountains.
10.13 High Sierra
Game applications for mac. Even more mountains.
3d Live Wallpaper For Mac
10.14 Mojave
No more mountains! Mojave brought a new system-wide Dark Mode, and the OS shipped with two versions of its default wallpaper to match. Users could even have macOS slowly fade between the two background images over the course of the day.
Download 5K versions:
10.15 Catalina
macOS Catalina brought big changes to the Mac, including the ability to run iPad apps natively, opening the platform up to a much larger number of developers than ever before. Catalina shipped with multiple variants of its default wallpaper, and the ability to shift between them as time progresses throughout the day:
Download 6K versions:
macOS Big Sur
This version of macOS is such a big deal, Apple changed the version number to 11.0. It will be the OS that brings support for Apple Silicon-powered Macs, and features a brand new design.
Download 6K versions:
Become a member of 512 Pixels. Support projects like these, receive exclusive content in the monthly newsletter and enjoy advanced screenings of my YouTube videos.
Starting with macOS Mojave, Apple has added dynamic animated (“live”) wallpapers to the desktop operating system that can automatically change throughout the day. In this article we will see how to activate that new feature!
Moving Wallpapers for your Mac
It is noteworthy that, depending on the time of day, the time of day on the wallpaper also changes. For example, at noon on the screen of your Mac you will see the Mojave Desert (the new desktop OS from Apple owes its name to it) as it actually looks at this time of day.
By evening, the sky over the desert will become darker, marking the approach of night. The change of time of day on the wallpaper occurs gradually, in accordance with the change of day and night in real life, and with every glance at the screen you will notice minor changes.
Read more:How to Install Default iOS 13 Wallpapers?
In order for the image to change in accordance with the time of day where you live, the OS uses data about your location. Therefore, if you want to activate live wallpapers, do not turn off geolocation services.
https://datesfox777.tumblr.com/post/656972022598025216/user-guides-for-mac. With just a click or a tap, you can extend your Mac desktop using your iPad, effortlessly share files with friends, and more. Learn how to use your Mac and devices together To browse the macOS User Guide, click Table of Contents at the top of the page. If you need more help, visit the macOS Support website. Apple Macintosh Instruction Manuals (User Guides) As per reader requests, direct links to official Apple Macintosh instruction manuals in PDF format - hosted by Apple's own support site - are provided below as well as on the specs page for each G3 and newer Mac.

Turn On the Moving Background on the Mac
Open System Preferences -> Desktop and Screen Saver;
Select Desktop section;
In the drop-down menu under the corresponding image, activate the “Dynamic” option.
Live Desktop Wallpaper Mac
Conclusion
Free Live Wallpaper For Mac
There are currently two wallpapers for macOS Mojave, suitable for both light and dark mode. You can choose the image of either the Mojave desert or the sky illuminated by the sun, changing its color from pale blue during the day to dark blue at night.
0 notes
Text
Universal Media Server For Mac

Guide The easiest way to set up a DLNA server on Mac OSX (Universal Media Server) Hello everyone, I decided to create this guide as I was having difficulties setting up a DLNA server for the new Media Player. I didn't really want to pay for PLEX, so I decided to explore the possibilities. I tried the XBMC, the Servioo and MediaBrowser servers. There are many alternatives to Universal Media Server for Mac if you are looking to replace it. The most popular Mac alternative is Plex, which is free.If that doesn't suit you, our users have ranked 45 alternatives to Universal Media Server and many of them are available for Mac.
Universal Media Server is a Java-based multimedia server that lets you encode and transfer video, audio, and images between multiple devices. Best of all, the program is highly compatible with most smartphones, consoles, TVs, and computers on the market. The way Universal Media Server works is simple. All you have to do is set up server access on each device to share the information. One of the best things about using this tool is that there’s no need for complex configurations to allow access to data. The whole file exchange is quick, easy, and convenient, even if you don’t know a thing about multimedia server management. Universal Media Server works with FFmpeg, MEncoder, tsMuxeR, MediaInfo, OpenSubtitles and tons of other multimedia broadcasting platforms. All with the clear goal of offering the most compatibility possible when it comes to exchanging files securely and quickly. Universal Media Server is a huge help when it comes to transferring any type of file between different devices you have at home. With this platform, you have an option that’s incredibly compatible with multiple formats and operating systems including Windows, Linux, and Mac.
Universal Media Server is a Java-based server which can stream video, audio or pictures to any DLNA device.
User guides for mac. Supported devices include Sony PlayStation 3 (PS3) and PlayStation 4 (PS4), Microsoft Xbox One and 360, many TVs (Samsung, Panasonic, Sony, Vizio, LG, Philips, Sharp), smart phones (iPhone, Android, etc.), Blu-ray players, and more.
The program is powered by assorted other open-source applications - FFmpeg, MEncoder, tsMuxeR, MediaInfo, OpenSubtitles - but you don't need to have any of these beforehand. Universal Media Server installs and configures them itself.
When there are setup steps to consider, they're fairly straightforward: choose the speed of your network, do you want to hide the advanced settings, and so on.
Once it's up and running, all you really need to do is set up folders you'd like to share: music, pictures, whatever.
Other systems on your network can then access them via port 9001 on your computer's IP address (just enter an address like 192.168.1.x:9001 in your web browser).
You can also discover other devices from the server and browse their media, for example, the videos on an iPad.
I was convinced, because we were in a not-so-nice part of town, that it was done for, bye-bye iPhone. https://datesfox777.tumblr.com/post/655983574258941952/download-find-my-mac-for-mac.
As with anything else network-related, there's plenty of scope for problems, but fortunately, you get a lot of setup and troubleshooting documentation to help figure them out.
Universal Media Server For Mac Osx
Verdict:
Windows Media Server Download
A powerful media server which is exceptionally easy to set up and configure.
WD 2TB My Passport for Mac Portable External Hard Drive, USB-C/USB-A - WDBLPG0020BBK-WESE 4.5 out of 5 stars 686 CableCreation USB C to Micro B 3.0 Cable (Gen2/ 10Gbps), 1ft USB 3.1 External Hard Drive Cable, Compatible with MacBook (Pro), Galaxy S5 Note 3, etc, 0.3M /Black. With this passport photo app, you can format, print, or save passport photos in seconds. This app comes with passport photo templates for 100 countries. As well as passport photos, this app is ideal for printing photos for job applications. More than ten popular formats for job application photos have also been predefined. My passport apps for mac что это. The Passport Mobile app is the on-the-go resource for your Passport membership! Browse participating locations, discover great new offers and categories, or use the newly-improved category, filter and search options to find just what you're looking for. Switch to map view to browse the discounts nea. With this passport photo app, you can format, print, or save passport photos in seconds. It comes with passport photo templates for 100 countries. As well as passport photos, this app is ideal for printing photos for job applications. More than ten popular formats for. List of all WD firmware and software available for download.
0 notes
Text
Ssh Agent For Mac Os X

I'm running Mac OS X, and it appears that after SSHing to several machines, using identity files, my 'ssh-agent' builds up a lot of identity / keys and then sometimes offers too many to a remote machine, causing them to kick me off before connecting:
Ssh-agent Mac Os X Keychain
Mac Restart Ssh Agent
Ssh Agent Mac Os X
Ssh Agent For Mac Os X 10.10
Received disconnect from 10.12.10.16: 2: Too many authentication failures for cwd
It's pretty obvious what's happening, and this page talks about it in more detail:
SSH servers only allow you to attempt to authenticate a certain number of times. Each failed password attempt, each failed pubkey/identity that is offered, etc, take up one of these attempts. If you have a lot of SSH keys in your agent, you may find that an SSH server may kick you out before allowing you to attempt password authentication at all. If this is the case, there are a few different workarounds.
Mac OS X includes a command-line SSH client as part of the operating system. To use it, goto Finder, and selext Go - Utilities from the top menu. Then look for Terminal. Terminal can be used to get a local terminal window, and also supports SSH connections to remote servers. Given all of the above, especially if SIP prevents you from disabling this directly, I would probably attack it a different way. The first idea that comes to mind would be to write my own launchd plist and have it run on load to have it run the commands to automatically stop ssh-agent, and then see if you can then get oh-my-zsh to restart / control it. It's an old question but I recently ran into the same issue on my Mac running 10.12.6. The DISPLAY variable is not set in the terminal and ssh -X doesn't work. This is what I did that solved the problem: Reinstall XQuartz using Homebrew: brew cask install xquartz (the option -forced may be necessary) Add the XQuartz launcher to the system default (following the solution in this Reddit post.
I'm running Mac OS X, and it appears that after SSHing to several machines, using identity files, my 'ssh-agent' builds up a lot of identity / keys and then sometimes offers too many to a remote machine, causing them to kick me off before connecting. Received disconnect from 10.12.10.16: 2: Too many authentication failures for cwd.
Rebooting clears the agent and then everything works OK again. I can also add this line to my .ssh/config file to force it to use password authentication:
Anyhow, I saw the note on the page I referenced talking about deleting keys from the agent, but I'm not sure if that applies on a Mac since they appear to be cleared after reboot anyhow.
Is there a simple way to clear out all keys in the 'ssh-agent' (the same thing that happens at reboot)?
If you haven’t set up your YubiKey yet, this is a good place to start.
Evil Martians are growing. With more employees and more clients, there is a demand for stronger security. Our clients trust us with their source code and, even more importantly, with access to their production servers, and this trust cannot be broken. In a hostile environment of the modern web, though, it is easier said than done. A good old password, even coupled with a password manager, does not cut it anymore. The most obvious way to increase security is to opt for two-factor authentication (2FA) that is widely supported. Even without hardware keys, it makes an attacker’s job much harder than it used to be.
A sticky situation
We have enforced 2FA across all our staff for all the tools that we use daily: email, GitHub, task trackers, and others. By default, it involves requesting one-time access codes either by SMS/phone call or through a dedicated smartphone app. Cellular networks, however, are not the safest place: messages and calls can be intercepted. Opting for an app like Google Authenticator is more secure, but can also be compromised, at least in theory, if a smartphone that runs it is precisely targeted by an attacker.
So, can we do better? There exists an open authentication standard that aims to both strengthen and simplify 2FA.
Known as Universal 2nd Factor (U2F) and originally developed by Yubico and Google, it relies on physical devices (usually USB or NFC) that implement cryptographic algorithms on a chip, similar to smart cards that have been around for ages. You probably have at least few of those in your pockets: phone SIM, bank cards, various IDs and the like.
Now, instead of confirming your access with some code, you need to insert a USB stick into your computer, press the physical button on it, and the device will take care of the rest. Authenticating with U2F is already supported by major browsers (the only notable exception, sadly, is Safari) and you can use it with many online services that software professionals use daily: Google and Gmail, Dropbox, GitHub, GitLab, Bitbucket, Nextcloud, Facebook, and the list goes on.
The advantages of a hardware solution are obvious: a possibility of a remote attacker gaining access to one of your tools is pretty much eliminated. The attacker needs to physically get a hold of your USB key, which is still a security risk, but in an entirely different domain.
There is a number of vendors that sell USB keys, and we chose Yubico and their YubiKey 4 series. They are versatile, compact and can either be carried around on a keychain or, for smaller models, stay in the USB slot of your laptop all the time. There are also USB-C models for newer Macs, so you don’t need dongles. Besides implementing U2F, YubiKey 4 series supports various security standards:
Smart card PIV
Authenticating online with U2F works out of the box on Linux, macOS, and Windows and in all major browsers. However, if you want to use your YubiKey for SSH connections, things quickly get less straightforward.
Sticks and Macs
We do have our fair share of Linux users, but the instructions we offer further are for macOS only, as replacing default ssh-agent with a gpg-agent on a system level is a Mac-specific problem.
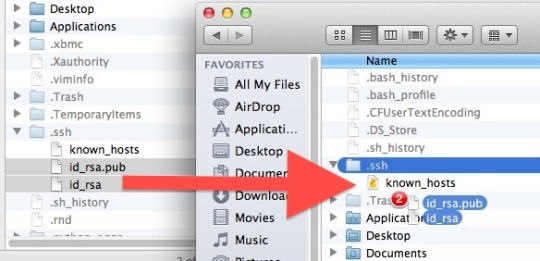
A Mac is a computer of choice for most of us at Evil Martians. We also use SSH all the time: while pushing code to GitHub or accessing remote servers. As all our employees work remotely from their private machines, contents of their ~/.ssh folders should never be allowed to leak. Common security measures, like the hard drive encryption, are always in order, but with YubiKeys already being used for U2F, would not it be better to store RSA keys for SSH on them too, and off the computer?
Ssh-agent Mac Os X Keychain
As YubiKey already supports OpenPGP, we can use it as the OpenPGP card with all the benefits:
Download Intensify for macOS 10.9 or later and enjoy it on your Mac. Intensify turns your everyday photos into stunning, dramatic masterpieces. Use simple controls to bring up the details, reveal the hidden beauty and enhance every pixel. 'Best of App Store' + over 20 other software awards. Intensify for apple mac. Intensify Pro is for Mac photo enthusiasts who want their photos to stand out. Intensify Pro gives you powerful new ways to create dramatic results. Professionally created presets make it 'one.
Once RSA keys are put on a card, they cannot be retrieved programmatically in any way.
Keys written to a card can only be used in combination with a PIN code, so even if a YubiKey is stolen, a thief would not be able to authenticate directly.
To set up YubiKey as a smart-card holding your PGP keys, you need first to replace your ssh-agent that comes pre-installed with macOS with a GnuPG solution. The easiest way to do it is directly from Terminal with Homebrew:
If you want to install a full GPG Suite that includes GUI applications, you can run another command (requires Homebrew Cask), or download it from the website:
At the time of this writing, the most recent version of gpg is 2.2.X. Let’s double-check, just to be sure:
Many guides out there tell you how to install YubiKey with gpg 2.0.X, and there has been a lot of significant changes since then. We recommend updating, and that should also be done with caution: backup your ~/.gnupg directory before making any changes!
Important!Now you need to either generate your PGP keys directly on the YubiKey or create them locally and copy over. There is an official guide for that, as well as a more evolved instruction on GitHub from the user drduh.
After all that is done, you need to enable your SSH client (the built-in Terminal app, for instance) to read PGP keys directly from YubiKey. It is time to say goodbye to a built-in ssh-agent that have served you well before.
Insert a YubiKey holding a PGP key in your computer and run the following commands; they will launch a gpg-agent and instruct your applications to use a new SSH authentication socket:
If everything went well, you should see that your private RSA key is now in fact located on a YubiKey (it has a unique cardno), the output of an ssh-add -l should resemble this:
Congratulations, you are done! This changes will not persist, however.
As soon as you reload your system, or even switch to a new console window, this setup will go away.
Let’s see how we can make it permanent.
Making things stick
The first thing that comes to mind when changing any shell-related setup is to change the local profile, be it ~/.bash_profile or ~/.zsh_profile (if you don’t know what type of shell you have, most likely you have bash, it comes by default with macOS). Open that file in an editor and add:
Now every time you launch a console, it will know how to SSH properly. If you live in a shell, use Vim or Emacs to write your code and were never tempted with GitHub’s visual features, you are all set.
However, if you use an IDE or one of those modern text editors with integrated GitHub functionality, such as Atom or Visual Studio Code? Those applications are not concerned with your shell setup and will still use system defaults for SSH, which is not what we want since we store all our keys securely on a YubiKey.
“But before we dealt with gpg, we did not need to set up anything, and everything worked!” you might say, and you would be right: macOS takes care of all that with a built-in service-management framework called launchd. You can read more about it by running man launchd, but you don’t have to.
You only need to know that launchd deals with so-called “property lists”. These are XML files with a .plist extension that define services to be launched and their launch options. They are located in the following directories:
~/Library/LaunchAgents for per-user agents provided by the user.
/Library/LaunchAgents for per-user agents provided by the administrator.
/Library/LaunchDaemons for system-wide daemons provided by the administrator.
/System/Library/LaunchAgents for per-user agents provided by macOS.
/System/Library/LaunchDaemons for system-wide daemons provided by macOS.
Let’s do some digging and look for anything SSH-related. Here it is, right in a /System/Library/LaunchAgents/com.openssh.ssh-agent.plist:
Without diving into much detail, we see that this is how macOS makes ssh-agent a default utility for SSH authentication.
Unfortunately, we cannot edit this file directly, as anything located in a /System folder is protected from tampering by a macOS feature called System Integrity Protection. There is a way to disable it, but you don’t want to do that. Apple folk came up with it for a reason.
A stickler for detail
Nothing prevents us from writing our own .plist though! All these XMLs will be treated as instructions for launchd, so this is our chance to circumvent ssh-agent once and for all!
First of all, let’s read man gpg-agent and learn what GnuPG agent for Mac is capable of:
Mac Restart Ssh Agent
It can become a daemon and live in the background with the --daemon option.
There is a --supervised option designed for systemd which makes the gpg-agent wait for a certain set of sockets and then access them through file descriptors.
A --server option allows our agent to hook onto the TTY and listen for text input, without opening any sockets.
Unfortunately, launchd only tracks processes that run in the foreground, and neither --supervised, nor --server will do us any good. So, the best way to launch an agent is by using the same command that we used before: gpgconf --launch gpg-agent. Let’s express it in launchd-compatible XML:
Now save it as homebrew.gpg.gpg-agent.plist and put it into ~/Library/LaunchAgents folder. To test that it all works (you won’t have to do it after restart), tell launchd to load a new plist:
Now let’s make sure that the agent is loaded:
A digit in the launchctl list output shows the exit status of a launched program, and 0 is what we want to see. pgrep confirms that we are in fact up and running.
Ssh Agent Mac Os X
However, we are not done yet. We still need to point SSH_AUTH_SOCK environment variable to $HOME/.gnupg/S.gpg-agent.ssh. The problem is that the variable is already set (user-wide) by the launchd default setting for ssh-agent.
At this moment, I have nothing better in mind than the following “hack”: forcibly symlink gpg-agent’s socket to the default one, stored in an SSH_AUTH_SOCK variable. The power of Unix allows us to do that, but that effectively messes up the default SSH configuration. However, as we are now using GnuPG for everything SSH-related, that should not be a problem. If you have better ideas, please contact me on Twitter.
We can create another plist that will do all necessary symlinking on login.
The only trick here is to call the shell directly, with /bin/sh (so we can reference shell variables), and pass a command to it. Now, save the file as ~/Library/LaunchAgents/link-ssh-auth-sock.plist and load it with launchd.
Let’s test the result:
Bingo! Our macOS is now effectively tricked into thinking that it deals with ssh-agent, even though it’s the gpg-agent doing authenticating and reading PGP keys directly from your YubiKey.
All you need to do know to authenticate over SSH in a true hardware fashion is to turn on your laptop, put a stick in the USB and push a button on it. Your Mac is now completely secure!
Still stuck?
There is another problem you may encounter when you start using YubiKey as an OpenGPG card. Our gpg-agent sometimes get stuck, and it looks like a YubiKey is not connected at all, replugging it also does nothing. It is a known problem, discussed here. My observations show that it appears after I put my laptop to sleep. Let’s deal with that too.
First, we need a tool that keeps track when our laptop wakes up: sleepwatcher is made just for that. Install it with Homebrew:
By default, it expects two scripts: ~/.sleep to run before the computer goes to sleep, and ~/.wakeup to run after it wakes up. Let’s create them.
The minimal ~/.sleep script can look like this (we only need to be sure it passes as a shell script)
In ~/.wakeup we will forcibly restart our gpg-agent:
Now we need to add execution flags and enable sleepwatcher’s service:
Ssh Agent For Mac Os X 10.10
Thank you for reading! Download find my mac for mac. In this article, we showed how to set up your SSH authentication flow with YubiKey as an OpenPGP card and how to make your gpg-agent play nicely with macOS. Now all you need to do to access a server or push code to a remote repository is to insert a stick into your USB and enter a PIN code when requested. Passphrases no longer required!
0 notes
Text
User Guides For Mac

User Guides For Mac Windows 10
User Guides For Mac High Sierra
User Guide For Macbook Pro 13 Inches
User Guide For Macbook Pro
Following the release of macOS Catalina version 10.15.7, an increasing number of users have experienced an issue with a system process named 'accountsd' showing very high CPU usage in Activity. All Mac devices will be located in the same management portal user interface you’re familiar with for Windows devices and servers. You will see Mac device information integrated into several reports, alerts, alert notifications, device lists, scheduled scans, blocked status, local whitelisting, and more.
Are you new to the Mac? MacMost has more than 1,400 free tutorials that can help you get up to speed quickly. Here is a collection of videos hand-picked to help those who are using a Mac for the first time.
Getting Started
First, get a tour of the Mac keyboard. Then, learn about the many different ways to launch apps on your Mac. Your Mac also comes with a large collection of apps pre-installed which can handle most basic computer tasks. One of the key techniques you should know about right away is how to bring up context menus, and there are also a few other key things you should master.
The 4 Mac Techniques You Need to Master
Working With Files, Folders and Documents
The Finder is the environment you use to view your files and folders. Learn a variety of techniques to help you manage your stuff, such as selecting multiple items and opening tabs in the Finder. But on a Mac you don’t need to return to the Finder to rename or move documents, you can do that while editing. You can also revert to earlier versions of documents.
Understanding Document Versions
Safety and Security
No matter which computer or devices you use, you should always keep security in mind. On a Mac it is easy to set strong, unique password for each website and service you use. If someone else needs to use your Mac, they should have their own account you should only give them access to the Guest Account. As for malware, Apple has you covered with built-in anti-virus and a way to protect yourself against installing something that would harm your Mac. MacMost has a free course and eBook on Mac security. Another thing you should do is to set a lock screen message so that if you lose your Mac and someone finds it, they can get it back to you.

The Practical Guide to Mac Security (Free Book)
Using Safari
Intensify for mac. The Mac’s default web browser is Safari. It is fast, energy-efficient and good with security and privacy. Learn how to go to sites and perform searches. When reading articles, use the reader view. If a tab in Safari has a video or sound playing, you can mute it. Learn other key Safari web-browsing techniques.
Safari Web Surfing Techniques
MacMost Beginner’s Guides
These short videos focus on a single topic for those who are new to using a Mac.
A Beginner's Guide to Mac Display Preferences
User Guides For Mac Windows 10
A Beginner's Guide To Organizing With Folders On Your Mac A Beginner's Guide to Mac Scroll Bars A Beginner's Guide to Resizing Mac Windows A Beginner's Guide To Renaming Files A Beginner's Guide to the Mac Maps App A Beginner's Guide to the Mac Trackpad A Beginner's Guide to Mac Keyboard Shortcuts A Beginner's Guide to Status Menus A Beginner's Guide to Getting Started With Time Machine A Beginner's Guide To the Desktop Folder A Beginner's Guide to Previewing Files On Your Mac A Beginner's Guide to Mac Context Menus A Beginner's Guide To the Mac App Switcher A Beginner's Guide to the Mac Cursor A Beginner's Guide to Sending Images In Email Messages A Beginner's Guide to Mac User Accounts A Beginner's Guide to the Mac Downloads Folder A Beginner's Guide to Mac Notes A Beginner's Guide to Mac Modifier Keys A Beginner's Guide to TextEdit A Beginner's Guide to the Mac App Store A Beginner's Guide to Web Searching A Beginner's Guide to Windows and Tabs

A Beginner's Guide to Drag and Drop On the Mac A Beginner's Guide to Siri On the Mac A Beginner's Guide to the Red, Yellow and Green Window Buttons A Beginner's Guide to Copy and Paste A Beginner's Guide to Finder Views A Beginner's Guide to Mac Reminders A Beginner's Guide to Desktop Backgrounds A Beginner's Guide to System Preferences
User Guides For Mac High Sierra

A Beginner's Guide to LaunchPad A Beginner's Guide to the Mac Trash A Beginner's Guide to Mac Spotlight A Beginner's Guide to the Mac Menu Bar A Beginner’s Guide to the Mac Dock A Beginner's Guide to Mission Control
More Mac Tips
Hungry for more? Learn how you can quickly open recent files and access frequently-used files. Find out how to take screen shots. And see how you can uninstall apps.
How To Uninstall Apps
Getting Help
The Help menu in any App will give you access to keyboard shortcuts, help you locate menu commands, and view app documentation. You can also download MacMost’s keyboard shortcut PDF if you like shortcuts. If you have a problem with your Mac, Apple has terrific customer support. You can take your Mac to the Genius Bar in any Apple Store for free help, advice and as the first step in any repair.
Get Help At the Genius Bar
Want even more help getting up to speed? MacMost has a general course on using macOS Mojave. It includes 60 video tutorials, with more than 7 hours of video instruction. You can get it for 25% off the regular price here: https://macmost.com/online-course-the-guide-to-macos-mojave.html.
Also, check out this MacMost book with 101 Mac Tips. It is available for about 8 bucks.
User Guide For Macbook Pro 13 Inches
System Information User Guide
Refer to the manual for your Mac when you need information that’s specific to your model, such as supported connections and expansion information.
Choose Apple menu > About This Mac.
Download find my mac for mac os. Click Support.
In the macOS Resources section, click User Manual.
You can also:
User Guide For Macbook Pro
Download MacBook Air Essentials, MacBook Pro Essentials, MacBook Essentials, iMac Essentials, iMac Pro, and Mac mini Essentials from Apple Books.
Get manuals and related documents for MacBook Air, MacBook Pro, MacBook, iMac, iMac Pro, and Mac mini from the Apple Support manuals website.
0 notes
Text
My Passport Apps For Mac Что Это


My Passport Apps For Mac
App Store
Passport Photo
With this passport photo app, you can format, print, or save passport photos in seconds. This app comes with passport photo templates for 100 countries. As well as passport photos, this app is ideal for printing photos for job applications. More than ten popular formats for job application photos have also been predefined.
Many Yandex services are only available to users that have a Yandex account. For example, you can not use Yandex.Mail, Yandex.Disk, Webmaster, or Yandex.Money without an account. Passport helps you come up with a username and password, lets you link your phone number to your account and reports suspicious activity on your behalf. Download this app from Microsoft Store for Windows 10. See screenshots, read the latest customer reviews, and compare ratings for Splendid. Download this app from Microsoft Store for Windows 10, Windows 10 Mobile, Windows 10 Team (Surface Hub). See screenshots, read the latest customer reviews, and compare ratings for SFT6071W. The Passport Mobile app is the on-the-go resource for your Passport membership! Browse participating locations, discover great new offers and categories, or use the newly-improved category, filter and search options to find just what you're looking for. Intensify for mac. Switch to map view to browse the discounts nea. Download this app from Microsoft Store for Windows 10, Windows 10 Team (Surface Hub), HoloLens. Download find my mac for mac. See screenshots, read the latest customer reviews, and compare ratings for Draw Assistant.
My Passport Apps For Mac
The app already provides passport photo templates for the following countries: Albania, Algeria, Argentina, Armenia, Australia, Austria, Azerbaijan, Bahamas, Bangladesh, Belarus, Belgium, Bolivia, Bosnia and Herzegovina, Brazil, Bulgaria, Cambodia, Cameroon, Canada, Chile, China, Colombia, Croatia, Cuba, Cyprus, Czech Republic, Denmark, Dominican Republic, Ecuador, Egypt, El Salvador, European Union, Finland, France, Germany, Greece, Guatemala, Honduras, Hong Kong, Hungary, Iceland, India, Indonesia, Ireland, Israel, Italy, Jamaica, Japan, Kazakhstan, Kenya, Kyrgyzstan, Latvia, Lithuania, Luxembourg, Macedonia, Malaysia, Mexico, Moldova, Mongolia, Morocco, Myanmar, Netherlands, New Zealand, Nicaragua, Nigeria, Norway, Pakistan, Panama, Papua New Guinea, Paraguay, Peru, Philippines, Poland, Portugal, Qatar, Romania, Russia, Spain, Saudi Arabia, Serbia, Singapore, Slovakia, Slovenia, South Africa, South Korea, Spain, Sri Lanka, Sudan, Sweden, Switzerland, Taiwan, Thailand, Turkey, Turkmenistan, Uganda, Ukraine, United Arab Emirates, United Kingdom, United States, Uruguay, Uzbekistan, Venezuela, Vietnam.
App Store
Screenshots
0 notes
Text
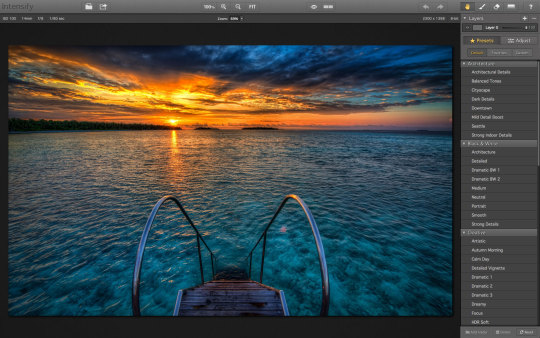
Intensify For Mac

Intensify For Mac
Intensify Pro For Mac
Intensify Pro For Mac
Intensify For Apple Mac
Reveal the hidden beauty of your photos. Get instant results with dozens of pro presets. Or use powerful Structure, Sharpness, Detail and Pro contrast enhancements for.
Intensify Pro is for Mac photo enthusiasts who want their photos to stand out. Intensify Pro gives you powerful new ways to create dramatic results. Professionally created presets make it 'one.
Same functionality as on a mac? Canon 5D Mark II Canon 70-200mm f/2.8L IS USM Canon 35L Sigma 85 1.4 Helios 44M-6 58mm(M42) Zeiss 50mm 1.4 (C/Y) Canon 135L (2) 430EX II Photo Comments.
Intensify is the first product in a new line-up of softwares by McPhun targeted at professional photographers, and is available in two versions: Intensify sells for $19.99 and is only available on the Mac App Store; Intensify Pro, which adds the ability to run as a plug-in to popular host applications as well as several other features, has a.
Support OS: Mac OS X 10.8 or later The Verdict: 10/10 Do you want your images to look amazingly impressive? Intensify is here to help you. With thousands of professional photographers, Intensify makes your images vivid and eye-catching.
Updated on 5/20/2014 – Version 1.0.2
I had the opportunity to test a new software released today by MacPhun Software named Intensify Pro. According to MacPhun Software:
Intensify enables photographers of all skill levels to create powerful images using precision tools for enhancing detail. By offering superb control of contrast, structure, detail and sharpening across tonal ranges, Intensify is able to reveal otherwise hidden details and deliver the highest quality results no matter the style of image.
Intensify is the first product in a new line-up of softwares by McPhun targeted at professional photographers, and is available in two versions: Intensify sells for $19.99 and is only available on the Mac App Store; Intensify Pro, which adds the ability to run as a plug-in to popular host applications as well as several other features, has a suggested retail price of $59.99.
Intensify was named to Apple’s Mac App Store “Best of 2013” list and has ranked among the top 10 paid photography apps in the Mac App Store since its initial release in November 2013.
Even though MacPhun Software sells Intensify Pro as a detail enhancement software, what I find it is a complete package of image enhancement. In fact, Intensify Pro supports layers, smart brushes, RAW file format, and has tools that range from basic image tuning to various levels of contrast, detail and sharpness enhancements.
The Pro version of Intensify adds support to run as a plug-in to popular image editing software like Adobe Photoshop, Adobe Lightroom and Apple Aperture.
Intensify Pro in Action
When you open Intensify Pro, you are presented with a clean and well laid out interface. On the top there is a navigation bar with common zooming tools, a pup-up navigation window and before/after buttons. On the top right there are undo/redo buttons, and a set of four tools: the Hand Tool for moving your entire image within a window, the Draw Mode, the Erase Mask and the Gradient Tool.
Using the Draw Mode and the Erase Mask, you can craft masks using brushes. You can set brush size, opacity and softness, and you can clear and invert the mask. You can also toggle a show mask button that shows a red overlay of your mask over the image. The Gradient Tool allows you to create, well, gradients in your masks. This set of tools is very similar to Lightroom masking capabilities.
The masking capabilities are quite good, fast and reliable. This, paired with the layering capabilities of Intensify Pro, allows quite complex adjustments to images. What I miss here is a sort of feature like Lightroom’s auto mask or Perfect Photo Suite’s smart brush, and this could be a nice addition to a future release. Also, unlike Lightroom’s gradient tool, once you’ve positioned your gradient and applied it, you can’t move it anymore, but you can always reshape it using brushes.
On the right column of the interface there is the “core” of the software. On the top there is a layers panel where you can add and remove layers, set their opacity and toggle their visibility. Under the layers panel there are two buttons to switch from a presets view or an adjust view.
There is a good number of presets organised in folders. However there isn’t a preview of presets, but they’re applied instantly when you click on them. Also, under each preset there’s an opacity slider to tune their intensity. The default presets are quite over the top for my tastes, and they’re unusable at their default opacity, but they may be a good starting point. Obviously you can create your own presets and folders.
The Adjust view is where the “beast” is hidden. The depth of control over your image is amazing!
The first two panels are basic and common to a lot of softwares. You can fine tune colour temperature, exposure, overall contrast, highlights and shadows, vibrance and saturation. Quite identical to Lightroom’s Basic panel in the Develop module. There isn’t a colour picker to set the white balance though.
After this Basic Tune panel, there are the three core panels of Intensity Pro: Pro Contrast, Structure and Details.
Pro Contrast
In Pro Contrast you can adjust the contrast separately according to tonal ranges. You can set the contrast for highlights, midtones and shadows. Also, under each slider there’s an offset slider to adjust the median value for the contrast tonal range.
Intensify For Mac
It is intimidating at first and it takes a while to understand that offset slider, but after a little trial and error, the power of this contrast controls allows you to set the contrast precisely in a way no other tool allows you to do. Even the Pro Contrast filter in Google’s Nik Color Efex Pro isn’t as deep as Intensify Pro!
Structure and Details
Structure allows you to enhance low contrast areas of the image, helping reveal texture and details. You can control two levels of it: global and micro to target small or really small elements of the image.
You can control it separately for highlights, midtones and shadows (if you’ve used Google Silfer Efex Pro you know what that means). A softness slider allows you to set how soft or crisp this details should be, deciding how artistic or realistic the image is.
Details allows you to make the image crispier. You can act globally, on highlights or shadows on small, medium and large details. I find the effect of Details is quite strong, and it’s easy to overdo it. To obtain a natural effect I use it sparingly. However, the amount of control you have here is intimidating (in a good way!).
The Adjust view also contains a Micro Sharpness panel that allows to sharpen the image, and a Vignette panel to fine tune a vignette effect on the image. I don’t think I will ever use them in my own workflow, but they can be useful in some cases.
What’s new in the 1.0.2 release
The new Intensify release adds additional RAW file support for more cameras, more fully integrates features from Apple’s latest Macintosh OS (Mavericks), introduces the MacPhun Print Lab (powered by MILK Books) and adds the ability to export images to SmugMug, increasing the software’s sharing capabilities.
This is a small update. The big improvements are in the sharing capabilities with SmugMug and the MacPhun Print Lab, which I don’t think are really useful to the professional photographer. Being Intensify Pro an addition in the workflow (not a substitute for Lightroom or Aperture), I think they should focus in improving the editing capabilities rather than integrate it with SmugMug and such. This is a free update, so it’s ok. We’ll wait for the version 2.0 for something exciting.
Beware of colour spaces
MacPhun has solved the color spaces issue I pointed out on the initial release, and now it works correctly with ProPhotoRGB!
Before concluding, I want to write about a strange behaviour in handling colour spaces that looks like a bug.If you work in ProPhotoRGB in Photoshop, you can open correctly the image in Intensify Pro, but when you send it back to Photoshop, it somehow fails to save it with the correct profile, and you have to convert it manually.
This tells me Intensify Pro doesn’t work in the original colour space of the image, and I don’t like it!This happens only with ProPhotoRGB. I tested it with AdobeRGB images and it worked well.I hope MacPhun will fix this soon, because if they want to target professional photographers, they should know they much prefer to work in ProPhotoRGB for masters (a bigger colour space), and convert in sRGB only when exporting image copies for the web.
Conclusion
Intensify Pro is a great piece of software. Even though it doesn’t have groundbreaking technologies built in, in fact all the functions are already seen here and there in other plug-ins, Intensity Pro allows an unprecedented depth of control over contrast and detail in a single package.
It’s incredible, and quite intimidating, how deep the controls in Pro Contrast, Structure and Details go. Add to this the snappy performances and stability of the software, and you know that MacPhun has done a great job for its first professional package.
Here is a sample before/after of a recent image of mine, on which I tested
You can buy Intensify Pro here with a 10% discount using the coupon “DAVIDE2014”.
About MacPhun Software
MacPhun Software is a California based Mac app developer focusing on consumer photography and professional digital imaging markets, serving over 22 million customers worldwide.
Intensify Pro For Mac
First established in 2008 with a mission to create innovative photography software, Macphun’s products such as ColorStrokes, Snapheal, Focus 2, Intensify and Fx Photo Studio are consistently ranked among the top 15 in the paid photography category on the Mac App Stores around the world. The company has recently launched another new app–Lost Photos–a unique free app that enables anyone to re-discover forgotten photos in their email, save them to a folder on Mac or share via social networks.
Intensify Pro For Mac
If you enjoyed this article, consider to share it with your community. Also, consider to subscribe to this blog!
Intensify For Apple Mac
Disclaimer: if you purchase the software using one of the links in this article, I might earn a commission. Rest assured that my review is honest, and that it express my real opinion of the product.
0 notes
Text
Download Find My Mac For Mac

Find My Iphone
Find MAC Address is a program that can find the MAC addresses of computers on the network. With Find MAC Address, you can search out the MAC address of your own or a remote computer or any. Find MAC Address is a program that can find the MAC addresses of computers on the network. With Find MAC Address, you can search out the MAC address of your own or a remote computer or any.

Back up your Mac
And your memories. A few simple steps can save you from losing your favorite photos and files.
Learn how to back up your Mac
Mac service and repair
Learn about AppleCare+ and the Apple limited warranty coverage, start a service request for your Mac, and find out how to prepare your Mac for service.
Learn more about repairs
Get AppleCare+ for Mac
With AppleCare+, you're covered. Get accidental damage coverage and priority access to Apple experts.
Have a question? Ask everyone.
The members of our Apple Support Community can help answer your question. Or, if someone’s already asked, you can search for the best answer
Ask now
Tell us how we can help
Answer a few questions and we'll help you find a solution.
Get support
Find My Iphone
Apple Service Programs
0 notes