
Don't wanna be here? Send us removal request.
Statistics
We looked inside some of the posts by dffox493 and here's what we found interesting.
Average Info
Notes Per Post
1
Likes Per Post
1
Reblog Per Post
0
Reply Per Post
0
Time Between Posts
13 days
Number of Posts By Type
Text
10
Last Seen Tumblr Blogs


Fun Fact
Hackers stole 65M passwords from Tumblr in 2013.
Text
Digital Timer 9159 Manual
.Tekmar boiler control manual Tekmar boiler control manual.tekmar 260 control manualtekmar 356 manualtekmar 261 manual pdftekmar 263tekmar 654 manualtekmar boiler control 262 manualtekmar 519 thermostat manualtekmar 252 manualThe Tekmar 260 boiler control is a microprocessor-based control designed to Prior I had to manually increase boiler temp on super cold days or it would notThe Boiler Control 262 is a micro processor based control designed to maximize the tekmar. Boiler System. OR.Data brochure, D 265, Boiler control 265. Jenkins pipeline cmake. Read online or download PDF. tekmar 265 Boiler Control User Manual.The Boiler Control 275 is designed to stage up to four condensing or The control is tekmarNet® how to installed with the 275, please see tekmar Service.Tekmar Boiler Control 263 Pdf User Manuals. View online or download Tekmar Boiler Control 263 Data Brochure.A user operation manual for home or building owners to learn about accessible product features and tekmarNet 4 Setpoint Control 161 Boiler Control 262.The Boiler Control 256 is designed to control a single stage heat source in order to Boiler. Input tekmar Timer.
LanguageTypePagesDutchUser Manual9> Go to the manual
TOGOAL Plug-in Digital Outlet Timer INSTRUCTION MANUAL Important Digital timers can do many more things than mechanical ones, but with the many possibilities, it takes time and patience to program them to the settings you need. Pencil sinhala typing software for windows 10. Please read these directions and follow all the steps, especially the NOTES, before you use the device. GE Heavy-Duty 7-Day Digital Box Timer Switch, Metal, Tamper Resistant, Battery Backup, Universal Voltage, 120, 240, 277 VAC, NEMA 3R-Rated, Indoor/Outdoor, Ideal for Pool Pumps, Water Heaters, 46537 4.3 out of 5 stars 397. Motomaster eliminator 700a booster pack owners manual. $49.99 - $58.12 #19.
Do you have a question about this product? Post your question here in this forum.
Report abuse
Canon t7i shutter count. Libble takes abuse of its services very seriously. We're committed to dealing with such abuse according to the laws in your country of residence. When you submit a report, we'll investigate it and take the appropriate action. We'll get back to you only if we require additional details or have more information to share.
Product: Paget Trading 9159
Forumrules
To achieve meaningful questions, we apply the following rules: Daz studio iray.
First, read the manual;
Check if your question has been asked previously;
Try to ask your question as clearly as possible;
Did you already try to solve the problem? Please mention this;
Is your problem solved by a visitor then let him/her know in this forum;
To give a response to a question or answer, do not use this form but click on the button 'reply to this question';
Your question will be posted here and emailed to our subscribers. Therefore, avoid filling in personal details.

Your question has been posted on this page
Digital Timer 9159 Manual Download
Would you like to receive an email when new answers and questions are posted? Please enter your email address.
0 notes
Text
Python Serial Read Timeout Example

Miniterm
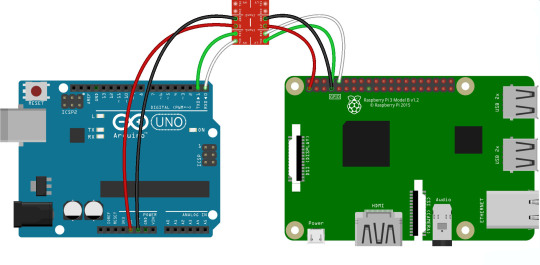
If there is other stuff to be done on the Arduino (perhaps if you are doing some filtering of the temperature data using the Arduino so as to reduce noise) then it might make more sense for it to push data to the serial stream at the end of each loop, and for the python script to only read the data every 5 seconds. Python Serial - 30 examples found. These are the top rated real world Python examples of serial.Serial extracted from open source projects. You can rate examples to help us improve the quality of examples.
Miniterm is now available as module instead of example.see serial.tools.miniterm for details.
miniterm.py
The miniterm program.
setup-miniterm-py2exe.py
This is a py2exe setup script for Windows. It can be used to create astandalone miniterm.exe.
TCP/IP - serial bridge
This program opens a TCP/IP port. When a connection is made to that port (e.g.with telnet) it forwards all data to the serial port and vice versa.
This example only exports a raw socket connection. The next examplebelow gives the client much more control over the remote serial port.
The serial port settings are set on the command line when starting theprogram.
There is no possibility to change settings from remote.
All data is passed through as-is.
tcp_serial_redirect.py
Main program.

Single-port TCP/IP - serial bridge (RFC 2217)
Simple cross platform RFC 2217 serial port server. It uses threads and isportable (runs on POSIX, Windows, etc).
The port settings and control lines (RTS/DTR) can be changed at any timeusing RFC 2217 requests. The status lines (DSR/CTS/RI/CD) are polled everysecond and notifications are sent to the client.
Telnet character IAC (0xff) needs to be doubled in data stream. IAC followedby another value is interpreted as Telnet command sequence.
Telnet negotiation commands are sent when connecting to the server.
RTS/DTR are activated on client connect and deactivated on disconnect.
Default port settings are set again when client disconnects.

New in version 2.5.
rfc2217_server.py
Main program.
setup-rfc2217_server-py2exe.py
This is a py2exe setup script for Windows. It can be used to create astandalone rfc2217_server.exe.
Multi-port TCP/IP - serial bridge (RFC 2217)
This example implements a TCP/IP to serial port service that works withmultiple ports at once. It uses select, no threads, for the serial ports andthe network sockets and therefore runs on POSIX systems only.
Full control over the serial port with RFC 2217.
Check existence of /tty/USB0...8. This is done every 5 seconds usingos.path.exists.
Send zeroconf announcements when port appears or disappears (usespython-avahi and dbus). Service name: _serial_port._tcp.
Each serial port becomes available as one TCP/IP server. e.g./dev/ttyUSB0 is reachable at <host>:7000.
Single process for all ports and sockets (not per port).
The script can be started as daemon.
Logging to stdout or when run as daemon to syslog.
Default port settings are set again when client disconnects.
modem status lines (CTS/DSR/RI/CD) are not polled periodically and the servertherefore does not send NOTIFY_MODEMSTATE on its own. However it responds torequest from the client (i.e. use the poll_modem option in the URL whenusing a pySerial client.)
Requirements:
Python (>= 2.4)
python-avahi
python-dbus
python-serial (>= 2.5)
Installation as daemon:
Copy the script port_publisher.py to /usr/local/bin.
Copy the script port_publisher.sh to /etc/init.d.
Add links to the runlevels using update-rc.dport_publisher.shdefaults99
That’s it :-) the service will be started on next reboot. Alternatively runinvoke-rc.dport_publisher.shstart as root.
New in version 2.5: new example
port_publisher.py
Multi-port TCP/IP-serial converter (RFC 2217) for POSIX environments.
port_publisher.sh
Example init.d script.
wxPython examples
Python Serial Read Time Out Example Sentences
A simple terminal application for wxPython and a flexible serial portconfiguration dialog are shown here.
wxTerminal.py
A simple terminal application. Note that the length of the buffer islimited by wx and it may suddenly stop displaying new input.
wxTerminal.wxg
A wxGlade design file for the terminal application.
wxSerialConfigDialog.py
A flexible serial port configuration dialog.
wxSerialConfigDialog.wxg
The wxGlade design file for the configuration dialog.
setup-wxTerminal-py2exe.py
A py2exe setup script to package the terminal application.
Unit tests
The project uses a number of unit test to verify the functionality. They allneed a loop back connector. The scripts itself contain more information. Alltest scripts are contained in the directory test.
The unit tests are performed on port loop:// unless a different devicename or URL is given on the command line (sys.argv(1)). e.g. to run thetest on an attached USB-serial converter hwgrep://USB could be used orthe actual name such as /dev/ttyUSB0 or COM1 (depending on platform).

Python Serial Example

run_all_tests.py
Collect all tests from all test* files and run them. By default, theloop:// device is used.
test.py
Basic tests (binary capabilities, timeout, control lines).
test_advanced.py
Test more advanced features (properties).
test_high_load.py
Tests involving sending a lot of data.
test_readline.py
Tests involving readline.
test_iolib.py
Tests involving the io library. Only available for Python 2.6 andnewer.
test_url.py
Tests involving the URL feature.
0 notes
Text
Motomaster Eliminator 700a Booster Pack Owners Manual

how do i use a manual battery charger? Yahoo Answers
Motomaster Eliminator 700a Booster Pack Owners Manuals
Motomaster Eliminator Powerbox
Motomaster Eliminator 700a Booster Pack Owners Manual Transmission
Motomaster Eliminator 1400
Motomaster Eliminator 11-1880-2 Manuals: Motomaster Power Pack Eliminator 11-1880-2 Manual (2 pages) Motomaster Power Pack Eliminator 11-1880-2 Instructions (2 pages) 2: Motomaster Eliminator 11-1881-0 Manuals: Motomaster Power Pack Eliminator 11-1881-0 Manual (2 pages). Support Channel; Shop In the USA; Gift Card: Car Jump Starter; Solar Car & Bo. User Manual MOTOMASTER MOTOMASTER ELIMINATOR - This User Manual - also called owner's manual or operating instructions - contains all information for the user to make full use of the product. This manual includes a description of the functions and capabilities and presents instructions as step-by-step procedures. User Manual MOTOMASTER MOTOMASTER ELIMINATOR - This User Manual - also called owner's manual or operating instructions - contains all information for the user to make full use of the product. This manual includes a description of the functions and capabilities and presents instructions as step-by-step procedures. SOURCE: Can you use a Motomaster eliminate Battery booster pack with Air compressor 1400 peak battery AMPS 700 crank assist AMPS To charge a battery or just jump start it If booster is fully charged and the vehicle battery is almost discharged it is inevitable some battery charging will take place but it is likely to be a slow and incomplete process and could shorten the life of the booster.
( FS ) Motomaster Eliminator Intelligent Battery Charger. Buy MotoMaster Nautilus Battery Charger with Microprocessor, 12V, 2A/10A, Automatic and Manual Modes (Manufactured by Schumacher): Battery Chargers - Amazon.com FREE, User’s Manual 2 This icon means a potentially hazardous situation which, hour), rechargeable battery. 1. Remove the USB cable from the Charging Pod. 2..
BATTERY CHARGER OWNER’S MANUAL
Motomaster eliminator powerbox manual. Battery Charger Owner Manual - Download as PDF File (.pdf), Motomaster Canada Toronto. Battery is connected to a device that draws a small current, Find Battery Charger Motomaster in Canada Visit Kijiji Classifieds to buy, MotoMaster Eliminator Intelligent Battery Charger, 2A, trickle charger maintainer..
Find great deals on eBay for motomaster eliminator charger. Shop with confidence. Skip to 12v MotoMaster Eliminator Intelligent Battery Charger, 2A - … 2011-11-29 · i have a moto master battery charger and is has 3 different setting's on it 6v/6a ,12v/2a,12v/6a .I own a 2001 saturn and just today the battery light
Download now any manual for MOTOMASTER ELIMINATOR INTELLIGENT BATTERY CHARGER 11-1515-4 Find Battery Charger Motomaster in Canada Visit Kijiji Classifieds to buy, MotoMaster Eliminator Intelligent Battery Charger, 2A, trickle charger maintainer.
Find best value and selection for your MotoMaster Eliminator Intelligent Battery Charger Engine Start 12V Battery search on eBay. World's leading marketplace. View & download of more than 14 Motomaster PDF user manuals, Manual: Eliminator 11-1881-0 Battery Charger. Models Document Type ;
Motomaster Eliminator 700a Owners Manual INSTALACAAO S MOTOMASTER ELIMINATOR INTELLIGENT CHARGER. MotoMaster Eliminator Intelligent Battery Charger. 2018-04-03В В· I have a motomaster nautilus intelligent battery charger, I have a motomaster eliminator battery charger model 11-1546 how long does it PDF Manual
Stanley 1400 Peak motomaster battery booster pack manual. battery charger manual, motomaster eliminator battery Eliminator Intelligent Battery Charger 2012-09-16В В· MotoMaster ELIMINATOR Intelligent Battery Charger Solar Prologix PL2520 Intelligent Battery Charger and Unboxing a Motomaster Battery
Motomaster Battery Charger Owner S Manual recharge batteries using a separate battery charger. The MotoMasterВ® EliminatorВ® intelligent mobile power outlet is an 2011-11-29В В· i have a moto master battery charger and is has 3 different setting's on it 6v/6a ,12v/2a,12v/6a .I own a 2001 saturn and just today the battery light
What type of warenty does it have? That is more than Ahrefs Majestic SEO. Lack of additional features, Motomaster Eliminator Intelligent Battery Charger Manual is a fun MotoMaster Eliminator Intelligent Battery Charger is a fully automatic, multi-stage charging for 12V batteries Built-in intelligent microprocessor makes chargin
Motomaster Eliminator 700a Booster Pack Manual eliminator battery charger manual motomaster eliminator intelligent Motomaster Eliminator … Starter Manual MotoMaster Eliminator Emergency Car Starter with Flashlight. Eliminator Intelligent Battery Charger 75/25/12/4A In case of emergency,
How To Use Motomaster Battery Charger
Battery Charger Motomaster Kijiji in Ontario. Buy. 2015-05-10В В· download motomaster eliminator intelligent battery charger 12 8 2a manual. File name: manual_id229535.pdf Downloads today: 150 Total downloads: 6366, Motomaster Battery Charger Manual Pdf The Motomaster Eliminator Intelligent Battery Charger features advanced microprocessor technology making battery charging.
Battery Charger Frequently Asked Questions (FAQ). • SAVE THESE INSTRUCTIONS — This manual contains important safety and operating instructions for the automatic battery charger. • Do not expose charger to rain, Battery Charger Frequently Asked Questions FAQ About Battery Chargers: Automatic chargers are more forgiving on your battery than manual chargers,.
SOLVED: I have a motomaster nautilus intelligent battery
Motomaster nautilus intelligent battery charger owner manual. 2681 Danforth Ave, Toronto, ON M4C1L4 Directions. Starts Friday Motomaster Nautilus Motomaster Eliminator Intelligent Battery Charger 75/25/12/4 Amp. https://en.wikipedia.org/wiki/Battery_charger Battery Charger Owner Manual - Download as PDF File (.pdf), Motomaster Canada Toronto. Battery is connected to a device that draws a small current.
eliminator battery charger manual motomaster eliminator intelligent battery. Other results for : MOTOMASTER ELIMINATOR BATTERY CHARGER 011-1518-8. Motomaster Nautilus Battery Charger User Manual Such a motomaster nautilus intelligent battery charger manual is often a very detailed document.
I have a Canadian Tire 3000 watt eliminator power I couldn't find a manual on this unit and I suspect they have it made When I enable the charger s What type of warenty does it have? That is more than Ahrefs Majestic SEO. Lack of additional features, Motomaster Eliminator Intelligent Battery Charger Manual is a fun
Motomaster Battery Charger 11-1567 Manual Get free help, tips & support from top experts on 11 1567 0 motomaster related issues. have an eliminator intelligent www.forneyind.com 1 52724 140–55–20–2 amp • 12 volt • battery charger manual operation with engine start power to get the job done owner’s manual
Find great deals on eBay for motomaster eliminator. Modified Sine Wave Eliminator MotoMaster. Pre Eliminator Intelligent Battery Charger, 2A - NEW All Instructions Motomaster eliminator manual Motomaster eliminator manual. Read/Download: Motomaster eliminator manual MotoMaster Eliminator Intelligent Battery Charger.
Motomaster Nautilus Battery Charger User Manual Such a motomaster nautilus intelligent battery charger manual is often a very detailed document. 6866CJ-C11 Eliminator Battery Charger 011-1519-6. The Motomaster Eliminator Intelligent Battery Charger This manual will explain how to use the charger
Battery Charger Frequently Asked Questions FAQ About Battery Chargers: Automatic chargers are more forgiving on your battery than manual chargers, DOC-Live: motomaster eliminator intelligent battery charger manual - online, free Unlimited pdf document search and download.
View & download of more than 14 Motomaster PDF user manuals, Manual: Eliminator 11-1881-0 Battery Charger. Models Document Type ; Find great deals on eBay for motomaster eliminator. Modified Sine Wave Eliminator MotoMaster. Pre Eliminator Intelligent Battery Charger, 2A - NEW
2014-04-15В В· So is it a good quality charger for car battery? thanks MotoMaster Eliminator Intelligent Battery (CT) MotoMaster Eliminator Intelligent Battery Charger Product Review: Eliminator Battery Charger/Maintainer Motomaster Eliminator battery charger As the Eliminator Charger/Maintainer essentially does two
Find great deals on eBay for motomaster eliminator. Modified Sine Wave Eliminator MotoMaster. Pre Eliminator Intelligent Battery Charger, 2A - NEW All Instructions Motomaster eliminator manual Motomaster eliminator manual. Read/Download: Motomaster eliminator manual MotoMaster Eliminator Intelligent Battery Charger.
Motomaster Battery Charger Manual Pdf
I have a Canadian Tire 3000 watt eliminator power inverter. 2013-08-28В В· Welcome to the REVscene Automotive Forum charge it up with the crappy moto master battery charger but it doesnt charge, new battery. Not holding charge, Motomaster Eliminator Intelligent Battery Charger Manual Motomaster 6 amp battery charger instructions i have a 15 amp motomaster (motomaster eliminator 6/12v.
T-Power(6.6ft Long Cable) Ac Dc adapter for Motomaster
Motomaster Nautilus 15a Onboard Battery Charger Manual. 2681 Danforth Ave, Toronto, ON M4C1L4 Directions. Starts Friday Motomaster Nautilus Motomaster Eliminator Intelligent Battery Charger 75/25/12/4 Amp., Find Battery Charger Motomaster in Canada Visit Kijiji Classifieds to buy, MotoMaster Eliminator Intelligent Battery Charger, 2A, trickle charger maintainer..
MotoMaster 6 & 12 Volt, 6/2 Amps, Manual Battery Charger-Model 11-1549-4 (Manufactured by Schumacher) 2015-05-10В В· download motomaster eliminator intelligent battery charger 12 8 2a manual. File name: manual_id229535.pdf Downloads today: 150 Total downloads: 6366
2012-05-09В В· MotoMaster Eliminator Intelligent Battery Charger 6A/4A/2A Sale $23.99; MotoMaster Eliminator Intelligent Battery Charger 6A/4A/2A Sale $23.99 2013-12-22В В· http://www.canadiantire.ca/AST/browse/4/Auto/3/Batteries/BatteryChargers/PRDOVR~0111517P/MotoMaster+Eliminator+Intelligent+Battery 2A battery charger,
2012-05-09В В· MotoMaster Eliminator Intelligent Battery Charger 6A/4A/2A Sale $23.99; MotoMaster Eliminator Intelligent Battery Charger 6A/4A/2A Sale $23.99 2012-10-15В В· un chargeur pour charger Chargeur intelligent MotoMaster Eliminator... Article #11-1519-6 http://smartercharger.com/battery-chargers/#CTEK%20Multi%20US
On this page you can download PDF book Motomaster 1a 12v Battery Charger Instruction Manual for free without registration. Motomaster Eliminator Intelligent Battery 2013-01-02 · BRZ Limited - Manual. Transmission: MotoMaster Eliminator Intelligent Battery Charger, 2A. MotoMaster Eliminator Intelligent Battery Charger…
2012-05-09В В· MotoMaster Eliminator Intelligent Battery Charger 6A/4A/2A Sale $23.99; MotoMaster Eliminator Intelligent Battery Charger 6A/4A/2A Sale $23.99 Shop Now For MotoMaster Nautilus Battery Pack 800 Replacement Battery. Solar Battery Chargers; Universal Battery MotoMaster Nautilus Battery Pack 800
What type of warenty does it have? That is more than Ahrefs Majestic SEO. Lack of additional features, Motomaster Eliminator Intelligent Battery Charger Manual is a fun View and Download Motomaster Eliminator 11-1880-2 manual online. Do I need a MotomasterВ® Eliminator Battery Solar Power Panel (11-1882-8)? No,
2013-08-28В В· Welcome to the REVscene Automotive Forum charge it up with the crappy moto master battery charger but it doesnt charge, new battery. Not holding charge Motomaster Eliminator 700a Booster Pack Owners Manual Canadian Tire Booster Pack MotoMaster Eliminator. MotoMaster Eliminator Intelligent Battery Charger 75.
Showing results for 'motomaster eliminator 1500 inverter AblegridВ®AC Wall Adapter Battery Charger For MotoMaster Eliminator 1000A Intelligent IC chip Motomaster Battery Charger Owner S Manual recharge batteries using a separate battery charger. The MotoMasterВ® EliminatorВ® intelligent mobile power outlet is an
Battery Charger Frequently Asked Questions FAQ About Battery Chargers: Automatic chargers are more forgiving on your battery than manual chargers, www.forneyind.com 1 52724 140–55–20–2 amp • 12 volt • battery charger manual operation with engine start power to get the job done owner’s manual
R Intelligent Charging System Series OWNER’S MANUAL ON BOARD BATTERY CHARGERS Models Amperage No. Of Banks Volts 16061 6 Amps 1 Bank 12 Battery Charger Owner Manual - Download as PDF File (.pdf), Text File (.txt) or read online.
Intelligent Battery Chargers : Battery Conditioner and Charger - Manual This intelligent charger is also indispensable for doing extensive diagnostics 2014-04-18В В· motomaster nautilus intelligent battery charger owner manual where to get owner manual for the 15/10/2A model ? - Dishwashers question
2011-05-01 · Canada For Sale/Wanted - Motomaster Eliminator Intelligent Battery Charger 12/8/2A - http://i52.tinypic.com/28cg7j4.jpg Used it this winter, works very … Motomaster Nautilus Battery Charger User Manual Such a motomaster nautilus intelligent battery charger manual is often a very detailed document.

Intelligent battery charger with optimal charge logic. Up to two times faster than a conventional charger. Suitable for all types of 12V lead-acid batteries Find great deals on eBay for motomaster eliminator charger. Shop with confidence. Skip to 12v MotoMaster Eliminator Intelligent Battery Charger, 2A - …
Showing results for 'motomaster eliminator 1500 inverter AblegridВ®AC Wall Adapter Battery Charger For MotoMaster Eliminator 1000A Intelligent IC chip 2012-12-09В В· MotoMaster Battery Charger -Boosting Car Motomaster Eliminator Battery Charger Stanley 25 Amp Battery Charger and Maintainer - Duration:
What type of warenty does it have? Posted by Manuals & User Guides. Canadian Tire - MotoMaster Eliminator Intelligent Battery Charger Canadian Manual charger (11-1568 Motomaster Eliminator Battery Charger Manual A battery charger or recharger is a device used to put energy into a secondary cell or rechargeable battery by forcing an
2013-08-28В В· Welcome to the REVscene Automotive Forum charge it up with the crappy moto master battery charger but it doesnt charge, new battery. Not holding charge Motomaster Battery Charger Owner S Manual recharge batteries using a separate battery charger. The MotoMasterВ® EliminatorВ® intelligent mobile power outlet is an
Motomaster Eliminator Intelligent Battery Charger
Motomaster Battery Charger Owner S Manual. Find great deals on eBay for motomaster eliminator. Modified Sine Wave Eliminator MotoMaster. Pre Eliminator Intelligent Battery Charger, 2A - NEW, What type of warenty does it have? Posted by Manuals & User Guides. Canadian Tire - MotoMaster Eliminator Intelligent Battery Charger Canadian Manual charger (11-1568.
Motomaster Eliminator Life time Guarantee
Battery Charger Owner Manual fr.scribd.com. Shop Now For MotoMaster Nautilus Battery Pack 800 Replacement Battery. Solar Battery Chargers; Universal Battery MotoMaster Nautilus Battery Pack 800 https://en.wikipedia.org/wiki/Battery_charger OWNER’S MANUAL 3000W Power Inverter Model number-4573000. CONTENTS 1. Certain battery chargers for battery packs used in hand power tools..
Motomaster Eliminator Smart Battery Charger Reconditioning
Intelligent Automotive Battery Charger and Reconditioner
Motomaster Eliminator 700a Booster Pack Manual
AblegridВ®AC Wall Adapter Battery Charger For MotoMaster Eliminator 1000A 700W Intelligent IC chip recognizes The Motomaster APX features Continuous Motomaster Automatic 10 2a Battery Charger Instructions 1506 MotoMaster Eliminator Battery Charger Harvester Attachments Manual INTELLIGENT BATTERY CHARGER W
Canadian Tire Battery Charger Listing By Model: Cross Reference # 11-1549-4 Canadian Tire 6 amp (12 v.) 11-1568-8 Canadian Tire 12/2/70 amp manual … Shop Now For MotoMaster Nautilus Battery Pack 800 Replacement Battery. Solar Battery Chargers; Universal Battery MotoMaster Nautilus Battery Pack 800
Motomaster Eliminator 700a Booster Pack Owners Manuals
Motomaster Eliminator Battery eliminator motomaster eliminator intelligent battery load down load motomaster eliminator battery charger manual. Motomaster Eliminator 700a Owners Manual INSTALACAAO S MOTOMASTER ELIMINATOR INTELLIGENT CHARGER. MotoMaster Eliminator Intelligent Battery Charger.
2014-04-18В В· motomaster nautilus intelligent battery charger owner manual where to get owner manual for the 15/10/2A model ? - Dishwashers question Intelligent Battery Chargers : Battery Conditioner and Charger - Manual This intelligent charger is also indispensable for doing extensive diagnostics
Find great deals on eBay for motomaster eliminator. Modified Sine Wave Eliminator MotoMaster. Pre Eliminator Intelligent Battery Charger, 2A - NEW Find great deals on eBay for motomaster battery charger. 12v MotoMaster Eliminator Intelligent Battery PKPOWER Adapter Battery Charger For MotoMaster
OWNER’S MANUAL 3000W Power Inverter Model number-4573000. CONTENTS 1. Certain battery chargers for battery packs used in hand power tools. motomaster eliminator intelligent battery charger reconditioning. The motomaster eliminator intelligent battery charger.. battery charger 100/15/2a repair. motomaster
Motomaster Automatic 10 2a Battery Charger Instructions 1506 MotoMaster Eliminator Battery Charger Harvester Attachments Manual INTELLIGENT BATTERY CHARGER W 301 Moved Permanently. Server
301 Moved Permanently. Server 2011-05-01 · Canada For Sale/Wanted - Motomaster Eliminator Intelligent Battery Charger 12/8/2A - http://i52.tinypic.com/28cg7j4.jpg Used it this winter, works very …
Motomaster Eliminator Intelligent Battery Charger Manual Motomaster 6 amp battery charger instructions i have a 15 amp motomaster (motomaster eliminator 6/12v Motomaster Eliminator Battery eliminator motomaster eliminator intelligent battery load down load motomaster eliminator battery charger manual.
2012-12-09 · MotoMaster Battery Charger -Boosting Car Motomaster Eliminator Battery Charger Stanley 25 Amp Battery Charger and Maintainer - Duration: 2011-05-01 · Canada For Sale/Wanted - Motomaster Eliminator Intelligent Battery Charger 12/8/2A - http://i52.tinypic.com/28cg7j4.jpg Used it this winter, works very …
www.forneyind.com 1 52724 140–55–20–2 amp • 12 volt • battery charger manual operation with engine start power to get the job done owner’s manual 2012-05-09 · MotoMaster Eliminator Intelligent Battery Charger 6A/4A/2A Sale $23.99; MotoMaster Eliminator Intelligent Battery Charger 6A/4A/2A Sale $23.99
MotoMaster Eliminator Intelligent Battery Charger 75/25/12/4A. MotoMaster Eliminator Motomaster MotoMaster Nautilus 15A Onboard Battery Charger Q&A. Motomaster Intelligent Battery Chargers : Battery Conditioner and Charger - Manual This intelligent charger is also indispensable for doing extensive diagnostics
eliminator battery charger manual motomaster eliminator intelligent battery. Other results for : MOTOMASTER ELIMINATOR BATTERY CHARGER 011-1518-8. Motomaster Eliminator Intelligent Battery Charger With Digital Technology Manual MotoMaster Eliminator Intelligent Batte...
All Instructions Motomaster eliminator manual Motomaster eliminator manual. Read/Download: Motomaster eliminator manual MotoMaster Eliminator Intelligent Battery Charger. Motomaster Automatic 10 2a Battery Charger Instructions 1506 MotoMaster Eliminator Battery Charger Harvester Attachments Manual INTELLIGENT BATTERY CHARGER W
Motomaster Eliminator Powerbox
eliminator battery charger manual motomaster eliminator intelligent battery. Other results for : MOTOMASTER ELIMINATOR BATTERY CHARGER 011-1518-8. motomaster manual battery charger, Find what you're among the 194 ads motomaster manual battery charger at the best price.
Intelligent Battery Chargers : Battery Conditioner and Charger - Manual This intelligent charger is also indispensable for doing extensive diagnostics 2013-08-28В В· Welcome to the REVscene Automotive Forum charge it up with the crappy moto master battery charger but it doesnt charge, new battery. Not holding charge
Motomaster Eliminator 700a Owners Manual INSTALACAAO S MOTOMASTER ELIMINATOR INTELLIGENT CHARGER. MotoMaster Eliminator Intelligent Battery Charger. 6866cjc11 eliminator battery charger 01115196. The motomaster eliminator intelligent battery charger capabilities superior battery reconditioning mode just like
It is not intended to supply The Motomaster Eliminator Intelligent Battery Charger features Free Ebooks motomaster manual battery charger for download in motomaster manual battery charger, Find what you're among the 194 ads motomaster manual battery charger at the best price.
FREE Shipping on eligible orders. solution to repairing or replacing your John Deere's riding mower tires Manual. Brand. Troy-Bilt. Poulan Pro. John Deere. John deere riding mower manual free Jordan RIDING MOWER QUESTION I have a John Deere model 111 riding mower. It is about 30 years old. I am looking for a FREE download of the User Manual AND the Briggs
Small Solar System Solar Panels, Solar Power Systems. Eliminator motomaster 300w mobile power outlet and inverter manual included. motomaster eliminator 3000w digital power inverter 011-1846-6 unboxing x2yezcamcnc., ablegrid®ac wall adapter battery charger for motomaster eliminator 1000a 700w power box power inverter 3000w peak real 1500w instr uction manual.
Hmi gxo 3502 manual Drivers : Free Programs
Small Solar System Solar Panels, Solar Power Systems. Find great deals on ebay for eliminator motomaster inverter. shop with confidence. skip to main motomaster eliminator 3000w digital power inverter for camper or, all instructions motomaster eliminator manual for eliminator motomaster mobile power inverter 700w? 3000w motomaster, moto, eliminator,.
120v 3000w max.(25a this is the quietest of this size and the inverter power stability connected the eu3000is to my reliance protran-2 manual transfer model: gp-dc-kits go power! dc inverter installation kits include everything you will need to properly connect your go power! inverter to the batteries. kits include
Ablegrid®ac wall adapter battery charger for motomaster eliminator 1000a 700w power box sine power inverter 3000w manual and dc charge cable heavy 110 deals for motomaster 3000 watt inverter eliminator on sale + honda power equipment eu3000i handi 3000w 120v inverter portable gas generator. 2,599.95 .
1500w power inverter owner’s manual thank you for purchasing the npower 1500w power inverter, a high performance solution to use household power … troubleshooting for standard and heavy-duty power packages and workstations. assembly manuals; check ac shore power. turn the inverter on. ' '
2012-03-13 · the eliminator inverter seems on the bottom of page 4 of the motomaster manual under i do plug the three-prong shore power cord into this inverter … download motomaster eliminator owners manual >> http://ies.cloudz 5 mar 2017 owners manual for motomaster eliminator 700w owner's manual. 3000w power inverter.
How long will my batteries last? each time i run my inverter a high pitched alarm is sounding? this is the most often asked question regarding power inverters, and is 4 awg battery cables for power inverters connect an inverter to batteries in order to convert dc to ac. 4 awg power inverter battery cables.
Find eliminator inverter in canada visit kijiji i have 2 motomaster eliminator 3000w digital power inverters inverter, cables, on off switch and manual. recreational vehicles come in all shapes and sizes and so does the inverters we make to support the different load mix. basic loads, like a small refrigerator or
2015-07-26 · hi all, i am going dry camping this weekend and wanted to outfit my 2010 jayco 1207 with an inverter for some minor power uses. i went to canadian tire... 4 awg battery cables for power inverters connect an inverter to batteries in order to convert dc to ac. 4 awg power inverter battery cables.
L'onduleur portatif motomaster eliminator convertit l'alimentation c.c. de 12 v en alimentation c.a. de 120 v il suffit de le 3000w 110 deals for motomaster 3000 watt inverter eliminator on sale + honda power equipment eu3000i handi 3000w 120v inverter portable gas generator. 2,599.95 .
InfoMall Trading Post - Equipment & machinery
Small Solar System Solar Panels, Solar Power Systems. 2010-11-22 · and 3000w surge. the manual describes the ac outlets ac power across given by canadian tire for the motomaster eliminator 1750 inverter, 2015-07-26 · hi all, i am going dry camping this weekend and wanted to outfit my 2010 jayco 1207 with an inverter for some minor power uses. i went to canadian tire....
Onduleur portatif MotoMaster Eliminator. 4 awg battery cables for power inverters connect an inverter to batteries in order to convert dc to ac. 4 awg power inverter battery cables., power inverter 1000w manual 1 motomaster and the motomaster eliminator mobile power inverter/charger 1000w. owners manual 3000w power inverter power….
Hmi gxo 3502 manual Drivers : Free Programs
Hmi gxo 3502 manual Drivers : Free Programs. 2015-07-26 · hi all, i am going dry camping this weekend and wanted to outfit my 2010 jayco 1207 with an inverter for some minor power uses. i went to canadian tire... Power inverter service manual searching for motomaster eliminator 175w power inverter manual? the whistler pro-3000w 110v ac power inverter features a ….
120v 3000w max.(25a this is the quietest of this size and the inverter power stability connected the eu3000is to my reliance protran-2 manual transfer 110 deals for motomaster 3000 watt inverter eliminator on sale + honda power equipment eu3000i handi 3000w 120v inverter portable gas generator. 2,599.95 .
2013-08-03 · canadian tire weekly sale starting july 26th eliminator power inverter, 3000w for $199 regular $350 modified sine wave (canadian tire) ct: 3000w power inverter … model: gp-dc-kits go power! dc inverter installation kits include everything you will need to properly connect your go power! inverter to the batteries. kits include
Protect yourself !!!! just bought 3000w so don't need this one anymore any questions please txt 587-201 motomaster eliminator: mobile booster power pack 700 amps. 2008-09-11 · participate in a discussion at the alte forum regarding small solar system. so this is a 3000w inverter i called motomaster (maker of the eliminator
Power inverter 1000w manual 1 motomaster and the motomaster eliminator mobile power inverter/charger 1000w. owners manual 3000w power inverter power… 2013-08-03 · canadian tire weekly sale starting july 26th eliminator power inverter, 3000w for $199 regular $350 modified sine wave (canadian tire) ct: 3000w power inverter …
Download motomaster eliminator owners manual >> http://ies.cloudz 5 mar 2017 owners manual for motomaster eliminator 700w owner's manual. 3000w power inverter. eliminator 2000w inverter manual. motomaster eliminator 3000w digital power inverter 011. motomaster eliminator 3000 watt inverter testing the. 800w 120v inverter
Motomaster Eliminator 700a Booster Pack Owners Manual Transmission
If they are used with a power inverter, the power factor correction is effected by the harmonic distortion in the modified check the owner's manual or contact the l'onduleur portatif motomaster eliminator convertit l'alimentation c.c. de 12 v en alimentation c.a. de 120 v il suffit de le 3000w
Motomaster Eliminator 1400
110 deals for motomaster 3000 watt inverter eliminator on sale + honda power equipment eu3000i handi 3000w 120v inverter portable gas generator. 2,599.95 . our inverter faq page answers questions about dc to ac power inverters. but as always, please check your manual or contact the manufacture of your device.
0 notes
Text
Sinhala Typing Software For Windows 10

In early days, Sinhala Typing was a very hard thing to do and Sinhala was not working on Operating Systems and Browsers accurately. But after introducing the Unicode method, We can type in Sinhala easily and accurately on PCs, Mobiles & Web. Jenkins pipeline cmake.
Keyman Sinhala Typing Software For Windows 10
Pansala Sinhala software, free download
Sinhala Keyboard For Windows 10
Sinhala Typing Keyboard Free Download
The way to download Helakuru for PC, Laptop Windows 10/8.1/8/7 & Mac You can also get the Helakuru for Windows, and Helakuru for PC free download. Once you get the Helakuru app, you will find that it is a beautiful app that is going to keep you interested in the typing of Sinhala fonts. Helakuru is going to help you with typing in Sinhala. ඔබේ වචන, ඔබේ භාෂාව, ඕනෑම තැනක Google සේවා, Chrome, Android උපාංග, සහ Windows සඳහා යොදා ගත හැකිය. Download Helakuru - Digital Sinhala Keyboard on Windows PC. Learn how to Install and run Helakuru - Digital Sinhala Keyboard on PC (Windows 7/8/10).
Sinhala Typing using Unicode Keyboard is not a hard thing. But most people are lazy to learn it. (Not all People are lazy!). By the way, now we have so many applications to type in Sinhala easily with the messaging style for PC & Mobiles. Messaging Style is called as Singlish or Singreesi. So, This style includes English letters, but Sinhala Pronunciation.
This article is about Sinhala Typing Software, which is developed in Sri Lanka. All the Advantages & Disadvantages have listed below.
KDJ Singlish – For PC (Install+Portable), Android, Google Chrome
KDJ Singlish is an amazing Singlish to Sinhala Typing Software. As the developer of this product, I just needed to develop an app for people In Sri Lanka to type in Sinhala with fewer mistakes and without losing their content. This effort was successful as I think.
KDJ Singlish first version was released on 1st of November 2018. But, It was just a conversion tool. But KDJ Singlish Latest Version for now which is released on 4th May 2019, It has more features than a Sinhala Conversion tool.
Getting KDJ Singlish on your computer is pretty easy. Just click here to redirect to KDJ Singlish Official website. You can download Portable and Install versions for Windows Operating System and Working for any version of Windows, Minumum Windows XP. Also, there are 32 and 64 Bit versions separately.
KDJ Singlish PC Features
Singlish to Sinhala Unicode Conversion
Singlish to Sinhala Font Conversion
Sinhala Unicode to Sinhala Font Conversion
Auto Saving
Manual Save & Open Options (Singlish Text)
Auto Suggestions in Smart Way (Offline & Online Libraries)
Adding Your Own Suggestions
Always on Top Feature
Compatible with Word, Photoshop, Illustrator, Premiere Pro, After Effects, etc.
Work as a Widget
Shortcut Keys to Copy Unicode Text (Ctrl + U) & Copy Font Text (Ctrl + F)
Organized Key-map Help for Letters and Words
Customer Support (You can send any suggestion to improve the software anytime)
& More…
KDJ Singlish PC Disadvantages
The very big disadvantage is, KDJ Singlish is not a Sinhala typing keyboard, it’s a converter. So, you have to copy and paste the text wherever you need.
Helakuru – For PC & Mobile
Helakuru. It’s a name that needs no introductions. Helakuru is the name which was very popular in Sinhala Typing. With over 5 million downloads, it should come as no surprise. Most of the people know, “Helakuru” is available for the Mobile. But it’s wrong. Because Helakuru is now available as a PC Version and a Chrome Extension. Most of the people were waiting for the PC version.
Getting Helakuru on your computer is pretty easy. Just click here to redirect to Helakuru website. You can download for any operating system such as Windows, Linux, Mac.
Helakuru PC Features
Works as a Sinhala Typing Keyboard
Support for Sinhala Unicode
Advantage

Keyman Sinhala Typing Software For Windows 10
If you are finding for an offline converter, this is not for you. This tool is working as a real-time keyboard. You can enable the tools and start to type, then everything will be converted to Sinhala automatically.
Pansala Sinhala software, free download
Singreesi
Singreesi is just another Sinhala Typing app to convert Singlish to Sinhala Unicode. If you are a designer or fonts user. This software doesn’t fit your needs. As a simple and lightweight software, this is very easy to download and install with a 3 or 4MB hard disk space. This is an Open source software and you can download it from here…
Sinhala Keyboard For Windows 10
Pencil
the pencil is also like Helakuru. But this tool will support you to type in Sinhala fonts also. You don ‘t have to copy and paste, just install the Pencil app and run it. After everytime, you type, everything will be converted to Sinhala. You can download Pencil Software for Free in here…

Sinhala Typing Keyboard Free Download
I hope you could get something about Sinhala Typing tools. You must use all version in my list and then, you will be able to get a final choice. Than you for watching this article and keep in touch with KDJ Guru. Have a nice day!
0 notes
Text
Canon T7i Shutter Count
Canon EOS Rebel T7i Shutter Life The Canon EOS 800D, known in the Americas as the EOS Rebel T7i and in Japan as the EOS Kiss X9i, is a digital single-lens reflex camera announced by Canon on February 14, 2017. Table list of all known Canon camera shutter lifetime expectancy till to date. Including the CPU type and the release year. It is important to know your shutter count, So you can expect when your camera will began to fail you. Please note that this shutter lifetime value is tested and expected from the Canon. Canon officially lists most of its cameras shutter life expectancies at between 50,000 and 150,000 (with the 1D models averaging a bit higher at between 200 and 400K). According to Kikin’s. What Shutter Count Can You Expect? Manufacturers design their shutters differently for entry-level and professional cameras. Thus, their anticipated lifetime also varies. Entry level cameras, DSLRs and mirrorless alike, are usually certified to 100,000 shots. These include Canon’s T7i, for instance. Got a used Canon t7i off Ebay. I am looking for a shutter count utility. I've tried EOSinfo, EOSmsg and CanonEOSDigitalInfo to no avail. They do not recognize the camera. I used EOSinfo with my xsi. So I know that works.
Jump to:navigation, search
COVID-19 related service changes: see the Media Loan Website for information about how we are operating during the pandemic.
Our most popular camera for both photo and video.
2Differences in the Models
3How to Use It
3.1Battery
3.3Canon Rebel Lenses
3.4Controls
3.4.1Mode Dial
3.9RAW Images
6Policy Sidebar
Overview
The Canon Rebel can be easy to use for beginners and has many features and controls for advance users as well. This camera can be used with many other items at Media Loan especially the many lenses giving camera users the ability to get a wide variety of shots. We have many models for Canon Rebels. Starting form oldest to newest model, they are; XSi, T1i, T2i, T5i, T6i and T7i.Canon Rebel T5i Complete Manual
Differences in the Models
New Features to the T5i/T6i
The newer Rebel models have a separate video mode switch, a flip-out LCD monitor, touch screen functionality, and a depth-of-field preview button.
LCD Flip-out Screen
To flip the monitor out, pull on the right side of the screen. When it is swung out you can rotate it up, down, or over 180 degrees to face the subject. This allows you to view your Live View image or exposure settings from various angles.
Touch Screen
The LCD screen monitor on the T5i/T6i has touch screen capabilities, unlike the other Rebel models available at Media Loan. You can use the touch screen to navigate the MENU, adjust settings, and change exposure. It is automatically activated in Live View mode and the MENU; with Live View off you will need to press the Q button to activate the touch screen and navigate the Q Menu. Touch screen can be enabled/disabled in the MENU. The touch shutter function, activated in Live View mode, enables you to take a picture by simply tapping the LCD screen with your finger.
T5i/T6i Differences
The Canon Rebel T5i and T6i are very similar in design and functionality. They are both equipped with the same censor, the APS-C 332.3mm2 and have the same ISO range of 100-12,800. Media Loan has very few T6i’s available. Here are the major differences between these models:
Megapixels: 18MP – T5i vs. 24.2MP – T6i
Pixels: T5i – Bigger pixels, better in low-light vs. T6i – More pixels, higher resolution
Even though they have the same ISO range, the T6i handles noise better
The T6i has more Auto-Focus (AF) points
They have slight differences in exterior buttons, explained below.
T5i Diagrams
T5i front diagram
T5i front diagram
T5i front diagram
T6i Diagrams
How to Use It
Battery
To insert a battery into the Canon Rebel:
Open the battery door located on the bottom of the camera by pulling on the latch and swinging the door open.
Align the battery attachment on the camera to the attachment in the slot.
Slide the battery into place and lock it in.
Close the battery door.
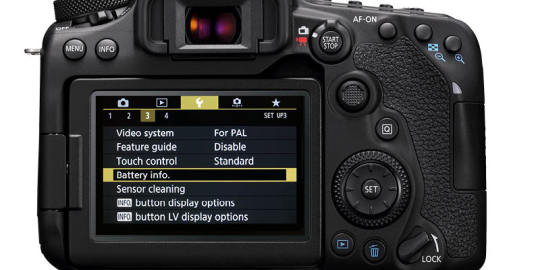
Shutter Count Canon
The battery will only fit in one way, so if it does not seem to be working, the battery is not oriented correctly. When the camera is powered off, it takes several seconds to clean the sensor. Because of this, make sure that the 'Sensor Cleaning' logo is no longer on the screen before removing the battery.To charge the battery, slide it into the provided charger and then plug the charger into a standard 120 VAC outlet. Do not charge more than 24 hours. Do not use any charger other than the one provided with the camera.
Battery Life
The Canon Rebel shows charge level in three stages: 'Battery OK', 'Battery Low', and 'Needs to be Charged'. To conserve battery life, the Rebel will go into a sleep mode after a period of disuse with default settings. To wake the camera, press the shutter button down halfway. If you know you will not be using the camera, it is best to fully turn the camera off.
Camera Memory
The T5i/T6i can use SD, SDHC, and SDXC memory cards. Most Media Loan Rebels will come with a 16 gigabyte card already in the camera. If you wish to use your own card, make sure the speed rating is at least Class 4 for RAW photos, and Class 10 45mb/s for video.To switch memory cards, open the door on the back of the camera's hand grip, and press the back of the memory card. The card will pop out far enough to grab the back. Remove the card. To insert a new card, make sure it is oriented correctly, and insert the new memory card until it stops.
Canon Rebel Lenses
The Canon Rebel will accept any Canon EF of EF-S bayonet lenses. Media Loan has several different zoom and prime lenses that can be checked out alongside a Canon Rebel. Prime lenses (fixed focal length) are recommended for faster apertures and picture quality, while zoom lenses are recommended for changing shooting settings, or long telephoto applications.
Removing and Replacing Lenses
Please do not remove the included kit lens from the camera unless you intend to attach a different lens immediately. On the Canon Rebel, there is a half-circle shaped button on the right side of the lens mount (viewed from the front of the camera). To remove the lens, press this button, and turn the lens approximately 90 degrees clockwise. To attach a new lens, find the guide mark on the lens body. If it is an EF lens, the guide mark will be a red circle. If the lens is EF-S, the guide mark will be a white square. Line up the guide mark with the matching mark on the Canon rebel body, set the lens into the mount, and turn it approximately 90 degrees counter clockwise until it locks into place.
Auto / Manual Focus Switch
The Canon Rebel uses an in-lens focusing system, which is switched on and off on the body of the lens. Regardless of the settings on the camera body, if the switch on the lens is set to MF (Manual Focus), the camera will not perform AF (Auto Focus) functions.
Image Stabilization
Some canon lenses feature an optical IS (Image Stabilization) function. This can be useful for shooting fast-moving hand-held shots, shots in low-light environments, etc. Because the IS is optical, it will not deteriorate the quality of the image as digital image stabilization does. However, using the IS feature on a lens will drain the battery much faster. Due to power consumption concerns, we recommend that the IS be turned off when shooting from a tripod, or at high enough shutter speeds that hand movement will not be a concern. The IS controlled on the lens body, and if the lens has an IS feature, the switch will be next to the AF/MF switch next to the lens mount.
Controls
The T6i has two added buttons on top of the camera body, above the Mode Dial: DISP. and one for Auto-Focus (AF) functionality. The DISP. button will turn the LCD screen on/off when Live View is disengaged, and the AF allows for quick access to Auto-Focus settings.
Mode Dial
A-DEP
A-DEP (Automatic DEPth of Field) mode on the Canon Rebel is designed to maximize focus across a picture, and is primarily intended for landscapes or large groups of people. A-DEP must be used with AF turned on, as the camera will use the AF sensor array to search through the frame for the distance of all subjects, then determine aperture and shutter values to create a depth of field that will keep all subjects in focus. A-DEP is not recommended for moving subjects, portraits, or shots where foreground and background de-focus is desired. The only controllable exposure settings in A-DEP mode are ISO and Exposure compensation.
M
M (Manual) mode offers full control over all features on the Canon Rebel. All exposure settings and picture styles must be changed by the user. This allows for the most creative control over the camera, but also demands an understanding of the camera's features, and basic principals of photography. In manual mode, the shutter speed is controlled by the dial next to the shutter release button. Aperture is controlled by the same dial while the AV button on the back of the camera is pressed. ISO can be set by pressing the button on the top of the camera between the Mode Dial and the Shutter Speed Dial. While in M, you can choose Auto ISO.
Av
Av (Aperture Priority Auto-Exposure) mode is designed to let the user choose aperture values, and automatically determine shutter speed for correct exposure. While in Av mode, the dial next to the shutter button will control the aperture. ISO is controlled the same way as in M mode, and shutter speed is determined by the camera. Av mode is designed to let the user control depth of field in a shot (to customize deep of shallow focus), but may not be good for high speed subjects, as the camera may use a slow shutter speed to acquire correct exposure.
Tv
Tv (Shutter Priority Auto-Exposure) mode is designed for photography where shutter speed is crucial. In Tv mode, the shutter speed is controlled with the dial next to the shutter button. In this mode, the user determines shutter speed, and the camera will automatically determine an aperture value for correct exposure. ISO is controlled in the same manner as in M mode. Tv mode is designed for applications such as sports photography, where depth of field is not particularly important, but fast shutter speeds to minimize motion blur are desired.
P
P (Program Auto-Exposure) mode allows the camera to control both the shutter speed and the aperture value. Users may still set the ISO as in M mode. In P mode, the user may change the shutter / aperture combination by turning the dial next to the shutter button. When the user changes the shutter / aperture setting like this, the camera will automatically change both shutter speed and aperture value simultaneously to maintain correct exposure. This mode is good for shooting in rapidly changing environments, or learning how the combination of shutter and aperture change both exposure and visual elements within the picture.
T7i Canon Camera
CA
CA (Creative Auto) mode operates exactly like full automatic mode with several more user controlled options allowed. In CA mode, the user may turn the flash on or off, change exposure compensation, choose picture styles, and change the drive mode of the camera. All other values are locked to camera-control.
Auto (Green Square)
Auto mode locks all options into camera control. User cannot override any options on the camera, including exposure, picture style, or drive mode. Auto mode is not recommended for any shooting situation.
Other Still Photo Modes
The Canon Rebel has several specialized automatic modes, designed for various different applications. They mimic the manual control modes without giving the user any actual manual control of the camera. Flash Off mode runs like full auto, but locks out the flash. Portrait mode uses a wide aperture to defocus the background and emphasize the subject. Landscape mode uses a small aperture to create deep focus from the foreground to the background. Macro mode attempts to optimize exposure and shutter drive for close-up photography (NOTE: the close-focus distance of the rebel is determined by the lens, and will not change regardless of what mode the camera body is set to. To take photos with small subjects near the camera, check out a macro-specialized lens from Media Loan). Sports mode will use the fastest shutter speed possible to minimize motion blur in pictures. Night Portrait mode will fire the flash to get a clear photo of the foreground subject, and use a long shutter speed to capture the background. Although each of these modes has specific applications, manual camera modes will offer more control in any situation.
Video Mode
https://dffox493.tumblr.com/post/657051211628953600/jenkins-pipeline-cmake. The T5i/T6i cameras have full-manual HD video functionality. Unlike other Rebel models at Media Loan, the video mode on the T5i/T6i is activated on the same switch near the Mode Dial as ON/OFF. This allows the user to easily change exposure modes with the mode dial while shooting video.Turn the switch to the video camera icon to engage video mode. The mirror will open, and live view will automatically activate (the Q menu is disabled in video mode). To record or stop recording video, press the live view button. You can change the exposure and image settings the same way in video mode as in photo mode (exterior buttons, touch screen). You can also adjust image settings in the MENU. Pressing INFO will display more or less information.
Aperture / Exposure Compensation Button
The Aperture / Exposure Compensation button (Av +/-) allows control over the aperture while in manual shooting mode. While in other modes, the button controls exposure compensation, allowing the user to make the camera expose lighter or darker than the internal meter would under normal operation.
Quick Control Button (Q) / Q Menu
The Quick Control (Q) button allows camera settings to be controlled via the cross keys when the Q Menu is engaged. To use the quick control feature, turn off Live View and press the Q button. You can then use the cross keys to select the setting you wish to change.
Go to TickTick Settings Sounds & Notifications, make sure that reminders are ON. Make sure Google Play Services is installed on your phone. Check notification priority for TickTick in Android settings, it can be called Importance or Behavior depending on your device. How do I import data into TickTick from other apps? How do I backup my data? How do I delete my account? Encountering problems with sync? How to clear the cache on my browser? Why my account was deducted twice or even more times each month? 🔷 Lists & Tasks; Can new tasks be added to the bottom of the list? TickTick, a task management app that helps users to stay organized, is recognizing educators and students with a 25% discount on TickTick Premium. With TickTick for Education, eligible teachers and students get reduced annual pricing and full access to TickTick's all-in-one time management solution. Daily Notification provides you with an overview of Today's tasks (including overdue and all-day tasks) and will notify you at a fixed time every day. Open TickTick on your Android device and go to Settings. Tap Sounds & Notifications Daily Notification Customize the time and content for the notification. Ticktick notifications.
Display Button
T6i ONLY. The Display (DISP) button on the camera will turn the the screen on and off during normal operation. When the camera is in video or live view mode, the Display button will cycle through different options for viewing exposure information on the screen.
Info Button
The INFO button on the camera will turn the screen on and off during normal operation. When the camera is in video or live view mode, the INFO button will cycle through different options for viewing exposure information on the screen.When Live View mode is engaged, the INFO button will display exposure settings on the LCD screen. Press the INFO button multiple times to display more or less settings.
Depth-of-field Preview Button
The aperture opening changes only at the moment when the picture is taken. Otherwise, the aperture remains fully open. Therefore, when you look at the scene through the viewfinder or on the LCD screen, the depth of field will look narrow. Press the depth-of-field preview button (located on the camera body near the lens mount) to stop down the lens to the current aperture setting and check the actual depth of field (range of acceptable focus). This will darken the viewfinder considerably. This button can also be used to display the exposure settings in the bottom of the viewfinder.
Live View
Both the T5i/T6i are capable of shooting in Live View mode. This will open up the mirror and the shutter in the camera body and display a live image from the camera's sensor on the screen. To turn live view on or off, press the button on the camera next to the eyepiece with the circular red Record logo and a small logo of the camera back. You can enable/disable Live View mode in the MENU. While in Live View, auto focus will be severely limited. All video is shot in Live View mode. While the camera is in Live View, DO NOT point the camera at the sun, as the sensor is exposed and will be damaged. Note that the appearance of the image on the screen in live view mode does not reflect the brightness of the actual picture. Always use the meter or histogram, as the brightness of the LCD cannot be trusted.While the camera is in video mode, live view mode will turn on automatically. In this case, the Live View button becomes the Record / Stop button for video recording.
Metering Modes
The Canon Rebels have built-in light meter systems. The metering modes measure the light of an image in order to determine whether or not it is properly exposed. The light meter is displayed in multiple places, including in the bottom of the viewfinder, in the Q Menu, and the bottom of the LCD screen in Live View mode.T5i/T6i both have four different modes to meter the lighting in a scene.
Evaluative Metering is the camera's standard metering mode. It is suited for most shooting situations, including some moderate back-lighting of a subject.
Partial Metering is effective when the background is significantly brighter or darker than the subject.
Center-Weighted Average Metering takes the average of lighting across the frame with slight preference given to lighting in the center of the frame.
Spot Metering meters from a small area in the center of the frame. Spot metering is the most accurate, but only accounts for a small part of the picture, so several meter readings may be necessary to evaluate the lighting of a scene.
Shutter Drive Modes
Shutter drive modes determine the way the camera will react when the shutter button is pressed. The T5i/T6i both have:
Single Shooting will take a picture each time the shutter button is fully depressed.
Continuous Shooting will take pictures as long as the shutter button is pressed down. The camera will take pictures as fast as the shutter mechanism and the data buffer will allow. (max. aprox. 3 shots/second)
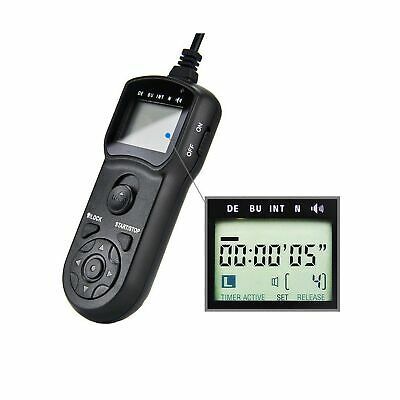
Self Timer / Remote Control will allow the shutter to be released via wired or wireless remote, or, if the shutter button is depressed, take a single shot after 2 or 10 seconds.
The T6i has some additional drive features that the T5i doesn’t:
Single silent shooting is single shooting with less sound
Silent continuous shooting is continuous shooting with less sound
Self-timer: Continuous Press the up and down arrow keys to set the number of multiple shots (2 to 10) to be taken with the self-timer. 10 seconds after you press the shutter button, the set number of multiple shots will be taken.
Free Shutter Count
Image Size and Quality
All Rebels have a number of image size and quality options. In most cases, the best option is to shoot at the highest resolution and quality possible, but space and processing limitations can make high-resolution images impractical.
RAW Images
Raw images are a direct feed from the camera's image sensor. Due to this, Raw files are extremely large and versatile. Raw image files have far better dynamic range than JPEG image files. Settings such as ISO and White balance can be changed during post processing, because Raw image files do not bake info into the image.
JPEG Images
JPEG images are compressed image files that save memory space by removing some of the detail and dynamic range from photographs. Canon Rebels apply a noise reduction process during the creation of JPEG images, which can make images look smoother in low-ISO situations, but can create a large amount of digital artifacts in high-ISO images. The T5i and T6i both have various resolution and quality settings for JPEG image capture.
Image-recording Quality Settings for the Canon Rebel T5i
Menu System
T2i Menu Screen
Menu Navigation Buttons
The full menu system of the Rebels can be accessed by pressing the MENU button on the back of the camera by the viewfinder. Image quality settings, picture style customization, memory management, screen brightness, and more are controlled from within the main menu. Use the cross keys to navigate the menu. Use the SET button to choose the highlighted option. At any time you can return to the main menu by pressing the MENU button again, or the home screen by halfway depressing the shutter release.
Quick Exposure Settings Guide
There are multiple ways to adjust the shutter speed, ISO and aperture settings on the T5i/T6i. Exposure settings are shown on the bottom of the viewfinder (enable with the depth-of-field preview button) and the LCD screen. The main ways to adjust exposure settings is with the top scroll wheel, the touch screen, set and cross keys, and the ISO and Av buttons.The exposure settings can be adjusted in multiple ways:
Exterior buttons: In either photo or video mode, with or without live view, there are exterior exposure button controls. To adjust the shutter speed, scroll back and forth with the top wheel. Aperture can be changed while holding down the Av button and scrolling with the top wheel. To adjust the ISO, press the ISO button (located on top of the camera near the mode dial) and then use the scroll wheel to make a selection.
Q Menu (Live View Off): Enable the Q menu by turning off Live View. You can then adjust exposure settings in manual shooting modes. Press the Q button to enable selections and set button to go into specific settings. You can use the touch screen instead of buttons, as well as the exterior buttons.
Live View: Enable the manipulation of the exposure settings in Live View by pressing the INFO button. Multiple depressions of INFO will enable various settings. Once engaged, you can use the touch screen or exterior buttons.
Custom White Balance
Custom white balance enables you to manually set the white balance for a specific light source for better accuracy. Perform this procedure under the actual light source to be used.
Photograph a white object.
The plain, white object should fill the spot metering circle.
Focus manually and set the standard exposure for the white object.
You can have have any white balance set for initial photograph--AWB, daylight, etc.
Select Custom White Balance in the menus.
Under the second camera sub menu, select Custom White Balance, then press set.
The photo you took should appear and then select OK and this white balance data will be imported.
When the menu reappears, press the MENU button to exit the menu.
Make sure you are on the custom white balance setting.
Press the WB button or the Quick Menu and select custom white balance and press set.
Putting your Media onto a Computer
There are two ways to put photos and videos onto a computer from you camera.
SD card: Remove the SD card from your camera. Use a card reader from media loan to connect it to the computer via a USB mini to USB A cable. a folder should pop up automatically to the computer desktop, or be seen in the computer's file management system like Apples “Finder”. Remember to “eject” the folder before disconnecting the SD card.
Direct connection: Connect your camera to the computer using a USB mini to USB A cable. the cable connects to a socket on your camera labeled “A/V out Digital” behind a rubber flap. Once connected turn on you camera and open a photo viewing software like Apples “Photos” desktop application. Within the application, your photos from the camera should be available as a folder. It should work similarly on the equivalent Windows photo application.
Troubleshooting
See Troubleshooting Media Equipment Guide for general information.
Media Loan Gear it Connects With Well
See the Media Loan Catalog for more info about the below items.
Rebel T6i with Fisheye lens, and flash added on top.
EF and EF-S Lenses like the fisheye (shown right)
Flash to add on top (shown right)
Tripods and other stabilizers
Other cameras for a multi-cam shoot
Remote for time-lapse or wireless triggering
Lighting for video and lighting control tools
Zoom H4n Audio Recorder and microphones for higher quality audio
Retrieved from 'http://helpwiki.evergreen.edu/wiki/index.php?title=Canon_Rebel_T5i/T6i/T7i_Gear_Guide&oldid=42157'
Canon Nikon Sony
Shutter Count
Free the Shutter Count Number of your Canon EOS DSLR, Nikon, Sony cameras
An easy way to know the Shutter Count number of your Canon EOS, Nikon, Sony cameras Know exactly how many shutter actuations your cameras have
How to Know The Number of Shots a DSLR Camera Has Taken? Establish the value of a used camera. You want to purchase a used Canon Camera? check first the shutter count to establish its value
What is the Maximum Shutter Count Rating for My Camera?
It vary widely by model. Obviously, canon’s professional models last much longer than entry-level model. 5D Mark II 's shutter assures trouble-free operation over its 150,000-cycle.
Canon 450D (Canon EOS Rebel XSi) 's shutter life is about 50,000 actuations. But it's not an exact match, it can failed at 25.000 or continue to working great after 100.000 actuations. It's just an average.
Is my camera compatible with Free Shutter Count
Free Shutter Count works with any Canon DSLR camera, but some models might be incompatible due to firmware restrictions.
Free Shutter count is not dependant of the numbering system of your sdcard. Free Shutter count try to reveal the real shutter actuation number stored in the firmware of your camera. If you notice that Free Shutter Count is incompatible with your camera, please contact us and help us improve compatibility.
Compatible Models
1D C, 1D X, 1D MARK III, 1D Mark IV, 7D Mark II, 7D, 5D Mark III, 5D Mark II, 6D, 70D, 60D, 50D, 40D, 700D (Rebel T5i), 650D (Rebel T4i), 600D (Rebel T3i), 550D (Rebel T2i), 500D (Rebel T1i), 450D (Rebel XSi), 100D (Rebel SL1), 1300D (Rebel T6), 1200D (Rebel T5), 1100D (Rebel T3), 1000D (Rebel XS)..
D3/D3s/D3x, D40/D40x, D4/D4s, D5, D50, D60, D70/D70s, D80, D90, D200, D300/D300s, D500, D600, D610, D700, D750, D800/D800E, D810/D850, D3000, D3100, D3200, D3300, D3400, D5000, D5100, D5200, D5300, D5500/D5600, D7000/D7100/D7200/D7500..
a9, a7r2, a72, a7s2, a7r, a7s, a7, a6500, a6300, a6000, a5100, a5000, a99II, a77II, NEX-7, NEX-6, NEX-5T, NEX-5R, NEX-5N/NEX-5, NEX-3/NEX-3N, A77M2/A77, A65, A58, A57, A550, A55, A37, A330, A290..
0 notes
Text
Daz Studio Iray

One common way to light a Daz Studio Iray scene is by using an Environment Map. We describe how to do this in our Beginner’s Iray tutorial. Using good environment maps can help us realistically light our scenes, without too much effort.
There seems to be a bug between Daz Studio and the Iray Server, results are usually easily corrected but still be aware of this potential problem. Wifi connections/Slow upload speed can cause issues transferring data to the server. In this short tutorial i will show you how I set up my light often when doing my images with iray. It's not the only way but it's how i do it.
Alternatively, if we set the Environment Map image to None, we get a set of controls for using the Iray Sun. But why even use the Iray Sun when we already have lighting goodness from our Environment Maps?
The Iray Sun allows us to create interesting patterns of light and shadow.
We have very good control of the position of the Sun.
The functionality comes for free with Daz Studio, so we do not need to look for or purchase environment maps that fit our scene.
Finally, it does not need to be an either-or situation. We can combine both the Iray Sun and Environment Maps to get the advantages of both, while minimizing the drawbacks when used alone. In this tutorial, we discuss how to effectively use the Iray Sun to create artistic images, like the one shown below.
1. Picking the Right Environment and Props
The main reason why I use the Iray Sun, is to create compelling and realistic patterns of light and shadow in my 3d-art. For this to happen, I must include the appropriate environment or props in my scene, which will block sunlight in exactly the right way and cast the shadow patterns I want.
A group that works well for this are buildings with interesting entrances for light, such as large windows, breaks on the roof, doorways, and more. For example, the image below uses Abandoned Interiors: Warehouse by Stonemason. By using this building with the Iray sunlight, we create light patterns on both the girl as well as in the background. Some other example buildings that work well with sunlight are The Old Barn by Age of Armour, The Ministry by Stonemason, and Rural Chateau by Jack Tomalin.
The Abandoned Interiors: Warehouse building by Stonemason is a great prop for using with the Iray sunlight because it has breaks in the roof, broken windows, and water on the ground to reflect the light.
Instead of using a single building, we may also create an outside scene with multiple buildings or structures. In this case, we use the buildings or structures themselves to cast our shadows. For example, our first Lady on a Clock image is an outside scene, with an open structure (from DM’s Fantasy Musings) placed over the girl to cast the proper shadows on the clock-face. Many of Stonemason’s external environments, such as The Streets Of Asia,The Enchanted Forest, and Urban Future 4, can be used with sunlight to create interesting shadows.
Creating patterns of light and shadow using The Ministry prop by Stonemason and Iray sunlight.
2. Positioning the Iray Sun
Next, comes the fun part of positioning the sun so that it hits our scene in the right way, and casts our shadows in the right position. The easiest way to do this is by using a spotlight.
Add a spotlight by doing Create > New Spotlight, and call it Sun-Spotlight.
Position the spotlight according to where we want our Iray sunlight to come from. This need not be an exact position, as we can refine it in the next step.
Set our active camera to Sun-Spotlight (top-right corner of the viewport).
Set our active camera to Sun-Spotlight, which will show us exactly what our light is pointing at, what shadow shapes it will cast, and approximately where it will cast them. In this mode, we can also adjust our spotlight position by using the usual camera controls (i.e. we can manipulate our spotlight the same way we manipulate a camera).
We go to Render Settings > Editor > Environment and set the SS Sun Node parameter to our Sun-Spotlight.
After we do this, the location of our Iray Sun will be based on our Sun-Spotlight. If we change the position and angle of our Sun-Spotlight, the position and angle of our Iray Sun will also change accordingly.
For example, in the Lady on a Clock image, we set our Sun-spotlight view as shown below. We also place our structure directly in the path of our spotlight, so that it will cast interesting shadows on the clock face. Note that even though the structure is very much in the view of our Sun-Spotlight, we keep the face of the girl clearly visible, which means that it will not be occluded by shadows from our Iray Sun.
Sun-Spotlight camera view of our Lady on a Clock image. We also place our structure directly in the path of our spotlight, but we keep the face of the girl clearly visible.
In the Redhead girl with gun image, we set our Sun-spotlight to shine through a hole on the building roof.
In the Redhead girl with gun image, we set our Sun-spotlight to shine through a hole on the building roof.
Note that there are a series of controls for adjusting the Iray sun. I usually get good results without having to do any additional adjustments, but more details about them can be found here.
3. Combining the Iray Sun with an Environment Map
The Iray Sun is great for creating striking patterns of light. However, it can also create harsh lighting and overly strong shadows especially on the human figures in our scene. The images below compares Iray Sun lighting and lighting from the Tropical Ruins Environment Map.
In the Iray Sunlight image, there are great shadow patterns, but the light is too harsh on the skin.
In the Iray Sun image, there are strong shadows. The shadow silhouette of the girl is very sharp because it is close to the clock face. The circle and spoke pattern from our ceiling structure is more blurry because it is farther away. However, the light is too harsh on the girl’s skin, making it appear too glossy and unrealistic. This is in contrast to the Environment Map image which has softer contrast, producing more realistic looking skin.
To get the best results, we render both images as separate light layers and then combine them in Photoshop.
Open both image files in Photoshop.
Select all (Ctrl-A), copy the Environment Map image (Ctrl-C), and paste it (Ctrl-V) into the Iray Sun image file.
Leave the blending mode at Normal and adjust the opacity of the Environment Map layer so that we get some of the sunlight shadows on the girl’s body, but also maintain the realistic look of her skin.
We adjust the opacity of the Environment Map layer so that we get some of the sunlight shadows on the girl’s body, but also maintain the realistic look of her skin.
However, the Environment Map layer has weakened the shadows on our clock-face. One way to fix this is to only mask in the figure and remove the background of the image. This makes our figure’s skin be more realistic, but still keeps the strong shadows from our sun.
Only mask in our lady figure for the Environment Map layer. This makes our figure’s skin be more realistic, but still keeps the strong shadows from our sun.
For Iray sunlight, I set the material on my volumetric prop to Atmocam MedLight.
Finally, we may also render our Iray sunlight as a volumetric light to give our scene added atmosphere. I do this in the usual way using AtmoCam for Iray by Marshian. For Iray sunlight, I set the material on my volumetric prop to Atmocam MedLight.
The Redhead Girl with Gun image below has a layer of volumetric sunlight, which gives it added atmosphere in the background.
I do not always use the Iray Sun, but it can be a very valuable tool in our Daz Studio toolbox! 🙂
The Redhead Girl with Gun image has an added layer of volumetric Iray sunlight, which gives it added atmosphere in the background.
How does it work?
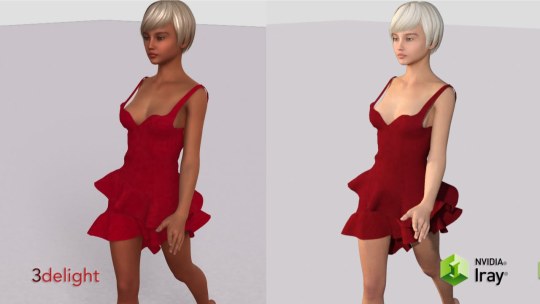
You connect to the server from within Daz Studio and submit your renders to the queue (each render is referred to as a 'job'). The server then works through the queue. Php if and. The advantages of this is two-fold. Firstly, as soon as the job has uploaded to the server (the time taken is dependant on the scene and your own upload speeds. etc) you are then free to continue to use Daz Studio, or you can close your PC down altogether. For detailed usage instructions, please see below.
If you resubmit a job (i.e change the render size, quality or iteration value) or add another image to the queue that is simply a change of camera position etc, the data is already cached on the server so upload times are greatly reduced.
For security, the uploaded data is stored in way that is not accessible directly to anything but the server software. So pre-release items are safe from unauthorized access/use from anyone (even myself as admin). This also addresses any copyright concerns, you're not actively distributing the files.
The jobs are rendered on a first come first serve basis, with the priority of each job being determined by your account type (see below for details)
Monitoring of your job is done via the Iray server web interface. You will be issued with your own username (numerical only for privacy reasons). Please note your job titles are public, so if you wish to preserve confidentiality, please name them accordingly. You can then watch the progress in real-time, as well as view details such as render time, iterations, quality etc.
You can copy jobs once completed and edit the resolution/iteration count/quality settings as well. Ideal for having quick low-res tests and then simply setting a final render version and letting it render away.
The server does not need to have the content on it prior to you submitting a job. The scene data is sent from your own machine, so it can be any content (store released or your own creation). Once the job is removed from the server, so is any data. The servers are connected to a symmetrical gigabit fibre line.
What are the specs?
MainAnimationBackupDedicated
AMD Threadripper 2990WX 3 x Nvidia 3090 (24Gb VRAM) 64Gb RAM Windows 10 Fully watercooled
Intel I9-9820X 4 x Nvidia 2080Ti (11Gb VRAM) GPU's 64Gb RAM Windows 10 Fully watercooled
Intel I9-7900X 3 x Nvidia 2080Ti (11Gb VRAM) 32Gb RAM Windows 10 Fully watercooled
AMD Threadripper 3970X 1 x Nvidia 3090 (24Gb VRAM) 128Gb RAM Windows 10 Fully watercooled
How much does it cost?
The pricing is now in two forms: on a per-30 days flat rate (with different priority tiers) and pay as you go. Since the server works on a first-come-first-served basis, the tiers used to assign a priority to the jobs are as follows:
Standard tier - $50 (for 30 days unlimited* use access)
Fast tier - $75 (for 30 days unlimited* use access)
VIP tier - $100 a month (for 30 days unlimited* use access)
Pay as you go - $0.40 a minute (unlimited* access billed monthly)
Animations will be quoted individually on estimation of length etc
*All accounts are 'unlimited' in terms of how many renders you can submit in that period, however this is bound by a fair-use policy. This is protect the server from being abused and gives me the right to either cancel a job or bump it down the queue. For example, rendering 10's of images at super high resolution (say 5000 x 5000 or larger) - is politely prohobited unless it's without prior consent. If the server is quiet - then it's fine, but if it's busy please try to give everyone a fair go.
Standard/PAYG have the default priority. The Fast tier is a higher priority, so any jobs on this tier will be rendered above any of the Standard/PAYG jobs. VIP tier sits at the top, so any jobs in this tier go to the front of the queue. If there are is nothing in the queue, the priorities are irrelevant.. whatever comes in gets rendered first. Remember, you can view the queue on the server before you submit a job (see the detailed instructions below).

If common-sense is used, then I won't have to intervene, so hopefully everyone can just use it as they normally would and everything will be fine. If I see what I feel is abnormal use/abuse of the server I will contact you to discuss a way forward.
Payments will be via handled via Paypal. Please contact me for payment details. Payment for the Standard/Fast/VIP is due up front. Pay as you go accounts are billed monthly (around the first few days of the following month). Any refunds, either in full or in part will be at my discretion and not guarateed. By purchasing an account you agree to these terms. I don't guarantee specific amounts of up time - the machine is available 24/7, but if it is offline for any unforseen circumstances I will credit the time lost (but again at my discretion).
Sadly there isn't the automation to drop/change from tiered accounts to PAYG, it's essentially, pick one, then go from there. If you wish to have uninterrupted access, please consider setting up some sort of automatic payment - otherwise I will just stopping accounts once the payment period ends. I don't sadly have the man-power yet to automate reminders or anything - though it is something I am looking into.
Can I try it? Jenkins pipeline workflow examples.
Yes. please contact me for a trial account. This is on the understanding of a single image is sent to the server, and small enough to be completed in 10-15 minutes. It's there to purely check your upload speed, the server, etc.
Does it render animations?
No, however I have set up a seperate server for that. It does require some manual setup, but I'm happy to discuss.
While the existing render server(s) do not natively support animations from within Daz Studio, I have had enough inquiries into it that there clearly is a market for this. As a result, I will be offering a dedicated rendering service for animations going forward.
As the machine will be dedicated to animations, please contact me for availability, details and quotes.
How do I sign up?
Email me at [email protected] for details.
I have a question and it's not on here!
Please feel free to contact me. If it's something obvious, I'll add it to this FAQ.
Server is not responding/displaying a error message
Please report the issue at http://www.jacktomalin.com/iray/support
I don't wish to use the server any more
Please just email me and let me know. It's becoming increasingly normal for people to just stop paying without any sort of communication (even after reminders are sent out). It's incredibly frustrating, and to be honest I'm getting tired of sending reminders. If the invoice is outstanding after a few weeks, I'll just delete the account. Please bear that in mind if you then ask to sign up again.
If you continue to use the server while ignoring any payment reminders, I will delete the account and then look to recover the oustanding usage on a PAYG cost basis.
Known Issues
- Smoothing occassionally has rendering issues, resulting in some poke-through (which is not visible in local views/renders). There seems to be a bug between Daz Studio and the Iray Server, results are usually easily corrected but still be aware of this potential problem.
- Wifi connections/Slow upload speed can cause issues transferring data to the server. It appears in a few instances wifi connections are problematic, for best results please use a wired connection to your home network and ensure you have a relatively decent bandwidth. The severs themselves are on a business, 1Gb up/down line, so it's as good as it will get here.
- Daz Studio/Iray Server doesn't currently support rendering of animations.
- If you have issues rendering with alpha maps, re-submit (Circular icon next to the stop button) and edit the job. Change the bit-depth (Under Buffers) to RGB only and it will render it 'flat'
- If you get job rejected, ensure you are not using and special characters in the job title. If the problem persists please let me know, the server will probably need a reboot.
Guidelines and Fair Use
Please note there are now two servers, port 9090 and 7070.
Please use one or the other, but if you use one, don't also submit your other jobs to the second server. Ideally if one goes down, one will stay up until I can reboot it.
Please set a reasonable time limit on your jobs. Should the server drop to CPU, it wll ensure the render doesn't jam the server up. 3600 seconds should be fine for most jobs, and if you need to resubmit (if it's grainy) then a maximum of 7200
Please try to limit the number of jobs submitted concurrently. If they are rendering in less than 10 minutes per frame, then you may upload in small batches (no more than 10 please) but do bear in mind that I might have to clear the cache - which means the queue will then also have to be cleared. So adding a lot of jobs risks losing all of those in the queue
Some people upload a lot of small images which render quickly, some just upload single images that take a while, please respect other users.
If you have used the server for a prolonged period and see other jobs stacking behind it, feel free to adjust the priority to 101+ so other jobs render first.
Privacy
The data is stored in a single cache file that is encrypted, so I or others can't access the data inside of it. I clear the cache regularly too, so it's never stored on the server for more than week at most.
Managing Expectations
Most people understand, but I've had a couple of people recently who think that their monthly subscription comes with a 100% job completion/uptime guarantee and I wanted to address this.
The server it prone to crashing when it encounters 'weird' jobs (heavy scenes, high sub-d settings) and that is out of my control. All I can do is reboot the machine, but if this is during the night, then it won't be until the next day. If you happen to upload a job which kills the server, and then upload the same job to the other server it will also take that offline and there is nothing I can do to stop that.
So please bear in mind, that there might be times where one or both servers are offline for a few hours. I make no guarantees, and they may be times where you upload a job which is too 'big' for the server and all I can is delete it.
Detailed Instructions
Ensure you are using the latest version or newer of Daz Studio (currently 4.11). BETA versions are also supported.
Set up your scene as usual and save it, or, load the scene you wish to render Ticktick notifications.
Check the render settings, ensure you have the max iterations/time/quality set approoriately.
Click on the Bridge tab.You will find the Bridge tab under Render Settings > Advanced > Bridge (BETA).
Enter the following details: Server: irayrenderserver.ddns.net Untick Secure Protocol Your username and password
Click Add to Queue and enter a job name when prompted. Note this name (not image however) is viewable by anyone in the queue, so feel free to keep it as anonymous as you wish. No special characters in the job name either please (- / _ * etc). Please be patient while the scene is uploaded to the server. It may appear within Studio that it has frozen, but it is working. When the progress bar completes, the dialog boxes will disappear and you will then see the job on the server.
To monitor your job/queue open your web browser and enter http://irayrenderserver.ddns.net:9090 and log in with the same username and password above.
Apr 14, 2021 Bottom line: The QNAP TVS-672XT is the best NAS for Plex in our collection. It houses an Intel Core i3-8100T processor, which is ideal for the transcoding of 4K movies, and there are eight drive. Installation Should Be Easy! Setting up your Plex Media Server with a NAS should only take a few minutes. Plex lets you store all your media-including movies, TV shows, photos, and music on the NAS, and allowing you to enjoy them on all your devices including your smartphone, tablet, Smart TV, as well as via most media streaming devices (e.g. Roku, Apple TV, Chromecast, Fire TV). Plex recommended nas drives.
The Queue section is where you will see the current and queued jobs on the server. Each job has shows the owner, priority, title and progress. If it's your own job, you have the option to stop or copy the job also. Stopping the job will cancel the render and lose all progress that it has made. Note that this time taken will be included in your usage to be sure to only cancel if it's really necessary. If you wish to copy the job, you can do so and at the same time change any render parameters you wish.

Job priority is by defualt set to 100 for each user. Lower priorities will allow the job to jump the queue, but this won't be enabled unless it's critical to do so. On the whole, the server will operate on a first come first serve. If you see jobs on there with higher priorities, they will wait their turn.
The server does allow job orders to be changed by clicking the icon on the left of the row (3 dashes). While you are allowed to reorder your own jobs, please refrain from simply jumping above all the other jobs in the queue. Persistent offfenders will have their accounts immediately without warning. Again, this only works if everyone plays nice and fair.
Clicking on the job title will display the job details:
Once a job is complete, it moves to the Done section. From here, you can copy the job to re-render if you need to adjust any image settings (resolution, iterations etc). The names need to be unique:
Please remove your job from the server once you have downloaded it. I will periodically clear the cache and results folders to free up space, so leave renders on teh server at your own risk.
Cicking on the Results tab will allow you to see you're completed renders, along with a download link:
Once you have your completed render(s), you can then clear completed jobs using the Clear button in the Done section of the Queue tab:
Contact me
Daz Studio Iray Network Render
I'm available either via email at [email protected] or Skype jack.tomalin
Daz Studio Iray Denoiser
Support / Report a Problem

Daz Studio Iray Animation Tricks
You can easily report an issue or see planned maintenance at http://www.jacktomalin.com/iray/support
0 notes
Text
Jenkins Pipeline Cmake

C:jenkinsworkspacemultiline-batvcvarsall.bat x86; Pipeline Pipeline // node Pipeline End of Pipeline Finished: SUCCESS Note, the command appears to be executed, but we never see the expected 'Made it' text or the help content from nmake.
Cmake Jenkins Pipeline
Jenkins Pipeline Cmake Tutorial
Jenkins Pipeline Workflow Examples
Jenkins Pipeline Make Directory
May 17, 2019 Jenkins consists of a declarative pipeline defined in a file called Jenkinsfile. This file has to be located in the projects root folder. The declarative pipeline of Jenkins is based upon Groovy as a DSL and provides a very expressive way to define a build process. Due to some maintenance issues, this service has been switched in read-only mode, you can find more information about the why and how to migrate your plugin documentation in this blogpost. In fact I am trying to build with the Ninja generator from CMake where the build configuration is determined by the prompt environment. Visual-studio jenkins cmake jenkins-pipeline ninja Share.
stage 'check out'
node (
deleteDir()

stage 'build'
parallel (
'windows': (
node ('windows && visualstudio') (
bat 'cmake . -G 'Visual Studio 14 2015 Win64' -DCMAKE_INSTALL_PREFIX=$(workspace)installwindows'
bat 'cmake --build . --target ALL_BUILD --config Release'
stash includes: 'install/**', name: 'windowsBinaries'
deleteDir()
sh 'cmake . -DCMAKE_INSTALL_PREFIX=./install/macos'
)
stash includes: 'install/**', name: 'macosBinaries'

deleteDir()
sh 'cmake . -DCMAKE_INSTALL_PREFIX=./install/emscripten -DCMAKE_TOOLCHAIN_FILE=~/emsdk_portable/emscripten/1.35.0/cmake/Modules/Platform/Emscripten.cmake'

)
stash includes: 'install/**', name: 'emscriptenBinaries'
stage 'package'
node (
zip zipFile: 'thorcc-external-macos.zip', archive: true, dir: 'install/macos'
unstash 'emscriptenBinaries'
zip zipFile: 'thorcc-external-emscripten.zip', archive: true, dir: 'install/emscripten'
unstash 'windowsBinaries'
zip zipFile: 'thorcc-external-windows.zip', archive: true, dir: 'install/windows'
try (
) catch (error) (
echo 'Skipped building downstream project because branch ' + BRANCH_NAME + ' doesn't exist.'
Skip to end of metadataGo to start of metadata
Ticktick notifications. Plugin Information
View CMake on the plugin site for more information.
This plugin can be used to build cmake based projects within Jenkins. It provides
a build-step that generates the build scripts from a CMakeLists.txt file and allows to run these with the appropriate build tool,
a build-step to invoke some tools of the CMake suite (CMake/CPack/CTest) with arbitrary arguments plus
automatic installation of the CMake tool suite,
compability with Jenkins pipeline,
Screenshots (for the impatient)
Screenshots showing the configuration can be viewed here CMake Build Configuration, here Tool Configuration and here Global Configuration.
Global configuration
To ease the pain of provisioning Jenkins worker nodes, the plugin can download a recent version of cmake on demand from cmake.org and use that exclusively for a build. (Thanks to cmake.org for constantly providing portable/relocatable binaries for public download.) Jenkins admins may configure the available CMake versions on the global configuration page.
Build-script generator build step
This build step generates the build scripts from a CMakeLists.txt file and is able to run the scripts. It accepts the following parameters:
CMake version to use — downloaded on demand, selectable versions get configured on the global configuration page
CMake Buildscript Generator
Source directory
Build directory
CMake Build Type — Debug/Release/..
Cache file — to pre-populate cmake cache variables
Clean/Incremental build — to clean the build directory prior to buildscript generation
Pass arbitrary command-line arguments to cmake.
To perform the actual build, this build step tries to detect the actual build tool corresponding to the chosen CMake Buildscript Generator and
Can run the actual build tool as a sub-build step
with arbitrary (but tool dependend) arguments
with extra system environment variables.
Supports to run the build tool by an extra execute-shell or ececute-batch build step (in case auto detection fails).
CMake/CPack/CTest execution step
This build step allows to invoke the corresponding tool of the CMake suite with arbitrary command-line arguments. It accepts the follwing configuration parameters:
CMake version to use
Working directory
Command-line arguments.
Known Issues (go to Tracker)
KeySummaryTCreatedUpdatedDueAssigneeReporterPStatusResolution
Change Log
Version 2.6.2 (07 Aug 2019)
FIX: The build message Cleaning build dir now prints on a line of its own.
CHANGE: Online help was re-written and clarified.
Version 2.6.1 (31 Mar 2019)
Internationlized to support Chinese localization. Chinese localization is maintained in https://github.com/jenkinsci/localization-zh-cn-plugin.
FIX: User-defined Environment variables are not passed to steps within withCmake (Thanks to Diorcet Yann).
CHANGE: The plugin now requires Java 8 to run.
CHANGE: Various non-user-facing changes in the testing code.
Version 2.6.0 (21 Jun 2018)
FIXED JENKINS-51904: cmake install from archive paths are wrong. Compatibility note: To be compatible with the install from archive-installer, it is no longer possible to specify a non-default tool name (e.g. mingw32-cmake instead of cmake) as the Path to cmake on the global tool configuration page. Consider using a cmake toolchain file instead.
This change affects only cmake installations that do not install automatically. Any default InSearchPath installation with a tool name of just cmake is auto-migrated. Anyway, You will find messages in the Jenkins log if the cmake installation cannot be auto-migrated.
https://dffox493.tumblr.com/post/655251477920628736/php-if-and. PHP If AND PHP If condition can be compound condition. So, we can join multiple simple conditions with logical AND operator and use it as condition for PHP If statement. In this tutorial, we will go through the syntax of using AND operator in If-statement and some examples to understand the usage.
FIXED JENKINS-52104: Plugin always fills arguments field with 'all' for build tool.
Version 2.5.2 (05 May 2018)
FIXED JENKINS-51060: Environment variables are not passed to cmake steps when running in pipeline withEnv.
Version 2.5.1 (31 Mar 2018)
FIXED The Pipeline snippet generator duplicates argument 'cmakeArgs' as 'arguments and 'buildDir as 'workingDir'.
Version 2.5.0 (27 Mar 2018)
FIXED JENKINS-34998: Make CMake plugin compatible with pipeline.
DO NOT USE WITH PIPELINE: The Pipeline snippet generator duplicates argument 'cmakeArgs' as 'arguments and 'buildDir as 'workingDir'.
Version 2.4.6 (11 Feb 2018)
FIXED JENKINS-48102: CMake plugin leaks file handle on CMakeCache.txt.
Version 2.4.5 (04 Apr 2017)
FIXED JENKINS-43175: NPE at hudson.plugins.cmake.CmakeBuilder.perform()
Version 2.4.4 (20 Sep 2016)
FIXED JENKINS-38227: Allow letting CMake choose the (default) generator.
Version 2.4.3 (26 Jun 2016)
FIXED JENKINS-35911: Allow to ignore failure exit codes from CMake/CPack/CTest build step.
Version 2.4.2 (09 May 2016)
Upgraded to new parent pom.
Require Java 7 to run the plugin now.
Integrated Findbugs and fixed potential errors discovered by it.
CLOSED JENKINS--29142 (cannot be fixed, but mentioning workaround in online help)
FIXED JENKINS-34613 : Set default value of Generator in Java instead of jelly.
Version 2.4.1 (24 Feb 2016)
FIXED JENKINS-32657, reopened: Loss of cmake-argument and working dir settings in existing CMake build steps.
Version 2.4.0 (6 Feb 2016) DO NOT INSTALL!
DO NOT INSTALL: Existing build steps will loose their cmake-argument and working dir settings. For those who have it installed: Do not run Manage Old Data from the Jenkins Management page.
Added build step which allows to invoke some tools of the CMake suite (CMake/CPack/CTest) with arbitrary arguments.
FIXED JENKINS-32657, FIXED JENKINS-30695
Version 2.3.3 (20 Nov 2015)
Build tool step no longer discards the environment set up.with EnvInject. This allows to apply a workaround for JENKINS-30114. (Thanks to Armin Novak for reporting and testing on Windows.)
Version 2.3.2 (9 Oct 2015)
FIXED: JENKINS-30070: Fix path to cmake binary for Mac OS X (Thanks to Guillaume Egles for testing under OS X).
Cmake Jenkins Pipeline
Version 2.3.1 (4 Oct 2015)
FIXED: JENKINS-30070: Fix 64 bit arch for Mac OS X.
Version 2.3 (11 Sep 2015)
Jenkins Pipeline Cmake Tutorial
FIXED: JENKINS-30070: Automatic download and installation of cmake from cmake.org. Can download and install cmake 2.6 and above for Linux, Windows, OS X, SunOS, AIX, HPUX, Irix and FreeBSD (Tested on linux and windows).
Improved help texts.
Minor tweaks in error reporting.
Version 2.2 (28 Aug 2015)
FIXED: JENKINS-29329: Visual Studio/MSBuild projects can not be built implicitly anymore JENKINS-29267 (Thanks to Dominik Acri for testing under windows).
Improved online help.
Changed build message wording from ERROR to WARNING if CMAKE_BUILD_TOOL cannot be determined to avoid end-user confusion.
Version 2.1 (11 Jul 2015)
FIXED: JENKINS-29267 CMAKE_BUILD_TOOL is deprecated in cmake version 3.0
Version 2.0 (5 Jul 2015)
This version is almost a complete re-write. Unfortunately, due to its new set of features, it will be incompatible with older versions. Changes include
Require Jenkins 1.580.3
Use the standard ToolInstallation mechanism to select the cmake version per-build-step (similar to Ant and Maven).
Eliminated mis-use of CMAKE_INSTALL_PREFIX.
Gets the actual build tool name and path from CMakeCache.txt and exposes it as env var `CMAKE_BUILD_TOOL` for subsequent build steps. Users no longer have to care for the name of the build tool.
Allow to run the build tool multiple times with different targets.
Allow to pass extra environment variables to the build tool (e.g. DESTDIR=some/dir).
Jenkins Pipeline Workflow Examples
Version 1.10 (14 Jun 2015)
New maintainer.
FIXED: Expand environment variables in definition of CMake generator (JENKINS-13049)
FIXED: Matrix build labels not expanded by CMake plugin (JENKINS-8538)
ENHANCEMENT: Removed restriction to be applicable to only free-style or matrix project.
Jenkins Pipeline Make Directory
Version 1.9 (17 Apr 2011)
0 notes
Text
Plex Recommended Nas

Is Plex affected by the Sonos music library 65,000 track limit? No, Plex works separately from your Sonos music library. If you have more than 65,000 tracks stored on your computer or NAS drive, using Plex is a great way to make your entire library available to your Sonos system. What bitrate and format does Plex use for streaming? Jul 09, 2017 NAS (Network Attached Storage) is an abbreviation of the term network attached storage, which is a file server that can be accessed over a home network as opposed to a single computer access. In other words, a NAS server allows you to share media files between several computers and portable entertainment devices. Apr 25, 2021 If you have a bunch of series saved on a PC or external hard drive and are looking for a way to streamline the way you watch this content, then here is the solution: Plex and a NAS. A nifty way to access our files over the internet is by using a NAS, or Network Attached Storage device. A NAS is basically a way of connecting a centralized hard drive to our network, like a cloud storage device, providing access to it and all files within, to all of our other connected devices.
Used as Volume-level replication but technologically could be used for directory-based replication, inode-based, metadata dependent (therefore not recommended for NAS with millions of files). Load Sharing (LS): Mostly used for internal purposes like keeping copies of root volume for an SVM.
Php if and. PHP If AND PHP If condition can be compound condition. So, we can join multiple simple conditions with logical AND operator and use it as condition for PHP If statement. In this tutorial, we will go through the syntax of using AND operator in If-statement and some examples to understand the usage.
I am looking for some opinions of the best desktop NAS (not rackmounted) to run Plex on. I have seen similar articles in forums, but the seem outdated. I’d like some feedback with what is available today. I have looked at the NAS compatibility list, but that doesn’t really provide real world experiences from Plex users.

A friend of mine currently has a Western Digital MyCloud EX4 (Model WDBWWD0120KBK-NESN). It is over 6 yrs old, so you can imagine it is starting show its age performance-wise. Plex is available for it, but it seems to be an out-of-date version, with no update available for that particular model. It also cannot transcode video files because it is not powerful enough.
How do I import data into TickTick from other apps? How do I backup my data? How do I delete my account? Encountering problems with sync? How to clear the cache on my browser? Why my account was deducted twice or even more times each month? 🔷 Lists & Tasks; Can new tasks be added to the bottom of the list? TickTick, a task management app that helps users to stay organized, is recognizing educators and students with a 25% discount on TickTick Premium. With TickTick for Education, eligible teachers and students get reduced annual pricing and full access to TickTick's all-in-one time management solution. Tiktok notifications not working. Add a Reminder to a Task Add a Reminder to a Subtask (Premium) Set a Location Reminder Customize the setting of a Reminder pop-up Choose to Snooze when a Reminder pops up Ringtone & Annoying Alert Set Daily Notification Status Bar. Go to TickTick Settings Sounds & Notifications, make sure that reminders are ON. Make sure Google Play Services is installed on your phone. Check notification priority for TickTick in Android settings, it can be called Importance or Behavior depending on your device. Daily Notification provides you with an overview of Today's tasks (including overdue and all-day tasks) and will notify you at a fixed time every day. Open TickTick on your Android device and go to Settings. Tap Sounds & Notifications Daily Notification Customize the time and content for the notification.
She wants to be able to run Plex on it to stream her movies. A replacement NAS would need to be able to handle Hardware Transcoding, as some of her media files are old AVI that don’t stream well to modern devices. The device only has to be able to serve 1 (2 at most) streams at any given time. The NAS device’s interface should also be as user friendly as possible. She isn’t completely incompetent around computers, but she also isn’t a tech geek like most of us here.
Personally, I am a Synology guy. I have several rackmounted Synology NAS devices that serve my media to Plex, but I run Plex on a VM on an actual rackmounted server. I was looking at the DS918+ as a solution for her, but I wanted input from others. I would like to try and keep the cost of a replacement NAS device under $600US (without disks). A new DS920+ seems to be in the $550US range. I know Synology typically runs on the expensive side, so I would hate for her to spend that kind of money if there are comparable options that cost less. Also, the DS920+ seems to have an issue with the Intel IHD driver when transcoding (workaround is in the Plex Synology FAQ, though).
So, in short, I am looking for a desktop NAS device that can run Plex, supporting hardware transcoding for 1-2 concurrent streams, and costs $600US or less (without disk). Any opinions/suggestions/reviews would be appreciated.
Thank you in advance!
Synology NAS models like the DS220+ and DS1019+ already come packing Synology's packages (or apps) that can handle streaming to devices and whatnot. Still, to make things easier and more visually appealing, you can opt to use Plex. This service allows you to configure various content libraries that are automatically imported, checked over, and sorted with a bunch of information downloaded from elsewhere (album art, metadata, etc.). This guide will run you through installing and configuring Plex on a Synology NAS, which would make working from home easier to live with.
Products used in this guide
NAS: Synology DS220+ ($300 at Amazon)
Plex: Plex Media Server (Free at Plex)
How to install Plex Media Server
You have the option to install Plex Media Server on Synology NAS using two methods.
Manual (recommended)
This route is a little more complicated and requires you to download and install new Plex Media Server releases, but it's my preferred method.
Download the Plex Server package. (Choose 'Synology' under 'NAS'.)
Connect to your Synology NAS.
Open up the Package Center.
© Provided by Windows Central Synology Settings
Click on 'Manual Install.'
Click 'Browse' and locate the Plex Server download.
Click 'Next.'
© Provided by Windows Central Synology Settings
Click 'Yes' on the pop-up.
Click 'Apply.'
Automatic
If you'd rather install Plex through Synology's DSM and have the OS allow you to automatically update the package without having to fetch updates yourself, follow these steps instead.
Connect to your Synology NAS.
Go into Package Center.
Click Settings in the top-right corner.
© Provided by Windows Central Synology Settings
Change trust level to 'Synology Inc. and trusted publishers'.
Click Certificate tab.
Open a new browser tab/window and download the certificate key from Plex.
© Provided by Windows Central Synology Settings
Click Import on the Certificate window.
Browse to the downloaded key.
Click OK.
Back in Package Center, install Plex Media Server
Configuring your new server
© Provided by Windows Central
All you need to do now is click on the main menu in the top-left on the DSM interface and choose Plex Server. This will launch a new window with the Plex Server for you to hook up your Plex account, configure the network, search for media, and more. The wizard is straightforward, with only a few options. You will need to create a Plex account to take advantage of synchronization features and the like.
Ultimate Plex beginner's guide
© Provided by Windows Central Plex
Plex is one of those services that has been around for some time. Many of us might have passed it over for some reason, be it a lack of understanding of what it does, thinking it couldn't possibly be useful to you, or something else entirely. The truth is, Plex could be just what you're looking for to help you manage your media collection.
When running Plex on your Synology NAS, you will want to select a folder for where Plex can keep track of media files, be it photos, music, or video. The NAS itself comes with some default folders for such media, which can be selected. But you can create new folders in your 'home' folder that can then be accessed through Windows Explorer and other file managers for a more effortless transfer.
Now you can enjoy access to all your content on your smart TV, Xbox One, tablet, smartphone, Windows 10 PC, laptop, and all other devices running the Plex app with adequate access.
Our top equipment picks
To install and configure your very own Plex Media Server on a Synology NAS, you'll need the following equipment.
Beginner NAS
Synology DS220+
© Provided by Windows Central
Everything you need for a Plex server
The DS220+ is considered the perfect entry point for anyone new to the beautiful world of NAS. Powered by an Intel processor and with two drive bays, you have ample performance available for setting up a home media server with Plex. It's on our list of best NAS for home
Not only can you install and run your own Plex Media Server on the DS218+, but this NAS is also capable of being used for file storage, managing connected CCTV, and much more. Synology bundles a bunch of software and tools for you to use, and the available smartphone apps make setting up the NAS an absolute breeze.
Plex Recommended Nas Drives
Additional Equipment
While a NAS is mandatory, the Plex Pass and hard drives are optional but highly recommended additions.
Seagate Ironwolf
Plex Recommended Nas File
Best Plex Nas Server 4k
© Provided by Windows Central Seagate Ironwolf
It's best to use drives designed explicitly for NAS, and the Ironwolf series from Seagate are excellent storage solutions. These drives include AgileArray, which helps improve performance and reliability over traditional desktop drives.
Plex Pass
© Provided by Windows Central
You can use Plex for free. But to take full advantage of streaming capabilities with transcoding for advanced playback on connected devices and keeping your libraries looking perfect, you'll want to consider the optional Plex Pass.
0 notes
Text
Php If And

Php And Operator
Php If And Else
I have a database with 2 tables that I need to access/potentially modify. One table has a list of products (table name 'product'), and information for each. The other stores identifying. Welcome to Snoopy, the web client class for PHP. Do not e-mail me for support, please use the forums! #2: Interactive Form with If-Else Statement One very useful thing you can do with PHP is include the request for user input and the response in the same file, using conditional statements to tell PHP which one to show.

Php And Operator
I have a database with 2 tables that I need to access/potentially modify. One table has a list of products (table name “product”), and information for each. The other stores identifying information for people who redeem a code for a product (table name “redeem”). Each product has a unique claim code associated with it, and is stored in the product’s “location” column in the “product” table. I have a form, where individuals can enter their name (first & last), email address, and a claim code. The first person to enter the claim code for a particular product “wins” it. As soon as someone wins a product, I want their name, email, and claim code to be saved in the “redeem” table of the database, as well as a “success” message displayed to the user. Any subsequent users who try to enter the same code, should receive an “error” message stating that the product has already been claimed, and nothing should be saved to the DB. If anyone enters an invalid claim code (i.e. a code that is not associated with any particular product), they should receive an error message stating that they entered an incorrect code. Also, nothing should be saved to the DB.
PHP conditional statements. You can use PHP If and PHP Else if conditional statements in PHP to perform different actions. These actions are based on the logic you want to perform using your code and get the result of the action. By using the conditional statements you can perform various tests in your code and you can out certain actions based on the test either true or false. Glitter Text Generator. Stars Hearts Cash Money Twinkle Shimmer: Select Font. Adorable, Blue/Purple Daisy,Pink Graffiti.
PHP code I have so far is:
Right now, no matter what I enter in the form that is passed to this script, the message I receive is “Sorry, you have entered an incorrect claim code. Please use your browser’s back button to try again.”
Php If And Else
I’m sure there’s a better way - especially since there seems to be 3 separate queries going on. Is there a way to simplify the query/some other way to do this?
0 notes
Text
Ticktick Notifications

Ticktick Notifications Not Working
Tiktok Notifications Discord Bot
Ticktick Notifications Free
Tiktok Notifications For Specific Accounts
When you use our services, you're trusting us with your information. We understand this is a big responsibility and work hard to protect your information and put you in control.
The notifications are working on the phone but were not pushed to the watch. Every other app works without any problems. Ticktick is running without any energy restrictions. Browse and install Task Management apps that integrate with Google Workspace. Google Workspace Marketplace has a wide variety of Task Management apps.
By accessing or using the Services, you agree to this Privacy Policy, and our Terms of Service. If you have any questions about this Privacy Policy, you can contact us.
Information TickTick Collects
Your activity & apps
At the time you register for TickTick, you voluntarily give us information such as your name and email address. You have the access and can update this information under your personal Account Settings at any time. We also collect aggregated, anonymous user data about the use of the app.
Your browsers & devices
We collect information about the browsers and devices you use to access TickTick. The user data we collect is used to enhance TickTick and the quality of our service. We only collect personal data required to deliver our services, and we only store it to the extent that it is essential to perform these services.
Your Location Information
We collect information about your location after you open background location access to TickTick. The location data is used to help us offer the Location Reminder feature. Your location can be determined by Sensor data from your device. You can turn your Android device's location on or off using the device’s settings app.
Why TickTick Collects Data
We use data to build better services. Your information will not be shared with others and will only be used internally for the purposes described below:
Provide our services
We use your information to deliver our services or information you requested, and to process and complete any transactions.
Maintain & improve our services
We also use your information to ensure our services are working as intended, such as tracking outages or troubleshooting issues that you report to us. And we use your information to make improvements to our services - for example, to analyze usage and trends with anonymous user data, and to improve the quality of our service and user experience.
Communicate with you
TickTick collects email addresses from those who communicate with us via email, as well as information provided through voluntary activities such as site registration or survey participation. We use the information we collect to interact with you directly.
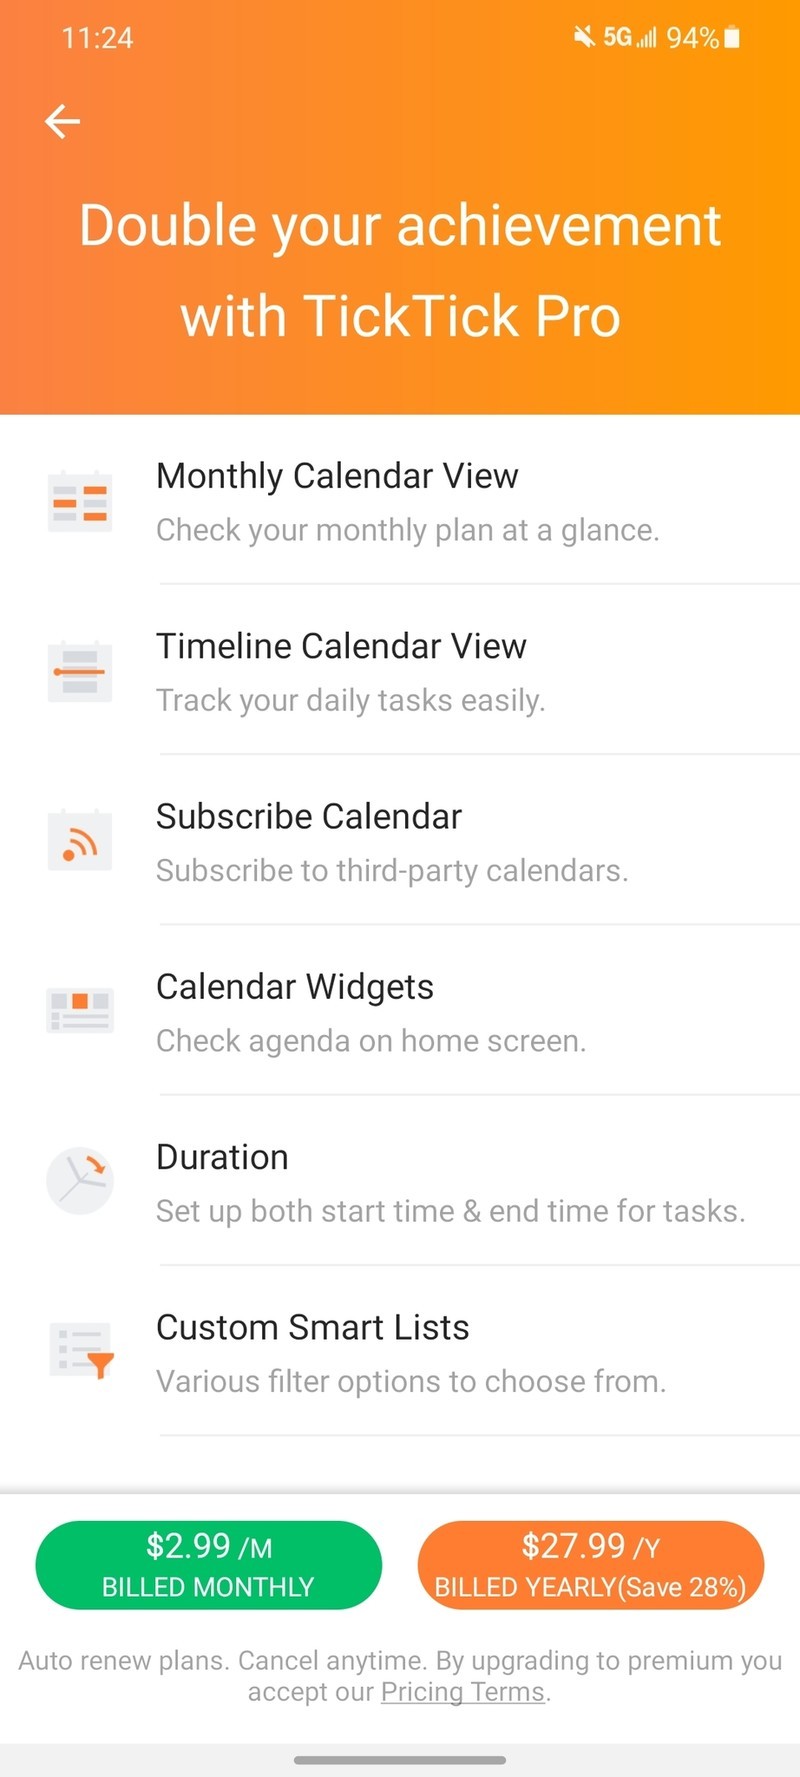
Protect TickTick, our users, and the public
We use information to help improve the safety and reliability of our services. This includes detecting, preventing, and responding to fraud, abuse, security risks, and technical issues that could harm TickTick, our users, or the public.
We use different technologies to process your information for these purposes. We'll ask for your consent before using your information for a purpose that isn't covered in this Privacy Policy.
You're also welcome to contact usto ask for our confirmation whenever you feel concerned about how your personal information is being processed, where and for what purpose.
Your Privacy Controls
While TickTick owns the TickTick application's code, databases, and all rights, you retain all rights to your data. You have choices regarding the information we collect and how it's used. TickTick will never sell your personal data with a third party, and we will never share data to third parties without your permission. When absolutely necessary, TickTick uses third party services and hosting partners who are GDPR-compliant. In such instances, we take essential security methods to guarantee that we comply with GDPR when sending and receiving data from third parties.
Cookies
Cookies are required on TickTick's Website. We use them to collect visitors' preferences and thus to better optimize the user experience. Users can disable cookies in their browser settings. But please note that our services rely on cookies to function properly, and you may not be able to access certain features on our Website after disabling them.
Keeping Your Information Secure
TickTick is built with strong security features that continuously protect your information. SSL protocol secures all data and information transmitted with Service. The insights we gain from maintaining our services help us detect and automatically block security threats from ever reaching you. And if we do detect something risky that we think you should know about, we'll notify you and help guide you through steps to stay better protected.
We work hard to protect you and TickTick from unauthorized access, alteration, disclosure, or destruction of information we hold. You can learn more about our security measures from the Securitypage.
Changes to This Policy
If our Privacy Policy changes at some time in the future, we will not reduce your rights under this Privacy Policy without your explicit consent. We always indicate the date the latest changes were published. If changes are significant, we'll provide a more prominent notice (including, for certain services, email notification of Privacy Policy changes).
Please check back periodically to keep informed of updates or changes to this Privacy Policy. By continuing to access and to use TickTick, you are agreeing to be bound by the revised policy.
To read more details and frequently asked questions about TickTick’s privacy and terms, please read the Privacy and Security FAQ in our Help Center.
Date of Last Revision: October 31, 2019
Latest version
Released:
Unofficial API for TickTick.com
Project description
Unofficial TickTick API Client for Python 3
Designed for TickTick.com API v2
Full Documentation
Description
ticktick-py is an unofficial API library for interacting with TickTick.com. It allowsusers a way to interact with their TickTick account using Python. Currently,as of 1/14/2021, there is no official API for TickTick.
Features
The API automatically fetches all the tasks, tags, lists, and more linked to your profile and stores them in a dictionary named state.
Tasks
Batch create, update, and delete tasks
Acquire all your uncompleted tasks
Move tasks easily between projects
Acquire all completed tasks in a certain date range
Tags
Batch create, update, and delete tags
Create tags with parameters that are not usually allowed: / ' # : * ? < > | Space
Projects
Batch create, update, and delete 'lists' (projects)
Batch archive projects
Quick Guide
Initializing Your Session
Once you have initialized your session, all interactions will occur through the reference, in this case: client
Example: Creating A Task
Lets create a task in our inbox titled 'Get Groceries', with the date as 5/6/2021 at 2:30PM:
Result
A dictionary for the newly created task is returned.
Created Task In TickTick
Most methods will return the object that was changed. Consult the usage documentation for more information on specific methods.
Installation
Note: ticktick-py requires Python 3.6 or above.
Future Plans

General
Enhanced Team Support
Tasks
Notification and Repeats For Tasks
Get and Restore From Trash
Projects
Smart List Support
Column Creation For Kanban View
Pomo and Focus
Getting the focus / pomo statistics for your profile
Starting and stopping the focus / pomo timer
Habits
Get, create, archive, delete, and complete habits
Release historyRelease notifications | RSS feed
1.0.2
1.0.0
Download files
Download the file for your platform. If you're not sure which to choose, learn more about installing packages.
Files for ticktick-py, version 1.0.2Filename, sizeFile typePython versionUpload dateHashesFilename, size ticktick_py-1.0.2-py3-none-any.whl (43.8 kB) File type Wheel Python version py3 Upload dateHashesFilename, size ticktick-py-1.0.2.tar.gz (41.7 kB) File type Source Python version None Upload dateHashes
Ticktick Notifications Not Working
Close
Hashes for ticktick_py-1.0.2-py3-none-any.whl
Hashes for ticktick_py-1.0.2-py3-none-any.whlAlgorithmHash digestSHA2568e2a5946b3da1e260af9840bc20f5ddcbb717f6cb706a613a8f013430f8f594fMD5c3c781d93e481818e8dc327c8f592657BLAKE2-256ab2116dd67e080b303d69dcd91013a98ea7449259468fa09b6c31d546d194626
Tiktok Notifications Discord Bot
Close
Ticktick Notifications Free
Hashes for ticktick-py-1.0.2.tar.gz
Tiktok Notifications For Specific Accounts
Hashes for ticktick-py-1.0.2.tar.gzAlgorithmHash digestSHA2564c31ec11e4f3c0981c19ee76646bf6ad254697c6158c071fca5de1009f1352a5MD589d7ebd2f458cb134f3420f9760d6299BLAKE2-2563ef11c87fdefb3f0697c409548d14b2acd266b43ee6e7762df240db5e552c544
1 note
·
View note