
Official Course Blog for BTEC Creative Media Production (Digital Publishing) Upper Sixth. To view older posts, click the Archive link below.
Don't wanna be here? Send us removal request.
Statistics
We looked inside some of the posts by digipubu6 and here's what we found interesting.
Average Info
Notes Per Post
0
Likes Per Post
0
Reblog Per Post
0
Reply Per Post
0
Time Between Posts
3 days
Number of Posts By Type
Text
17
Last Seen Tumblr Blogs


Fun Fact
Average visit duration of Tumblr.com is 10 mins and 25 secs.
Text
12 Jun | End of Year Show
A big thank you to everyone who came along to our End of Year Show last night. I hope you enjoyed seeing your work on display. Wishing you all the best for your future ventures! - Steph


0 notes
Text
10 Jun | Activities
We have scheduled at 9.00am Tuesday 10th June:
UX Design Workshop
Gavin Spoors, outreach officer from Norwich University will be running a UX design workshop with you all focusing on wireframes and user journeys
User Testing *
Karen Loasby, from Dogwood Digital, will be asking for volunteers on the day to do some UX testing for Norwich University's website. She will focus on the phone version, so volunteers will be observed on how you use it on mobile devices.
*Volunteers will receive an Amazon voucher
0 notes
Text
2-3 Jun | End of Year Exhibition Poster Displays
We are approaching the end of the course, and it’s time to prepare for the End of Year Exhibition on June 11th. Please work through the following task independently.

Task: End of Year Exhibition Poster Displays
For the end-of-year show, every student will have one banner to showcase their best work from the course. The banner will hang from the ceiling, displaying the chosen work. It is your responsibility to select the work you would like to feature and use our exhibition poster templates to create the display.
To start, please pick out *high-quality images* of your favourite pieces of work. DO NOT use screenshots - they are poor quality and will pixelate.
Download the banner template zip file here.
Open the template in Adobe InDesign, then input your images - you can mix and match the sizes of your images as long as you keep within the grid.
Change all text as appropriate and check your spelling.
When your Exhibition banner is complete, package it, compress it and please upload it to Moodle here.

What happens to my work when I leave College?
You won’t be able to access your student OneDrive indefinitely once you have left, so don’t leave your work there and lose it.
Before you leave, it is a good idea to spend time tidying up and organising your files to take your work with you. Bring a USB with you, or upload your work to a personal cloud storage account such as Google Drive or Dropbox.
0 notes
Text
Submission Link
Submit your work as one ZIP file to Moodle here:
W-00010-23-Q01-Y2: B2 Final Major Project - due Friday 23RD May 2025 | New City College
Deadline Friday 23rd May 10pm.
0 notes
Text
20 May | Instagram Stories
SAS
Our last piece of set work is creating two Instagram Stories.

TASK 1: You will create 2x Stories for Instagram:
#1 - The Coming Soon Story should be designed to be posted one month before launch of the exhibition - entice your audience with what is coming soon - hint at what you have to offer, but try not to fully reveal all your products. Keep your audience intrigued.
#2 - The Launch Story should be designed to be posted the day before the exhibition launch. This story should reveal your products, let your audience know where the exhibition will take place, and what they can expect.
Requirements for your 2x Stories:
Adobe Photoshop or Illustrator.
Size: Width 1080 pixels x Height 1920 pixels.
Each Story made up of minimum 5 frames (images).
Name each image and in the order you would like them viewed - eg. ComingSoon1, ComingSoon2 etc…. Launch1, Launch 2…
Export all images as high quality JPG files.
How to make the GIF
Starting with your Coming Soon Story, please:
Upload all images to the GIF maker website.
Reorder so that they are in chronological order.
Toggle the animation speed bar to find a speed you like.
Check canvas size is 100%.
Create GIF animation and download.
Rename your downloaded GIF ComingSoonStory.
Repeat the steps above with your Launch Story.
Add both GIFs to your Supporting Document.
TASK 3: Write an evaluation, focussing on:
What were your ideas behind the designs for both Stories?
Do the Instagram Stories fit in with the aesthetics you have used for your Instagram account takeover, and products?
Ask a peer for feedback and record their comments.
What could you improve if done again?
Deadline for this project is Friday 23rd May.
0 notes
Text
19 May | B2: Exhibition Poster #2
NER - B2: Final Major Project

Task: You now need to create a poster to promote the exhibition taking place at the college.
Poster Information:
Title - End of year show Where - NCC Havering Sixth Form Locations - Minster Court, International Building and the Gatehouse Date - Wednesday 11th June 2025 Times - 1600 - 1900, (1700 start of the TV and Film screening) NCC Logo - Click here.
Qualification on show - BTEC Digital Publishing, Games Development and TV and Film. A-Level Fine Art, Graphics, Interior and Architectural Design, Product Design, Photography, Music, Music Tech, Music performance, Film Studies and Media Studies.
Dimension: A3 portrait + A6 landscape Adobe InDesign. Exported as Adobe InDesign Package.
Document this within your B2 supporting document under the heading of “B2 Havering Sixth Form Campus, Minster Court - Poster 2”.
0 notes
Text
16 May | B2: Exhibition Poster #1
NER - B2: Final Major Project
Task: You now need to create a poster to highlight the exhibit/theme of your project at the Natural History Museum. You will need to use elements from your project as a base to work from. Poster Information: Natural History Museum logo. Name of exhibit Location of exhibit Short introduction of the exhibit (100-150 words)
Dimension: A2 - 420x594mm and should be created in Adobe InDesign.
Document this within your B2 supporting document under the heading of“B2 Natural History Museum - Poster 1”.
0 notes
Text
14 May | Instagram Takeover
SAS
Utilising social media as a marketing strategy is important in any campaign. For a short time period you will take over the Natural History Museum’s Instagram account, posting images and stories to promote your contribution to the Journeys exhibition.

TASK 1 - Find and screenshot Instagram accounts which you find interesting (best done on your phone then email to your college account)*. The accounts could fit some of the criteria below:
The same / similar topics as yours
Natural history illustrators
Other museums
Influencers / individual campaigners relating to your topic
Add your screenshots to your Supporting Document, describing the kind of content shared and analysing the purpose of the account.
TASK 2: Create an Instagram grid. Download the grid template here. The template is fully editable; so you can change every piece of text etc. Using Photoshop, you will need to create:
9 images for your Instagram grid (can be a mix of image + text)
Images for story highlights
Use the Natural History Museum logo for your profile picture
Use the NHM username, but write a bio relevant to your campaign
TASK 3: Create a single post. Download the single post template here. Using Photoshop, you will need to:
choose ONE of your images from your grid to reuse
write a relevant 50+ word caption
write 5+ appropriate #hashtags
add in Natural History Museum profile picture, username and location
View this folder for alternative Instagram mockup templates.
TASK 4: Write an evaluation, focussing on:
What were your ideas behind the design and contents of your grid?
Does the Instagram account look consistent aesthetically with the rest of your collection?
Who would you expect to follow this Instagram account?
Ask a peer for feedback and record their comments.
What could you improve if done again?

EXTENSION TASK: Try making an ‘Instagram Puzzle’ style grid.
Download the template here.
Create your ‘puzzle’ design across the one large square.
Using the Crop tool, crop your design into 9 equal squares, saving each individual square as a separate JPG.
Add your JPGs to the grid mockup from TASK 2.
Write a short 100+ evaluation comparing your Instagram Puzzle grid to your original Instragram grid.
Include in your Supporting Document.
0 notes
Text
13 May | Collection Graphic
SAS
It’s time to think about your merchandise now more as a collection. You will work on bringing your merch together as a whole.

TASK 1: Naming your collection. The name should encompass the overall look and feel of your collection. Think of keywords relating to your project. Consider: what could capture the interest of your target audiences?
Mindmap / list 10+ keywords which relate to your collection. You will use these words as inspiration to create a name to move forward with.
Write down your chosen name, plus a tagline, which says a little about your collection.
Explain how the name and tagline are appropriate to your collection’s identity.
TASK 2: Create a graphic which brings the whole of your merchandise collection together. It is up to you how to present this graphic, but it must meet these requirements:
Photoshop or Illustrator
Size: Width 2000 pixels x Height 2000 pixels
Include your Publication, Tote Bags, Pin Badges, T-Shirts and Mug.
TASK 3: Write an evaluation of your collection graphic:
How successful do you believe your collection is?
Explain your design choices.
Did you encounter any obstacles whilst compiling your graphic?
Ask a peer for their feedback - record their name and their comments.
What could you improve if done again?
0 notes
Text
7-8 May | Mug Mockup
SAS
This is the last product you will mockup as part of your merchandise collection. A common product sold in gift shops is mugs. See some being sold at the museum here.

TASK 1: Sketch ideas for a mug design to appeal to your audience. Your mug must feature the Natural History Museum logo on the bottom of the mug, plus the box.
Add your sketches to your Supporting Document and annotate with your thoughts behind your design ideas.
TASK 2: Design your mug. Screenshot as you make, please:
Download the mug mockup template
Open in Photoshop.
Click on the thumbnails on the Layers panel to make changes to aspects such as all sides of the mug, the box and the background colour.
Your mug must feature the Natural History Museum logo on the bottom of the mug, plus the box.
Save as JPG.
Hide all background layers inc shadow to reveal a transparent background, then save a copy as a PSD file.
Add your final JPG to your Supporting Document.
TASK 2: Evaluate:
What have you done to appeal to your target audience?
Describe your thoughts behind your box design.
How successful do you feel your mug is?
How would you price your mug?
Ask a peer for their feedback - record their name and their comments.
What could you improve if done again?
PDP: Thursday - what have you achieved?
Reflect on whether you have met your goals for this week.
Did you come up against any struggles?
How did you overcome them?
0 notes
Text
6 May | T-shirt Mockups
SAS
Design 3x t-shirts to appeal to each of the three target markets you outlined in your Proposal to be sold in the gift shop. See some t-shirts currently being sold at the museum here.

PDP: What are your goals for the week? Write down what you hope to achieve this week and how you plan to do it.
TASK 1: Sketch ideas for a collection of 3X t-shirts to appeal to each of the three target markets you outlined in your Proposal. Sketch out a variety of design ideas for each of your 3 tshirts on paper or digitally. Each t-shirt must feature the Natural History Museum logo.
Add your sketches to your Supporting Document and annotate with your thoughts behind your design ideas.
TASK 2: Design your t-shirts. Screenshot key stages as you go along - annotate them with the steps you took.
Download the t-shirt mockup template. Open in Photoshop.
Add your design to the YOUR DESIGN layer. CMD+S then close tab to return to main design.
Change background colour to suit, add gradient or image if you wish.
Save as JPG.
Now turn off the view for the CHANGE BG COLOUR layer. File > Save As > name your file T-shirt1Transparent and save as PSD fie.
Repeat steps for your remaining two t-shirt designs. Include your final JPGs of your 3x t-shirts in your Supporting Document.
TASK 3: Write an evaluation to cover all 3x t-shirts - focussing on:
How successful do you believe you have been in targeting each of your t-shirt designs?
How do you they work together as a collection?
Why might somebody buy a t-shirt?
How would you price your t-shirts - individually and as a set?
Ask a peer for their feedback - record their name and their comments.
What could you improve if done again?
0 notes
Text
1 May | Pin Badge Mockups
SAS
It is always good to have some items for sale at a lower price point. Today you will design 3 pin badges, which can work together as a set, or stand alone.

TASK 1: Design 3 pin badges, which can work together as a set, or stand alone. Use the template provided to alter the colour of the pin badge, place a PNG design and swap the background colour.
Ensure you end up with 3x badges with backgrounds, and 3x PSD files with transparent backgrounds.
Screenshot your making and add to your Supporting Document.
TASK 2: Evaluate your three pin badge designs:
Who would buy them?
How would you price them individually, then as a set of 3?
How successfully do they fit in with the rest of your growing Journeys collection?
Show your designs to a peer and record their feedback.
What could you improve?
PDP: What have you achieved?
Reflect on whether you have met your goals for this week.
Did you come up against any struggles?
How did you overcome them?
0 notes
Text
30 Apr | Tote Bag Mockups
SAS
Design a collection of 3x tote bags for your buyers to choose from when purchasing your Publication from the gift shop. See some on sale at the Natural History Museum here.
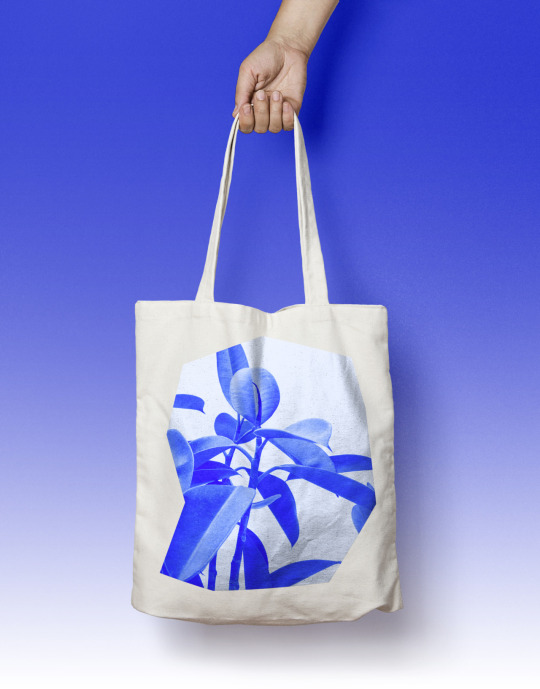
TASK 1: Sketch ideas for a collection of 3x tote bags. Your tote bags, when lined up together, must form a journey. Think back to the earlier work on journeys we did at the beginning of the project in your Supporting Document. Please sketch out a variety of design ideas for each of your 3 tote bags on paper or digitally. Each tote bag must feature the new Natural History Museum logo.
Add your sketches to your Supporting Document and annotate with your thoughts behind your design ideas.
TASK 2: Design your tote bags. Everything can be edited in this mockup. Screenshot key stages as you go along and annotate them with the steps you took.
Download the tote bag mockup template
Open in Photoshop.
Add your design to the YOUR DESIGN HERE layer. Include the Natural History Museum logo. CMD+S then close tab to return to main design.
Change colour of tote bag, select TOTE BAG layer, then Layer > New Fill Layer > Solid Color > Tick ‘User Previous Layer as Clipping Mask’. Then, change layer mode from Normal to Multiply.
Change background colour - click CHANGE BACKGROUND COLOUR layer. If you prefer you can instead add gradient or image as a new layer. Save as JPG.
Now turn off the view for the following 4x layers: Shadow, Texture overlay, Gradient Fill 1 and CHANGE BACKGROUND COLOUR.
File > Save As > name your file ToteBag1Transparent.
Repeat for your remaining tote bag designs.
Include your final JPGs of your 3x tote bags in your Supporting Document.
TASK 3: Write an evaluation to cover all 3x tote bags - focussing on:
How successful do you believe each tote bag design is?
How do you feel you conveyed a journey?
Why might somebody buy a tote bag?
How would you price your tote bags - individually, and as a set?
Ask a peer for their feedback - record name and comments.
What could you improve if done again?
0 notes
Text
29 Apr | Publication Mockups
SAS
Let’s start with your first item of merchandise for the gift shop: your Publication. It is beneficial to have mockups of publications to see how they could look before you print.


TASK 1: Download the correct templates below:
Publication mockup (front, front and back, inside)
Foldout Poster mockup (repeat for each poster)
If you opted for a different product, please search for alternative free mockup templates to use.
TASK 2: Open your template files in Photoshop and follow the tutorial here. Screenshot key stages as you go along - annotate them with the steps you took.
Add all final JPG images to your Supporting Document.
TASK 3: Evaluate:
How successful do you believe your publication mockups are?
Why did you make the design choices you did?
When do you feel the mockups might come in use?
Ask a peer for their feedback - record their name.
What could you improve if done again?

EXTENSION TASK: Create an A3 poster advert for your Publication. Include the price, where it will be on sale (NHM gift shop), Natural History Museum logo, as well as text to catch the audience’s attention.
Export as PDF when finished and add image to your Supporting Document, explaining your idea behind your advert.
0 notes
Text
28 Apr | B2: My Publication - Printing & Binding.
NER - B2: Final Major Project

The next stage we will need to consider is printing and binding your publication. Now you have selected your paper, you will need to think about the printing and binding. Again, this can have a huge impact on the way your publication looks and feels.
Task: For the first 15 minutes of the session, I would like you to write down how you would print and bind your publication. Consider the pros and cons of the possible methods available to you. Remember that your choice of paper will also have an impact on how it will be printed.
I will be then coming around to have 1-1 with you all regarding this stage of making your publication.
Document this within your B2 supporting document under the heading of “B2 My Publication - Printing and Binding”. Please keep all Printing and Binding-related work together.
0 notes
Text
25 Apr | B2: My Publication - Paper
NER - B2: Final Major Project

For the next part of the project with me, we will concentrate on the planning needed to make your publication. This will include selection of paper, printing and binding. The first part of making your publication is selecting the correct paper to use. The colour, weight and texture of the paper can have a huge impact on the way your publication looks and feels.
Task: Using the samples of paper provide, you will need to investigate the different paper types and their possible impact on your publication. Consider colour, weight and texture.
By the end of the session, you all should have an idea of what kind of paper you wish to print your publication on. Document this within your B2 supporting document under the heading of“B2 My Publication - Paper”. Please keep all Printing and Binding-related work together.
0 notes
Text
24 April | Blue Serif Talk & Portfolio Crit
SAS - B2 Major Project
8.30 - 9.00 - Finish outstanding Supporting Document work.
9.00-10.00 - Matt Barry from brand design agency Blue Serif is coming in to give a talk and portfolio critique to first year and second year Digital Publishing students. Please ensure on you have work loaded on your computer you would like to receive feedback on - whether that is portfolios you created for B1 or specific advice on your current B2 project. If you have any questions career wise, have these ready to ask at the end of the talk.
10.00- 11.00 - Matt will be doing portfolio critiques during Tutorial time.
0 notes