
A fabulous Victorian Velociraptor who still has no idea how to use this but is trying very hard.
Don't wanna be here? Send us removal request.
Statistics
We looked inside some of the posts by dino-in-a-dress and here's what we found interesting.
Average Info
Notes Per Post
268K
Likes Per Post
122K
Reblog Per Post
146K
Reply Per Post
674
Time Between Posts
4 months
Number of Posts By Type
Text
16
Note
1
Last Seen Tumblr Blogs


Fun Fact
Tumblr has a 66 index score for customer satisfaction in the US.
Text
Coming up in May:
Here's a sneak peek at the plates for May!

3 notes
·
View notes
Text
Raglan crop blouse.
Pretty Easy Blouse Tutorial
A more recent trend in lolita fashion is the cropped sheer blouse that’s meant to be worn only under a JSK. They’re inexpensive, but they’re also very easy to make on your own.

Yes, the Mannequin Corner is a mess. That’s just how this blog is, these days.
So, first, the pattern:
Due to the gathered nature of this blouse, you can get carefree and almost sloppy with how you draft this, and still have a good result.
The front and back are the same shape.

And the whole thing is constructed like a raglan sleeve:

For the front, draw a box that’s (the measure of your fullest part of your bust+10″)/2. Cut off the top corners so that there’s a 12″ long slanted line on each corner. The angle of this line controls how baggy the armpits of your blouse are, which also controls how easily you can raise your arms over your head. A more vertical line will give you smoother armpits and make raising your hands harder, and a line closer to 45 degrees will give you baggier armpits but a lot of overhead motion.
For the sleeve, wrap a tape measure around your arm where you want the sleeve to be the fullest, and add or take away fullness until you like how baggy the sleeves are in your mind. I wish I had a better way to describe that, but all I can come up with is “visualize your dream sleeve and then measure that illusion in your mind” and that also doesn’t help.
Give the top of your sleeve some slanted lines that are the same length as the slanted top part of your front and back.
Again, since this is meant to be full and blousey, the exact measurements aren’t super important. What’s important is that the left and right side are symmetrical, that the overall size of the blouse is larger than your total bust measurement, that the slanting lines at the top of the front and back pieces are the same length as the slanting lines at the top of the sleeves, and that you have enough room up top to put your head and shoulders through.
Once you have your pieces, it’s time to cut out of your fabric. This pattern is meant to be used with something drapey and thing, that gathers well. It’s usually made of something sheer or with very little coverage. Chiffon, voile, chantilly lace all work well. I used some $4 raschel sheet lace because I wasn’t sure this pattern would work. When picking your fabric, keep in mind what kind of JSK you’re putting over this blouse. What level of detail do you need to keep it balanced with the rest of the look?
If you’ve got the kind of fabric that frays, like chiffon or crepe, finish off the edges of all four pieces before you start assembling them.

Start by sewing the slanted edges on the sleeves to the slanted edges on the front and back. You’ll end up with your neckline edge sewn and the whole thing will start to look blouse-shaped.
If you followed my pattern up there, your sleeve pieces will look taller than mine. Mine are sad and flat. Give them some poof and don’t make your sleeve top edges 4″ like I did.
Now, you’ll have your sleeve seams and the side seams of the blouse body open. Sew those shut, so that you have an awkward tubey oversized blouse.
You now need to decide how you’re applying your elastic. I used the elastic-thread-in-the-bobbin tactic and just did three or four lines of elastic shirring. I did this because I didn’t have any 1/4″ elastic and didn’t want to go to work on my day off.
Other good methods include using bias tape or ribbon to make a little applied casing, and then threading 1/4″ elastic through; hemming the neckline edge and putting elastic in the hem; or pinning the elastic down and stretching it as you sew.
Whatever style you pick, make sure you’re comfortable with it.

Because we are about to commit to doing a lot of it. I started up with my neckline. Since my lace had a scalloped selvedge, I used that edge for my neckline, and got a good result. If you don’t have a nice looking edge, you might want to sew some lace onto this edge, just to make the blouse a little more extravagant looking. Otherwise, make sure you have a nice-looking hem.
Start by going around your neckline edge and gathering that in where you like the look. It’s important to do the neckline first, because that’ll let you accurately judge where you want the other lines of elastic to go.

The next line that I did was under the bust. If you have boobs, putting the elastic line under the bust stops your blouse from pulling up and bunching when you lift up your arms. You can decide if you want to trim the rest of the blouse underneath the elastic line, or if you don’t want to do that.
Now’s also the time to run your line of elastic around the bottom of the sleeves, to draw them in to gather them. Depending on where you put the line of elastic, your sleeve can be many shapes.
Since I wanted some hime sleeves (or hime-inspired), I cut a half-circle sleeve extension and attached it to the end of my sleeve. Slapped some nice custom-dyed lace onto the end and boom, fancy sleeve. There’s still a line of elastic at the point where the sleeve extension meets the sleeve of the blouse, which makes it cute and puffy.
Tie off your elastic ends and clip your threads and you’re good to go.
Anyhow, this whole thing took less than half a day to make even with only one hand, and ended up being very comfortable and a much better match to this JSK than the one I had originally planned for it. The lolita crop-top isn’t a good blouse for everything, but it’s a nice little thing to whip up in an afternoon to expand your wardrobe.
287 notes
·
View notes
Text
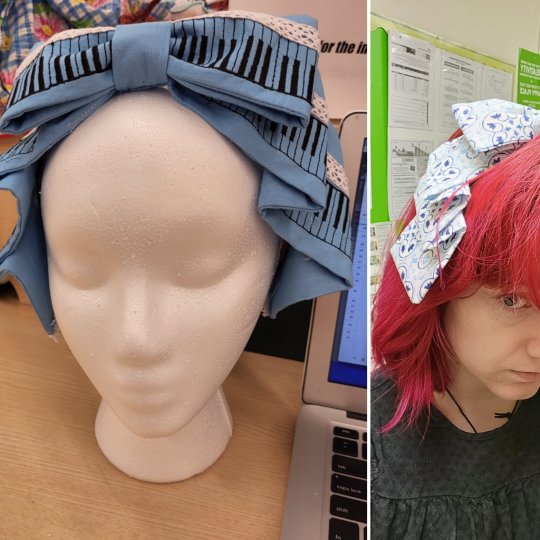
Bow proportions
Someone on a sewing discord I follow that was created by @20dollarlolita asked if anyone had the dimensions of a BtSSB headbow so they could make their own and I drew up a schematic. Decided to also include my AP headbow as well for comparison. Enjoy!

The bow itself is extra long because of internal wire. To create the double bow effect you just fold in the edges of the loop.
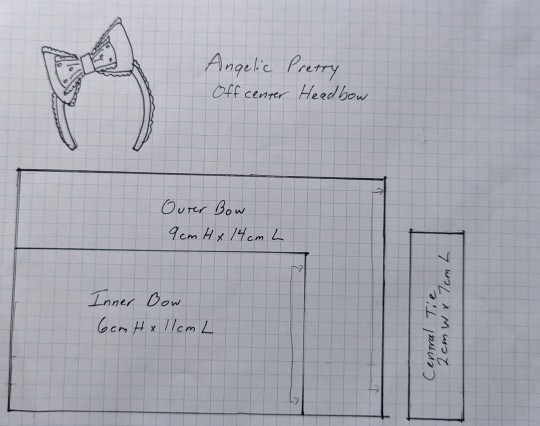
The AP bow is really good to scale up or down because the finished product is very precise.
Both of these are the finished dimensions. If you want to use it to make your own- don't forget seam allowance! ❤️🧡💛💚🩵💙
228 notes
·
View notes
Text
Holly Loli Headbow link and instructions
My personal instructions for the Holi Loli tiered headbow pattern
<Note: I've literally spent like 4 hours on this post, was making a final adjustment, and tumblr ate the post. This is the same post, rewritten from memory, by someone who is now very angry>
Good headbows are kind of hard to make, because they rely so much on good proportioning. Because of this, it's helpful to find a good pattern with good proportions, and use that. After all, that's what patterns are for.
This $4 pattern makes a very lovely headbow, but unfortunately, it doesn't come with instructions [more on that later]. Because of that, I'm going to share the method that I had to figure out to use this pattern. This is entirely my original method that I determined by using my experience sewing, and will probably differ from the way that Holi Loli assembled their example bows. This is not me reposting anyone else's work and is just my interpretation of how to make a pattern that did not come with instructions.
Let's begin.
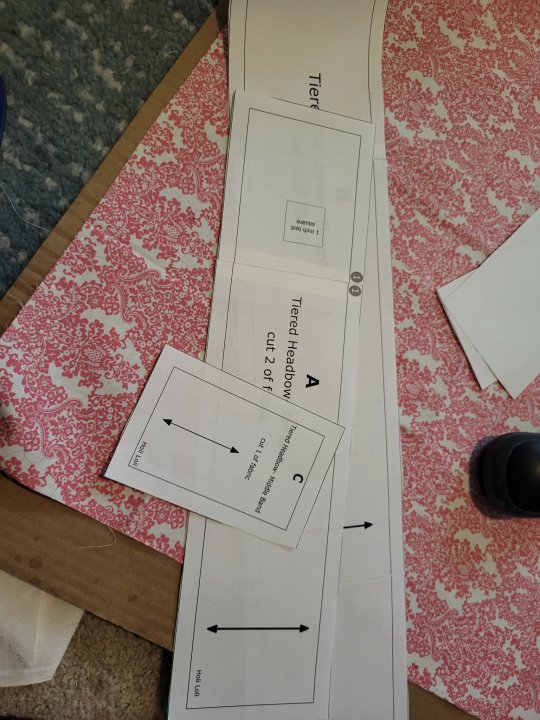
The pattern does come with instructions on how to print the pattern on your home printer and assemble it, and these steps show that they do know how to make instructions.
There are six pattern pieces, for three components of the bows. The pieces are called A, B, and C, and there are pieces for the fabric and for the interfacing. These pieces do have cutting instructions on them, so cutting out the interfacing is relatively straightforward.
However, I deviated when it came to cutting out the actual bow.
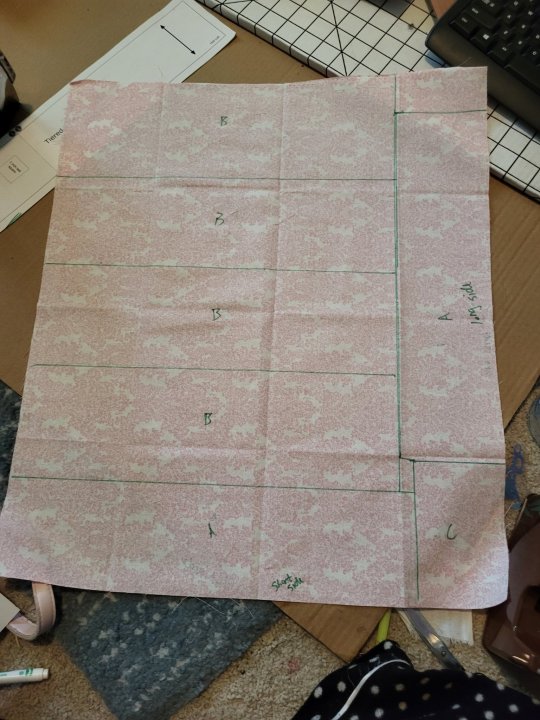
These bow components fit perfectly on a fat quarter without almost any leftover space. To do this, fold piece B in half, and then cut four of that piece.
Piece C is in the corner, with the short side along the short side of the fat quarter and the long side along the long side. Then, one copy of piece A goes along the short side next to piece C, and the other piece goes along the long side next to piece C. Four copies of piece B will stack nicely in the remaining space.
Yes, this means that one copy of piece A will be at a 90 degree angle relative to the other pieces, but you can use that piece as your facing and no one will ever know, since it'll be inside the bow loops.
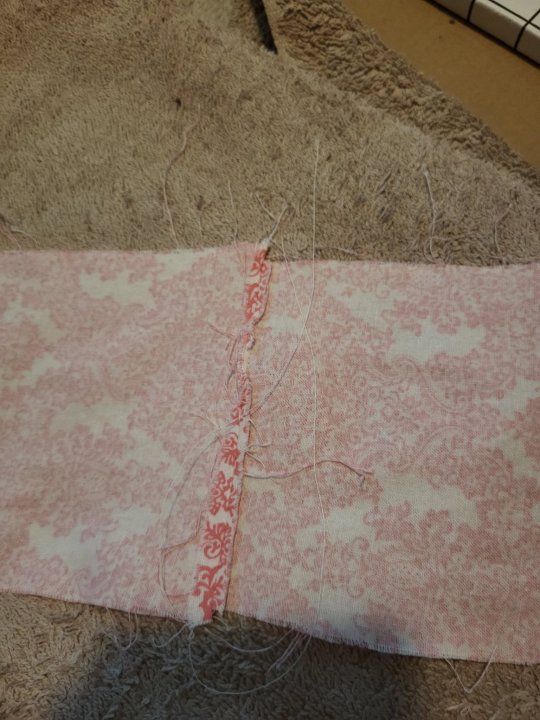
You now need to take your piece B's and sew the short sides together so that you have pieces that are the size of your actual pattern piece. Use the smallest seam allowance you can. This seam will be hidden under piece A and piece C, so it doesn't need to be beautiful and matched.
Look at your pieces B and A and decide which will be the front, and which will be the facing. On piece A, the piece with the sideways print will be your facing. Fuse your interfacing onto the facings of A and B, and onto the back of piece C, since there is no facing on that.
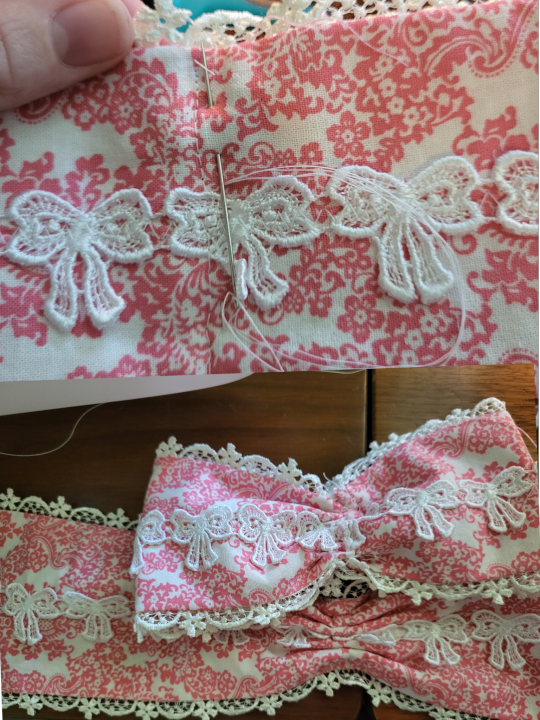
We add lace. This pattern looks good with a single line of details running down the length of both A and B. I'm using lace here but I've also used machine embroidery, and it looks good. This is a good size project to use your repositionable hoop on, if that's what you're into. Here, I'm using a premade venise lace with some bows.
Based on the pattern drawings and the fact that this shop is in Canada, I think this pattern uses a 1cm seam allowance. So, I placed my edging lace at 1cm in from the edge, with the decorations pointed inward. This way, when I turned them to front, the lace is pointing outward.
The way I assembled this bow, part A is sewn as a tube, with the ends open. Part B is sewn almost all the way around, with just a little hole for turning. This means that I needed to put lace on the ends of part B, but it would be a waste to do it on the ends of part A. (You can also save some lace by not applying it to the last inch or so of part A on each end, since that will be folded back).
The lace is sewn on first, and then the facings are placed right sides together on their respective pieces, pinned, and sewn. If you did lace edging, it helps to sew this piece with the lace side up, so you can see where the edging actually is.
So, piece A: Sew the two long sides so that you have a tube with open ends. Turn to front and press. Piece B: Sew almost all the way around the piece. Leave a couple of inches of space near the center seam. You leave the hole here so that it will be covered by piece A and piece C in the finished bow. Turn the piece inside-out and press. Piece C: Fold in half like a hot dog. Sew down the long side. Turn to front. Roll the piece so that the seam is in the back, press, turn to front, press again. This hides the back seam.

Fun fact, I tend to get into a groove and autopilot sew all the way around the piece, and then have to seam rip my opening, because I sewed it shut. To avoid this, I will make a little plus sign with two pins at the point where I need to start and stop, so that I can't forget.

You need to join the two short edges of A together so that it becomes a loop. I did this with a zigzag where the stitches fell off the edge on the right side. This trick lets you open it up to a seam that's completely flat. You can also just stick the two ends over each other and sew down that.
My scissors in that bottom picture show the opening I had to leave to turn piece B to the front. Since this piece will be hidden under pieces A and C, you can just sew that together on machine, being careful to sew near the edge.
Thread up a hand sewing needle and some hefty thread, though, because you now need to gather your central bow bits. Normally on a bow, I stack the two pieces and then fold them into an M, but my interfacing made that incredibly difficult, so I gathered them separately. No picture, but after I gathered the A part, I still wasn't happy with the way it lay, so I took some of my chunky thread and just wrapped it all the way around the middle so that I could snug it up a little bit.
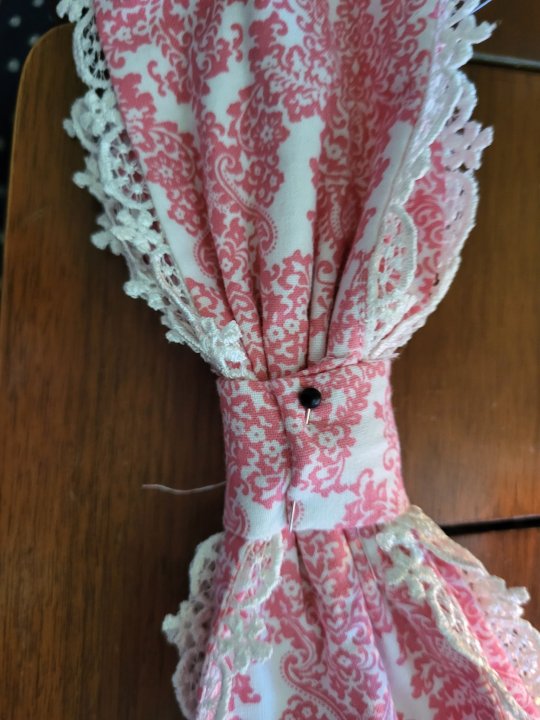
Stack pieces A and B, and wrap piece C around the middle. Tuck the raw edge down so things are pretty, and sew this seam shut.
I got my headbands for this for 99cents for two at Goodwill, and they don't have the kind of bar where you can slide the bow onto the band, so I will attach this with several whip stitches after I set the B part into its tiered ends.
Setting the tiers is a little bit of an art, and I'm going to say that because every time I tried to measure these, it looked bad. Actually, it looked so bad on this pink headbow that I'm using these two examples instead. The end results come from a little bit of measuring and a lot of eyeballing things until they look right and even.
I took a lot of inspiration from this tiered bow that I already own. I'm at the picture cap for this post so here's a link to my International Lolita Day 2022 coord where I was wearing it. You can look up more bow options to try to figure out how you like things.
I found it easiest to tack the bow with pins and then stick it on my head to see where it looks the best. What we know from this pattern is that it is possible to do a really nice tiered effect with these proportions, so just keep messing with it until you unlock the secret...and then try to remember it for your next bow!
Once you have your tiers proportioned, I found that I liked whipstitching the back side of the pieces together, and then steaming the bow to get it to stay pretty and in this shape. You can use a couple of tacking stitches or some fabric glue if you'd rather.
And then, I sew the center of the bow and the very tail ends of the tiers to the headband, so that everything looks nice and pretty and stays in place. There you go! You made a bow!
Final note:
Addressing the elephant: I am aware that you can purchase a separate tutorial for this pattern. The pattern is $4 and the tutorial is $10. They are sold as separate products and I am going to treat them as separate products. I did not buy the tutorial. This tutorial that I have just made is my own interpretation of the pattern, based on my own sewing experience, showcasing techniques that are probably not or definitely are not in the tutorial.
As someone who has made a LOT of tutorials, I'm aware of how much work they are, and I believe that if someone wants to be paid extra to make a very thorough tutorial, it's fair to ask for extra money as compensation for the work.
Here's where we get to it, though. This tutorial and this pattern are not Pokemon Red and Pokemon Blue. Pokemon Red and Blue are two games that can stand alone, but where 100% coolness is accomplished by playing both of them. This is more like buying "a cup of soda" for $1 and they hand you an empty cup, and the fine print says that the "of soda" is another $3. It is two halves of a single product. Babelstitch actually did a post where she bought JUST the instructions and tried to use them like they are a standalone product, without the specific Holi Loli pattern. It's a funny post.
But, if "tutorial for this specific bow" is a standalone product, having another tutorial out there for this bow should threaten them about as much as there being other headbow patterns. Do my headbow patterns (x) (x) that I provide for free potentially bring traffic away from this Holi Loli headbow pattern? Probably, but I still recommend buying this pattern, because hers offer something that mine do not. Her bow pattern is better than mine, so you should buy it.
If "tutorial for this bow" is a standalone product, it competes with hers in the same way my headbow patterns do. If her tutorial provides things that mine does not, and it can prove its worth as a $10 product, then it should still sell despite my own, separate, standalone (free) product.
I can go into more things, like how the headbow pattern listing really heavily permits people to believe they're buying instructions, and how there's no refunds on digital downloads which forces people who weren't paying attention to buy the instructions just to complete their project, how the low price and weird wording on the listing makes it very easy to share and favorite this pattern and drive more publicity to the shop even if people aren't buying the pattern, etc. However, if y'all want me to go on a rant about something along those lines, you actually want me to review the Kliot loom by Lacis because that's an ACTUAL CONSPIRACY and this is a sewing tutorial.
So, in the end BUY THE PATTERN BECAUSE THAT PATTERN IS REALLY GOOD. I'M REALLY GLAD THAT I BOUGHT IT AND I'VE MADE FIVE HEADBOWS WITH IT ALREADY. and buy the tutorial if you think it'll help you, but don't get trapped into buying the pattern because you thought there were instructions and there weren't.
45 notes
·
View notes
Text
Frill Skirt Tutorial
Here's a tutorial for making a lolita skirt with a fully elastic waistband.
Recommended background reading: How to pick quilt prints for use in lolita fashion. And here's some things I've previously said about this project.

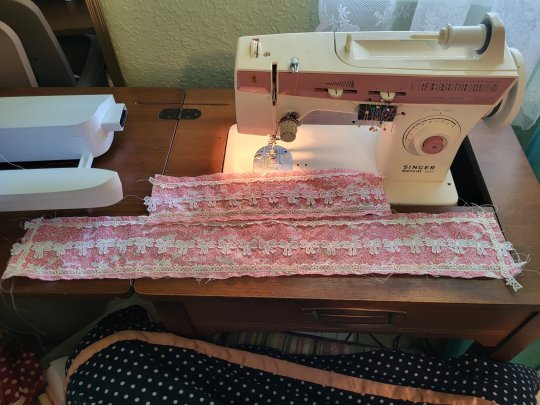
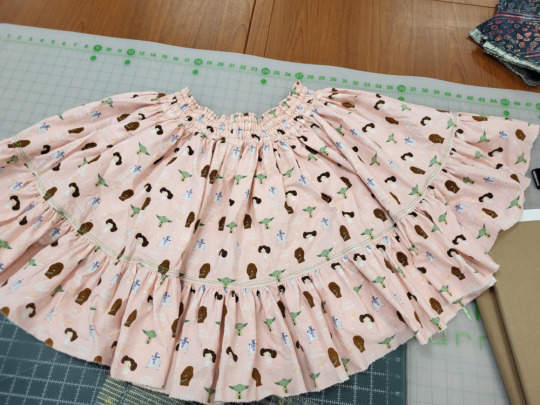
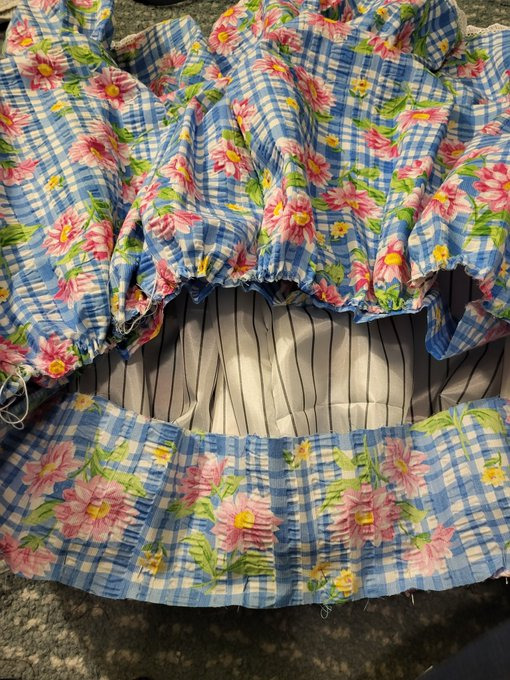
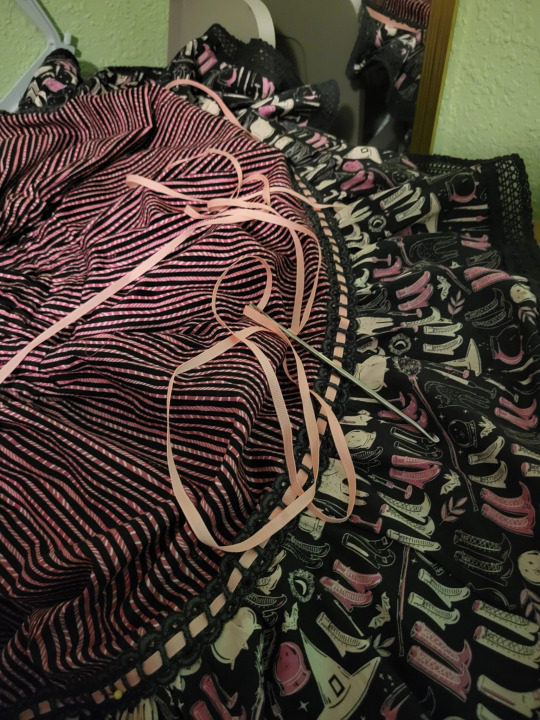
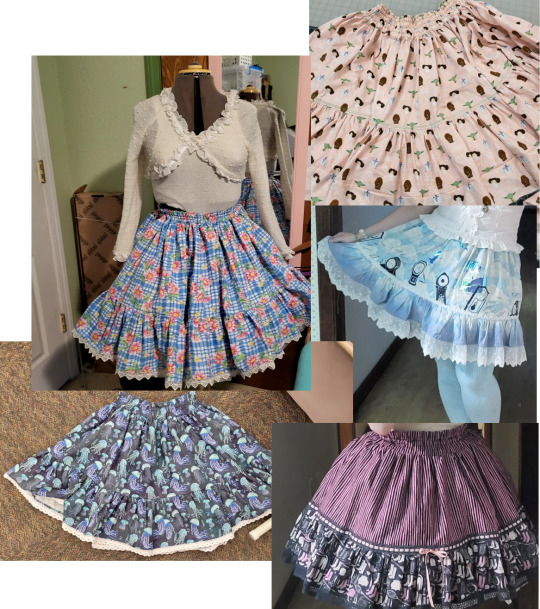
We're going to make some skirts that look like this. This is a really fun project because you can use a lot of quilt prints, and fully elastic skirts are comfortable and flexible wardrobe pieces.
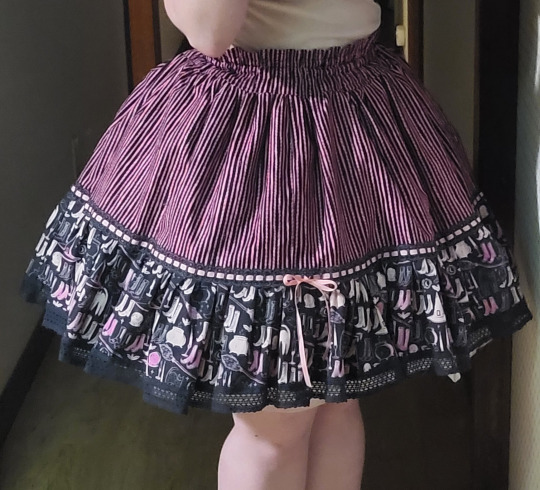
In this skirt, my pink striped fabric is "Skirt", and the navy with the shoes is "frill". The black lace at the bottom of the skirt is the hem lace, and the lace with the pink ribbon is the transition lace.
You can use the same fabric for the frill and the skirt, making it look more like the skirts referenced above. If you use different fabric for the frill and the skirt, it's is a little bit like faking a border print.
Here's some cutting dimensions. Please excuse the fact that I forgot to turn off "emulate brush dynamics".
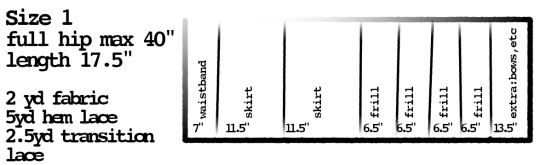
Because this is elastic, we're going to be basing the sizes off how much fabric you cut. When you're working with a big, gathered rectangle, you have a lot of options for how much ease you're going to put in the garment.
I forgot to list it, but these skirts really look better when they're lined with a slippery lining fabric. For lining, you just need the "skirt" measurement. For size 1, you need 23" of lining, or 2/3 of a yard.
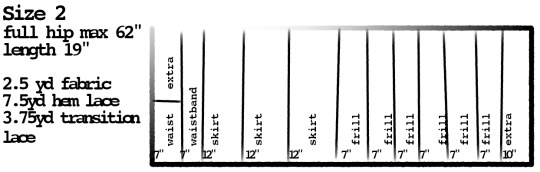
For size 2, you're going to want 36" of lining, or one yard.
All these sizes include some fabric for extra things like bows and hair accessories. I highly, HIGHLY recommend getting into the habit of making matching accessories as part of the project of making a lolita garment. You're going to need them anyway, so they might as well match.

For size 3, you will want 40" of lining fabric, or 1 + 1/8 yards.
All of these sizes assume that you're using 45" wide fabric. If you're using 60" fabric, you can likely go down a size. (This would be max hip of 52" for size 1, 82" for size 2, and 172" for size 3).
For any view, you will also need enough 1/4" or 3/8" elastic to go around your natural waist (or wherever you wear your skirt) about 4 times. Let's be honest, we all have a massive roll of 1/4" elastic hanging around from making covid masks, so let's use it up.
These skirts are a little bit on the shorter side, because that's just how Meta releases them. Since you're the one making the skirt, you can make some decisions. If you're tall, want to wear a fuller petticoat, or are building a skirt for a substyle where you usually want a longer skirt, you can add a few inches. You'll get a slightly different look if you're lengthening the skirt versus lengthening the frill, versus lengthening both equally. If you're not sure, now's a good time to check out lolibrary and look for dresses and skirts and see where they place the details around the hem. Lolibrary lets you search by brand, so search by brand and just take a note of what you see most often in pieces that you like.

For example, Alice and the Pirates often has the hem detail to be pretty close to the hem on their solid pieces, while Baby the Stars Shine Bright will have the detail going up quite a bit higher. (Please do more than the 10 seconds of searching that I did to get these examples). Therefore, if you want to lengthen the skirt and have a slightly more AatP tone, you can add the length to the skirt part of the skirt, and if you want a slightly more BtSSB tone, you can add the length to the frill part.
Researching your garments is the secret to having handmade garments that actually read as lolita fashion. Lolita fashion history is documented to an extent that no other fashion I've ever heard of is, and it really helps to take advantage of that extraordinary resource.
With our pattern ready and maybe lightly adjusted, let's get to work:
Foundational fact #1: fabric that rips will rip in a straight line along the grain of the fabric. Our skirt is made entirely of rectangles, so we're going to take advantage of that fact. If you want to cut your fabric with scissors, or with a rotary cutter, you're completely allowed to. If you don't have a serger with a functional cutting blade, you might want to cut it so that you don't need to trim the edges. I have a serger and I like to rip it. It might not be the best way, but it's how I've been making my lolita skirts since 2011, and I don't like change and I do like the stress-relieving experience of ripping.

So, lay your fabric out, and mark your cutting lines. If you're ripping the fabric, like I am, you just need to cut a little snip to get the tearing started.
This pattern factors in a half inch for seam allowance. If you're ripping the fabric, you will lose a little bit of usable fabric, so add yourself an extra inch to each cut.

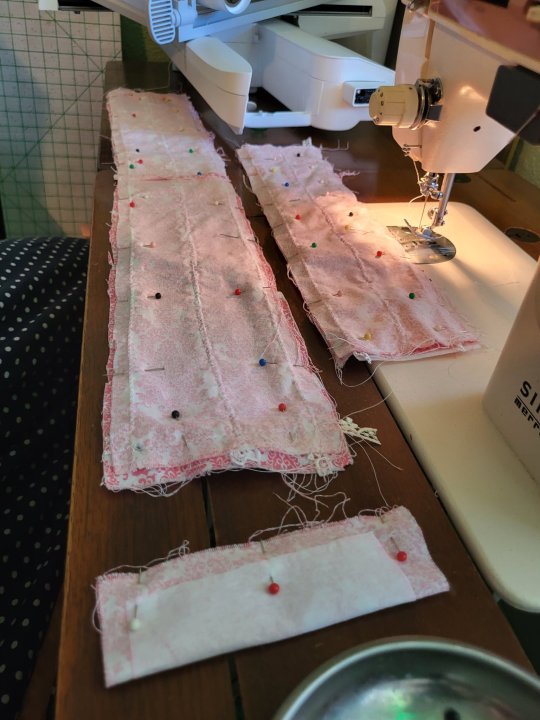
Take your nice straight cuts/rips and lay them out in an organized fashion. You should have a frill pile, a skirt pile, a waistband pile, and an extra pile. If you like piles, you can also pile up your lace next to it.

You're going to sew every pile together so that you have each it its own long strip. Your lining (white fabric) should be the same size as your skirt piece. If it's longer (if you're using 45" quilt fabric for the face and 60" lining fabric for the lining), go ahead and trim them so they're the same total length in the long dimension.
Put the skirt on top of your lining and sew the top edges together.
You'll notice that this skirt is made up in doubles. The skirt is twice the long dimension as the waistband, and the frill is twice the long dimension of the skirt. This makes things easy to gather up.
If you're not using an overlocker to assemble this skirt, you will also want to run some kind of seam finish on the long ends of this skirt, to stop fraying.

(please pardon my hypermobile thumb)
A lot of people do gathering stitches by sewing two lines of basting stitches, and then pulling the thread on those stitches to cinch up the gathers. This does work really well on small things. However, as the amount that you need to gather gets longer and longer, it's gets more and more difficult to pull those threads without them breaking. Instead, I like using an applied gathering string. My current favorite string is waxed dental floss. Most dentists recommend unwaxed floss since it grabs more plaque, so make the smart decision and retire your waxed floss to be in your sewing box.

If you are making this project on a serger or an overlocker (and this is a GREAT first serger project), you can overlock over the dental floss. Here you can see the white floss going between the two needles. The needles are not going through the floss, just on either side of it. Tip: that little hole in the front of the presser foot is actually intended for you to put elastic or thread through so you don't need to hold it as carefully. I forgot and so I didn't do that here).
We're applying the dental floss onto the top edge of the ruffle.

If you aren't using an overlocker, you can do some form of hem finish (my favorite is the 3-step zigzag) and then apply the dental floss by doing a zigzag over it. Again, the needle isn't going through the floor, just on either side of it.

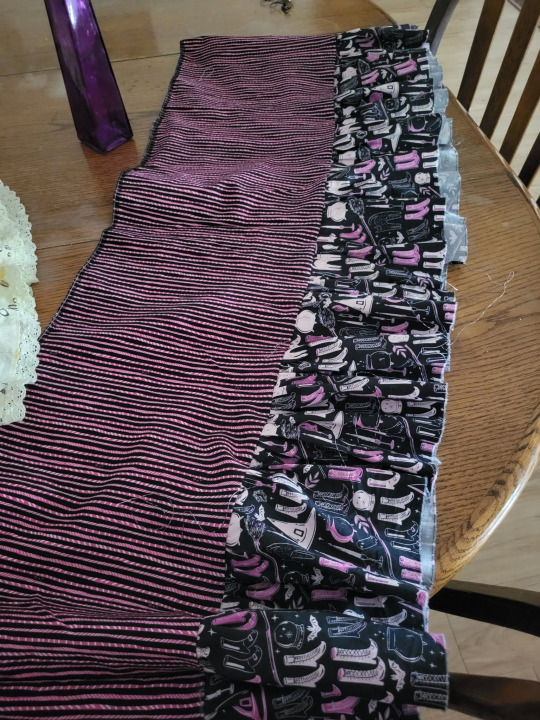
Now, pin your ruffle onto your skirt. I divide the ruffle and skirt up into equal portions, and then pin it first. My ruffle is twice the long measure as the skirt is, and they're both cut out of the same width of fabric. This means that dividing the ruffle up is pretty easy, because I can use the seams of the ruffle. The first seam in my ruffle goes halfway between the edge of the skirt and its first seam. The second seam of my ruffle goes on the first seam of my skirt, and so on.
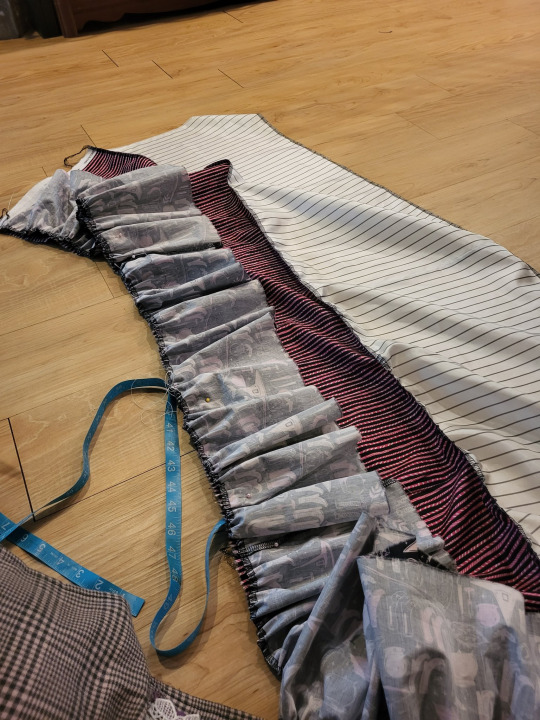
Then, you just pull your dental floss so that it gathers up the fabric, and pin it down. Since we divided the fabric up earlier, we don't need to spend as much fight getting all the ruffles to be even. Go ahead and pin everything down, and then sew it together.
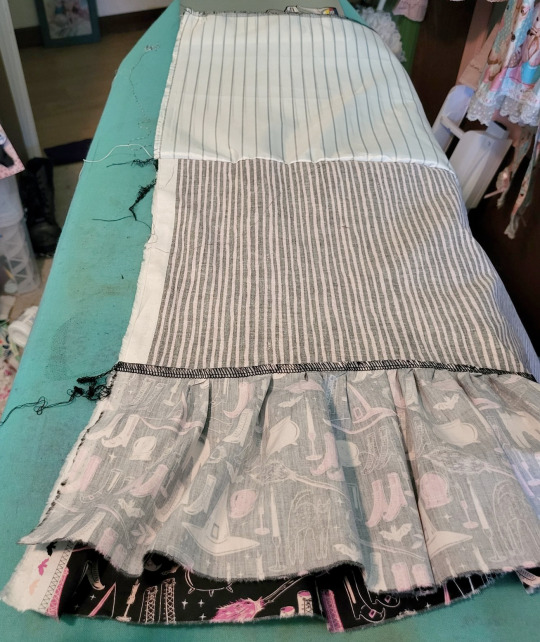
Now you're going to fold the skirt and lining in half to seam it all together. Match up your seams, and unfold your lining (see picture). This will let you sew the frill, the skirt, and the lining all together in one go.
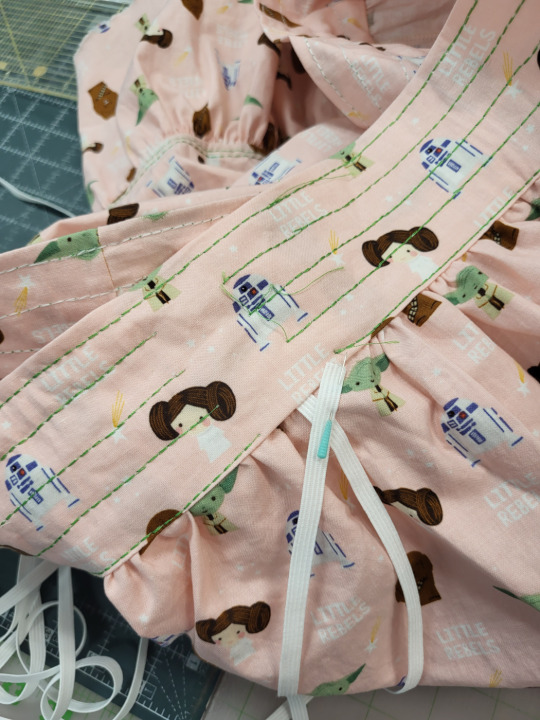
The easiest time to put the hem and transition laces on is before you attach the waistband. The basic rule with gathered skirts is that it's a lot easier to apply anything flat that you can before you gather it.
In a lot of older lolita tutorials, a lot of people treated lace as optional. However, now that it's not 2007 anymore, we have a bit more of an expectation for detail in the garments we wear. Quilt cotton especially has a very flat texture, even when it has a nice print. If you can add a bit of texture and detail, you want to do so. If you're doing the skirt and the ruffle out of the same fabric, you can probably get away without using the transition lace, but you will still want hem lace.
I didn't have any lace when I was making this one, so I used a couple of lines of decorative topstitching between the skirt and the frill. I got the idea from this blog post from 2010. I didn't execute it as well as Lolita Noveau did, but that was the general concept.
Anyway, waistband time.

Take the edges of your waistband and press them in. You don't need to apply a seam finish before you do this. I have overlocking on mine because I ripped my fabric, and used the serger to clean up the edge. If you don't rip your fabric like a savage and use technology like scissors instead, you don't have that problem.

Fold your waistband in half. It's now time to sew the elastic channels.
Here's the secret to this waistband. Start out by stitching a line about 3/16" away from the fold in your waistband.
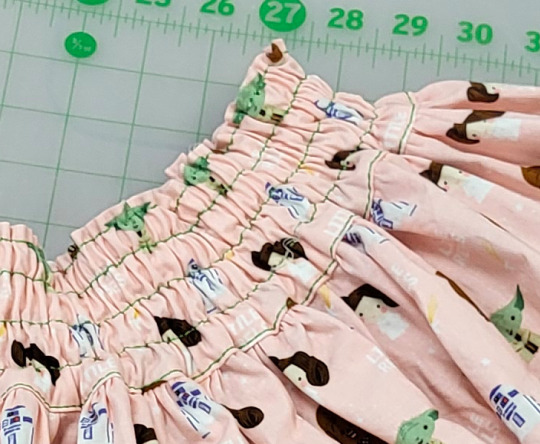
When you put your elastic in, this little line of stitching makes your waistband stay on straight, and adds a tiny ruffle to the top. I picked this up from the Metamorphose frill skirts, and it's amazing.
After you've made that line of stitching, start making channels for your elastic. Add about 1/8" of width from the width of your elastic (so 1/4" elastic, sew your channels at 3/8". 3/8" elastic, sew your channels at 1/2"). Leave a space for you to be able to actually put the elastic in. Don't forget this, or you'll have to redo it. Ask me how I know. I found that three channels works pretty well. Don't sew the channel closest to the edge, because you need to attach your skirt.
You're going to need to gather the top of your skirt, just like you gathered the top of your frill. Get your dental floss and your zigzag stitch ready.
Your waistband (flat) will be twice the length of your skirt, so you can pin and pull the gathers just like you did for the ruffle.
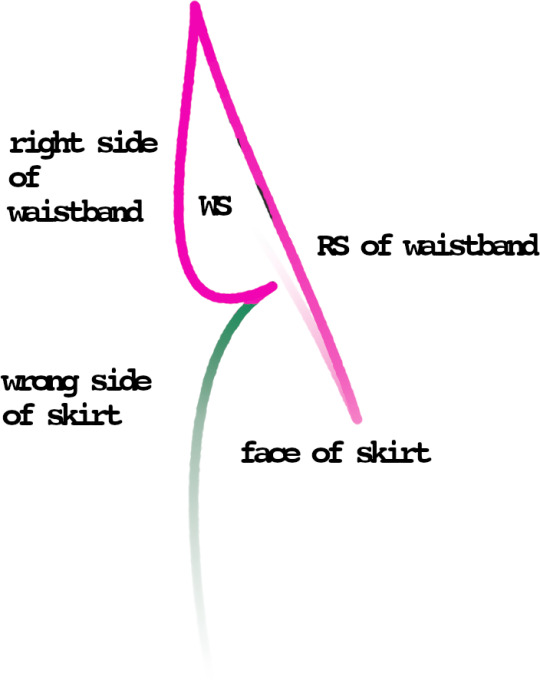
So this part is important: You are going to sew the right side of a single thickness of the waistband onto the wrong side of the skirt. I don't have a good picture of this, but here goes trying to explain it.
You need to sew the waistband so that the top seam of the skirt (the part that's sewn to the lining) is sandwiched between the front and back of the waistband. You are going to have your edges of the waistband turned under to hide the raw edge.
While you CAN do this by just putting the top of the skirt edge into the waistband seam and sew it down, you can make it look prettier by doing it like this:
You sew the right side of a single thickness of the waistband to the wrong side of the skirt. This means that, when you unfold it, the seam will be pointing outward, towards the viewer. This feels like it would look bad.
You then press that seam so that it's flat, and then wrap the front of the waistband to the front of the skirt. You tuck the raw edges into the waistband, so that they're all sandwiched between the back and the front of the waistband. You then sew the front of the waistband down from the front.
What this does is it allows you to have very precise control of where your final line of topstitching is. If you've ever sewn a skirt facing and been told to stitch the back of the facing by doing a stitch-in-the-ditch, this is like that but in reverse. It's the same process, but with the top stitching definitely showing.
Anyway, you can now cut your elastic to your waist measurement (or maybe about an inch shorter than your waist measurement) and start feeding it through your elastic channels. Since you're using such thin elastic, it helps to have negative ease (which is the technical name for "cut it smaller because it'll stretch) in your elastic measurements. Start by putting in the elastic at the top casing, and go down.
Sew your elastic ends together when you're done, and there you go! If this is your first lolita garment, congrats! See if Wunderwelt Closet Child has a blouse in your size that goes with your skirt, because they ship fast and some items are really discounted. 42lolita is a lolita-themed taobao reseller that's easy to shop. Basically just don't overpay from devilinspired. If you're going to have to wait crazy long lead times anyway, you might as well be not spending their big marked up prices.
Finish up any little last things, like threading the ribbon through your beading lace, if you used it.
Anyway, now you have a skirt! Yay. Make yourself several and learn how colors, prints, scale, and texture work with each other.
1K notes
·
View notes
Text
Grey whales I love because they have insanely long migration paths and are really interesting but also that this is the first picture when you google them.

Everyone please tell me your favorite species of whale. I need roughly 30 kinds of whale.
If you really like ocean life, please feel free to tell me what makes your favorite ocean mammal unique and special.
74 notes
·
View notes
Text
I wanna know
A customer comes up to me with a wide roll of Floriani Wet n' Gone Tacky embroidery stabilizer.
Customer: "Is this really $76?" Me: "Unfortunately, yes." Customer: "I can get some offbrand stuff on Amazon for $45 for twice as much!" Me, who has made that decision before: "I did that, actually. I got some offbrand stuff for $45, and I can't use it. There's three big problems with it." Customer: "What are they?" Me: "Well, first one is that it's not tacky, so I have to still baste it down anyway. The second one is that when you get it wet, it doesn't n'gone."
110 notes
·
View notes
Note
This is poetic
why do you hang out with a 19 year old? aren't you like 30 or 40?
I have no age I am Eternal I am just a piece of sentient smoke that when you inhale causes a hallucination when you speak to me or actually speaking to nothing I am a tree and I am the soul inside of the tree that is released when it is cut down and inside it were kittens I am that piece of darkness in the back of your car that's still there even on sunny days I am that video of crab crab frightened crab hand hand hand hand I am that hatred that you will not embrace even when you think you probably need to. I am the feeling you get when you hear the first chords of Never Going To Give You Up I am the darkness in your head that still decides that you lose the game every time that you hear it I am the soul of the guitar that was pointlessly smashed just to be dramatic I am nothing and I am everything and I am in the glove box of your car and I am in The Sound Hole of your guitar and I am that thing that you are aware of but really don't want to be and I am uncomfortable and I will make you uncomfortable Alexa play despacito
53 notes
·
View notes
Text
Pink, question, WHY WOULD YOU HIDE THIS IN THE TAGS

Some highlights from this week:
The customer who brought swatches of a very popular fabric--one for me and one for the other person who suggested it--so that we could "remember that she hated it."
Not my fucking job, Beverly.
We sell bolts and bolts of this stuff and no one else complains, which has lead me to believe that, while she might not have enjoyed the fabric, it is not a defective product.
You know what is my job?
Being proud of Randall.

This is Randall. He's a succulent that we have on a side table at work, but look at him! Look at how tall he is! Good job, Randall.
In other news, did you know that, instead of admitting that you were wrong and the machine didn't work because you were the problem, you can just insistently get the machine serviced over and over again? And when the feedback is that you need to stop putting oil in the red reservoir under the needle plate, over and over, you can just keep putting oil there, fucking up your machine, and getting it serviced, over and over? And we'll fucking let you, because in the specific case where the customer says they will not accept that the problem is so simple as them massively over-oiling their $15,000 machine, the customer is always right. Correct, ma'am, you WILL never accept that the problem is that simple. Good job.
30 notes
·
View notes
Text
Mine is the I believe I can fly splat squirrel
reblog this and tag the first vine that comes to ur mind. mine is the one of the people yelling at cabbage
167K notes
·
View notes
Text
The reason the heroes are always so easily able to infiltrate the bad guy’s secret base isn’t because evil minions are stupid. I mean, they may well be, but that’s not why.
Rather, it’s because effective operational security depends on establishing and enforcing norms. No behaviour is suspicious in the abstract; that judgment can only be made with reference to some accepted code of conduct.
And if you’re a minion? You basically have no point of reference, because working for an evil overlord is, scientifically speaking, weird as hell.
You had to fight a giant squid as part of your orientation. You’re pretty sure Alice over in engineering is a version of you from a parallel universe, but neither of you have ever had the guts to bring it up. Your supervisor wears a horned helmet in the goddamn break room.
So when you’re confronted with that “new hire” who’s really, really obviously three raccoons in a trenchcoat, you’ve gotta ask yourself: is this… normal? Should I be reporting this to someone?
More importantly, do I want to make this my problem?
And for those who make it as minions, the answer very quickly becomes no, no I do not.
28K notes
·
View notes
Text
You mean the digital dice on Roll20?
A set of dice that only roll 1s
494 notes
·
View notes
Text
how do you respond to miscellaneous men who call you ‘sweetheart’?
46K notes
·
View notes
Text
i have no Fear, but keep in mind i also have no Perspective and very Poor Judgement
1K notes
·
View notes
Text
i’m such a big fan of monsters that are creepy bc they do human things, but WRONG
18K notes
·
View notes
Text
am approaching my 3rd life decade and it only now occurs to me pufferfish inhale water not air
5K notes
·
View notes