
Don't wanna be here? Send us removal request.
Statistics
We looked inside some of the posts by divergentjm and here's what we found interesting.
Average Info
Notes Per Post
0
Likes Per Post
0
Reblog Per Post
0
Reply Per Post
0
Time Between Posts
7 hours
Number of Posts By Type
Text
17
Last Seen Tumblr Blogs


Fun Fact
Forty percent of Tumblr users are between the ages of 18 to 25.
Text
Final Installation.
Here I have a total of 7 large plaster casts, and 10 singular casts. They are not attatched to the wall but sustended on 2 nails like a shelf. There is double sided sticky tape along the top that rests against the blanket. This gives them a bit more support. The blanket has the Paisely pattern along the top and bottom and a perfect green space in the middle for my pieces. I sorced this blacket and others at an antique auction and was very pleased with them. They tie in great with this project. I used 6 small nails along the top of the blanket to hold it straight. Then used larger nails for the shelves.

I particularly love the contrast between the organic and square edges. I also feel that the tiny singular bobbins are so effective and create real depth to the piece.


Overall, this piece is an investigation into the past. So I wanted my piece to reflect that. The ghosty element of the plaster creates a skeleton like feel to the bobbins, and when protruding out of the surrface it is like I have dusted of the remains and discovered the final imprints of a great history.


My favourite and probably the piece that brings it all together are the single bobbins. They are so effect, tiny and simple. Looking back I am glad I used to different bobbins for single casts because I needed a graduale increase in size to make it seem like a cohesive body of work. Overall, I am extremely proud of this work. I feel that I have done a lot of experimenting, which has led my artwork to many new places. I have also loved this project because it has been about Scotland, which I am passionate about and helped inspire this project.


Many thanks to all the support from my lecturers and the college.
0 notes
Text
Studio set up.
Here I have set up my desk with all of my development work and supporting evidence.
I am just going to provide a walk through of what it here and my conclusions on them.

First the colliograph prints. These were a great skill to learn and I loved the process. I feel they turn out great and gave me a lot of interesting abstract imagery. But, they worked best paired along side something else.

This led to pairing the prints with the 'Thread Web'.
This was one of the most successful parts of the whole project I feel. I transformed simple, and sturdy thread into fragile shards. But in developing this technique, I found enjoyment in these abstract shapes, and they told a story that was not so obvious to the viewer. I chose to not install this piece as my final because it was to loud and complex. This is not a bad thing and is one of that aspects that made it so effective. But this is not how I wanted to convey this project. My aim is to show the simple facts regarding Scotland's rich history in the textile industry, using the Paisley Thread Mills as a great example.

Next is a close up of the table showing plaster piece that didnt work as well or broke. I found all of these a good learning curve which helped me get to the finalised pieces. For example a few on the table are broken because I took them out the cast to early, mainly due to impatience. along with these are the bobbins I used for my impressions, which are of great importance to this project so I wanted them out on show.

Lastly I have a close up of my copper plateing experiment. The two above are my ones (unfinished) and the one below is my grandmas which inspired that technique. This experiment is what I am most disappointed about because I did not manage to finish one completely. In spite of this I like how it pushed me towards a more technical line of work. Which involves set instructions and materials. Just like how the people in the mills worked.

0 notes
Text
Final thread refinement.
After considering my last developmental process, I decided to add in my colliograph prints. This worked very well. I stared off with similar colours, pitting the greens and blues together. I love these colours, and it made the thread pop. I love how the thread looks so chaotic and the bright background highlights this.


Then, moving on to the more muted tones. Which was nice, but the blues worked better. The two below are not striking enough. But I like how they add the delicate nature of the thread rather than highlighting the sharpness of the plaster.


I then added all these colours together. Which did a great job at adding contrast, but not unity within the piece.


Overall, my favourite here was with the first blue and green colliographs. I think it's because the greens are exploding with life, much like the Mills were. The thread has a certain fossil quality. They seem frozen in time and remind me of skeletons. This is a great representation of the Mills.
0 notes
Text


Adding colour to the plaster.
I knew that to exhibit these pieces well I need to add some contrast. This is what I tried what putting them on top of my collar prints. But here I tried adding colour into them using watercolour.
I first started with the air dry clay I made earlier on in the project. First, with a simple blocked colour and then exploring with different combinations dn patterns.
I used the texture of the clay to my advantage. I let the water colour run and pool into the bumps and lumps.


What worked best I feel was the painting of the bobbin impressions. They almost seem cartoon like. Very simple yet effective.

But when I tried it on the plaster cast, straight away I didn't like it.it did bring a certain quality to the bobbin. Making it seen more present in the room. But it was not what I wanted it to be. I wanted to bobbin to represent the past, not what was going on now.

0 notes
Text
Projection development.
Last time I projected onto fabric, but I thought it would be fun to project onto the thread.
I feel this worked quite well. It adds more interest, context, and depth in places. For example, the two images below tell a lot about the thread Mills. But I feel it's too obvious and a little rigged compared to the thread.


Next, I tried the cutout wheels. When I cropped this it worked quite well. But I like the image on the right more. I am not projecting an image here just the light to cast strong shadows. I feel this works the best so far because it's so striking.


Lastly, I played with fabric scarps. These first two are good. The left shows great abstract shapes which tie in with the jagged shards of plaster. While the right is a bit more timid but still works well because it creates a leading line throughout the piece.


These last two worked the best. They are close ups and I think that works better because it frames to thread in a different way. Going forward, I feel there needs to be more contrast. Not in shape but colour. This is something I plan to work on.


0 notes
Text
Artist Research – Rachel Whiteread | PDF
https://www.scribd.com/document/811868795/Artist-Research-Rachel-Whiteread
The link above is to a document on Rachel Whitereads work and how in has helped my project and influenced my work.
if one doesn't work the other should.
Visit to the Gallery of Modern Art.
I when to the gallery of Modern Art for inspiration regarding my final piece abd that installation.
The first thing to catch my eye was these giant paintings. I love the one to the left. It is chaotic, but everything is working together. It reminded me of the 'Thread Web' and the chaotic nature of the plaster and thread. I especially like the colour because of the contrast between warm and cool. Showing me both feelings of anger and calm. The one to the left was huge. It went from ceiling to floor. I loved this notion of filling the space and I thought of using some Paisely pattern blankets to elongate my installation. Pictures of these are below.


Next was these organic shaped pieces of mdf. The shape was very attractive and drew my eye it because of its unpredictable nature. I like the way they float of the wall. It keeps the interest on the piece. This is something I want to replicate in my work.


The piece above was also inspiring. There was a whole collection on show and all the individual pieces are connected. I like this idea of having a working group or some form of organism working together. This is the type of feeling I want to create when presenting my work. Everything connected and needing one another to function. Much like the workers and machinery at the Mills.


The link above is to artists research on Faith Ringgold. Her work with textile has pushed me to use more textiles in my work which is here these Paisley Pattern Blankets come in. I think combining this with my plaster piece will be very effective.
0 notes
Text
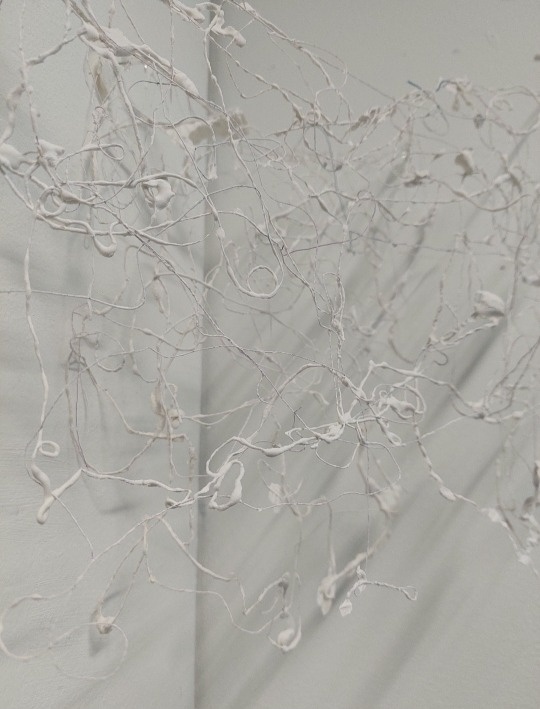
Further thread development.
After considering the ups and downs of my last trail, I decided to cut up the PVA sheets I had made. I cut them into stripes to mimic the robs and chains of the Mills machinery.
I placed the strips in and around the hanging plaster threads, and I also added more sheets of plaster thread to the wall, making my work space bigger.
I feel this is definitely an improvement. The slight colour adds more depth and dimension to the piece and makes it easier to see and understand.


But I think a great tool to use was the flash while taking photos. I somehow made the thread 10 times more intriguing. It brought out every movement, twist, turn, and shadow.
Below is a far away shot of the whole piece. Which I like because it gives a sense of everything there. But I feel the close ups are far more interesting because you are not given all the information.

These close ups are interesting and effective but I don't like the cluncky blobs of plaster. I feel I should aim for a more delicate approach to mirror the delicacy of the thread.


These close ups on the other hand, show the small, frail nature of the thread, but in a strong and complicated setting. My favourite part of these pictures is the shadow. I feel it is so effective at creating a lot of depth, making it seem that this spider web goes on forever.


Next, I would like to get something bolder behind the thread. With a stronger colour to make the 'Thread Web' stand out even more. I would do this because even though it is effective close-up, if I was to install this in a gallery space, I would want it to be eye-catching from far away as well.
0 notes
Text
Another part of the New Lanark Mills that gave me great insight was the water wheel that powered the station. Most Mills, including Paisley, was powered by the water. Visiting here helped me find out how it worked.


You can see in the photos above that New Lanark Mills was powered by an over-shot waterwheel. Which meant the water was directed at the top of a wheel in order for it to spin and generate power.
The breast-shot and under-shot were also variations of this.


This is the important part. The bar in the middle of the wheel (picture on the right) was connected to many more, just like it. These robs travelled all over the site into these secure holders (left pocture), which transfers the spinning action to the Mills machinery. These holders are everywhere. On every floor, every window and across every celling.
This gave me great insight into how Paisley Mills could have looked, sounded and how they were powered.
0 notes
Text
I think my favourite part of visiting the Mills was the living quarters.
The New Lanark Mills was ahead of its time, so even though these conditions seem unthinkable for us, it was a revelation for these people.
First, a family shared about 2 rooms. Living and sleeping together. Then, working together during the day.


As time went on, it was sir Owen who introduced indoor toilets and sewer systems to help control disease.


This is another video that gave me an insight into life in any mill. From what I have gathered, it is more of a community than a workforce. They may work together, but they make food together, play, learn, educate, and celebrate as a community. While visiting New Lanrk Mills, there were green spaces with very old apple trees, and I can imagine familys going out together collecting food.
0 notes
Text
These are more photos from my visits to the new lanark Mills. Even though I am studying the Paisley Thread Mills, I could not see how they were in real life as they were demolished. So I used the New Lanark Mills as a way to better undertsand this way of life. How small their working space was, where/how they lived, how loud the machinery was and how fast it moved. New Lanark Mills have the original machinery there and still working. I was able to catch a glimpse of how they worked.
Below is just one machine working, and the video does not show how loud it was standing next to it. But can you imagine up to 10 machines in one room, on each floor.
This picture below shows the machinery stationary. When the belt moves and turns in the video above, the whole part along the back wall moves forward and back with it. This is even louder.


You can see the long iron tracks extending out from the back. This is what the milling machine slides along as it pulls and works the cotton.


The one directly above is the modern-day equivalent. This can be operated by one person. It is safer and not quite as loud.
0 notes
Text
This is a research document of different Textile Industries in Scotland that I completed in written notes earlier in the year. I have transfered these notes onto one document which include links to relevent sites and images.
0 notes
Text
Thread development.
After hanging a singular plaster thread sheet on the wall I knew I would need more to layer up and make an impact. So I made about 5 or 6 more and pinned them in a corner so the shadow were more visible.


I really like the abstract shapes I got from both the plaster thread and the shadow it made. My main issue with this it that it does not stand out enough against the white wall behind it. I think I should either hang something behind it or find a different coloured wall.
0 notes
Text
Copper transfer experiment.
This idea was inspired by my grandma, who gave me one of her copper etchings. My Papa then taught me how to do it.
The equipment I acquired was the sulfate solution, copper pipe, and a positive and negative wire with clips attached to a simple phone charger.
Then I melted wax into a wee plate and cared in my design. For this I just used an etching tool for drypoint.
Below, I have the copper pipe attached to one clip and submerged in the solution along with my wax etching attached to the other wire. The clothes pegs are used to stop the clips going in the solution because the transfer will not work as well.
It is best to stir the solution before and during the copper transfer.


For my first time trying this I am quite pleased with the outcome. The next step here would be to back piece in plaster, then melt the wax off.
But for the next time trying this, I want to make the piece of wax longer so my design can go on the lower half, then making it easier to get a good coverage of copper all over my design.
0 notes
Text
I experimented again with the prints and plaster casts. This time with some of my new prints and new full bobbin plaster casts.
Starting with the red.
It is a striking colour and certainly catching the eye, but does it make the bobbins look better? My aim here is for the plaster casts to be the main feature, not the prints. This is because I feel the plaster casts show more of the history of Scotlands industrys, but in a delicate, subtle way.


Moving on to the blues.
I still feel the colour is to much. But the shards behind are intriguing, and give great dimensions to the piece. Making it seem that the bobbins are floating with a vast space.


I went back to the original prints, and prefer these colours much better.


Even the green and reds tones work really well and are just vibrant enough but not to much.
0 notes
Text
Next, it was time to change, not the wall of my casts, but the impression tool. My papa trained as an orthodontist and practised with algernate and plaster. He showed me how to mix, impression, remove, and cast the moulds.
I immediately loved this process, and it was so successful. I stated with my usual format, but quickly discovered that this material would have far more success when used in a different way.


The plater above is stone like plaster, specifically for the use of algernate and dental practice. My Papa found some among his kit and gave it to me. Unfortunately, because the plaster is a decade out of date, it did not set fully, and therefore, it was very crumbley. But I liked the difference in colour, even though subtle, it adds age to the piece.


Moving on to the full bobbin cast. I placed two bobbins in the algernate and covered it almost completely. Once dry, I could cut a small rectangular piece, which would allow me to remove the bobbin. Important note: always coat the bobbin and thread in oil before placing it in the algernate, or it will stick to the thread and rip your mould.
Once out, I could carefully clean and prepare the mould, then prod and poke plaster into every corner.


Leaving me with these whole bobbins made from plaster. These reflect how the Pasiely Thread Factories are so out of reach. The plaster bobbin looks like thread, but it is not. Relating to how there are buildings and equipment left from the Mills, but none are working or producing, just existing, much like the plaster bobbin.

Algernate moulds.
0 notes
Text
I wanted to used my colliograph prints from another use. I knew I was going to present my plaster piece for finals, so I experimented with ways of incorporating my prints.


This worked dramatically well. The colour contrast is outstanding. The colour and texture of the prints make the plaster piece seem even more ghost like but still manage to bring out detail. I definitely underestimated how well this would work.
Reflecting on this, I made more prints.


It is the same kind of design inspired by thread. Here, I pulled more parts of the mounting board off, which left jagged shards of the past. Like open wounds telling a story which stretches back decades.
0 notes
Text


I quickly moved onto other materials for the walls of my plaster casts. I used scrap wood to make a nice square edge, I filled up any gaps with clay. This worked a treat!! I loved the shape instantly because of the contrast between organic shapes and rounded curves of the bobbins and the imposing right angles that surrounded. It can be seen in the above photos that I experimented with different lengths, shaped, and widths because I want to make sure I don't miss an opportunity to make the impressions more successful.


Here are the results. Much better. They feel more purposeful, dramatic and finalised. I love how the bobbins creep through the surface, like a ghost of the past.


All these pieces have been sanded down to get rid of the stain from the clay and smooth down any rugged edges.
0 notes